1
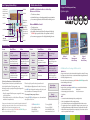
Alert & alarm activation START/OK Displays pump infusion status & programming choices/ instructions STOP/NO INFO LED Indicator: Infusion running (green light flashes) Alarm state/ stand-by mode (continuous red light) CLINICIAN ACTIVATED BOLUS ON/OFF Scroll UP Scroll DOWN Troubleshooting Screen Result/CauseAction Air/Up Occlusion -Air in line -Tubing clamped/kinked - Prime/re-prime line - Clear kinked/trapped line Down Occlusion -Tubing clamped/kinked - Access device blocked - Line not loaded correctly - Clear kinked/trapped line - Change/flush access device - Reload set correctly Missing Key Stopped - Set is loaded incorrectly, pump will not start - User trying to load a non-proprietary set - The pump has been paused/on stand-by for more than 2 minutes - Load set with infusion line key positioned correctly - Ensure that a dedicated BodyGuard set is being used -Either restart infusion, continue pause or turn power off Technical problem/error and failure identification The pump alarms if an internal system fault has been detected and the unit will be inoperative, screen information and user prompts will vary depending on the cause of the fault. • Power the pump off and then power on again, this may rectify the problem. • If the problem cannot be rectified: Power off the pump and remove from patient use. When an ALARM is activated: 1. The infusion stops 2. The LED indicator turns red 3. An audible alarm activates (this will continue until either the STOP/NO key is pressed to mute or the problem is rectified) 4. A screen message appears on the display indicating the cause Screen Result/Cause Action -Infusion programme is nearly complete -Prepare new bag, if applicable End of Infusion -Current infusion programme is complete -Turn the pump off or change the bag to start a new infusion Low Battery (Alert) - Approximately 30 minutes of battery life remaining - Place pump in charger or use the battery cable to connect to the DC socket End Battery (Alert) - Pump stops -Place pump in charger or use the battery cable to connect to the DC socket Near End of Infusion Press INFO key to display information on the fault, record the code number and a summary of the fault. The example shown prompts the user: Pressing the INFO key displays an error code number and a description of the error: NOTE: In the event of an emergency, the STOP/NO and START/YES keys can still be activated with keypad lock in place. Quick user guide 1. The infusion continues 2. Intermittent beeps are heard approximately every 3/4 minutes 3. A screen message alternates with the infusion running screen Follow local policy and/or contact your authorised Medical Engineering Department for advice if necessary. Changes cannot be made to the infusion with the Keypad lock activated. To change bag, change rate, to deliver CA bolus or to discontinue the infusion, keypad lock must be removed by designated users only. Bodyguard Pain Management Pump An ALERT is activated when there is a low battery OR near end of infusion: CME Medical UK Ltd Kincraig Business Park, Kincraig Road, Blackpool FY2 0PJ Epidural Infusion Pump Pain Management Infusion Pump Regional Analgesia Infusion Pump CME Medical Device Training is RCN Accredited KEYPAD LOCK Changes cannot be made to the infusion with the Keypad lock activated. To change bag, change rate, to deliver CA bolus or to discontinue the infusion, keypad lock must be removed by designated users only. Please note: In the event of an emergency, the STOP/NO and START/YES keys can still be activated with keypad lock in place. Restart Pump Switch off & on Error 26 Starting MotMove Fail Tel: 01253 894646 Fax: 01253 896648 [email protected] www.cmemedical.co.uk Doc ref: Pain Mgt/QUG/v5/Sept 2011 Front of pump features & keys ACCESSING INFUSION SUMMARY During an infusion, repeatedly press the INFO to access current infusion information: • Volume infused/to be infused •Battery level • Bolus attempts / given & clinican bolus •Protocol review screen • Date & time NOTE: • Users must have undertaken training before operating this device. • Refer to Operating Manual for full operating instructions. • Screen information/sequences may vary slightly with different software versions. • The guidance given is based on pump default settings, the pump set-up for your hospital/department may vary if additional features/set-up options have been added. • Always follow screen prompts and before pressing keys to proceed ensure selections made correspond with what is required. Priming the pump Prime via the pump only 1.Press START/OK 1. Load the set into the pump 2. Turn power on by pressing ON/OFF (First two screens display automatically) 2. For a new patient, press START/OK • Pump name & software version displays BodyGuard XXX (software version) • Pump configuration displays Limit OFF Air Alarm XXX ml Occlusion XX psi 3. To go to the main menu, press STOP/NO 4. Enter relevant access code, press START/OK Press OK to Resume Press NO for Menu Level X Code .... Enter & Press OK 5. Ensure arrow is pointing to “PRIME” press START/OK => Prime Select Protocol Change Bag 6. ENSURE THE LINE IS DISCONNECTED FROM THE PATIENT, when read, press START/OK Disconnect Patient Press OK to Prime 7. Allow priming to complete Rate change whilst infusing Selecting a protocol 3. Scroll down to the Protocol required, press START/OK Prime => Select Protocol Change Bag • Screen will move forward to Select Protocol 2. Enter the new rate required, press 8 Rate 6 ml/hr Enter & Press OK 3. Enter relevant code, press START/OK Level X Code . . . . Enter & Press OK 4. Infusion continues & new rate displays. Activate keypad lock if required A: (Protocol 1 title) Rate 8 ml/hr Bolus X ml Answer OK or NO A: (Protocol 1 title) B: (Protocol 2 title) C: (Protocol 3 title) D: 4. Review the infusion summary screen, to confirm, press START/OK VTBI Initial xxx ml VTBI Current xxx ml Volume Infused 0 Press OK to Continue 5. Review the protocol parameters screen, to confirm, press START/OK Rate xxml/hr Max. Rate xxml/hr PCEA xml/xxmin OH Limit xxx NOTE: If the rate selected is above the pre-set limit, the pump will alert the user to the maximum rate that can be set Bag change NOTE: De-activate/activate keypad lock as necessary At the end of infusion alarm: 6. When ready, press START/OK 7. Infusion running screen is now visible Start Infusion? A:(Protocol 1 title) Rate X ml/hr Bolus X ml 1. To confirm end of infusion alarm, press START/OK 2. Enter relevant code, press START/OK 3. Check arrow pointing to “CHANGE BAG”, when bag change complete press START/OK 4. Review infusion summary screen (VI will show the total of all bags used), press START/OK 5. Review protocol summary screen, press START/OK 6. When ready to start infusion, press START/OK Clinician Bolus (FOR DESIGNATED USERS ONLY) 1.Press STOP/NO key 2.Press BOLUS key • Repeat priming to eliminate air if required 1. Remove keypad lock, (if applied) New Patient? WARNING !! PRIME 0 6 Press NO to Stop Example shown is a rate change from 6mlhr to 8mlhr 3. Follow the instructions on the screen(s) 4.Press START/OK key to confirm and commence bolus Green flashing LED will indicate infusion has re-commenced Prior to the end of infusion alarm: 1.Press STOP/NO to halt infusion 2. Press and continuously hold down STOP/NO key again until ‘Press OK to resume, Press NO for menu screen displays 3.Press STOP/NO for menu 4. In the main menu, (using the zero/arrow down key) scroll down to ‘change bag’ press START/OK 5. Change Infusion bag and when done, press START/OK 6. Check VTBI/VI screens & continue to press START/OK until infusion has resumed (green flashing light appears when infusion is running)