1
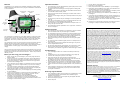
Welcome
Important Information
Congratulations on your purchase of the Tee2Green sureshotgps™ Please read the
following information on this sheet to ensure you gain the full benefit of all the features
in your sureshotgps™.
Signal Strength
Indicator
1.
2.
3.
Battery Capacity
Indicator
4.
GPS Time
5.
6.
Hole
Information
On/Off
key
Up arrow
& Mark Ball
key
8.
Soft Key
Descriptions
1.
Menu
key
Left
soft key
Centre
soft key
Right
soft key
Your sureshotgps™ is extremely easy to use. Most operations can be performed with
the press of one or two keys. The soft keys change their function depending on the
screen display. The function of each soft key is shown in the green bar at the bottom
of the display. The menu key is used to display the main menu or exit from submenus.
Your sureshotgps™ is also a very accurate clock as it’s time is derived from the GPS
satellites. The time is shown in the top right hand corner of the display on most
displayed screens. Also displayed is the current battery capacity and signal strength of
received satellites. The battery gauge is blue when being used and red when
charging.
The second line of the Green Screen displays the Hole number and the Par. If scoring
is enabled your sureshotgps™ will suggest a club to use based on the calibrated club
distances stored in the unit. Refer to the section Features – Clubs for the procedure to
calibrate your clubs.
Before you start using your sureshotgps™
2.
3.
4.
5.
6.
7.
9.
Software Upgrades
Left, right &
down keys
1.
7.
Your sureshotgps™ uses the Global Positioning System (GPS) to work out how
far you are from the green or hazard.
The system relies on the sureshotgps™ receiving signals from orbiting GPS
satellites.
Note that the GPS system is controlled by the United States Government and
can be disabled in times of military conflict.
Allow at least 10 minutes after the sureshotgps™ has been turned on before
using the device.
If you use your sureshotgps™ during the 10 minute period the accuracy may be
impaired.
For best accuracy make sure that your sureshotgps™ has an unimpeded view
of the sky.
If your clip your sureshotgps™ to a buggy or bag that impedes the view of the
sky the accuracy of your sureshotgps™ may be reduced.
Your sureshotgps™ is not waterproof and should not be exposed to rain. If it
does get wet dry it with a soft cloth.
Your sureshotgps™ has been optimised for use on a golf course. It should not
be used for navigation.
Before you start using your sureshotgps™ you must fully charge the internal
lithium ion battery.
Connect the AC charger to a suitable power source. Plug the USB cable from
the AC charger into the sureshotgps™. The USB connector is located on the
bottom of the sureshotgps™. Ensure that the orientation of the plug matches
the socket in the sureshotgps™ unit.
Turn on the power to the AC adapter. You should allow six hours to fully charge
the battery. You cannot over charge the battery so you can leave it charging
overnight.
You can also charge the sureshotgps™ using the supplied USB cable and
connecting it to a computer. Note that you should not charge a completely flat
battery using this method. You should use the AC charger.
After charging the battery turn on your sureshotgps™ by momentarily pressing
the power on/off key.
To turn off your sureshotgps™ momentarily press the power on/off key. The
display will show “shutting down” and count down for 5 seconds. You can
cancel the power off sequence by pressing the Menu key.
If the battery in your sureshotgps™ has completely discharged your
sureshotgps™ will automatically turn on a short time after charging has
commenced. To charge the battery in the shortest possible time make sure the
sureshotgps™ is turned off when charging.
2.
3.
4.
5.
6.
7.
8.
When you connect your sureshotgps™ to sureanalysis™ you may be notified
that a new software version for your sureshotgps™ is available.
You should always upgrade your sureshotgps™ to the latest software version.
Your sureshotgps™ will still function if you choose to not upgrade. However,
you may miss out on having additional functionality that will be released from
time to time and also any bug fixes that may have been identified.
Ensure that sureshotgps™ is fully charged before commencing the upgrade
procedure.
You must ensure that the software upgrade process is not interrupted once it
has commenced.
If the software upgrade process is disrupted the sureshotgps™ may need to
have the original software restored.
See the section “Reloading the original software” for the procedure to do this.
After the original software has been reloaded when you next connect to
sureanalysis™ you will be able to upgrade to the latest sureshotgps™ software.
Troubleshooting
1.
2.
3.
4.
5.
6.
7.
If your sureshotgps™ fails to turn on make sure the battery has been fully
charged.
If it still fails to turn on you can reset the sureshotgps™ using a paper clip.
Unfold one side of the paper clip so that it is an L shape.
Gently insert the paper clip into the small hole in the bottom of the
sureshotgps™ case next to the USB connector until you feel the switch click.
The display will now show the normal power on image.
When inserting the paper clip you may need to angle the paper clip slightly
towards the back of the unit to ensure you make contact with the reset switch.
If the sureshotgps™ still fails to turn on, you may need to reload the original
software. See the section “Restoring Original Software” for the procedure to do
this.
If the sureshotgps™ still fails to turn on after reloading the original software
your sureshotgps™ is possibly faulty and you may need to return the unit to
your supplier or Tee2Green.
Restoring Original Software
1.
2.
3.
4.
If your sureshotgps™ fails to turn as described in the “Troubleshooting” section
you will need to reload the original software that is installed during the
installation of sureanalysis™.
Connect your sureshotgps™ to the computer using the supplied USB cable.
Start the sureanalysis™ program.
Click the Help Tab.
5.
6.
7.
8.
Click the “Recover sureshotgps” button.
Follow the on screen instructions.
When prompted hold down the power on/off key on your sureshotgps™.
While holding down the on/off key Insert a paper clip as described in the
“Trouble Shooting” section to reset sureshotgps™.
9. When your sureshotgps™ unit is reset sureanalysis™ will display a message
saying that the sureshotgps™ is being programmed.
10. When you see this message your can release the power on/off key on the
sureshotgps™.
11. If you release the power on/off key before you reset the sureshotgps™ using
the paper clip and before sureanalysis™ displays the programming message
you will have to repeat the procedure described in this section.
12. After your sureshotgps™ unit has been restored with the original software it will
automatically turn on.
13. If it fails to turn on repeat the above procedure. If it still fails to turn on the
sureshotgps™ is faulty and should be returned to your supplier.
Warranty
Tee2Green Technologies Pty Ltd (“T2G”) warrants that product delivered in this package
will be free from material defects for one (1) year following the date of purchase from T2G
or its authorised reseller. For the purpose of this warranty, “material defect” means any
defect in a T2G product that can be reproduced by T2G and is a substantial nonconformity
from the published specifications for such product. T2G shall not be responsible for any
loss or damage whatsoever resulting from any defect in or associated with its products
which occur or are notified by the purchaser to T2G or its authorised repairer more than 1
year form said date of purchase. This warranty does not extend to any defects which have
been caused or contributed by neglect, misuse or accident, nor in respect of product which
has been altered by other than authorised T2G personnel or its authorised repairers. The
determination as to whether the terms of this warranty are to apply to returned products is
within the sole discretion of T2G or its authorised repairer. Provided any returned product is
determined to be covered by this warranty, T2G or its authorised repairers shall at T2G’s
sole discretion, repair or replace, free of charge, any products or parts thereof. In no event
whatsoever shall T2G be liable for any incidental, special or consequential loss or damage
resulting from the purchase and/or use of its products howsoever caused and howsoever
claimed. Any liability on T2G under this warranty in respect of any repair and /or
replacement and/or any action involving any of its products shall be limited to and not
exceed the purchase price of the product in question. The terms of this warranty are
subject to relevant provisions of any Federal, State or Municipal law. Any dispute or action
in relation to this warranty or the construction of it shall be subject to and conducted in
accordance with the laws of Victoria, Australia.
Before returning any product contact the T2G Customer Support Group and obtain an RMA
number. Visit the Tee2Green web site, www.tee2greengps.com for support contact details.
If the Customer Support Group verifies that the product is likely to be defective they will
issue an RMA number to place on the outer package in which the product will be shipped.
T2G cannot accept any product without an RMA number on the package. Warranty returns
must also be accompanied by a copy of the dated proof of purchase. Deliver the product
along with the RMA number to T2G. If you ship the product you must assume the risk of
damage or loss in transit. You must use the original container (or the equivalent) and pay
the shipping charge. T2G may replace or repair the product with either a new or
reconditioned product and the returned product becomes T2G’s property. T2G warrants the
repaired or replaced product to be free from material defects for a period of the greater of
(i) ninety (90) days from the return shipping date; or (ii) the period of time remaining on the
original one (1) year warranty.
Software Licence
This product contains embedded software. You have a non-exclusive, non-transferable
right to use the software only as embedded in the hardware and may not copy,
disassemble or attempt to reverse engineer the software or use it on any other hardware.
The software includes software supplied to T2G by third parties (“Suppliers”) which is
provided without warranty by such Suppliers. The software is owned by T2G or its
Suppliers and is protected by copyright laws and laws protecting trade secrets, intellectual
property and confidential information.
Copyright © 2005 Tee2Green Technologies Pty Ltd
sureshotgps™ and sureanalysis™ are Trade Marks of
Tee2Green Technologies Pty Ltd
http://www.tee2greengps.com
Using Your sureshotgps™
16. If scoring is enabled, press and hold the View soft key to display penalties and
green up/downs on both the Green and the Hazard Screens. Press the Pens
soft key to increment the penalty count. Hold down the Pens soft key to
decrement the penalty count. Press the up/down soft key to set greenside up
and downs.
17. If scoring is enabled, press the right arrow key to go to the display Score
Screen. If scoring is not enabled the next hole will be displayed. The score
defaults to the par of the hole. Use the up/down arrows to
increment/decrement the score. Press the right arrow key to go to the next
hole. Press the left arrow key to display the previous hole.
18. If scoring is enabled, at any time during the game, press and hold down the
down arrow key to display the current score. Press the Done soft key to return
to the game.
19. Press the Menu key at the end of the game. If scoring is enabled press the Yes
soft key to save the score. Press No to discard the score and return to the Main
Menu
Map Course
Play Golf
1.
2.
3.
4.
5.
6.
7.
8.
9.
10.
11.
12.
13.
14.
15.
Scoring is on by default. To enable or disable scoring refer to section Features
4 – Scoring)
You must map or download a course before you can use your sureshotgps™.
See Map Course or sureanalysis™ for further information.
Ensure that your sureshotgps™ has been turned on for at least 10 minutes with
clear access to the sky before you begin playing your game of golf.
From the main menu use the up/down arrows to select Play Golf and then
press the Select soft key.
Use the up/down arrows to select the desired course and then press the
Select soft key.
Details of the chosen course will be displayed. Press the Play soft key.
If hazards have been mapped for the hole, the Hazard Screen will be displayed.
If there are no hazards for the hole the Green Screen will be displayed.
Press the View soft key to change between the Green Screen and the Hazard
Screen.
Press and hold the Mark Ball (up arrow key) key to mark the position of the ball
at the beginning of a drive. Press the Back soft key to return to the Play
Screen.
Press and hold the Mark Ball (up arrow key) key to view the drive distance.
Press the Save soft key to save the drive distance or the ReMark soft key to
remark a ball position. Press the Back soft key to return to the play screen
The Green Screen will show the distance to the front, centre and back of the
green. The status bar at the bottom of the display shows the soft key scoring
options if scoring is enabled.
If scoring is enabled, on the Green Screen press the Putt soft key to increment
the putt count. Hold down the Putt soft key to decrement the putt count. Press
the Sand soft key to set sand saves.
The Hazard Screen shows the distance to the centre of the green and for each
hazard the distance to the front and the carry distance. Each hazard is labelled
L – Left, C – Centre or R – Right. If there are more than three hazards a red
arrow will be displayed. Use the up/down arrows to scroll through the mapped
hazards.
If scoring is enabled, on the Hazard Screen press the Fairway soft key to set
fairway hit. Press the Green soft key to set greens in regulation.
If there are no hazards mapped for a hole and scoring is enabled, the View soft
key is used only for the scoring options.
Map Course
1. Ensure that your sureshotgps™ has been turned on for at least 10 minutes with
clear access to the sky before you begin mapping your course.
2. From the main menu use the up/down arrows to select Map Course and then
press the Select soft key.
3. Use the up/down arrows to select Start Mapping and then press the Select
soft key
4. Enter the course name. Select the desired letter using the up/down and
left/right arrow keys and then press the Save soft key.
5. Press the Map soft key to map the course or the Back soft key to return to the
previous display.
6. If there are hazards for the hole use the up/down arrow keys to select the
hazard type and press the Select soft key.
7. Walk to the front of the hazard, wait 20 seconds and press the Front soft key.
Walk to the position to carry the hazard, wait 20 seconds and press the Carry
soft key.
8. Repeat this process for each hazard.
9. After the last hazard use the up/down arrow keys to select the Green icon and
press Select.
10. Walk to the front of the green, wait 20 seconds and press the Front soft key.
11. Walk to the back of the green, wait 20 seconds and press the Back soft key.
12. Walk to the centre of the green, wait 20 seconds and press the Centre soft key.
13. Press the right arrow key to and the Par of the hole using the up/down arrow
keys.
14. Press the right arrow key to go to the next hole.
15. Repeat steps 4 to 12 for each hole.
16. To exit mapping and save the course press the Menu key. A message will be
displayed noting the saved course number.
Edit Course
17. Use the up/down arrow keys to select Edit Course and press the Select soft
key.
18. Use the up/down arrow keys to select desired course and press the Select soft
key.
19. For each hole that needs to be edited repeat steps 4 to 12.
20. To exit editing and save the changed course press the Menu key. A message
will be displayed noting the saved course number.
Delete Course
21. Use the up/down arrow keys to select Delete Course and press the Select
soft key.
22. Use the up/down arrow keys to select desired course and press the Select soft
key.
23. Press the Yes soft key to delete the course. Press the No soft key to return to
the previous display.
24. Press the Menu key to return to the main menu.
Analyse Game
1.
2.
3.
4.
5.
6.
7.
From the main menu use the up/down arrows to select Analyse Game and
then press the Select soft key.
Use the up/down arrows to select the desired Game and then press the Select
soft key.
Press the Statistics soft key to view the statistics for the game. Press the Back
soft key.
Press the Score soft key to display the score for the game.
Press the Back 9/Front 9 soft key to toggle between the front 9 and back 9
scores. Press the Done soft key.
Press the Back key to go back to the Select Game display.
To delete a game use the up/down arrows to select the desired Game and
then press the Delete soft key. When prompted press the Yes soft key to delete
the game or the No soft key to return to the game list without deleting the game.
Features
1.
2.
3.
4.
5.
6.
From the main menu use the up/down arrows to select Features and then
press the Select soft key.
Use the up/down arrows to select the desired Feature and then press the
Select soft key.
For each Menu Item press the Select soft key to access the feature. After
setting the feature press the Back soft key to return to the previous menu.
Setup Menu.
Units – Press the Metres or Yards soft key to set the distances to the required
standard.
Scoring – Press the On or Off soft key to turn scoring on or off.
Backlight – Press the appropriate soft key to set the time the backlight will stay
at high intensity. Use the down arrow to sequence through the available
options. If Off is selected the backlight will turn off after the selected time. If
Low is selected the backlight will go to low intensity after the selected time. For
best results and battery life set the time to 1 minute and Low.
Date/Time
Date Format – Select the desired date format.
Set Local Time – Use the up/down arrows to change the displayed time to the
local time. Use the left/right arrows to move between hours and minutes. Press
the Save soft key to save the local time. Note: Depending on your location and
the time of day you may need to use the up arrow key or down arrow key to set
the hours to the local time. The date is automatically obtained directly from the
GPS satellites.
Status Menu
GPS Status – Displays the satellite number and signal strength for each
satellite. A blue bar indicates that the satellite is being used in the position
calculation. A red bar indicates that the satellite signal is being received but it is
not used in the position calculation. The latitude and longitude of the current
position is also displayed.
Battery Status – Displays the battery voltage, remaining battery capacity and
the internal temperature.
Registration – Displays the software version, unique electronic serial number,
registration date and owner details.
Reset Unit – Enables a user to reset the sureshotgps™ to the factory defaults.
It will delete all loaded courses, saved games and reset features to their default
values. It does not reset the registration details.
Clubs
Press left/right arrows to select the desired Club and then press the Select soft
key. Press the Mark soft key to record the ball position. Take the shot and then
walk to the ball. Press the Mark soft key to record the ball position. Press the
Save soft key to save the distance hit with the selected Club. Repeat this
procedure for each Club. When complete press the Back soft key.
7. Demo
Press the Select soft key to view a demonstration screen of the sureshotgps™.
Press the Menu key to exit.