1
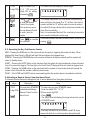
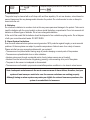
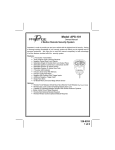
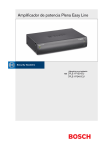
Model WS-101TX(G2)
RED SHIELD KEY FOB REMOTE CONTROL
INSTALLATION AND OPERATING INSTRUCTIONS
For use with Red Shield Wire-free Home Protection System
Please keep these instructions in a safe place for future reference.
Kit contents
1 x Key Fob Remote Control
1 x 12V alkaline battery (included)
1 x Instruction leaflet
1. Introduction
The Red Shield Wire-free Home Protection System Remote Control allows you to operate the systems Smart
Panel remotely, from inside or outside the property. Using the control the system can be armed or disarmed
and the siren can be activated instantly if required (using the Panic function).
2. Operation
2.1 Powering up the Key Fob Remote Control
The Remote Control includes a 12V alkaline battery. To activate, unscrew and remove the back of the Remote
Control, and carefully remove the clear plastic insulation tab from the battery. If the battery is dislodged, replace
it noting the correct polarity shown inside the battery compartment. Replace the battery cover.
2.2 Enrolling the Remote Control onto the Smart Panel
Before they can operate the system, new Remote Control devices need to be enrolled (added to the system) as
follows:
Step
1
Keys
Description
You must be in STANDBY
(1234/
4-digit PIN) mode before enrolling a
new Remote Control onto
+
the Smart Panel
Note
*To make sure you are in STANDBY mode:
- Enter the default PIN “ 1 2 3 4 ”
OR your new 4-digit PIN
- Press
- The Smart Panel will display the image below when you are
in STANDBY mode:
(One beep indicates that you entered a valid PIN, three
beeps indicate that an invalid operation was performed).
.1.
2
Enter the default PIN “ 1
(1234/
4-digit PIN) 2 3 4 ” OR your new
4-digit PIN for setting
+
followed by
3
Press
then
to enter the Remote
Control Enrol mode.
Then press any key on
the new Remote Control
to enrol it onto the
system.
- LCD display flashes the ID no. of the remote to be enrolled e.g.
when enrolling the first remote ID no. “01” will flash. Once the first
remote is enrolled the “02” will flash ready for a second remote to
be enrolled (One beep indicates that the remote was enrolled to the
Smart Panel successfully)
Note: It is recommended that the ID No. is marked on the remote in
case it needs to be deleted at a later stage
4
Press
to complete
the enrolment
Confirm the enrolment and return the Smart Panel to STANDBY by
pressing
The Smart Panel will display the below image:
2.3. Operating the Key Fob Remote Control
ARM – Pressing the ARM button on the remote will arm the system, triggering the preset exit delay. When
triggered the Smart Panel’s LED light will flash Red and indicate the triggered zone.
DISARM – Pressing the DISARM button on the remote will disarm the system instantly and the system will
return to Standby mode.
ALERT – Pressing the ALERT button on the remote will put the system into Alert mode and a chime will sound
if any of the sensors are triggered. The Green light on the Smart Panel LED display will flash and indicate the triggered zone.
HOME – Pressing the HOME button on the remote will set the system in Home mode which will operate the
system in both Arm and Alert modes in different preset zones.
PANIC – If the HOME and ALERT buttons are pressed together the systems alarm is immediately activated
2.4 Deleting a Remote Control from the Smart Panel
If a Remote Control devices is damaged or lost, it can be deleted from the system as follows:
Step
1
Keys
Description
You must be in STANDBY
(1234/
4-digit PIN) mode before deleting a
Remote Control from the
+
Smart Panel
Note
*To make sure you are in STANDBY mode:
- Enter the default PIN “ 1 2 3 4 ”
OR your new 4-digit PIN
- Press
- The Smart Panel will display the image below when you are
in STANDBY mode:
(One beep indicates that you entered a valid PIN, three
beeps indicate that an invalid operation was performed).
.2.
2
Enter the default PIN
(1234/
4-digit PIN) “ 1 2 3 4 ” OR your new
4-digit PIN for setting
+
followed by
3
Press
then
to enter the Remote
Control Deleting mode.
Then input the number
of the Remote Control
you wish to delete from
the system
- LCD display flashes the total number of remote currently enrolled
to the system
(e.g. If the Smart Panel has 3 remotes enrolled the LCD display will
flash “03”)
- Input the remote ID no. (e.g. “02”) for the remote you wish to
delete (Inputting “00” will delete all remote controls)
- LCD display will then flash the total number of remotes enrolled
after deletion
(One beep indicates that the remote was successfully deleted from
the Smart Panel)
4
Press
to complete
the deletion
Confirm the deletion and return the Smart Panel to STANDBY by
pressing
The Smart Panel will display the below image:
2.5 Querying the ID Number of a Remote Control
The ID number of a Remote Control device can be checked as follows:
Step
1
Keys
Description
You must be in STANDBY
(1234/
4-digit PIN) mode before querying the
Remote Control ID number
+
Note
*To make sure you are in STANDBY mode:
- Enter the default PIN “ 1 2 3 4 ” OR your new 4-digit PIN
- Press
- The Smart Panel will display the image below when you are in
STANDBY mode:
(One beep indicates that you entered a valid PIN, three beeps
indicate that an invalid operation was performed).
2
3
Enter the default PIN “ 1 2
(1234/
4-digit PIN) 3 4 ” OR your new 4-digit
PIN for setting followed by
+
Press
then
to go into Remote
Querying mode, and then
press any key on the
remote to check its ID.
The Smart Panel will display the below image:
- After entering into Remote Querying mode, the LCD display will
flash the total number of remote controls currently enrolled to the system
(e.g. If 3 remotes are enrolled the LCD display will flash “03”)
- The ID No. of the Remote can then be checked by pressing any
key on the remote (e.g, if the LCD display flashes “02” then that is
the ID of the remote)
.3.
4
Press
the query
to complete
Complete the query and return the Smart Panel to STANDBY by
pressing
3. Maintenance
The product may be cleaned with a soft damp cloth and then wiped dry. Do not use abrasive, solvent based or
aerosol cleaners as this may damage and/or discolour the product. Do not allow water to enter or attempt to
clean inside the unit.
4. Batteries
Do not allow the batteries to corrode or leak as this may cause permanent damage to the product. Take care to
insert the batteries with the correct polarity as shown inside the battery compartments. Do not mix new and old
batteries or different types of batteries. Do not use rechargeable batteries.
At the end of their useful life the batteries should be disposed of via a suitable recycling centre. Do not dispose
of with your normal household waste. DO NOT BURN.
5. Alarm System Limitations
Even the most advanced alarm systems cannot guarantee 100% protection against burglary or environmental
problems. All alarm systems are subject to possible compromise or failure-to-warn for a variety of reasons.
Please note that you may encounter problems with your system if:
• The sensors are not placed within hearing range of persons sleeping or remote parts of the premises.
• The sensors are placed behind doors or other obstacles.
• Intruders gain access through unprotected points of entry (where sensors are not located).
• Intruders have the technical means of bypassing, jamming, or disconnecting all or part of the system.
• The power to the sensors is inadequate or disconnected.
• The sensors are not located in proper environmental/temperature conditions i.e. too close to a heat source.
Note: Inadequate maintenance is the most common cause of alarm failure; therefore, test your
system at least once per week to be sure the sensors and sirens are working properly.
Although having an alarm system may make you eligible for reduced insurance premiums, the
system is no substitute for insurance.
.4.