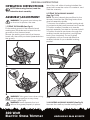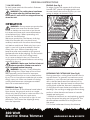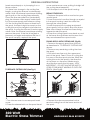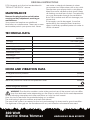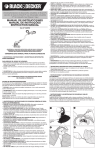
1
GGT3001
OPERATING INSTRUCTIONS
300 Watt
Electric Grass Trimmer
HELPLINE NO 0844 8010979
ORIGINAL INSTRUCTIONS
GENERAL POWER TOOL
SAFETY WARNINGS
WARNING! When using the machine
the safety rules must be followed. For
your own safety and bystanders please
read these instructions before operating the
machine. Please keep the instructions safe
for later use.
SAVE THESE INSTRUCTIONS
This grass trimmer is designed for cutting
grass and similar soft vegetation and for
trimming grass edges in private and hobby
garden areas which are not accessible with
a lawnmower.
The device is not allowed to be used in
public gardens, parks, sports centres or
at roadsides as well as in agriculture and
forestry.
This lawn trimmer is not allowed to be used
for cutting or chopping:
- Hedges, shrubs and bushes,
- Flowers,
- In terms of composting.
Otherwise, there is a risk of injury.
This appliance is not intended for use by
persons (including children) with reduced
physical, sensory or mental capabilities,
or lack of experience and knowledge,
unless they have been given supervision or
instruction concerning use of the appliance
by a person responsible for their safety.
Children should be supervised to ensure that
they do not play with the appliance.
If the supply cord is damaged, it must be
replaced by the manufacturer, its service
agent or similarly qualified persons in order to
avoid a hazard.
a) Wear protective glasses or goggles;
b) Never allow children or people unfamiliar
with the instructions to use the machine;
c) Stop using the machine while people,
especially children, or pets are nearby;
d) Only use the machine in daylight or good
artificial light;
e) Before using the machine and after
any impact, check for signs of wear or
damage and repair as necessary;
f) Never operate the machine with
300 Watt
Electric Grass Trimmer
g)
h)
i)
j)
k)
I)
damaged guards or without the guards in
place;
Keep hands and feet away from the
cutting means at all times and especially
when switching on the motor;
Take care against injury from any device
fitted for trimming the filament line length.
After extending new cutter line always
return the machine to its normal operating
position before switching on;
Never fit metal cutting elements;
Never use replacement parts
or accessories not provided or
recommended by the manufacturer;
Disconnect the machine from the mains
before checking, cleaning or working on
the machine and when it is not in use;
Always ensure that ventilation openings
are kept clear of debris;
MAINTENANCE
a) After use, disconnect the machine from
the mains and check for damage;
b) When not in use store the machine out of
the reach of children;
c) Mains powered trimmers should only be
repaired by an authorised repairer;
d) Use only manufacturers recommended
replacement parts and accessories.
- Read the instructions carefully,
- Be familiar with the controls and proper
use of the equipment;
- Before use check the supply and
extension cord for signs of damage or
ageing,
- If the cord becomes damaged during
use, disconnect the cord from the supply
immediately. DO NOT TOUCH THE CORD
BEFORE DISCONNECTING THE SUPPLY,
- Do not use the lawn trimmer (edge
trimmer), if the cords are damaged or
worn.
WARNINGS:
WARNING: Cutting elements continue
to rotate after the motor is switched
off,
- Keep extension cords away from cutting
elements;
It is recommended that appliances should
HELPLINE NO 0844 8010979
ORIGINAL INSTRUCTIONS
be supplied via a residual current device
(RCD) with a tripping current of not more
than 30mA.
SYMBOLS
Read the manual
Double insulation
Warning
Wear eye protection
Wear ear protection
Wear dust mask
Do not expose to moisture
Keep bystanders away.
Switch off! Remove plug from
mains before adjusting, cleaning
or if cable is entangled or
damaged.
Waste electrical products
should not be disposed of with
household waste. Please recycle
where facilities exist. Check with
your Local Authority or retailer for
recycling advice.
300 Watt
Electric Grass Trimmer
HELPLINE NO 0844 8010979
ORIGINAL INSTRUCTIONS
1
10
2
3
4
5
6
7
8
1.
TRIGGER SWITCH
2.
AUXILIARY HANDLE
3.
HANDLE ROTATION LOCKING COLLAR
4.
HEIGHT ADJUSTMENT LOCKING COLLAR
5.
TELESCOPE TUBE
6.
MOTOR HOUSING
7.
FLOWER GUARD AND EDGE GUIDE
8.
CUTTING HEAD ASSEMBLY
9.
SAFETY GUARD
9
10. CABLE STRAIN RELIEF HOOK
11. CUTTING LINE (See Fig L)
12. CUTTING HEAD COVER (See Fig L)
13. CUTTING HEAD COVER RELEASE LATCH (See Fig L)
14. SPOOL (See Fig L)
15. EYELET (See Fig L)
16. CUTTING HEAD (See Fig L)
17. CUTTING LINE SPOOL NOTCH (See Fig L)
300 Watt
Electric Grass Trimmer
HELPLINE NO 0844 8010979
ORIGINAL INSTRUCTIONS
OPERATING INSTRUCTIONS
NOTE: Before using the tool, read the
instruction book carefully.
ASSEMBLY/ADJUSTMENT
WARNING! The guard must always be
on the tool to protect the user.
1. FITTING THE GUARD (See Fig A)
Fix the safety guard to the trimmer head
making sure the sides are located into the
grooves on the trimmer head.
Secure the safety guard onto the trimmer
head with the screw provided (assembled on
the guard).
Use of the unit without having installed the
guard will cause the motor to overheat, and
void the warranty.
2. FITTING THE AUXILIARY HANDLE
(See Fig C1,C2)
NOTE: This may already be pre-fitted to the
trimmer. However the following instructions
give full assembly details.
1. Unscrew the auxiliary handle locking knob
(counterclockwise) and remove from handle.
2. Position auxiliary handle onto handle
bracket assembly located on trimmer’s shaft.
3. Position the knob and screw through the
auxiliary handle and bracket, and tighten
knob (turn clockwise). Do not tighten
completely until you have adjusted the
auxiliary handle to your desired working
position.
A
C1
B
WARNING! Take great care when doing
this as the guard has a very sharp
cutting edge. (See Fig B)
WARNING! Never operate the tool
without the guard properly in place.
300 Watt
Electric Grass Trimmer
C2
3. ADJUSTING AUXILIARY HANDLE (See Fig D)
Unscrew the auxiliary handle locking knob.
HELPLINE NO 0844 8010979
ORIGINAL INSTRUCTIONS
The auxiliary handle’s bracket can be moved
up or down on the shaft and the auxiliary
handle itself can be moved forward or
backward into 5 different locked positions
Then tighten the auxiliary handle locking
knob.
place.
F
D
4. ADJUST THE HEIGHT (See Fig E)
To adjust the telescopic shaft, simply pull the
height adjustment locking collar down and
pull the bottom section of the shaft down to
the desired height. It will click into one of the
notches on the shaft, and lock into place.
Release the locking collar to lock the shaft
into place.
G
6. MAINS SUPPLY CABLE STRAIN RELIEF
(See Fig H)
In order to reduce strain on the cable inlet,
form a loop and locate the cable around
the strain relief hook.
E
5. ROTATE THE REAR HANDLE AND UPPER SHAFT
1800 (See Fig F,G)
Pull Handle rotation locking collar and turn
the top of the shaft 1800 counter-clockwise
(The head will only move in one direction).
Release the locking collar to lock shaft in
300 Watt
Electric Grass Trimmer
H
HELPLINE NO 0844 8010979
ORIGINAL INSTRUCTIONS
7. ON/OFF SWITCH
To start, press and hold the switch. Release
the switch to stop.
WARNING: The cutting head continues
to rotate after the trimmer has been
switched off, wait until it has stopped then lay
down the tool.
EDGING (See Fig J)
To edge, rotate the upper shaft with rear
handle 1800, place the edge guide and
trimmer head above the surface you are
going to edge, as shown in Fig J.
2
OPERATION
WARNING: Always wear eye protection.
Never lean over the trimmer head.
Rocks or debris can ricochet or be thrown
into eyes and face and cause blindness or
other serious injury. When operating unit,
check for the following:
Wear eye protection and heavy clothing.
Hold front handle with one hand and
auxiliary handle with the other hand. Keep
unit below waist level. Work only from your
right to your left to ensure debris is thrown
away from you. Without bending over,
keep line near and parallel to the ground
(perpendicular when edging). Do not switch
the machine on with the cutting head
on or near material to be cut. Ensure the
cutting line is at full speed before contacting
material to be cut.
WARNING: Make sure that line is fed out
before operation. Make sure motor is
up to full speed before trimming.
WARNING: Use only 1.2mm diameter
cutting line. Other sizes of line will not
feed properly and will result in improper
cutting head function or can cause serious
injury. Do not use other material such as wire,
string, rope, etc. Wire can break off during
cutting and become a dangerous missile
that can cause serious injury.
TRIMMING (See Fig I)
Hold the bottom of the trimmer head about
8cm above the ground and at an angle.
Allow only the tip of line to make contact. Do
not force trimmer line into work area.
When trimming, cut from left to right to cut
efficiently. This throws the clippings away
from the operator.
300 Watt
Electric Grass Trimmer
1
I
J
EXTENDING THE CUTTING LINE (See Fig K)
During operation, cutting lines shorten due to
normal wear. For greater convenience and
efficiency, your trimmer has been equipped
with a bump feed head that allows you to
simply bump the trimmer head to extend the
cutting lines while the trimmer is operating.
Cutting line will wear faster and require more
feeding if the cutting or edging is done along
paths or other abrasive surfaces or heavier
weeds are being cut.
1. While the trimmer is on and spinning, gently
bump the spool housing on the ground. This
should release additional cutting line from
the spool.
2. If no line is released, bump the trimmer
HELPLINE NO 0844 8010979
ORIGINAL INSTRUCTIONS
head more sharply or try bumping it on a
firmer surface.
3. If there is no change in the cutting line
length, un-plug the trimmer’s mains supply
cable. After the trimmer head stops rotating,
gently pull out the cutting lines manually.
Once the lines are pulled out (extended),
plug the trimmer mains supply cable back
into the power supply and resume cutting.
4. If the cutting line still does not feed from
the spool, the spool might be empty or the
cutting line may be tangled or jammed on
the spool. Un-plug the trimmer’s mains supply
cable. After the trimmer head stops rotating,
remove the spool. If the line is tangled or
jammed, untangle and replace the line. If
the spool is empty, replace the spool.
K
TO REPLACE CUTTING LINE (See Fig L)
cover and remove cover, pulling it straight off
the cutting head assembly.
3. Lift the spool out of the spool housing.
REPLACE THE SPOOL
1. Replace the spool with a new factory prewound spool.
2. Insert the end of one line through an eyelet
in the spool housing. Insert the other line
through the other eyelet.
3. Insert the spool into housing and press it
down gently until you feel it drop into place.
Take care to keep the line from becoming
trapped under the spool.
4. Snap the cutting head cover back on and
at the same time pull lines and be sure that
they are released from spool notch.
FILLING SPOOL WITH CUTTING LINE (Fig M)
1. Remove the empty spool from the tool
as described in “TO REPLACE CUTTING LINE”
above.
2. Remove any remaining cutting line from
the spool.
3. First wind new line onto the uppermost
part of the spool. Feed 1-2cm of cutting line
into one of the line spool notches. Wind the
cutting line onto the spool in the direction
of the arrow on the spool. Make sure to
wind the line neatly and in layers - VERY
IMPORTANT – DO NOT ALLOW THE LINE TO
CRISS CROSS WHILST WINDING IT ONTO THE
SPOOL. (See Fig M).
12
13
17
14
11
16
15
L
1. Turn trimmer over to access spool head
cover.
2. Press the release latch on the spool head
300 Watt
Electric Grass Trimmer
M
4. Repeat the above procedure for the
second cutting line on the lower section of
the spool.
HELPLINE NO 0844 8010979
ORIGINAL INSTRUCTIONS
5. Fit the spool onto the tool as described in
“REPLACE THE SPOOL” above.
MAINTENANCE
Remove the plug from the socket before
carrying out any adjustment, servicing or
maintenance.
Your power tool requires no additional
lubrication or maintenance. There are no user
serviceable parts in your power tool. Never
use water or chemical cleaners to clean
your power tool. Wipe clean with a dry cloth.
Always store your power tool in a dry place.
Keep the motor ventilation slots clean. Keep
all working controls free of dust. Occasionally
you may see sparks through the ventilation
slots. This is normal and will not damage your
power tool.
If the supply cord is damaged, it must be
replaced by the manufacturer, its service
agent or similarly qualified persons in order to
avoid a hazard.
TECHNICAL DATA
GGT3001
Voltage
Power input
No load speed
Max. cutting diameter
Diameter of line
Line length
Protection class
Machine weight
230 -240V~50Hz
300W
11000/min
25cm
1.2mm
2*3m
/II
2.0kg
NOISE AND VIBRATION DATA
A weighted sound pressure
85dB(A)
A weighted sound power
96dB(A)
Wear ear protection when sound pressure is over
85dB(A)
Typical weighted vibration
4.0m/s2
WARNING: The vibration emission value during actual use of the power tool can differ
from the declared value depending on the ways in which the tool is used dependant
on the following examples and other variations on how the tool is used:
How the tool is used and the materials being cut or drilled.
The tool being in good condition and well maintained.
The use of the correct accessory for the tool and ensuring it is sharp and in good condition.
The tightness of the grip on the handles and if any anti vibration accessories are used.
300 Watt
Electric Grass Trimmer
HELPLINE NO 0844 8010979
ORIGINAL INSTRUCTIONS
And the tool is being used as intended by its design and these instructions.
This tool may cause hand-arm vibration syndrome if its use is not adequately managed.
WARNING: To be accurate, an estimation of exposure level in the actual conditions
of use should also take account of all parts of the operating cycle such as the times
when the tool is switched off and when it is running idle but not actually doing the job. This
may significantly reduce the exposure level over the total working period.
Helping to minimise your vibration exposure risk.
Maintain this tool in accordance with these instructions and keep well lubricated (where
appropriate).
If the tool is to be used regularly then invest in anti vibration accessories.
Avoid using tools in temperatures of 100C or less.
Plan your work schedule to spread any high vibration tool use across a number of days.
ACCESSORIES
Safety guard
Auxiliary handle
1
1
We recommend that you purchase your accessories from the same store that sold you the
tool. Use good quality accessories marked with a well-known brand name. Choose the type
according to the work you intend to undertake. Refer to the accessory packaging for further
details. Store personnel can assist you and offer advice.
300 Watt
Electric Grass Trimmer
HELPLINE NO 0844 8010979
ORIGINAL INSTRUCTIONS
ENVIRONMENTAL
PROTECTION
PLUG REPLACEMENT
(UK & IRELAND ONLY)
Waste electrical products should not
be disposed of with household waste.
Please recycle where facilities exist.
Check with your Local Authority or retailer for
recycling advice.
If you need to replace the fitted plug then
follow the instructions below.
IMPORTANT
The wires in the mains lead are colored in
accordance with the following code:
Blue = Neutral
Brown = Live
As the colors of the wires in the electrical cord
of this appliance may not correspond with
the colored markings identifying the terminals
in your plug, proceed as follows. The wire
which is colored blue must be connected to
the terminal which is marked with N. The wire
which is colored brown must be connected
to the terminal which is marked with L.
WARNING! Never connect live or
neutral wires to the earth terminal of the
plug. Only fit an approved 13Amp BS1363/A
plug and the correct rated fuse.
NOTE: If a moulded plug is fitted and has to
be removed take great care in disposing
of the plug and severed cable, it must be
destroyed to prevent engaging into a socket.
13Amp fuse approved
to BS1362
Connect
Blue to N
(neutral)
Brown L (live)
Outer sleeve
firmly clamped
300 Watt
Electric Grass Trimmer
Cable grip
HELPLINE NO 0844 8010979