1
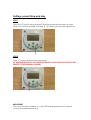
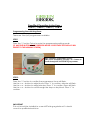
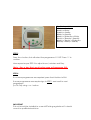
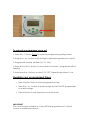
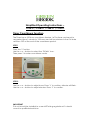
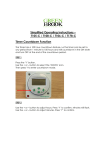
Simplified Operating Instructions –
T105-C / T108-C / T106-C / T17B-C
Button Operations
R - Reset (with pen or other pointed instrument).
Y - Enters function setup.
+/- Buttons to scroll through icons.
Y - To confirm.
N - To Exit.
YY - (Pressing ‘Y’ twice) - To enter program mode
DISPLAY DETAIL
SCROLL DOWN MENU APPEARS
WHEN ‘Y’ BUTTON IS PRESSED
DISPLAYS DAY OR DAY BLOCK
PROG
DOWN
00:0000
CLOCK
SUMMER
RANDOM
ALWAYS ON
AFFIRM
SETUP
PROG
PROG
SELECT ADJUST
CHANGE MODE
ALWAYS OFF
EXIT
THESE ICONS ARE VIEWABLE WHEN
BUTTONS ‘Y’ AND ‘N’ ARE BEING USED
4 OPTIONS – WHEN ‘N’ BUTTON
IS PRESSED
IMPORTANT
This unit should be installed to current IEE wiring regulations if In doubt
consult a qualified electrician.
Setting current time and day
STEP 1
Press the ‘R’ button using a pencil or similar pointed instrument to reset
timer to its default settings. Pressing ‘R’ will delete all stored programmes.
STEP 2
Press ‘Y’ button to enter function setup.
(IF ANOTHER BUTTON IS NOT PRESSED WITHIN 10 SECONDS THE DISPLAY WILL
REVERT TO THE NORMAL SCREEN)
IMPORTANT
This unit should be installed to current IEE wiring regulations if In doubt
consult a qualified electrician.
STEP 3
Use the + or – button to scroll to the clock icon (flashing).
Then press the Y button to enter the current time setting mode (Hours
flashing).
Use the + or – button to adjust the hours. Press Y to confirm. Minutes will
flash.
Use the + or – button to adjust the minutes. Press Y to confirm. Day will
flash.
Use the + or – button to adjust the day. Press N to exit.
If you keep the + or – buttons pressed for
more than 3 seconds, the display will enter
fast scroll mode.
Y
N
IMPORTANT
This unit should be installed to current IEE wiring regulations if In doubt
consult a qualified electrician.
Simplified Operating Instructions –
T105-C / T108-C / T106-C / T17B-C
Programming the switching times
There are 24 on/off programmes available.
STEP 1
Press the ‘Y’ button Twice to enter the programming setting mode.
(IF ANOTHER BUTTON IS NOT PRESSED WITHIN 10 SECONDS THE DISPLAY WILL
REVERT TO THE NORMAL SCREEN)
Note: Default is programme ‘01 ON’.
This can be changed by pressing + or – button to
Scroll through the 24 ON/OFF programmes.
STEP 2
Press the ‘Y’ button to confirm the programme. Hours will flash.
Use the + or – button to adjust hours. Press ‘Y’ to confirm. Minutes will flash.
Use the + or – button to adjust minutes. Press ‘Y’ to confirm. Days will flash.
Use the + or – button to scroll through the days or day block. Press ‘Y’ to
confirm.
IMPORTANT
This unit should be installed to current IEE wiring regulations if in doubt
consult a qualified electrician.
Day Blocks available–
Monday to Sunday
Monday to Friday
Saturday to Sunday
Monday to Saturday
Monday + Wednesday + Friday
Tuesday + Thursday + Saturday
Monday + Tuesday + Wednesday
Thursday + Friday + Saturday
STEP 3
Press the + button, this will select the programme O1 OFF. Press ‘Y’ to
confirm.
Now repeat as per STEP 2 to adjust hours / minutes and Day.
(Note – Day or day Block must be the same as Programme ON).
STEP 4
If no more programmes are required, press the N button to Exit.
If more programmes are required go to STEP 1 and scroll to next
programme
(i.e 02 ON) using + or – button.
IMPORTANT
This unit should be installed to current IEE wiring regulations if in doubt
consult a qualified electrician.
To cancel a programme once set
1. Press the ‘Y’ button Twice to enter the programming setting mode.
2. Using the + or – button scroll through to desired programme to cancel.
3. Programme number will flash (i.e ‘O1 ON’).
4. Press and hold ‘N’ button for more than 3 seconds – programme will be
deleted.
5. Now press the + button to select ‘O1 OFF’. Repeat instructions 2 to 4.
Reading your programmed times
•
Press Y button Twice to enter programme mode.
•
Press the + or – button to scroll through the 24 ON/OFF programmes
to check settings.
•
Press N button to exit and revert to clock mode.
IMPORTANT
This unit should be installed to current IEE wiring regulations if in doubt
consult a qualified electrician.
Simplified Operating Instructions –
T105-C / T108-C / T106-C / T17B-C
Timer Countdown Function
The Timer has a 100 hour countdown feature. i.e The timer can be set to
any period from 1 minute to 100 hours and will countdown in the ON state
and turn OFF at the end of the countdown period.
STEP 1
Press the ‘Y’ button.
Use the + or – button to select the ‘DOWN’ icon.
Then press Y to enter countdown mode.
STEP 2
Use the + or – button to adjust hours. Press ‘Y’ to confirm. Minutes will flash.
Use the + or – button to adjust minutes. Press ‘Y’ to confirm.
IMPORTANT
This unit should be installed to current IEE wiring regulations if in doubt
consult a qualified electrician.
STEP 3
•
Press the N button to start the countdown.
(Output switched to ON during the countdown period)
•
Press the N button to pause the countdown. (Output switched to
OFF)
•
To resume countdown simply press the N button.
STEP 4
Press and hold the N button for more than 3 seconds to exit the
countdown function.
IMPORTANT
This unit should be installed to current IEE wiring regulations if in doubt
consult a qualified electrician.
Simplified Operating Instructions –
T105-C / T108-C / T106-C / T17B-C
Manual Override
When in normal clock mode, pressing the ‘N’ Button will scroll through the following
switching options:
•
ALWAYS ON – Timer is permanently ON.
•
PROG (WITH CLEAR SYMBOL) – Timer is in programme ON mode. It will switch off at
the next programme OFF mode.
•
ALWAYS OFF – Timer is permanently OFF.
•
PROG (WITH HALF CLEAR SYMBOL) – Timer is in programme OFF mode. It will switch
on at the next programme ON mode.
Summer Time setting
STEP 1 - Press the ‘Y’ button.
STEP 2 - Use the + or - button to scroll through to ‘SUMMER’ (Flashing).
STEP 3 - Press the ‘Y’ button to access the summer time setting.
STEP 4 - Press the + or – button will toggle the ‘SUMMER’ icon on or off.
STEP 5 - Press ‘Y’ button to confirm summer setting. Time will advance 1 hour.
STEP 6 - The ‘SUMMER’ icon will appear in the display.
Use the same steps as above to remove the ‘SUMMER’ icon from the display.
IMPORTANT
This unit should be installed to current IEE wiring regulations if in doubt
consult a qualified electrician.
Random setting
The random setting allows the timer to switch ON and OFF with a random delay of
between 2 and 32 minutes. This function will only operate if one or more programmes
have been programmed into the timer.
STEP 1 - Press the ‘Y’ button.
STEP 2 - Use the + or - button to scroll through to ‘RANDOM’ (Flashing).
STEP 3 - Press the ‘Y’ button to access the RANDOM setting.
STEP 4 - Press the + or – button will toggle the ‘RANDOM’ icon on or off.
STEP 5 - Press ‘Y’ button to confirm RANDOM function.
STEP 6 - The ‘RANDOM’ icon will appear in the display.
Timer will now operate in the RANDOM mode
Use the same steps as above to remove the ‘RANDOM’ icon from the display.
E. [email protected]
W. www.greenbrook.co.uk
IMPORTANT
This unit should be installed to current IEE wiring regulations if in doubt
consult a qualified electrician.