1
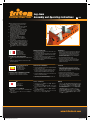
Log Jaws
Precision Power Tools Assembly and Operating Instructions
GBPlease read these instructions carefully. They
contain information necessary for safe and
effective use of this product
NLLees de instructies zorgvuldig door. Ze bevatten
noodzakelijke informatie voor een veilig en
efficiënt gebruik van dit product.
F Veuillez lire attentivement les instructions. Elles
contiennent des informations nécessaires sur la
sécurité et l utilisation optimale de ce produit.
D Bitte lesen Sie diese Gebrauchsanweisung
sorgfältig durch, denn sie enthält wichtige
Informationen zur sicheren und effektiven
Nutzung dieses Produkts.
I Si prega di leggere attentamente queste
istruzioni. Essi contengono le informazioni
necessarie per un uso sicuro ed efficace di
questo prodotto
E Lea atentamente este manual de instrucciones y
asegúrese de entender completamente todas las
instrucciones antes de utilizar esta herramienta.
JPこの取扱説明書には、本製品を安全かつ効
率よくご使用いただくための注意点や使用
方法が記されていますので、
よくお読みくだ
さい。
CONTENTS
1. Front Jaw
2. Rear Jaw
3. Coach Bolts
4. Mounting Knobs
REMOVING THE URETHANE FACE COVERS
1. Pry the fixed face cover off the fixed face
2. Pry the moving face cover off the moving face
INHOUD
1. Voorste kaak
2. Achterste kaak
3. Slotbouten
4. Monteerknoppen
HET DEMONTEREN VAN DE URETHAAN PANELEN
1. Verwijder het vaste paneel van de vaste kop
2. Verwijder het bewegende paneel van de bewegende kop
CONTENU
1. Mâchoire avant
2. Mâchoire arrière
3. Boulons d’entraîneur
4. Molettes de support
RETIRER LE REVÊTEMENT URETHANE DES PLATEAUX
1. Faites levier sur la mâchoire fixe pour retirer le revêtement
2. Faites levier sur la mâchoire mobile pour retirer le
revêtement
TEILELISTE
1. Vordere Spannbacke
2. Hintere Spannbacke
3. Schlossschrauben
4. Drehknöpfe
ENTFERNEN DER URETHAN-BACKENBELÄGE
1. Lösen Sie den fest montierten Backenbelag von der nicht
beweglichen Spannbock-Spannbacke.
2. Lösen Sie dann den nicht fixierten Backenbelag von der
beweglichen Spannbock-Spannbacke.
SJA 460
4
2
4
3
1
3
4
FITTING THE LOG JAWS
IN USE
1. Position the Front Jaw (1) onto the fixed face with the mounting holes aligned
These jaws can accommodate logs or poles up to
approximately 300mm diameter. When clamping large
diameter material avoid applying too much force on the foot
pedal as excessive pressure on the top of the log jaws can
damage the clamping mechanism.
2. Insert the Coach Bolts (3) through the holes and tighten the
mounting knobs onto the bolts to secure the front face in
position
3. Locate the Rear Jaw (2) onto the moving jaw, with the
mounting holes aligned
Take great care when cutting.
4. Secure it in position using the Coach Bolts (3) and
Mounting Knobs (4)
Ensure that the work is securely clamped and that precautions
have been taken to handle the offcut. Follow all of the
chainsaw manufacturers safety and operating instructions.
HET MONTEREN VAN DE GETANDE KAKEN
1. Plaats de voorste kaak (1) op de vaste kop met de montage
gaten uitgelijnd
2. Plaats de slotbouten (3) door de gaten en draai
de monteerknoppen (4) hierop vast om de kaak te
vergrendelen
3. Plaats de achterste kaak (2) op de bewegende kop en lijn
de montage gaten uit
4. Vergrendel de kaak in positie met gebruik van de
slotbouten (3) en de montageknoppen (4)
IN GEBRUIK
• De kaken klemmen houtblokken en palen met een
diameter van maximaal 300 mm. Oefen bij het klemmen
van voorwerpen met een grotere diameter niet te veel
druk op het voetpedaal uit waar dit het klemsysteem kan
beschadigen
• Ben voorzichtig bij zagen
• Zorg ervoor dat het werkstuk stevig vast is geklemd
en dat u rekening houd met de afsnee. Volg alle
veiligheidsinstructies geleverd bij de kettingzaag op.
AJUSTEMENT DES MÂCHOIRES
1. Placez la mâchoire avant (1) sur le plateau fixe avec les
trous de montage alignés
2. Insérez les boulons d’entraîneur (3) dans les trous et
serrez avec les molettes de support sur les boulons pour
fixer la mâchoire avant.
3. Placez la mâchoire arrière (2) sur le plateau mobile, avec
les trous de montage alignés.
4. Fixez-la en utilisant les boulons d’entraîneur (3) et les
molettes de support (4)
UTILISATION
• Ces mâchoires peuvent servir au serrage de bûches ou de
poteaux jusqu’à un diamètre de 300 mm En serrant des
matériaux de plus grand diamètre, évitez d’appliquer une
force de serrage trop importante avec la pédale à pied, car
trop de pression sur les mâchoires peut endommager le
mécanisme de serrage.
• Faites attention lors des découpages.
• Assurez-vous que votre travail soit bien stable et que
toutes les précautions ont été prises pour effectuer la
découpe. Suivez les instructions d’utilisation et de sécurité
du fabricant de la tronçonneuse.
ANBRINGEN DER GEZAHNTEN SPANNBACKEN
1. Setzen Sie die vordere Spannbacke (1) auf den fest
montierten Backenbelag, wobei sich die Montagelöcher
decken müssen.
2. Führen Sie die Schlossschrauben (3) durch die Löcher und
ziehen Sie die Drehknöpfe auf den Schrauben fest, um die
vordere Spannbacke zu fixieren.
3. Setzen Sie die hintere Spannbacke (2) auf die bewegliche
Spannbock-Spannbacke und achten Sie darauf, dass sich
die Montagelöcher decken.
4. Ziehen Sie die hintere Spannbacke mit den verbleibenden
Schlossschrauben (3) und Drehknöpfen (4) fest
BEI GEBRAUCH
• Diese Spannbacken eignen sich zum Einspannen von
Stämmen, Pfosten, Stangen und anderen runden
Werkstücken mit einem Durchmesser bis ca. 300 mm.
Üben Sie beim Einspannen von Werkstücken mit einem
großen Durchmesser nicht zu starken Druck auf den FußSpannmechanismus aus. Übermäßiger Druck oben auf die
gezahnten Spannbacken kann den Spannmechanismus
beschädigen.
• Gehen Sie bei Säge- und anderen Schneidarbeiten sehr
vorsichtig vor.
• Vergewissern Sie sich, dass das Werkstück fest und
sicher eingespannt ist. Sorgen Sie dafür, dass geeignete
Abstützvorrichtungen für den anfallenden Verschnitt
bereitstehen. Befolgen Sie sämtliche Sicherheits- und
Bedienungsanweisungen des Kettensägenherstellers.
www.tritontools.com
SJA460_MANUAL(Japan).indd 1
16/07/2014 11:52
Log Jaws
Precision Power Tools Assembly and Operating Instructions
GBPlease read these instructions carefully. They
contain information necessary for safe and
effective use of this product
NLLees de instructies zorgvuldig door. Ze bevatten
noodzakelijke informatie voor een veilig en
efficiënt gebruik van dit product.
F Veuillez lire attentivement les instructions. Elles
contiennent des informations nécessaires sur la
sécurité et l utilisation optimale de ce produit.
D Bitte lesen Sie diese Gebrauchsanweisung
sorgfältig durch, denn sie enthält wichtige
Informationen zur sicheren und effektiven
Nutzung dieses Produkts.
I Si prega di leggere attentamente queste
istruzioni. Essi contengono le informazioni
necessarie per un uso sicuro ed efficace di
questo prodotto
E Lea atentamente este manual de instrucciones y
asegúrese de entender completamente todas las
instrucciones antes de utilizar esta herramienta.
JPこの取扱説明書には、本製品を安全かつ効
率よくご使用いただくための注意点や使用
方法が記されていますので、
よくお読みくだ
さい。
CONTENUT0
1. Mascella anteriore
2. Mascella posteriore
3. Bulloni di fissaggio
4. Manopole del montaggio
RIMOZIONE DELLE COPERTURE IN URETANO
1. Sollevare la copertura del quadrante fisso via dalla facciata
fissa
2. Sollevare la copertura quadrante in movimento via dalla
facciata in movimento
DESCRIPCCIÓN DE LAS PARTES
1. Mandíbula frontal
2. Mandíbula posterior
3. Tornillos de carrocería
4. Perillas de montaje
DESINSTALACIÓN DE LAS MANDÍBULAS DE URETANO
1. Haga palanca sobre la cubierta de la cara fija.
2. Haga palanca sobre la cubierta de la cara móvil.
目次
1. フロントジョー
2. リアジョー
3. コーチボルト
4. マウントノブ
ウレタン製ジョーフェースを取り外す
1.固定ジョーのフェースを、ドライバーなどを用いて取
り外します。
2.スライドジョーのフェースを、ドライバーなどを用い
て取り外します。
2
SJA 460
4
3
1
4
3
MONTAGGIO DELLE MASCELLE
1. Posizionarei la mascella anteriore (1) sul fronte fisso con i
fori di montaggio allineati
2. Inserire i bulloni di fissaggio (3) attraverso i fori e stringere
le manopole di montaggio sui bulloni per fissare il fronte
anteriore in posizione
3. Posizionare la mascella posteriore (2) sulla mascella in
movimento, con i fori di montaggio allineati
4. Assicurarlo in posizione usando i bulloni di fissaggio (3) e le
manopole di montaggio (4)
QUANDO IN USO
• Queste ganasce possono accogliere tronchi o pali fino al
diametro di circa 300mm. Quando bloccando materiale
di grande diametro evitare l’applicazione di una forza
eccessiva sul pedale siccome una pressione eccessiva
sulla parte superiore delle ganasce può danneggiare il
meccanismo di bloccaggio
• Fare molta attenzione durante il taglio.
• Assicurarsi che il lavoro sia ben serrato e che le
precauzioni sono state prese per gestire un mal taglio.
Seguite tutte le istruzioni operative e di sicurezza del
produttore di motosega
INSTALACIÓN DE LAS MANDÍBULAS
1. Coloque la mandíbula frontal (1) en la cara fija alineándolos
con las ranuras de montaje.
2. Inserte los tornillos de carrocería (3) a través los orificios
de sujeción y apriete las perillas de montaje junto a los
tornillos para fijar la mandíbula frontal en su posición.
UTILIZACIÓN
• Estas mordazas pueden sujetar troncos y piezas de
madera hasta 300 mm de diámetro aproximadamente.
Cuando sujete piezas de gran diámetro, evite no forzar la
herramienta ni aplicar una fuerza excesiva ya que podría
dañar el mecanismo de sujeción.
• Tenga precaución cuando realice cortes.
• Asegúrese de que la pieza de trabajo esté bien sujeta
y tome siempre medidas de precaución. Consulte las
instrucciones de seguridad de su herramienta eléctrica
proporcionadas por el fabricante.
3. Coloque la mandíbula posterior (2) en la cara móvil con los
tornillos correctamente alineados.
4. Fíjela en la posición adecuada utilizando los tornillos de
carrocería (3) y las perillas de montaje (4).
ログジョーズの取り付け
1.フロントジョー(1)を固定ジョーに置き、取り付け
穴の位置を合わせます。
2.コートボルト(3)を取り付け穴に通し、
マウントノブ
をボルトに取り付けて締め、フロントジョーを固定し
ます。
3.リアジョー(2)をスライドジョーに置き、取り付け
穴の位置を合わせます。
4.残っているコーチボルト(3)とマウントノブ(4)を
用いてリアジョーを正しく固定します。
使用方法
• ログジョーズは、最大直径が約300mmまでの丸太
や柱などを固定できます。太い木材を固定する場合
は、フットペダルに必要以上の大きな力をかけ過ぎ
ないように注意してください。クランプ機構が破損
する可能性があります。
• 切断作業をする時には、十分注意してください。
• 必ず加工材が確実に固定されていることを確認し、
切れ端の処理には十分に注意してください。使用す
るチェーンソーの取扱説明書を良く読み、それに従
って作業してください。
www.tritontools.com
SJA460_MANUAL(Japan).indd 2
16/07/2014 11:52