1
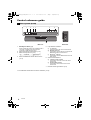
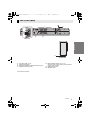
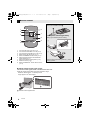
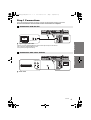
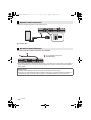
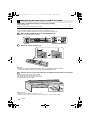
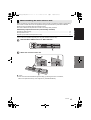
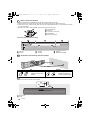
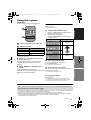
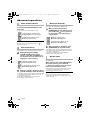
SC-HTB18_EB_VQT5J46.book 1 ページ 2014年3月19日 水曜日 午前9時47分 Operating Instructions Home Theater Audio System Model No. SC-HTB18 Thank you for purchasing this product. Please read these instructions carefully before using this product, and save this manual for future use. Included Installation Instructions The installation work should be done by a qualified installation specialist. (> 12 to 16) Before commencing work, carefully read these installation instructions and the operating instructions to ensure that installation is performed correctly. (Please keep these instructions. You may need them when maintaining or moving this unit.) Model number suffix “EB” denotes UK model. EB VQT5J46 2014/04/02 SC-HTB18_EB_VQT5J46.book 2 ページ 2014年3月19日 水曜日 午前9時47分 Safety precautions Table of contents WARNING CAUTION Unit Unit ≥ To reduce the risk of fire, electric shock or product damage, jDo not expose this unit to rain, moisture, dripping or splashing. jDo not place objects filled with liquids, such as vases, on this unit. jUse only the recommended accessories. jDo not remove covers. jDo not repair this unit by yourself. Refer servicing to qualified service personnel. ≥ To prevent injury, this apparatus must be securely attached to the wall in accordance with the installation instructions. ≥ Do not place sources of naked flames, such as lighted candles, on this unit. ≥ This unit may receive radio interference caused by mobile telephones during use. If such interference occurs, please increase separation between this unit and the mobile telephone. ≥ This unit is intended for use in moderate climates. ≥ Product Identification Marking is located on the bottom of the unit. AC mains lead ≥ To reduce the risk of fire, electric shock or product damage, jEnsure that the power supply voltage corresponds to the voltage printed on this unit. jInsert the mains plug fully into the socket outlet. jDo not pull, bend, or place heavy items on the lead. jDo not handle the plug with wet hands. jHold onto the mains plug body when disconnecting the plug. jDo not use a damaged mains plug or socket outlet. ≥ The mains plug is the disconnecting device. Install this unit so that the mains plug can be unplugged from the socket outlet immediately. Button-type battery (Lithium battery) ≥ Risk of fire, explosion and burns. Do not recharge, disassemble, heat above 60 oC or incinerate. ≥ Keep the Button-Type battery out of the reach of children. Never put Button-Type battery in mouth. If swallowed call your doctor. Small object ≥ Keep the button-type battery out of reach of children to prevent swallowing. 2 VQT5J46 Placement ≥ Place this unit on an even surface. ≥ To reduce the risk of fire, electric shock or product damage, jDo not install or place this unit in a bookcase, built-in cabinet or in another confined space. Ensure this unit is well ventilated. jDo not obstruct this unit’s ventilation openings with newspapers, tablecloths, curtains, and similar items. jDo not expose this unit to direct sunlight, high temperatures, high humidity, and excessive vibration. Button-type battery (Lithium battery) ≥ Danger of explosion if battery is incorrectly replaced. Replace only with the type recommended by the manufacturer. ≥ Insert with poles aligned. ≥ Mishandling of batteries can cause electrolyte leakage and may cause a fire. jRemove the battery if you do not intend to use the remote control for a long period of time. Store in a cool, dark place. jDo not heat or expose to flame. jDo not leave the battery(ies) in a car exposed to direct sunlight for a long period of time with doors and windows closed. ≥ When disposing of the batteries, please contact your local authorities or dealer and ask for the correct method of disposal. SC-HTB18_EB_VQT5J46.book 3 ページ 2014年3月19日 水曜日 午前9時47分 (For the AC mains plug of three pins) For your safety, please read the following text carefully. This appliance is supplied with a moulded three pin mains plug for your safety and convenience. A 5-ampere fuse is fitted in this plug. Should the fuse need to be replaced please ensure that the replacement fuse has a rating of 5-ampere and that it is approved by ASTA or BSI to BS1362. Check for the ASTA mark Ï or the BSI mark Ì on the body of the fuse. If the plug contains a removable fuse cover you must ensure that it is refitted when the fuse is replaced. If you lose the fuse cover the plug must not be used until a replacement cover is obtained. A replacement fuse cover can be purchased from your local dealer. Before use Remove the connector cover. How to replace the fuse The location of the fuse differ according to the type of AC mains plug (figures A and B). Confirm the AC mains plug fitted and follow the instructions below. Illustrations may differ from actual AC mains plug. 1. Open the fuse cover with a screwdriver. Figure A About Bluetooth® Precautions Caution for AC Mains Lead Panasonic bears no responsibility for data and/or information that is compromised during a wireless transmission. ∫ Frequency band used This system uses the 2.4 GHz frequency band. ∫ Certification of this device ≥ This system conforms to frequency restrictions and has received certification based on frequency laws. Thus, a wireless permit is not necessary. ≥ The action below are punishable by law in some countries: j Taking apart or modifying the unit. j Removing specification indications. ∫ Restrictions of use ≥ Wireless transmission and/or usage with all Bluetooth® equipped devices is not guaranteed. ≥ All devices must conform to standards set by Bluetooth SIG, Inc. ≥ Depending on the specifications and settings of a device, it can fail to connect or some operations can be different. ≥ This system supports Bluetooth® security features. But depending on the operating environment and/or settings, this security is possibly not sufficient. Transmit data wirelessly to this system with caution. ≥ This system cannot transmit data to a Bluetooth® device. ∫ Range of use Use this device at a maximum range of 10 m. The range can decrease depending on the environment, obstacles or interference. ∫ Interference from other devices Figure B Fuse cover ≥ This system may not function properly and troubles such as noise and sound jumps may arise due to radio wave interference if the main unit is located too close to other Bluetooth® devices or the devices that use the 2.4 GHz band. ≥ This system may not function properly if radio waves from a nearby broadcasting station, etc. are too strong. ∫ Intended usage 2. Replace the fuse and close or attach the fuse cover. Figure A Figure B Fuse (5 ampere) Fuse (5 ampere) ≥ This system is for normal, general use only. ≥ Do not use this system near equipment or in an environment that is sensitive to radio frequency interference (example: airports, hospitals, laboratories, etc). VQT5J46 3 SC-HTB18_EB_VQT5J46.book 4 ページ 2014年3月19日 水曜日 午前9時47分 Table of contents Safety precautions............................................................................................. 2 Caution for AC Mains Lead............................................................................... 3 About Bluetooth® ............................................................................................... 3 Before use Supplied items ................................................................................................... 5 This system (SC-HTB18)............................................................................................................ 5 Accessory ................................................................................................................................... 5 Control reference guide .................................................................................... 6 This system (Front)..................................................................................................................... 6 This system (Rear) ..................................................................................................................... 7 Remote control ........................................................................................................................... 8 Getting started Step 1 Connections ........................................................................................... 9 Connection with the TV .............................................................................................................. 9 Connection with other devices.................................................................................................... 9 Speaker cable connection ........................................................................................................ 10 AC mains lead connection........................................................................................................ 10 Bluetooth® connection .............................................................................................................. 11 Step 2 Placement ............................................................................................. 12 Safety Precautions ................................................................................................................... The subwoofer.......................................................................................................................... Wireless interference................................................................................................................ Selecting the placement method .............................................................................................. When placing the main unit on a rack or on a table ................................................................. When attaching the main unit to a wall..................................................................................... 12 12 12 13 14 15 Operations Using this system ............................................................................................ 17 Advanced operations ...................................................................................... 18 Reference Troubleshooting .............................................................................................. Unit care ........................................................................................................... Licenses ........................................................................................................... Indicator illumination ...................................................................................... Specifications .................................................................................................. 4 VQT5J46 20 21 21 22 23 SC-HTB18_EB_VQT5J46.book 5 ページ 2014年3月19日 水曜日 午前9時47分 Before use ≥ The illustrations shown may differ from your unit. ≥ Operations in this operating instructions are described mainly with the remote control, but you can perform the operations on the main unit if the controls are the same. Supplied items ∏ 1 Subwoofer (SB-HTB18) Before use ∏ 1 Main unit (Speaker) (SU-HTB18) Precautions This system (SC-HTB18) Accessory Check the supplied accessory before using this system. Getting started ∏ 1 Remote control (with a battery) (N2QAYC000103) Reference Operations ≥ Product numbers are correct as of March 2014. These may be subject to change. VQT5J46 5 SC-HTB18_EB_VQT5J46.book 6 ページ 2014年3月19日 水曜日 午前9時47分 Control reference guide This system (Front) 1 2 3 ヷヰロ リワヱヶヵ 4 ヵヷ 5 6 ャュバュヷュ ヤロユモンチヷヰリヤユ ヴヶンンヰヶワュ ⾼ヱモリンリワヨ 7 Main unit 1 Standby/on switch (Í/I) Subwoofer 5 Press to switch the unit from on to standby mode or vice versa. In standby mode, the unit is still consuming a small amount of power. 2 3 Adjust the volume of this system (> 17) Select the input source (> 17) “TV” --# “BD/DVD” --# “ ”(Bluetooth®) ^--------------------------------------------------------} Select the Bluetooth® device as the source (> 17) 4 Input selector indicators§ A TV indicator Lights green when the TV is the audio source B BD/DVD indicator Lights amber when the device connected to the BD/DVD terminal is the audio source C Bluetooth® indicator Lights amber when the Bluetooth® device is the audio source 6 Sound mode indicators§ D CLEAR VOICE indicator Lights amber when clear voice is the current sound mode E SURROUND indicator Lights amber when surround is the current sound mode 7 Remote control signal sensor (> 8) § The indicators will also blink in various conditions. (> 22) 6 VQT5J46 SC-HTB18_EB_VQT5J46.book 7 ページ 2014年3月19日 水曜日 午前9時47分 This system (Rear) 9 8 10 11 12 13 Before use Main unit 14 Subwoofer 8 9 10 11 AC mains lead (> 10) Wall mounting hole OPTICAL DIGITAL AUDIO IN terminal (> 9) AUDIO IN terminal (> 9) 12 MULTI ANGLE switch (> 14, 15) Switch the audio quality according to the placement method of the main unit. 13 Subwoofer terminal 14 Speaker cable § For service use only VQT5J46 7 SC-HTB18_EB_VQT5J46.book 8 ページ 2014年3月19日 水曜日 午前9時47分 Remote control ∫ Before using for the first time Remove the insulation sheet A. 1 6 2 SURROUND 3 CLEAR VOICE 7 8 4 5 1 2 3 4 5 6 TV BD/DVD 9 Turn the main unit on or off (> 17) Turn the surround effect on or off (> 17) Turn the clear voice effect on or off (> 17) Select the TV as the source (> 17) Select the BD/DVD as the source (> 17) Adjust the output level of the subwoofer (bass sound) (> 17) Adjust the volume of this system (> 17) Mute the sound (> 17) Select the Bluetooth® device as the source (> 17) 7 8 9 ∫ To replace a button-type battery Battery type: CR2025 (Lithium battery) ≥ Set the button-type battery with its (i) mark facing upward. ∫ About remote control signal sensor The remote control signal sensor is located on the main unit. ≥Use the remote control within the correct operation range. Distance: Within approx. 7 m directly in front Angle: Approx. 30o left and right B Remote control signal sensor 8 VQT5J46 SC-HTB18_EB_VQT5J46.book 9 ページ 2014年3月19日 水曜日 午前9時47分 Step 1 Connections Getting started ≥Turn off all equipment before connection and read the appropriate operating instructions. Do not connect the AC mains lead until all other connections are completed. Connection with the TV A TV TV OPTICAL DIGITAL AUDIO IN OPTICAL OUT Before use A Optical digital audio cable ≥ When you use the optical digital audio cable, insert the tip correctly into the terminal. ≥ Do not bend the optical digital audio cable. ≥ The optical input supports PCM only. Getting started Connection with other devices AUDIO OUT R L BD/DVD AUDIO IN e.g., Blu-ray Disc player WHITE: L RED: R B B Audio cable VQT5J46 9 SC-HTB18_EB_VQT5J46.book 10 ページ 2014年3月19日 水曜日 午前9時47分 Speaker cable connection Match the connector shape and connect to the terminal. A SUBWOOFER A speaker cable AC mains lead connection ≥ Connect only after all other connections are completed. C B To a household mains socket C AC mains lead B ≥This system consumes a small amount of AC power (> 23) even when it is turned off. In the interest of power conservation, if you will not be using this system for a long time, unplug it from the household mains socket. Saving energy The main unit is designed to conserve its power consumption and save energy. ≥ The main unit will automatically switch to standby mode when no signal is input and no operation is performed for approx. 2 hours. Refer to page 18, “Auto Power Down” to turn this function off. 10 VQT5J46 SC-HTB18_EB_VQT5J46.book 11 ページ 2014年3月19日 水曜日 午前9時47分 Bluetooth® connection By using the Bluetooth® connection, you can listen to the sound from the Bluetooth® audio device from this system wirelessly. ≥ Refer to the operating instructions of the Bluetooth® device for further instruction on how to connect a Bluetooth® device. Preparation ≥Turn on the Bluetooth® feature of the device and place the device near the main unit. Bluetooth® pairing Press [ ] to select “ ”. ≥ If the “ ” indicator flashes quickly, go to step 3. Press and hold [ ] until the “ ” indicator flashes quickly. ≥ If the “ ” indicator flashes slowly, repeat step 2. Select “SC-HTB18” from the Bluetooth® device’s Bluetooth® menu. ≥ If prompted for the passkey on the Bluetooth® device, enter “0000”. ≥ Once the Bluetooth® device is connected, the “ ” indicator stops flashing and lights up. Getting started ≥ You can register 8 or more Bluetooth® devices to this unit. However, when this unit is turned off, it can store only up to 8 registered devices. If you register 9 or more devices, devices with the oldest connection history will be deleted. Connecting a paired Bluetooth® device Press [ ] to select “ ”. ≥ If the “ ” indicator lights, a Bluetooth® device is already connected with this system. Disconnect it. (> below) Select “SC-HTB18” from the Bluetooth® device’s Bluetooth® menu. ∫ Disconnecting a Bluetooth® device Press and hold [ ] until the “ ” indicator flashes slowly. ≥ When “ ” is selected as the source, this system will automatically try and connect to the last connected Bluetooth® device. If the connection attempt fails, try to establish a connection again. ≥ The Bluetooth® device will be disconnected if a different audio source (e.g. “TV”) is selected. ≥ This system can only be connected to one device at a time. VQT5J46 11 SC-HTB18_EB_VQT5J46.book 12 ページ 2014年3月19日 水曜日 午前9時47分 Step 2 Placement Safety Precautions Professional installation is required. The installation should never be done by any other than a qualified installation specialist. PANASONIC DISCLAIMS ANY PROPERTY DAMAGE AND/OR SERIOUS INJURY, INCLUDING DEATH RESULTING FROM IMPROPER INSTALLATION OR INCORRECT HANDLING. ≥ Be sure to install the main unit as indicated within this operating Instructions. ≥ Attach using techniques suited to the structure and materials of the installation location. Caution ≥ This system is to be used only as indicated in these instructions. Failure to do so may lead to damage to the amplifier and/or the speaker, and may result in the risk of fire. Consult a qualified service person if damage has occurred or if you experience a sudden change in performance. ≥ Do not attempt to attach the main unit to a wall using methods other than those described in this manual. ≥ Do not hold the main unit in one hand to avoid injury, you may drop the main unit when carrying it. ≥ To prevent damage or scratches, lay down a soft cloth and perform the assembly on it. The subwoofer When carrying the subwoofer A Do not hold the subwoofer from this opening. The parts inside may get damaged. B Always hold the bottom of the subwoofer when moving it. A B Wireless interference To avoid interference, maintain the following distances between the main unit/subwoofer and other electronic devices that use the same radio frequency (2.4 GHz band). C Main unit/subwoofer D Wireless router, cordless phone and other electronic devices: approx. 2 m C D 12 VQT5J46 SC-HTB18_EB_VQT5J46.book 13 ページ 2014年3月19日 水曜日 午前9時47分 Selecting the placement method Choose a placement method that suits you best. ≥ Place the main unit on a flat and horizontal surface. ≥ Place the main unit in front of the TV pedestal. Precautions When placing the main unit on a rack or on a table Page 14 When attaching the main unit to a wall ≥ Place the main unit on a flat and vertical surface. ∫ When placing the main unit in front of the TV The main unit may block or interfere with the TV’s various sensors (C.A.T.S. (Contrast Automatic Tracking System) sensor, remote control sensor, etc.) and the 3D Eyewear transmitters on a 3D compatible TV. ≥If interference occurs, move the main unit further away from the TV. If the TV still does not function correctly, try using it in a rack or in the wall mount position. ∫ If the TV’s remote control sensor is blocked by the main unit Try using the TV’s remote control from a different angle. ≥ Place the subwoofer within a few meters of the main unit and in a horizontal position with the top panel facing upward. ≥ Do not use the main unit or the subwoofer in a metal cabinet. ≥ Placing the subwoofer too close to the walls and corners can result in excessive bass. Cover walls and windows with thick curtains. ≥ If irregular colouring occurs on your TV, turn the TV off for about 30 minutes. If it persists, move the main unit and subwoofer further away from the TV. ≥ Keep magnetised items away. Magnetised cards, watches, etc., can be damaged if placed too close to the main unit and subwoofer. ≥ Keep the main unit approximately 150 mm away from the TV. VQT5J46 13 Getting started Page 15 SC-HTB18_EB_VQT5J46.book 14 ページ 2014年3月19日 水曜日 午前9時47分 When placing the main unit on a rack or on a table Additionally required accessories (commercially available) ≥Fall prevention cord ..................................................................................................................... k 1 ≥Screw eye (to attach the fall prevention cord)............................................................................... k 1 ≥ Use commercially available screws that are capable of supporting over 33 kg. ≥ Use a cord that is capable of supporting over 10 kg (with a diameter of about 2 mm). Slide the MULTI ANGLE switch to “RACK/TABLE TOP”. ≥Press the AC mains lead into the holder. Attach the cord to the main unit. A Cord§ § If the cord cannot be threaded through the holes, try bending the cord in 2 locations, about 5 mm apart from the tip, at an angle of 45o (as illustrated above). Place the main unit in the desired position and attach the cord onto the rack or table. ≥ ≥ ≥ ≥ Make sure that the slack of the cord is minimal. Do not lean the main unit against the TV or wall. Do not place the main unit over the AC mains lead. Ensure that the main unit is stable. B Screw eye ≥Attach at a position capable of supporting over 10 kg. ≥Depending on the placement of the main unit, the screwing position of the screw eye may differ. 14 VQT5J46 SC-HTB18_EB_VQT5J46.book 15 ページ 2014年3月19日 水曜日 午前9時47分 When attaching the main unit to a wall Additionally required accessories (commercially available) ≥Screws for wall mounting ............................................................................................................. k 2 ≥Fall prevention cord ...................................................................................................................... k 1 ≥Screw eye (to attach the fall prevention cord) .............................................................................. k 1 Precautions Make sure that the screw used and the wall are strong enough to support the weight of at least 33 kg. The screws and other items are not supplied as the type and size will vary with each installation. ≥Refer to step 3 for details about the required screws. ≥Be sure to attach the fall prevention cord as a secondary safety measure. ≥ Use a cord that is capable of supporting over 10 kg (with a diameter of about 2 mm). Slide the MULTI ANGLE switch to “WALL MOUNT”. Attach the cord to the main unit. Getting started A Cord§ § If the cord cannot be threaded through the holes, try bending the cord in 2 locations, about 5 mm apart from the tip, at an angle of 45o (as illustrated above). VQT5J46 15 SC-HTB18_EB_VQT5J46.book 16 ページ 2014年3月19日 水曜日 午前9時47分 Drive a screw into the wall. ≥ Use the measurements indicated below to identify the screwing positions on the wall. ≥ Leave at least 20 mm of space above of the main unit to allow enough space for fitting the main unit. ≥ Leave at least 10 mm of space on both sides of the main unit. Without sufficient space, it is not possible to mount the main unit successfully. ≥ Be sure to use a level to insure that both mounting holes are level to each other. B C D E F At least 30 mm ‰4.0 mm ‰7.5 mm to ‰9.4 mm Wall or pillar 7.5 mm to 8.5 mm Front view (semi-transparent image) G 320 mm J 15 mm H 215 mm K 115 mm I 215 mm L Wall mounting hole Fit the main unit securely onto the screw(s). DO DO NOT ≥ Move the speaker so that the screw is in this position. Secure the cord to the wall. ≥ Make sure that the slack of the cord is minimal. M Screw eye N Cord 16 VQT5J46 ≥ In this position, the speaker will likely fall if moved to the left or right. SC-HTB18_EB_VQT5J46.book 17 ページ 2014年3月19日 水曜日 午前9時47分 Using this system Operations Preparation ≥ Turn on the TV and/or connected device. ∫ To adjust the volume of this system Press [i VOL j]. ∫ To adjust the subwoofer level SURROUND 1 CLEAR VOICE 2 BD/DVD ---- PAIRING Indication ャュバュヷュ ヤロユモンチヷヰリヤユ ヴヶンンヰヶワュ 4 ャュバュヷュ ヤロユモンチヷヰリヤユ ヴヶンンヰヶワュ 3 ャュバュヷュ ヤロユモンチヷヰリヤユ ヴヶンンヰヶワュ 2 ャュバュヷュ ヤロユモンチヷヰリヤユ ヴヶンンヰヶワュ 1 Press [Í] to turn on the main unit. Select the source. Press [TV] [BD/DVD] To select “TV” “BD/DVD” [ “ ] Effect level Highest ” (Bluetooth ) ® ≥ This remote control cannot be used to control the operations of the connected devices. Lowest Getting started TV Press [i SUBWOOFER] or [SUBWOOFER j] to display the current level. While the level is displayed: Press [i SUBWOOFER] or [SUBWOOFER j] to adjust the level. Precautions ≥ Volume range: 0 to 100§ ∫ When “ ” is selected as the source ∫ When “BD/DVD” is selected as the source On the TV and the connected device: Select the TV’s input for this system and start the playback on the connected device. ∫ To set the surround mode You can enable/disable the surround effect. Press [SURROUND]. ≥ To cancel, press the button again. ∫ To set the clear voice mode With the clear voice mode you can hear dialogs clearer. Press [CLEAR VOICE]. ≥ To cancel, press the button again. Operations On the Bluetooth® device: Select this system as the output source of the connected Bluetooth® device and start the playback. ∫ To mute the sound Press [MUTE]. ≥ While muting, all the indicators blink simultaneously. ≥ To cancel, press the button again or adjust the volume. ≥ Muting is cancelled if the main unit is turned off. If this system does not operate as expected or sound is unusual, returning the settings to the factory preset may solve the problem. (> 20) § BD/DVD indicator, Bluetooth® indicator and sound mode indicators blink from left to right (i) or from right to left (s) while adjusting. The indicators will not blink when it has reached the maximum or minimum. ≥ If there is sound coming out of the TV’s speakers, reduce the volume of the TV to its minimum. ≥ If the main unit is turned off with the volume setting in the greater half (above 50), the main unit will automatically lower the volume to the middle (50) when the main unit is turned on (Volume limitation). To turn this function off, refer to page 19. VQT5J46 17 SC-HTB18_EB_VQT5J46.book 18 ページ 2014年3月19日 水曜日 午前9時47分 Advanced operations Audio format indicator Bluetooth® Stand-by To display the current audio format. Press and hold [SURROUND] for more than 4 sec. This function allows you to connect a paired Bluetooth® device when the main unit is in standby mode. While pressing and holding [SURROUND] on the remote control, press and hold [ ] on the main unit for more than 4 sec to display the current mode. ≥ The current audio format is indicated for 5 sec. ヤロユモンチヷヰリヤユ ヴヶンンヰヶワュ “CLEAR VOICE” indicator blinks: Dolby® Digital is the audio format. “SURROUND” indicator blinks: DTS® is the audio format. ャュバュヷュ ヤロユモンチヷヰリヤユ Audio format is not indicated when “BD/DVD” or “ selected as the source. ” is While pressing and holding [CLEAR VOICE] on the remote control, press and hold [INPUT] on the main unit for more than 4 sec to display the current setting. ャュバュヷュ ヤロユモンチヷヰリヤユ “BD/DVD” indicator blinks: Auto Power Down is on. “CLEAR VOICE” indicator blinks: Auto Power Down is off. While the setting is displayed, press [CLEAR VOICE] to select the setting. ≥ The setting changes each time [CLEAR VOICE] is pressed. ≥ The indicator for the selected setting blinks for 20 sec and then exits the setting mode. ≥ The setting is maintained until it is changed again. ≥ Default setting of this function is on. 18 VQT5J46 “CLEAR VOICE” indicator blinks: Bluetooth® Stand-by is off. While the mode is displayed, press [SURROUND] to select the mode. Auto Power Down The main unit is automatically turned off if there is no audio input and when you do not use it for approx. 2 hours. “BD/DVD” indicator blinks: Bluetooth® Stand-by is on. ≥ The setting changes each time [SURROUND] is pressed. ≥ The indicator for the selected setting blinks for 20 sec and then exits the setting mode. ≥ The setting is maintained until it is changed again. ≥ Default setting of this function is off. Dimmer mode You can turn off dimmer mode and keep the LED indicators bright. While pressing and holding [BD/DVD] on the remote control, press and hold [s VOL] on the main unit for more than 4 sec to turn off Dimmer mode. ≥ The indicator for the current condition will turn brighter. ≥ The setting is maintained until it is changed again. ≥ Default setting of this function is on. To turn on dimmer mode, repeat the operation above. After performing the operation, the indicator for the current condition will be dim. SC-HTB18_EB_VQT5J46.book 19 ページ 2014年3月19日 水曜日 午前9時47分 Others ∫ Remote control code When other Panasonic devices respond to this system’s remote control, change the remote control code on this system and the remote control. Preparation ≥ Turn off all other Panasonic products. ≥ Turn on the main unit. Change the remote control code to code 2: 1 Aim the remote control at the main unit’s remote control sensor. 2 Press and hold [MUTE] and [ ] on the remote control for more than 4 sec. ≥ All the indicators will blink for 10 sec when the code of this system is changed. ヵヷ ャュバュヷュ ヤロユモンチヷヰリヤユ ヴヶンンヰヶワュ ≥ The setting is maintained until it is changed again. ≥ If the main unit does not operate after changing the code, repeat steps 1 and 2. ≥ To change the remote control code to code 1, repeat the steps above, but replace [ ] with [TV]. ∫ To turn off the volume limitation If a state of the lowered volume disturbs you every time the main unit turns on, for example, it is possible to turn off this function as follows: While pressing and holding [MUTE] on the remote control, press and hold [VOL i] on the main unit for more than 4 sec. ≥ All the indicators will blink once when the volume limitation is turned off. ャュバュヷュ ヤロユモンチヷヰリヤユ ヴヶンンヰヶワュ Operations ヵヷ To reset the setting, return to the factory preset. (> 20) VQT5J46 19 SC-HTB18_EB_VQT5J46.book 20 ページ 2014年3月19日 水曜日 午前9時47分 Troubleshooting Reference Before requesting service, make the following checks. If you are in doubt about some of the check points, or if the solutions indicated in the following guide do not solve the problem, consult your dealer for instructions. To return to the factory defaults. While the main unit is on, press and hold [Í/I] on the main unit for more than 4 sec. (All the indicators will blink twice when this system is reset.) If this system does not operate as expected, returning the settings to the factory defaults may solve the problem. ≥ The remote control code will return to “1” when this system is returned to the factory preset. To change the remote control code, refer to page 19. General operation No power. ≥ Insert the AC mains lead securely. (> 10) ≥ If the indicators blink and the main unit turns off immediately after you have turned it on, unplug the AC mains lead and consult your dealer. The remote control does not work properly. ≥ The battery is depleted. Replace it with a new one. (> 8) ≥ It is possible that the insulation sheet has not been removed. Remove the insulation sheet. (> 8) ≥ It may be necessary to set the code of the remote control again after changing the battery of the remote control. (> 19) ≥ Use the remote control within the correct operation range. (> 8) The “TV” indicator blinks. Unplug the AC mains lead and consult your dealer. If other indicators are also blinking, be sure to inform your dealer of these indicators. The main unit is automatically switched to standby mode. “Auto Power Down” function is on. The main unit will automatically switch to standby mode when no signal is input and no operation is performed for approx. 2 hours. Refer to page 18 to turn this function off. Bluetooth® Pairing cannot be done. Check the Bluetooth® device condition. The device cannot be connected. ≥ The pairing of the device was unsuccessful or the registration has been replaced. Try pairing the device again. (> 11) ≥ This system might be connected to a different device. Disconnect the other device and try pairing the device again. The device is connected but audio cannot be heard through this system. For some built-in Bluetooth® devices, you have to set the audio output to “SC-HTB18” manually. Read the operating instructions for the device for details. The sound is interrupted. ≥ The device is out of the 10 m communication range. Bring the Bluetooth® device closer to the main unit. ≥ Remove any obstacle between the main unit and the device. ≥ Other devices that use the 2.4 GHz frequency band (wireless router, microwaves, cordless phones, etc.) are interfering. Bring the Bluetooth® device closer to the main unit and distance it from the other devices. Sound No sound. ≥ Turn muting off. (> 17) ≥ Check the connections to the other device. (> 9) ≥ Make sure that the received audio signal is compatible with this system. (> 23) ≥ Turn this system off and then on again. ≥ If the connections are correct, there might be a problem with the cables. Redo the connections with different cables. ≥ Check the audio output settings on the connected device. The volume is lowered when the main unit is turned on. If the main unit is turned off with the volume setting in the greater half (above 50), the main unit will automatically lower the volume to the middle (50) when the main unit is turned on. (> 19) The dialog is too persistent or the dialog does not sound natural. This system has a function to make the dialog stand out when the volume is low. (> 17) 20 VQT5J46 SC-HTB18_EB_VQT5J46.book 21 ページ 2014年3月19日 水曜日 午前9時47分 (When the main unit detects a problem, a safety measure is activated and the main unit automatically switches to standby mode.) ≥ There is a problem with the amplifier. ≥ Is the volume extremely high? If so, lower the volume. ≥ Is this system placed in an extremely hot place? If so, move this system to a cooler place and wait a few moments and then try to turn it on again. If the problem persists, check if the TV indicator and the BD/DVD indicator are blinking first. After checking the indicators, turn off this system, unplug the AC mains lead, and consult your dealer. Make sure to remember which indicators were blinking and inform the dealer of them. Unit care ∫ Clean this system with a soft, dry cloth ≥ When dirt is heavy, wring a cloth moistened in water tightly to wipe the dirt, and then wipe it with a dry cloth. ≥ Never use alcohol, paint thinner or benzine to clean this system. ≥ Before using chemically-treated cloth, carefully read the instructions that came with the cloth. ∫ To dispose or transfer this system This system may keep the user settings information in the main unit. If you discard the main unit either by disposal or transfer, then follow the procedure to return all the settings to the factory presets to delete the user settings. (> 20, “To return to the factory defaults.”) ≥ The operation history may be recorded in the memory of the main unit. Licenses Manufactured under license from Dolby Laboratories. Dolby and the double-D symbol are trademarks of Dolby Laboratories. For DTS patents, see http://patents.dts.com. Manufactured under license from DTS Licensing Limited. DTS, the Symbol, & DTS and the Symbol together are registered trademarks, and DTS Digital Surround is a trademark of DTS, Inc. © DTS, Inc. All Rights Reserved. The Bluetooth® word mark and logos are owned by the Bluetooth SIG, Inc. and any use of such marks by Panasonic Corporation is under license. Other trademarks and trade names are those of their respective owners. Declaration of Conformity (DoC) Hereby, “Panasonic Corporation” declares that this product is in compliance with the essential requirements and other relevant provisions of Directive 1999/5/EC. Customers can download a copy of the original DoC to our R&TTE products from our DoC server: http://www.doc.panasonic.de Contact to Authorised Representative: Panasonic Marketing Europe GmbH, Panasonic Testing Centre, Winsbergring 15, 22525 Hamburg, Germany This product is intended for general consumer. (Category 3) VQT5J46 21 Reference There is no audio. The power of the main unit turns off automatically. SC-HTB18_EB_VQT5J46.book 22 ページ 2014年3月19日 水曜日 午前9時47分 Indicator illumination The indicators display the condition of this system by flashing. The indicator patterns illustrated below are displayed during normal operational conditions. They do not refer to the indications of a problem. Indicator Description ヵヷ ャュバュヷュ ヤロユモンチヷヰリヤユ ヴヶンンヰヶワュ ヵヷ ャュバュヷュ ヤロユモンチヷヰリヤユ ヴヶンンヰヶワュ ヵヷ ャュバュヷュ ヤロユモンチヷヰリヤユ ヴヶンンヰヶワュ ヵヷ ャュバュヷュ ヤロユモンチヷヰリヤユ ヴヶンンヰヶワュ ヵヷ ャュバュヷュ ヤロユモンチヷヰリヤユ ヴヶンンヰヶワュ The indicator blinks for 20 sec. ≥ When the setting is on ( “Auto Power Down” and “Bluetooth® Stand-by”) (> 18) The indicator blinks for 20 sec. ≥ When the setting is off ( “Auto Power Down” and “Bluetooth® Stand-by”) (> 18) The indicators blink for 5 sec. ≥ When the audio format is Dolby Digital (> 18) The indicator blinks for 5 sec. ≥ When the audio format is DTS® (> 18) The indicators blink for 10 sec. ≥ When the remote control code is changed (> 19) The indicators blink once. ≥ When changing the setting ( “To turn off the volume limitation”) (> 19) The indicators blink twice. ≥ When the main unit is reset (> 20) Bluetooth® indicator blinks quickly. ≥ When the main unit is ready for pairing (> 11) Bluetooth® indicator blinks slowly. ≥ When the main unit is waiting to connect (> 11) Bluetooth® indicator turns on. ≥ When the main unit is connected with a Bluetooth® device (> 11) Disposal of Old Equipment and Batteries Only for European Union and countries with recycling systems These symbols on the products, packaging, and/or accompanying documents mean that used electrical and electronic products and batteries must not be mixed with general household waste. For proper treatment, recovery and recycling of old products and used batteries, please take them to applicable collection points in accordance with your national legislation. By disposing of them correctly, you will help to save valuable resources and prevent any potential negative effects on human health and the environment. For more information about collection and recycling, please contact your local municipality. Penalties may be applicable for incorrect disposal of this waste, in accordance with national legislation. Note for the battery symbol (bottom symbol): This symbol might be used in combination with a chemical symbol. In this case it complies with the requirement set by the Directive for the chemical involved. 22 VQT5J46 SC-HTB18_EB_VQT5J46.book 23 ページ 2014年3月19日 水曜日 午前9時47分 Specifications AMPLIFIER SECTION Bluetooth® SECTION RMS Output power : Dolby Digital Mode Front ch (non-simultaneous drive) 30 W per channel (1 kHz, 10 % THD, 4 ≠) Subwoofer ch 60 W (100 Hz, 10 % THD, 8 ≠) Total RMS Dolby Digital mode Power 120 W TERMINALS SECTION Digital Audio Input (TV) Optical digital input Optical terminal Sampling Frequency 32 kHz, 44.1 kHz, 48 kHz, 88.2 kHz, 96 kHz Audio Format LPCM, Dolby Digital, DTS Digital SurroundTM Analog audio input (BD/DVD) Audio input Pin jack Speaker output Subwoofer 1 SPEAKER SECTION Bluetooth® system specification Bluetooth® Version 3.0 Wireless equipment classification Class 2 (2.5 mW) Supported profiles A2DP (with SCMS-T) Supported codec SBC Frequency band 2.4 GHz band FH-SS Operating distance approx. 10 m Line of sight GENERAL Power consumption 35 W Power consumption in standby mode Approx. 0.5 W Power supply AC 220 V to 240 V, 50 Hz Main unit For table top layout Dimensions (WkHkD) 750 k65.5 k118 mm FRONT SPEAKER (L/R) Type For wall mounting layout Dimensions (WkHkD) 1 way, 1 speaker system Unit(s) 750 k115 k65 mm Mass 8 cm k2 (Cone type) Impedance 4≠ Approx. 2.3 kg Subwoofer Dimensions (WkHkD) 156 k290 k263 mm SUBWOOFER Type Mass Unit 16 cm (Cone type) Impedance 8≠ Approx. 3.0 kg Operating temperature range 0 oC to r40 oC Operating humidity range 20 % to 80 % RH (no condensation) ≥ Specifications are subject to change without notice. ≥ Mass and dimensions are approximate. ≥ Total harmonic distortion is measured by a digital spectrum analyzer. VQT5J46 23 Reference 1 way, 1 speaker system (Bass-ref) SC-HTB18_EB_VQT5J46.book 24 ページ 2014年3月19日 水曜日 午前9時47分 Sales and Support Information Customer Communications Centre ≥ For customers within the UK: 0844 844 3899 ≥ For customers within Ireland: 01 289 8333 ≥ Monday–Friday 9:00 am – 5:00 pm (Excluding public holidays). ≥ For further support on your product, please visit our website: www.panasonic.co.uk Direct Sales at Panasonic UK ≥ Order accessory and consumable items for your product with ease and confidence by phoning our Customer Communications Centre Monday–Friday 9:00 am – 5:00 pm (Excluding public holidays). ≥ Or go on line through our Internet Accessory ordering application at www.pas-europe.com. ≥ Most major credit and debit cards accepted. ≥ All enquiries transactions and distribution facilities are provided directly by Panasonic UK. ≥ It couldn’t be simpler! ≥ Also available through our Internet is direct shopping for a wide range of finished products. Take a browse on our website for further details. Manufactured by: Importer for Europe: Panasonic Corporation Kadoma, Osaka, Japan Panasonic Marketing Europe GmbH Panasonic Testing Centre Winsbergring 15, 22525 Hamburg, Germany Panasonic Corporation Web Site: http://panasonic.net C Panasonic Corporation 2014 EU p VQT5J46 F0314KE0