1
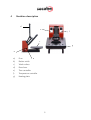
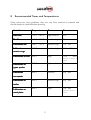
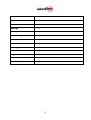
OPERATING INSTRUCTIONS
for heat presses
Secabo TC 2, TC 5 and TC 7
Congratulations on purchasing a Secabo heat press!
Please read these operating instructions carefully so you can start production with
your press without problems.
Reproduction of these operating instructions in any form requires the written
approval of Secabo GmbH. We reserve all rights to change technical data and
product features.
Secabo GmbH does not assume any liability for direct or indirect damage resulting
from use of this product.
Version 1.3 (22.02.2011)
Table of contents
1
Brief overview ................................................................
.........................................................................................
......................................................... II
2
Safety Precautions ................................................................
...................................................................................
................................................... 3
3
Scope of Delivery ................................................................
....................................................................................
.................................................... 4
4
Machine description ................................................................
................................................................................
................................................ 5
5
Controllers ................................................................
.............................................................................................
............................................................. 6
6
Operation ................................................................
..............................................................................................
.............................................................. 7
7
Maintenance and cleaning ................................................................
.......................................................................
....................................... 8
8
Recommended Times and Temperatures................................
Temperatures ....................................................
.................................................... 9
9
Technical data ................................................................
......................................................................................
...................................................... 11
1
Brief overview
Secabo Secabo TC 2, TC 5 and TC 7 heat presses
presses
Secabo Secabo TC 2, TC 5 and TC 7 heat presses enable you to carry out all
common forms of heat transfers (flock foil, flex, sublimation, transfer, InkJet flex,
chromablast, etc.) in a professional manner. The desired settings are easy to
programme using the digital controllers for temperature and time. The pressure is
regulated using a simple handwheel. When open, the presses offer a generous
working space, allowing transfer items to be aligned quickly and accurately.
Secabo Secabo TC 2, TC 5 and TC 7 clam heat presses
presses – a brief overview
• Professional heat presses for small to medium applications.
• Fast and simple selection of time and temperature, comparison of
theoretical and actual values with digital display.
• Pressure can be varied using the height-adjustable heating plate.
• CE certificate, RoHS certificate, tested according to European safety
standards.
2
2
Safety Precautions
Please read these instructions and safety precautions carefully before using your
press for the first time!
• Never reach into the heat press with your hands when it is connected to the
power supply, particularly when it is switched on and heated up – danger of
severe burns!
• Never open the housing or attempt to modify the machine yourself.
• In case you are requested by the Secabo customer support to open the
heating plate cover, please make sure you are wearing respiratory protection
and only touch the contained insulation wool with gloves. Any disposal of the
wool must be contained in a closed bag.
• Ensure that liquids and metal objects do not get into the inside of the heat
press.
• Ensure that the power socket used is grounded. Note that it is only
permissible to operate a heat press from a power socket protected by a
ground fault protection switch.
• Disconnect machine from power outlet when not in use!
• Never operate the heat press within the reach of children and never leave the
machine unsupervised when switched on.
• Ensure that the machine is used only in dry rooms.
If you cannot observe one or more of the safety precautions above, or if you are
not sure whether all points are satisfied, please contact our Technical Support
Department.
Department.
3
3
Scope of Delivery
Before starting work, please check whether the following items are all present:
Item
Quantity
Heat press
1
230 V connection
1
cable
Operating
instructions
1
4
4
Machine description
d
e
f
c
g
a
a)
Fuse
b)
Rocker switch
c)
Work surface
d)
Press lever
e)
Time controller
f)
Temperature controller
g)
Heating plate
b
5
5
Controllers
Display during transfer
Actual value
Display when set
temperature reached
Temperature unit
Flashing during heating
Theoretical value
Counter for completed
transfers
Reduce value
Set counter to zero
Increase value
“START”
Press button to start heating
“STOP”
Press button again to stop heating
6
6
Operation
• Remove the magnetic strip on the press lever.
• Connect the heat press to a 230 V power socket using the connection cable
supplied.
• Switch on the press with the red rocker switch.
• “STOP” is displayed on both controllers.
• Theoretical value “SV” and actual value “PV” are displayed. The theoretical
value can now be set on the individual controllers.
• Use “UP” or “DOWN” to set the desired temperature on the temperature
controller and to set the desired time on the time controller.
• Press the "START/STOP" button to start heating to the set temperature.
“STOP” and “OUT” is displayed alternately on the temperature controller
while the press is heating.
• Actual value PV rises to the set temperature.
• A signal is heard when the set temperature is reached. “STOP” and “HOLD”
are displayed on the controller; the press is ready for operation.
• You can now make the first transfers. The timer starts running as soon as the
press is closed with the press lever. “AT” is displayed on the time controller
during the pressing process.
• After expiration of the set time a warning signal sounds.
• You can adjust the contact pressure by turning the large hand screw on the
top of the press to increase or reduce the lever path. Turning it clockwise
reduces the contact pressure, while turning it anticlockwise increases the
pressure.
• The settings cannot be changed during pressing.
• Each time the pressing process is completed, the counter display increments
by one after the set time has expired.
• You can reset the counter by pressing “CLEAR”. “COT” is displayed on the
time controller. Press “CLEAR” for longer than 2 seconds. If you press it for
less than 2 seconds, the action will be cancelled.
• The “MODE” function button is only used for maintenance purposes and
does not affect press operation.
Note: Please note that a certain time is required before the press cools down after
it is switched off.
7
7
Maintenance and cleaning
Maintenance work should always be accomplished with the press switched off and
cooled down. The plug must first be disconnected from the power socket. Consult
Technical Support before carrying out any maintenance work.
Clean the press regularly with a soft cloth and mild household cleaner to remove
adhesive residues etc. Never use scouring sponges, solvents or gasoline!
8
8
Recommended Times and Temperatures
These values are only guidelines; they can vary from material to material and
should always be checked before pressing.
Material
Temperature
Pressure
Time
Flock film
170°C - 185°C
light-medium
25s
Flex film
160°C - 170°C
medium-high
25s
Sublimation flex
180°C - 195°C
medium-high
10s - 35s
Sublimation on
200°C
medium-high
150s - 180s
200°C
high
120s
ceramic mugs
Sublimation on tiles
-
480s
(depending on thickness of
material)
Sublimation on
200°C
light-medium
25s
200°C
medium
20s - 40s
200°C
medium-high
30s - 50s
200°C
high
10s - 50s
jigsaw puzzles
puzzles
Sublimation
mousepads
mousepads
Sublimation on
textiles
Sublimation on
on
(depending on thickness of
metal plates
plates
material)
9
Important note: You should carry out your own tests with the transfer material and
backing to be used before starting production. The values given above and the
manufacturer’s own figures are only intended as a guide. You should establish the
washability and behaviour during transfer in your own tests.
The recommended values do not imply a guarantee. The user is responsible for
determining and using the appropriate setting for his particular conditions.
Note for textile work: After pressing, allow textiles to cool down before removing
any type of backing from the transfer material. The hot glue in the transfer material
develops its adhesive force only in the cold state. If the adhesive does not stick in
the cold state, it may have been pressed too cold or for too short a time.
10
9
Technical data
Heat press
Secabo TC 2
Type
Clam heat press
Work surface size
28 cm x 38 cm
Clam angle
0° - 50°
Max. temperature
260°C
Max. time setting
setting
9999s
Max. contact pressure
250g/cm²
Pressure adjustment
Height of heating plate adjusted using handwheel
Power supply
230 V / 50 Hz – 60 Hz AC, 1.75 kW
Ambient conditions
+ 5°C - +35°C / 30% - 70% humidity
Weight
30 kg
Dimensions (W x H x D)
29 cm x 36 cm x 68 cm
Scope of Delivery
Heat press, power cable, operating instructions
11
Heat press
Secabo TC 5
Type
Clam heat press
Work surface size
38 cm x 38 cm
Clam angle
0° - 50°
Max. temperature
260°C
Max. time setting
9999s
Max. contact pressure
250g/cm²
Pressure adjustment
Height of heating plate adjusted using handwheel
Power supply
230 V / 50 Hz – 60 Hz AC, 2.20 kW
Ambient conditions
+ 5°C - +35°C / 30% - 70% humidity
Weight
34kg
Dimensions (W x H x D)
39 cm x 36 cm x 68 cm
Scope of Delivery
Heat press, power cable, operating instructions
12
Heat press
Secabo TC 7
Type
Clam heat press
Work surface size
41 cm x 51 cm
Clam angle
0° - 50°
Max. temperature
260°C
Max. time setting
9999s
Max. contact pressure
250g/cm²
Pressure
Pressure adjustment
Height of heating plate adjusted using handwheel
Power supply
230 V / 50 Hz – 60 Hz AC, 2.20 kW
Ambient conditions
+ 5°C - +35°C / 30% - 70% humidity
Weight
39kg
Dimensions (W x H x D)
42cm x 36cm x 72cm
Scope of Delivery
Heat press, power cable, operating instructions
13
Konformitätserklärung
Statement of Conformity
Hiermit erklären wir in alleiniger Verantwortung, dass das unter „9. Technische
Daten“ genannte Produkt mit den Bestimmungen der folgenden EG-Richtlinien und
Normen übereinstimmt:
We herewith declare under sole responsibility that the under „9. technical data“
mentioned product meet the provisions of the following EC Directives and
Harmonized Standards:
EG-Richtlinien / EC Directives:
2006/95/EG Niederspannungsrichtlinie
2006/95/EC Low Volatge Directive
98/37/EG Maschinenrichtlinie (2006/42/EG ab 29.12.2009)
98/37/EC Directive on machinery (from 2009-12-29: 2006/42/EC)
Norm / Standard:
EN 60204-1:2006
Technische Dokumente bei / Technical documents at:
Secabo GmbH, Hochstatt 6-8, 85283 Wolnzach, Germany
Dipl. Ing. Fabian Franke
Dipl. Ing.(FH) Bernhard Schmidt
Secabo GmbH, www.secabo.com, Hochstatt 6-8, 85283 Wolnzach, Germany
14