1
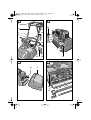
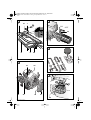
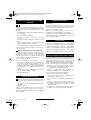
EURO • Printed in England • BA F 016 L69 830 • Balmoral • Titel • OSW 09/01
F016 L69 830 - Buch Seite 1 Freitag, 21. September 2001 2:04 14
BALMORAL
OPERATING INSTRUCTIONS
EURO • Printed in England • BA F016 L69 830 • Balmoral • U2 • OSW 09/01
F016 L69 830 - Buch Seite 2 Freitag, 21. September 2001 2:04 14
2 • F016 L69 830 • 09.01
EURO • Printed in England • BA F016 L69 832 • Balmoral • U3 • OSW 07/01
F016 L69 830 - Buch Seite 3 Freitag, 21. September 2001 2:04 14
9
STOP
8
7
1
2
3
6
5
4
3 • F016 L69 832 • 07.01
EURO • Printed in England • BA F016 L69 830 • Balmoral • U4 • OSW 09/01
F016 L69 830 - Buch Seite 4 Freitag, 21. September 2001 2:04 14
A
B
1
15
12
13
11
12
5
III
II
˚MAX
I
3
˚MIN
max.
min.
10
16
12 6 14
C
D
23
4
17
24
18
19
4 • F016 L69 830 • 09.01
25
24
EURO • Printed in England • BA F016 L69 830 • Balmoral • U5 • OSW 09/01
F016 L69 830 - Buch Seite 5 Freitag, 21. September 2001 2:04 14
E
F
1
21
7
ON
OFF
20
G
8
9
22
H
31
32
I
28
29
26
27
30
5 • F016 L69 830 • 09.01
EURO • Printed in England • BA F016 L69 830 • Balmoral • U4 • OSW 09/01
F016 L69 830 - Buch Seite 1 Freitag, 21. September 2001 2:04 14
Safety Notes
Warning! Read these instructions carefully, be familiar with
the controls and the proper use of the lawnmower.
Learn how to stop the lawnmower quickly in any emergency.
Explanation of symbols on the lawnmower
General hazard safety alert.
Read instruction manual.
Beware of thrown or flying objects to bystanders.
Keep bystanders a safe distance away from the
machine.
Remove spark plug lead before maintenance.
Sharp blade(s). Beware of severing toes or fingers.
Wait until all machine components have completely stopped before touching them. The blades
continue to rotate after the machine is switched
STOP off, a rotating blade can cause injury.
Never allow children or people unfamiliar with these instructions to use the lawnmower. Local regulations may restrict
the age of the operator.
Never mow while people, especially children or pets, are
nearby.
Never pick up or carry the lawnmower while the motor is running.
Keep in mind that the operator or user is responsible for accidents or hazards occurring to other people or their property.
Whilst mowing, always wear substantial footwear and long
trousers. Do no operate the equipment when barefoot or
wearing open sandals.
Thoroughly inspect the area where the lawnmower is to be
used and remove all objects that may be thrown by the machine.
WARNING – Petrol is highly flammable.
– Store fuel in containers specifically designed for this purpose.
– Refuel outdoors only and do not smoke while refuelling.
– Add fuel before starting the engine. Never remove the
cap of the fuel tank or add petrol whilst the engine is running or when the engine is hot.
– If petrol is spilled, do not attempt to start the engine but
move the machine away from the area of spillage and
avoid creating any source of ignition until petrol vapours
have dissipated.
– Replace the fuel tank and container caps securely.
– Replace faulty silencers.
– Do not operate the engine in a confined space where
dangerous carbon monoxide fumes can collect.
– Before using, always visually inspect to see that the
blades, blade bolts and cutter assembly are not worn or
damaged. On multi-bladed lawnmower, take care as
rotating one blade may cause other blades to rotate.
Mow only in daylight or in good artificial light.
Avoid operating the lawnmower in wet grass, where feasible.
Always be sure of your footing on slopes.
Walk, never run.
F016 L69 761 • TMS • 29.09.00
Mowing on banks can be dangerous:
– Mow across the face of slopes - never up and down.
– Be particularly careful of your footing on slopes or wet
grass.
Exercise extreme caution when changing direction on
slopes.
Do not mow excessively steep slopes.
– Use extreme caution when stepping back or pulling the
lawnmower towards you. Never cut grass by pulling the
mower towards you.
Stop the blades if the lawnmower has to be tilted for transportation when crossing surfaces other than grass and when
transporting the lawnmower to and from the area to be
mowed.
Do not tilt the lawnmower when starting or switching on the
motor, except if the lawnmower has to be tilted for starting
in long grass. In this case, do not tilt it more than absolutely
necessary and lift only the part which is away from the operator. Always ensure that both hands are in the operating
position before returning the mower to the ground.
Never operate the lawnmower with defective guards, or
without the grassbox in place.
Do not change the engine governor settings or overspeed
the engine. Operating an engine at excessive speed may
increase the hazard of personal injury.
Disengage all blade and clutches before starting the engine.
Start the engine or switch on the motor carefully according
to instructions and with feet well away from the blade(s). Do
not tilt the mower when starting.
Do not put hands or feet near, or under, rotating parts while
the lawnmower is being operated.
Stop the engine and disconnect the spark plug cap:
– before checking, cleaning or working on the lawnmower.
– after striking a foreign object. Inspect the lawnmower for
damage and make repairs before restarting and operating the lawnmower.
– if the lawnmower starts to vibrate abnormally (check immediately).
– before making height of cut adjustment.
Stop the engine:
– whenever you leave the machine
– before refuelling
– before clearing blockage
– before making height of cut adjustment
Reduce the throttle setting during engine shut-down.
Keep all nuts, bolts and screws tight to be sure that the lawnmower is in safe working condition.
Replace worn or damaged blades and bolts in sets to preserve balance.
Never store the lawnmower with petrol in the tank inside a
building where fumes may reach open flame or spark.
Allow the engine to cool before storing in any enclosure.
To reduce the fire hazard, keep the engine, silencer, battery
compartment and petrol storage area free of grass, leaves
or excessive grease.
Check the grassbox/bag frequently for wear or deterioration.
Replace worn or damaged parts for safety.
Go slow when using a trailing seat.
If the fuel tank has be drained, this should be done outdoors.
Be careful during adjustment of the lawnmower to prevent
entrapment of the feet and hands between moving blades
and fixed parts of the lawnmower.
Ensure replacement parts fitted are Atco-Qualcast approved.
English - 1
EURO • Printed in England • BA F016 L69 830 • Balmoral • U4 • OSW 09/01
F016 L69 830 - Buch Seite 2 Freitag, 21. September 2001 2:04 14
Product Specification
Cylinder Mower
Balmoral 14 S BALMORAL 14 SE BALMORAL 17 S Balmoral 17 SE BALMORAL 20 S BALMORAL 20 SE
Part number
Engine size (cc)
Fuel tank capacity (l)
Rated power (kW)
Blade width (cm)
Height of cut (mm)
Cuts per metre
Grassbox capacity (l)
Weight (kg)
Max. overall
width (mm)
Serial number
F016 307 542
148
1.7
2.15 (3.5 HP)
35
6–35
79
52
40
F016 307 642
148
1.7
2.15 (3.5 HP)
35
6–35
79
52
42
51
51
See rating details on machine
F016 308 542
148
1.7
2.15 (3.5 HP)
43
6–35
79
62
48
F016 308 642
148
1.7
2.15 (3.5 HP)
43
6–35
79
62
50
F016 309 542
148
1.7
2.15 (3.5 HP)
50
6–35
79
70
57.5
F016 309 642
148
1.7
2.15 (3.5 HP)
50
6–35
79
70
59.5
60
60
68
68
Intended Use
Operating Controls
This product is intended for domestic lawn mowing.
1 Top handle
2 Petrol filler cap
3 Petrol tank
Introduction
4 Grassbox
This manual gives instructions on the correct assembly and safe use of your machine. It is important
that you read these instructions carefully.
6 Carburettor
When fully assembled the machine weighs approximately 40–59.5 kg. Obtain assistance to remove
from packaging.
8 Drive control lever
Take care when transporting the mower to the
lawn, as the blades are sharp.
5 Bottom handle
7 Throttle lever
9 Cutter control lever
Not all of the accessories illustrated or described are
included as standard delivery.
Delivered Items
Assembly
Carefully remove the machine from its packaging
and check that you have the all the following
items:
A Handles
Unfold the handle top 1 and secure with the handle
clamping lever 10. Make sure the cables do not become trapped between the handles.
– Lawnmower with handle assembly
The handle top is height adjustable. The cam lock
spindle 11 can be repositioned indesired position I,
II or III.
– Operating instructions
– Spare parts list
– Machine registration card
Use cable clips 12 to attach cables to bottom handle 5 and top handle 1.
– Engine Maintenace manual
– Petrol tank
Fit petrol tank 3 to mower using screw 13 and attach petrol pipe 14 to the carburettor 6 using petrol
pipe clip.
– Petrol tank screw
– Allen key
For convenience when storing, the handle can be
folded by lifting the handle clamping lever 11.
– Handle spindle
– Grassbox
– Grassbox cradle
– side wheel spindle (incl. of nuts) x 2 side wheel
When parts are missing or damaged, please contact the consumer hotline on (0 14 49) 74 21 30 for
assistance. We have also a network of approved
Atco-Qualcast service agents who you can also
contact for service and advice both within and
outside the period of guarantee.
F016 L69 761 • TMS • 29.09.00
English - 2
EURO • Printed in England • BA F016 L69 830 • Balmoral • U4 • OSW 09/01
F016 L69 830 - Buch Seite 3 Freitag, 21. September 2001 2:04 14
Petrol
Petrol deteriorates over time. Engine starting may
be difficult if you use petrol kept for more than
30 days. Always run the fuel tank dry when storing
over 30 days.
1. Remove the petrol filler cap 2, add unleaded
petrol to the tank 3, leaving approximately
25 mm of tank 3 space for fuel expansion.
2. Replace the petrol filler cap 2.
3. Wipe up any spilt petrol from the engine before
starting the mower.
B Engine Oil
The mower is not supplied with oil in the engine,
however it is possible that there is a small quantity
in the engine. It is essential to fill with oil before starting the engine to avoid damage to your engine. It
is important to use the recommended oil to avoid
damage to your engine.
D Cutting Long Grass Using Side Wheel Kit (appropriate models only)
Your mower is fitted with a full width front roller
which is suitable for normal smooth lawns. For cutting longer, coarse grass a side wheel kit can be fitted. To fit this kit proceed as follows:
1. Tilt the mower back and wedge securely.
2. Remove the front roller/comb assembly by removing screw 18 and slackening nut 19 on both
sides.
3. Fit the side wheel, space tube on to the side
wheels spindle.
4. Fit side wheel assembly by placing a washer
either side of the roller brackets and tighten the
nut securely.
Refit the full width roller by following steps 1-3 in reverse.
1. With the mower standing on level ground, unscrew and remove the oil filler dip stick 15.
2. Wipe the oil filler dip stick clean; refit and tighten
the oil filler dip stick 15, then remove it again.
Check the oil level.
3. Add a good-quality SAE 30 API SF in small quantities at a time, allowing it to settle. Repeatedly
add oil and check the level until it reaches the
max position on the dip stick 15. The engine may
require up to 0.6 litres of oil.
Starting and Stopping
Starting from Cold
E F
Recoil start models
1. Move the throttle lever 7 to position
.
2. Move the choke lever 20 to On.
3. Pull the recoil cord handle. Allow the recoil handle to return slowly after each pull.
4. Refit and tighten the oil filler dip stick 15.
C Grassbox/bag
Attach/remove the grassbox 4.
B C Height Of Cut Adjustment
Your mower has an infinitely adjustable height of
cut between 6 – 36 mm with four markings between these (numbered 1-4) as a guide to adjustment. A fifth position labelled ‘S’? should only be
used with the scarifier cassette accessory or to
achieve a particularly short cut if the lawn is very
flat. The height of cut is adjusted by turning the
knob 16 at the right hand rear of the machine. The
comb will also require adjustment, See “Comb Adjustment”.
D Comb Adjustment
4. Once the engine has run for a few minutes move
the choke lever to “OFF”.
E F
Electric start models
1. Move the throttle lever 7 to position
.
2. Move the choke lever 20 to On.
3. Turn the key 21 clockwise to start. If the engine
does not start use the recoil start method and
charge the battery (see maintenance and fault
finding)
4. Once the engine has run for a few minutes move
the choke lever to “OFF”
Starting from Hot
Your mower is fitted with an adjustable comb 17
which can be brought into use on the lower heights
of cut. It is set by loosening the screws 18 and rotating the comb until the tines just touch the ground.
You may need to re-adjust after changing the
height of cut. Take care not to set the comb too
deep, as this could cause damage to either your
mower or lawn.
F016 L69 761 • TMS • 29.09.00
Using Your Mower
Follow “Starting from Cold” using steps 1 & 3 only.
If the engine does not start or will not continue to
run follow the “Starting from Cold” procedure with
choke lever 20 between the “On” and “Off” position.
Stopping
G
E Move the throttle lever 7 to position
English - 3
.
EURO • Printed in England • BA F016 L69 830 • Balmoral • U4 • OSW 09/01
F016 L69 830 - Buch Seite 4 Freitag, 21. September 2001 2:04 14
E Engaging Cylinder cutter and rear roller
1. Start engine.
Maintenance
2. Push the red safety latch 22 forward and gradually squeeze the cutter control lever 9 towards
the top handle 1.
Stop and remove spark plug cap.
3. Gradually squeeze the drive control lever 8 towards the top handle 1.
Note: To ensure long and reliable service, carry out
the following maintenance regularly!
4. Release the red safety latch 22.
Check for obvious defects such as loose, dislodged
or damaged blades, loose fixings, and worn or
damaged components.
5. Adjust the speed as required by moving the
throttle lever 7 between
and
.
6. To stop, release both control levers 8 and 9.
Engaging rear roller only
1. Start engine.
2. Gradually squeeze the drive control lever 8 towards the top handle 1.
3. Adjust the speed as required by moving the
throttle lever 7 between
and
.
4. To stop, release the drive control lever 8.
Engaging Cutters only
1. Start engine.
2. Push the red safety latch 22 forward and gradually squeeze the cutter control lever 9 towards
the top handle 1.
Check that covers and guards are undamaged
and correctly fitted. Carry out necessary maintenance or repairs before using.
Clean the exterior of the machine thoroughly using
a soft brush and cloth. Do not use water, solvents or
polishes. Remove all debris, especially from the air
filter and engine fins.
If the mower should happen to fail despite the care
taken in manufacture and testing, repair should be
carried out by an Approved Service Agent for
Atco-Qualcast garden products.
For all correspondence and spare parts orders, always include the 10-digit part number from the
nameplate of the machine!
Adjusting the Blade
3. To stop, release the cutter lever 9.
Mowing
Before mowing, check the engine oil level and fill
the petrol tank.
Toward the end of season, it is advisable to put only
as much fuel in the tank as you need for each cut,
since it should be completely used before storing
the mower.
G For best results, place the lawnmower on the
edge of lawn, mow in a forward direction. Then
at right angles at the end of each turn, slightly
overlapping the previously cut strip.
The next time you mow the lawn, try to work at right
angles to the previous cut as this will help prevent
unevenness in the surface soil which can build up if
you always mow in the same direction.
F016 L69 761 • TMS • 29.09.00
C D
The cutters should be adjusted if the grass is not cut
cleanly and evenly.
1. Tilt the mower back and wedge securely.
2. Remove grassbox cradle 23.
3. Turn adjusting nuts 24 clockwise a little at a time.
Note: The blades are correctly adjusted when the
cutting cylinder 25 lightly brushes the bottom blade
across the full width as the cylinder 25 is turned.
The blades act like a pair of shears, as a test, correctly adjusted blades will cut a piece of good
quality writing paper across the width of the blade.
Once correctly adjusted refit grassbox cradle 23.
English - 4
EURO • Printed in England • BA F016 L69 830 • Balmoral • U4 • OSW 09/01
F016 L69 830 - Buch Seite 5 Freitag, 21. September 2001 2:04 14
Removing/replacing QX Cylinder
Cassette
Engine Maintenance
Changing oil:
C
H
The mower is fitted with a QX (quick exchange)
cassette which can be removed and taken to Approved Service Agent for sharpening. To move the
cassette:
– It is advisable to wear a pair of gardening gloves
(not supplied).
– Remove grassbox cradle 23.
– Remove the
screws 27.
drive
cover 26
by
removing
Change the oil after 2 hours of use. The oil should
then be changed every 25 hours or at the end of
each season before storage, whichever is sooner.
(see engine manual for details)
Note: It is important that you use the recommended oil to avoid damage to your engine.
Replacing Air filter (See engine manual for details).
General maintenance and Adjustments (See engine manual for details).
– Remove cassette retaining screws 28 on both
sides.
– Pull the cutting cassette unit 29 out using the
handle, Obtain assistance if required.
– Refit cassette 29 following the above in reverse.
This method is the same for fitting or removing cassette accessories.
I Battery Charging (electric start models only)
The battery is trickle charged continuously when
the mower is running, however it will require charging before initial use, once a month during the
mowing season and once during winter storage.
Use the battery charger supplied as follows:
1. Remove the battery 30.
2. Connect the battery to the charger.
3. Connect the charger to a 230 V 50 Hz mains supply. Switch on and charge for between 16 – 24
hours. If necessary the battery can be left on
charge for up to 72 hours. Any longer may damage the battery. The charger must not be used
outdoors.
4. Switch off the mains supply before disconnecting the battery charger or battery.
5. Refit the battery 30.
Accessories
Scarifier unit - BALMORAL 14S/SE UK
F016 800 092
Scarifier unit - BALMORAL 14S/SE EURO F016 800 093
Scarifier unit - BALMORAL 17S/SE UK
F016 800 094
Scarifier unit - BALMORAL 17S/SE EURO F016 800 095
Scarifier unit - BALMORAL 20S/SE UK
F016 800 096
Scarifier unit - BALMORAL 20S/SE EURO F016 800 097
Winter Storage/Storage over 30 days
Regular maintenace at the recommended service
intervals, replacing worn or damaged parts as necessary and having the mower serviced by an
ATCO-QUALCAST Approved Service Agent before
winter storage will maximize the life and reliability of
the mower. Observe the following before storage:
1. Clean the mower down thoroughly. Remove
any grass debris especially around the engine
cooling fins (also see engine manual).
2. Check the cutting action (see “Adjusting the
Blades”) and lightly oil the cutting edges.
3. Check that all nuts and bolts are tight.
4. Drain off any fuel in the petrol tank by:
– Removing the pipe from the carburettor and
emptying the fuel into a can.
Adjusting Drive Cable
H If the mower does not drive adequately it may
be necessary to adjust the drive cable as follows:
– Slacken nut 31, turn adjuster 32 a few turns anticlockwise.
– Retighten nut 31.
When correctly adjusted, drive to the rear roller is
engaged when the drive control lever 8 is
squeezed against the handle top 1 or disengaged
when released.
F016 L69 761 • TMS • 29.09.00
– Run the engine for a few minutes until the engine
stops.
– Remove the carburettor bowl by removing nut,
and drain off any fuel in the carburettor. This will
prevent gum (fuel deposits) forming on essential
carburettor parts.
5. Change the oil and replace the air filter. (Winter
storage only. See engine manual for details).
English - 5
EURO • Printed in England • BA F016 L69 830 • Balmoral • U4 • OSW 09/01
F016 L69 830 - Buch Seite 6 Freitag, 21. September 2001 2:04 14
Fault Finding
The following table gives checks and actions that you can perform if your machine does not operate correctly. If these do not identify/remedy the problem, contact an ATCO-QUALCAST Approved Service Agent.
Warning: Switch off, remove spark plug cap before investigating fault.
Symptom
Possible Cause
Remedy
Mower leaves a ragged
finish
Cutter not correctly adjusted
Adjust the cutter
Engine will not start
Engine is flooded
Spark plug lead not connected
Spark plug dirty
Leave for 10 – 15 minutes
Reconnect
See engine maintenance manual
Engine stops
No petrol
Engine speed too low for conditions
Cutting cylinder obstructed
Refill tank
Move throttle
Turn off engine and clear obstruction
Engine does not stop
Throttle cable not correctly adjusted. Stop engine by removing spark plug
lead and refer to the engine maintenance manual.
Cutting cylinder does not
rotate
Incorrect adjustment
Contact an ATCO-QUALCAST
Approved Service Agent
Land drive does not
engage
Incorrect adjustment/cable
damaged
Adjust cable
Contact an ATCO-QUALCAST
Approved Service Agent
Excessive vibration/noise
Blade(s) or/and cylinder bearing
damaged
Engine fault
Contact an ATCO-QUALCAST
Approved Service Agent
See engine maintenance manual
F016 L69 761 • TMS • 29.09.00
English - 6
EURO • Printed in England • BA F016 L69 830 • Balmoral • U4 • OSW 09/01
F016 L69 830 - Buch Seite 7 Freitag, 21. September 2001 2:04 14
Guarantee
ATCO-QUALCAST guarantees this product against
manufacturing defects. We will repair (or replace
at our option) if a manufacturing defect occurs
within the guarantee period as long as it has not
been subjected to rental/hire use. The engine fitted
to this mower is covered by the engine manufacturer. See engine manual for details
The guarantee period for domestic use is 3 years for
parts (2 years engine + extend guarantee option of
one further year, see engine manual for details)
and 2 years for labour costs from date of purchase.
For the purpose of this guarantee:
Domestic use means any use of the product on the
property belonging to the purchaser forming part
of the garden area of his/her dwelling.
Should you require spares always insist on genuine
ATCO-QUALCAST spares. Any damage caused to
the product through the fitting of parts not made or
approved by ATCO-QUALCAST is not covered by
the Guarantee.
Your statutory rights are not affected by this guarantee.
Your product has been manufactured under an
environmental management system using where
possible the most environmentally responsible material and processes, and with the potential for recycling at the end of its life.
When the time comes to dispose of this product
please consider the environmental and take it to
recognised recycling facility.
(Please contact your Local Authority for location information.)
To obtain a repair under this guarantee:
Declaration of Conformity
– Take your lawnmower to a ATCO-QUALCAST Approved Service Agent.
Measured values determined according to
2000/14/EC (1.60 m height, 1 m distance away)
and EN 25 349.
– Show your dated proof of purchase.
– Show the guarantee page.
This guarantee does not apply if:
– the product has been resold by original purchaser (this does not apply in the Republic of Irland), or has been used under hire.
– the product has been modified to change the
manufacturer‘s specification, or if non-genuine
spares have been fitted.
– if any previous repair was undertaken by anyone
other than an ATCO-QUALCAST Approved Service Agent.
– the fault is due to maladjustment, abuse, neglect or accidental damage.
– the fault is due to lack of lubrication or maintenance.
Blades, drive chains, bearings, belts, rubber on the
rear roller and cables.
The cost of routine maintenance of the product is
not covered by the guarantee.
It is in your best interest to follow the Operating Instructions for your mower/scarifier, as a properly
cared for product should give many yeas of excellent service.
F016 L69 761 • TMS • 29.09.00
Typically the A-weighted noise level of the product
is: sound pressure level 81 dB (A) 14 S, 82 dB (A)
14 SE, 81 dB (A) 17 S, 82 dB (A) 17 SE, 83 dB (A) 20 S,
82 dB (A) 20 SE; sound power level: 92 dB (A) 14 S,
93 dB (A) 14 SE, 92 dB (A) 17 S, 93 dB (A)17 SE,
94 dB (A) 20 S, 93 dB (A) 20 SE.
The typical weighted acceleration is 4 m/s2.
We declare under our sole responsibility that this
product is in conformity with the following standards or standardization documents: EN 60 335,
EN 836 according to the provisions of the directives
89/336/EEC, 98/37/EC, 2000/14/EC.
2000/14/EC: The guaranteed sound power level
LWa is lower than 95 dB (A) 14 S, 95 dB (A) 14 SE,
93 dB (A) 17 S, 95 dB (A) 17 SE, 95 dB (A) 20 S,
95 dB (A) 20 SE. Conformity assessment procedure
according to Annex VIII.
Notified body: SRL, Sudbury England
PLACE: Stowmarket, Juli 2001
Signature:
English - 7
Position: Director
Rückseite • Printed in England • BA F 016 L69 830 • Balmoral • OSW 09/01
F016 L69 830 - Buch Seite 1 Freitag, 21. September 2001 2:04 14
Atco-Qualcast Ltd, Suffolk Works, Stowmarket, Suffolk, IP14 1EY, England
Tel: (01449) 742130 Fax: (01449) 674243
Printed in England
F016L69 830 (01.09) O