1
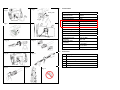
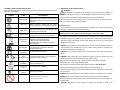
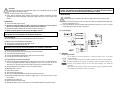
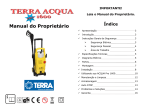
13
12
11
9
10
8
7
6
14
5
ON/OFF
SWITCH
High Pressure Washer User’s Manual
Model YLQ16S-150A
15
4
3
2
WATER
OUTLET
1
WATER
INLET
16
Fig.1
Fig.2
Fig.4
Fig.3
Fig.5
Original instructions
Warning: Do not use machine without reading the instruction sheet
Water outlet
1.
Technical data
Fig.7
Fig.6
Safety lock
trigger
Water inlet
Fig.8
Fig.9
OFF
ON
Fig.11
Fig. 10
Rated voltage:
AC220 – 240V , 50Hz
Rated input power:
1800W
Protection class
Degree of protection:
II
IPX5
Rated pressure:
90Bar(9Mpa)
Max. pressure:
Rated flow:
6 l/min
Max. flow:
7l/min
Supply hose length
5 metre
Power cord length
5 metre
Rated temperature:
0-40℃
Max. inlet pressure:
Sound pressure level:
Uncertainty:
Sound power level:
Uncertainty:
0.7MPa
LpA=77 dB(A)
KPA=3dB
Vibration value
Weight:
2.
Fig.12
Fig.13
Water inlet
Fig.14
Fig.15
Fig.16
135Bar(13.5Mpa)
LwA=96dB (A)
αh=1.8m/s2
2
Kαh=0.05m/s
9.5 Kg
Accessories
1、
Trigger gun
2、
lance
3、
Nozzle Cleaning Needle
4、
Water Inlet Connector
5、
High Pressure Hose
6、
Detergent tank
3. SYMBOLS USED TO MARK INSTRUCTIONS
4. IMPORTANT SAFETY INSTRUCTIONS
Some of the following symbols may be used on this product. Please study them and learn their
meaning for safe operation.
SYMBOL
NAME
EXPLANATION
Read instruction
Before starting up your high pressure washer for
the first time, this instruction manual must be
read through carefully. Save the instructions for
later use.
Safety Alert
Safety instructions marked with this symbol
must be observed to prevent danger to persons.
Safety mark
This symbol is used to mark safety instructions
that must be observed to prevent damage to the
machine and its performance.
Indication mark
This symbol indicates tips and instructions to
simplify work and to ensure a safe operation.
Waste products
disposal
Waste electrical products should not be
disposed of with household waste.
Please recycle where facilities exist.
Check with your Local Authority or retailer for
recycling advice.
Eye Protection
Class II
Construction
WARNING!
This appliance is not intended for use by children or other persons without assistance or
supervision if their physical, sensory or mental capabilities prevent them from using it safely.
Children should be supervised to ensure that they do not play with the appliance.
Before starting up your machine please check it carefully for any defects. If you find any, do not
start up your machine and contact your distributor.
Especially check:
- The insulation of the power cord should be faultless and without any cracks. If the power cord
is damaged, an authorized distributor should replace it.
WARNING!
Warning: Do not use this appliance without reading this instruction sheets.
- If the supply cord is damaged it must be replaced by a qualified person in order to avoid hazard.
- The Electric supply to this appliance should include either a residual current device that will
interrupt the supply if the leakage current to earth exceeds 30 mA for 30 ms or a device that
will prove the earth circuit.
Always wear safety goggles or safety glasses
with side shields or a full face shield when
operating this product.
- WARNING: This appliance has been designed for use with the cleaning agent supplied or
Double-insulated construction.
- WARNING: Do not use the appliance within range of persons unless they wear protective
recommended by the manufacturer. The use of other cleaning agents or chemicals may
adversely affect the safety of the appliance.
clothing.
keep
Bystanders Away
To reduce the risk of injury, user must keep all
bystanders at least 15m away.
Electric Shock
Precaution
Remove plug from the mains immediately if
cable is damaged or cut.
Sound power
level
Sound power level is 96dB(A)
- WARNING: High pressure jets can be dangerous if subject to misuse. The jet must not be
directed at persons, live electrical equipment or the appliance itself.
- Do not direct the jet against yourself or others in order to clean clothes or foot-wear.
- Risk of explosion – Do not spray flammable liquids.
- Disconnect from the electrical power supply before carrying out user maintenance .
- High pressure cleaners shall not be used by children or untrained personnel.
- To ensure appliance safety, use only original spare parts from the manufacturer or approved by
Electrical shock
hazard
Electrical shock hazard
the manufacturer.
- WARNING: Water that has flown through backflow preventers is considered to be non-potable.
Machine not suitable for connection
to the potable water mains
- WARNING: The machine shall be disconnected from its power source during cleaning or
maintenance and when replacing parts for mains operated machines by removing the plug from
the socket-outlet;
- WARNING: High pressure hoses, fittings and couplings are important for safety of the
appliance. Use only hoses, fittings and couplings recommended by the manufacturer.
- Do not use the appliance if a supply cord or important parts of the appliance are damaged, e.g.
safety devices, high pressure hoses, trigger gun.
- WARNING: If an extension cord is used, the plug and socket must be of watertight
Thermal sensor:
- A thermal sensor protects the motor against overloading. The machine will restart after a few
minutes when the thermal sensor has cooled.
5. NAME OF PARTS: (FIG. 1)
construction.
- WARNING: Inadequate extension cords can be dangerous.
1. Wheel
- This high pressure washer must not be used at temperatures below 0°C.
2. Water Inlet Connector
6. Support of lance
10. Plug/cable
14. Lance
3.Filter
7. Bottle Assembly
11. High Pressure Hose
15.Nozzle Cleaning Needle
4.Housing
8. Handle
12. Safety lock
WARNING!
- Cord on drums should always be completely extended to prevent the cord from overheating.
- If an extension cord is used, the plug and socket must be of watertight construction.
- Inadequate extension cords can be dangerous.
- Power cord connections should be kept dry and off the ground.
- If the power cord is damaged, it must be replaced by the manufacturer or his service agent or
similarly qualified person in order to avoid a hazard.
- Always ensure the machine is on a flat level surface and is stable. Never tip the machine on
one side.
In the event of accident or breakdown, switch off the machine immediately. (e.g. contact with
detergent: rinse with an abundance of clean water)
WARNING! ELECTRICAL SHOCK HAZARD
To reduce the risk of electrocution, you keep all connections dry and off the ground. You do
not touch the plug with wet hands. The electric supply connection shall be made by a qualified
electrician and comply with IEC 60364-1.
Mains power connection
The following should be observed when connecting the high pressure
washer to the electric installation:
- The electric installation shall be made by a certified electrician and comply with IEC-364.
- It is recommended that the electric supply to this appliance should include either a
residual current device that will interrupt the supply if the leakage current to earth exceeds
30 mA for 30 ms.
IMPORTANT! Only use water without any impurities.
- The water inlet fi lter must be inspected regularly, so as to avoid blockage and restriction in
the water supply to the pump.
Safety devices
- The pressure washer is equipped with an auto stop device. When the trigger is released it will
open the power circuit to the motor and cause the pressure washer motor to stop.
5. Screw
9. Support of hose
13. Spray Handle
6. PRODUCT DESCRIPTION
PURPOSE
z The high pressure cleaner is designed to clean vehicles, machines, buildings, facades, etc.
in the private sector.
AREAS OF APPLICATION
z Never use the machine in potentially explosive areas under any circumstances!
z The operating temperature must be between 0 and +40℃.
z The machine consists of an assembly with a pump, which is encased in a shock absorbing
housing. For an optimal working position the machine comes with a lance and a non-slip
handle grip, whose shape and configuration comply with the applicable regulations.
z Do not cover or modify the lance or the spray nozzles in any way.
z The high pressure cleaner is designed to be used with cold or lukewarm (max. 60℃);
higher temperatures can damage the pump.
z Do not use water that is dirty, gritty or contains any chemical products, as these could
impair operation and shorten the life of the machine.
z Accessories can be used to carry out work with foam cleaners, sand spraying.
7. ASSEMBLY
z Position the washer as NEAR as possible to the water supply.
z Always ensure the machine is on a flat level surface and is stable. Never tip the machine on
one side. FIG.2.
z Fit the lance into the gun and rotating it until the two parts are completely locked FIG. 3.
z Connect the gun to the high pressure hose FIG.4.
z Connect the high pressure hose to the water outlet on the washer FIG. 5.
z Connect the water supply hose to female coupler FIG.6, then connect to the water inlet of
the washer. The supply hose must have an internal diameter of at least 13mm (1/2 in.) and
must be reinforced. The water supply must be at least equal to the washer delivery
capacity.
z NOTE: The machine not suitable for connection to the potable water main (FIG. 16).
WARNING
The intake water temperature must not exceed 40℃. The water supply must not exceed
0.7 MPa.
CAUTION
The washer must only be used with clean water; use of unfiltered water of corrosive
chemicals will damage the washer.
z Push the motor switch to “OFF” position FIG. 9.
z Check that the electrical supply voltage and frequency (Volt/Hz) correspond to those
specified on the washer rating plate. If the power supply if correct, you may now plug in the
washer.
8. OPERATION
z Turn on the water supply tap fully.
z Release the safety lock FIG.7 and FIG. 8, then press the trigger for a few seconds to
allow air to escape and to discharge residual pressure in the hose.
z Keeping the trigger pressed, push the switch to start the motor FIG.9.
z When re-starting the motor, always keep the trigger pressed.
WARNING:BEFORE REUSING, COMPLETELY FLUSH THE UNIT OUT WITH PLAIN
WATER. ANTI-FREEZE CAN DAMAGE PAINTWORK SO YOU MUST ENSURE THERE IS
NO ANTI-FREEZE LEFT IN THE SYSTEM BEFORE USING IT AGAIN.
9. MAINTENANCE
CAUTION
Before working on the washer, disconnect the plug from the power supply socket.
z To ensure good performance, check and clean the suction and detergent filters after every
50 hours of operation FIG. 12.
z Clean the nozzle with the tool provided. Remove the lance from the gun, FIG. 13, remove
any dirt from the nozzle hole (FIG. 14) and rinse.
10. Circuit Diagram
NOTE:
THE MOTOR ONLY RUNS WHEN THE TRIGGER IS OPERATED.
USE DETERGENT
z Fill the detergent tank to the level indicated through the inlet FIG. 10.
CORRECT USE OF STANDARD ACCESSORIES
z The washer is equipped with the adjustable nozzle.
z Jet adjustment from pencil to fan FIG. 11.
WARNING: DO NOT ADJUST THE NOZZLE WHILE THE TRIGGER IS SQUEEZED.
CORRECT USE OF TURBO NOZZLE
z For increasing washing power, use the turbo nozzle kit as follows:
z Turn off the high pressure washer.
z Unscrew the adjustable head and fit the turbo nozzle onto the lance.
z Turn the high pressure washer back on.
RECOMMENDED CLEANING PROCEDURE
z Dissolve dirt by applying detergent with the fan jet to the dry surface. On vertical surfaces,
work from the bottom upwards. Leave the detergent to act for 1 to 2 minutes, but do not
allow to dry out. Apply the high from the surface, working from the bottom upwards.
z Avoid allowing the rinsing water to run on to unwanted surfaces.
STORAGE (FIG.12 – FIG. 15)
z Switch off the washer.
z Turn off the water supply tap.
z After use, the detergent residuals should be removed from the tank.
z Discharge residual pressure by pressing the trigger until no more water comes out of the
lance nozzle.
z Engage the gun safety lock.
z Remove the plug from the socket.
z Operate the washer with non-corrosive/ non-toxic antifreeze before storing for the winter.
11. DISPOSAL
Recycling the washer
Do not dispose of electrical appliances as unsorted municipal waste, use separate
collection facilities.
Contact you local government for information regarding the collection systems available.
If electrical appliances are disposed of in landfills or dumps, hazardous substances can
leak into the groundwater and get into the food chain, damaging your health and
well-being.
When replacing old appliances with new ones, the retailer is legally obligated to take back
your old appliance for disposals at least free of charge.
12. TROUBLE-SHOOTING
Disconnect from the electrical power supply before carrying out user maintenance or
checking its correct functioning.
To avoid unnecessary disappointments, you should check the following before contacting
the service organization:
Symptom
Machine refuses
to start
Fluctuating
pressure
Cause
Machine not plugged
in
Defective socket
Fuse has blown
Defective extension
cord
Pump sucking air
Valves dirty, worn out
or stuck
Pump seals worn out
Fuse has blown
Incorrect mains
voltage
Machine stops
Thermal sensor
activated
Nozzle partially
blocked
Fuse too small
Fuse blows
Air in inlet hose
Inadequate supply of
mains water
Machine
pulsating
Machine often
starts and stops
by itself
Nozzle partially
blocked
Water filter blocked
Hose kinked
Pump/spray gun is
leaking Centre.
Recommended action
Plug in machine
Try another socket.
Replace fuse. Switch off other
machines.
Try without the extension cord.
Check that hoses and connections
are airtight.
Clean and replace or refer to local
distributor
Clean and replace or refer to local
distributor
Replace fuse. Switch off other
machines.
Check that the mains voltage
corresponds to specification on the
model tag.
Leave the washer for 5 minutes to
cool down. Clean the nozzle
Change to an installation higher
than the amp. consumption of the
machine. You may try without the
extension cord.
Allow machine to run with open
trigger until regular working
pressure resumes.
Check that the water supply
corresponds to specifications
required
NB! Avoid using long, thin hoses
(min. 1/2")
Clean the nozzle
Clean the filter
Straighten out hose.
Contact your nearest Service
Wait for pump/hoses or accessory
Pump/hoses or
to thaw.
accessory frozen
Connect inlet water.
No water supply
Clean the filter
Water filter blocked
Clean the nozzle
Nozzle blocked
In case problems other than the above occur, please contact your local distributor.
Machine starts,
but no water
comes out
PLUG FITTING
Note: If a moulded plug is fitted and has to be removed take great care in disposing of the
plug and severed cable, it must be destroyed to prevent engaging into a socket. If the supply
cord is damaged it must be replaced by a qualified person in order to avoid hazard. Your
pressure washer is supplied with a fitted plug, however if you should need to fit a new plug
follow the instruction below. If in doubt consult a qualified electrician.
IMPORTANT
The wires in the mains lead are coloured in accordance with the following code:
Blue - Neutral, Brown – Live. As the colours of the wires in the mains lead of this appliance
may not correspond with the coloured markings identifying the terminals in your plug,
proceed as follows: The wire which is coloured blue must be connected to the terminal which
is marked with N. The wire which is coloured brown must be connected to the terminal which
is marked with the letter L. No connection is to be made to the earth terminal of the plug. If a
13 AMP (BS 1363/A) plug is used, a 13 AMP fuse must be fitted, or if any other type of plug is
used a 13 AMP fuse must be fitted, either in the plug, or adaptor or on the distribution board.
13. WARRANTY SERVICE
1. This Product has been manufactured to a high quality standard. The warranty period is 12
month from date of purchasing.
2. For warranty service, please contact the present the warranty card and the original
invoice for the warranty service.
3. This warranty DOES NOT apply to:
z O-rings, seals, valves, nozzles, filters.
z Damages to high pressure hose, gun, pump, motor, housing shells due to misuse,
operation errors, or exposure to natural elements.
z Transportation damages after sales.
z Services not provided by our authorized service centers.
z Accessories and spare parts, if any, provided in the package.
z Damage resulted from commercial or industrial use, as this product is intended for
DIY use only.
SAVE THESE INSTRUCTIONS