1
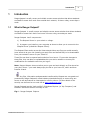
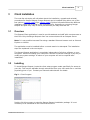
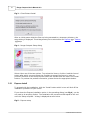
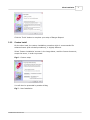
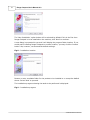
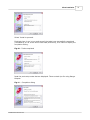
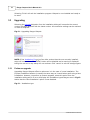
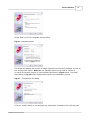
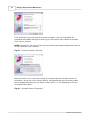
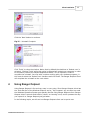
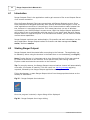
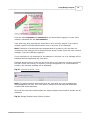
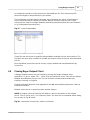
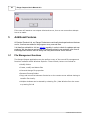
Ranger Outpost User's
Manual v2.0
Manual COPYRIGHT (c) 2006 Sentinel Products Ltd. All rights reserved
2
Ranger Outpost User's Manual v2.0
Table of Contents
Foreword
0
3
Part I Introduction
1 What is Ranger
...................................................................................................................................
Outpost?
3
4
Part II System Requirements
1 Ranger Outpost
...................................................................................................................................
Client
4
5
Part III Client Installation
1 Overview
................................................................................................................................... 5
2 Installing
................................................................................................................................... 5
Express Install..........................................................................................................................................................
Custom Install..........................................................................................................................................................
6
7
3 Upgrading ................................................................................................................................... 10
Perfom an upgrade
..........................................................................................................................................................
Upgrade: Advanced
..........................................................................................................................................................
Configuration Setup
Setup Instructions
.........................................................................................................................................................
10
12
12
4 Uninstalling................................................................................................................................... 14
Removing Outpost
..........................................................................................................................................................
Part IV Using Ranger Outpost
15
17
1 Introduction................................................................................................................................... 18
2 Starting Ranger
...................................................................................................................................
Outpost
18
3 Transfering ...................................................................................................................................
a file
21
4 Editing a local
...................................................................................................................................
File
23
5 Tranfering files
...................................................................................................................................
back to the server
24
6 Submitting Files
................................................................................................................................... 25
7 Viewing submitted
...................................................................................................................................
Files
26
8 Closing Rager
...................................................................................................................................
Outpost Client
27
Part V Additional Features
28
1 File Management
...................................................................................................................................
functions
28
Index
29
© 2006 Sentinel Products Ltd.
Introduction
1
3
Introduction
Ranger Outpost is a safe, secure and reliable remote access solution that allows students
and staff to access their work from outside their network, 24 hours a day, seven days a
week.
1.1
What is Ranger Outpost?
Ranger Outpost is a safe, secure and reliable remote access solution that allows students
and staff to access their work from home 24 hours a day, seven days a week.
Ranger Outpost has 2 components:
1) The Outpost Server in your school or college.
2) A program you install on your computer at home to allow you to connect to the
Outpost Server (called the ‘Outpost Client’).
The Outpost Client works across the Internet and allows any files you would normally
have access to at your site (usually your work files and shared files) to be downloaded
from your network’s server to your Client PC.
These files can then be opened and worked on from home†. If you make changes to
these files, they can later be uploaded back to your site's network to ensure your
modifications are available next time you log on.
Note: Ranger Outpost does not allow you to open and work directly on files stored on
your site's server – you must always copy the file to your home PC, edit it and then
transfer it back.
Any files, information and passwords transferred by Outpost are encrypted and
protected by Ranger Outpost’s robust industry standard security to ensure they are
secure to use and cannot be intercepted or used by others. (Further details of the
security can be found on our web site at www.rangersuite.com)
Ranger Outpost has the ‘look and feel’ of Windows Explorer (or ‘My Computer’) and
therefore should be familiar and easy to use.
Fig 1 – Ranger Outpost Explorer
© 2006 Sentinel Products Ltd.
4
Ranger Outpost User's Manual v2.0
Files can be ‘dragged and dropped’ between the Outpost Explorer window and your PC’s
desktop (or other Window's folders). The Outpost Explorer window also allows most usual
file management 28 operations such as deleting, renaming and moving files.
† Some files may not open if you do not have a compatible application at home. For example: If the file was
created with Microsoft Publisher and you don’t have Microsoft Publisher installed at home then you may not be
able to work on the document.
2
System Requirements
In this topic, we give some highlights on the systems configurations that should be seen
as a minimum for Ranger Outpost to perform effectively
2.1
Ranger Outpost Client
A Personal Computer (PC) with Internet access (minimum 28k dial-up, broadband
recommended) running either:
· Windows 95 (with Internet Explorer v4 or later)
· Windows 98
· Windows ME
· Windows 2000 Professional
· Windows XP Home/Professional
On Windows 2000 and XP computers, administrator privileges are required to install the
Ranger Outpost client software. Once installed, only standard user privileges are
required to run the application.
© 2006 Sentinel Products Ltd.
Client Installation
3
5
Client Installation
The next few sub-topics will talk about about the installation, upgrade and uninstall
procedures for Ranger Outpost. Ranger Outpost can be installed using either one of the
two options; express install 6 or custom install 7 . More information about the different
installation types can be found in the next sub-topics. Upgrading or removing Ranger
Outpost are quite very easy to follow procedure as you may soon find out.
3.1
Overview
The Outpost Client application is used to provide students and staff with remote access to
their files. Only the Ranger Outpost client can communicate with an Outpost Server.
Note: It is not possible to access files using a standard Internet browser such as Internet
Explorer or Mozilla.
The application must be installed before a remote session is attempted. The installation
steps are explained in the next topics.
The Ranger Outpost application is completely independent of all other software on your
computer. It does not change your network or Internet connection settings in any way or
modify any system settings. A reboot of your computer will not be required after
installation.
3.2
Installing
To install Ranger Outpost, locate the client setup program made specifically for access to
your site. This may be available through a download from your site’s web site or could be
physically given to you. Contact your network administrator for details.
Fig 2 – Client Program
Double-click this program to start the Ranger Outpost installation package. It is not
necessary to be connected to the Internet at this time.
© 2006 Sentinel Products Ltd.
6
Ranger Outpost User's Manual v2.0
Fig 3 – Client Extract Install
After an initial pause whilst the files are being extracted to a temporary directory, the
setup dialog is displayed. This dialog allows you to select either an Express 6 or Custom
7 Setup.
Fig 4 – Ranger Outpost Setup dialog
Select either one of the two options. To preview the licence, click the ‘read the licence’
button after which you must select the checkbox to accept the licence in order to
proceed. Selection of the Accept licence button will activate both the ‘back’ and ‘install’
buttons. To preview the product information, please choose the appropriate button.
3.2.1
Express Install
To proceed with the installation, click the ‘Install’ button which in turn will kick off the
installation procedure of your choice.
If you chose the Express installation option in the preceding dialog (see Fig 4), you do
not need to do anything further. The installation will proceed uninterrupted to the end
until the ‘Setup complete…’ dialog is displayed as seen below.
Fig 5 – Express setup
© 2006 Sentinel Products Ltd.
Client Installation
Click the ‘Finish’ button to complete your setup of Ranger Outpost.
3.2.2
Custom Install
On the other hand, the custom installation procedure which is recommended for
advanced users (and uninstall procedures), is slightly different.
Select ‘Custom installation’ as seen in the image below, read the licence document;
accept the terms, in order to proceed.
Fig 6 – Custom setup
You will then be presented by another dialog
Fig 7 – New Installation
© 2006 Sentinel Products Ltd.
7
8
Ranger Outpost User's Manual v2.0
The ‘New Installation’ option button will be selected by default if this is the first time
Ranger Outpost is to be installed on the machine; click ‘Next’ to continue.
A new dialog is presented to you and it will display the program folder location. If you
would prefer installing Ranger Outpost to another location, you may click the ‘browse’
button. We, however, recommend the default settings.
Fig 8 – Installation Location
Browse or enter a suitable folder for the product to be installed to or accept the default
shown. Select ‘Next’ to proceed.
The installation progress showing the tasks to be performed is displayed.
Fig 9 – Installation progress
© 2006 Sentinel Products Ltd.
Client Installation
Select ‘Install to proceed.
Each task item is run in turn and once all the tasks have successfully completed
(indicated by an ‘ok’ at the end of each task performed), click ‘Next’ to display the
completion dialog.
Fig 10 – Tasks completed
Read the post-setup notes that are displayed. These contain tips for using Ranger
Outpost.
Fig 11 – Completion dialog
© 2006 Sentinel Products Ltd.
9
10
Ranger Outpost User's Manual v2.0
Selecting ‘Finish’ will exit the installation program. Outpost is now installed and ready to
be used.
3.3
Upgrading
Selecting the upgrade 10 option from the installation dialog will overwrite the current
version of Ranger Outpost with the latest version. All connection settings can be retained
or reset as required.
Fig 12 – Upgrading Ranger Outpost
NOTE: If the Installation file 5 is of an older version than the one currently installed,
setup will not continue. The ‘Install’ button will be disabled and a warning is displayed
telling the user as to why setup will not continue. Click ‘cancel’ to exit the setup program.
3.3.1
Perfom an upgrade
Upgrading Ranger Outpost offers to options as is in the case of a new installation. The
Express installation behaves in exactly the same way as it would when performing a New
Installation. However, to perform an custom upgrade, select this option from the
installation dialog which in turn will display the installation type dialog as seen in Fig 13.
Notice that the 'New Installation' option is now disabled.
Fig 13 – Installation type
© 2006 Sentinel Products Ltd.
Client Installation
11
Select ‘Next’ to view the upgrade options dialog.
Fig 14 – Upgrade options
This dialog will display the version of Ranger Outpost client currently installed, as well as
the version to be copied. Note that the upgrade option can be used to perform a
re-install of the same version of client software as shown in Fig 14 above. The setup
tasks dialog in Fig 15 will be displayed during the next installation process.
Fig 15 – Configuration file dialog
Click the ‘Install’ button to proceed with the setup tasks. Installation will continue until
© 2006 Sentinel Products Ltd.
12
Ranger Outpost User's Manual v2.0
all tasks have been completed successfully. This will be marked by an ‘Ok’ next to each
task performed as shown in Fig 16 below.
Fig 16 – Setup tasks completed
Click ‘Next’ to continue and ‘Finish’ in the next dialog. Ranger Outpost setup is now
completed and the product is ready to use.
3.3.2
Upgrade: Advanced Configuration Setup
Ranger Outpost has an advanced upgrade option for experienced users. This option is
available for those users who may wish to run their outpost client against more than one
Outpost server. In the following pages, we shall see how this is achieved.
By default, the configuration details for the site that created the installation package will
automatically be included in the setup package. This option is provided for advanced
installations where, for instance, multiple site connections are required.
Ranger Outpost configuration files are custom files produced in .SDF format. These Site
Definition Files (.SDF) contain information about the target gateway address, port and
Outpost server. These files should not be modified manually.
If a Remote Access client is required to connect to multiple remote sites, multiple .SDF
files can be imported.
3.3.2.1
Setup Instructions
Upgrading Ranger Outpost with the advanced option selected can be done in cases where the
Outpost client needs to be setup to connect to more than one server. This option is not
normally used, although outpost client has an inbuilt function to handle such a situation.
To configure your Ranger Outpost client with an an advance option, you will need to
choose the 'custom' option. When you get to the ‘Upgrade Options..’ dialog, tick the
checkbox ‘I want to add a configuration file’ as shown below:
Fig 17 – Advance Configuration Option
© 2006 Sentinel Products Ltd.
Client Installation
13
Click ‘Next’ to continue with the advanced configuration installation. Setup will run
through the setup tasks and when they are completed, a new dialog for remote access
configuration will be presented to you as shown in Fig 18 below:
Fig 17 – Remote Access Configuration
Click the '...' button to browse to the folder containing the configuration file(s) for the
other server(s) as in Fig 19 below:
Fig 19 – Browse to the Configuration file(s) folder
© 2006 Sentinel Products Ltd.
14
Ranger Outpost User's Manual v2.0
Select your target folder and click ‘Ok’ to continue. In this example, my configuration file
is located in the ‘MyConfigurationFiles’ folder on the C:\ drive. You will then be presented
by the dialog, showing your selection.
Fig 20 – Site Definition File Location
NOTE: If your selected location does not contain any site configuration files, a dialog will
be presented to warn you of this fact and you may decide to continue or go back to select
the correct folder.
If your selected location is correct, confirm by clicking ‘Next’ and the setup will continue
to completion.
Fig 21 – Setup complete
Click ‘Finish’ to exit the installation program. Ranger Outpost will now be set up and
ready for use.
3.4
Uninstalling
You may wish to uninstall Ranger Outpost from your computer for any reason. Removing
Ranger Outpost from your computer can be as simple as the installation process itself.
The Client can be removed from your computer at any time. Select ‘Ranger Outpost
Remote Access Client’ from 'add/remove programs' control panel applet.
© 2006 Sentinel Products Ltd.
Client Installation
3.4.1
15
Removing Outpost
Fig 22 – Add/remove programs
Select ‘Change/Remove’ to launch the Ranger Outpost setup program. This brings you to
another dialog. Notice that you will only be presented with one option – to ‘Uninstall’.
Fig 23 – Uninstall Ranger Outpost Option(s)
Click ‘Next’ to begin the removal process. The beginning of the removal process dialog is
displayed, showing you the tasks to be performed.
Fig 24 – Uninstall Actions to be taken
© 2006 Sentinel Products Ltd.
16
Ranger Outpost User's Manual v2.0
Click ‘Uninstall’ to proceed with the removal procedure. You will immediately be
presented with another dialog box warning you of the action that is about to be taken.
Click ‘Yes’ to continue.
NOTE: Clicking ‘No’ will cancel all the previous actions and Ranger Outpostclient will not
be removed from your computer.
Fig 25 – Confirm Uninstall - Warning
When you select ‘Yes’ in the above dialog, the uninstall process will start and run to
completion. At the end of all removal actions, a dialog displaying all the actions taken
will be displayed showing you the status of each action, i.e. by displaying an ‘Ok’ per
successful action taken.
Fig 26 – Uninstall Actions Completed
© 2006 Sentinel Products Ltd.
Client Installation
17
Click the ‘Next’ button to continue.
Fig 27 – Uninstall Complete
Click ‘Finish’ to close the window. Notice that by default the checkbox to ‘Reboot now’ is
selected. Clicking ‘Finish’ while this option is selected will restart your computer in order
to completely remove the outpost dependent folders. This is required in order to
complete the uninstall. You may wish continue working with your windows programs, in
this case de-select the ‘Reboot now’ checkbox and click finish. The Ranger Outpost Client
will complete the uninstall on the next reboot.
4
Using Ranger Outpost
Using Ranger Outpost is fun and very easy in every step. Since Ranger Outpost client has
the 'look and feel' of the Windows Explorer and or, 'My Computer' any one who has used
the Windows Operative System gets quickly familiar using Ranger Outpost client. Ranger
Outpost client is smooth and intuitive, there's no learning curve, and it operates the way
you expect it to. Ranger Outpost just got better.
In the following topics, we will see how Ranger Outpost client can be put to use.
© 2006 Sentinel Products Ltd.
18
4.1
Ranger Outpost User's Manual v2.0
Introduction
Ranger Outpost Client is the application used to gain access to files on an Outpost Server
via a remote connection.
Only the Ranger Outpost Client can communicate with Ranger Outpost servers. Since
both products were designed specifically with security and controlled access in mind, no
other applications can utilise or interpret any of the communications traffic between the
two, because it is encrypted and secure. This means that when you are in Windows
connected to your School/College’s remote server, ONLY the Ranger Outpost application
will be able to see or communicate with that server. If you ‘switch task’ during a Ranger
Outpost session to Internet Explorer or a command-line window, you will have no similar
remote access capabilities.
Ranger Outpost combines user authentication, file transfer and work submission into the
same application. Ranger Outpost makes file transfer and data management faster,
easier, and more secure.
4.2
Starting Ranger Outpost
Ranger Outpost should be started after connecting to the Internet. The application can
be started by either using the shortcut in the Start Menu or on the desktop (see Fig 27).
Note: If using dial-up, it is important not to close Internet Explorer if this was required
to initiate a connection to the Internet. If this was the case, then closing Internet
Explorer could terminate the connection to the Internet.
Tip: For security reasons, the Ranger Outpost communications channel will automatically
close after 15 minutes of inactivity. This will result in a warning message 27 being
reported, followed by the Ranger Outpost application shutting down.
If this does happen, re-start Ranger Outpost client from the appropriate shortcut on the
desktop or Start Menu.
Fig 27 – Ranger Outpost client shortcut
Once the program is started, a logon dialog will be displayed.
Fig 28 – Ranger Outpost client Logon dialog
© 2006 Sentinel Products Ltd.
Using Ranger Outpost
19
Enter the same username and password as you would when logging in to your site's
network. Passwords are still case-sensitive.
Take extra care when entering this information, as for security reasons if you make a
mistake, specific information about which entry is incorrect is not displayed.
Note: Possession of a valid username and password for access to your site does not
necessarily mean that you will be allowed remote access. Please check with your network
manager if you have difficulty logging in.
If your username is not recognised or the password is incorrect, an error message will be
displayed and the application will shut down.
If Ranger Outpost cannot connect to the server due to your Internet not being connected,
the site’s server not running, an invalid or corrupt configuration or a communications
problem, the following message will be displayed:
Fig 29 –Connection failed – Error
Note: The Ranger Outpost client application will close after any error messages are
acknowledged by the user. This is for security reasons to avoid potential automated
unauthorised access attempts.
Once the user has been authenticated, the Ranger Outpost client Explorer window will be
displayed.
Fig 30 –Ranger Outpost client Explorer window
© 2006 Sentinel Products Ltd.
20
Ranger Outpost User's Manual v2.0
This window will display a tree view containing the following information:
Note: The information in the table below may differ from the example in Fig 30 above.
My Work
This contains your own files and documents as would
be seen from your ‘home’ drive (such as H:\ or N:\)
when logged in to your site. All files and sub-folders
will also be displayed.
Shared
This folder points to the sites’s Shared Folder.
Different organisations use this for different
purposes. You will have the same permissions on this
folder and its files as you have when logged on at a
network PC. If you don’t have access to a folder or
file when at site, you will not have access to it when
connected remotely.
Staff
This folder contains the names of Staff users that
have been added to the Outpost system. These
folders can be used to hand-in or submit work
directly to a member of staff. You will not be able to
see any files other than those you have handed in.
Note: Any files or documents ‘handed in’ to a
member of staff will be automatically tagged with
your username. This is to allow the recipient to
instantly see who the document has come from.
Any files uploaded to a staff folder will automatically
appear in the staff user’s OutpostBox folder.
If you upload a file by mistake or want to delete it,
then simply select the file and press delete.
Cancelled or failed uploads (perhaps because the
Internet connection was disconnected part-way) will
entirely delete the uploaded file.
The toolbar displays the most common tasks available.
Fig 31 – Ranger Outpost client Toolbar
© 2006 Sentinel Products Ltd.
Using Ranger Outpost
21
The following table shows the tasks available from the Ranger Outpost client toolbar.
4.3
Back
Display the last view shown
Forward
Move down the selected folder
Up
Move up to the parent folder
Stop
Stop the current file transfer
Refresh
Refresh the current view
Delete
Delete the selected file/folder
Properties
View the properties of the selected file/folder
Cut
‘Cut’ the selected file/folder to the clipboard
Copy
‘Copy’ the selected file/folder to the clipboard
Paste
Paste the file/folder currently in the clipboard to
the current location
Views
Change the view of the current folder to list,
large or small icon mode
Transfering a file
If you are within the Ranger Outpost client explorer and you double-click a file or select a
file and press the ‘Enter’ key, the local browse dialog will be displayed.
Fig 32 –Browse dialog
© 2006 Sentinel Products Ltd.
22
Ranger Outpost User's Manual v2.0
Select a local target path for the file to be transferred to. This can be any area on your
PC where you are allowed to save files.
Note: It is not possible to open files from their remote location. The file must be moved
or copied to a local location for editing.
Select ‘OK’ to begin the transfer/download process.
Fig 33 –Transfer in progress
The file will be copied to the local machine. The time taken will depend on the file size,
the speed of the Internet connection and the number of other users currently using the
Outpost Server system. As an example, a ten page Word document may take 2 minutes
to download using a 56k dial-up connection, but only 20 seconds using a 512K ADSL
connection.
Note: If the copied file is too small or the internet connection is very fast or both, the
preceding dialog box may not appear.
If many other users are downloading files simultaneously to their remote machines,
download speeds will be limited by the site’s available upstream bandwidth.
For example:
If a school has a 1Mbs downstream and 256kbs upstream Internet connection and 256
users are trying to download files simultaneously, the average maximum available
transfer speed per user will be 1kb per second (slow). In reality it is unlikely all users will
be downloading files simultaneously, but if demand is high, it may be necessary to try
later or ask the Network Manager to increase the school’s Internet bandwidth.
Copying a file using ‘Drag’n’Drop’ - On the plus side, the drag-and-drop
makes file transfers intuitive.
24
functionality
It is possible to drag and drop any file visible in the Ranger Outpost client ‘explorer’
window to your local PC. Usually you would drag files to the desktop, but files can be
dragged to any open Explorer folder. Files cannot be dragged directly to an application.
© 2006 Sentinel Products Ltd.
Using Ranger Outpost
23
Highlight the file with the mouse and while keeping the left mouse button held down,
drag the file to the desired location on your PC.
This will initiate the transfer progress as shown above.
Note: It is not possible to move a file using the right mouse button, although cut/copy
and paste work normally.
Tip: If using a dial-up Internet connection, Ranger Outpost client can be closed after
downloading a file to allow the Internet to disconnect, and then reopened and
reconnected when the document needs to be uploaded. However, ADSL (broadband)
users may wish to leave the connection open for longer periods of time.
NEW: Complete directories can now be moved using Ranger Outpost client
4.4
Editing a local File
Once the file has been copied to your PC it is available for local editing. The file can be
edited with any suitable software present on the local machine. Double-clicking the file
will usually select the most suitable program.
If no suitable program to view or edit the file is present, a dialog will appear asking what
program to use. A choice of selecting from a list or using the web selection service is
available. Choose ‘Select the program from list’.
Fig 34 –Open with
Selecting from a list will display a dialog showing all the programs installed on your
computer.
Fig 35 –Open with - choose an application.
© 2006 Sentinel Products Ltd.
24
Ranger Outpost User's Manual v2.0
This is usually a good indication that no suitable program exists to view or edit this file.
Some software can open and edit files created with other software applications. If a file is
modified, remember to save the file in a format which can be read by the software
present on your site’s PCs.
Tip: If you do not have the popular Microsoft Office product installed on your home
machine then use a freely available reader to view documents or freeware compatible
applications such as StarOffice (available for free download from
http://www.sun.com/software) to open, edit and work with school documents.
Similarly, many establishments now subscribe to the ‘Microsoft at Home’ software licence
scheme which lets students and staff install and use Microsoft products at home for free.
(Ask your Network Manager for details).
4.5
Tranfering files back to the server
Any file on your PC can be copied to your host site's network server using Ranger
Outpost. You will only be able to copy files to your home area and locations where you
have specific write permissions. The same permissions and security apply when
connected remotely as when logged on at a network PC.
For example, if you have ‘read-only’ permission to a network shared area, you will not be
able to transfer a file to this location using Ranger Outpost since the operation also
requires 'write' permission.
Note: Files transferred to the server will usually be scanned by the network’s anti-virus
system. Also, all file transfers are logged to allow the identification of system usage and
or, abuse.
© 2006 Sentinel Products Ltd.
Using Ranger Outpost
25
Files are transferred to the server using drag and drop. Multiple files can be selected at
one time.
Select the file(s) to be copied with the mouse. Hold down the left mouse button and ‘
drag’ 21 the file(s) into the Ranger Outpost folder area.
Fig 35 – Transferring a file
Alternatively, select the file with the mouse. Right click on the file and select ‘copy’ from
the menu. Click into the Ranger Outpost folder area and select the ‘Paste’ button to
initiate the file transfer.
If there is a file with the same name already in the folder it will be overwritten
automatically.
The file will be copied to the server, displaying a file transfer dialog as shown when it was
copied down. The only noticeable difference in the dialog is the fact that it reads
Uploading instead of downloading as in the case of the former file transfer operation.
Once the transfer is complete, the local file can be deleted if it is no longer required.
Note: All logon sessions and file transfers are logged and recorded onto the Outpost
server to provide Network Managers with detailed usage information.
If a transfer is cancelled either manually or as a result of a fault (e.g.: the Internet
connection failing), the whole file transfer will fail and none of the file will be transferred.
4.6
Submitting Files
You can ‘submit’ documents and files directly to members of staff using Ranger Outpost
client. This will copy documents and files from your PC into a specific ‘OutpostBox’ folder
in the staff user’s home area on the network.
This allows you to ‘hand in’ work to a member of staff without being able to see other
files in their area or being able to modify the file after it has been submitted. It is
possible for you to submit multiple files to this area, all of which will be date and name
© 2006 Sentinel Products Ltd.
26
Ranger Outpost User's Manual v2.0
stamped accordingly.
Browse the ‘staff’ folders in the Ranger Outpost Client window. Select the user who is to
receive the file.
Select the local file(s) to be copied with the mouse. Hold down the left mouse button
and ‘drag 21 ’ the file(s) either onto the target username’s folder in the left hand tree or
anywhere in the right hand pane.
Fig 36 – Submitting a file
If the target staff user is configured to receive files (i.e. has an ‘OutpostBox’ folder in the
root of their home drive with appropriate access permissions set) the cursor will allow
you to drop the file onto the folder, and the file transfer will start immediately.
If the target staff user’s OutpostBox folder does not exist or you do not have appropriate
write permissions, a notification message will be displayed advising you that you cannot
transfer files to this location.
If file transfer is allowed, the file will be copied to the remote site server, displaying a
similar transfer dialog to that shown when it was copied down.
After file transfer is complete the staff folder will refresh to show the file successfully
uploaded.
TIP: Make sure your file transfer is successful before you log out of the Ranger Outpost
client.
4.7
Viewing submitted Files
Only Staff users who have the ability to receive submitted files can view and edit files
either remotely via Ranger Outpost or by browsing their home directory whilst logged on
to a network PC.
Log in to the network as normal and browse your home folder. A folder called OutpostBox
will contain all the files that have been submitted. The filenames will have been modified
© 2006 Sentinel Products Ltd.
Using Ranger Outpost
27
to include the username of the person who submitted the file. This username prefix
cannot be forged or tampered with by the sender.
This mechanism provides both an accurate way of knowing the source of a document,
and a convenient way to identify the sender without having to open the file. It also
overcomes the issue of multiple students submitting a document with the same filename
(e.g. Earthquakes homework.doc).
Fig 37 – View of OutpostBox
These files can be viewed or modified using software available on the local machine. The
file name will have been modified to include the account name of the user who submitted
the file.
Once submitted, these files can be moved, copied, deleted and manipulated like any
normal file.
4.8
Closing Rager Outpost Client
A Ranger Outpost session can be finished by closing the Ranger Outpost client
application. To do so, select ‘File’ – ‘Close’ from the pull down menu. This will exit Ranger
Outpost and effectively log you out. This will close the window and terminate any
transfers currently in progress.
Closing the Ranger Outpost client application will not automatically disconnect a dial-up
Internet connection.
Outpost client can be re-opened to start another session.
NOTE: A lengthy period of inactivity will lead to a loss of connection to the outpost
server. This is not an error; it is a security check. The user will be presented with a dialog
box as seen in Fig 38 below.
Fig 38 – Automatic closure of an inactive connection
© 2006 Sentinel Products Ltd.
28
Ranger Outpost User's Manual v2.0
If the user still wants to use outpost client and server, then a new connection attempt
has to be made.
5
Additional Features
At Sentinel Products Ltd. our Ranger Products are continually developed and new features
and or, functions are added to the programs every now and then.
It is therefore advisable to visit our website regularly in order to check for updates and new
products. We also have a vast amount of knowledge related to our products in the form of
knowledge base articles' that can easily and freely be accessed via the internet.
5.1
File Management functions
The Ranger Outpost application can also perform many of the normal file management
functions available within Windows Explorer: These include, but are not limited to:
· Modify folders
· Create, modify and delete files
· View and change file properties
· Rename files and folders
· Copy and move files between directories on the remote server without having to
transfer files locally.
· Multiple windows can be started by selecting File | New Window from the menu
or pressing Ctrl+N
© 2006 Sentinel Products Ltd.
Index
Index
-MManagement
-AAdvanced
-N-
12
New
-BBrowser
Options 5
OutPost 3
Overview 5
-CClient 3
Close 17
Configuration
Custom 5
-R-
12
Ranger 3
Remove 14
Requirements
-D-
-S-
5
-EEditing 17
Exit 17
Explorer Window
Express 5
3
-FFeatures 28
File 17
Files 17
Folder 17
Functions 28
-IInstall
5
-LLocal
5
-O-
5
Download
28
17
© 2006 Sentinel Products Ltd.
Server 3
Start 17
Submitt 17
Supported 4
System 4
-TTasks
5
-UUninstall 14
Upgrade 5
Use 17
Using 17
-VView
17
4
29
30
Ranger Outpost User's Manual v2.0
-WWindows
4
© 2006 Sentinel Products Ltd.