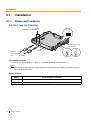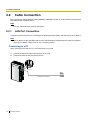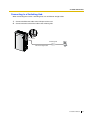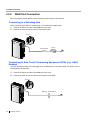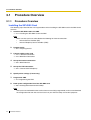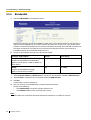
1
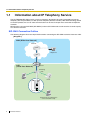
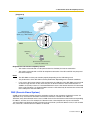
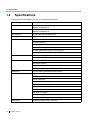
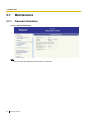
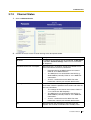
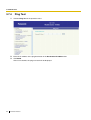
4-Channel SIP Trunk Card
Installation Manual
Model No.
KX-TDA3450
Thank you for purchasing a Panasonic 4-Channel SIP Trunk Card.
Please read this manual carefully before using this product and save this manual for future use.
In this manual, the suffix of each model number (e.g., KX-TDA3450X) is omitted unless necessary.
Table of Contents
1
Overview.................................................................................................. 5
1.1
1.2
2
Information about IP Telephony Service.........................................................................6
Specifications..................................................................................................................10
Installing in the KX-TDA15/KX-TDA30 PBX ........................................ 11
2.1
2.1.1
2.1.2
2.2
2.2.1
2.2.2
3
Programming the SIP-GW4 Card......................................................... 21
3.1
3.1.1
3.2
3.2.1
3.2.2
3.3
3.3.1
3.3.2
3.4
3.4.1
3.4.2
3.4.3
3.4.4
3.5
3.5.1
3.5.2
3.5.3
3.5.4
3.5.5
3.6
3.6.1
3.6.2
3.6.3
3.7
3.7.1
3.7.2
3.7.3
3.7.4
3.7.5
3.7.6
3.8
3.8.1
4
2
Installation .......................................................................................................................12
Names and Locations .......................................................................................................12
Installing the SIP-GW4 Card in the PBX ........................................................................... 16
Cable Connection............................................................................................................ 18
LAN Port Connection ........................................................................................................ 18
WAN Port Connection ....................................................................................................... 20
Procedure Overview .......................................................................................................22
Procedure Overview.......................................................................................................... 22
Preparations ....................................................................................................................23
Preparing the PC ..............................................................................................................23
Starting the SIP-GW4 Maintenance Utility ........................................................................27
Programming—Network Settings ..................................................................................28
WAN Interface ................................................................................................................... 28
LAN Interface ....................................................................................................................33
Programming—SIP Settings ..........................................................................................34
Channel & SIP Telephony .................................................................................................34
Voice Communication ....................................................................................................... 41
NAT Traversal ....................................................................................................................43
Options.............................................................................................................................. 45
Programming—Advanced Settings ...............................................................................46
DHCP Server ....................................................................................................................49
Static Route ......................................................................................................................51
IP Filter.............................................................................................................................. 52
NAT Settings ..................................................................................................................... 55
Bandwidth .........................................................................................................................60
Configuration Management............................................................................................61
Backup (Download from SIP-GW4) ..................................................................................61
Restore (Upload to SIP-GW4)...........................................................................................62
Initialization .......................................................................................................................63
Maintenance ....................................................................................................................64
General Information .......................................................................................................... 64
Channel Status .................................................................................................................65
System Log (for engineers only) .......................................................................................67
Ping Test ...........................................................................................................................68
Change Password .............................................................................................................69
Firmware Upgrade ............................................................................................................70
Others...............................................................................................................................72
Reboot .............................................................................................................................. 72
Programming the PBX.......................................................................... 73
Installation Manual
4.1
Programming the PBX ................................................................................................... 74
A Guidance for VoIP Installation .............................................................75
A1
A1.1
A1.2
Important Notice for Subscription and Installation..................................................... 76
Firewall Requirements...................................................................................................... 76
Bandwidth Requirements ................................................................................................. 77
B Initialisation of the SIP-GW4 Card .......................................................79
B1
Initialising the SIP-GW4 Card ........................................................................................ 80
Index ............................................................................................................81
Installation Manual
3
4
Installation Manual
Section
1
Overview
Installation Manual
5
1.1 Information about IP Telephony Service
1.1
Information about IP Telephony Service
The KX-TDA3450 SIP-GW4 card is a trunk card which is designed to be easily integrated into Internet
Telephony Service provided by an ITSP (Internet Telephony Service Provider). With VoIP technology based
on the SIP protocol, the cost of voice communication can be much cheaper than conventional telephone
networks.
Mounting the 4-channel VoIP DSP (SIP-DSP4) card on a SIP-GW4 card can enhance the channel capacity
to a total of 8 channels.
SIP-GW4 Connection Outline
The following diagrams illustrate simple VoIP networks connecting the SIP-GW4 card to the Internet or LAN.
[Diagram 1]
WAN (Wide Area Network)
Internet
ITSP
Local
Telephone
ISP
LAN
(Local Area Network)
Router
Switching
Hub
PC
IP-PT
PC
(Exclusively for maintenance
of the SIP-GW4 Card)
6
Installation Manual
1.1 Information about IP Telephony Service
[Diagram 2]
WAN
Internet
ITSP
Local
Telephone
ISP
Data Circuit
Terminating Equipment
(DCE) (e.g., ADSL Modem)
LAN
Switching
Hub
Extension
PC
(Exclusively for maintenance
of the SIP-GW4 Card)
Requirements for Internet Telephony Service
•
You need to subscribe with an ISP (Internet Service Provider) for Internet connection.
•
You need to subscribe with an ITSP for telephone connection. The ISP and ITSP may be part of
the same company.
Notes
•
•
•
The SIP-GW4 card may not function properly depending on the ITSP being used.
The performance of the SIP-GW4 card may deteriorate depending on the network conditions.
If you access the Internet from the PC connected to the LAN port of the SIP-GW4 card and send
or receive large amounts of data, there may be an adverse affect on voice communication. In
addition, for security reasons, it is recommended not to access the Internet from the PC connected
to the card. Therefore, it is recommended to connect a PC exclusively for maintenance of the card
to the LAN port of the SIP-GW4 card.
DNS (Domain Name System)
A DNS server normally provides the name resolution service for your computer. As domain names are
alphabetic, they are easier to remember. The Internet, however, is based on IP addresses.
Therefore, every time a domain name is used, a DNS server must translate the name into the corresponding
IP address, and vice versa. For example, the domain name www.example.com may be translated to
192.0.34.166. If one DNS server does not know how to translate a particular domain name, it asks another
one, and so on, until the correct IP address is returned.
Installation Manual
7
1.1 Information about IP Telephony Service
NAT (Network Address Translation) Traversal
When NAT/NAPT (Network Address Port Translation) is enabled, the router translates a local IP address
from the SIP-GW4 card into a global IP address. However, the router with NAT enabled does not translate
local IP addresses stored in SIP messages into global IP addresses.
Therefore, the address which the SIP Server recognises as the destination IP address to reply to is actually
the local IP address of the SIP-GW4 card, not the global IP address of the router. Therefore, if the SIP server
receives a SIP message from the SIP-GW4 card and sends a message back to the SIP-GW4 card using
the address stored in the SIP message, the packet information will not reach the SIP-GW4 card.
STUN Servers function to solve the global IP address problem under certain NAT conditions, for example,
in case of full duplex communication. A STUN Server, used alongside the SIP Server, finds out the global
IP address of the router with NAT enabled. With the STUN feature enabled, the packet information sent by
the SIP Server is able to "traverse" NAT and reach the SIP-GW4 card.
The settings can be configured to specify whether to enable the NAT Traversal feature for each ISP/ITSP. In
addition, the NAT Traversal method can be selected from “STUN” and “Fixed IP Address” (refer to 3.4.3 NAT
Traversal).
The SIP-GW4 card may require the NAT Traversal feature to be enabled to connect to the WAN via a router.
The following diagram illustrates how VoIP communication is enabled between the SIP-GW4 card and the
SIP Server (SIP Receiver) via a router with NAT enabled.
8
Installation Manual
1.1 Information about IP Telephony Service
WAN
Internet
STUN
STUN
Server
Fixed IP Address
SIP
Server
SIP
Server
ISP/ITSP
ISP/ITSP
LAN
Router
(NAT enabled)
Switching
Hub
PC
IP-PT
PC
(Exclusively for maintenance
of the SIP-GW4 Card)
Notes
•
•
If an ISP/ITSP uses a device such as SBC (Session Border Controller), you may not have to enable
the NAT Traversal feature.
A STUN Server is supplied by an ISP/ITSP, and not included with the PBX.
Installation Manual
9
1.2 Specifications
1.2
Specifications
For details about the SIP-GW4 card, refer to the following specifications.
Items
Specification
LAN Interface
RJ-45
10BASE-T/100BASE-TX
WAN Interface
RJ-45
10BASE-T/100BASE-TX
Voice Channel
4ch (Max 8ch with SIP-DSP4 card)
SIP Accounts
Max 8
SIP RFCs
RFC3261 (UDP only)
RFC3262 (PRACK)
RFC3264 (Offer/Answer)
RFC3311 (UPDATE)
RFC3581 (Symmetric Response Routing/rport)
RFC4028 (Session Timer)
CODECs
G.711 (a-law and µ-law)
G.729AB
Voice Options
Echo Cancellation (64 ms)
Jitter Buffer (100 ms)
VAD (Voice Activity Detection)
PLC (Packet Loss Concealment)
DTMF Relay
Inband/Outband (RFC2833)/Outband (INFO)
Protocol/Function
RTP
RTCP
PPPoE (WAN Port)
DHCP Client (WAN Port)
DHCP Server (LAN Port)
DNS
NAPT
NAT Traversal (STUN)
Port Forwarding
QoS (ToS field setting in IP header of SIP/RTP/RTCP)
Maintenance
10
Installation Manual
WEB-based Programming (LAN Port)
Section
2
Installing in the KX-TDA15/KX-TDA30 PBX
This section describes the physical installation process of the
KX-TDA3450 SIP-GW4 card covering the following topics: (1)
installing the card in the KX-TDA15/KX-TDA30 PBX, and (2)
connecting the card to a network device using a Category 5
(CAT 5) Ethernet cable.
Installation Manual
11
2.1 Installation
2.1
Installation
2.1.1
Names and Locations
SIP-GW4 Card (KX-TDA3450)
RJ45
(10BASE-T/100BASE-TX)
DIP-SW
OFF
1
2
3
INI
Set the switch to the
"ON" position.
SW1
SW1
OFF
OFF
ON
ON
To LAN
(maintenance
PC)
To WAN
LEDs
Included Accessories
Ferrite Core × 2, Extension Bolt × 1, Strap × 1, CD-ROM (including documentation) × 1
Note
When connecting the RJ45 connector, attach the included ferrite core. Refer to "Attaching a Ferrite
Core to an RJ45 Connector".
Switch Settings
Switch
12
Usage and Status Definition
SW1
Set the switch at "ON" position before installing the card in the PBX.
DIP-SW
Keep all DIP switches at default "OFF" positions.
Installation Manual
2.1 Installation
Pin Assignments
RJ45 Connector (10BASE-T/100BASE-TX)
TX+
TXRX+
RX-
1
8
Signal Name
Level [V]
Function
TX+
(+)
Transmit data (+)
TX-
(-)
Transmit data (-)
RX+
(+)
Receive data (+)
RX-
(-)
Receive data (-)
–
–
Reserved
Indication Light (LED)
When the SIP-GW4 card is operating, each LED should show the status identified in bold-face letters
under normal conditions.
Indication
RUN
VoIP
PPP
LINK
Colour
Green
Card status indication
•
ON: Normal
•
OFF: Power Off
Green
Voice data transmission status indication
•
ON: Registered on a VoIP server
•
OFF: Not registered on a VoIP server
•
Flashing: During a conversation
Green
Indication of whether a PPPoE session has been established with the
IP telephone company
•
ON: PPPoE session established
•
OFF: PPPoE session not established
•
Flashing: PPPoE session establishment in process
Green
Indication of link status with connected devices (e.g., modem)
•
ON: Normal connection
•
OFF: Connection error
Green
Indication of transmission speed with connected devices (e.g., modem)
•
ON: Operating at 100 Mbps
•
OFF: Operating at 10 Mbps
•
Flashing: Data transmitting (only when operating at 100 Mbps)
WAN
100
Description
Installation Manual
13
2.1 Installation
Indication
LINK
Colour
Green
Indication of link status with connected devices (e.g., PC, hub)
•
ON: Normal connection
•
OFF: Connection error
Green
Indication of transmission speed with connected devices (e.g., PC,
hub)
•
ON: Operating at 100 Mbps
•
OFF: Operating at 10 Mbps
•
Flashing: Data transmitting (only when operating at 100 Mbps)
LAN
100
Description
Attaching a Ferrite Core to an RJ45 Connector
A ferrite core must be attached when an RJ45 connector is connected to the SIP-GW4 card.
Wrap the cable once around the ferrite core, then close the case of the ferrite core. Attach the ferrite core 5
cm away from the connector.
5 cm
14
Installation Manual
2.1 Installation
SIP-DSP4 Card (KX-TDA3451)
4-channel VoIP DSP card. To be mounted on the SIP-GW4 card.
Screws
SIP-DSP4 Card
SIP-GW4 Card
Included Accessories
Screws × 2
Installation Manual
15
2.1 Installation
2.1.2
Installing the SIP-GW4 Card in the PBX
Install the SIP-GW4 card in slot 05, 06, or 07 of the PBX.
1. Before installing the card, cut and remove the dummy cover plate for the appropriate slot from the main
unit.
Dummy Cover Plate
CAUTION
For safety reasons, smooth the cut edges after removing the dummy cover plate.
2. Position the card in the open slot, making sure that the tabs on both sides of the card fit into place. Then,
holding the card firmly in place, lower the rear end so that the hole of the card fits over the extension
bolt.
1
2
Extension Bolt
16
Installation Manual
2.1 Installation
3. Insert the new extension bolt (included with the card) into the hole on the card, and tighten it to secure
the card.
Extension Bolt
Installation Manual
17
2.2 Cable Connection
2.2
Cable Connection
Use a Category 5 (CAT 5) Ethernet cable (10BASE-T/100BASE-TX) with an RJ45 connector to connect the
SIP-GW4 card to a network device.
Note
Use only CAT 5 Ethernet cable for connection.
2.2.1
LAN Port Connection
Connect the card to your PC or to a switching hub, following the steps below, and then specify an IP address.
Note
The IP address of the SIP-GW4 card must be specified before connecting to the network. For details
about the IP address setting, refer to "3.2.1 Preparing the PC".
Connecting to a PC
When connecting the card to a PC, use an Ethernet cross cable.
1. Connect the Ethernet cable to the LAN port of the card.
2. Connect the other end of the cable to the PC.
LAN Port
Ethernet Cross Cable
18
Installation Manual
PC
2.2 Cable Connection
Connecting to a Switching Hub
When connecting the card to a switching hub, use an Ethernet straight cable.
1. Connect the Ethernet cable to the LAN port of the card.
2. Connect the other end of the cable to the switching hub.
LAN Port
Switching Hub
Ethernet Straight Cable
PC
Installation Manual
19
2.2 Cable Connection
2.2.2
WAN Port Connection
Be sure to specify the IP address of the card before connecting it to the network.
Connecting to a Switching Hub
When connecting the card to a switching hub, use an Ethernet straight cable.
1. Connect the Ethernet cable to the WAN port of the card.
2. Connect the other end of the cable to the switching hub.
WAN Port
Switching Hub
Router
Internet
Ethernet Straight Cable
Connecting to Data Circuit Terminating Equipment (DCE) (e.g., ADSL
Modem)
The type of Ethernet cable (Cross/Straight) to be used depends on the type of DCE. For details, refer to
documentation for the DCE.
1. Connect the Ethernet cable to the WAN port of the card.
2. Connect the other end of the cable to the LAN port of the DCE.
WAN Port
DCE (e.g., ADSL Modem)
Internet
20
Installation Manual
Section
3
Programming the SIP-GW4 Card
Installation Manual
21
3.1 Procedure Overview
3.1
Procedure Overview
3.1.1
Procedure Overview
Installing the SIP-GW4 Card
The following steps describe the start-up procedures when installing the SIP-GW4 card in the PBX for the
first time.
1. Install the SIP-GW4 card in the PBX.
→ "2.1.2 Installing the SIP-GW4 Card in the PBX"
Note
Make sure that you have subscribed to the following for Internet connection:
•
Internet Service Provider (ISP)
•
Internet Telephony Service Provider (ITSP)
2. Prepare the PC.
→ "3.2.1 Preparing the PC"
3. Connect cables to the card.
→ "2.2.1 LAN Port Connection"
→ "2.2.2 WAN Port Connection"
4. Set up the Internet connection.
→ "3.3.1 WAN Interface"
5. Set up the ITSP connection.
→ "3.4.1 Channel & SIP Telephony"
6. Specify other settings (if necessary).
7. Program the PBX.
→ "4.1 Programming the PBX"
8. Back up the configuration file of the SIP-GW4 card.
→ "3.6.1 Backup (Download from SIP-GW4)"
Note
After you have confirmed that the card has been successfully programmed, make sure to download
the configuration file from the card and save it on your PC for backup and archive purposes.
22
Installation Manual
3.2 Preparations
3.2
Preparations
A web programming utility called the SIP-GW4 Maintenance Utility is available for programming of the SIPGW4 card.
System Requirements
•
Microsoft® Windows® 98, Windows Me, Windows 2000 Professional, Windows XP Professional
SP2, or Windows XP Home Edition SP2
•
Microsoft Internet Explorer® 6.x
Trademarks
•
Microsoft, Windows, and Internet Explorer are either registered trademarks or trademarks of
Microsoft Corporation in the United States and/or other countries.
•
All other trademarks identified herein are the property of their respective owners.
•
Microsoft product screen shot(s) reprinted with permission from Microsoft Corporation.
Copyright for MD5
This software uses the Source Code of RSA Data Security, Inc. described in the RFC1321 (MD5 MessageDigest Algorithm).
Copyright (C) 1991-2, RSA Data Security, Inc. Created 1991. All rights reserved.
Licence to copy and use this software is granted provided that it is identified as the "RSA Data Security, Inc.
MD5 Message-Digest Algorithm" in all material mentioning or referencing this software or this function.
Licence is also granted to make and use derivative works provided that such works are identified as "derived
from the RSA Data Security, Inc. MD5 Message-Digest Algorithm" in all material mentioning or referencing
the derived work.
RSA Data Security, Inc. makes no representations concerning either the merchantability of this software or
the suitability of this software for any particular purpose. It is provided "as is" without express or implied
warranty of any kind.
These notices must be retained in any copies of any part of this documentation and/or software.
Note
The screen may not be displayed properly when Internet Explorer settings have been changed. In that
case, confirm the settings as follows:
The example below is based on the Windows XP operating system:
1. Confirm that the display properties DPI is set to 96 DPI. If not, restore the default setting (96 DPI).
2. Click Internet Options from the Tools menu. Select the General tab, and click User Assistance.
Confirm that each check box is not checked for Format Setting on the User Assistance screen.
3.2.1
Preparing the PC
To prepare for programming using the SIP-GW4 Maintenance Utility, configure your PC by (1) assigning an
IP address and a subnet mask address for the same network as that of the SIP-GW4 card, and (2) choosing
the appropriate options for Internet properties.
Installation Manual
23
3.2 Preparations
Note
The procedures vary depending on the operating system of the PC.
This example is based on the Windows XP operating system.
1. Open Control Panel from the Start menu.
2. a.
Double click Network Connection.
b. Double click Local Area Connection.
c. Click Properties.
d. Confirm that Internet Protocol (TCP/IP) is listed.
Note
If Internet Protocol (TCP/IP) is not listed, you must
install TCP/IP. For details about installation, refer to
the documentation for Windows XP.
3. Open Internet Protocol (TCP/IP) Properties from the list.
4. a.
Select Use the following IP address:.
b. In the IP address box, type 192.168.0.10.
This is an example entry. Type an IP address different
from those assigned to the other LAN devices within
the same network.
c. In the Subnet mask box, type 255.255.255.0.
d. Click OK.
Note
To obtain an IP address automatically, select Obtain
an IP address automatically.
5. a.
Start Internet Explorer from the Start menu.
b. Click Internet Options from the Tools menu.
24
Installation Manual
3.2 Preparations
6. a.
Click the Connections tab.
b. Select Never dial a connection if necessary.
c. Click LAN Settings.
7. a.
Clear all check boxes.
b. Click OK.
Your PC is now ready for programming through direct
access to the card.
Notice When Using a Proxy Server
If the network has a proxy server installed, you must apply the appropriate proxy settings to your PC. In this
case, follow the steps below in substitution for step 5 above:
5. a.
Check all boxes for Proxy server.
b. Click Advanced.
Installation Manual
25
3.2 Preparations
6. a.
Under Do not use proxy server for addresses
beginning with:, type the IP address of the LAN port
of the card.
b. Click OK.
Your PC is now ready for programming the card through an
IP network.
26
Installation Manual
3.2 Preparations
3.2.2
Starting the SIP-GW4 Maintenance Utility
To start the SIP-GW4 Maintenance Utility, log in from your PC connected to the card by specifying the
default IP address, username, and password.
Notes
•
•
If the SIP-GW4 Maintenance Utility is being operated during VoIP communication, it may degrade
the speech quality. Programming of the card should be avoided during calls.
The contents and design of the software are subject to change without notice.
1. Start Internet Explorer from the Start menu.
2. Specify the URL of the SIP-GW4 Maintenance
Utility with the IP address
http://192.168.0.1:8000/Exp.
3. a.
The log-in screen is displayed.
In the User name box, type INSTALLER.
b. In the Password box, type 1234.
c. Click OK.
Now the menu screen of the SIP-GW4
Maintenance Utility is displayed.
Installation Manual
27
3.3 Programming—Network Settings
3.3
Programming—Network Settings
3.3.1
WAN Interface
Select Connection
1. Click 1.1.1 WAN Interface in the operation menu.
2. Specify a connection method for the WAN port from one of the following.
Parameter
Description
PPPoE
Select when connecting to the network using PPPoE connection
(including using a fixed IP address for PPPoE connection).
DHCP Client
Select when connecting to the network using DHCP server.
Fixed IP Address
Select when connecting to the network using a fixed IP address assigned
by an ISP.
3. Click Set for the selected method for detailed configuration.
28
Installation Manual
3.3 Programming—Network Settings
PPPoE Configuration
If you select PPPoE in Select Connection and click the corresponding Set button, the following screen is
displayed.
PPPoE Basic Configuration
1. Assign each parameter, based on the information provided by the ISP, referring to the descriptions
below.
Parameter & Description
Default
Value Range
ISP name
Provider1
Max. 15 alphanumeric
characters
No default
Max. 63 alphanumeric
characters
No default
Max. 31 alphanumeric
characters (case-sensitive)
0.0.0.0*2
Available IP addresses
No default
28–32
Specifies the ISP name (optional).
User name
Specifies the user name provided by the ISP
(compulsory).
Password
Specifies the password provided by the ISP
(compulsory).
Fixed IP Address*1
Specifies the IP address provided by the ISP
(required only when using a fixed IP address for
PPPoE connection).
Subnet mask
Specifies the subnet mask address for the fixed
IP address (required only when using a fixed IP
address for PPPoE connection).
*1:
*2:
If not using a fixed IP address for PPPoE connection, do not change the default value.
If obtaining an IP address automatically, do not change the default IP address.
Installation Manual
29
3.3 Programming—Network Settings
PPPoE Detailed Configuration
Generally, the following configurations are not required.
1. If necessary, assign each parameter referring to the descriptions below.
Parameter & Description
Default
Value Range
Server Name
No default
Max. 23 alphanumeric
characters
No default
Max. 31 alphanumeric
characters
1454
576–1492
Auto Config
Auto Config, Manual Config*
AUTO
AUTO, Not Used, CHAP, PAP
Enable
Enable, Disable
Specifies the server name used for PPPoE
connection.
Service Name
Specifies the service name that is applied to a
PPPoE connection.
MTU
Specifies the maximum size of IP packet to be
sent.
DNS Server Address
Specifies the method of IP address setting for a
DNS server.
Authentication Type
Specifies the authentication method.
PPP Keep Alive
Specifies whether the PPP Keep Alive feature is
used or not.
*:
When selecting "Manual Config", specify the IP addresses of both Primary DNS Server and
Secondary DNS Server.
2. Click Set.
The Select Connection screen is displayed.
3. Click OK (Reboot) to reboot the card.
30
Installation Manual
3.3 Programming—Network Settings
Fixed IP Address Configuration
If you select Fixed IP Address in Select Connection and click the corresponding Set button, the following
screen is displayed.
1. Assign each parameter, based on the information provided by the ISP, referring to the descriptions
below.
Parameter & Description
Default
Value Range
IP Address of WAN Interface
No default
Available IP addresses
24 (255.255.255.0)
8–30
No default
Available IP addresses
No default
Available IP addresses
No default
Available IP addresses
Specifies the IP address of the WAN port.
Subnet Mask
Specifies the subnet mask address of the WAN
port.
Primary DNS Server
Specifies the IP address of the primary DNS
server.
Secondary DNS Server
Specifies the IP address of the secondary DNS
server.
Default Gateway
Specifies the default gateway IP address.
Installation Manual
31
3.3 Programming—Network Settings
Note
Do not assign an IP address and a subnet mask address from the same network as the LAN port,
for example:
LAN port: IP address 192.168.0.1, Subnet mask 24 (255.255.255.0)
WAN port: IP address 192.168.0.2, Subnet mask 24 (255.255.255.0)
If you do so, disconnect the cables from the LAN and WAN ports and reboot the SIP-GW4 card.
Then, connect the cable only to the LAN port, and reassign the IP address and subnet mask
address for the WAN port.
2. Click Set.
3. Click Set Static Route to specify a static route.
Note
Set Static Route is displayed only when 1.3 Advanced Settings is enabled. Refer to "3.5
Programming—Advanced Settings".
32
Installation Manual
3.3 Programming—Network Settings
3.3.2
LAN Interface
1. Click 1.1.2 LAN Interface in the operation menu.
2. Assign each parameter referring to the descriptions below.
Parameter & Description
Default
Value Range
IP Address
192.168.0.1
Available IP addresses for the
card
24 (255.255.255.0)
8–30
Specifies the IP address of the card.
Subnet Mask
Specifies the subnet mask address of the card.
Notes
•
•
Do not assign an IP address and a subnet mask address from the same network as the WAN
port, for example:
LAN port: IP address 192.168.0.1, Subnet mask 24 (255.255.255.0)
WAN port: IP address 192.168.0.2, Subnet mask 24 (255.255.255.0)
If you do so, disconnect the cables from the LAN and WAN ports and reboot the SIP-GW4
card. Then, connect the cable only to the LAN port, and reassign the IP address and subnet
mask address for the LAN port.
If you change the IP address or subnet mask address of the card here, the settings of IP
Masquerade (NAPT) in 3.5.4 NAT Settings may need to be changed as well. Refer to "3.5.4
NAT Settings".
3. Click Set.
A confirmation screen is displayed.
Installation Manual
33
3.4 Programming—SIP Settings
3.4
Programming—SIP Settings
3.4.1
Channel & SIP Telephony
Channel Settings
1. Click 1.2.1 Channel & SIP Telephony.
[Items in the table]
Item
Explanation
Channel
Indicates the channel number.
ITSP Name
Indicates the ITSP (Internet Telephony Service Provider) name
specified in Server Settings in SIP Telephony Basic Settings.
Registration to SIP server
Indicates the registration status of each channel to the SIP server,
as follows:
•
–: The channel is not assigned.
•
•
•
Channel Attribute
*:
34
Reboot to enable new setting: Reboot is required.*
Succeeded: Registration to the SIP server is complete,
and calls can be made/received.
Failed: Registration to the SIP server is incomplete.
Indicates the attribute of each channel. It is necessary to program
this item to activate each channel.
When changing the attribute between "Basic channel" and "Additional channel of ChN", reboot is
not required.
Installation Manual
3.4 Programming—SIP Settings
2. Specify Channel Attribute for each channel referring to the descriptions below.
Attribute
Description
Not Used (default)
The channel is not in use.
Basic channel
A subscriber channel.
If you select this attribute, the "Set" button will become active,
which allows you to configure SIP Telephony Basic Settings
and SIP Telephony Detailed Settings.
Additional channel of ChN (N: 1–8) Subordinative channel that can be added to Basic channel
above. This setting is to be configured when several channels
can be used for one subscription with an ITSP. Selects a basic
channel number to which an additional channel is added.
Note
Channels 5 through 8 are only available when the SIP-DSP4 card is mounted on the SIP-GW4 card.
3. Click the Reboot button that appears below the table after all the required configuration, including the
following SIP Telephony Basic Settings, is complete.
SIP Telephony Basic Settings
If you change the Channel Attribute to Basic channel in Channel Settings and click the corresponding
Set button, the following screen is displayed.
1. Assign parameters in Server Settings based on the information provided by the ITSP.
Parameter & Description
Default
Value Range
Proxy Server
No default
Available domain names or IP
addresses (max. 83
alphanumeric characters)*1
Enable*2
Enable, Disable
Specifies the domain name or IP address of a
proxy server (compulsory). If an ITSP provides
both Proxy and Registrar Server information,
specify the Proxy Server information.
Registration
Specifies whether to register on the SIP server or
not (if required).
Installation Manual
35
3.4 Programming—SIP Settings
Parameter & Description
Default
Value Range
Registration Timer (Offer)
3600 sec*2
20–86400 sec
No default*2
Available domain names or IP
addresses (max. 83
alphanumeric characters)*1
No default*2
Max. 83 alphanumeric
characters
No default
Max. 8 alphanumeric
characters
Specifies the length of time that the card offers for
registration to the SIP server (if required).*3
Registrar Server
Specifies the domain name or IP address of a
registrar server (if provided). If an ITSP provides
both Proxy and Registrar Server information,
specify the Registrar Server information.
Domain Name
Specifies the domain name (if provided besides
proxy and registrar server).
ITSP Name
Specifies the ITSP name (optional).
*1:
*2:
*3:
If the port number of the server is not "5060", enter ":" and the specified port number after the domain
name or IP address.
[Example]
•
If you do not need to specify the port number of the server (i.e., the port number is 5060):
Domain name format: example.com
IP address format: 192.168.1.1
•
If you need to specify the port number of the server:
Domain name format: example.com:7777
IP address format: 192.168.1.1:7777
The value range of the port number is 1024–65535.
No need to change unless necessary.
The actual length of time depends on the negotiation with the SIP server or the other device.
Therefore, the Registration Timer will not always function for the length of time set in advance.
2. Assign parameters in Account Settings based on the information provided by the ITSP.
Parameter & Description
Default
Value Range
SIP Account
No default
Max. 63 alphanumeric
characters
No default
Max. 63 alphanumeric
characters
No default
Max. 32 alphanumeric
characters
Specifies the SIP account (telephone number)
(compulsory).
Authentication ID
Specifies the ID (compulsory).
Authentication Password
Specifies the password (compulsory).
36
Installation Manual
3.4 Programming—SIP Settings
SIP Telephony Detailed Settings
If you change the Channel Attribute to Basic channel in Channel Settings and click the corresponding
Set button, the following screen is displayed.
The following settings may be required depending on the ITSP being used.
1. Assign parameters in Caller ID Settings referring to the descriptions below.
[Sending Caller ID for Outgoing call]
Configurations for caller ID to be sent when making calls.
Parameter & Description
Default
Value Range
Sending Caller ID Mode
"From" header
"From" header, "PPrefered-Identity" header
SIP Account
SIP Account,
Authentication ID, PBX
Caller ID*2
Specifies the header of the SIP message in which
the caller ID is stored.
Username*1 in "From" header
Specifies the value to be stored in the username
part of the SIP-URI of the "From" header.
Installation Manual
37
3.4 Programming—SIP Settings
Parameter & Description
Default
Value Range
Complete SIP-URI Address in "From"
header
No default
Max. 89 alphanumeric
characters
Specifies the complete SIP-URI address of the
"From" header.
Note
If you enter the complete SIP-URI address
here, the configuration in Username in
"From" header will be invalid.
Anonymous format in "From" header
Specifies the format of the "From" header when
not sending caller ID.
Displayname and SIP- Displayname and SIPURI
URI, Displayname only*3
Username in "P-Prefered-Identity" header SIP Account
Specifies the value to be stored in the username
part of the SIP-URI of the "P-Prefered-Identity"
header (required only when this header is
selected in Sending Caller ID Mode).
Complete SIP-URI Address in "PPrefered-Identity" header
SIP Account,
Authentication ID, PBX
Caller ID*2
No default
Max. 89 alphanumeric
characters
0
0–32
No default
Max. 20 alphanumeric
characters
National
National, International,
International (with +)*4
Specifies the complete SIP-URI address of the
"P-Prefered-Identity" header (required only when
this header is selected in Sending Caller ID
Mode).
Note
If you enter the complete SIP-URI address
here, the configuration in Username in "PPrefered-Identity" header will be invalid.
PBX Caller ID Modification–Removed
Number of Digits
Specifies the number of leading digits of the caller
ID to be removed (required only when "PBX
Caller ID" is selected above).
PBX Caller ID Modification–Added
Number
Specifies the number to be added to the caller ID
in the place of the removed digits above (required
only when "PBX Caller ID" is selected above).
PBX Caller ID Format
Selects the format of the caller ID (required only
when "PBX Caller ID" is selected above).
*1:
*2:
38
For example, in the SIP-URI "sip:[email protected]", the username is "1234".
If "PBX Caller ID" is selected, it is necessary to programme the PBX so that it will send the Caller
ID to the SIP-GW4 card. Refer to "4.1 Programming the PBX".
Installation Manual
3.4 Programming—SIP Settings
*3:
*4:
If "Displayname and SIP-URI" is selected, the displayname part and the SIP-URI of the "From"
header will be displayed as "Anonymous".
[Example]
From: Anonymous <sip:[email protected]>
If "Displayname only" is selected, only the displayname part of the "From" header will be
displayed as "Anonymous".
[Example]
From: Anonymous <sip:[email protected]>
The Caller ID Format for each value is as follows:
National: <Area Code> <Number>
International: <Country Code> <Area Code> <Number>
International (with +): + <Country Code> <Area Code> <Number>
[Receiving Caller ID for Incoming call]
Configurations for caller ID to be received from callers.
Parameter & Description
Default
Minimum Caller ID Digits for International 12
Call
Value Range
1–31
Specifies the minimum number of digits of the
caller ID for international calls.
Added Number for International Call
No default
Max. 8 alphanumeric
characters
Disable
Enable, Disable
Specifies the number to be added to the caller ID
for international calls.
Receiving Caller ID (Name)
Specifies whether to receive caller ID (name)
from a caller.
2. Assign parameters in Dialed Number Settings referring to the descriptions below.
[Sending Dialed Number for Outgoing call]
Parameter & Description
Default
Value Range
Dialed Number Format
National
National, International,
International (with +)*
Specifies the format of the dialled number to be
sent to the called party.
*:
The Dialed Number Format for each value is as follows:
National: <Area Code> <Number>
International: <Country Code> <Area Code> <Number>
International (with +): + <Country Code> <Area Code> <Number>
[Receiving Dialed Number for Incoming call]
Parameter & Description
Default
Value Range
Receiving Dialed Number Mode
"To" header
Request-URI, "To" header
Specifies the header of the SIP message in which
the dialled number is stored when receiving a call.
Installation Manual
39
3.4 Programming—SIP Settings
Parameter & Description
Default
Value Range
Receiving Dialed Number Validity Check
Disable*
Enable, Disable
Specifies whether to check the validity of a dialled
number when receiving a call.
*:
Depending on the ITSP conditions, you may be required to change the setting to "Enable".
3. Assign parameters in SIP Options referring to the descriptions below.
Parameter & Description
Default
Value Range
PRACK
Enable (Passive)
Disable
Enable (Passive):
Activates this feature only
when requested by the
other device
Enable (Active): Activates
this feature only if the
other device supports the
feature
Enable (Passive)
Disable
Enable (Passive):
Activates this feature only
when requested by the
other device
Enable (Active): Activates
this feature only if the
other device supports the
feature
180 sec
180–3600 sec
re-INVITE
re-INVITE, UPDATE
Specifies whether the PRACK feature is enabled
or disabled.
Session Timer
Specifies whether Session Timer is enabled or
disabled.
Session Timer (Offer)
Specifies the length of time that the card offers for
Session Timer.*
Session Timer Method
Specifies the method to be used for Session
Timer.
*:
The actual length of time depends on the negotiation with the SIP server or the other device.
Therefore, the Session Timer will not always function for the length of time set in advance.
4. Click Set.
The Channel Settings screen is displayed.
40
Installation Manual
3.4 Programming—SIP Settings
3.4.2
Voice Communication
The following is the procedure to set the voice encoding rules.
1. Click 1.2.2 Voice Communication.
2. Assign each parameter for each channel, referring to the descriptions below.
Parameter & Description
Default
Value Range
Codec Priority
1. G.711-A
2. G.711-Mu
3. G.729-AB
G.711-Mu, G.711-A, G.729AB, None (for priority 2 and 3
only)
20 ms
20, 30, 40, 50, 60 ms
Disable
Enable, Disable
Specifies the priority of the codecs to be used.
The order of priority is as follows: 1 (High), 3
(Low)
Packet Interval
Specifies the interval time until the next RTP
packet is sent.
VAD
Specifies whether to use Voice Activity Detection
(VAD).
The VAD conserves bandwidth by detecting silent
periods during a call and suppressing the packets
of silence from being sent to the network.
Installation Manual
41
3.4 Programming—SIP Settings
Parameter & Description
Default
Value Range
DTMF Relay
Inband
RFC2833, SIP INFO, Inband
RFC2833, SIP INFO
(Both methods are
enabled.)
RFC2833, SIP INFO
Priority: 5
0–7
Sending method
Specifies the sending method
of DTMF tones.
This enables end-to-end DTMF
relay over the network.
Receive
Specifies whether to receive
DTMF tones in the RFC2833
and/or SIP INFO methods.
QoS
SIP
ToS
Specifies the value in the ToS Normal
field of the header of IP packets
by a generic term.
DSCP
Normal, Monetary Cost,
Reliability, Throughput, Delay
40
0–63
a0
0–FF
Priority: 5
0–7
Normal
Normal, Monetary Cost,
Reliability, Throughput, Delay
40
0–63
a0
0–FF
Specifies the value in the ToS
field of the header of IP packets
by a DSCP for DiffServ.
HEX
Specifies the value in the ToS
field of the header of IP packets
by a hexadecimal number.
RTP/ ToS
RTCP Specifies the value in the ToS
field of the header of IP packets
by a generic term.
DSCP
Specifies the value in the ToS
field of the header of IP packets
by a DSCP for DiffServ.
HEX
Specifies the value in the ToS
field of the header of IP packets
by a hexadecimal number.
4. Click Set.
5. The new setting must be followed by a reboot to become effective.
Do one of the following:
– Click Reboot Now to make the changes effective now.
– Click Reboot Later to return to the previous screen.
42
Installation Manual
3.4 Programming—SIP Settings
3.4.3
NAT Traversal
Channel Settings (only for Basic Channel)
1. Click 1.2.3 NAT Traversal in the operation menu.
2. Assign each parameter for each channel, referring to the descriptions below.
Parameter & Description
Default
Value Range
Channel
No default
Channel number
No default
ITSP name
Disable
Disable:
NAT traversal is disabled.
Fixed IP Addr.:
The global IP address of the
router with NAT enabled is
fixed.
STUN:
A STUN Server, used
alongside the SIP Server,
finds out the global IP
address of the router with
NAT enabled.
Indicates the channel number specified in Basic
Channel in 1.2.1 Channel & SIP Telephony.
ITSP Name
Indicates the ITSP (Internet Telephony Service
Provider) name specified in Server Settings in SIP
Telephony Basic Settings in 1.2.1 Channel & SIP
Telephony.
NAT Traversal
Specifies the NAT traversal method.
Installation Manual
43
3.4 Programming—SIP Settings
Parameter & Description
Default
Value Range
STUN Server*1
No default
Domain name (max. 83
alphanumeric characters) or
IP address*2
(Disable)
(Disable), Blank UDP
20 sec
10–60 sec
Enable
Enable, Disable
Specifies the domain name or IP address of the
STUN server. This setting is compulsory if STUN is
selected in NAT Traversal.
Keep Alive
for NAT
Binding
Packet Type
Specifies the type of Keep Alive
packets to be sent out.
Interval (10–60)
Specifies the interval time until the
next Keep Alive packet is sent.
Note
It is required to set this
interval shorter than the NAT
binding time of the router. The
default value is appropriate in
most cases.
rport
Enables this feature to request that the SIP server
sends the response back to the source IP address
and port from which the request originated.
*1:
*2:
When more than one channel is assigned for only one ITSP, specify STUN Server and Keep Alive
for NAT Binding for only one channel. The settings are automatically applied to the other channels.
If the port number of the server is not "3478", enter ":" and the specified port number after the domain
name or IP address.
[Example]
•
If you do not need to specify the port number of the server (i.e., the port number is 3478):
Domain name format: example.com
IP address format: 192.168.1.1
•
If you need to specify the port number of the server:
Domain name format: example.com:7777
IP address format: 192.168.1.1:7777
The value range of the port number is 1024–65535.
Common Settings
1. Assign the parameter, based on the information provided by the ISP, referring to the description below.
Parameter & Description
Default
Value Range
Fixed IP Address
No default
Available IP addresses
Specifies the global IP address of the router with
NAT enabled. This setting is compulsory if Fixed
IP Addr. is selected in NAT Traversal.
44
Installation Manual
3.4 Programming—SIP Settings
3.4.4
Options
Local Port Settings
1. Click 1.2.4 Options in the operation menu.
2. Assign each parameter referring to the descriptions below.
Parameter & Description
Default
Value Range
SIP Client Port Number*1
5060
1024–65535
5004
1024–65434 (even number
only)
3478
1024–65535
Specifies the port number of the SIP-GW4 card
used for communications with the SIP server.
RTP/RTCP Port Start Number
Specifies the starting port number of the dynamic
ports used for voice communications. Starting
with this port, 100 consecutive ports can be used
as RTP/RTCP ports.*2
STUN Client Port Number*1
Specifies the port number of the SIP-GW4 card
used for communications with the STUN server.
*1:
*2:
Specify different values for each parameter.
For example, if the RTP/RTCP Port Start Number is "5004" (default), ports 5004 to 5103 can be used
as RTP/RTCP ports.
Installation Manual
45
3.5 Programming—Advanced Settings
3.5
Programming—Advanced Settings
Enabling the Advanced Settings
1. Click Enable for 1.3 Advanced Settings in the operation menu.
2. Read Agreement for the Advanced Settings carefully, and click Agree.
46
Installation Manual
3.5 Programming—Advanced Settings
3. Click Reboot Now.
When the reboot finishes, the following screen is displayed, and each programming item is enabled.
Disabling the Advanced Settings
1. Click Disable for 1.3 Advanced Settings in the operation menu
Installation Manual
47
3.5 Programming—Advanced Settings
2. Click OK.
3. Click Reboot Now.
When the reboot finishes, the following screen is displayed, and each programming item is disabled.
48
Installation Manual
3.5 Programming—Advanced Settings
3.5.1
DHCP Server
1. Click 1.3.1 DHCP Server in the operation menu.
2. Assign each parameter referring to the descriptions below.
Parameter & Description
Default
Value Range
Enable/Disable
Disable
Enable, Disable
192.168.0.1
Available IP addresses for the
primary DNS server
0.0.0.0
Available IP addresses for the
secondary DNS server
192.168.0.1
Available default gateway IP
addresses for the card
192.168.0.2
Available IP addresses
128
1–254
Specifies the use of a DHCP server.
Primary DNS Server
Specifies the IP address of the primary DNS
server.
Secondary DNS Server
Specifies the IP address of the secondary DNS
server.
Gateway
Specifies the default gateway IP address of the
card.
Start IP Address
Specifies the first IP address that the DHCP
server can assign.
IP Address Number
Specifies the number of IP addresses that the
DHCP server can assign.
3. Click Set.
A confirmation screen is displayed.
4. The new settings must be followed by a reboot to become effective.
Do one of the following:
– Click Reboot Now to make the changes effective now.
Installation Manual
49
3.5 Programming—Advanced Settings
–
50
Click Reboot Later to return to the previous screen.
Installation Manual
3.5 Programming—Advanced Settings
3.5.2
Static Route
1. Click 1.3.2 Static Route in the operation menu.
•
•
•
Current Active Route List: Current active routing lists are displayed. "link#1" indicates the LAN
port of the card, and "link#2" indicates the WAN port of the card.
Route Configuration Table: Available routing lists are displayed. If there is a route displayed in
the table, clicking the Delete button will delete the route from both Current Active Route List and
Route Configuration Table.
Add a Route: Additional routes can be specified.
2. Assign each parameter referring to the descriptions below.
Parameter & Description
Default
Value Range
Destination IP Address
No default
Available IP addresses (default
route: 0.0.0.0)
24 (255.255.255.0)
0, 8–32
No default
Available IP addresses, PPPoE
Specifies the destination IP address.
Destination Subnet Mask
Specifies the destination subnet mask address.
Next Hop
Specifies a gateway by selecting either an IP
address or Interface.
3. Click Add.
A confirmation screen is displayed.
The new route specified in Add a Route is added to Route Configuration Table. If the network is
connected, the route is also added to Current Active Route List. If not, the route will be queued and
added when the network is connected.
Installation Manual
51
3.5 Programming—Advanced Settings
3.5.3
IP Filter
1. Click 1.3.3 IP Filter in the operation menu.
In the IP Filter Rules table, several IP filter rules are registered as default. IP packets are checked
against the IP filter rules in that order. If the IP packet matches a rule, the IP packet is blocked or allowed
to pass according to the rule. If the IP packet does not match any rules, the IP packet is allowed to pass.
[Buttons in the table]
Button
Description
Delete
Deletes the IP filter rule.
Edit
Edits the IP filter rule.
Copy
Copies the IP filter rule. The copied rule can be edited to create
a new rule.
Down
Lowers the priority level of the IP filter rule.
Up
Raises the priority level of the IP filter rule.
CAUTION
For security reasons, special care must be taken when configuring the IP Filter settings.
52
Installation Manual
3.5 Programming—Advanced Settings
2. Click Add to add IP filter rules.
A maximum of 32 rules (including defaults) can be assigned to the table.
3. Assign each parameter referring to the descriptions below.
Parameter & Description
Default
Value Range
Action
Block
Block, Allow
No default
Available source IP
addresses*1
0 (0.0.0.0)
0, 8–32*1
No default
1–65535*3
No default
Available destination IP
addresses*1
0 (0.0.0.0)
Available destination subnet
mask addresses*1
No default
1–65535*3
Specifies whether the IP packet is blocked or
allowed to pass.
Source
IP Address
Specifies the source IP address.
Mask
Specifies the source subnet mask
address.
TCP/UDP Port*2
Specifies the range of the source
port number to apply the filter rule.
Destination
IP Address
Specifies the destination IP
address.
Mask
Specifies the destination subnet
mask address.
TCP/UDP Port*2
Specifies the range of the
destination port number to apply
the filter rule.
Installation Manual
53
3.5 Programming—Advanced Settings
Parameter & Description
Default
Value Range
Protocol
Any
Any, ICMP, IGMP, TCP, UDP,
RSVP, OSPF, GRE
Input
Input: IP filter rules are
applied to IP packets that are
received at the interface
specified in Interface.
Output: IP filter rules are
applied to IP packets that are
sent from the interface
specified in Interface.
WAN (Fixed IP
Address/DHCP
Client), PPPoE
LAN, WAN (Fixed IP Address/
DHCP Client), PPPoE*4
Specifies the protocol to which the IP filter rule is
applied.
Filter When
Specifies the direction of the IP packets (Input/
Output) to which the IP filter rule is applied.
Interface
Specifies the interface to which the IP filter rule is
applied.
*1:
*2:
*3:
*4:
Enter "0 (0.0.0.0)" to apply the IP filter rules to all the IP packets.
This setting is activated when "TCP", "UDP", or "TCP/UDP" is selected in Protocol.
To specify the range, enter the lowest port number, hyphen and highest port number.
To apply the IP filter rules to all port numbers, enter "0–65535". "0" can only be entered in this case.
It is possible to select multiple interfaces.
In Interface in the IP Filter Rules table, "Any" will be automatically displayed for the timing that is not
selected in Filter When.
4. Click Set.
A confirmation screen is displayed, and the new setting is displayed in the IP Filter Rules table.
54
Installation Manual
3.5 Programming—Advanced Settings
3.5.4
NAT Settings
1. Click 1.3.4 NAT Settings in the operation menu.
2. Assign the following items referring to the descriptions.
–
–
–
–
–
IP Masquerade (NAPT)
Static NAT (DMZ [Demilitarized Zone])
Port Mapping (Port Forwarding)
Private IP Packet Restriction to WAN
VPN Pass-through
IP Masquerade (NAPT)
IP Masquerade enables internal devices (e.g., PCs) on a LAN network to communicate with external
devices on the WAN network by using the global IP address assigned to the WAN port.
Specify the local IP address of each internal device. After configuration is complete, the address information
is added to the list (A).
Installation Manual
55
3.5 Programming—Advanced Settings
A
1. Click Delete if you wish to delete the address information listed in that row.
2. Assign each parameter referring to the descriptions below.
Parameter & Description
Default
Value Range
Local IP Address
192.168.0.0
Available IP addresses
24 (255.255.255.0)
8–32
Specifies the target local network address for
address translation.
Local Subnet Mask
Specifies the subnet mask address for the local
IP address assigned above.
Notes
•
•
•
When the IP address is changed in 3.3.2 LAN Interface, it may be necessary to change the IP
masquerade settings as well.
Depending on the destination to which IP packets are sent, the IP address of the WAN port may
be automatically selected as the local IP address.
When two or more addresses are listed, an address that matches any one of the listed entries will
be a target for address translation.
3. Click Add.
A maximum of 8 sets of addresses (including defaults) can be assigned to the table.
A confirmation screen is displayed.
4. Click Back to [NAT Settings] to return to the previous screen.
Static NAT (DMZ [Demilitarized Zone])
Specifies the IP addresses for address translation using Static NAT. After configuration is complete, the
address information is added to the list (A).
CAUTION
If Static NAT is enabled, external devices on a WAN network can directly access internal devices on a
LAN network. For security reasons, special care must be taken when configuring the Static NAT
settings.
56
Installation Manual
3.5 Programming—Advanced Settings
A
1. Click Delete if you wish to delete the address information listed in that row.
2. Assign each parameter referring to the descriptions below.
Parameter & Description
Default
Value Range
Local IP Address
No default
Available IP addresses
No default
Available IP addresses
Specifies the target local IP address for address
translation.
Global IP Address
Specifies the global IP address for address
translation.
3. Click Add.
A maximum of 8 sets of addresses can be assigned to the table.
Port Mapping (Port Forwarding)
Port Mapping enables external devices on a WAN network to communicate with internal devices on a LAN
network.
Specify the packet information to the WAN port and internal device (Host) information to which those
packets will be transferred. After configuration is complete, the information is added to the list (A).
Note
When the list contains several entries, the packet information to the WAN port will be checked in the
order of top to bottom.
CAUTION
If Port Mapping is enabled, external devices on a WAN network can directly access internal devices on
a LAN network. For security reason, special care must be taken when configuring the Port Mapping
settings.
Installation Manual
57
3.5 Programming—Advanced Settings
A
1. Click Delete if you wish to delete the port information listed in that row.
2. Assign each parameter referring to the descriptions below.
Parameter & Description
Default
Value Range
Interface
No default
None, WAN (Fixed IP
Address/DHCP
Client), PPPoE
TCP
TCP, UDP, ESP, GRE
One Port
One Port: Enter a
specific port number
Port Range: Enter a
range of port
numbers
IP Address
IP Address, MAC
Address*2
No default
Available IP
addresses
8 (255.0.0.0)
8–32
Specifies the target interface for address translation.
Protocol*1
Specifies the target protocol for address translation.
Port Number*1
Specifies the effective port numbers.
Local Host
Specifies the local host by selecting either an IP address
or a MAC address.
Remote Host*3
IP Address
Specifies the target remote Specifies the IP address for
host for address translation. the remote host.
Subnet Mask
Specifies the subnet mask
address for the remote host.
58
Installation Manual
3.5 Programming—Advanced Settings
*1:
*2:
*3:
The type of VPN pass-through specified in VPN Pass-through determines the values to be entered,
as follows:
•
IPSec
– Protocol: UDP; Port number: 500
– Protocol: ESP; Port number: Not required
•
PPTP
– Protocol: TCP; Port number: 1723
– Protocol: GRE; Port number: Not required
If a DHCP server is assigned, a MAC address must also be assigned (refer to 3.5.1 DHCP Server).
If no remote host is assigned, IP packets that are sent from all the remote hosts will be targets for
address translation.
3. Click Add.
A confirmation screen is displayed.
4. Click Back to [NAT Settings] to return to the previous screen.
Private IP Packet Restriction to WAN
Specifies whether to block IP packets that have private addresses as a source IP address to be sent to the
WAN port without NAT.
1. Check the box to block IP packets.
2. Click Set.
A confirmation screen is displayed.
3. Click Back to [NAT Settings] to return to the previous screen.
VPN Pass-through
Specifies the type of VPN pass-through, IPSec or PPTP.
1. Check the desired box.
2. Click Set.
Notes
•
•
The new setting must be followed by a reboot to become effective (refer to "3.8.1 Reboot").
It is necessary to configure the Port Mapping (Port Forwarding) settings to allow access from the
Internet.
Installation Manual
59
3.5 Programming—Advanced Settings
3.5.5
Bandwidth
1. Click 1.3.5 Bandwidth in the operation menu.
Specify the maximum amount of bandwidth for VoIP (voice, data) communication on the network. If it
requires more bandwidth than is set here, packets will not be sent. In that case, voice packets (RTP
packets) are prioritised and data to be sent via the LAN will be discarded. The bandwidth restriction set
here does not influence IP packets that are received at the interface. Set the actual amount of
bandwidth (refer to "A1.2 Bandwidth Requirements").
2. Assign each parameter referring to the descriptions below.
Parameter & Description
Default
Value Range
WAN (Fixed IP Address/DHCP Client)
800
20–30000
800
20–30000
Specifies the bandwidth for the WAN port.
Applies to connection by a fixed IP address or
DHCP Client.*1
PPPoE
Specifies the bandwidth for PPPoE.
Applies to connection by PPPoE.*2
*1:
*2:
When Fixed IP Address or DHCP Client is selected as the connection method in WAN Interface.
When PPPoE is selected as the connection method in WAN Interface.
3. Click Set.
A confirmation screen is displayed.
4. The new settings must be followed by a reboot to become effective.
Do one of the following:
– Click Reboot Now to make the changes effective now.
– Click Reboot Later to return to the previous screen.
Note
After reboot, the card will be disconnected from the network for a number of seconds.
60
Installation Manual
3.6 Configuration Management
3.6
Configuration Management
3.6.1
Backup (Download from SIP-GW4)
The following is the procedure for downloading the configuration file from the SIP-GW4 card for backup.
Note
If the configuration file is backed up during VoIP communication, it may degrade the speech quality.
Backup procedures should be avoided during calls.
1. Click 2.1 Backup (Download from SIP-GW) in the operation menu.
2. Click Execute.
The download dialogue box is displayed.
3. Click Save.
The Save dialogue box is displayed. To cancel downloading, click Cancel.
4. Navigate to the folder in which you want to save the file.
5. Enter a file name (default: "config").
6. Click Save.
Installation Manual
61
3.6 Configuration Management
3.6.2
Restore (Upload to SIP-GW4)
The following is the procedure for restoring the backup file to the SIP-GW4 card.
Note
If the backup file is restored during VoIP communication, it may degrade the speech quality. Restoring
procedures should be avoided during calls.
1. Click 2.2 Restore (Upload to SIP-GW) in the operation menu.
2. Click Browse and select the file to be restored.
3. Click Execute.
A confirmation screen is displayed. To cancel uploading, click Clear.
4. The new settings must be followed by a reboot to become effective.
Do one of the following:
– Click Reboot Now to make the new setting effective now.
– Click Reboot Later to return to the previous screen.
Note
After reboot, the card will be disconnected from the network for a number of seconds.
62
Installation Manual
3.6 Configuration Management
3.6.3
Initialization
1. Click 2.3 Initialization.
2. Click All settings will be returned to default.
A confirmation screen is displayed.
3. Click Execute.
To cancel the initialisation, click Cancel.
Notes
•
•
After initialisation, the card will automatically be rebooted.
After initialisation, the IP address of the LAN port is changed to "192.168.0.1", and the card
and PCs may become unable to communicate. In that case, change the TCP/IP settings of the
PCs.
Installation Manual
63
3.7 Maintenance
3.7
Maintenance
3.7.1
General Information
Click 3.1 General Information.
Note
You can switch the displayed. Click "Deutsch" for German.
64
Installation Manual
3.7 Maintenance
3.7.2
Channel Status
1. Click 3.2 Channel Status.
2. Confirm the status of each channel referring to the descriptions below.
Status
Description
Not Used
The settings for the channel are not configured, or Not Used
is selected in Channel Settings. Refer to "3.4.1 Channel &
SIP Telephony".
Initial WAN Connection Incomplete
WAN connection is incomplete. Check the probable causes
below and make the necessary corrections:
•
Programming for the WAN interface is incorrect.
Refer to "3.3.1 WAN Interface".
•
The WAN port is not connected to the DCE (e.g.,
ADSL Modem) correctly. Refer to "2.2.2 WAN Port
Connection".
•
There is a malfunction on the WAN. For more
information, consult your network administrator.
SIP Registration Failed
After WAN connection is complete, registration to the SIP
server failed. Check the probable causes below and make the
necessary corrections:
•
The settings for the channel are incorrect. Refer to
"3.4.1 Channel & SIP Telephony".
•
The WAN port is not connected to the DCE (e.g.,
ADSL Modem) correctly. Refer to "2.2.2 WAN Port
Connection".
•
There is a malfunction on the WAN. For more
information, consult your network administrator.
Idle
WAN connection and registration to the SIP server are
complete. The channel is available and in standby status.
Installation Manual
65
3.7 Maintenance
66
Status
Description
Busy
WAN connection and registration to the SIP server are
complete. The channel is being used.
Installation Manual
3.7 Maintenance
3.7.3
System Log (for engineers only)
1. Click 3.3 System Log in the operation menu.
Notes
•
•
•
To update the displayed system log information, click Refresh System Logs.
To clear all system log information, click Clear System Logs.
If the number of recorded system logs exceeds the limit, the oldest system logs will be
overwritten.
Installation Manual
67
3.7 Maintenance
3.7.4
Ping Test
1. Click 3.4 Ping Test in the operation menu.
2. Enter the IP address of the ping destination in the Destination IP Address box.
3. Click Send.
After a few seconds, the ping test result will be displayed.
68
Installation Manual
3.7 Maintenance
3.7.5
Change Password
1. Click 3.5 Change Password in the operation menu.
2. Assign a new log-in password in the New password box.
3. Assign the same password in the Reenter new password box.
4. Click Set.
A confirmation screen is displayed.
Notes
•
•
•
A maximum of 16 alphanumeric characters can be assigned for the password.
The password is case sensitive.
For security, it is recommended to change the password periodically.
Installation Manual
69
3.7 Maintenance
3.7.6
Firmware Upgrade
1. Click 3.6 Firmware Upgrade.
2. Click Browse to select the firmware file.
3. Click Execute.
To clear the entry, click Clear.
Notes
•
•
Do not turn off the power to the PBX during the upgrade.
Do not change the card status (OUS/INS) during the upgrade.
4. The new setting must be followed by a reboot to become effective.
Do one of the following:
– Click Reboot Now to make the changes effective now.
– Click Reboot Later to restore or backup the configuration file. For details, refer to the steps below.
How to restore the configuration file
1. Click Browse and select the file to be restored.
2. Click Execute.
A confirmation screen is displayed. To clear the entry, click Clear.
3. The new setting must be followed by a reboot to become effective.
Do one of the following:
– Click Reboot Now to make the new setting effective now.
– Click Reboot Later to return to the previous screen.
70
Installation Manual
3.7 Maintenance
How to backup the configuration file
1. Click Execute.
The download dialogue box is displayed.
2. Click Save.
The Save dialogue box is displayed. To cancel downloading, click Cancel.
3. Navigate to the folder in which you want to save the file.
4. Enter a file name (default: "config").
5. Click Save.
Installation Manual
71
3.8 Others
3.8
Others
3.8.1
Reboot
1. Click 3.7 Reboot in the operation menu.
2. Click Reboot Now.
A confirmation screen is displayed.
3. Click Execute.
After reboot, the card will be disconnected from the network for a number of seconds. Click Cancel to
return to the previous screen.
72
Installation Manual
Section
4
Programming the PBX
Installation Manual
73
4.1 Programming the PBX
4.1
Programming the PBX
Depending on the conditions in which the SIP-GW4 card is used, programming may be required for the PBX
using the KX-TDA Maintenance Console (PC programming software of the PBX):
Making Calls
With the default settings, the PBX sends calls to the SIP VoIP network 10 seconds after an extension user
completes dialling the telephone number.
Through programming the PBX, calls can be sent to the SIP VoIP network from the PBX as soon as dialling
is completed. The settings can be changed in the following two ways:
1) Pressing the # key
The PBX sends calls to the SIP VoIP network when the # key is pressed after dialling the telephone
number.
Programming Location of the KX-TDA Maintenance Console
2. System—9. System Options—Option 2—ISDN en Block Dial—[#] as End of Dial for en Bloc mode
Note
The programming above is same for ISDN.
2) Dialling Plan
The PBX sends calls to the SIP VoIP network when the dialled number is a preprogrammed telephone
number.
Programming Location of the KX-TDA Maintenance Console
•
3. Group—1. Trunk Group—1. TRG Settings—Main—Dialling Plan Table
•
6. Feature—7. Dialling Plan
Caller ID Modification
When receiving calls via the SIP VoIP network, caller ID may not be displayed properly.
In that case, the caller ID can be edited through programming the PBX.
Programming Location of the KX-TDA Maintenance Console
•
3. Group—1. Trunk Group—1. TRG Settings—Main—Caller ID Modification Table
•
6. Feature—2. Caller ID Modification—Caller ID Modification
For details about programming each setting, refer to the PC Programming Manual of the PBX.
74
Installation Manual
Appendix
A
Guidance for VoIP Installation
Installation Manual
75
A1 Important Notice for Subscription and Installation
A1
Important Notice for Subscription and
Installation
A1.1
Firewall Requirements
If the VoIP network contains a firewall, you must configure the firewall to allow VoIP packets to pass through
certain ports of the ports listed below without being blocked by filtering. The ports for which you need to
configure the firewall may vary depending on the network conditions.
For more information, consult your network administrator.
[IP Packets to SIP-GW4 Card]
Port
TCP/UDP
Default Port No.
SIP Client Port
UDP
5060
STUN Client Port
UDP
3478
RTP/RTCP Port
UDP
5004–5103
DNS Client Port
UDP
53
[IP Packets from SIP-GW4 Card]
Port
TCP/UDP
Default Port No.
Proxy Server Port
UDP
5060
Registrar Server Port
UDP
5060
STUN Server Port
UDP
3478
DNS Server Port
UDP
53
Router Requirements
•
•
Port Forwarding:
When a SIP-GW4 card is located under a NAT router, and when incoming packets are routed to a
SIP Client port or RTP/RTCP port indicated in the [IP Packets to SIP-GW4 Card] table above, it
may be required to set the NAT router so that it forwards the incoming packets to the IP address of
the SIP-GW4 card.
SIP-NAT Feature:
When a SIP-GW4 card is located under a NAT router that supports the SIP-NAT feature*, it is
recommended to disable this feature.
*: When NAT is enabled, the router translates the IP address stored in the IP header and the port
number stored in the UDP header. When SIP-NAT is enabled, the router also translates the IP
address and port number stored in SIP messages.
76
Installation Manual
A1 Important Notice for Subscription and Installation
A1.2
Bandwidth Requirements
When using the SIP-GW4 card, you must ensure that the WAN has enough bandwidth to support VoIP
communications. Refer to the table below and ensure that the sum of the required bandwidth for each
channel is smaller than the amount the WAN (e.g., ADSL network) can provide.
Note that the amount in the table is only a guide. Subscribe to a network that has enough bandwidth. If the
amount of bandwidth required for VoIP communications is larger than what the network can accommodate,
speech quality will be compromised.
Note
If you use an ADSL network, note that it has a narrow bandwidth for outgoing IP packets. Specify the
bandwidth of the ADSL network for outgoing IP packets in "3.5.5 Bandwidth".
Required Bandwidth for Each Channel
The required bandwidth depends on what combination of CODECs and packet sending interval is used.
Keep in mind the following points about the type of CODEC and packet sending interval, in terms of the
speech quality:
•
The speech quality of the CODECs varies as follows: G.711 (High), G.729 (Low)
•
The shorter the packet sending interval, the higher the speech quality.
•
The higher the speech quality the SIP-GW4 card provides, the more bandwidth the WAN requires.
Packet Sending Interval
CODEC
20 ms
30 ms
40 ms
50 ms
60 ms
G.711
90.4 kbps
81.6 kbps
77.2 kbps
74.6 kbps
72.8 kbps
G.729
34.4 kbps
25.6 kbps
21.2 kbps
18.6 kbps
16.8 kbps
Installation Manual
77
A1 Important Notice for Subscription and Installation
78
Installation Manual
Appendix
B
Initialisation of the SIP-GW4 Card
Installation Manual
79
B1 Initialising the SIP-GW4 Card
B1
Initialising the SIP-GW4 Card
If you have forgotten, for example, the IP address or log-in password you set for the SIP-GW4 card, follow
the procedure below to return the settings of the card to the factory default.
Note
Resetting the card will restore all settings, not just the IP address and log-in password, to the factory
default.
1. Slide the Initialise Switch on the card to the "INI" position, and then turn on the power to the PBX.
DIP-SW
OFF
OFF
1
2
3
INI
1
2
3
INI
2. To start the SIP-GW4 Maintenance Utility, log in with the default IP address, user ID, and password from
the PC connected to the card (refer to "3.2.2 Starting the SIP-GW4 Maintenance Utility").
3. Open "2.3 Initialization" from the menu and execute initialisation (refer to "3.6.3 Initialization").
4. After initialisation is complete, return the Initialise Switch to the "OFF" position.
Note
Ensure that the Initialise Switch is returned to the "OFF" position after initialisation is complete.
80
Installation Manual
Index
Installation Manual
81
Index
Numerics
4-Channel SIP Trunk Card (KX-TDA3450)
4-Channel VoIP DSP Card (KX-TDA3451)
LAN Port Connection
18
Local Port Settings
45
12
15
M
B
Maintenance
Backup (Download from SIP-GW4)
Bandwidth
60
Bandwidth Requirements
77
61
N
Names and Locations, Installation
NAT Settings
55
NAT Traversal
8, 43
C
Cable Connection
18
Change Password
69
Channel & SIP Telephony
34
Channel Settings, Channel & SIP Telephony
34
Channel Settings, NAT Traversal
43
Channel Status
65
Configuration Management
61
Connecting to a Switching Hub, LAN Port
19
Connecting to a Switching Hub, WAN Port
20
Options
Ping Test
68
Port Mapping (Port Forwarding), NAT Settings
57
PPPoE Configuration, WAN Interface
29
Preparations
23
Preparing the PC
23
Private IP Packet Restriction to WAN, NAT Settings
59
Procedure Overview
22
Programming the PBX
74
Programming, Advanced Settings
46
Programming, Network Settings
28
Programming, SIP Settings
34
F
R
31
G
I
KX-TDA3450 SIP-GW4 Card
KX-TDA3451 SIP-DSP4 Card
12
15
76
22
Voice Communication
41
VPN Pass-through, NAT Settings
W
L
LAN Interface
33
Installation Manual
77
SBC (Session Border Controller)
9
Select Connection, WAN Interface
28
SIP Telephony Basic Settings, Channel & SIP Telephony
35
SIP Telephony Detailed Settings, Channel & SIP Telephony
37
SIP-DSP4 Card (KX-TDA3451)
15
SIP-GW4 Card (KX-TDA3450)
12
SIP-GW4 Connection Outline
6
Specifications
10
Starting the SIP-GW4 Maintenance Utility
27
Static NAT (DMZ), NAT Settings
56
Static Route
51
STUN
8
STUN Server
8
System Log (for engineers only)
67
System Requirements
23
V
K
82
Reboot
72
Required Bandwidth for Each Channel
Restore (Upload to SIP-GW4)
62
Router Requirements
76
S
General Information, Maintenance
64
Guidance for VoIP Installation
75
Important Notice for Subscription and Installation
Indication Light (LED)
13
Information about IP Telephony Service
6
Initialisation, Configuration File
63
Initialisation, SIP-GW4 Card
80
Initialise Switch
80
Installation
12
Installing the SIP-GW4 Card, Procedure Overview
IP Filter
52
IP Masquerade (NAPT), NAT Settings
55
ISP (Internet Service Provider)
7
ITSP (Internet Telephony Service Provider)
6
45
P
20
Ferrite Core
14
Firewall Requirements
76
Firmware Upgrade
70
Fixed IP Address Configuration, WAN Interface
12
O
D
Data Circuit Terminating Equipment (DCE)
DHCP Server
49
DNS (Domain Name System)
7
DNS Server
7
64
WAN Interface
28
WAN Port Connection
20
59
Index
Installation Manual
83
Panasonic Communications Co., Ltd.
1-62, 4-chome, Minoshima, Hakata-ku, Fukuoka 812-8531, Japan
Copyright:
This material is copyrighted by Panasonic Communications Co., Ltd., and may be reproduced for internal
use only. All other reproduction, in whole or in part, is prohibited without the written consent of Panasonic
Communications Co., Ltd.
© 2007 Panasonic Communications Co., Ltd. All Rights Reserved.
PSQX4474XA KK0407TE2048