1
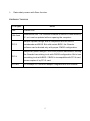
F IXED DISK GUARDER/SAFER
USER M ANUAL
The 6 th Edition © Feb. 27, 2003
CONTENTS
ABOUT FIXED DISK GUARDER /SAFER................................................ 3
Functions...................................................................................... 3
Features........................................................................................ 3
Software Versions ......................................................................... 4
Hardware Versions........................................................................ 5
CHAPTER 1
QUICK START GUIDE .................................................... 6
Before You Begin.......................................................................... 6
Installation Steps........................................................................... 6
1. Welcome ................................................................................ 6
2. Options.................................................................................. 7
3. Guard Partitions........................................................................ 9
Quick Test................................................................................... 10
CHAPTER 2
BASIC OPERATION GUIDE.......................................... 11
Default Password and Hot Keys.................................................. 11
Saving Fixed Disk Data............................................................... 11
Recovering Fixed Disk Data........................................................ 13
Entering the Main Menu .............................................................. 13
Setting Options ........................................................................... 14
1. Guarding Fixed Disk .................................................................15
2. Recovery Schedule ...................................................................15
3. Checking Password Recovery ......................................................15
4. OS Driver ..............................................................................15
5. Guarding CMOS......................................................................16
6. Changing Password ..................................................................16
1
7. Anti-Virus Option ....................................................................17
8. Boot Logo .............................................................................17
9. Booting OS from Fixed Disk Only .................................................18
10. Boot Wait .............................................................................18
Re-installing Guarder .................................................................. 18
Uninstalling Guarder ................................................................... 18
Exiting from the Main Menu......................................................... 19
Checking Password .................................................................... 19
CHAPTER 3
ADVANCED GUIDE ...................................................... 22
Boot Mode .................................................................................. 22
Guarding CMOS Intelligently....................................................... 23
How to Guard CMOS Intelligently....................................................24
Unique Serial Number and Serial-Number Password .................. 25
Anti-Evil-Attack............................................................................ 25
Setting Multi-OS Booting by System Commander ....................... 26
How to Skip Possible Virus Warning .................................................26
Setting Multi-Bootable-Partition Booting by BootMagic................ 27
CHAPTER 4
TROUBLESHOOTING ................................................... 28
I forgot the password ....................................................................... 28
The message “DISK BOOT FAILURE, INSERT...” appears ...................... 28
As if no Guarder card is plugged in ..................................................... 29
Repeatedly Rebooting...................................................................... 31
System breaks down once Guarder is plugged in before OS startup .......... 31
The ROM address of Guarder conflicts with others ................................. 32
Displaying blue screen and Windows breaks down ................................ 32
2
About Fixed Disk Guarder/Safer
Functions
²
PNP design. Press key Enter three times to finish default installation in five
seconds without re-fdisk.
²
Once fixed disk data is destroyed by any mistake, virus and/or hacker, only
press key F9 one time to recover it in half a second.
²
Support IDE and SCSI fixed disk controller.
²
Support PIO, DMA33, DMA66, Ultra DMA66, ATA-100 and Ultra ATA-100 IDE
interface.
²
Support FAT16/16E, FAT32/32E, NTFS/HPFS partitions and file systems.
²
Support 256GB fixed disk.
²
Guard whole fixed disk or selected partitions.
²
Support multi-OS booting by System Commander and multi -bootable-partition
booting by BootMagic.
²
Support not only DOS, Windows 3x/95/98/ME, but also Windows NT/2000/XP
server better.
²
Guard CMOS intelligently.
Features
²
Three boot modes make Guarder compatible with all sorts of mainboards and
BIOS.
²
When first set up, saved, or recovered, Guarder uses only 5KB of fixed disk;
when running , it uses 1.33MB of fixed disk at most.
²
Virtual Fixed Disk Drive (VFDD) is one created and managed by Guarder in
guarded partitions for new data saving. Theoretically Guarder supports a VFDD
3
of 1207GB, practically it supports a 12GB one, so it better supports Windows
NT/2000/XP server and ensures that the Defrag routine can run and large data
can be saved when any partition is guarded.
²
The magic Save function is best suitable for such application environment
about government, business, institute, home, finance, securities, accounting
and the military. When any partition is guarded, all writing on it will be recorded
as new data and saved on virtual fixed disk drive (VFDD). Once we use
recovery or uninstallation function, VFDD and all new data will be cleaned.
Guarder provides Save function to write data on VFDD onto physical fixed disk
drive.
²
Anti-Evil-Attack function is best suitable for net cafes and the computer groups
of schools and colleges. When the attacker deletes all installation information
on the guarded partitions, and reboots the computer, the Guarder will enter a
Security Check routine. OS can only be booted when the manager enters the
correct serial-number password, or the computer will be automatically reset to
prevent the attacker from destroying fixed disk data further.
²
Automatic-Uninstallation function is best suitable for net cafes and the
computer groups of schools and colleges. If the Guarder card is pulled out
without uninstallation, Guarder’s Security Check routine will automatically
uninstall itself after booting up Windows.
²
By providing the two valuable functions of Anti-Evil-Attack and
Automatic-Uninstallation, and shielding the booti ng interface, Guarder
safeguards itself and fixed disk better.
²
A careful design of triple pressing on key Enter to install Guarder intelligently, a
proper arrangement of four hot keys, and F1 for help make Guarder better
operated.
Software Versions
²
System-safety version with no Save function.
4
²
Data-safety version with Save function.
Hardware Versions
PCB types
ISA
ISA flash
Notes
Lowest cost.
Economical cost. The Guarder software is saved in Flash memory
IC, so it can be updated without opening the computer.
Adopts a patent design and is compatible with all sorts of
PCI 2
mainboards and BIOS. But with certain BIOS, the Guarder
software can be booted only with proper CMOS configuration.
Adopts two patent designs. With most popular mainboards, booting
PCI 4
the Guarder has nothing to do with CMOS configuration. But is has
something to do with BIOS. If BIOS is incompatible with PCI 4 card,
please replace it by PCI 2 card.
PCI NIC
10/100Mbps PCI Ethernet adapter integrated with the Guarder.
5
Chapter 1 Quick Start Guide
Before You Begin
²
Make sure that the system functions well. Though the Guarder can be installed
when viruses exist, it is advised to install it without viruses.
²
Make sure there is no static electricity.
²
Make sure the ISA card and the PCI card are not plugged into the wrong slot.
²
Do not plug the card in the wrong direction.
Installation Steps
1. Welcome
²
Plug the card and then boot the computer. If the above screen does not appear,
6
please refer to “As if no Guarder card is plugged in” section in the
Troubleshooting chapter.
²
Click Exit or press key Esc to quit installation and continue starting OS.
²
Click key Enter or Space Bar three times to finish default installation.
²
Remember the default password of the Guarder is function. The letters are in
lower case.
²
If the welcome screen prompts “Install Windows NT/2000/XP drivers first”,
please make sure you have booted up Windows NT/2000/XP as a system
administrator, run Install.EXE in Guarder’s Utilities Diskette to install the
Windows drivers. Some versions of Guarder do not include this prompt. For
computers with only DOS, Windows 3x/95/98/ME, do not care about this
prompt, because the Guarder can automatically install the Windows drivers.
2. Options
²
Click Cancel or press key Esc to quit the process a nd continue starting OS.
²
Please refer to “Setting Options” for detailed information about function setting
7
on this screen.
²
After clicking Ok, the Guarder will scan all the partitions, get the size and free
space of them, then go to the next step.
²
The 2 nd, 3rd, 7 th items of the Data-safety Guarder are different from the above.
They are shown as the follow screen.
8
3. Guard Partitions
²
Click Cancel or press key Esc to quit installation and continue starting OS.
²
Your PC screen will display the partitions information of its fixed disk, and the
Guarder will adjust the display format automatically according to the partitions.
²
The fixed disk with the partitions on the above screen is one to test Guarder. It
has three primary partitions and three extended partitions. Windows 98, ME,
NT, 2000 and XP are installed in the primary partitions and their GHOST image
files are saved in drive E. To get a fixed disk with the partitions on the above
screen, please use PQmagic to set partitions first, and then install BootMagic
for Multi-Bootable-Partition booting, let PC boot on every primary partition,
install OS and applications, create their own GHOST partition image files and
save them in drive E last.
²
The Guarder uses patent algorithm. It has an excellent performance and
default guard covers all partitions.
²
After clicking OK, Guarder scans all the folders in all partitions in fixed disk, and
sets protection for every Windows system. Now installation is finished.
9
Quick Test
²
Create a folder at the root of drive C, and create another at Windows desktop.
²
Reboot your computer, do nothing if a system-safety Guarder is used. If the
folders disappear, it means that the Guarder functions well and has
automatically finished recovery.
²
Reboot your computer, press key F9 or Ctrl-R repeatedly if a data-safety
Guarder is used, input the default password function on the following box and
press key Enter to start OS. If the folders disappear, it means that the Guarder
functions well and has finished recovery.
10
Chapter 2 Basic Operation Guide
Default Password and Hot Keys
The default password is function. The letters are in lower case.
Besides PgUp, PgDn, Left, Right, Space Bar, Enter and Esc, there are also four sets
of hot keys:
F9
or
Ctrl-R
: Recover fixed disk to the previous status when it was last set
protection or saved.
F10 or
Ctrl-M
: Enter the main menu.
F11 or
Ctrl-B
: Change Boot Mode (not often used). Please refer to “Boot
Mode” section in the Advanced Guide chapter.
F12 or
Ctrl-S
: Write data on VFDD onto physical fixed disk drive. This
advanced function is available only in the data-safety version of the Guarder.
Note: Hot keys can only be used after CMOS configuration and before OS
startup.
Saving Fixed Disk Data
All writing on the guarded partitions will be recorded as new data and saved on
virtual fixed disk drive (VFDD). This function is to write data on VFDD onto physical
fixed disk drive. There are two ways:
²
Press Ctrl-S or F12 to save data. The Guarder demands your password before
data saving.
²
Enter the main menu, click “Save system”. The following screens will appear.
11
The system-safety Guarder does not include this function. The Guarder will prompt
the following screen, and then you can only reset or shut down your computer.
The data-safety Guarder with this function will display the following processing
screen.
Notes:
²
Between 0% and 1%, the Guarder is doing a sorting of up to 150,000 arrays in
80386 PVAM. If you feel impatient, please wait a minute.
²
The Guarder uses patent algorithm. It can make changes to data of up to 12GB
in guarded partitions. The algorithm requires one reading and one writing of the
revised data, i.e. the data read and written onto the fixed disk is twice the size
of the revised data. Thus with more data, it takes a longer time to save.
12
Recovering Fixed Disk Data
Clear the VFDD and recover fixed disk (only guarded partitions, i.e. guarded fixed
disk drive) to the previous status when it was last set protection or saved in half a
second.
There are three ways to recover fixed disk:
²
Automatic recovery when booting.
²
Press Ctrl-R or F9, and enter the password.
²
Enter the main menu, choose “Recover system”, and the following screen will
appear.
Entering the Main Menu
Press Ctrl-M or F10, enter the password, and then you will enter the main menu.
13
Setting Options
There are two ways to set the Guarder’s options: one is to follow the second step in
installation, the other to click Options in the main menu.
14
1. Guarding Fixed Disk
If this function is disabled, Guarder works as if the card is not plugged in, but every
time before starting OS, it will show the message “No guard”.
If you wish to disable the Guarder without removing it, please disable this function.
2. Recovery Schedule
There are five choices:
²
“Nth boot” means an automatic recovery every Nth time the system boots. If
N=1, it will recover the fixed disk every time the system boots. Press PgUp or
PgDn to set N.
²
To manually recover the fixed disk, press Ctrl-R or F9, or enter the main menu
and choose “Recover system”.
²
Or you can choose automatic recovery every 12 hours, every 24 hours (every
day) or every week.
3. Checking Password Recovery
In case you carelessly pressed Ctrl-R or F9 to start recovery, enable this option to
check the password before recovery.
4. OS Driver
²
auto: the Guarder always installs its internal OS driver every installation.
²
manually: to update OS driver, first the Guarder examines OS driver. If none,
or a lower version of driver has been installed, the Guarder will automatically
install its internal one to replace it; or it will use the installed OS driver.
15
5. Guarding CMOS
To recover any changes made to CMOS, boot the computer somewhere between
CMOS configuration and OS startup.
If the computer reboots repeatedly after guarding CMOS, please press Ctrl-M or F10
repeatedly before OS startup, and then enter the password. Then the Guarder will
provide three choices as follows:
²
Click No to recover CMOS and reboot the computer.
²
Click Yes to backup CMOS, i.e. to save the new CMOS, then enter the main
menu.
²
Click Cancel or press key Esc to check CMOS. The computer will reboot three
times, and the Guarder will check CMOS automatically. For further information,
please refer to “Guarding CMOS Intelligently” section in the Advanced Guide
chapter.
6. Changing Password
If the password is not default function, the menu will display “********” instead of
“function”. To change the password, please enter your new password twice in the
dialogue box below.
16
If the two passwords you enter are not consistent, or you pressed key Esc, the
following screen will appear to indicate that the password is not changed.
If the password has been successfully changed, the following screen will appear.
7. Anti-Virus Option
To guard against CIH virus, there will be two 27th but no 26th every month. For such
application environment about government, finance, securities, accounting and the
military, please don’t enable Anti-Virus Option.
8. Boot Logo
Choose booting interface, e.g. to display a picture.
17
9. Booting OS from Fixed Disk Only
Enable or disable booting OS from fixed disk only.
10. Boot Wait
Boot Wait can vary from 1 to 15 seconds as you choose.
Re-installing Guarder
Reselect the partitions to be guarded. Please refer to the third step of the installation
process.
Note: the Guarder automatically recovers fixed disk data before re-installation. If you
have made very important new data on the guarded partitions, please do Save
function before re-installing.
Uninstalling Guarder
After clicking Uninstall, the following screen will appear to check if you really wish to
uninstall Guarder.
If you click Yes, the Guarder will automatically delete all the installation information
and VFDD. Then the following screen appears.
18
Click Ok to shut down your computer. If it does not have an ATX power supply, the
Guarder will lock the computer, and you will have to shut it down manually or reset.
If the Guarder is uninstalled but the Guarder card is still plugged in, the Guarder will
display its Welcome Interface every time the computer boots.
Exiting from the Main Menu
Click Yes on the following screen to exit from the main menu. When you exit, the
Guarder will automatically finish its task according to the settings and the guarded
partitions chosen.
Checking Password
Password check is used:
²
When you press Ctrl-R or F9 to recover fixed disk;
19
²
When you press Ctrl-M or F10 to enter the main menu;
²
When you press Ctrl-B or F11 to change boot mode;
²
When you press Ctrl-S or F12 to save VFDD;
²
Or when the Guarder detects an abnormal use and starts its security check
routine. Please refer to “Anti-Evil-Attack” section in the Advanced Guide
chapter.
20
You can only enter the password three times at most. If you press key Esc to cancel,
the Guarder will continue running without giving any notice. If the password is wrong,
after three times, the sign “Password Invalid” will appear. Click Ok, then it will
continue running with no further notice.
If you press key F1 when entering the password, Guarder will display its serial
number.
By the serial number, you can get the serial number password. The serial number
password is an all-purpose password corresponding with your unique serial number,
and it can be only got from the distributors.
21
Chapter 3 Advanced Guide
Boot Mode
Boot mode is a technical concept. For BIOS, after POST finishes, it boots the
Guarder, and then boots the OS in a certain order and ways. For the Guarder, it
takes different strategies (i.e. different boot modes) to respond to BIOS requests.
Change boot mode when:
²
The computer can’t boot OS after the card is plugged in;
²
The card is plugged in, but there is no sign that the card has been plugged in.
After BIOS finishes its POST and the CMOS configuration screen disappears, press
Ctrl-B or F11 repeatedly to enter the Boot Mode menu.
²
Standard Mode: compatible with almost all sorts of mainboards and BIOS. For
computers requiring Enhanced Mode, choosing Standard will cause the second
problem as described above.
²
Enhanced Mode: A few mainboards with AMI BIOS will require this mode. For
computers requiring Standard Mode, choosing Enhanced mode will cause
repeated rebooting and system breakdown.
²
Original Mode: rarely used. Only certain Dell computers require this mode.
22
Choose the boot mode compatible with your computer, then press any key to reboot
it.
²
For ISA card, you can only set boot mode by changing the jumpers of card. The
Guarder will give no sign.
²
For PCI card, you can only change boot mode after the Guarder checks the
password first.
Note: For Intel D845GEBV2/L mainboard using AMI BIOS Version
RG84510A.86A.0017.P09 (released on Sept. 9 th 2002 by AMI), only Enhanced
Mode is available, and only a PCI 2 card is allowed. By updating the BIOS with
0022.P12, you will have no trouble.
Guarding CMOS Intelligently
CMOS will be checked:
²
When the computer repeatedly reboots after guarding CMOS;
²
When the computer repeatedly reboots after new hardware is installed, e.g. a
new fixed disk is added, or re-install some hardware, e.g. connect the IDE fixed
disk on another connector.
²
When you wish to revise CMOS after guarding CMOS.
The steps to check CMOS are as follows:
23
1.
In the third case above, please revise CMOS first to make it different from the
one the Guarder has saved. In the other two cases, please do the next step
directly.
2.
Press Ctrl-M or F10 repeatedly after CMOS configuration and before OS
startup. Then enter the right password, the following menu will appear.
3.
Click Cancel or press key Esc to check CMOS. The computer will reboot three
times for the Guarder to analyze CMOS.
4.
In the third case above, you can revise CMOS every time the computer reboots,
so CMOS will be different from the one before last reboot. Later, only the
changes made now or at the first step will be allowed when CMOS is guarded.
How to Guard CMOS Intelligently
The third reason for CMOS analysis is: you can still revise certain parts of CMOS
after guarding CMOS. E.g. if you guard CMOS after you choose to boot from fixed
disk first, then unless it is disabled, the computer can not boot from floppy drive.
Even if you change it to boot from floppy drive, the Guarder will recover CMOS to
make the computer boot from fixed disk. In this case, if you wish to boot from floppy
drive without canceling CMOS guard, please follow these steps:
1.
Revise CMOS;
2.
Press Ctrl-M or F10, and check the password. The Guarder will not enter the
main menu (for you have changed CMOS), but display the dialogue box above.
Click “Cancel” to check CMOS.
3.
The Guarder starts analyzing CMOS, and the computer will be rebooted three
24
times. We can revise CMOS in any of the rebootings. The guarder will compare
these CMOS, and mark the changed units or bytes as permitted changes.
To partly change CMOS when it is guarded, please use the Guarder to analyze it,
and mark the changes allowed, so that the computer will not reboot when you
change these parts later.
Unique Serial Number and Serial-Number Password
In the dialogue boxes of Installation screen, configuration screen, main menu and
password check, press F1, and you will see
²
“20010822” is the manufacture date of your Guarder card.
²
“8899AABB.CCDDEEFF” is the serial number. It is unique.
²
“System Guarder” is the product name. Some versions will also include
copyright information.
²
“2001.0822” is the release date of the Guarder’s software.
Serial-number password is an all-purpose pas sword corresponding with the unique
serial number. It is used in case you forget the password, or Guarder carries security
check to prevent evil-attack. You can only get the password from the distributors.
Anti-Evil-Attack
When the attacker deletes all installation information on the guarded partitions, and
reboots the computer, the Guarder will enter a Security Check routine. The OS can
only be booted when the correct serial-number password is entered, or it will
automatically reset to prevent the attacker from destroying fixed disk data further.
For applications with lower security requirements, you can use the default password
instead. But for Guarders with the highest security level, the serial-number password
25
is required.
When the above window appears , press F1 to get the serial number. With it, you can
get the serial-number password from the distributors.
Setting Multi-OS Booting by System Commander
System Commander is a good software for multi -OS booting. Install first OS,
applications and System Com mander, and then the Guarder.
How to Skip Possible Virus Warning
The first time System Commander starts after Guarder installation, the Possible
Virus Warning window will appear as follows.
Press U to update. For system-safety Guarder, this window will appear every time
the fixed disk data is recovered. For data-safety Guarder, reboot the computer and
save fixed disk data. Then as long as you do not uninstall the Guarder, this window
will not appear whenever you recover fixed disk data.
26
Setting Multi-Bootable-Partition Booting by BootMagic
BootMagic is a software packed with PQmagic. It is specially used in installing Multi
Bootable Partitions.
Please set OS partitions in PQmagic first, and then install BootMagic, OS,
applications and the Guarder in this o rder.
27
Chapter 4 Troubleshooting
Legends
L
Detailed description of the problems.
J
Analysis of possible causes.
@
Ways to solve the problems.
F
Further notes.
M
Caution!
I forgot the password
J
Try default password first. If that won’t do, please get the serial-number
password from your distributor.
The message “DISK BOOT FAILURE, INSERT...” appears
L
Once Guarder card is plugged in, the message “DISK BOOT FAILURE,
INSERT SYSTEM DISK AND PRESS ENTER” appears every time the
computer boots.
J
Boot mode does not match BIOS.
Please refer to Boot Mode section in the Advanced Guide chapter.
28
As if no Guarder card is plugged in
L
1.
I pressed Ctrl-B or F11 when booting, but the computer does not
respond and starts OS as usual.
2.
I pressed Ctrl-B or F11 and entered the Boot Mode menu, but the
computer does not respond to pressing Ctrl-M or F10, the installation
screen does not appear, and the computer starts OS as usual.
3.
When the card was plugged in for the first time, I pressed Ctrl-B or
F11 and entered Boot Mode menu, pressed Ctrl-M or F10 and
checked password, but the installation screen would not appear if I
did not press the hot keys.
J
For the first case, the possible causes may be
²
The card is not properly plugged.
²
The ROM address of ISA card conflicts with others, e.g. SCSI cards,
and remote bootable network adapters .
²
The power supply has poor loading capacity; the ISA slot does not
meet the requirements.
²
If the Guarder is a PCI 2 card or an All-in-One card with Ethernet
adapter, CMOS is not properly configured.
²
PCI 4 Guarder can not be used with certain desktop boards and
BIOS.
For the second case, the possible cause may be
²
The boot mode does not match BIOS. Please refer to Boot Mode
section in the Advanced Guide chapter.
For the third case, the possible cause may be
²
You installed Guarder once, and pulled it out from your computer
without uninstallation. Note: the Guarder we sell now can
automatically uninstall itself when Windows is booted after the card
is pulled out without uninstallation.
29
is pulled out without uninstallation.
@
u
Plug the card again, or change a slot, or clean the slot/the card.
u
Adjust the ROM address of other ISA cards if possible, otherwise
change the jumpers J1 and J2 of Guarder ISA card. Note : This will
also change the boot mode of ISA Guarder. Please refer to Boot
Mode section in the Advanced Guide chapter.
u
Retry it with another ISA card, ISA flash card, PCI card or All-in-One
card. If the power supply does not work, contact your computer
distributor or the manufacturer, and replace either the power supply
or the computer itself.
u
Only a PCI 2 card, or an All-in-One card which integrates Guarder
and Ethernet adapter, will be affected by CMOS. This perhaps
occurs when an AMI BIOS mainboard is used. Set the CMOS
parameter BIOS FEATURES SETUP as follows:
Set First boot device to LAN
Or set Boot from LAN first to Enable. Certain mainboards or BIOS
may also require Set PnP OS installed to Yes.
u
PCI 4 card adopts a patent technique in hardware design, so its
functions should not be affected by CMOS. But with the Intel
D845GEBV2/L mainboard with AMI BIOS Version
RG84510A.86A.0017.P09 (released by AMI, Sept. 9 th 2002), PCI 4
Guarder can not work. Solution: Replace it with a PCI 2 card, and
choose the Enhanced Mode, or update BIOS.
u
MThe automatic uninstallation function is available i n the
Guarders we sell now. The following only goes for versions before
2002.
You installed Guarder once, and pulled it out from your computer
without uninstallation.
30
To verify this, please press Ctrl-M or F10 repeatedly after CMOS
configuration and before OS startup. If Check Password window
appears, it means the Guarder has been installed once.
Solution: input the password, enter the main menu, and choose
“Uninstall”, then try to reinstall it.
F
There is little possibility that the above causes concur combinedly.
Improper CMOS configuration or Boot Mode not matching BIOS perhaps
occurs with mainboards using AMI BIOS.
Repeatedly Rebooting
J
u
You must have set CMOS Guard.
u
The BIOS of certain mainboards may put a dynamic variable in
CMOS. It is changing every time the computer boots.
u
New hardware must have been installed (e.g. a fixed disk is added),
or re-install some hardware, e.g. connect the IDE fixed disk on
another connector, and BIOS automatically changes CMOS (e.g. the
IDE fixed disk parameter has been set as AUTO).
u
@
The boot mode does not match BIOS.
Please refer to Guarding CMOS Intelligently section in the Advanced
Guide chapter.
Please refer to Boot Mode section in the Advanced Guide chapter.
System breaks down once Guarder is plugged in before OS startup
J
u
Boot mode does not match BIOS. Please refer to Boot Mode section
in the Advanced Guide chapter.
u
Retry it after disabling the virus scan function in BIOS.
u
Please refer to “Displaying blue screen and Windows breaks down” in
this chapter.
31
The ROM address of Guarder conflicts with others
L
The Guarder can only run before or after other BOOT ROM programs (e.g.
SCSI BOOT ROM, Remote bootable Ethernet adapter ROM), and the
Guarder does not function normally.
J
u
Please change ROM address of ISA Guarder ROM, e.g. from D000 to
D800. Make sure that no new collisions occur.
u
For PCI Guarders, please plug it in another slot at the other side of the
other PCI card with a BIOS ROM.
Displaying blue screen and Windows breaks down
J
u
It has been infected with viruses.
u
The free space in fixed disks is limited. There is no cache for the
Guarder.
u
Check if Anti-Virus software or System Performance Administration
software has been installed.
@
²
Recover the fixed disk data, or set it to Automatic Recovery.
²
Uninstall the Guarder, Anti-Virus software and System Performance
Administration software, and then install the Guarder.
²
Uninstall the Guarder, do defrag in fixed disks. Reinstall it after the
system is Ok.
F
Guarder software of all versions uses patent algorithm to ensure a better
guard capacity. It allows revisions of over 12GB data in the guarded
partitions, and default guard covers all partitions. Guarder will guarantee a
longtime stable working of Windows NT/2000/XP Professional or Server
without automatic recovery.
32