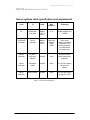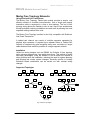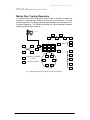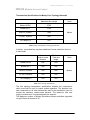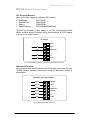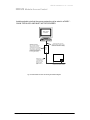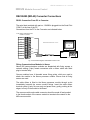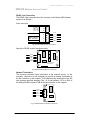
1
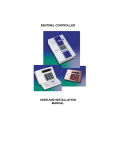
NEXUS Installation V1.07 - 01/11/04 NEXUS Modular Access Control NEXUS MODULAR ACCESS CONTROLLER INSTALLATION MANUAL Copyright © 2002 Morley Electronics Page 1 of 51 Document Number CTD1000 NEXUS Installation V1.07 - 01/11/04 NEXUS Modular Access Control About this Manual_____________________________________________5 Nexus Controllers____________________________________________________ 5 Visikey Management Software__________________________________________ 6 Forward/Backward System Compatibility__________________________________ 6 Readers ___________________________________________________________ 6 Contact Details______________________________________________________ 7 Nexus System Overview _______________________________________9 Nexus Parts & Operation ______________________________________11 Nexus Enclosure and Processor Module _________________________________ 11 Nexus Enclosure details ___________________________________________________ 11 Nexus Terminals & LED’s __________________________________________________ 11 Nexus Power ____________________________________________________________ 12 Power supplies __________________________________________________________ 12 Dual Reader Module (DRM)___________________________________________ 13 Inputs - Clean Contact Monitors (CCM) _______________________________________ 14 Outputs - Relays _________________________________________________________ 15 Input/Output Protection ____________________________________________________ 15 Nexus Communications ______________________________________________ 16 Networked Nexus ________________________________________________________ 16 RS232 Networks ___________________________________________________ 16 RS485 Networks ___________________________________________________ 17 RS232/485 Converters ____________________________________________________ 17 Nexus systems cable specification and requirements Morley Free Topology Networks _________________________________________________________ 18 Morley Free Topology Networks _______________________________________ 19 Using Echelon® Link Transceivers ___________________________________________ 19 Installation ______________________________________________________________ 19 Supported Topologies _____________________________________________________ 19 Morley Free Topolgy Repeaters________________________________________ 20 Transmission Specifications for Morley Free Topology Networks ___________________ 21 Installation and Testing _______________________________________22 Unpacking Contents_________________________________________________ 22 Installing the Controller ______________________________________________ 22 Nexus Controller Modules Layout ____________________________________________ 23 Nexus Visual Indications & Controls ____________________________________ 24 Processor Module ________________________________________________________ 24 Dual Reader Modules _____________________________________________________ 25 Communications Modules __________________________________________________ 25 Nexus Controller Fuses____________________________________________________ 25 Controller Addressing _____________________________________________________ 26 DIP Switch Programming __________________________________________________ 27 Switches 1-5 ____________________________________________________________ 27 Switches 6-8 ____________________________________________________________ 27 Copyright © 2002 Morley Electronics Page 2 of 51 Document Number CTD1000 NEXUS Installation V1.07 - 01/11/04 NEXUS Modular Access Control Reader Module Layout ____________________________________________________ 28 Reader, contact input and relay output assignments _____________________________ 29 Default Assignments and Installer Connections _________________________________ 29 Reader Interface Operation and Connection ___________________________________ 31 Reader Voltage Selection ____________________________________________ 33 Reader Connections in Nexus __________________________________34 AceProx Readers ________________________________________________________ 34 HID Proximity Readers ____________________________________________________ 34 Motorola/Indala Readers ___________________________________________________ 35 MR Sensors Readers _____________________________________________________ 35 PAC Proximity Readers____________________________________________________ 36 Watermark® Readers _____________________________________________________ 36 RS422/485 Nexus/PC Network Interconnection ____________________37 Unpacking ______________________________________________________________ 37 Cable Installation_________________________________________________________ 37 RS232/485 (MD-42) Converter Connections ______________________________ 39 RS232 Connection From PC to Converter _____________________________________ 39 Fitting Communications Modules in Nexus _____________________________________ 39 RS422 Line Connection ___________________________________________________ 40 Network Termination ______________________________________________________ 40 Nexus RS485 Network Cable Testing_________________________________________ 41 Configuration of PC COM Port in Visikey Software ______________________________ 41 Fitting Echelon Transceivers and Networks ____________________________________ 41 Applying Power______________________________________________42 Calculating Power Requirements_______________________________________ 44 Power Supply Current Requirement Example 1 ___________________________ 44 Power Supply Current Requirement Example 2 ___________________________ 46 Specifications _______________________________________________49 Technical Support____________________________________________51 Copyright © 2002 Morley Electronics Page 3 of 51 Document Number CTD1000 NEXUS Installation V1.07 - 01/11/04 NEXUS Modular Access Control List of Figures & Tables Fig. 1 A simple Nexus 1 door system ..........................................................................................................9 Fig. 2 Illustration of Nexus Controller and modules...................................................................................11 Fig. 3 Clean Contact Inputs to Nexus DRM...............................................................................................14 Fig. 4 Diagram showing MOV protection located at door lock terminals ..................................................15 Fig. 5 RS232 Network Schematic ..............................................................................................................16 Fig. 6 RS485 Network Schematic ..............................................................................................................17 Table 1 – Nexus Cable Specifications .......................................................................................................18 Fig. 7 Echelon Topologies..........................................................................................................................19 Fig. 8 Typical system topology for Echelon Transceiver Networks...........................................................20 Table 2 Doubly–terminated Bus Topology Specification...........................................................................21 Table 3 Free Topology Specifications........................................................................................................21 Fig. 9 Nexus Controller Modules Layout....................................................................................................23 Fig. 10 Diagram showing indicator section of Nexus processor module ..................................................24 Fig. 11 Nexus Dual Reader Module LED Status Indication.......................................................................25 Fig 12. Nexus Processor Module Dipswitch Settings ................................................................................26 Fig 13. Dipswitch location ..........................................................................................................................27 Fig 14. DRM Input/Output Layout ..............................................................................................................28 Table 4 DRM Input & Output Configuration Options .................................................................................29 Table 5 DRM Default reader, input and relay output assignments ...........................................................30 Fig. 15 Reader Input Functions..................................................................................................................31 Fig. 16 Reader Voltage Selection ..............................................................................................................33 Fig. 17 AceProx Reader Connection .........................................................................................................34 Fig. 18 HID Standard Reader Connection .................................................................................................35 Fig. 19 Motorola Reader Connection .........................................................................................................35 Fig. 20 MR Sensors Reader Connection ...................................................................................................35 Fig. 21 PAC Reader Connection (see table for applicable PAC readers).................................................36 Fig. 22 Watermark Reader Connection .....................................................................................................36 Fig. 24 Connection diagram, RS232/485 converter to PC ........................................................................39 Fig. 25 RS232/485 Converter Connections ...............................................................................................40 Fig. 26 RS232/485 485 Module Connections ............................................................................................40 Fig. 27 RS485 Module Termination Connections......................................................................................40 Fig. 28 Nexus Power Input.........................................................................................................................42 Copyright © 2002 Morley Electronics Page 4 of 51 Document Number CTD1000 NEXUS Installation V1.07 - 01/11/04 NEXUS Modular Access Control Note: Nexus controllers are designed to operate with and be administered from, Morley’s Visikey Access Management software package and must be connected to a PC running Visikey at all times. About this Manual This manual is intended to aid engineers in the installation and testing of the NEXUS range of access controllers. Nexus controllers form only part of the overall security access system so it is important for the installer to have a full understanding of the whole system. The following chapters explain how to install, commission and test Nexus controllers within the access control system. You should ensure that you have copies of all relevant equipment documentation before proceeding with this manual. Nexus Controllers The Nexus controller is a fully modular controller, which provides a fully scalable access control solution. At the heart of the controller is a pipelined 16-bit microprocessor, designed to give high system performance, even in the most demanding installations. The processor not only carries out the onboard control functions but also stores all system user details and system configuration database in each controller. The controller comprises a main system processor board, housed in a lockable steel box (Part no.101007) into which up to 4 dual reader modules (DRM) can be connected. The standard dual reader module (Part no. 101008) accommodates two readers together with 4 clean contact inputs and 4 changeover relay outputs. An alternate DRM (Part no. 101009) also has two reader inputs, but offers increased input and output capability, with 8 CCM inputs (clean contact monitor) and 8 c/o relay outputs on each DRM, thereby enabling each Nexus to control up to eight readers with 32 monitored inputs and 32 relay outputs. Each Nexus controller stores up to 23,000 users data. If necessary, this can be expanded to 65,000-user capacity. Nexus also has an on-board transaction database. This database is needed in case the controller loses communications with other controllers and the PC. Each reader input will store 4,000 events, ready to be uploaded to the PC once communications have been restored. Copyright © 2002 Morley Electronics Page 5 of 51 Document Number CTD1000 NEXUS Installation V1.07 - 01/11/04 NEXUS Modular Access Control Changes to the system configuration, such as new users added, are automatically uploaded to all Nexus controllers via the Visikey software package. Visikey Management Software Visikey is a powerful and flexible software package operating on a wide range of Windows platforms. Visikey is used to initially instruct the Nexus controllers about their configuration, about users connected and about how the controller should behave under operational conditions. Once configured, the software receives all transaction data from each controller. The data is used to update the transaction screen, carry out intercontroller logic functions and to update the system database. The system database is a store of all events, including operators logged on the system, transactions, whether they were accepted or rejected, alarms, doors forced open, left open or timed events, to name but a very few. For further details of the capabilities of Visikey software, please see the Visikey product manual. Visikey is compliant with a number of operating platforms including Windows 95, 98, 2000, NT and ME. Forward/Backward System Compatibility Nexus controllers are fully compatible with existing Visikey (ACS) systems and can be installed alongside existing Morley ISC4 controllers. Nexus will also run the advanced communications networks sometimes required, such as IEC or Echelon protocols. When retrofitting existing installations it is important to ensure that Visikey version 2.40 or later is installed for correct operation of the Nexus controllers. Decisions on the structure of system communications networks can be an exact science. In almost all cases, Morley already includes the network provisions within our standard parts list. The installer therefore has only to install the relevant modules and inter-connection cables to complete the network structure. However, if you are unsure of the networking requirements or would like further information; please do not hesitate to contact Morley Electronics. Door Readers Door readers form an important part of any access control system and a multitude of reader types are available on the market. It is important to use the correct type of reader for the environment to which they will be installed Copyright © 2002 Morley Electronics Page 6 of 51 Document Number CTD1000 NEXUS Installation V1.07 - 01/11/04 NEXUS Modular Access Control and the installer should give this due consideration at the design and installation stages. When installing into environments where there is a likelihood of card contamination it is advisable to select a contactless technology such as RFID (Radio Frequency Identification) ‘proximity’. Contactless technologies also have the advantage of requiring less ‘hands on’ maintenance. When considering door readers for external operation ensure that readers with suitable IP ratings, resistance to abuse and operational temperature ranges are chosen. Morley offers a complete range of readers for all applications and user requirements; including vandal resistant and door entry panel mount readers and can be contacted for further information and advice. When installing proximity type readers to both sides of a door it is sometimes desirable to mount the readers back to back. In such cases ensure that the two readers will not interfere with each other. This is most important when installing APB systems, as on partition walls it is possible for both readers to see the presented token, thereby causing a potential system ABP violation. In the event that installed readers do interfere with each other it is sometimes possible to prevent cross reading by offsetting one reader, this very much depends on the structure material and layout and is therefore a trial and error process of moving and re-testing, until a satisfactory result is achieved. Contact Details Morley Electronics Limited Unit 34, Moorland Way, Nelson Park, Cramlington, Northumberland, NE23 1WE Tel: Fax: +44 (0) 1670 732444 +44 (0) 1670 707333 Sales Email: [email protected] Copyright © 2002 Morley Electronics Page 7 of 51 Document Number CTD1000 NEXUS Installation V1.07 - 01/11/04 NEXUS Modular Access Control Technical Email: [email protected] Website – sales and technical info Web: www.morleyuk.co.uk Copyright © 2002 Morley Electronics Page 8 of 51 Document Number CTD1000 NEXUS Installation V1.07 - 01/11/04 NEXUS Modular Access Control Nexus System Overview The simplest form of Nexus access control system consists of four components: The PC administration system, The Nexus controller, A door reader And an electronic lock. PC Printer RS232/422 Convertor NEXUS - 2-8 Door On-Line Access Controller Door Lock Door Reader User token Fig. 1 A simple Nexus 1 door system When a user presents an access token to the reader, the unique encoded token number is sent to the Nexus controller via the reader, which is connected to the reader input on the DRM. The controller then processes this number, with checks being carried out against the database held in the controller. These checks are the configuration and access rights for the user and may include the following considerations: • Does the card number on the card match a card in the database? Copyright © 2002 Morley Electronics Page 9 of 51 Document Number CTD1000 NEXUS Installation V1.07 - 01/11/04 NEXUS • • • • Modular Access Control Is the card valid for the area to which the reader is assigned? Is the card valid for the time of presentation? Is the card disabled? Does the card have the correct APB level (APB readers only)? If any of these conditions are not met the user will not be granted access through the door. A PC administers the databases held in each of the controllers in the system controller network. Morley’s Visikey software package has been designed by Morley specifically for this task and has, over several years of use and development, become one of the most powerful and flexible packages of its kind available throughout the access control industry. Although administration of the controller database is carried out using a PC, the controllers are fully autonomous, operating in a distributed intelligence process. Should communications be lost with the PC, the controller will continue to process card transactions and store them in its internal history database which when communications are restored will be uploaded to the PC. This ensures that no card transactions or alarm conditions are lost during system failure. Both the controller database and real time clock are maintained during power outages ensuring unbroken correct controller operation when power is restored. If the entry conditions are met, Nexus grants access by releasing the door lock via the output relay. If the user is inside and wants to get out using a request to exit button, the button is pressed and the change of state of the button contacts is acknowledged by the CCM input on the DRM. The controller then releases the door lock via the output relay. Copyright © 2002 Morley Electronics Page 10 of 51 Document Number CTD1000 NEXUS Installation V1.07 - 01/11/04 NEXUS Modular Access Control Nexus Parts & Operation Nexus Enclosure and Processor Module Nexus is a modular access control system. The illustration below shows each of the controller elements. NEXUS ENCLOSURE DRM DRM DRM PROCESSOR MODULE DRM COMMS MODULE Fig. 2 Illustration of Nexus Controller and modules Each Nexus controller has a common part number for the controller enclosure (101007), which also includes the processor module. Nexus Enclosure details Dimensions: 360H X 375W X 75D all mm. Painted mild steel box with key lockable door, fully hinged on the left side. 26 x 20mm cable (knockout) entries, 7 along top and bottom, 6 down each side. Removable electronic assembly back plane, holds Processor Module, DRM’s & Comms Module (Comms Module fits on to Processor Module) Nexus Terminals & LED’s Nexus is designed with the engineer in mind. Therefore every reader input, contact input, relay output and communications connection is backed by visual LED confirmation of operation. Copyright © 2002 Morley Electronics Page 11 of 51 Document Number CTD1000 NEXUS Installation V1.07 - 01/11/04 NEXUS Modular Access Control Connections to reader inputs, contact inputs and relay outputs are carried out using plug in terminal blocks for greater control and ease of installation and maintenance. Nexus Power Power for the controller is provided via a separate 12Vdc power supply; two separate power inputs are provided on the motherboard. These being ‘controller’ and ‘auxiliary’ power supplies. The controller supply provides power for the controller logic circuitry whilst the auxiliary supply provides power for readers and relays both input are fused and connection of both supplies to one suitable rated power supply is acceptable. Power supplies Nexus does not carry on board transformer and battery charging facilities. This is provided by external psu’s, which must be suitably rated for both the power requirements of the controller as well as the readers connected to the controller. The section ‘Applying Power’ (page 41), discusses power requirements in greater detail, as well as offering guidance on the estimation of system power requirements. Copyright © 2002 Morley Electronics Page 12 of 51 Document Number CTD1000 NEXUS Installation V1.07 - 01/11/04 NEXUS Modular Access Control Dual Reader Module (DRM) Dual reader modules are used to connect readers into the Nexus controllers. Up to 4 dual reader modules can be ‘plugged’ into each Nexus controller, giving a total reader capacity of 8 per controller. Reader modules may be added at any stage to the controller should system expansion be required during the life of the system. Nexus dual reader modules support the most commonly used unidirectional reader interfaces. These include, Watermark ABA Track 2 Wiegand PAC Which covers the majority of reader technologies in use. Many other reader and user token formats are factory configurable on request, with numerous variations to the most common formats available as standard. For details and/or specific reader technology queries, contact Morley Electronics. Interface to the reader is provided via a 6 way removable terminal block. The reader module provides selectable 12Vdc and 5Vdc power, which is over-current, protected. It should be noted that the over-current protection, once activated, can only be reset by removal of power to the Auxiliary supply input. Reader supply protection is on a reader input-by-reader input basis and does prevent proper operation of the remaining readers connected to the controller. Readers connected do not have to be of the same operating technology; Nexus will happily run different reader technologies on each reader input. Other forms of reader input are also catered for including smart readers, biometric readers, as well as keypads. When designing a Nexus access installation, consideration may be given to future expansion by leaving spare DRM slots in controllers. When the time comes to expand the system, add another DRM and the control element is complete. DRM’s also carry clean contact inputs and relay contact outputs, which are used to link and control other facets of access control installations, such as request to exit buttons. Copyright © 2002 Morley Electronics Page 13 of 51 Document Number CTD1000 NEXUS Installation V1.07 - 01/11/04 NEXUS Modular Access Control Inputs - Clean Contact Monitors (CCM) The clean contact monitors are voltage free inputs, which look for a remote contact to change over and indicate a change in state, for instance a request to exit button. The input change is programmed to elicit the required response from the controller, for instance to release a door lock, via the output relay. Note that connection to any type of device other than that, for which the contact is specified, may lead to system malfunction and potentially permanent damage to the controller. Connection to the CCM should be carried out as illustrated below. Fig. 3 Clean Contact Inputs to Nexus DRM Copyright © 2002 Morley Electronics Page 14 of 51 Document Number CTD1000 NEXUS Installation V1.07 - 01/11/04 NEXUS Modular Access Control Outputs - Relays DRM onboard relay contacts are single pole changeover with both N/C and N/O contacts available for use. Note that no more than 24Vdc should be switched across any relay contact as this may cause permanent damage to the reader module. When switching inductive loads it is important that adequate transient suppression is installed. Morley includes in the Nexus kit, Metal Oxide Varistors (MOV) that are used to prevent back e.m.f. These effects are also known, as ‘spikes’ and the MOV will help avoid damage to the Nexus controller. The MOV suppression kits included with the controller for lock suppression should be installed as close to the lock as possible. When switching other types of inductive load ensure that suitable suppression is employed. See each device manufacturers’ information to ascertain possible effects and to select the appropriate form of protection. +ve supply Door Lock -ve return Fig. 4 Diagram showing MOV protection located at door lock terminals Note: Nexus relay contact ratings are subject to relay specification and may change. If you have contact rating issues, please contact Morley for further advice. Input/Output Protection Both inputs and outputs are fully protected against over voltage damage, but installers should always check that only the correctly rated power is applied. As stated earlier, damage can be caused through the connection of over voltage or some other inappropriate power form. For any further details or advice, contact Morley Electronics. Copyright © 2002 Morley Electronics Page 15 of 51 Document Number CTD1000 NEXUS Installation V1.07 - 01/11/04 NEXUS Modular Access Control Nexus Communications Nexus controllers relate with the outside world through communications modules. The communications module links the Nexus controller with other controllers, with modems, networks, other types of networking links, or directly with the administrating PC. Networked Nexus Multiple Nexus controllers can be connected singularly or in networks. Networking methods are varied and can include the following (not exhaustive) list. RS232 RS422/485 Echelon free topologies Dedicated ‘Lease Line’ modems Dial-Up Modem LAN/Network connections CAT5 networking Micro-Wave links Radio links Mobile GSM links Infra Red Transceivers Fibre Optic networks RS232 Networks In a single controller application, the installer may connect the Nexus directly to the RS232 input port of a PC through the use of a Nexus RS232 communications module (102002). This part is connected to the processor board and offers direct connection to the PC. Note however, that the connection length should not exceed 11m. Additional controllers will necessitate changing the RS232 connection to an alternate network structure, such as RS485 or Echelon. Fig. 5 RS232 Network Schematic Copyright © 2002 Morley Electronics Page 16 of 51 Document Number CTD1000 NEXUS Installation V1.07 - 01/11/04 NEXUS Modular Access Control RS485 Networks The most common communications method is the RS485 loop. With a maximum of 32 controllers per RS485 loop and each loop having a network length of 1.2Km, RS485 is more than adequate for most applications. For applications where more than one loop is required it is easy to add another RS485 loop and a further 32 controllers, up to a maximum of four loops, as shown below. RS485 modules (102001) are mounted on to the Nexus processor board in each Nexus enclosure. Fig. 6 RS485 Network Schematic RS232/485 Converters Nexus networks are connected to the administration PC via converters. These converters (104008) allow the RS485 communications from the Nexus controllers to be converted to RS232, which can be connected directly to a serial port in the PC. This is by far the easiest and safest way to connect the network to the administration PC. The converters are sent from Morley complete with housings and RS232 connection cables to the PC. Locate the converter as close as possible to the PC. Copyright © 2002 Morley Electronics Page 17 of 51 Document Number CTD1000 NEXUS Installation V1.07 - 01/11/04 NEXUS Modular Access Control Nexus systems cable specification and requirements From To Cable Max Distance Comments PC RS232/485 Converter Belden 8723 or Equiv. 15 m Cable supplied with 104008 RS232/485 Converter Nexus Controller Belden 8723 or Equiv. Max total network length 1200m Daisy chain between controllers. Maximum of 32 Nexus controllers per RS232/485 converter loop Nexus Controller Reader / Indicators/ Release 20AWG 125m Nexus Controller Monitored Inputs 20AWG 250m 4 or 8 clean contact monitors per Module. Nexus Controller Relay outputs 20AWG 200m 4 or 8 output relays. 4A @ 12v or 24v See also, reader specifications and guidelines Table 1 – Nexus Cable Specifications Copyright © 2002 Morley Electronics Page 18 of 51 Document Number CTD1000 NEXUS Installation V1.07 - 01/11/04 NEXUS Modular Access Control Morley Free Topology Networks Using Echelon® Link Transceivers The Morley Free Topology Twisted pair module provides a simple, cost effective method of controller interconnection. Use of single pair polarity insensitive cable is employed in a free or bus topology. The use of free topology wiring allows the installer to wire in star, loop or bus architectures thereby potentially reducing installation time and costs by allowing the most expedient cabling method to be used. The Morley Free Topology interface is also fully compatible with Echelon’s Link Power Transceiver. A twisted pair channel can consist of multiple segments separated by physical layer repeaters. A physical layer repeater allows a Twisted Pair network to inexpensively grow accepting many more controllers or longer cable distances than would be possible on a single segment network. Installation Unlike bus wiring designs such as RS485, the Echelon ® free topology wiring scheme supports star, loop and/or bus wiring. This method of wiring has many advantages, firstly the installer is free to select the method of wiring that best suits the installation, reducing the need for system planning and allowing last minute system changes. Secondly retrofits to existing Echelon® based installations can be carried out with minimal wiring changes. Supported Topologies C C C C C C T T Single Termination Bus Topology C C C C T Double Termination Bus Topology C C C C C T T C C C Star Topology C C T C C C C Mixed Topology C Loop Topology Fig. 7 Echelon Topologies Copyright © 2002 Morley Electronics Page 19 of 51 Document Number CTD1000 C NEXUS Installation V1.07 - 01/11/04 NEXUS Modular Access Control Morley Free Topolgy Repeaters In the event that limits on physical cable length or number of nodes are exceeded, a physical layer repeater can be use to interconnect 2 or more network segments. The Morley physical layer repeater can interconnect 2 to 6 network segments. The following drawing is a typical channel illustration utilizing a physical layer repeater. IBM Compatible C C T C C T C T C C T T C R R R R R R T C C C T Controller or compatable device C C C T C C C Network Termination C C C C Fig. 8 Typical system topology for Echelon Transceiver Networks Copyright © 2002 Morley Electronics Page 20 of 51 Document Number CTD1000 NEXUS Installation V1.07 - 01/11/04 NEXUS Modular Access Control Transmission Specifications for Morley Free Topology Networks Maximum Bus Length Belden 85102 2700 Belden 8471 2700 Level IV, 22AWG 1400 JY (St) Y 2x2x0.8 900 TIA Category 5 900 Units Meters Table 2 Doubly–terminated Bus Topology Specification A doubly - terminated bus may have additional 3 meter stubs from the bus to each node. Maximum node–to-node distance Maximum Total wire length Belden 85102 500 500 Belden 8471 400 500 Level IV, 22AWG 400 500 JY (St) Y 2x2x0.8 320 500 TIA Category 5 250 450 Units Meters Table 3 Free Topology Specifications The free topology transmission specification includes two components, which must both be met for proper system operation. The distance from each transceiver to all other transceivers and to the termination must not exceed the maximum node-to-node distance. The maximum total wire length is total amount of connected cable per segment. The Maximum number of Morley Electronics access controllers supported on any Echelon ® channel is 63. Copyright © 2002 Morley Electronics Page 21 of 51 Document Number CTD1000 NEXUS Installation V1.07 - 01/11/04 NEXUS Modular Access Control Installation and Testing Unpacking Contents All Nexus controllers are tested prior to packing. When you receive a controller, you should be receiving the complete unit to meet the requirements for your specification, so please locate the controller key, which should be attached to the side of the controller. Open the controller housing and ensure the following parts are present. 1 2 8 1 2 3 Nexus Installation Manual Cable Ties MOV suppression components for connection to lock devices Nexus chassis plate with controller card, fixed to the enclosure Reader Modules, as requested in your order Communications Module of a type (RS232/485, etc. as requested) Please note that all wiring connections to Nexus are made via plug-in terminal blocks to aid installation and commissioning. You should ensure that all terminal blocks are present. Installing the Controller Installers should remove the Nexus back plate, complete with processor board and any DRM’s, from the enclosure and store until installation cabling is complete. Nexus controller boxes should be oriented correctly, that is with the door hinge on the left. Ensure the box is positioned in a clean, dry area, free as possible from dust and any other contaminants. Ensure also that the controller and the system cabling is kept away from any medium or high voltage cabling, system wiring for large machines likely to create electrical spikes or interference with reader operation and Nexus supplies. The Nexus enclosure has 4 fixing points, one at each corner. Note that the controller should be flat mounted against a fixed, dry surface. Nexus controllers do not carry external status indication and can be placed in risers, ceiling voids, etc. However, installers should ensure that the controller remains accessible for both wiring and future maintenance. Having located the controller enclosure, ensure cable tails are of sufficient length to keep Nexus wiring neat and tidy, this can help enormously during commissioning and any future modifications. Once the cabling is in place, re-fit the Nexus back plate using the four, machined nuts fixed to the four back plate studs in the Nexus enclosure. Copyright © 2002 Morley Electronics Page 22 of 51 Document Number CTD1000 NEXUS Installation V1.07 - 01/11/04 NEXUS Modular Access Control Nexus Controller Modules Layout NEXUS MOUNTING BACK PLANE DRM SLOT 1 DRM SLOT 2 DRM SLOT 3 PROCESSOR MODULE DRM SLOT 4 COMMS MODULE Fig. 9 Nexus Controller Modules Layout The diagram above shows the overall controller layout with all four modules connected. Dual reader modules do not have to be installed in sequential order that is in slots 1-4. However Nexus has been designed to follow sequential slot use, in order to make installation and commissioning a much more simple task. This is achieved by following a set installation pattern, the form of which you can see from the controller diagram above. Each of the DRM’s has a designated reference in the controller, as do the reader and contact inputs and the relay outputs. This organized approach also allows intermediate modules to be removed from a controller without affecting the remaining installed modules, which can be very useful when relocating readers on an existing system. Copyright © 2002 Morley Electronics Page 23 of 51 Document Number CTD1000 NEXUS Installation V1.07 - 01/11/04 NEXUS Modular Access Control Nexus Visual Indications & Controls Processor Module Controller status indication is given on the processor module for the each of the following conditions. SERV RUN RCV TXM PWR FUSE B FUSE A Fig. 10 Diagram showing indicator section of Nexus processor module Where, SERV - Echelon service pin indicator is a steady Green LED RUN - Controller running is a Yellow LED cycling at 1-second duration RCV - Data reception in progress is a flashing Red LED TXM - Data transmission in progress is a flashing Green LED PWR - Power present when illuminated with a steady Green LED Copyright © 2002 Morley Electronics Page 24 of 51 Document Number CTD1000 NEXUS Installation V1.07 - 01/11/04 NEXUS Modular Access Control Dual Reader Modules Nexus DRM’s have indication of each of the following DRM conditions. CCM input LED's Reader input LED's READER 1 READER 2 INPUTS 5 TO 8 INPUTS 1 TO 4 R RELAYS 1 TO 4 DRM comms LED's RELAYS 5 TO 8 Relay output LED's Fig. 11 Nexus Dual Reader Module LED Status Indication Where, Reader inputs Green LED Red LED - Steady Green indicates card read and accepted - Steady Red indicates card read and rejected - Flashing Red indicates card read but data is not recognised Contact (CCM) inputs Yellow LED - Steady Yellow indicates input activated Relay outputs Green LED - Steady Green indicates output activated Comms LED’s Green LED - Flashing Green for Transmit to processor module Red LED - Flashing Red for Receive from processor module Communications Modules Some communications modules carry visual indication of module status, dependent upon the type used. All comms modules are designed to operate without the need for installer modifications. For further details on particular types used and for status checks, please call Morley Electronics. Nexus Controller Fuses Two fuses located on the processor module provide power protection for the Nexus controller. Fuse (A) 1A 20mm anti-surge, protects controller logic circuits during overcurrent and over voltage conditions. Fuse (B) 3.15A 20mm anti-surge, protects reader and relay supplies. Note that reader supplies are individually over-current protected by resettable Copyright © 2002 Morley Electronics Page 25 of 51 Document Number CTD1000 NEXUS Installation V1.07 - 01/11/04 NEXUS Modular Access Control thermal fuses. This fuse maintains power to all serviceable readers under reader fault conditions. Controller Addressing A Bank of 8 DIP switches for addressing the controller are located on the motherboard. Nexus Controller DIP Switch Addressing (DIP Switch located on Processor Module) bit 8 CLEAR DOWN RAM ON POWER UP on NORMAL POWER UP off POWER UP BEHAVIOUR PROTOCOL ALWAYS ON ALWAYS OFF bit 7 on off bit 6 on off Fig 12. Nexus Processor Module Dipswitch Settings Copyright © 2002 Morley Electronics Page 26 of 51 Document Number CTD1000 NEXUS Installation V1.07 - 01/11/04 NEXUS Modular Access Control DIP Switch Programming As part of the commissioning process, Nexus controllers are addressed through the DIPswitches shown in the diagram on the previous page. The Dipswitches are located on the Processor Module, adjacent to the controller status LED’s Controller DIPswitches 1 8 FUSE B FUSE A Fig 13. Dipswitch location Switches 1-5 The first five switches in the block of eight set the address of the Nexus controller, where the number corresponds to the controller address on each Nexus ‘loop’ – remember that controllers can be connected to different network loops - with up to 4 RS485loops. Nexus allows a maximum of 32 controllers per RS485 loop. Echelon communications networks offer different loop structure, but controllers are still addressed using the same bank of Dipswitches. For further specific details regarding the installation and commissioning of Echelon based systems, contact Morley Electronics. Switches 6-8 Switch 6 is always set to the ‘off’ position. Switch 7 is always set to the ‘on’ position. Switch 8 is set to the ‘on’ position during installation and commissioning, but set to the ‘off’ position once the Nexus system has been commissioned. Note: Switch 8 is used to clear the controller RAM on power up. As controllers are tested at Morley prior to being sent out, setting the switch to ‘off’ prior to being commissioned, would cause the controller to attempt to re-use the test data, thereby causing controller malfunction. Copyright © 2002 Morley Electronics Page 27 of 51 Document Number CTD1000 NEXUS Installation V1.07 - 01/11/04 NEXUS Modular Access Control Reader Module Layout Each DRM has two reader inputs, together with CCM (Clean Contact Monitor) inputs and relay outputs. The diagram below illustrates the layout of a DRM as viewed from the front, with the plug-in pins facing downward. Note that the diagram shows a fully populated DRM with 8 inputs and 8 outputs (part no. 101009). The more commonly used 101008 DRM has 4 inputs and 4 relay outputs. Either type of DRM may be used and the two types can be mixed on the same controller. READER MODULE LAYOUT CLEAN CONTACT MONITORS RELAY OUTPUTS RELAY H N/C CCM INPUT A RELAY H COM RELAY H N/O CCM INPUT B RELAY G N/C RELAY G COM CCM INPUT C RELAY G N/O RELAY F N/C CCM INPUT D RELAY F COM RELAY F N/O RELAY E N/C CCM INPUT E RELAY E COM RELAY E N/O CCM INPUT F RELAY D N/C CCM INPUT G RELAY D COM RELAY D N/O CCM INPUT H RELAY C N/C RELAY C COM RELAY C N/O READER B CLOCK / DATA 1 RELAY B N/C DATA / DATA 0 RELAY B COM GREEN LED RELAY B N/O RED LED RELAY A N/C 0V RELAY A COM 12Vdc / 5Vdc RELAY A N/O READER A CLOCK / DATA 1 DATA / DATA 0 GREEN LED RED LED 0V 12Vdc / 5Vdc Fig 14. DRM Input/Output Layout Copyright © 2002 Morley Electronics Page 28 of 51 Document Number CTD1000 NEXUS Installation V1.07 - 01/11/04 NEXUS Modular Access Control Reader, contact input and relay output assignments The table below is shows the assignment of reader input, contact inputs and relay outputs as they are given for a fully populated Nexus controller. The heading on each of the shaded columns represents the dual reader module slot number, 1-4, whilst the row titles indicate the assigned numbers for each of the reader inputs, contact inputs and relay outputs. Assigning connections allows Nexus to be easily installed and commissioned. It also makes installation an easier format to follow. For example reader port A becomes reader 5, when connected to dual reader module (DRM) slot 3. Reader Slots Reader A Reader B Clean Contact Inputs CCM Input A CCM Input B CCM Input C CCM Input D CCM Input E CCM Input F CCM Input G CCM Input H Relay Outputs Relay Output A Relay Output B Relay Output C Relay Output D Relay Output E Relay Output F Relay Output G Relay Output H DRM Slot 1 DRM Slot 2 DRM Slot 3 DRM Slot 4 Reader 1 Reader 2 Reader 3 Reader 4 Reader 5 Reader 6 Reader 7 Reader 8 CCM Input 1 CCM Input 2 CCM Input 3 CCM Input 4 CCM Input 5 CCM Input 6 CCM Input 7 CCM Input 8 CCM Input 9 CCM Input 10 CCM Input 11 CCM Input 12 CCM Input 13 CCM Input 14 CCM Input 15 CCM Input 16 CCM Input 17 CCM Input 18 CCM Input 19 CCM Input 20 CCM Input 21 CCM Input 22 CCM Input 23 CCM Input 24 CCM Input 25 CCM Input 26 CCM Input 27 CCM Input 28 CCM Input 29 CCM Input 30 CCM Input 31 CCM Input 32 Relay Output 1 Relay Output 2 Relay Output 3 Relay Output 4 Relay Output 5 Relay Output 6 Relay Output 7 Relay Output 8 Relay Output 9 Relay Output 10 Relay Output 11 Relay Output 12 Relay Output 13 Relay Output 14 Relay Output 15 Relay Output 16 Relay Output 17 Relay Output 18 Relay Output 19 Relay Output 20 Relay Output 21 Relay Output 22 Relay Output 23 Relay Output 24 Relay Output 25 Relay Output 26 Relay Output 27 Relay Output 28 Relay Output 29 Relay Output 30 Relay Output 31 Relay Output 32 Table 4 DRM Input & Output Configuration Options Default Assignments and Installer Connections To further ease programming and commissioning, Morley has included a set of default assignments, which correspond with the most often-used configuration settings for Nexus control systems. The preparation of the default configuration has been guided through our experiences over countless security access control systems and system configurations, to speed up the installation and commissioning process. However, this does not mean that Nexus assignments are fixed and rigid. Manual setting and re-setting of input and output assignments through logic programming (via Morley Visikey software) ensures that Nexus remains flexible to site and applications requirements. Copyright © 2002 Morley Electronics Page 29 of 51 Document Number CTD1000 NEXUS Installation V1.07 - 01/11/04 NEXUS Modular Access Control Reader Slots Reader A Reader B Clean Contact Inputs CCM Input A CCM Input B CCM Input C CCM Input D CCM Input E CCM Input F CCM Input G CCM Input H Relay Outputs Relay Output A Relay Output B Relay Output C Relay Output D Relay Output E Relay Output F Relay Output G Relay Output H Module Slot1 Module Slot 2 Module Slot 3 Module Slot 4 Reader 1 Reader 2 Reader 3 Reader 4 Reader 5 Reader 6 Reader 7 Reader 8 Door 1 REM Door 1 Monitor Door 2 REM Door 2 Monitor Door 3 REM Door 3 Monitor Door 4 REM Door 4 Monitor Door 5 REM Door 5 Monitor Door 6 REM Door 6 Monitor Door 7 REM Door 7 Monitor Door 8 REM Door 8 Monitor Door 1 Release Door 3 Release Door 5 Release Door 7 Release Door 2 Release Door 4 Release Door 6 Release Door 8 Release Table 5 DRM Default reader, input and relay output assignments The default connections for the nexus controller are shown in the table above. The REM (Remote Exit (release) Monitor) should be wired to the normally open contacts of the Remote release button. The Door monitor input should be connected to a normally closed, door contact. The default connections will provide 3 second door operation on REM or card with 20 second ‘door open’ alarm. These timings and programs are not fixed and can be changed via Visikey administration software to suit the installation. Copyright © 2002 Morley Electronics Page 30 of 51 Document Number CTD1000 NEXUS Installation V1.07 - 01/11/04 NEXUS Modular Access Control Readers and Reader Interface Operation With all four DRM’s connected, Nexus has 8 independent reader inputs. Each reader interface can connect to a reader and a number of differing reader technologies, although in the main there are four types of wired interface employed, Wiegand Watermark ABA Track 2 PAC This is not an exhaustive list and Morley is often asked to supply systems for site upgrades, where the adoption of existing cards and tokens is a requirement either as a permanent arrangement or as a temporary measure, as readers and tokens are exchanged. For details of other reader technologies available or to discuss the inclusion of another technology, please contact Morley Electronics. Reader Interface Operation and Connection As outlined above, Nexus has the ability to accept alternate reader types; the following information discusses the interface connections and their meaning. Installers should note that reader cable shields should always be terminated to the Nexus controller back plate. The DRM reader connection consists of six terminal inputs (on one block), where two are data lines, two LED outputs and power and ground, as illustrated in the diagram below. DATA 1/CLOCK Reader Cable DATA/DATA0 GREEN LED RED LED 0V POWER Fig. 15 Reader Input Functions Each of these inputs relates to a specific reader interface connection dependent upon the reader technology to be used. The following table reviews the functionality of each of the inputs. Copyright © 2002 Morley Electronics Page 31 of 51 Document Number CTD1000 NEXUS Installation V1.07 - 01/11/04 NEXUS Modular Access Control Input connection 1. Data1/Clock. This input interfaces to the clock or strobe line on Track 2 and Watermark readers. On Wiegand interfaces the Data 1 data output should be connected to this input. Input connection 2. Data/Data0 This input interfaces to the data line on Track 2 and Watermark readers. On Wiegand interfaces the data 0 output should be connected to this input. When using PAC readers this pin should be connected to the SIG output. Input connection 3. Green LED Open Collector output capable of sinking 50mA Input connection 4. Red LED Open Collector output capable of sinking 50mA Input connection 5. 0V Input connection 6. Power This pin supplies power to the reader at both 5 and 12 volts. This output is protected with a 200mA thermal fuse. Once activated this fuse can only be reset by the removal of power to the auxiliary supply input. This Pin can supply both 12 and 5 volts @ 150mA. Readers requiring more current should be supplied via and alternative power source. The reader interfaces will support most readers but if you are in any doubt as to the suitability of a reader, contact Morley Electronics Technical Support. Copyright © 2002 Morley Electronics Page 32 of 51 Document Number CTD1000 NEXUS Installation V1.07 - 01/11/04 NEXUS Modular Access Control Reader Voltage Selection A reader voltage selector is located adjacent to each reader port and can be used to select between 12V and 5V reader supply voltages as shown in the diagram below. 12V 5V Fig. 16 Reader Voltage Selection NOTE that the application of an incorrect supply voltage to a reader may cause permanent damage to the reader. Copyright © 2002 Morley Electronics Page 33 of 51 Document Number CTD1000 NEXUS Installation V1.07 - 01/11/04 NEXUS Modular Access Control Reader Connections in Nexus The Nexus controller is, as described earlier, capable of supporting multiple card reader types concurrently. The following diagrams show wiring connections for the more common readers used with Nexus. AceProx Readers The AceProx range of readers use a standard Wiegand interface. All readers in the range are supported and should be wired as shown below. For further technical information refer to the reader installation manual. ACE PROX READER BLUE DATA1 YELLOW DATA0 WHITE GREEN LED GREEN RED LED BLACK 0V 12VDC RED Fig. 17 AceProx Reader Connection HID Proximity Readers HID proximity readers are available with both Wiegand and track 2 interfaces, however readers from Morley are supplied with a Wiegand interface as standard. All readers in the HID range are fully supported by Nexus. The diagram below shows typical wiring for ProxPoint, MiniProx, ProxPro, and VandalProx and PanelProx readers. When installing other HID models, consult the installation manual for wiring and operational specifications. HID READERS WHITE DATA 1 GREEN DATA 0 ORANGE GREEN LED BROWN RED LED BLACK 0V RED Copyright © 2002 Morley Electronics 12VDC Page 34 of 51 Document Number CTD1000 NEXUS Installation V1.07 - 01/11/04 NEXUS Modular Access Control Fig. 18 HID Standard Reader Connection Motorola/Indala Readers Motorola and Indala proximity readers are available with both Wiegand and track 2 interfaces however these readers are supplied as standard with a Wiegand interface. All readers in the Motorola range are fully supported by Nexus. The diagram below shows typical wiring for Motorola two wire format readers. Note that Motorola readers are soft programmable and as such, allow the interface type and LED/Buzzer operation to be changed by the use of programming cards. When installing other Motorola models consult the installation manual for wiring and operational specifications. MOTOROLA PROXIMITY TWO WIRE FORMAT READER WHITE DATA1 GREEN DATA0 ORANGE GREEN LED BROWN RED LED BLACK 0V 12VDC RED Fig. 19 Motorola Reader Connection MR Sensors Readers Nexus controllers support all MR Sensors Track 2 readers, however some keypad versions need modification for correct LED operation. We advise customers wishing to utilise card and keypad versions to contact Morley Electronics before purchasing readers. The diagram below shows standard interconnection wiring for a 5132B magstripe reader. For wiring and operational specifications, refer to the reader installation manual. MR SENSORS TYPE 5132B READER YELLOW STROBE BROWN DATA GREEN GREEN LED ORANGE BLACK RED LED 0V 5VDC RED Fig. 20 MR Sensors Reader Connection Copyright © 2002 Morley Electronics Page 35 of 51 Document Number CTD1000 NEXUS Installation V1.07 - 01/11/04 NEXUS Modular Access Control PAC Proximity Readers Nexus controllers supports the following PAC readers, • EasiReader 20377/20387 • Standard Plus 20592/20593 • Slimline 20595/20596 • Vandal Resistant 20378/20388/20688/20683 To check the suitability of other readers in the PAC range please contact Morley technical support. Standard wiring interconnection for PAC readers is shown in the diagram below. PAC READERS DATA1 SIG DATA0 VCA GREEN LED -V 0V +V 12VDC Fig. 21 PAC Reader Connection (see table for applicable PAC readers) Watermark® Readers Nexus supports both the old letterbox type Watermark readers and the new 1300SO readers. Standard interconnect wiring for Watermark readers is shown below. WATERMARK 1300SO SWIPE READER BROWN STROBE YELLOW DATA PINK GREEN LED VIOLET RED LED BLACK 0V 12VDC RED Fig. 22 Watermark Reader Connection Copyright © 2002 Morley Electronics Page 36 of 51 Document Number CTD1000 NEXUS Installation V1.07 - 01/11/04 NEXUS Modular Access Control RS422/485 Nexus/PC Network Interconnection Part Number 104008 The RS232/485 converter is used to interface the administration PC RS232 serial port to the first Nexus controller RS485 Comms module. Why do we do it this way? Because it is much easier to enter the PC through the serial port than to attempt to install an RS485 PC board into the computer – which incidentally, may cause warranty invalidity issues with the PC supplier. The converter has been chosen for its reliability and continued operation. Part number 104008 includes all elements necessary to interface communications and comprises the constituent parts described below. Unpacking After removing the 4 retaining screws from the enclosure, check the following parts are present 1 x Westermo MD-45 Converter (Din Rail Mounted) 1 x Serial Lead (female 9 way D Plug to 3 flying leads) 2 x Termination Resistors 120 ohm 5 x Cable ties 5 x Cable tie mounting eyelets 5 x Self-tapping screws 1 x Instruction/Specification Manual Cable Installation It is recommended that BELDEN 8723 or an equivalent cable type be used for the Nexus inter-controller connections. Each RS485 Nexus network can be a total network length of 1,200 m and, as mentioned earlier in this manual, up to 4 x RS485 networks can be installed on each PC. The following diagram re-visits the Nexus network structure. Installers should always remember to link cable shields together within the RS485 comms modules. The shields ‘float’ between modules. Copyright © 2002 Morley Electronics Page 37 of 51 Document Number CTD1000 NEXUS Installation V1.07 - 01/11/04 NEXUS Modular Access Control Installers should note that the comms network must be wired in a DAISY CHAIN TOPOLOGY AND MUST NOT BE SPURRED. Part No. 104008 Pentium PC RS232/422 Convertors Note: Convertors are placed adjacent to the PC and are connected directly to the RS232 Ports of the PC. The convertors avoid the need to add modules to the PC, thereby reducing installation time and maintaining the PC suppliers warranty 1M Interface cable to convertor, supplied by Morley. Female 9 way 'D' connector to PC RS232 Port, with flying lead cores x 3. Connects to 104008 Part No. 104008 RS232/422 Convertor Belden 8273 or equivalent cable, with max. network total distance of 1,200M. Network must be daisy-chained. No spurs 102001 - RS 485 Communication Module, 1 required for each Nexus Controller Fig. 23 RS232/485 Converter & Housing Schematic Diagram Copyright © 2002 Morley Electronics Page 38 of 51 Document Number CTD1000 NEXUS Installation V1.07 - 01/11/04 NEXUS Modular Access Control RS232/485 (MD-45) Converter Connections RS232 Connection From PC to Converter The serial lead provided with part no. 104008 is plugged into the Serial Port ‘COM 1’ at the rear of the PC. Connections from the PC to the Converter are indicated below. 9 Way Screw Terminal Connecter on MD-45 converter SIG Green DS DT Serial Lead to Comm's Port 1 on PC Visikey System P.C DCD CTS RTS Black RD Red TD White Cable PW IBM Compatible Fig. 24 Connection diagram, RS232/485 converter to PC Fitting Communications Modules in Nexus Nexus 485 communications modules are dispatched with fixing screws, a network cabling (9-pin) female connectors and a ribbon cable with fitted plug-in terminal strip. Comms modules have 4 threaded screw fixing points, which are used to attach the module to the Nexus processor module. Ensure that all fixing screws are used. The cable ribbon is fitted to the Nexus processor module through a slot immediately beneath the comms module fixings. Insert the cable ribbon terminal socket (it only fits one way) and press down, gently pushing at the edges, to firmly fit the socket to the board. The comms module male cable connector should be made off and pushed to the female socket of the comms module to terminate the network to the 485 comms module. Copyright © 2002 Morley Electronics Page 39 of 51 Document Number CTD1000 NEXUS Installation V1.07 - 01/11/04 NEXUS Modular Access Control RS422 Line Connection The RS422 Line connection from the converter to the Morley 485 Interface module is as follows: At the converter, POWER L N E LINE MD-45 RS232/ 422 Converter 5 SHIELD 4 RED 3 BLACK 2 WHITE 1 GREEN Fig. 25 RS232/485 Converter Connections And at the RS485 comms interface module, SK1 WHITE 1 GREEN RED 2 3 BLACK 4 SHIELD 5 Morley Electronics Ltd RS485 Interface 1 Fig. 26 RS232/485 485 Module Connections Network Termination The converter provides 4-wire termination at the network source, i.e. the converter. However it is still necessary to provide a network termination at the last controller on the network. This is achieved by inserting the two 120 ohm resistors provided between Pins 1 & 2 and between 3 & 4 on SK1 of the Morley RS485 Interface PCB at the last controller on the network. SK1 WHITE 1 GREEN RED 2 3 BLACK 4 SHIELD 5 1 Fig. 27 RS485 Module Termination Connections Copyright © 2002 Morley Electronics Page 40 of 51 Document Number CTD1000 NEXUS Installation V1.07 - 01/11/04 NEXUS Modular Access Control Nexus RS485 Network Cable Testing Before powering up the installation, use a multi-meter to carry out the following tests: With your meter set to resistance measure between Pins 1 & 2 on the RS485 module, this should yield a value of about 60 ohms. With your meter set to resistance measure between Pins 3 & 4 on the RS485 module, this should yield a value of about 120 ohms. Finally check for high impedance between the two pairs and between each pair and ground. Configuration of PC COM Port in Visikey Software Visikey should be active at this stage. As with all Nexus/Visikey installations, the configuration of the system including the mapping of ports, is best carried out through Visikey Express Install feature (within Visikey). If this method is used, then all port mapping and configuration to the PC is carried out automatically. However, if an additional controller is being added, express install is not the menu to help you, it will just re-install the software and re-set your configuration at the same time. In such instances, configure the port manually via the ‘Config’ and then ‘Com port I/O’ menus in Visikey software, i.e. Once in the menu, set the Com Port as follows (for COM 1) Configuration = COM 1 (0 x 03F8) IRQ 4 If you are unsure about setting up ports or would like further advice, feel free to contact Morley Electronics Fitting Echelon Transceivers and Networks The installation and fitting of Echelon networks and transceivers is a specialist task, which should be carried out in conjunction with Morley Technical Support. For details of Echelon networks and cabling, please see the Echelon network overview earlier in this manual, or contact Morley Electronics. Copyright © 2002 Morley Electronics Page 41 of 51 Document Number CTD1000 NEXUS Installation V1.07 - 01/11/04 NEXUS Modular Access Control Applying Power CONTROLLER POWER SUPPLY INTERFACE CONNECTOR MAINS FAIL INPUT BATTERY CHARGING INPUT BATTERY LOW INPUT 0V Auxiliary Supply 10.5Vdc to 13.8Vdc 0V Controller Supply 10.5Vdc to 18.5Vdc Fig. 28 Nexus Power Input The controller has two power supply inputs, which are for the controller and an auxiliary supply. The controller supply provides power for controller logic and has a quiescent load of approximately 1.5W. This can be supplied from an unregulated power supply or connected in parallel with the auxiliary power supply. The Auxiliary power supply provides power for relays and readers. When power is applied to the controller the green power LED located on the controller board illuminates and the yellow run LED flashes at one-second intervals to indicate correct operation of the Nexus micro controller. Nexus does not carry an on-board power supply and is therefore reliant upon outside power to provide the necessary supply. Morley recommends that a (Part No. 109002) 1.5A psu be purchased for each Nexus controller. This rating is enough to power a fully loaded (i.e. 8 reader) Nexus controller. Note however, that this rating assumes standard readers and does not include power for locks. Should non-standard readers – long range for instance, be considered, the appropriate increase in quiescent and full load power requirements be estimated and a higher rated power supply be provided. Accurately assessing the power requirements for any electrical system is a fundamental requirement to assure correct, safe and reliable operation of the system. To help installers reach this objective, the following power supply notes outline methods to accurately assess power needs. Copyright © 2002 Morley Electronics Page 42 of 51 Document Number CTD1000 NEXUS Installation V1.07 - 01/11/04 NEXUS Modular Access Control Please remember that changes in the system layout, in door and lock types and in reader selection, can all alter the original power requirements. Copyright © 2002 Morley Electronics Page 43 of 51 Document Number CTD1000 NEXUS Installation V1.07 - 01/11/04 NEXUS Modular Access Control Calculating Power Requirements The following equation should be used for calculating the Auxiliary power supply requirements: AL = (RL*0.035)+(RC * NR) Where AL = Auxiliary Load RL = Number of Relays Fitted NR = Number of Readers fitted RC = Reader Current If the calculation above is unclear, the following calculation notes and examples may help establish the power computation detail. Power Supply Current Requirement Example 1 Typical Four-Door System (Read-in only) For a typical four-door Nexus system we would need, 1 Nexus controller Part no. 101007 DRM’s, each having 4 relays and 2 readers connected Part no. 101008 Using for example, HID MiniProx readers, which require 50mA per reader Part no. 105001 Therefore we have in total: 1 Nexus Controller 8 Relays 4 Readers For the total PSU current loading we need to add the auxiliary current (IAUX) to the controller current (ICTRL). Calculating The Auxiliary Current (IAUX) The auxiliary current (IAUX) is the current required to drive the relays and the readers. Each relay requires 35mA and we have 8 of them. Each reader requires 50mA and we have 4 of them. So, IAUX = (8 x 35mA) + (4 x 50mA) = (8 x 0.035A) + (4 x 0.050A) = 0.28A + 0.2A = 0.48A So, 0.48A is required just to power the relays and the readers. Copyright © 2002 Morley Electronics Page 44 of 51 Document Number CTD1000 NEXUS Installation V1.07 - 01/11/04 NEXUS Modular Access Control Calculating The Controller Current (ICTRL) The controller current (ICTRL) is the current required to drive a controller without any DRM’s present. The Controller quiescent current is 150mA Therefore, ICTRL = (1 x 150mA) = (1 x 0.15A) = 0.15A Total System Current The total current (ITOTAL) loading for this system is the auxiliary current (IAUX) plus the controller current (ICTRL). Therefore: ITOTAL = IAUX + ICTRL = 0.48A + 0.15A = 0.63A So, we would require a power supply capable of supplying at the very least 0.63A for this system. NOTE: THIS DOES NOT INCLUDE THE CURRENT REQUIREMENT FOR DOOR LOCKING MECHANISMS, WHICH SHOULD BE ESTIMATED SEPARATELY. Copyright © 2002 Morley Electronics Page 45 of 51 Document Number CTD1000 NEXUS Installation V1.07 - 01/11/04 NEXUS Modular Access Control Power Supply Current Requirement Example 2 2 X Nexus Controller System Suppose we have, 2 Nexus controllers, one controller has 4 reader modules each having 8 relays and 2 readers connected The second controller has 1 reader module with 4 relays and 2 readers connected Using as before, HID MiniProx readers, which require 50mA per reader. Therefore we have in total: 2 Nexus Controllers 36 Relays 10 Readers For the total PSU current loading we need to add the auxiliary current (IAUX) to the controller current (ICTRL). Calculating The Auxiliary Current (IAUX) The auxiliary current (IAUX) is the current required to drive the relays and the readers. Each relay requires 35mA and we have 36 of them. Each reader requires 50mA and we have 10 of them. So, IAUX = (36 x 35mA) + (10 x 50mA) = (36 x 0.035A) + (10 x 0.050A) = 1.26A + 0.5A = 1.76A So, 1.76A is required just to power the relays and the readers. Copyright © 2002 Morley Electronics Page 46 of 51 Document Number CTD1000 NEXUS Installation V1.07 - 01/11/04 NEXUS Modular Access Control Calculating The Controller Current (ICTRL) The controller current (ICTRL) is the current required to drive a controller with no reader modules present. Each Nexus controller requires 150mA. Therefore, (2 x 150mA) ICTRL = = (2 x 0.15A) = 0.3A Total System Current The total current (ITOTAL) loading for this system is the auxiliary current (IAUX) plus the controller current (ICTRL). Therefore: ITOTAL = IAUX + ICTRL = 1.76A + 0.3A = 2.96A So, we would require a power supply capable of supplying at the very least 2.96A for this system. NOTE: THIS DOES NOT INCLUDE THE POWER REQUIREMENT FOR DOOR LOCKING MECHANISMS, WHICH SHOULD BE CALCULATED SEPARATELY. Copyright © 2002 Morley Electronics Page 47 of 51 Document Number CTD1000 NEXUS Installation V1.07 - 01/11/04 NEXUS Modular Access Control Specifications Controller Controller Power Supply Auxiliary Power Supply 10.5Vdc – 18Vdc 150mA 10.5Vdc – 18Vdc 3A MAX (Configuration Dependent) Temperature Humidity Dimensions Weight 0ºC to 40ºC 0-80% RH, non-condensing W 380mm x H 370mm D 70mm 6Kg, fully loaded Nexus c/w 4 x DRM RS232/422 Networks Cable Type Maximum N/work Length Network Topology Belden 8723 or Equivalent 1200m maximum Daisy Chain Echelon ® Networks FTT Network Length Bus Network Length 500m Maximum 2700m Maximum (Doubly terminated) Standard Modules Reader interfaces Supported interfaces Reader Cable Monitored Inputs CCM cable Relay Outputs Relay Switching current 2 per module Watermark Wiegand ABA track2 PAC 20 AWG 125m Maximum (std readers) 4 or 8 clean contact monitors 20 AWG 250m Maximum 4 or 8 change over contacts 4A @ 12v or 24v Copyright © 2002 Morley Electronics Page 49 of 51 Document Number CTD1000 NEXUS Installation V1.07 - 01/11/04 NEXUS Modular Access Control Technical Support Tel: Fax: Email: Web: +44 (0) 1670 732444 +44 (0) 1670 707333 [email protected] www.morleyuk.co.uk Morley Electronics Limited Unit 34 Moorland Way Nelson Park Cramlington Northumberland NE23 1WE Copyright © 2002 Morley Electronics Page 51 of 51 Document Number CTD1000