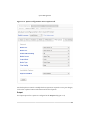
1
PrePrint User Manual
PrePrint User Manual
PrePrint User Manual
Version 1b424e3 (master), 11 April 2013
Copyright © 2013 William Matthew Limited. All rights reserved.
Acknowledgements. Microsoft and Windows are registered to Microsoft Corporation.
HP and PCL are trademarks of Hewlett Packard.
PostScript is a trademark of Adobe Systems.
PowerEdge is a trademark of Dell Corporation.
VMware is a trademark of VMware, Inc.
Linux is a registered trademark of Linus Torvalds.
Prescribe is a registered trademark of Kyocera-Mita Corporation.
E&OE
Table of Contents
About this manual ........................................................................................... v
1. Intended Audience ................................................................................. v
2. Software Licence and Copyright ............................................................... v
1. Introduction ................................................................................................ 7
2. Getting Started ............................................................................................ 9
2.1. Platform set-up ................................................................................... 9
Setting up a Tempest PrePrint ............................................................. 9
Setting up a Virtualized PrePrint ........................................................ 10
2.2. Accessing the console ......................................................................... 47
Accessing the console on Tempest appliances ....................................... 47
Accessing the console on Virtualized appliances .................................... 47
Accessing the console on Server-based appliances ................................. 48
2.3. IP address configuration ...................................................................... 48
Console IP address configuration ........................................................ 48
2.4. Accessing the PrePrint user interface ..................................................... 49
PrePrint users ................................................................................. 49
3. Disaster recovery and backup procedures .................................................... 51
3.1. Backup ............................................................................................. 51
Automated backup with WML's disaster recovery system ........................ 51
Static virtual machine backup procedure ............................................. 51
Database backups ............................................................................. 53
Making backups of PrePrint system settings ......................................... 53
3.2. Recovery ........................................................................................... 53
4. PrePrint Configuration ............................................................................... 55
4.1. System configuration .......................................................................... 55
Network settings .............................................................................. 55
System date and time ....................................................................... 57
System timezone and locale ............................................................... 58
System logging ................................................................................ 58
Email settings .................................................................................. 61
Licence key ..................................................................................... 62
System passwords ............................................................................ 63
System settings ............................................................................... 64
Firmware ........................................................................................ 66
Status and Control ........................................................................... 67
5. Queue Management .................................................................................... 69
5.1. Queue management interface ............................................................... 69
Print user actions ............................................................................ 70
Print admin controls ........................................................................ 71
Classes ........................................................................................... 73
5.2. Queue configuration ........................................................................... 74
Data input ...................................................................................... 74
Archiving ........................................................................................ 81
iii
PrePrint User Manual
Failover ..........................................................................................
Alerts (Queue Monitoring) .................................................................
PPD driver ......................................................................................
Driver options .................................................................................
Output ...........................................................................................
Queue info ......................................................................................
5.3. Jobs ..................................................................................................
5.4. Platform settings ................................................................................
Cups Control ...................................................................................
Failover ..........................................................................................
Edit cupsd.conf ................................................................................
Edit mime.types ...............................................................................
Edit mime.convs ..............................................................................
6. Kyocera Prescribe Emulation ......................................................................
6.1. Basic Defaults ....................................................................................
6.2. Paper Cassettes ..................................................................................
Using Digital Paper Stock ..................................................................
Using PostScript Paper Selection Tags .................................................
6.3. Persistent State ..................................................................................
7. File Manager ..............................................................................................
7.1. Form Files .........................................................................................
7.2. Log Files ...........................................................................................
7.3. Archive Files ......................................................................................
7.4. PPD Files ...........................................................................................
7.5. All User Files .....................................................................................
Print Diagnostics ..............................................................................
iv
84
84
86
88
89
91
91
91
92
92
92
92
92
93
94
94
94
94
95
97
97
98
98
98
98
98
About this manual
This manual describes the use of the WML PrePrint network print emulation appliance.
1. Intended Audience
This manual is aimed at IT administration staff who will be involved with maintaining and
configuring the WML PrePrint.
2. Software Licence and Copyright
The Software is copyrighted and all rights reserved by William Matthew Limited, 22 Haxey
Lane, Haxey, Doncaster, South Yorkshire, DN9 2NE. UK. Email [email protected]
Important
Before using the WML PrePrint Software please read the licence agreement
carefully. The right to use this software is granted only if the Customer agrees
to the terms of this Licence. If you do not agree to the terms of this Licence,
please return the product unused.
William Matthew Limited considers that installation of the Software is your acceptance of our terms and conditions of the license.
1. The Software has been developed for use with the WML PrePrint; The Licence is to be
used without any time limit and may be subject to change.
2. The Software may not be duplicated, copied, resold, or re-branded without the written
consent of William Matthew Limited.
3. It is the responsibility of any user, reseller, distributor, OEM or other third party to protect the rights of William Matthew Limited against violation of this Software Licence.
4. Some portions of The Software have been developed by third parties and are used by
WML under the terms of the GNU General Public Licence, as well as other open source
and free software licences. The source code to these portions of The Software are available to WML's customers under the same terms under which WML uses them. WML will
uphold and protect the copyright of the original author of these portions of The Software.
5. William Matthew will consider any attempt to duplicate the functionality of any application provided by the software to constitute a breach of software licence, and may instigate legal proceedings to protect the copyright of the PrePrint software and William
Matthew Limited.
6. This Licence and the Software product may be transferred to a third party provided the
third party agrees to all the terms of this Licence and that the transferring party retains
no copies of the Software.
7. William Matthew Limited reserves the right to terminate this Licence upon breach.
v
About this manual
8. In the event of a termination, all copies of the software must be destroyed or returned
to William Matthew Ltd
9. Any disputes in respect of the Software Licence will be considered a breach of copyright
and subject to English Law.
vi
Chapter 1. Introduction
WML PrePrint is a network print appliance. It acts as a print server on your network, receiving Prescribe and other legacy data from a variety of sources, which it converts into
PDF format then passes on to your printers. The appliance can be configured via its builtin web user interface.
PrePrint can accept data from your mainframe, Unix, Windows and Linux application
servers using Berkeley LPD protocol, IPP protocol and simple TCP raw-data transfer. It is
also able to collect print jobs from Windows (SMB/CIFS) and Unix (NFS) network-shared
“hot folders”. In addition, FTP can be used to send input data, enabling the PrePrint to be
used in conjunction with multi-function printers to process scanned images.
Figure 1.1. WML PrePrint work flow
PrePrint is intended to add a print emulation function to your print work flow. Its primary
emulation is of the Kyocera Prescribe page description language, which it converts directly
into Portable Document Format (PDF). It can also convert plain formatted text and simple
PCL documents into PDF.
The generated PDF documents can be archived, sent directly to a PDF-capable printer, or
processed through PrePrint's internal printer drivers into PostScript or PCL format.
Prescribe cassette selection commands can be used to trigger “Digital Paper Stock”, where
a single page PDF file is applied to pages which would originally have processed onto preprinted stock from a particular cassette. This allows a legacy printing system to be converted into a white-paper process.
If the use of pre-printed stock is required, PostScript paper selection tags can be embedded
into the output from the internal PostScript driver.
PrePrint can masquerade as multiple printers by assuming an IP address for each printer.
Using this feature, it is possible to use PrePrint to replace a number of legacy desktop printers with a single production printer with no change to the application which generates the
print jobs.
Print jobs are output, via a print driver, to destination printers using LPD, IPP or raw protocols. Archiving of jobs (in PDF format) is available.
7
Introduction
PrePrint has the versatility to enable you to move away from legacy printing hardware with
minimal change to your existing software.
8
Chapter 2. Getting Started
In this chapter, you will be guided through the initial set-up for the WML PrePrint. WML
PrePrint is available in two platform configurations:
• Tempest PrePrint is an appliance form-factor device, based on an AMD Geode LX processor.
• Virtualized PrePrint is a VMware or Linux KVM virtual machine image of the software delivered as a virtual disk image to install on the customer's own virtualization infrastructure.
2.1. Platform set-up
In this section, you will find out how to set up the various platform configurations. The
following sections describe set-up tasks that are common to all configurations.
Setting up a Tempest PrePrint
Figure 2.1. Tempest PrePrint appliance and stand
The Tempest PrePrint includes the following components:
• Tempest appliance;
• stand;
9
Getting Started
• power adaptor.
You will also need an ethernet cable to connect the unit to your network.
Figure 2.2. Rear panel of Tempest PrePrint
Connect the box to your network by plugging an ethernet cable into the network port on
the back of the unit (Figure 2.2).
Figure 2.3. Front panel of Tempest PrePrint
Plug the power supply into the back of the unit. Turn the PrePrint on using the button on
the front of the unit (Figure 2.3). You should see the blue indicator light come on.
Setting up a Virtualized PrePrint
Virtualized appliance disk files are distributed either as VMWare images (.vmdk files) or a
Linux Kernel Virtual Machine (KVM) compatible images (.qcow2 files).
Follow the procedure given by the vendor of your virtualization infrastructure to create a
new virtual machine using the Virtualized appliance disk file as the virtual disk.
Note
The Virtualized appliance disk file will be read from and written to. For this
reason, it is advisable to keep a copy of the original disk file from which a fresh
10
Getting Started
virtual machine can be created. Select a suitable location on your disk system to
store your in-use disk files. This should be somewhere where it is unlikely that
the files will be moved or interfered with externally.
Make a separate copy of the Virtualized appliance disk file for each new virtual
appliance which you create.
Adding a second virtual disk for increased storage
The Virtualized appliance disk file provides up to 2.5 GB of space to store settings, DCC
profiles and PDF forms. This is a sensible amount of storage for systems which do not need
to archive locally, store log files locally for long periods of operation or run an internal
database.
In practice, DataGateway systems typically require more storage as they will, in most cases,
run an internal database (MySQL), archive document data and store log files internally.
PdfPlus and PrePrint systems usually work well with the default disk file.
All WML Print Platform appliances will recognise the presence of a second virtual hard disk
and make use of this disk to store all persistent data in place of the persistent partition of
the Virtualized appliance disk file.
When the second disk is first detected during a boot of the Virtualized appliance, the system
tests it to see if it already contains the persistent files from a WML Print Platform system. If
it does contain files, it is attached as the persistent storage, and boot up continues as normal. If it is empty, then the boot up procedure first copies all the files from the Virtualized
appliance disk file's persistent partition to the second disk, then completes boot up using
the second disk as persistent storage.
To make use of a second disk, simply create a new disk in VMware or KVM, create a Linux
ext3 filesystem on the entire disk (that is, don't create any partitons on the new disk), ensure it is attached to your virtual machine as the second disk and reboot your appliance.
Ideally, the new disk should appear as a SCSI disk to the operating system. It should appear
internally on the Linux-based WML Print Platform system as the device /dev/sdb for correct results.
VMware infrastructure options
VMware provides a number of different infrastructure options, including VMware workstation, VMware ESX and VMware vSphere/ESXi.
A Virtualized PrePrint should work on any type of VMware infrastructure, from the free
VMware Server, through to VMware vSphere systems, however, you do need to choose to
download the correct vmdk disk image from our servers.
VMware virtual disks, pre-installed with PrePrint software are available in two formats.
The first is a growable disk provided as a single file with a name such as:
wmlpp-pre-vmware-sata-tree3-20130228_1502.vmdk
11
Getting Started
This format can be used as the virtual disk for virtual machines created on VMware Workstation and VMware Server, but not recent versions of VMware ESXi/vSphere.
If you are using VMware ESXi or vSphere, you will need to download the ESX-compatible
VMDK. This is provided as a zip file with a file name suffix .esx.zip. The zip contains two
files, a .esx.vmdk disk descriptor file and a 2.5 GB pre-allocated .esx-flat.vmdk file which
contains the disk data. For example:
wmlpp-pre-vmware-sata-tree3-20130228_1502.esx.vmdk
wmlpp-pre-vmware-sata-tree3-20130228_1502.esx-flat.vmdk
Upload both of these .vmdk files to the data store of your VMware infrastructure before
creating a new virtual machine.
Note
It is possible to use the ESX-compatible VMDK files on VMware Workstation.
VMware Server walk-through
This walk-through demonstrates the set up of a Virtualized appliance on VMware Server
version 2.0.2.
Note
It is assumed that you have VMware Server version 2.0.2 already installed on
your PC. For help installing VMware Server, please refer to the VMware website.
VMware Server 2.0.2 can be obtained both for Linux and for Windows platforms;
our appliances have been verified to work correctly on both.
Creating a new Virtualized appliance is carried out in the VMware Infrastructure Web Access interface. This is accessed via a web browser on the system on which VMware Server
was installed. Typically, it can be accessed at the address http://yourcomputer:8333/
12
Getting Started
Figure 2.4. Creating a Virtual Machine in the VMware Infrastructure Web
Access Interface.
In VMware Infrastructure Web Access, click Virtual Machine > Create Virtual Machine.
The Create Virtual Machine dialog will open (Figure 2.4). Assign a name for your new
appliance. Here is has been called “wmlvpa-preprint”. Click Next.
Figure 2.5. Specifying the operating system for the guest appliance.
The next window (Figure 2.5) allows you to choose which operating system your target
appliance will be running. All WML appliances run a 32 bit Linux operating system and so
13
Getting Started
you should choose Linux operating system for Operating System and Other 2.6x Linux
(32-bit) for Version. Click Next.
Figure 2.6. Setting the amount of RAM and number of processors for the
virtual appliance.
This screen (Figure 2.6) allows you to specify the initial amount of RAM and processor resource to assign to your virtual print appliance. Specify a minimum of 256 MB of RAM. Some
applications may require more memory to run correctly, but 256 MB is sufficient for simpler tasks and short documents.
Assign the desired number of processors for the virtual appliance. A single processor may
be sufficient for simpler applications. Assigning two processors to the system will improve
the responsiveness of the web interface when the print processing load is high.
Note
The amount of RAM may be altered after the virtual appliance has been created.
Altering the number of processors is not recommended by VMware, but it can
be done. WML appliances will safely handle a change in the number of available
processors.
14
Getting Started
Figure 2.7. Adding a hard disk to the virtual appliance.
In the next window (Figure 2.7) you have the option to Create a New Virtual Disk. This
would create an empty disk, which would then need to have the operating system installed
(perhaps from a dvd or cdrom). Because you are using a pre-populated disk file supplied by
WML, you should click on Use an Existing Virtual Disk, which will open the next window,
shown in Figure 2.8.
Figure 2.8. Setting the hard disk properties.
15
Getting Started
Figure 2.9. Selecting the WML Virtualized disk file.
On the Properties window (Figure 2.8), click Browse and browse to the location where you
saved your .vmdk disk image (See Figure 2.9) then click OK (it's not necessary to change
Disk Mode, Virtual Device Node or Policies from their default values).
Warning
VMware Server will not make a copy of this disk image file; it's up to you to
keep a copy of the original disk image. The disk image file will be read from and
written to, and may increase in size to a maximum of approximately 2.5 GB.
Figure 2.10. The Network Adapter window.
16
Getting Started
Figure 2.11. The Network Adapter properties window.
In the Network Adapter window (Figure 2.10), click Add a Network Adapter. In the properties window for the network adapter (Figure 2.11), you can select different kinds of network. For a most systems, you are likely to need Bridged networking, which allows your
virtual appliance to join your physical network as if it were a real machine. NAT (Network
Address Translation) networking is unlikely to be suitable, as the WML Virtualized appliance acts as a server. For test installations, HostOnly may be a suitable choice. In this case,
the virtual machine exists on an internal, virtual network.
A full discussion of networking your virtual machines is outside the scope of this document.
If you are unsure of which type of network connection to choose, contact your network
administrator or your networking consultant or supplier.
Leave Connect at Power On checked, and press Next.
Figure 2.12. The CD/DVD Drive window.
17
Getting Started
Figure 2.13. The Floppy Drive window.
Figure 2.14. The USB Controller window.
On the CD/DVD Drive window (Figure 2.12), click Don't Add a CD/DVD Drive. Likewise, on
the floppy drive (Figure 2.13) and USB Controller (Figure 2.14) windows, click “Don't Add...”
Figure 2.15. Ready to Complete - a summary of your new virtual appliance.
18
Getting Started
Click Next on the USB Controller window and you will arrive on the summary window (Figure 2.15). When you click Finish, your Virtualized virtual appliance is ready to use.
You can access the console of your virtual machines via the VMware Infrastructure Web
Access interface. Figure 2.16 shows a Windows desktop with two running Virtualized appliances; a DataGateway and a PrePrint.
Figure 2.16. Two VMware virtual consoles; one is a WML DataGateway, the
other is a WML PrePrint appliance.
We hope this walk through for VMware Server is useful. Other VMware infrastructure options will differ from VMware Server, but the process will be similar to the one shown above.
VMware Workstation walk-through
This walk-through demonstrates the set up of a Virtualized appliance on VMware Workstation version 9.0 running on Microsoft Windows 8.
Note
It is assumed that you have VMware Workstation version 9.0 already installed
on your PC. For help installing VMware Workstation, please refer to the VMware
website.
Creating a new Virtualized appliance is carried out in the VMware Workstation user interface. This is accessed via an icon in your start menu or on the desktop.
19
Getting Started
Figure 2.17. The Home tab of the VMware Workstation user interface.
In the VMware Workstation Home tab, click Create a New Virtual Machine. The New
Virtual Machine Wizard will open (Figure 2.18). Select Custom (advanced) so that it will
be possible to specify that we want to use an existing, preformatted virtual disk. Click Next.
Figure 2.18. The “New Virtual Machine Wizard”.
20
Getting Started
The first window allows you to specify the hardware compatibility for the virtual machine.
This may be a consideration if you wish to move your virtual machine to older versions
of VMware Workstation or to other VMware infrastructure products. In our example, we
leave it at its default of Workstation 9.
Figure 2.19. Choosing the virtual machine hardware compatibility.
As we will use a pre-existing virtual disk, containing a ready-to-boot operating system, select I will install the operating system later on the Guest operating system installation
window (Figure 2.20).
21
Getting Started
Figure 2.20. Selecting the source for the operating system for the virtual
machine.
Figure 2.21. Specifying the operating system for the guest appliance.
The next window (Figure 2.21) allows you to choose which operating system your target
appliance will be running. All WML appliances run a 32 bit Linux operating system and so
22
Getting Started
you should choose Linux for Guest operating system and Other Linux 2.6.x kernel for
Version. Click Next.
Figure 2.22. Choosing the name for the virtual machine.
You can now choose the name for your virtual machine. Here, it has been named “datagateway” (Figure 2.22). The virtual machine definition files will be created in the default
location Documents\Virtual Machines\.
23
Getting Started
Figure 2.23. Setting the number of processors for the virtual appliance.
Figure 2.24. Setting the amount of RAM for the virtual appliance.
The next two screens (Figure 2.23 and Figure 2.24) allow you to specify the initial amount
of RAM and processor resource to assign to your virtual print appliance.
24
Getting Started
Assign the desired number of processors for the virtual appliance. A single processor may
be sufficient for simpler applications. Assigning two processors to the system will improve
the responsiveness of the web interface when the print processing load is high.
Specify a minimum of 256 MB of RAM. Some applications may require more memory to run
correctly, but 256 MB is sufficient for simpler tasks and short documents.
Note
The amount of RAM may be altered after the virtual appliance has been created.
Altering the number of processors is not recommended by VMware, but it can
be done. WML appliances will safely handle a change in the number of available
processors.
Figure 2.25. The Network Type window.
In the Network Type window (Figure 2.25) you can select different kinds of network. For a
most systems, you are likely to need Use bridged networking, which allows your virtual
appliance to join your physical network as if it were a real machine. Use network address
translation (NAT) is unlikely to be suitable choice, as the WML Virtualized appliance acts
as a server. For test installations, Use host-only networking may be a suitable choice. In
this case, the virtual machine exists on an internal, virtual network.
A full discussion of networking your virtual machines is outside the scope of this document.
If you are unsure of which type of network connection to choose, contact your network
administrator or your networking consultant or supplier.
25
Getting Started
Figure 2.26. Selecting the virtual I/O controller type.
Figure 2.26 shows a screen allowing a choice of virtual disk I/O controllers. Leave the default
LSI Logic (Recommended) checked.
Figure 2.27. Selecting a hard disk for the virtual appliance.
26
Getting Started
In the next window (Figure 2.27) you have the option to Create a new virtual disk. This
would create an empty disk, which would then need to have the operating system installed
(perhaps from a dvd or cdrom). Because you are using a pre-populated disk file supplied by
WML, you should click on Use an existing virtual disk, which will open the next window,
shown in Figure 2.28.
Figure 2.28. Selecting an existing disk.
Browse to the vmdk disk image (Figure 2.29). You will probably see a pop-up asking if you
wish to convert the existing virtual disk to a newer format (Figure 2.30). You can choose to
do this or not, as you prefer; the virtual machine will boot correctly in either case.
Warning
VMware Workstation will not make a copy of this disk image file; it's up to you
to keep a copy of the original disk image. The disk image file will be read from
and written to, and may increase in size to a maximum of approximately 2.5 GB.
27
Getting Started
Figure 2.29. Selecting the WML Virtualized disk file.
Figure 2.30. Converting to newer format.
Choose to keep the existing disk format, or convert it and press Next. You'll see the final
window in the wizard (Figure 2.31). When you click Finish, your Virtualized virtual appliance is ready to use.
28
Getting Started
Figure 2.31. Ready to Create Virtual Machine - a summary of your new virtual
appliance.
After creating your new virtual machine, a new tab will appear in the VMware Workstation
UI. You can access the console of your virtual machine here (Figure 2.32). When you first
boot your virtual machine, you will see a message about installing a guest operating system.
You can simply click the button labelled I Finished Installing.
Note
There is no need to install VMware tools on a WML Virtualized. VMware tools
enhances the user experience when using a mouse within a graphical environment. The PrePrint has no graphical console and hence VMware tools is not
used.
29
Getting Started
Figure 2.32. The new appliance tab.
We hope you found this walk-through for VMware Workstation useful. If you compare this
with the VMware Server walk-through, you will see the process has many common features.
VMware vSphere ESXi walk-through
This walk-through demonstrates the set up of a Virtualized appliance on a VMware ESXi
hypervisor version 5.1.0. The ESXi hypervisor is controlled from vSphere client 5.1.0 running on Windows 8.
Note
It is assumed that you have a server with VMware ESXi version 5.1.0 already
installed on a server, and VMware vSphere client version 5.1.0 on a separate
PC or laptop. For help installing VMware vSphere, please refer to the VMware
website.
30
Getting Started
Figure 2.33. The Summary tab in vSphere client for the ESXi host
(192.168.0.158).
Creating a new Virtualized appliance is carried out in the VMware vSphere client user interface. This is accessed via an icon in your start menu or on the desktop. When you open
vSphere client, you must connect to the IP address of your VMware ESXi host.
Once you have connected to the ESXi host, you will see the vSphere client Getting Started
screen. Figure 2.33 shows the vSphere client, with the Summary tab showing.
Figure 2.34. VMware images on the WML web server.
31
Getting Started
Before starting, download the latest PrePrint image from:
http://wmltd.co.uk/preprint/
Choose the .esx.zip file (Figure 2.34). Unpack the zip and find the two .vmdk files (Figure 2.35).
Figure 2.35. The .esx.zip file unpacks to provide two vmdk files.
Upload both of the .vmdk files to the datastore of your ESXi host; in the Summary tab (Figure 2.41), right-click on the datastore and choose Browse datastore. The Datastore Browser has icons to upload two files. Your datastore will now contain the pre-installed virtual
disk for your new virtual machine.
32
Getting Started
Figure 2.36. The “New Virtual Machine” wizard.
In the Getting Started tab, click the link Create a new virtual machine. The Create New
Virtual Machine wizard will open (Figure 2.36). Select Custom so that it will be possible to
specify that we want to use an existing, preformatted virtual disk. Click Next.
33
Getting Started
Figure 2.37. Choosing the name for the virtual machine.
You can now choose the name for your virtual machine. Here, it has been named “datagateway” (Figure 2.37).
34
Getting Started
Figure 2.38. Choosing a datastore for the virtual machine.
The next window allows you to specify a datastore in which you will create or find the
virtual disk for the machine. Choose the datastore to which you uploaded the PrePrint vmdk
files. In this example, there is only a single datastore called datastore1.
35
Getting Started
Figure 2.39. Choosing the virtual machine hardware compatibility.
The Virtual Machine Version window allows you to specify the hardware compatibility for
the virtual machine. This may be a consideration if you wish to move your virtual machine
to older versions of VMware ESXi or to other VMware infrastructure products. In our example, we leave it at its default of 8.
36
Getting Started
Figure 2.40. Specifying the operating system for the guest appliance.
The next window (Figure 2.40) allows you to choose which operating system your target
appliance will be running. All WML appliances run a 32 bit Linux operating system and so
you should choose Linux for Guest Operating System and Other 2.6.x Linux (32-bit) for
Version. Click Next.
37
Getting Started
Figure 2.41. Setting the number of processors for the virtual appliance.
38
Getting Started
Figure 2.42. Setting the amount of RAM for the virtual appliance.
The next two screens (Figure 2.41 and Figure 2.42) allow you to specify the initial amount
of RAM and processor resource to assign to your virtual print appliance.
Assign the desired number of processors for the virtual appliance. A single processor may
be sufficient for simpler applications. Assigning two processors to the system will improve
the responsiveness of the web interface when the print processing load is high.
Specify a minimum of 256 MB of RAM. Some applications may require more memory to run
correctly, but 256 MB is sufficient for simpler tasks and short documents.
Note
The amount of RAM may be altered after the virtual appliance has been created.
Altering the number of processors is not recommended by VMware, but it can
be done. WML appliances will safely handle a change in the number of available
processors.
39
Getting Started
Figure 2.43. The Network window.
In the Network window (Figure 2.43) you can select the number of virtual network interface
cards to assign to the virtual machine. The default of a single NIC is usually suitable for a
PrePrint. By default, the NIC for the virtual machine will join the same network as the ESXi
host.
40
Getting Started
Figure 2.44. Selecting the virtual I/O controller type.
Figure 2.44 shows a screen allowing a choice of virtual SCSI disk controllers. Leave the default LSI Logic Parallel checked.
41
Getting Started
Figure 2.45. Selecting a hard disk for the virtual appliance.
In the next window (Figure 2.45) you have the option to Create a new virtual disk. This
would create an empty disk, which would then need to have the operating system installed
(perhaps from a dvd or cdrom). Because you are using a pre-populated disk file supplied by
WML, you should click on Use an existing virtual disk, which will open the next window,
shown in Figure 2.46.
42
Getting Started
Figure 2.46. Selecting an existing disk.
43
Getting Started
Figure 2.47. Selecting the WML Virtualized disk file.
Browse to the vmdk disk image (Figure 2.47) in your datastore and select it.
44
Getting Started
Figure 2.48. Advanced disk options.
The penultimate window shows some advanced options for your virtual disk. Leave the
virtual device node as SCSI (0:0) and click Next.
45
Getting Started
Figure 2.49. Ready to Complete - a summary of your new virtual appliance.
The last window shows a summary of the settings chosen for your new virtual machine
(Figure 2.49). Click Finish to create the VM.
After creating your new virtual machine, a new item will appear in the inventory for your
ESXi host (Figure 2.50). You can also access the console of your virtual machine in the
vSphere client to find its IP address. Connect a browser to the IP address to access the
PrePrint web user interface.
Note
There is no need to install VMware tools on a WML Virtualized. VMware tools
enhances the user experience when using a mouse within a graphical environment. The PrePrint has no graphical console and hence VMware tools is not
used.
46
Getting Started
Figure 2.50. The new appliance summary tab.
We hope you found this walk-through for VMware vSphere and ESXi useful.
2.2. Accessing the console
Occasionally, you may need to access the console of your PrePrint, to carry out system configuration, maintenance and trouble-shooting.
Accessing the console on Tempest appliances
You will need a USB keyboard, a VGA monitor and an appropriate VGA cable to access the
console of Tempest and Server-based appliances.
Connect a VGA monitor and USB keyboard to the PrePrint. When the PrePrint is switched
on and the system has booted up you will see a login prompt.
You can log in as admin for manual IP address configuration or as root for other system
tasks.
Accessing the console on Virtualized appliances
The virtual machine console for Virtualized appliances is available via the VMware Server
management interface, the VMware Workstation UI or the vSphere client, depending on
which VMware infrastructure is in use.
You can log in as admin for manual IP address configuration or as root for other system
tasks.
47
Getting Started
Accessing the console on Server-based appliances
Please contact WML support for details of how to access the console on your Server-based
PrePrint.
2.3. IP address configuration
By default, the IP address of the PrePrint will be allocated using DHCP.
To determine what IP address has been allocated you can consult your DHCP server logs.
Alternatively, you can log into the PrePrint console, view the IP address displayed there or
carry out manual IP address configuration.
Console IP address configuration
When you need to configure the IP address without the web user interface, you can do so
by logging in at the machine's console, as described in Section 2.2.
At the PrePrint console, log in using the username admin and password blankdoc (or
the password that has been set for the admin user on your system).
When you have logged in, the current network settings will be displayed. You will then be
given the option to configure the IP address manually or via DHCP, or to quit.
Enter “manual” for manual IP configuration
or “dhcp” for automatic IP configuration (q to
quit).
If manual configuration is chosen, you will then be prompted for an IP address for the device, a Netmask address and, optionally, a gateway address.
Enter the IP for the device: 192.168.0.20
Enter the Netmask for the device: 255.255.255.0
Enter the Gateway (n for none): _
For both manual and DHCP configuration, you will be asked to confirm whether you want to
reset the DNS settings. Specifying a DNS server IP which is not accessible on your network
can lock the web based user interface of the PrePrint.
Do you wish to reset the DNS settings? Specifying a DNS
server IP which is not accessible on your network
can lock the web based user interface of this device.
Enter 'y' to remove DNS settings, 'n' to keep them.
The PrePrint will now be reconfigured, the new network settings will be displayed and the
program will exit. To make further changes you will need to log in and follow the process
through again.
48
Getting Started
2.4. Accessing the PrePrint user interface
You can access the PrePrint user interface from anywhere on your local network by directing a web browser at the IP address that has been allocated, either manually or via DHCP,
to the device.
You will need to log in to administer and configure the PrePrint.
PrePrint users
The PrePrint is configured with two levels of user: System Manager and Print Manager. The
default passwords shipped with the system are “blankdoc” in each case.
The System Manager has unrestricted access to all configuration options on the PrePrint.
The Print Manager has restricted access to the system, allowing the user to administer print
jobs and print queues, but not make changes to system settings or operate the optional LAN
Manager. For example, the Print Manager can't change the IP address of the PrePrint or redirect system logging messages.
49
50
Chapter 3. Disaster recovery and
backup procedures
This chapter describes strategies for making a backup of your production PrePrint so that
a replacement system can be re-created in the event of it failing.
Warning
Please note that WML's standard maintenance contracts do NOT cover the rebuild of a solution following a hardware failure unless virtual machine backup
images can be provided or a WML disaster recovery system is in place.
3.1. Backup
Automated backup with WML's disaster recovery system
The best way to backup your PrePrint is to implement WML's disaster recovery system. This
is implemented as a feature in the Appliance Manager module (see ???).
The production system is configured as the “DR master” and has the Appliance Manager
module installed. A second, backup PrePrint is configured to act as the “DR backup”. The DR
master automatically pushes all configuration and archive files to the DR backup twice per
day. It also makes a database dump of the mysql database and pushes this to the DR backup.
Crucially, every time a firmware upgrade is applied to the DR master, the upgrade is pushed
to the DR backup, which automatically applies the upgrade itself. This means that the DR
backup can be rebooted into production mode at any time, with the on-board configuration
being no more than 12 hours out of date.
Warning
The DR backup system should be running on the same infrastructure as the
main system. Either both should be KVM (Kernel Virtual Machine) based (such
as those which are supplied by WML as hardware appliances) OR both should be
VMware based. If one system is KVM based, and the second is VMware based,
firmware upgrades applied to the main system will not propagate to the DR
backup system.
Static virtual machine backup procedure
If a WML disaster recover system is not implemented, it is important to make backups of
the virtual machine disk image files.
51
Disaster recovery and
backup procedures
Note
All Server-based and Virtualized PrePrints operate as virtual machines. Server-based systems are provided running on a pre-configured Ubuntu Linux server which provides a Linux KVM infrastructure for running the PrePrint virtual
machines.
Linux KVM virtual machines
If you have a Server-based PrePrint or you have implemented PrePrint on your own KVM
infrastructure, you will be running a KVM based system.
If you are running PrePrint on your own KVM infrastructure, please make regular backups
of the PrePrint qcow2 disk files, and of any files stored in a logical volume which is attached
to the PrePrint virtual machine.
Note
It is not necessary to shut down the PrePrint while copying the qcow2 disk files,
but it is advisable. If the PrePrint is not shutdown when the backup is made,
it will be necessary to run a file system check on the qcow2 file when the recovered PrePrint boots up. Although this is completed automatically on every
PrePrint boot, there may be rare cases where the filesystem check cannot recover a file in the disk image.
If your KVM infrastructure has the facility to make complete backups or copies of running
virtual machines, then consider making use of it.
If you are running a Server-based PrePrint, you will need to backup the qcow2 disk files in
/var/vm/ on the Ubuntu server and any logical volume which has been presented to your
PrePrint as a second virtual disk.
To backup files in /var/vm/, use the scp (Secure CoPy) protocol to connect to the server on
port 22 or 1522. Copy all files from the path /var/vm/ on the remote system to your local
backup location. You will need to have obtained and recorded the password associated with
the user wmldev on the Ubuntu server.
Note
The WinSCP program (http://winscp.net/) is a free utility which implements
the scp protocol and runs on Microsoft Windows.
You can determine if your PrePrint is using an attached logical disk by consulting System
Settings > Status/Control > Share mounts. This will open a dialog containing a table of
File Systems and Mounted Network Shares. If you have a Path of /dev/sdb with Mount
Point /etc/persistent, then you do have an attached logical volume.
Because this logical volume may be encrypted, the best way to back it up is to copy the files
from the PrePrint rather than via the underlying server.
52
Disaster recovery and
backup procedures
Use scp to copy all files from /etc/persistent/ on the PrePrint to your local backup location.
Use port 22 or 7522.
VMware virtual machines
If you are running your PrePrint on a VMware infrastructure, please make use of the tools
provided by VMware to make backups of your PrePrint.
Database backups
An on-board MySQL database is used to record information for the Document Content Control module, the Electronic Document Delivery module and for full audit-trail reporting.
A static virtual machine backup will copy the existing state of the database, but it is also
possible to make external backups of the database content.
To make dumps of the on-board database, ask your vendor to set up a read-only database
user and then make use of the mysqldump utility to extract a snapshot of the database
contents from the PrePrint.
Making backups of PrePrint system settings
The PrePrint web user interface provides a method for saving configuration files, such as
queue configuration and Document Content Control configuration.
These backups are particularly useful for creating duplicate systems for testing or to provide to WML to aid support. Each backup created is a tar archive file, containing the backed
up files.
Refer to the section called “System settings” for details of backing up PrePrint system settings.
Warning
This method does NOT allow you to backup archived documents, database content (used for Document Content Control, Electronic Document Delivery and
audit report systems) or Archive Manager configuration.
3.2. Recovery
The method for recovering a PrePrint following a failure of the hardware platform will
depend on how the backups were made.
If the WML disaster recovery system is implemented, the DR master should be unplugged
from the network, if it is still running, and the DR backup should be rebooted into “master
mode”. (see ??? for more details).
If you are managing the virtualization infrastructure, then follow suitable steps to re-create
a virtual machine from the backups you have made of the disk images/virtual machine.
If you are running a Server-based PrePrint it will be necessary to have WML supply a preconfigured server running Ubuntu Linux with KVM onto which the virtual machine backups can be restored.
53
Disaster recovery and
backup procedures
Note
The standard WML software maintenance contract will cover the work required
to restore virtual machine disk image files onto the server. Hardware maintenance agreements should be arranged to cover the server hardware, which is
otherwise supplied at additional cost.
If the system is a Tempest appliance, a replacement should be set up using the backup files
made in the PrePrint web user interface.
54
Chapter 4. PrePrint Configuration
This chapter covers the steps necessary to configure the PrePrint system. After configuration, the system will have the correct network settings, it will keep time correctly and system log messages will be logged to your syslog server.
After configuring the system, you will be ready to set up print queues, as described in Chapter 5: Queue Management.
This chapter also describes the configuration of passwords for authentication and describes
how to modify the licence key.
4.1. System configuration
System configuration tools can be found in the PrePrint web user interface by selecting the
System Settings item from the main menu.
Network settings
To access the network settings controls (Figure 4.1), select System Settings > Network.
This notation means “select the System button from the upper row, then select the Network
tab in the lower row.”.
Figure 4.1. Network settings
Here you can set the network address for the network interface(s). Figure 4.1 shows a PdfPlus on which there is one network interface, eth0. On hardware platforms with multiple
55
PrePrint Configuration
network interfaces, additional sections for the extra interfaces will be shown. The interfaces are named eth0, eth1, eth2 and so on.
The parameters for each network interface can be set to fixed, static values or can be set to
be dynamically updated using DHCP (Dynamic Host Configuration Protocol). If you check
“Use dhcp”, the IP address will be allocated by your DHCP server. The client ID passed to the
DHCP server will be “eth0” for the eth0 interface, “eth1” for the eth1 interface and so on.
You may need to consult the log of your DHCP server to find the IP address allocated to the
PrePrint. Alternatively, access the console of the PrePrint and login as admin, as described
in Section 2.2 in Chapter 2: Getting Started. On doing so, the current network settings will
be displayed.
Configuring multiple aliases
The PrePrint can be configured with multiple IP addresses for each network interface. To
add an alias, press the “Add Alias” button. A field will appear in which you can specify a
static IP address or enter dhcp to have the alias obtain a dynamic IP address from your
DHCP server.
When using DHCP to allocate IP addresses to multiple aliases on the same network interface,
you will need to configure the server to make use of the client ID parameter. The client ID
is an identifier passed by the DHCP client to the DHCP server to identify the request. The
first alias on the interface eth0 has the client ID eth0:1, the second alias has the client ID
eth0:2 and so on.
Configuring DNS settings
DNS settings are also configured on the Network Settings page. You can configure the primary and secondary DNS servers, along with the domain and a domain search order for
name resolution. These parameters are placed in a standard Unix/Linux resolv.conf file.
Bandwidth limit
It is possible to limit the rate at which the PrePrint sends data on its output. This feature can
be used to preserve a portion of a site's bandwidth for other uses which may be sensitive
to latency.
Note
It is not possible to limit the rate at which data comes into the appliance. This
is a fundamental limitation of the IP protcol, which is designed to accept all incoming packets on an interface. Bandwidth limiting is always achieved by limiting the rate at which data packets are sent.
To limit the bandwidth for a given interface, enter a number in the corresponding “Bandwidth (bits)” field and press “Update”. A suffix of K for kilobits per second, M for megabits
per second or G for gigabits per second can be appended.
To remove the bandwidth limit, enter 0 in the “Bandwidth (bits)” field.
56
PrePrint Configuration
System date and time
To access the system date and time controls (Figure 4.2), select System Settings > Time.
Figure 4.2. Setting system date and time
The system date can be set manually or using network time protocol (NTP). If you choose
to use NTP, you can specify to use your own NTP server or a public pool of NTP servers. To
make use of the server pool, your device must have access to the public internet and DNS
must be configured so that the device can resolve network names.
To set the date, manually enter a string of the form MMDDhhmmYYYY. For example, to set
date to 09:44 July 19 2006, enter 071909442006.
To save your changes, click on the “Update” button.
To configure NTP, check “Enable NTP” and select “Use Public NTP Server Pool” or enter the
address of your preferred NTP server (you can do both). Note that if your device is unable to
57
PrePrint Configuration
access either the public pool or the preferred NTP server, then a timeout of approximately
10 seconds will occur when you press “Update”.
Don't forget to set the correct timezone (Section : System timezone and locale), to ensure
that daylight savings adjustments are automatically applied.
System timezone and locale
To access the system timezone and locale controls (Figure 4.3), select System Settings >
Location.
Figure 4.3. Setting system timezone and locale
The drop-down controls can be used to select your timezone and language/locale.
It is important for time-keeping (see “System date and time”) to set the the correct timezone in which you are operating.
To save your changes, click on the “Update” button.
System logging
To access the system logging controls (Figure 4.4), select System Settings > System Log.
The system logging controls allow you to choose whether or not to permanently store system log messages. As well as being useful for diagnosing problems system reports are
If left unconfigured, the PrePrint will only store system messages to a temporary log in
RAM. This log is frequently truncated and overwritten. In order to permanently store the
system log, messages may be sent to a syslog server. Messages may also be stored to a network share or local drive (on Server-based and Virtualized systems).
58
PrePrint Configuration
Figure 4.4. System logging
If you want to send syslog messages to another device, check the “Send syslog messages...”
box and enter the IP address, port number and protocol to be used. You may send the messages to multiple devices by entering multiple, comma-separated IP addresses.
You may also choose to receive network syslog messages on the PrePrint by checking the
“Receive network syslog messages...” box and filling in the port number and protocol appropriately.
To store messages to a network share or local disk, check the “Store log messages to network share...” box and specify the storage type as described in the section called “Selecting
network/hard disk storage”.
Note
If you un-check “Send...”, “Receive...” and “Store...”, system log messages will
still be written to a file in RAM, but they will be periodically truncated and will
not persist after a reboot.
Permanently stored system log messages are stored to two files, wmlpp_job.log and
wmlpp_sys.log. As the file names suggest, wmlpp_job.log contains messages relating to
print jobs, while wmlpp_sys.log stores messages relating to other aspects of the system.
Example 4.1 shows an example set of log files.
59
PrePrint Configuration
Example 4.1. Example system log files
2009-07-10-wmlpp_job.log
2009-07-10-wmlpp_job.log.partner
2009-07-10-wmlpp_report.csv
2009-07-10-wmlpp_sys.log
2009-07-11-wmlpp_job.log
2009-07-11-wmlpp_job.log.partner
2009-07-11-wmlpp_report.csv
2009-07-11-wmlpp_sys.log
2009-07-12-wmlpp_job.log
2009-07-12-wmlpp_job.log.partner
2009-07-12-wmlpp_report.csv
2009-07-12-wmlpp_sys.log
2009-07-13-wmlpp_job.log
2009-07-13-wmlpp_report.csv
2009-07-13-wmlpp_sys.log
2009-07-14-wmlpp_job.log
2009-07-14-wmlpp_job.log.partner
2009-07-14-wmlpp_sys.log
wmlpp_job.log
wmlpp_report.csv
wmlpp_sys.log
wmlpp_job.log and wmlpp_sys.log are “rotated” daily in the early morning. Each day, the
files are renamed in the format YYYY-MM-DD-wmlpp_job.log (for wmlpp_job.log) and the
current log is then truncated. The system messages for the previous day are stored in the
dated file. For example, 2009-07-12-wmlpp_job.log contains the job logs for 2009-07-11.
To save your changes to the system logging settings, click on the “Update” button.
Selecting network/hard disk storage
The “Network/Hard Disk Storage” section enables you to specify a network share or local
drive (on Server-based systems) to use for system log storage. The network share may be
either a Unix/Linux Network File Server (NFS) share or a Windows/Samba (SMB/CIFS) network share. The preferred storage option may be selected using the “Share Type” dropdown.
Selecting a share
NFS (Linux/Unix shares)
To connect to a Linux/Unix NFS share, choose NFS (Linux/Unix) from the Share Type
drop-down. Enter the path to the NFS share in the following format:
[Network/IP Address]:[folder path]
For example:
192.168.100.100:/input_data
The NFS server's exports file should be configured to allow both read and write access to the
directory path (/input_data in the example). An example of a suitable line in /etc/exports
on the NFS server is:
/input_data 192.168.0.0/255.255.255.0(rw,no_root_squash,sync,subtree_check)
If the NFS share is to be used as an archive Share, then correct permissions must be set on
the share directory on the NFS server. The following would be required for an archive share
specified as:
60
PrePrint Configuration
192.168.100.100:/archiveData
On the server it would be necessary to change the user on this directory to “root” or 0 and
the group of the directory to 7, which is the GID for the “lp” user on some systems:
root@nfsServer# chown 0:7 /archiveData
Finally, ensure that both user and group are able to read and write to the directory:
root@nfsServer# chmod ug+rwx /archiveData
SMB/CIFS (Windows shares)
For Windows SMB/CIFS network shares, select SMB/CIFS (Windows share) and click on
the Refresh button to scan the network for available shares. This will populate the Available SMB/CIFS shared folders drop-down.
Important
Most recent Microsoft Windows file servers will not broadcast their available shares to
the network without authentication.
If necessary, enter your network username and password in the fields Network
user name and Network password and then press Refresh. The username and
password will be used to obtain the list of available shares.
It is also possible to enter the share path manually in the Manual path entry text field, by
choosing the option Enter path in text box from the Available SMB/CIFS shared folders
drop-down.
Enter the SMB/CIFS path in the format:
\\MACHINE\shareName
The Network user name and the Network password fields must be filled in to attach
shares which require authentication.
To save your changes, click on the “Update” button.
Email settings
To access the email settings controls (Figure 4.5), select System Settings > Email.
61
PrePrint Configuration
Figure 4.5. Email settings
The system may be set up to send reports and alerts to specified email addresses. Enter
a comma-separated list of email addresses, or leave the field blank if you do not wish to
receive system emails.
You will also need to provide the IP/network address of the SMTP server to be used to send
the emails and SMTP username and password, if required.
To save your changes, click on the “Update” button.
Licence key
To access the licence key controls (Figure 4.6), select System Settings > Licences.
62
PrePrint Configuration
Figure 4.6. Setting the licence key
Enter the licence key received from the appliance vendor and click on “Update Key”. The
licence details will be displayed below.
WML Print Platform Licences have a number of “licence credits” enabled. They also provide
a number of flags to enable certain features on the appliance, such as the Prescribe emulation and archiving. A number of USB devices may also be enabled in the licence.
A licence credit enables the use of an IP address on the appliance or the use of a input
share/hot folder or archive share (if enabled with the relevant flags). The number of valid
licence credits, USB devices and enabled feature flags is shown for the key which is stored
on the appliance. The number of licence credits and USB devices which are in use will also
be displayed.
System passwords
To access the system password controls (Figure 4.7), select System Settings > Password.
63
PrePrint Configuration
Figure 4.7. Setting system and print manager passwords
You can use these controls to set passwords for the system and print manager users.
To change either password (you can't change both at once), enter the new password in both
boxes and click on “Update Password”.
Note
Passwords must have a minimum length of five characters.
The default password is blankdoc.
System settings
To access the controls to backup, restore and reset system settings (Figure 4.8), select System Settings > Backup.
64
PrePrint Configuration
Figure 4.8. System settings
Backing up system settings
Before backing up the system settings decide which parts of the configuration need to be
stored. The options for back up will include:
• System Files and Settings
• Network Settings
• Print Queues
• Print Job Data
• Overlay and Logic Profiles
There is also a checkbox to select or deselect all options.
It is common to want to copy the print settings from one appliance to another, without
making any other changes to the target system. In this case, a backup of “Print Queues” and
“Overlay and Logic Profiles” would be a suitable selection.
To copy an entire system setup, but without affecting the network settings of the target
appliance, select all options except “Network Settings”.
To make a full backup to use in the case that the hardware failed and an identical setup
were required on new hardware, select all options.
After making the selection, click “Create Backup”. A new button “Download Backup” will
appear. Click this button and save the file to the local system.
Click on the link provided to backup the system settings. You will be prompted to save a
file called “settings.tar”. This contains an archive of all the current settings for the device.
65
PrePrint Configuration
Restoring system settings
To restore settings from a previously saved file, click “Upload Backup”, and browse to the
file. After the file uploads successfully, a new button “Restore From File” will appear. Click
this button to apply the uploaded backup.
Restoring factory defaults
To restore factory default settings for passwords and network, click on “Factory Defaults”.
A confirmation dialog box will appear.
Firmware
To access the system firmware controls (Figure 4.9), select System Settings > Firmware.
Figure 4.9. Firmware
To perform a firmware upgrade, you must first upload a new firmware image to the device,
either by browsing to the file, by uploading a firmware image into the “update” directory
via FTP or by using scp/sftp to copy the firmware image into the “/tmp/uploads/update”
directory. Details of the current and uploaded firmware images are shown on the page. Click
on “Refresh” if you have uploaded an image and it is not yet displayed.
When the image has been uploaded, the “Update Firmware” button will be displayed. Click
on the button to start the update process. The process will reboot the appliance. Avoid interrupting the firmware update, which takes approximately 45 seconds in total. The brower
will re-connect to the user interface when the update has completed.
To revert to the previous version of the firmware, click on the “Revert Firmware” button.
66
PrePrint Configuration
Status and Control
The system status and control page provides status information such as system load and
memory usage, the ability to shut down or reboot the appliance and a feature to allow WML
staff to access the appliance for support.
To access the system status and control page (Figure 4.10), select System Settings > Status/Control.
Figure 4.10. Status and Control user interface
System Status
This section shows the current system status. Most of the entries in the list are self-explanatory.
“Persistent Storage” is the amount of storage available on the on-board hard disk or flash
disk module for storing user files such as PDF forms. When this runs low, the user will be
unable to add new PDF forms to the appliance.
The “RAMDisk Storage” is used for all temporary files and is half the size of the total installed RAM. If this runs low, then print jobs may stop processing through the PrePrint.
During the implementation phase, it is important to ensure that the maximum print load
will not cause the RAMDisk Storage to run out.
The “View” button for the “System Log” will display a pop-up window showing the last few
lines of the internal system log (which resides on the RAMDisk and is not persistent across
reboots).
The “View” button for “Network Mounts” displays a window showing mounted network
shares. This is used to verify that any archive and hot folder shares which have been con67
PrePrint Configuration
figured have been successfully mounted by the appliance and have sufficient storage available.
System Control
This page provides shut down and reboot buttons.
Shut down
The shut down button will display a confirmation dialog box. After confirmation has been
given, the system will go through a safe shut down procedure. The web interface will display
a success message when it is no longer able to connect to the appliance's embedded web
server.
Reboot
If the user confirms a reboot, the appliance will safely shut down, then reboot. The web
interface will re-connect to the appliance login screen as soon as the reboot is complete.
Support Access
The PrePrint provides a remote access mechanism to allow support staff to access the appliance and investigate problems.
To use this feature, the appliance must have internet access. If a firewall is in use, it must be
configured to allow the appliance to initiate a direct connection on TCP port 80 (HTTP) to
the support access server (rssh.wmltd.co.uk). This is equivalent to allowing the appliance
to browse the web.
To turn support access on, check the box “Enable support access”. The appliance will attempt to connect to the support access server. When a successful connection is made, a
connection ID will be displayed. Support staff will request this connection ID to enable them
to connect back to the appliance.
68
Chapter 5. Queue Management
Queue management is carried out in the Print Platform section of the PrePrint user interface. This section contains the queue management interface, comprising the Queues page,
which lists and monitor all queues on the appliance, and the Queue Config section, where
detailed configuration of queues can be carried out.
Other pages in this section are the Jobs page, on which recent jobs are listed and managed,
and the Platform Settings page, on which platform-wide settings may be configured.
5.1. Queue management interface
Simple queue administration tasks, such as adding a queue or changing input and output
details, may be carried out on the Print Platform > Queues page. Full configuration is carried out in Print Platform > Queue Config, described in Section 5.2.
The first point of entry to the queue management interface is the print queues list (Figure 5.1), found on the Print Platform > Queues page.
Figure 5.1. The print queues list
This list displays and monitors all queues on the PrePrint. The summary view shown in Figure 5.1 displays a status line for each queue, comprising the queue name, activity monitor
and queue status information, as well as a number of print user actions for the queue. The
queue list is updated periodically so that the information shown always reflects the current
state of the queues.
System status information is displayed above the queue list. The system load average and
the total and inactive memory are displayed. The information is updated periodically to
show the current values.
Figure 5.2 details the components of the queue status line.
69
Queue Management
Figure 5.2. The queue status line
❶
❷
❸
❹
Queue info button. Click to display a summary of the queue configuration.
Activity monitor. The bars light up when jobs are processing on the queue.
Queue status. The current status of the queue and information about the last job processed on the queue.
Print user actions: print file, view jobs and print status page.
Print user actions
The queue status line enables a number of print user actions, which are described below.
Print file
Click on the print icon ( ) to send a file to print on the queue. You will be prompted to
browse to a file. Once a file has been selected, it will be sent to print.
View jobs
The view jobs icon ( ) provides a direct link to the Print Platform > Jobs page (see Section 5.3), set to display all jobs on the selected queue.
Print status page
Click on the print status icon ( ) to send to print a queue statue report page (Figure 5.3)
providing queue details and status information and current system information.
70
Queue Management
Figure 5.3. Queue status report page
Print admin controls
The print queues list provides admin controls which allow simple administrative tasks to
be carried out on existing queues and which facilitate the addition of new queues.
The print admin controls for an existing queue are revealed by clicking on the status line
for the queue. The controls will appear in a new line below the queue status line, and labels
for the controls will appear in the queue list header (Figure 5.4). Click on the status line
again to hide the controls.
Tip
To show or hide the print admin controls for all queues, click on the queue list
header.
71
Queue Management
Figure 5.4. Print admin controls
Note
Please note that Info field is hidden at narrow browser widths. For access to this
field, your browser window should be 1000px or more wide.
Editing a queue
Changes made to the queue name take effect as soon as focus leaves the queue name field.
Modifications made to other fields should be saved by clicking the update button ( ).
Note
The queue name may contain upper and lower case letters, numbers, the dash
character and the underscore character. Queue names may not contain spaces.
Click on the configure button ( ) to gain access to the full queue configuration interface
for the queue.
A queue may be duplicated by clicking on the duplicate button ( ). This will create a copy
of the queue, including full configuration details. You will be given the opportunity to edit
the automatically-generated name for the new queue before the new queue is created.
An existing queue may be removed by clicking on the delete button ( ). You will be prompted to confirm the deletion. You can also delete multiple queues by checking the “Select”
checkbox for each queue, then clicking on the delete selected button ( ).
72
Queue Management
Adding a print queue
To add a queue, fill in the queue name, input port, output protocol, destination network
name or address and output port/queue name in the “Add a new queue” area, then click on
the add button ( ). The queue will be added to the system.
Note
The queue name may contain upper and lower case letters, numbers, the dash
character and the underscore character. Queue names may not contain spaces.
The input port defaults to the next available port number, starting at 9100, a value which
is commonly used in printing applications. It is possible for two queues to respond on the
same raw port. In this case the first queue (alphabetically) will respond to incoming print
data on the shared port, unless you have enabled per-IP address filtering in the input
tab of the queue configuration. To find out more about how queues can respond based on
sender and destination IP addresses, see the section called “LPD/raw input settings”.
Classes
The PrePrint can be configured with print classes. A print class is a group of print queues.
Print data sent to a print class will be forwarded to members of the class in rotation.
The classes interface is similar to that for print queues (Figure 5.5).
Figure 5.5. The classes list
To add a class, enter a name for the class, and select at least one member for the class.
Multiple queues may be selected by holding down the control key. The input port defaults
to the next available port number, starting at 10100. Click on the add button ( ) to add the
class to the system.
Note
At least one queue must be configured before it is possible to add a class.
73
Queue Management
Click on the configure button ( ) to gain access to the full configuration interface for the
class. Classes have Input and Output options, but no data processing options; all data processing is configured on a per-queue basis.
5.2. Queue configuration
While some queue parameters can be modified in the print queue list, full configuration
options for each queue are reached via the configure button in the print queues list, as
shown in Figure 5.6, or by going to the Print Platform > Queue Config page and switching
to the required queue using the Switch to queue menu.
Figure 5.6. The configure button in the print queues list
The following sections describe the options available for configuration within the Print
Platform > Queue Config section.
Data input
Print data can be sent to the PrePrint using a variety of methods. These include the wellknown Berkeley LPD protocol, defined in Internet RFC 1179, the IPP protocol, which is defined
in RFC 3510 and the raw print protocol, by which data is sent unmodified, with no additional
command metadata, to a particular TCP port.
In addition to these input protocols, the PrePrint can can receive data from an HTTP POST
request, where the print data is encoded in a POST form and it can also collect print files
from a network-shared hot folder. This is called the input share or hot folder method.
The PrePrint also has a unique feature which allows it to behave as if it were any number of
printers on a network, each using the same TCP port for raw printing. The PrePrint can be
configured with a number of IP address aliases. Any queue can then be instructed to “listen”
only on a particular IP address, ignoring input to other IP addresses.
74
Queue Management
Select the Input tab (Figure 5.7) to configure the input data options for the queue.
Figure 5.7. Queue configuration: Input tab
The left-hand column contains the input settings for LPD/raw input data. The right-hand
column contains the input share settings.
Caution
Before changing any settings, shut down any print job scheduler which may be
sending data to the PrePrint. If print jobs are spooling onto the PrePrint when
the queue settings are updated, data loss may occur.
LPD/raw input settings
The input IP on which to listen for raw print data can be selected from the “Receive on IP
alias” drop-down control. This shows the available IP addresses on which the device can
75
Queue Management
listen, including all the aliases. To add aliases, use the Network settings page in System
Settings > Network.
It is possible to filter jobs using the origin IP. Enter an IP address in the Receive only from
IP field and the queue will only accept jobs originating from that single IP address.
Note
It is only possible to specify a single IP address or “all” for the input IP and the
origin IP. To process data from two or more originating servers, create additional print queues with identical settings and set input/origin IP settings for
the two or more addresses.
The Input Port for raw TCP data input can be set to a value in the range 1024 to 32767,
inclusive.
Note
The input port can also be set in the Print Queues list.
Note
If the CDL module has been licenced (DataGateway only) some additional fields
will be visible here, allowing you to specify that the incoming data is expected
to be CDL-formatted data.
The Input LPD Queue field can be set to a value with less than 256 characters and no spaces.
This alias can be used with the LPD input protocol in place of the actual name of the queue.
The LPD queue alias defaults to the name of the queue.
HTTP GET/POST input
To enable the queue to receive data via an HTTP GET or POST request to sendfile.cgi, check
the box in HTTP GET/POST.
Note
The HTTP GET/POST input feature uses a licence credit for each queue on which
it is enabled.
Making an HTTP POST request
Note
While it is possible to use an HTTP GET request to send data to the PrePrint, it
is more natural to use HTTP POST, which is the recommended request to use.
76
Queue Management
To print some data to the PrePrint, make an HTTP POST request with the following parameters in POST form (use the application/x-www-form-urlencoded POST request type):
• queue: The queue to which you wish to send the data (required).
• copies: The number of copies of the data which should be output (defaults to 1 if omitted).
• title: The title for the job (optional).
• user: The user who sent the data (optional).
• data: The data for the job (required).
All parameters should be url-encoded. This will be necessary for most of the fields; certainly
for the data.
Make the request to http://your.PrePrint.net/sendfile.cgi. An XML-formatted response
will be returned.
A useful utility for testing is curl, available, at the time of writing, from http://curl.haxx.se/.
The following call to the curl command will spool one copy of the file “file.name” giving
it the title “test”, and printing it to the queue “testgm” on the PrePrint “wml.localnet” on
behalf of the user “Bob”:
curl -X POST http://wml.localnet/sendfile.cgi -d queue=testgm -d copies=1 \
-d title=test -d user=Bob --data-urlencode [email protected]
Note
If copies is set to a number N, greater than 1, then the data will be spooled as
input N times, rather than having the output of any processing on the queue
emitted N times. Any processing which the PrePrint would carry out on the data
will be repeated N times.
The response to an HTTP POST request
The response returned by call to sendfile.cgi is XML data which indicates the success or
failure of the request.
If the request was successful, the XML will contain an element called success meaning that
the data was accepted onto the queue. It doesn't mean that the data was successfully output,
only that the data was received and accepted onto the queue.
If there was an error which prevented the data from being accepted, then a field called
error will be found in the XML response. This error message will describe what went wrong.
In addition to the success and error elements in the XML, the parameters of the request will
be returned back to the caller, which can be helpful when testing the process.
An example of a successful response is shown below. The success element contains the
message “Successfully spooled data to” followed by the target queue name (testgm, in the
example).
<?xml version="1.0" ?>
77
Queue Management
<!DOCTYPE WmlSendFileResponse>
<WmlSendFileResponse>
<copies>1</copies>
<dataSizeBytes>674</dataSizeBytes>
<jobId>34933</jobId>
<queue>testgm</queue>
<success>Successfully spooled data to testgm</success>
<title>test</title>
<user>seb</user>
</WmlSendFileResponse>
In the next response, the call failed because the user did not pass a data file:
<?xml version="1.0" ?>
<!DOCTYPE WmlSendFileResponse>
<WmlSendFileResponse>
<dataSizeBytes>0</dataSizeBytes>
<error>Please pass document data in the parameter "data".</error>
</WmlSendFileResponse>
The full list of elements in the response XML
• copies: The number of times to spool the data to the target queue.
• dataSizeBytes: The number of bytes of data presented in the POST (or GET). Always returned, whether request is a success or not.
• error: An error message. If present, the data was not accepted onto the queue.
• jobID: The internal CUPS job ID for the successfully spooled data. Only present if the job
is successfully spooled. If copies was set to >1, then this will contain a comma-separated
list all IDs.
• queue: The target queue specified in the request.
• success: A success message. Only present if data is successfully accepted.
• title: The job title specified in the request.
• user: The user specified in the request.
The most common HTTP POST request error messages
• Please pass document data in the parameter "data". Check your HTTP request.
• The target queue does not accept HTTP GET/POST requests to spool data. Make sure you
have enough licence credits and ensure that HTTP GET/POST is enabled in Print Platform >
Queue Config > Input .
• Please set the target queue in the parameter "queue". Check your HTTP request.
• The queue is not accepting jobs. Check that the Accept box is checked for your target queue
in Print Platform > Queues.
• The print transport (CUPS) did not accept the job. Check you haven't used up all the ramdisk
or persistent storage on the system (System Settings > Status/Control). Try re-starting CUPS at
Print Platform > Platform Settings > Cups Control.
78
Queue Management
Duplicating input jobs
The Duplicate jobs to: box is a multi-select menu. Any queues highlighted in this box will
receive a copy of every input data file received on the current queue. Hold the Ctrl key to
select multiple queues in this box.
Share-based input
To print files from a network share, the PrePrint first “mounts” the network share, then
scans it on a regular basis (every second) for new files to print. When it finds a file, it
monitors its size, then when the size has been static and non-zero for 3 seconds (the “settle-time”), it spools it for print.
Empty files (with zero size) are not printed. The PrePrint logs the existence of empty files
in the input share with a message like this:
Oct 16 10:08:35 wmldevice ctrl[731]: \
Ignoring zero sized file: '/tmp/hotfolder/myqueue/file.pdf'
This log message is repeated every 60 seconds.
Caution
The input share settle-time is only 3 seconds.
Files must be fully copied onto the input share within this time-scale.
Care must be taken with the share-based input method if your application creates files on
the input share using file access programming techniques.
If you use functions such as fopen() in C or file-streams in C++, you must ensure that your
application creates the file in less than the settle-time of 3 seconds.
Suppose your application creates a file in the input share, sends some, but not all of the
print data into the file, then pauses for more than the settle-time before completing. The
PrePrint will see the the file size is non-zero and has remained static for 3 seconds, so it will
pick up the incomplete job, and attempt to print it.
To avoid this problem, you can use two strategies: Either have your application generate
the file in a separate folder and then copy the completed file into the PrePrint input share or
have your application create each file with a “.spl” suffix (meaning SPooLing). The PrePrint
will ignore files with a “.spl” suffix (which must be in lower case). When your application
has completed generating the file, have it re-named without the .spl suffix. The job will
then be printed.
Once printed, the PrePrint erases the file from the network share. For this reason, the network share used for printing should be configured for read/write access and if a copy of the
print data is required it should either be archived using the PrePrint's archiving features,
or archived before it is dropped in the input share.
To enable share-based input, check the box labelled Scan share directory for inputs. It's
possible to use either Unix/Linux Network File Server shares or Windows/Samba SMB/CIFS
network shares from which to collect print data.
79
Queue Management
Selecting a share
NFS (Linux/Unix shares)
To connect to a Linux/Unix NFS share, choose NFS (Linux/Unix) from the Share Type
drop-down. Enter the path to the NFS share in the following format:
[Network/IP Address]:[folder path]
For example:
192.168.100.100:/input_data
The NFS server's exports file should be configured to allow both read and write access to the
directory path (/input_data in the example). An example of a suitable line in /etc/exports
on the NFS server is:
/input_data 192.168.0.0/255.255.255.0(rw,no_root_squash,sync,subtree_check)
If the NFS share is to be used as an archive Share, then correct permissions must be set on
the share directory on the NFS server. The following would be required for an archive share
specified as:
192.168.100.100:/archiveData
On the server it would be necessary to change the user on this directory to “root” or 0 and
the group of the directory to 7, which is the GID for the “lp” user on some systems:
root@nfsServer# chown 0:7 /archiveData
Finally, ensure that both user and group are able to read and write to the directory:
root@nfsServer# chmod ug+rwx /archiveData
SMB/CIFS (Windows shares)
For Windows SMB/CIFS network shares, select SMB/CIFS (Windows share) and click on
the Refresh button to scan the network for available shares. This will populate the Available SMB/CIFS shared folders drop-down.
80
Queue Management
Important
Most recent Microsoft Windows file servers will not broadcast their available shares to
the network without authentication.
If necessary, enter your network username and password in the fields Network
user name and Network password and then press Refresh. The username and
password will be used to obtain the list of available shares.
It is also possible to enter the share path manually in the Manual path entry text field, by
choosing the option Enter path in text box from the Available SMB/CIFS shared folders
drop-down.
Enter the SMB/CIFS path in the format:
\\MACHINE\shareName
The Network user name and the Network password fields must be filled in to attach
shares which require authentication.
Unsupported share types
The PrePrint print platform uses a subset of the tools from Samba (www.samba.org) to scan
for, and attach, SMB/CIFS network shares. Some Microsoft Windows share configurations
are not supported and cannot be used for input share access on the PrePrint. In particular,
Active Directory shares cannot be used. There may also be problems with certain WINS
configurations.
Archiving
A queue may be configured to archive print jobs to network attached storage. The network
share may be either a Unix/Linux NFS share or a Windows/Samba SMB/CIFS network share.
To configure the archive settings for the queue, select the Archive tab (Figure 5.8).
81
Queue Management
Figure 5.8. Queue configuration: Archive tab
To turn on archiving, check the Archive jobs to network attached storage box. This will
activate the Share Type drop-down and other form controls, allowing you to select the
storage to be used for the archive.
Selecting a share
NFS (Linux/Unix shares)
To connect to a Linux/Unix NFS share, choose NFS (Linux/Unix) from the Share Type
drop-down. Enter the path to the NFS share in the following format:
[Network/IP Address]:[folder path]
For example:
192.168.100.100:/input_data
The NFS server's exports file should be configured to allow both read and write access to the
directory path (/input_data in the example). An example of a suitable line in /etc/exports
on the NFS server is:
/input_data 192.168.0.0/255.255.255.0(rw,no_root_squash,sync,subtree_check)
If the NFS share is to be used as an archive Share, then correct permissions must be set on
the share directory on the NFS server. The following would be required for an archive share
specified as:
192.168.100.100:/archiveData
82
Queue Management
On the server it would be necessary to change the user on this directory to “root” or 0 and
the group of the directory to 7, which is the GID for the “lp” user on some systems:
root@nfsServer# chown 0:7 /archiveData
Finally, ensure that both user and group are able to read and write to the directory:
root@nfsServer# chmod ug+rwx /archiveData
SMB/CIFS (Windows shares)
For Windows SMB/CIFS network shares, select SMB/CIFS (Windows share) and click on
the Refresh button to scan the network for available shares. This will populate the Available SMB/CIFS shared folders drop-down.
Important
Most recent Microsoft Windows file servers will not broadcast their available shares to
the network without authentication.
If necessary, enter your network username and password in the fields Network
user name and Network password and then press Refresh. The username and
password will be used to obtain the list of available shares.
It is also possible to enter the share path manually in the Manual path entry text field, by
choosing the option Enter path in text box from the Available SMB/CIFS shared folders
drop-down.
Enter the SMB/CIFS path in the format:
\\MACHINE\shareName
The Network user name and the Network password fields must be filled in to attach
shares which require authentication.
Archive file name format
The format for the file names of archived print jobs can be controlled in the Archive File
Name section of the Archive tab. An example file name is shown in the box, and the controls
below can be used to customize the file name format.
The Fields box displays the list of fields used to make up the current archive file name. Add
fields by choosing them from the dropdown menu and clicking on the add button ( ). You
can re-order or delete fields by highlighting them and clicking on the up and down arrows
or delete button. You can also choose the field separator character and the file suffix to be
used. The example file name will be updated to reflect your changes.
To save your changes, click on the Update button.
Archive expiry
You can choose to have archive files "expire" after a given number of days. This means
that they will be removed from the system after the given time period has elapsed. If the
Archive expiry value is set to 0, then archive files will not expire.
83
Queue Management
Failover
The PrePrint can be placed into failover mode in Platform Settings > Failover. In failover
mode, incoming print jobs will be passed to the “failover queue(s)”.
To set the failover queues for the current queue, select the Failover tab (Figure 5.9).
Figure 5.9. Queue configuration: Failover tab
You may select the queues through which jobs should be processed in failover mode.
If failover mode is engaged, then jobs which are received for the current queue will be
forwarded unmodified to the queues specified.
If Pool is selected, then jobs will be failed over to each of the selected queues in turn.
To save your changes, click on the Update button.
Alerts (Queue Monitoring)
The PrePrint system may be configured to send alerts if the queue does not appear to be
processing print jobs at the expected rate. The alerts are sent as emails, using the main
84
Queue Management
system email settings configured in System Settings > Email, or per-queue settings, if provided.
Alerts can be sent when too few documents are processed, on a regular basis with a status
message about how many jobs have been processed, or for every individual document processed on the queue.
To configure the queue alert settings, select the Alerts tab (Figure 5.10).
Figure 5.10. Queue configuration: Alerts tab
85
Queue Management
Firstly, set the working hours during which the queue should be monitored using the dropdown controls. Choose a start time and an stop time for the queue monitoring period. This
monitoring period will be applied daily, though Saturday and Sunday can optionally be
excluded using the checkboxes for five and six day production weeks.
To monitor the queue continuously, set both start monitoring and stop monitoring times
to 00:00.
Next, enter a threshold time (in minutes) and a threshold number of print jobs. If, after the
threshold time has expired, fewer than the threshold number of jobs have been printed on
the queue, an alert email will be sent out to the recipients listed in System Settings > Email
(see “Email settings” in Chapter 4: PrePrint Configuration).
Set either Time Threshold or Minimum Jobs Threshold to 0 to disable monitoring.
If a status message is required even when the minimum threshold has been exceeded, check
the Send monitoring email even when... checkbox.
To configure the system to send an alert email for every single job processed during the
monitoring working hours, check the box Send monitoring email for EVERY job....
To save the queue alert settings, click on the Update button.
PPD driver
To select a PPD driver for the queue, select the PPD Driver tab (Figure 5.11).
86
Queue Management
Figure 5.11. Queue configuration: PPD Driver tab
A PPD file is a printer description. It describes the options available for a particular printer
and what data format the printer requires (PostScript, PCL, raster data etc). It's not actually
a printer driver, but it does specify which driver to use, and what the parameters of the
print driver should be.
The current PPD file is displayed at the top of the page. You can view the content of the file
by clicking on the file name.
A selection of PPD files are shipped on the PrePrint. These are available for selection in the
“Choose printer make” and “Choose printer model” menus. First choose the make of your
printer, then a selection of models will be listed in the “Choose printer model” menu.
It is also possible to upload an individual PPD file or a package of PPD files via the “Add a
PPD File or package” file upload dialog.
If an individual PPD file is uploaded, it will be stored (and added to the make/model menus)
and set as the current PPD.
87
Queue Management
A package of PPD files is added to the make/model menus. PPD packages can be rpm packages, deb packages, zip archives or tar archives. These are automatically uncompressed and
unpacked.
All uploaded PPD files are listed in File Manager > PPD Files
When a PPD file is set for a queue, the driver options for the printer will be made available
(see “Driver options”).
Internal data PPD files
The PrePrint contains PPD files which force print data output to be PDF, generic PCL or
“raw”, where not modification is made to input print data. These PPDs all have the make
“WilliamMatthew”.
Driver options
To modify printer driver options for the queue, select the PPD Options tab.
Printer driver options are displayed here. The options will match the current PPD file (see
“PPD driver”).
88
Queue Management
Figure 5.12. Queue configuration: Driver Options tab
Use the drop-down controls to modify the driver options as required. To save your changes,
click on the “Update” button at the bottom of the list of options.
Output
The output options for a queue are configured in the Output tab (Figure 5.13).
89
Queue Management
Figure 5.13. Queue configuration: Output tab
Common output options
For lpd, raw, ipp, and ipps protocols, select the required output protocol from the menu
and enter a suitable destination address (Queue output address) and port or queue.
IPP options
If either “ipp” (Internet Printing Protocol) or “ipps” (Secure IPP) is chosen for “Queue output protocol”, it is possible to specify whether IPP compression should be applied to outgoing data. Use of this feature requires that the receiving IPP device is able to decompress
the data. If the receiving IPP device is not able to apply decompression, then the data will
be sent without compression.
Generally IPP print jobs are sent to port 631. If a different port is required, do not enter it
in “Port/Queue” - this is where the IPP destination queue name must be entered. Instead,
enter the port with the address in the following format:
192.168.0.100:632
Queue diagnostics
For diagnostic purposes, the print job can be saved before and after it is processed by the
PrePrint software. The input data will appear in the file list as prefilter_queue.bin and the
output as postfilter_queue.bin.
Enable diagnostics by checking the “Diagnosis” checkbox.
This feature has the potential to fill the storage of the device and lead to failed print jobs,
so care must be taken with its use. Because of this, the feature will always be switched off
following a reboot of the PrePrint.
90
Queue Management
Queue info
The queue info tab (Figure 5.14) displays a summary of queue and printer details for the
current queue.
Figure 5.14. Queue configuration: Queue Info tab
5.3. Jobs
The Print Platform > Jobs page shows lists of currently processing and completed jobs.
It shows details for a limited number of jobs; by default the last 500 print jobs are listed.
This number can be adjusted in Print Platform > Platform Settings by going to the Cups
Control tab and setting the “MaxJobs” parameter.
Jobs printed on individual queues can be shown using the “Print queues” menu. The size of
the job lists can be limited with the “Number of jobs” menu.
If job data is held, in addition to job info (by setting the parameter PreserveJobFiles in the
Edit cupsd.conf tab of Print Platform > Platform Settings), then jobs can be re-printed
via this interface. Note that re-printing here will be from the original input data, so if any
meta-data has been applied to the job previously (such as the current date or time) or if a
PDF form was applied and has since changed, the print job may render differently from the
originally printed version. For accurate re-printing of jobs, the job archiving and re-print
feature should be used (File Manager > Archive Files).
5.4. Platform settings
Print settings which are not specific to a single queue are configured via the “Platform
Settings” page.
91
Queue Management
Cups Control
All WML Print Platform products use CUPS for print data transport. This tab allows certain
CUPS parameters to be changed by the user, and allows the CUPS daemon to be re-started.
• LogLevel: Determines which log messages CUPS output to the system log.
• MaxJobs: The number of jobs for which CUPS holds information.
• Port: The TCP port on which CUPS listens.
Note
Leave the LogLevel at “notice” if print job reporting features are being used.
Failover
Check “Enable failover mode” if the main print destinations have failed and jobs should be
re-routed to the failover queues.
Edit cupsd.conf
This feature is intended for support staff only. This is the main CUPS configuration file.
Edit mime.types
This feature is intended for support staff only. This is the configuration file which determines how the file type of input data files is identified.
Edit mime.convs
This feature is intended for support staff only. This is the configuration file which determines how data files are converted into the PrePrint's internal format, PDF.
92
Chapter 6. Kyocera Prescribe
Emulation
WML's Kyocera Prescribe Emulation converts Prescribe input data, including formatted
text and simple PCL, directly into Portable Document Format (PDF).
The converted PDF files can be archived to a document store provided by a Windows or Unix
network-share and finally processed for printing through the on-board printer drivers,
which convert the document into PCL or PostScript.
The Kyocera Prescribe emulation is configured in the Queue Config section of the PrePrint
user interface in the tab Kyo Settings. Each print queue can be configured with unique
Prescribe parameters.
The emulation parameters specified in Kyo Settings are effectively the “printer defaults”.
The parameters should be configured to match the settings on the printer on which the
data was previously being rendered.
The WML Kyocera Prescribe emulation follows the definition of the Prescribe page description language given in the Prescribe Technical Reference 4.51, available from Kyocera.
Figure 6.1. Prescribe emulation configuration interface
93
Kyocera Prescribe Emulation
6.1. Basic Defaults
The basic parameters, orientation, duplex mode, default margins, paper width and height and
clipping parameters, will be familiar to all users and function according to the Prescribe
specification.
The country code and character set are used to select the appropriate internal character set
and glyphs according to the Prescribe specification, where possible.
6.2. Paper Cassettes
The default cassette is the paper cassette which the emulation will use if the cassette is otherwise unspecified (with a CASS or PSRC command).
The PrePrint has two ways to apply paper stock to your printing. It can either apply digital
paper stock to the output, using a PDF file as the background to the print, or it can embed
PostScript paper selection tags into the output data.
Note
When used with a PCL printer, only digital letter stock can be used to emulate
the CASS/PSRC Prescribe commands.
Using Digital Paper Stock
Digital stock is especially useful when building electronically distributable documents. Digital stock can be used to add a letterhead or the company logo to documents which were
previously printed on pre-printed stock.
To set digital stock for a particular cassette, you must first upload the PDF of the stock onto
the PrePrint appliance. Got to File Manager > Form Files. Use the “Upload a new file” field
to upload the PDF. Newly uploaded PDF files will now appear in the menus in Kyo Settings.
To set your newly uploaded PDF file as the stock for Cassette 1, select it from the menu for
“CASS 1 digital stock”.
Using PostScript Paper Selection Tags
To have a paper selection tag embedded in PostScript output for Cassette 1, select “Specify
a tag” from the menu for “CASS 1 digital stock”. Type the exact text of the tag into the
adjacent text field.
Note
Common text tags are “Plain” and “Letterhead” but be aware that these are
often case sensitive and each printer will have its own tags. In some cases, the
tags can be user-specified in the printer or RIP environment.
94
Kyocera Prescribe Emulation
6.3. Persistent State
If “Persistent state” is checked, then the WML emulation will save the effective printer state
between print jobs. This ensures that Prescribe macros are stored between jobs. It will also
store the current paper cassette value, page margins and so on.
Storing and re-reading the printer state between print jobs has a small performance cost.
If you need your Prescribe macros to be stored between individually sent print batches,
then check “Persistent state”, otherwise leave it un-checked.
95
96
Chapter 7. File Manager
To access the built in file manager, select File Manager from the top level menu. Your
browser will display a page similar to Figure 7.1.
Figure 7.1. The PrePrint's file manager
The File Manager has a number of sections listing files relating to different features of the
PrePrint.
• Form Files: User-uploaded PDF files for use as forms or digital stock.
• Log Files: Daily system logs stored on a network share or on internal storage.
• Archive Files: Archived print jobs, in PDF format, stored on a network share or on internal
storage.
• PPD Files: User-uploaded PPD driver files.
• All User Files: Shows PDF form files and any files generated with the print diagnostics
feature (enabled in Print Platform > Queue Config > Output).
To upload a file to the PrePrint, use the “Upload a new file” field.
Each page of the File Manager contains a search field which will display files whose name
matches the entered search term.
Where relevant, listed files can be viewed, printed and deleted from the system using the
icon buttons in the “Action” column. When an option to print is given, the output queue to
which the files will be sent is chosen from the “Output queue” menu.
7.1. Form Files
The file browser shows a list of the files stored on the internal flash or hard disk of the
PrePrint. Note that not all files stored on the PrePrint are displayed. Archived files and log
files are not displayed here; the list is intended for user-supplied files such as PDF overlays
97
File Manager
and printer macros, and diagnostic files which may be generated by the PrePrint job-processing software.
7.2. Log Files
Shows daily system logs stored either on a network share, or on internal storage. System
log settings are configured in System Settings > System Log.
7.3. Archive Files
Shows files archived to a network share or internal storage. Choose the queue to list
archived files for in the menu “List files for queue”. The number of files shown can be limited with the menu “Max files to display”.
7.4. PPD Files
Shows PPD files and gzipped PPD files which have been uploaded to the PrePrint by the user.
7.5. All User Files
This page displays PDF form files and other user-uploaded files. Files generated with the
print diagnostics feature (enabled in Print Platform > Queue Config > Output) appear
here.
Print Diagnostics
For diagnostic purposes, you can have the print job saved before and after it is processed
by the PrePrint software. The input data will appear in the file list as prefilter_queue.bin
and the output as postfilter_queue.bin.
This feature has the potential to fill the storage of the device and lead to failed print jobs,
so care must be taken with its use. Because of this, the feature will always be switched off
following a reboot of the PrePrint.
Enable print queue diagnostics in the Output tab of Print Platform > Queue Config.
98