1
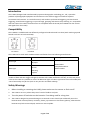
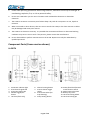
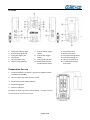
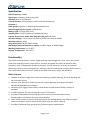
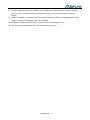
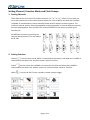
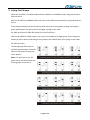
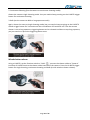
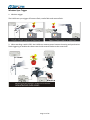
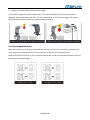
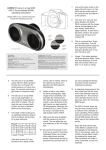
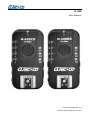
H-430
User Manual
Issued: November2011 v1.0
Website: http://www.ojecoco.com
Introduction
The H-430 is designed and manufactured by Ojecoco Photographic Technology Co., Ltd, a specialist
producer of photographic equipment and accessories. This wireless trigger set features separate
transmitters and receivers. It is multi-functional, with wireless synchronized triggering, wireless shutter
triggering, wired shutter triggering, TTL pass-through, grouping and camera relay shooting. It is compatible
with the H-550. The H-430’s multi-functions are compatible with the H-550 (the H-430RX can also receive
HSS signals from the H-550).
Compatibility
The H-430TX is available with two differently configured underside male hot shoes (with matching topside
female hot shoes on both TX and RX):
For Canon
For Nikon
The H-430 can be used* with suitable cameras and flashes from the following manufacturers:
H-430 Variant
Camera Manufacturer
Canon type
Canon
Olympus
Nikon type
Nikon
Pentax
Samsung
Fujifilm
Flash Types
OEM Flashes
Compatible Flashes
Studio Flashes
* Not all H-430 functions may be available with all camera models. In particular, pay attention to older
models of flash and their trigger voltages (maximum safe is 300V attached to the RX), as some may cause
harm to the H-430. It is possible to use the H-430 Canon type as a Nikon type and vice versa if needed, but
some functionality may be lost (such as TTL pass thru and flash wakeup).
Safety Warnings
1.
Before installing or removing the H-430, please make sure the camera or flash are off.
2.
The H-430 is not a toy. Please keep out of reach of children and pets.
3.
Turn the power off and take out the batteries if not being used for a long time.
4.
The H-430 is designed to prevent damage to its internal circuits should you accidentally insert the
batteries with reversed polarity. However, please, pay attention to the battery polarity, otherwise the
batteries may leak corrosive liquid, overheat or even explode.
Page 2 of 15
5.
Follow safe operating procedures when using batteries, otherwise there may be a danger of
overheating, explosion, fire, or risk to personal safety.
6.
Do not use H-430 when you are near to locations with combustible substances or hazardous
chemicals.
7.
The H-430 is not water or moisture proof. Please keep it dry and do not expose it to rain, liquids or
moisture.
8.
When connected to other devices, take care not to wrench the H-430, or the shoe contacts or cables
may be damaged and cause poor contact.
9.
The H-430 is an electronic accessory. It is possible that environmental factors or abnormal working
conditions may cause it not to work. If this persists, please contact the manufacturer.
10. Do not disassemble or perform maintenance on the H-430. Repairs must only be undertaken by
qualified personnel.
Component Parts (Canon version shown)
H-430TX
1.
2.
3.
4.
LED Status indicator light
4 bit channel signal LED
3 bit group signal LED
Shutter trigger/test
button
5. Hot shoe (flash only)
6. Channel setting button
7. 2.5mm shutter trigger
socket
8. 2.5mm ECP socket (for
trap shooting)
9. Group setting button
Page 3 of 15
10. Power/hand-hold/camera
mode function switch
11. Metal camera hot shoe
12. Battery bay cover
13. Hot shoe locking wheel
14. Hot shoe locking pin
H-430RX
1.
2.
3.
4.
5.
6.
LED Status indicator light
4 bit channel signal LED
3 bit group signal LED
Test button
Hot shoe (flash only)
Channel setting button
7. 2.5mm shutter trigger
socket
8. 2.5mm flash trigger
socket
9. Group setting button
10. Power/flash/camera
mode function switch
Preparation for use
1. Install the batteries as shown in the picture (applies to both
H-430TX and H-430RX).
2. Turn on power and select function mode.
3. Set all units to the same channel
4. Set up the groups
5. Connect to devices.
For details of steps 2-4, see the section below: “Setting Channel,
Function Mode and Flash Groups”.
Page 4 of 15
11.
12.
13.
14.
15.
16.
Cold shoe mount
Battery bay cover
Cold shoe locking wheel
Cold shoe locking pin
Hole for lanyard strap
¼” BSW thread metal
fixed insert
Specification
Radio frequency: 2.4GHZ
Signal type: Frequency Shift Keying (FSK)
Antenna: Built-in PCB Antenna
Control Distance: 150m (subject to environmental limitations)
Channels: 5
Flash groups: 3 groups; 7 different group combinations
Normal triggering sync-speed: 1/320 second
Battery Type: 2 x AAA (2.4V~3.2V)
Standby time: H-430TX 100 days, H-430RX 200 hours
Camera shutter port, Studio flash (RX)/ECP (TX) ports: Ø2.5mm
Safe Port Voltage: 3.3V to camera (H-430TX), 300V from flash (H-430RX)
Minimum latency: 400µs
Body Dimensions: 84*42*38mm (LWH)
Net Weight (without batteries or cables): H-430TX: 52gm, H-430RX: 46gm
Working Temperature: -15°C~65°C
Storage Temperature: -30°C~85°C
Functionality
The H-430 combines shutter release, trigger and high-speed trigger all in one. Users may choose
either one according to their requirements. It utilizes the global free FSK 2.4G wireless radio
frequency, with 5 independent broadcast channels, and can be used in a variety of situations
where there may be many photographers working in the same place and time (like sports events).
The H-430 offers efficient control, speed of operation and setup, range, and reliability.
Main Features:
1. Capable of wireless single shot, continuous shooting, B (Bulb) shooting, ECP trap shooting and
wired shutter control.
2. Wireless auto wakeup of flashes (those that support wakeup, for example the Nikon
SB-600/700/800/900 series flashes)
3. Wirelessly sync trigger camera flash, studio flashes and off camera flashes, indoors or
outdoors.
4. H-430TX supports TTL pass-through (but not e-TTL function).
5. Provides 5 independent channels to be used in a busy environment where many
photographers use flash at the same time and place.
6. Use a master camera to control multiple cameras for photographing from different angles
(note that remote cameras cannot share flashes with the master camera).
7. Provides 3 individual flash groups giving 7 different group combinations.
Page 5 of 15
8. In basic triggering mode: sync speed is up to 1/320s for mechanical shutter cameras, and in
excess of this for hybrid electronic/mechanical shutter cameras (dependent on camera
design).
9. H-430 is available in Transmitter and Receiver form factor and they are designed to be used
together; both are compatible with the H-550TRX.
10. Accidental reverse polarity battery installation will not damage the unit.
11. Wheel lock for underside hot and cold shoes, with locking pin.
Page 6 of 15
Setting Channel, Function Mode and Flash Groups
1. Setting Channels
The H-430 can be set to one of 5 possible channels (“1”,“2”,“3”,“4”,“1234”). Ensure that you
set all the transceivers to the same channel before use. One H-430TX can work with multiple
H-430RXs to simultaneously control multiple flashes and/or multiple remote cameras. The
H-430 can also be used by many photographers working together to control different cameras,
but each photographer must set their own channel different to the others to avoid signal
interference.
Set different channels by pressing the
channel setting button (7) on the side of
the H-430:
2. Setting Function
Camera: Use this when the H-430TX is connected to the camera, and when the H-430RX is
connected to the camera for ‘wireless shutter release’ function.
FLASH- : Use this when the H-430RX is connected to the flash and when the H-430RX is
connected to the camera for ‘Master camera to control multiple cameras’ function.
HOLD-
: Turns the H-430 TX into a wireless remote camera trigger.
Page 7 of 15
3. Setting Flash Groups
When the H-430TX is in HOLD mode and the H-430RX is in CAMERA mode, the group function
does not work.
With the H-430TX in CAMERA mode, there are seven different combinations of groups that can
be set.
Press the group button (9) and the Group LEDs show the current group setting. Pressing the
group button again, the group will be changed, cycling in this order:
G1→G2→G3→G1+G2→G1+G3→G2+G3→ G1+G2+G3→G1 ...
With the H-430RX in FLASH mode, it can only be a member of a single group. Press the group
button (9) and it selects and changes the group as the H-430TX does, but cycling in this order:
G1→G2→G3→G1 …
The flash groups LEDs will turn
off after approximately 4 seconds
after the last press of the group
select button.
Note: For the flash to fire, the
group set on the RX must be one
of the groups set on the TX.
Page 8 of 15
Master camera to control multiple cameras
Place one H-430TX onto the master camera’s hot shoe, set the function switch to “Camera -
”.
With a H-430RX, set the function switch to “FLASH - ” and connect the shutter cable with
“Camera” interface of H-430RX to the shutter interface of the camera.
As the master camera shoots, so the controlled cameras each shoot. This may not perfectly
synchronous, as there may be a slight delay between master and remote camera shutter release.
Camera shutter triggering
Wireless shutter release
1. Single shooting (Set the camera to single shooting mode)
Get one H-430RX and set the function switch to “Camera “. Connect the camera shutter cable
with “Camera” interface of H-430RX to the shutter interface of the camera.
Get a H-430TX, set the function switch to “Hold - ”. A half-press of the H-430TX trigger button
will activate the camera auto focus system and the shutter indicator LED of both of the H-430 units
will be green. Press the H-430TX trigger button fully and the shutter indicator LED turns to red,
which will wirelessly trigger the camera shutter for a single shot.
Page 9 of 15
2. Continuous Shooting (Set the camera to continuous shooting mode)
Almost the same as single shooting mode - but you need to keep pressing on the H-430TX trigger
button for continuous shooting.
3. Bulb (set the camera to bulb or long exposure mode)
Again, almost the same as single shooting mode, but you need to keep pressing on the H-430TX
shutter trigger button for 3 seconds until the red indicator LED switches off. Then the camera
shutter is set to long exposure, triggering button can be released and then to stop long exposure,
you just need to re-press the triggering button once.
Wired shutter release
Using a H-430TX, set the function switch to “Hold - ”, connect the shutter cable to “Camera”
interface of H-430TX unit to the shutter cable interface of the camera. Press the H-430TX trigger
button for single shooting, continuous shooting and bulb (as with wireless shutter release).
Page 10 of 15
Wireless Sync Trigger
1.Wireless trigger
The H-430 can sync trigger off-camera flash, studio flash and camera flash.
2.When working a with H-550, the H-430 can remote control camera shooting and synchronize
flash triggering to enable the camera work with several flashes at the same time.
Page 11 of 15
3.Camera TTL Flash and Off-camera Flash Trigger
The H-430TX supports on camera flash with TTL function and will not affect communication
between camera and camera flash for TTL data. Meanwhile, it will also sync trigger off-camera
flash (normal off-camera flash sync speed parameters apply).
Use of Incompatible Mode
When the H-430 unit is not directly compatible with the camera or the flash, you need to simultaneously
press the group and triggering buttons once to place the H-430 into non-compatible mode.
After 30 minutes of non-use, or if it has been switched off, H-430 units will automatically revert to
the normal compatible mode.
Page 12 of 15
Other Notes
1.1 Wired trigger flash test. Set the function switch of H-430RX to “Flash trigger button, and it will trigger the connected flash.
”, half press the
1.2 Wireless trigger flash test. Set the function switch of H-430TX to “Camera ”, half press the
trigger button, and it will trigger any flashes that are connected to H-430RXs that are set to “Flash
-
”.
” and connect this unit to
2. Wired Shutter Test. Set the function switch of H-430TX to “Hold camera by shutter cable. Half press trigger button and the connected camera focus once. Fully
pressing the trigger button will trigger the camera to shoot once.
3. Incompatible mode wireless flash trigger. If the H-430TX’s “Camera -
” status is in non-
compatible mode with the camera, you must also set the H-430RX ‘s “Flash- ” status to noncompatible mode to make it work, regardless of whether the H-430RX is compatible with the flash
or not.
4. Non-compatible mode and flash wakeup. If the H-430RX and the attached flash are working in
non-compatible mode, the H-430RX cannot wakeup the flash.
5. The H-430RX ‘s working status indicator lamp. This will flicker approximately every 5 seconds. If
the H-430RX is not in use for a long time, please turn it off.
6. Low Power Indication. When the H-430 working status indicator lamp is red and flickers
approximately every 2 seconds, it means the battery is running out of power and needs replacing
or re-charging in the case of rechargeable batteries.
Page 13 of 15
FAQ
1. General Troubleshooting Checklist
Make sure the battery is installed and receiver power switch turned on.
Set the H-430TX and H-430RX to the same channel.
Make sure the H-430TX and H-430RX are set to the correct function mode.
Make sure the hot shoe mount is correctly connected.
Make sure the hot shoe is compatible with the flash or camera.
2. Camera shoots but doesn't focus
Make sure the camera body and lens focus mode is set to AF, not MF.
3. Misfires or Signal Interference
Please change the channel of the transmitter and receiver at the same time.
4. Limited Operating distance
Check if the battery is exhausted.
Try to move transmitter's location.
Page 14 of 15
Cable Options (extra cost)
Type 2.5mm to PC (screwlock) can be used for RX to
Flash PC sync port.
All cables coiled; nominal length uncoiled is 1m.
Shutter Cable Usage (camera model list may not be extensive):
Cable
Type
Usage
C1
Canon 60D, 1100D, 1000D, 600D, 550D, 500D, 450D, 400D, 350D, 300D, G11 and G10 (and
probably other Canon cameras). Also for Samsung GX-20, GX-10; Pentax K20D, K200D,
K10D, K100D (and probably other Samsung and Pentax cameras that use a 2.5mm jack
shutter trigger port connector).
C3
1D, 1Ds, 5D, 7D, 40D, 30D, 20D, 10D (and probably other Canon cameras)
N1
D3 series, D2 series, D1 series, D700 series, D300 series, D200, N90S, F5, F6, F100; Fuji S5
Pro/S3 Pro; Kodak DCS-14n (and probably other Nikon cameras that use the MC-22 round
10 pin connector)
N2
Nikon D70s and D80
N3
D90, D3100, D5000 and D7000 (and future Nikon cameras that use the Nikon MC-DC2
connector)
O2
Olympus E10/E20/E1/E300/E3
Page 15 of 15