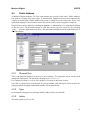
1
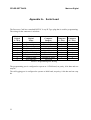
configurAID
The programming Aid for mcl Digital Exchanges
Version 2.x
© Marine Communications Limited 2000
Marine Communications Limited
59 Bownham Park,
Rodborough Common,
Stroud,
Glos., GL5 5BZ
England
Telephone:
Fax:
Email:
Web:
+44 (0)1453 873399
+44 (0)1453 873344
[email protected]
http://www.marinex.co.uk
June 2001
Marinex Digital
CONTENTS
CONTENTS
Chapter 1
Introduction to ConfigurAID ...............................1
Chapter 2
Installing configurAID .........................................2
2.1
Floppy Disk....................................................................................................... 2
2.2
Compact Disk.................................................................................................... 2
2.3
Download from Internet.................................................................................... 2
2.4
Updates to configurAID.................................................................................... 2
2.5
Installation Process ........................................................................................... 2
2.6
How the configuration is stored ........................................................................ 4
Chapter 3
Getting Started.....................................................5
3.1
configurAID screen........................................................................................... 5
3.2
Building a new configuration............................................................................ 6
3.3
Saving a Configuration ................................................................................... 10
3.4
Opening a Saved Configuration...................................................................... 10
3.5
Getting a System Configuration...................................................................... 11
3.6
Sending a System Configuration..................................................................... 11
3.7
Leaving configurAID...................................................................................... 11
3.8
Changing Settings ........................................................................................... 12
Chapter 4
Ports ...................................................................13
4.1
Analogue Extensions....................................................................................... 13
4.2
Analogue Tie Lines ......................................................................................... 17
4.3
Public Address ................................................................................................ 21
4.4
Special Types .................................................................................................. 24
Chapter 5
Groups................................................................25
Chapter 6
Users ..................................................................26
i
CONTENTS
Marinex Digital
6.1
Detailed Information........................................................................................26
6.2
Adding Many Users .........................................................................................28
Chapter 7
Printing...............................................................30
Chapter 8
Other Settings....................................................31
8.1
Class Lists ........................................................................................................31
8.2
Options.............................................................................................................31
Appendix A - Serial Lead .........................................................32
ii
Marinex Digital
INTRODUCTION TO CONFIGURAID
Chapter 1 Introduction to ConfigurAID
configurAID is used to program the microSwitch Digital and Marinex Digital Exchanges,
produced by Marine Communications Ltd. so that they meet customers specific requirements.
It offers extensive facilities to allow for almost every feature of the exchange to be
customized.
A standard P.C. with at least one serial port is required with Windows 95, 98, NT, ME or
2000. The serial port can be internal or attached by USB. Providing that it appears in
windows as COM1 to COM8, then configurAID is able to use it.
The minimum configuration of the P.C. is a Pentium 150MHz with 32 Mbytes RAM.
The latest version of configurAID and firmware for the systems are available from our
website at http://www.marinex.co.uk/LatestVersions.
To find out the full capabilities of the systems, please read the user manuals for the
exchanges.
1
INSTALLING CONFIGURAID
Marinex Digital
Chapter 2 Installing configurAID
2.1
Floppy Disk
configurAID is installed from floppy disk, by goig to the “Run” on the “Start Menu” and
entering “A:SETUP” and pressing OK as shown below.
2.2
Compact Disk
The setup program for configurAID should automatically start when the CD is inserted. If it
does not, go to the CD drive in Windows Explorer and double click on the file
“confAID_Setup.EXE”.
2.3
Download from Internet
Download the file and save it somewhere on your hard disk. When the file has been
downloaded, go the place you saved the file and double-click on the file
“confAID_Setup.EXE”.
On the internet there is a file called “confAID_DISK.ZIP”. This file contains the files
required for a floppy disk installation. Download the zip file and extract the enclosed files
onto separate floppy disks.
2.4
Updates to configurAID
When configurAID is updated there will be a self-extracting zip exe containing the updates.
Download the file and follow the instructions. configurAID must not be running when
updating.
2.5
Installation Process
The following screen will appear as the program is installed. Follow the prompts.
2
Marinex Digital
INSTALLING CONFIGURAID
3
INSTALLING CONFIGURAID
2.6
Marinex Digital
How the configuration is stored
2.6.1 microSwitch Digital
The setup file for any exchange is held in Flash memory within the exchange. Initially the
system is delivered with the standard factory setup as shown in the user manual.
ConfigurAID is used to modify this setup. When the configuration is updated using
configurAID, the changes are immediately recognised and used in the exchange
2.6.2 Marinex Digital
The configuration is held on the solid state hard disk on the processor card. The card
normally holds the factory configuration. However this can be updated so if the default
configuration is needed to be used, then the correct setup is available. As the configuration is
updated, the new settings are used.
If extensions are in use during an update, then strange effects may be noticed. It is
advised that the configuration is updated, when the telephone use is at its lowest.
All of the information used in configurAID is also stored in the exchange so that a true
representation of a system can be obtained.
4
Marinex Digital
GETTING STARTED
Chapter 3 Getting Started
3.1
configurAID screen
The configurAID screen is divided up into 5 main areas.
¾ The menu across the top are used to open and close files, Add new extensions etc, and set
other parameters.
¾ The tool bar which allows the display to changed
¾ An Explorer style tree, showing all of the different extensions, tie lines, users etc.
¾ The detail for the item chosen in the tree view.
¾ A status bar at the bottom
The different detail sections will be described later.
5
GETTING STARTED
3.2
Marinex Digital
Building a new configuration
A new configuration can be created by selecting File →New menu. This will go through a
series of prompts which will help make the setting up of a new system easy with most of the
required extensions, tie lines etc setup and with extension numbers.
Step 1 Create a new configuration
This screen explains the steps which you are about to take. Use the buttons < Back and Next >
to move between the different steps. Please note that if you go back through the steps then the
settings may be lost.
Step 2 Select System Type and Size
The first stage of building a new configuration is to define the system and setup of the
exchange which is required to be programmed.
Marinex Digital is available in two sizes, 6U for upto 160 extensions and 24 tie lines and 12U
with a maximum 320 extensions and 48 tie lines. As the different heights are selected in the
height dropdown list the drawing of a Marinex Digital will change to show the different
number of board slots available.
The Extensions dropdown list shows the possible number of extensions available (in groups
of 16). This is not defining the number to be used, but the maximum available. As the number
6
Marinex Digital
GETTING STARTED
is changed, then the number of red boards in the drawings will change. In a 12U system, the
boards will be distributed evenly between the Master and Slave racks.
The Tie Lines dropdown list shows the possible number of tie lines available (in groups of 6).
This is not defining the number to be used, but the maximum available. As the number is
changed, then the number of blue boards in the drawings will change. In a 12U system, the
boards will be distributed evenly between the Master and Slave racks.
The types of boards installed in the system can be displayed by right-hand clicking on the
black, yellow, red, or blue boards. If the type of board is changed using the menu that appears
(for example from Empty → Extension) then the relevant number will also change.
Step 3 Select number of Extensions
Once the size of the exchange has been set then, the number of Officer Class (have access to
Tie Lines), Crew Class (no access to tie lines, but most other features) and Passenger Class
(no access to tie lines, most other features not allowed) can be selected.
The Total Number of Extensions available is shown at the top, this is calaculated from the
number of extension boards chosen in Step 2.
The normal numbering scheme (3 to 8 digits) can be selected from the Number of Digits to
Dial dropdown list. As the number is changed, the extension numbers shown below
automatically change.
The Number of extension in each class can be changed, if there are no free extensions and
you wish to add more, then reduce the number in another class first.
The Start extension number for each class can be changed. Care must be taken, not to
duplicate number between the classes. There are some checks to stop this happening. The
End extension number is automatically calculated.
The transmit and receive gain (TX and RX Gain dropdown lists) can be set for extensions. It is
advised to leave them at the default -10dB as this gives no loss across the system.
The classes are generated in the displayed order with no gaps. Any unused extensions will be
at the end.
7
GETTING STARTED
Marinex Digital
Step 4 Select number of Tie Lines
Step four defines the number of Shore, Satellite (SatCom) and Celluar (GSM or NMT) tie
lines in the system.
The Total Number of Tie Lines available is shown at the top, this is calaculated from the
number of tie line boards chosen in Step 2.
The Number of different tie lines can be changed, if there are no free tie lines and you wish to
add more, then reduce the number in another type first.
The Start dialled number for each type can be changed. Care must be taken, not to duplicate
number between the types and the extension classes. There are some checks to stop this
happening. The End dialled number is automatically calculated.
The “tick box” and Group text box are used to place all of the Tie Line type into an outgoing
group. For example, tick the box against Shore Lines and enter 9 in the Group box and then
the first free shore tie line will be used when the user dials ‘9’.
The transmit and receive gain (TX and RX Gain dropdown lists) can be set for all tie lines. It is
advised to leave them at the default -5dB as this gives no loss across the system.
The Default Ext is the extension number that the tie lines will call for incoming calls. If is is
not valid then the fourth officer extension will be used.
The tie lines are generated in the displayed order with no gaps. Any unused tie lines will be at
the end.
8
Marinex Digital
GETTING STARTED
Step 5 Select number of Public Address Lines
The last type of line in the system are Public Address. There is one PA line on each Tie Line
card.
The Total Number of PAs available is shown at the top, this is calaculated from the number of
tie line boards chosen in Step 2.
The Number of different PAs can be changed upto the maximum available.
The Start dialled number is for the PA Zone 1. Three numbers will automatically be
generated, for Zone 1, Zone 2 and Zones 1 & 2.
Care must be taken, not to duplicate number between the types and the extension classes.
There are some checks to stop this happening. The End dialled number is automatically
calculated.
The transmit gain (TX RX Gain dropdown list) can be set for all PA lines. It is advised to leave
it at the default 0dB as this gives the best output from the system at about line level.
Step 6 Name of System and Call Logging
The final stage before generating the configuration is giving the system a name, for example
the Build Number or Ship’s Name and selecting the type of call logging.
9
GETTING STARTED
Marinex Digital
Internal logs
calls between different extensions. This is not normally used as it will generate a
lots of call records.
logs calls coming in from the tie lines. This is not normally used as these calls
normally do not cost money.
Incoming
logs calls between extensions and outgoing tie lines. This is normally selected as
these calls normally cost money.
Outgoing
logs calls between extensions and the Public Address System. This is not
normally used unless a record is required of PA use.
PA Access
Step 8 Finished configuration - Press Finish
The final action required is to press the “Finish” button to generate the new configuration.
When the process is finished, the new file will be displayed in the main window, where it can
be fine tuned for the specific system. Hopefully, majority of the hard work has finished.
3.3
Saving a Configuration
Once a configuration has been generated, you will need to save it to disk. The file can be
saved over the previous file, by selecting File → Save.
The file can be saved as a new file by selecting File → Save As. A standard windows “Save As”
dialog box will appear.
3.4
Opening a Saved Configuration
A previously saved configuration can be open by the File → Open menu. The last ten files
saved also appear on the File menu.
If there is an unsaved file open in configurAID, then a warning dialog box will appear.
10
Marinex Digital
3.5
GETTING STARTED
Getting a System Configuration
The configuration of a system can be obtained from a system by connecting a serial lead
between your computer and the system. (Please see Appendix A for the wiring). configurAID
will automatically work out which port and system it has been connected to. The window
below appears and as the different records are obtained from the system, the two progress
bars will move.
If the process is stopped before it is finished, then a partial configuration will be loaded.
3.6
Sending a System Configuration
After a configuration has been created, it will be needed to be sent to an exchange. The
configuration is held on the processor card so it is the only card needed. There is no checks to
see if the system has enough cards for the required configuration.
In a 12U system, currently the file will need to be sent to both racks separately, by connecting
to each.
Currently once the configuration has been sent, the systems need to be rebooted (by turning
off and on) for the new settings to take effect.
The window below appears as the new configuration is sent to the system
If the process is stopped before it is finished, then a partial configuration will be loaded and
this may be unstable.
3.7
Leaving configurAID
When you have finished with configurAID, select the File→Exit menu. If the file has not
been saved, then a confirmation dialog box will be displayed.
11
GETTING STARTED
3.8
Marinex Digital
Changing Settings
When a configuration has been loaded or created, it will need to be changed to reflect the
actual requirements. This is achieved through the main window. On the left hand side of the
window is an Explorer style tree. The Extension, Tie Lines etc (Ports) are all grouped under
the relevant heading. When a heading is selected, a summary of is shown on the right hand
side as below. A detailed view of the port can be shown by “double-clicking” the line on the
right hand side or by opening up the tree and clicking on the port.
Each of the different types of ports are explained in the relevant section.
12
Marinex Digital
PORTS
Chapter 4 Ports
4.1
Analogue Extensions
An analogue Extension card contains the circuits for 8 lines in a microSwitch Digital and 16
lines for a Marinex Digital. There is no individual settings for the extension on the line cards
so they can be swapped as required.
New extension can be added by selecting the Add New → Add New Extension or by right hand
clicking on the tree view. All the main settings of an extension can be copied to a new one by
selecting “Copy…” from the right hand click menu. The information displayed on the right
hand side is described below.
4.1.1
Physical Port
This is the physical position of the extension in the exchange. The dropdown menu can be
used change the connection. The position is displayed as “Board.Port”.
For example extension 100 is set at 01.01 (board 1 port1) in the basic system.
If the extension is required to be moved from one port to another, only the Physical Port
needs to be changed and all the rights, and dialled number will be transferred.
4.1.2
Type
In the digital exchanges only analogue telephones are currently used. Digital telephones will
be available at a later date.
13
PORTS
4.1.3
Marinex Digital
Action
This window determines the action to be taken when the telephone is taken off-hook. The
following actions are available:Extension
The majority of extensions will be set to this. When the extension
is used a dial tone will be heard and an number will need to be
dialled.
Disabled
The extension is not allowed to dial out but can receive calls.
Hot Line
As soon as the extension is picked up, an other extension or tie line
is automatically called, no number needs to be dialled.
Warm Line
This is similar to Hot Line. There is a short delay before a number
is automatically dialled, giving time for another extension number
to be dialled instead.
4.1.4
Name
An extension can be renamed with a name such as Captain or Galley to give more
informative information. The extension table on the left window is updated with the new
name. This name is used through configurAID, when for example setting up groups.
4.1.5
Dial
The Dialled number is the extension number to be used to call it. Normally an extension has
only one number however more than one can be allocated separated by “;”.The number can
be between 1 and 8 digits long.
There is one simple rule with numbering:- The number must be unique as it is dialled.
For example:
It is impossible to have 10 and 100 as extension numbers because there is no way of
determining which has been dialled after the 2 digit.
It is possible to have 10, 12, 13, 110, 111, 112, 1141, 1142 and 1145 as 11x is unique after
the 2 digit and 114x unique after the 3 digit.
This rule applies together to all extensions, tie lines and Public Addresses.
4.1.6
Virtual Port
This is the internal number allocated to the extension. The exchange operates using a
principle of virtual ports, which are then related to the extension, tie line, group etc. This
gives the system great flexibility in programming
4.1.7
Default User
Every extension has a default user assigned to it. This can be changed on a per call basis by
entering a users security code. The default User are the rights and accesses allowed when the
extension is taken off-hook.
More detailed explanation of Users is in the Users sections.
14
Marinex Digital
4.1.8
PORTS
Options
Various options are available for each extension to determine specific operation.
Enabled
If an extension is not enabled, then it will not be able to received or
make calls. This effectively hides the extension from the system. It
is useful when there are live telephone sockets in public places but
are not to be used.
No Powerdown
The extension can be set to power down mode to reduce power
requirements and heat generation in the telephone exchange. Most
modern telephones do not need this option selected. If problems
are encountered with telephones not being recognised, select this
option to see if it makes it work.
CLI UK style
When not selected CLI information is sent using US Bell system
(between 1st and 2nd rings). If selected then the British Telecom
system is used (CLI before first ring after line reversal). Special
“Caller Display” telephones are required for this option.
No Send CLI
An extension can be set so that it does not transit its identity to
other extensions.
Receive CLI
An extension can be set so that caller information is received.
Log to Extension
Call logging information of callers to that extension is logged.
Log From Extension
Call logging information on calls made from that extension is
logged.
Please note that CLI has not been implemented in the digital system at the moment
4.1.9
Action Details
If an extension action required more information, dropdown menus or text boxes will appear
here.
4.1.9.1 Hot Line
The port (extension, tie line or PA) to be automatically called will be listed to be selected.
4.1.9.2 Warm Line
The port (extension, tie line or PA) to be automatically called will be listed to be selected.
The time (in seconds) before the listed extension is called.
4.1.10 Group Membership
There are three types of groups. When groups have been defined, they will be listed under the
relevant dropdown menu.
Hunt
If an extension is busy, the listed extensions will be tried until a
free one is found, and this one will be called. This is useful where
there an extension is often busy, and others are able to deal with
the call.
15
PORTS
Marinex Digital
Pickup
If extensions are placed in a Pickup Group, then one of the other
extensions can be answered by entering the “Group Pickup” code,
instead of having to know the extension number. Often telephones
in the engine space have a pickup group defined.
Ring
If an extension is not answered within a certain time, then the other
extensions in the group will be rung in turn until one is answered.
This is useful where there an extension is often unmanned, and
others are able to deal with the call.
4.1.11 Class Type
All extensions can be placed in different classes to stop extension ringing certain other ones.
This is useful on a Cruise Ship where you do not want the passengers to be able to ring the
bridge or the officers directly, however the officers are able to call both passengers and other
officers.. You would place the passenger extensions in a different class to the officers. In the
default user rights, the passengers would be given the right to only call other passengers,
whilst the officers would be allowed to call all extensions. More information is available in
the advance topics section.
Normally an extension would only have one class selected. However in certain cases it may
need more than one. “Multiple…” will be displayed and the classes shown by clicking the “>”.
4.1.12 Gains
The transmit and receive gain of each extension can be controlled. On every call, the loudest
settings between the two ports will be calculated and used.
Care must be taken when setting gains above 0dB as damage may occur
16
Transmit gain
The transmit gain of extensions can be set to meet individual
requirements. Normal setting is –10 dB. Range is +3dB to –27dB
Receive Gain
The receive gain of extensions can be set to meet individual
requirements. Normal setting is –10 dB. Range is +3dB to –27dB
Marinex Digital
4.2
PORTS
Analogue Tie Lines
A Marinex Digital analogue Tie Line card contains the circuits 6 lines and 1 Public Address
line with two voltage free zone relays. A microSwitch Digital Processor card contained the
circuits for 4 lines and 2 Public Address lines with 1 voltage free zone relay each. There is no
individual settings for the extension on the line cards so they can be swapped as required.
New Tie Lines can be added by selecting the Add New → Add New Tie Line or by right hand
clicking on the tree view. All the main settings of an Tie Line can be copied to a new one by
selecting “Copy…” from the right hand click menu. The information displayed on the right
hand side is described below.
4.2.1
Physical Port
This is the physical position of the Tie Line in the exchange. The dropdown menu can be
used change the connection. The position is displayed as “Board.Port”.
For example Shore Line 1 is set at A.01 (board A port1) in the basic system.
If the tie line is required to be moved from one port to another, only the Physical Port needs
to be changed and all the rights, and dialled number will be transferred.
4.2.2
Type
In the digital exchanges only analogue Tie Lines are currently available. ISDN can be
connected using an external ISDN → Analogue Line convertor.
17
PORTS
4.2.3
Marinex Digital
Action
This window determines the action to be taken when the Tie Line rings from an external
source. The following actions are available:Tie In
When the ring is detected, the extension in “call dropdown” in
“Action Details” will be called.
DISA
When the ring is detected, the call will automatically be accepted
and a voice message (Defined as Msg # in “Action Details) will be
played. The external caller has the option to enter an extension
number or wait to be connected to the extension in “call dropdown”
in “Action Details”. If the extension does not answer within a certain
time then the call will be dropped.
4.2.4
Name
An tie line can be renamed with a name such as Shore 1 or NMT to give more informative
information. The tie line table on the left window is updated with the new name. This name is
used through configurAID, when for example setting up groups.
4.2.5
Dial
The Dialled number is the number to be used to access the tie line. Normally an tie line has
only one number however more than one can be allocated separated by “;”.The number can
be between 1 and 8 digits long.
There is one simple rule with numbering:- The number must be unique as it is dialled.
For example:
It is impossible to have 10 and 100 as extension numbers because there is no way of
determining which has been dialled after the 2 digit.
It is possible to have 10, 12, 13, 110, 111, 112, 1141, 1142 and 1145 as 11x is unique after
the 2 digit and 114x unique after the 3 digit.
This rule applies together to all extensions, tie lines and Public Addresses.
4.2.6
Virtual Port
This is the internal number allocated to the tie line. The exchange operates using a principle
of virtual ports, which are then related to the extension, tie line, group etc. This gives the
system great flexibility in programming
4.2.7
Default User
Every tie line has a default user assigned to it. The default User are the rights and accesses
allowed when there is an incoming tie line call.
More detailed explanation of Users is in the Users sections.
18
Marinex Digital
4.2.8
PORTS
Options
Various options are available for each tie line to determine specific operation.
Enabled
If a tie line is not enabled, then it will not be able to receive or
make calls. This effectively hides the tie line from the system. It is
useful when there are live tie line links but are not to be used.
No Active Check
The tie line is able to detect if there is a line connected when
searching for a useable tie line. Sometimes the voltage presented is
too low (for example using power saving) so the check will be
ignored if this is ticked.
No Send CLI
An tie line can be set so that it does not transit its identity to other
extensions.
Receive CLI
An extension can be set so that caller information is received.
Log to Line
Call logging information of callers to this tie line is logged.
(defined as outgoing in the new wizard)
Log From Line
Call logging information on calls made from that extension is
logged. (defined as incoming in the new wizard)
4.2.9
Action Details
If an tie line action required more information, dropdown menus or text boxes will appear
here.
4.2.9.1 Tie In
The port (extension) to be automatically called when ringing is detected.
4.2.9.2 Warm Line
The port (extension) to be automatically called if no digits are entered by the caller.
The time (in seconds) before the listed extension is called.
4.2.10 Group Membership
There are two types of groups for tie lines (Pickup is not applicable). When groups have been
defined, they will be listed under the relevant dropdown menu.
Hunt
If a tie line is busy, the listed tie lines will be tried until a free one
is found, and this one will be used. This is useful where there are
more than one tie line at the same cost (for example all shore
lines).
Ring
If the default incoming extension is not answered within a certain
time, then the other extensions in the group will be rung in turn
until one is answered.
19
PORTS
Marinex Digital
4.2.11 Class Type
All tie lines can be placed in different classes to stop users accessing certain tie lines.
For example, you might want only Officers to have access to the Sat Com lines, but all crew
can use the shore lines when in port.
Normally a tie line would only have one class selected. However in certain cases it may need
more than one. “Multiple…” will be displayed and the classes shown by clicking the “>”.
4.2.12 Gains
The transmit and receive gain of each tie line can be controlled. On every call, the loudest
settings between the two ports will be calculated and used.
20
Transmit gain
The transmit gain of extensions can be set to meet individual
requirements. Normal setting is –5 dB. Range is +3dB to –27dB
Receive Gain
The receive gain of extensions can be set to meet individual
requirements. Normal setting is –5 dB. Range is +3dB to –27dB
Marinex Digital
4.3
PORTS
Public Address
A Marinex Digital analogue Tie Line card contains the circuits 6 lines and 1 Public Address
line with two voltage free zone relays. A microSwitch Digital Processor card contained the
circuits for 4 lines and 2 Public Address lines with 1 voltage free zone relay each. There is no
individual settings for the extension on the line cards so they can be swapped as required.
New PA lines can be added by selecting the Add New → Add New PA or by right hand clicking
on the tree view. All the main settings of a PA line can be copied to a new one by selecting
“Copy…” from the right hand click menu. The information displayed on the right hand side is
described below.
4.3.1
Physical Port
This is the physical position of the PA in the exchange. The dropdown menu can be used
change the connection. The position is displayed as “Board.Port”.
For example PA Zone 1 is set at A.PA (board A PA port) in the basic system.
If the PA is required to be moved from one port to another, only the Physical Port needs to be
changed and all the rights, and dialled number will be transferred.
4.3.2
Type
In the digital exchanges only analogue Public Address lines are available
4.3.3
Action
The only action for a PA is PA.
21
PORTS
4.3.4
Marinex Digital
Name
An PA line can be renamed with a name such as PA Zone 1 or PA All Zones to give more
informative information. The PA table on the left window is updated with the new name.
This name is used through configurAID, when for example setting up groups.
4.3.5
Dial
The Dialled number is the number to be used to access the PA. Normally an PA has only one
number however more than one can be allocated separated by “;”.The number can be
between 1 and 8 digits long.
There is one simple rule with numbering:- The number must be unique as it is dialled.
For example:
It is impossible to have 10 and 100 as extension numbers because there is no way of
determining which has been dialled after the 2 digit.
It is possible to have 10, 12, 13, 110, 111, 112, 1141, 1142 and 1145 as 11x is unique after
the 2 digit and 114x unique after the 3 digit.
This rule applies together to all extensions, tie lines and Public Addresses.
4.3.6
Virtual Port
This is the internal number allocated to the Public Address. The exchange operates using a
principle of virtual ports, which are then related to the extension, tie line, group etc. This
gives the system great flexibility in programming
4.3.7
Default User
Every PA line has a default user assigned to it. This is required for compatibility with other
ports in the system.
4.3.8
Options
Various options are available for each PA line to determine specific operation.
Enabled
If a PA line is not enabled, then it will not be able to be used to
make a PA call. This effectively hides the PA line from the system.
It is useful when there are live PA links but are not to be used.
Log to Line
Call logging information of callers to this PA line is logged.
(defined as PA in the new wizard)
4.3.9
Action Details
The two relays available for each PA can be selected from the Zone dropdown menu.
4.3.10 Group Membership
There is only one type of groups for PA lines (Pickup and Ring are not applicable). When
groups have been defined, they will be listed under the relevant dropdown menu.
Hunt
22
If a PA line is busy, the listed PA lines will be tried until a free one
is found, and this one will be used.
Marinex Digital
PORTS
4.3.11 Class Type
All PA lines can be placed in different classes to stop users accessing certain PAs.
For example, you might want only Officers to have access to the Passenger PA system, but
all crew can use the crew PA system.
Normally a PA line would only have one class selected. However in certain cases it may need
more than one. “Multiple…” will be displayed and the classes shown by clicking the “>”.
4.3.12 Gains
The transmit gain of each PA line can be controlled. On every call, the loudest settings
between the two ports will be calculated and used. The transmit gain of extensions can be set
to meet individual requirements. Normal setting is 0dB to maximum voice quality. Range is
+3dB to –27dB
23
PORTS
4.4
Marinex Digital
Special Types
The access digits for the “Star” functions (for example ring test and alarm setting) can be
changed if required. It is strongly recommended that theses are not changed.
24
Marinex Digital
GROUPS
Chapter 5 Groups
To Be Written
25
USERS
Marinex Digital
Chapter 6 Users
6.1
Detailed Information
In digital exchanges there are two types of users.
Default users
These are normally assigned to extensions, tie lines, etc for when
the port is used without entering a security code. A default user can
not be accessed using a security code.
Users
These are not normally assigned to extensions, tie lines. They are
used to give a user special rights and accesses for that call.
A PIN number is a 2 – 16 digit Personal Identification Number, consisting of an ID code (18) and a secret code (1-8).
For example, the Captain could use his security code to access the Sat Com from a crew
cabins phone, without having to return to his cabin to make the call.
All call logging records, list the user codes used to make the call so that the cost can be
recovered from that user without him having to remember to write down the call details.
The detail information screen for Default Users and Users is the same, except that a default
user can not have a security code entered.
26
Marinex Digital
6.1.1
USERS
Name
A User can be renamed with a name such as Captain, Radio Officer, 1st Mate so that the user
can be identified in reports or in other screens. The relevant user table on the left window is
updated with the new name. This name is used through configurAID.
6.1.2
Icon
The icon can be changed by clicking it and selecting a new one from the list. The icon is used
on all of the port summary reports to indicate the rights available.
6.1.3
Public Dial ID & Private Pass Code
This is not used for the default user.
A PIN number is a 2 – 16 digit Personal Identification Number, consisting of an Public Dial
ID (ID Code) and a Private Pass code (Secret Code). Each section can be up to 8 digits long.
6.1.4
Ring Type
Various ring types are available such as continuous, Double, Rapid, Single, triple or Danish.
Selection of the particular type required for this user is made from the pull down window to
the left of the “Ring Type” window. The called extension will use this ring cadence to show
the type of call coming, for example Tie Line or from the Captain.
6.1.5
Priority Level
Currently this is not implemented
Various priority levels can be given to a user so that in the event of a conflict when say a
group is being accessed than the higher priority will take precedence.
6.1.6
ACL number
This is the internal number allocated to the user. This number appears on the call log
printouts so that it is impossible to work out the users security code.
6.1.7
Class Access
The various types of classes can be accessed using this window. The Class Code which are
set up on the extensions, tie lines etc, are compared to the settings here to see if the user is
allowed to use it.
Access to the “*” functions and the security system can also be controlled.
6.1.8
Rights
The rights for setting alarms call, backs etc, can be set on a per user basis. This means that
officers and the sub-contractor “Fred” are allowed to set a wake up call, but no one else. Most
of the options are explained in the user manual. The
Clear all…
These are normally given to the system engineer. He is able to
clear all of the problems of “telephones not working” without
resetting the system.
Intrude
The user is allowed to intrude into another call if required
27
USERS
Marinex Digital
No intrusion
If this right is set, then if a user tries to intrude, then it will not
succeed. This is normally set on modem calls to stop someone
breaking the call.
Set time …
The time and date of the system is used on the call logs. This is
normally only given to the system engineer.
Tell…
The voice system can be used to read out the time and date, and
other important information in the system. This is normally only
given to the system engineer.
6.1.9
Options
These control the use of the User. The following options are available.
6.2
No display
The user is not displayed on certain printouts
No enter PIN
The user can not be accessed by entering his security code. This is used
to tell the difference between a default user and a normal user
No Change Pass
The second part of the security code is not able to be changed by the
user. This is useful for users, which are pre-programmed into
telephones.
Set Access Check
This is an advanced feature which limits the use of user security code to
certain ports.
Adding Many Users
When copying a user the following dialog box will appear. It is useful when copying users to
give many people access to tie lines for logging who is using them.
If “NO” is selected then only 1 copy is made.
If “YES” is selected, another dialog box will appear to allow the copies to be made.
28
Marinex Digital
USERS
Number to Create
selects how many copies to be made.
Base of Name
Allows the start of the new users name to set.
For example “Sub Con #” could be entered so ten new users called
“Sub Con #1”, “Sub Con #2”, “Sub Con #3”, etc would be created.
Starting Public Code
The starting 1st part of the security code
ID Increment
The increase in Public code can be changed so that numbers are
not consecutive.
Pass Code = Public
If this is checked then the 2nd part of the security code will be same
as the 1st part. This requires the user to change his security code
when he first uses it. If it is not checked then a random 4 digit
security code will be generated.
Generate ACLs
Clicking on this button will generate the Users
The users generated will be listed in the box below the options. This list can be copied using
the clipboard (Ctrl-C to copy) and imported into another program.
To close the window, click on the “Window Close X” in the top right hand corner.
29
PRINTING
Marinex Digital
Chapter 7 Printing
configurAID is able to generate various detailed reports, which can be printed or saved in
adobe acrobat format. The reports have been designed for A4 paper.
Please note that some reports may take some time to be generated.
The sections in the report are selected from the menus in the Print Preview windows. To print
the report, select “File→Print” from the preview window.
30
Marinex Digital
OTHER SETTINGS
Chapter 8 Other Settings
8.1
Class Lists
The names of the current classes and new classes can be added using the “Advanced→Show
Classes” menu. There can be up to 32 different classes.
The enabled column controls wether the class is listed in the dropdown menus. It does not
stop the class from being used.
The Name is for displaying in the rest of configurAID.
The Ext,Tie,PA,Func columns control which classes are shown in each type of port.
8.2
Options
The serial port used to communicated with the digital exchange on your computer can be
changed using the PC Serial Port drop down menu.
When the Display All Users check box is selected, the default user dropdown list has all the
users and not just the default users.
Display Special Types check
box is used to show or hide the Special Types in the left hand list.
31
OTHER SETTINGS
Marinex Digital
Appendix A - Serial Lead
The Processor Card has a standard RS232C 9 way D-Type plug that is used for programming.
The wiring for the connector is as below:
Marinex
Digital
9 - Way
1
2
3
4
5
6
7
8
9
Marinex
Digital
Computer
Computer
Name
Purpose
9 - Way
Carrier Detect
Not Used
Receive Data
Transmit Data
3
Transmit Data
Receive Data
2
Data Terminal Ready
Not Used
Signal Ground
Signal Ground
5
Data Set Ready
Not Used
Request to Send
Clear to Send
8
Clear to Send
Request to Send
7
Ring Indicator
Not Used
RS232C Programming Port Wiring
Computer
25 - Way
2
3
7
5
4
The programming port is configured to operate at 115200 baud, no parity, 8-bit data and one
stop bit.
The call logging port is configured to operate at 9600 baud, no parity, 8-bit data and one stop
bit.
32