1
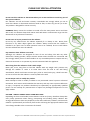
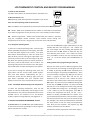
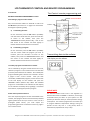
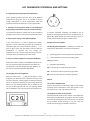
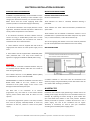
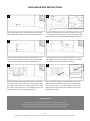
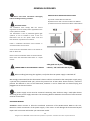
Updated 2/3/11
The ROMA II
USER MANUAL AND
INSTALLATION GUIDE
With Intelligent Technology
www.intelligentheat.co.uk
INDEX
PAGE 3
PLEASE PAY SPECIAL ATTENTION
PAGE 4
USER GUIDELINES
PAGE 5
PRODUCT OVERVIEW
PAGES 6 - 7
LCD THERMOSTAT CONTROL AND REMOTE PROGRAMMING
PAGE 8
LCD THERMOSTAT CONTROLS AND SETTINGS
PAGE 9
INSTALLATION – USER GUIDELINES
PAGE 10
ELECTRICAL INSTALLATION GUIDELINES
PAGE 11
WALL MOUNTING INSTRUCTIONS
PAGE 12
GENERAL GUIDELINES
PAGE 13
ANTI-DISASSEMBLY SPINGS, SPECIFICATIONS AND WARRANTY
PAGES 14 - 15
PLEASE RECORD THE DETAILS OF YOUR PURCHASE / NOTES
PAGE 16
INTELLI HEAT COMPANY INFORMATION
2
All Rights on this USER GUIDE are Reserved © No reproduction is permitted - Intelli Heat and i-Green are patented brands
PLEASE PAY SPECIAL ATTENTION
Do not touch the radiator or thermostat when you are wet and do not install any part of
the system outdoors.
Our radiators are safe and water resistant, nevertheless we strongly advise you not to
touch the radiator or thermostat with wet hands or feet, or when any part of you is wet.
This product is designed for interior use only.
CLEANING: Always ensure the radiator is turned off at the main power source and clean
with a soft, non abrasive damp cloth. Never wash with water or allow water to go onto the
thermostat or any electrical connection.
Do not cover or lay any material over the radiator.
Do not lay any material over the radiator especially if it is damp or wet. Never place
furniture or any other object against the radiator. Always ensure that the radiator is
installed in an open area to allow optimum heat to be radiated, do not install where
curtains will be drawn over the radiator.
Pay attention when children are around.
Although our radiators are designed for ease of use and safety, like with any other
electrical or heating product, always exercise caution where children are concerned. We
also strongly advise you not to allow children or any unsuitable person to tamper with any
electrical connection or to operate any controls associated with the appliance.
Never hang from the radiator or load it with weight.
Never pull, sit on, hang from or load the radiator with any weight. Such practice may
damage the radiator or cause it to come loose from the wall or the wall fitting
attachments, which could cause serious injury. Also to avoid such injury, check from time
to time to ensure that the radiator is securely fixed to the wall.
Do not tamper with or modify the product.
Never attempt to alter or modify a radiator or any associated control system or electrical
connection. Such action would invalidate the warranty and may cause system malfunction
or injury. If required, our products should only be repaired by an appropriately qualified
person. Do not attempt any maintenance or replace any damaged components. Do not
apply stickers.
CAUTION - ALWAYS HANDLE HEAVY ITEMS WITH CARE.
Depending on the size and model, some radiators can be very heavy, therefore always take
every safety precaution when storing, transporting and installing heavy radiators. We
strongly advise that at least two people lift, move and install heavy radiators, and that each
radiator is professionally and securely fixed to the wall using the appropriate method and
screw fixings suitable to the construction of the wall.
3
All Rights on this USER GUIDE are Reserved © No reproduction is permitted - Intelli Heat and i-Green are patented brands
USER GUIDELINES
FOR YOUR SAFETY
IMPORTANT
IN ACCORDANCE WITH THE REGULATIONS
It is essential that you keep this user guide and all
documentation related to this product for further
reference and for the support of your warrantee.
The heating element inside each radiator is
equipped with an integrated fuse. In case of
overloading the fuse melts and cuts off the power
supply. The heater element must then be changed
by the manufacturer or by a qualified electrician
familiar with such products. If needed, please
contact your dealer.
IF YOU SELL OR TRANSFER
Should you decide to sell or transfer this product to
a third party, this manual must also be passed to
the new owner to enable a full understanding of
the product and to ensure safety and adherence to
these guidelines. Also, should any warranty period
still be in effect, failure to comply with this will
invalidate the warranty.
MAINTENANCE
To ensure the perfect functioning of your radiator
and to ensure its durability, it is necessary to clean
the radiator at least twice a year. Before you start
the cleaning process you must ensure that the
power supply is turned off at the main power
source.
We strongly advise you to seek expert advice if
you are unsure about any aspect regarding the
installation of this radiator.
Clean the main body of the radiator with a damp
soft cloth using, if required, a non aggressive and
non abrasive cleaning product. Clean the front and
side surfaces including in between any grooves and
fins, and where possible, the back surfaces of the
radiator.
Waste electrical and electronic
equipment (WEE)
Do not use any water or cleaning products when
cleaning the LCD display, use a slightly damp soft
cloth to wipe it clean ensuring that you do not
apply too much pressure.
Please act responsibly when disposing of any
electrical item. The WEE Directive aims to both
reduce the amount of electrical and electronic
equipment being produced and to encourage
everyone to reuse, recycle and recover it. Intelli
Heat as a manufacturer fully complies with the UKs
WEE Regulations. For further information should
you intend to dispose of an electrical item please
visit: www.environment-agency.gov.uk.
Never allow any water, cleaning fluid or spray
cleaning product to go onto the thermostat or any
other electrical connection.
PLEASE NOTE
This radiator may sometimes produce light clicking
sounds; this is nothing to be concerned about.
These sounds are produced by the interlocking of
certain types of thermostats. A radiator may also
produce light cracking noises, especially when first
installed. This is also nothing to be concerned
about. This is due to the expansion of the various
metals the radiator is composed of. This is a natural
occurrence associated with electric heaters. It does
not signal a fault and will not affect performance.
4
All Rights on this USER GUIDE are Reserved © No reproduction is permitted - Intelli Heat and i-Green are patented brands
PRODUCT OVERVIEW
The Roma II radiator is a high-tech product with superior reliability, a high level of performance, and
optimum energy efficiency, we trust that you will be fully satisfied with this product.
The technology included in this product ensures maximum economic performance, comfort, reliability and
scrupulously respects security and safety parameters.
Everything is designed and manufactured to ensure your complete satisfaction.
First of all, you are advised to read this manual carefully so as to avoid making any mistakes during the
installation and operation of the radiators.
MODEL: ROMA II
NEVER connect
WHAT YOU NEED TO KNOW
the BLACK PILOT WIRE to an
EARTH, LIVE or NEUTRAL connection. The black
pilot wire is a signal wire. It is only to be used for
connection to an external programmer.
This manual and any other supporting information
present essential information to ensure the reliable
and correct performance of these radiators.
Connection of the PILOT WIRE to any LIVE,
NEUTRAL or EARTH connection will destroy the
thermostat. If the black pilot wire is not to be
connected to an external pilot wire programmer, it
must be correctly isolated and insulated to ensure
that this does not unintentionally occur.
The correct use, care and regular maintenance of
this product will contribute to its conservation.
If this product is incorrectly installed or used, all
rights under your warrantee will be rendered
invalid. Therefore please ensure all related advice,
instructions and guidelines are adhered to.
The ROMA II is fully compatible with our ZoneRay
and iGreen pilot wire programming systems.
5
All Rights on this USER GUIDE are Reserved © No reproduction is permitted - Intelli Heat and i-Green are patented brands
LCD THERMOSTAT CONTROL AND REMOTE PROGRAMMING
1. Switch on the electricity:
The device has 2 buttons, to activate the device, push both once.
10 °
2. When the device is on:
LOC (operating mode) the temperature will appear on the screen.
10 °
There are three operating modes to choose from:
LOC - Local Mode - Direct (stand-alone) control of the temperature: Manual Control.
GIF - GIFAM - Mode to be selected when the radiator is connected to and operated
by an external programmer via the pilot wire, such as our ZoneRay or iGreen systems.
IRP – Remote Programmer – Mode to be selected when the radiator is operated
using the compatible remote controller, which enables various timings and
temperatures to be set over 7 day periods. The iControl unit is sold separately.
3. To change the operating mode:
Then press the SET button (right middle button), the day
indicator will flash. Then using the + and - buttons you
can scroll though each day. Starting with Monday (far
left) then press the SET button to select that day, the
hours will flash, then use the + and - buttons to set the
hour, press SET to confirm, then the minutes will flash,
press + or - to set the minutes, press the SET button to
confirm.
To select your required operating mode - press the right
button repeatedly (temperatures will appear), then after
25 º the LOC option appears on the screen – then press
both buttons simultaneously to enter the mode menu
(LOC will blink), then by pressing the right button once
each time you will be able to scroll through to GIF, then
IRP. When the operating mode you require appears on
the screen, press the left button once to confirm. The
operating mode will then be saved and 25 º will appear.
Use the left button to lower the temperature if required.
Setting remote hourly programming for each day:
Now you can create up to four different programs (P1 to
P4). In each case, scroll through to the program you wish
to modify by pressing the PR button repeatedly, then
select that program by pressing the SET button. Once
you have selected a program (e.g. P1) you will need to
create a program for week days and one for the
weekend. To do so, use the + and – buttons to choose
the week or the weekend days, confirm by pressing the
SET button. You then have up to 6 different timing slots
for the days and 00:00 will appear. The second set of 00
will blink, this is the ending time of that timing slot (the
first set of 00 is the starting time - 12 midnight), use the
+ and – buttons to set the ending time, press SET to
confirm, the temperature will blink, use the + and –
buttons to modify, press SET button to confirm. Then
you will automatically be taken to the second slot, repeat
the same process for each slot up to the end of the day
(12 midnight). Then select the weekend days and follow
the same process to set the timing and temperature
slots. Now you have created a full program (e.g. P1)
ready for transmission to the radiator.
If you want to change the operating mode, press the
right button until the current mode symbol appears,
then press both buttons simultaneously for just a
second, the screen will start flashing. Again, press the
right button repeatedly until your required mode
appears on the screen, then proceed and finish as above.
4. LOC - Local Mode: Manual setting of the temperature
To select the operating temperature, press the left
button to lower the temperature and the right to raise
the temperature. The maximum temperature that can be
selected is 25 º C. The minimum is 6 º C. For domestic
comfort / optimum energy efficiency, we suggest 19 ° C.
5. USE WITH THE REMOTE PROGRAMMER: iControl
To set the time: Press the PR button (left middle button)
on the remote controller repeatedly to scroll through the
options until the time is shown.
(Use with the remote programmer continued on page 7)
6
All Rights on this USER GUIDE are Reserved © No reproduction is permitted - Intelli Heat and i-Green are patented brands
LCD THERMOSTAT CONTROL AND REMOTE PROGRAMMING
5. Continued:
The iControl remote programming unit
USE WITH THE REMOTE PROGRAMMER: iControl
Infrared transmitter
Transmitting a program to the radiator
First, ensure that the radiator is switched on and set to
the IRP Mode (see section 3. on page 6 for instructions
to change the operating mode)
a)
Transmitting the time:
On the controller press the PR button repeatedly
until the screen shows the time, point the controller
at screen on the radiator, then press the
TRANSMISSION button (bottom left), a dot on the
LCD screen of the radiator will blink lightly to
indicate that the transmission was successful.
b) Transmitting a program:
On the controller press the PR button repeatedly
until the screen shows the program you wish to
transmit, point the controller at screen on the
radiator, then press the TRANSMISSION button and
the screen on the radiator will blink lightly to
indicate that the transmission was successful.
Transmitting data to the radiator
LCD display on the radiator
To modify a program transmitted to a radiator
This is achieved by using the remote iControl unit. First,
select the program on the remote control unit that was
previously transmitted to the radiator. Then modify that
program following the instructions as outlined in section
5, pages 6 and 7 of this manual. Once you have
successfully modified that program, aim the iControl unit
at the LCD display on the radiator and press the
TRANSMIT button (bottom left). When the modified
program is transmitted to the radiator the LCD display
on the radiator will briefly blink, signifying a successful
transmission, replacing the previous program.
PLEASE NOTE
Power failure protection feature
The iControl wireless control unit is not supplied as a
standard item with the ROMA II. However, we strongly
recommend that you add it to your system as it will
provide you with the ability to control/minimize energy
consumption. The iControl programmer will enable you
to program different temperature settings during set
periods of each day over a 7 day period, which is
automatically repeated over every 7 days.
Once the required program has been transmitted to the
radiator, that program will be memorized and protected
against power failure for up to 5 hours. In the case of a
prolonged power failure, you must repeat the
programming processes as outlined in section 5, pages 6
and 7 of this manual.
7
All Rights on this USER GUIDE are Reserved © No reproduction is permitted - Intelli Heat and i-Green are patented brands
LCD THERMOSTAT CONTROLS AND SETTINGS
6. Programming the operating GIF and IRP modes:
These operating modes allow the user to set different
temperatures during the day. It is possible to set the
T/High temperature or T/Low temperature. Both the
temperature levels and the hours can be programmed.
7. Activation of the operation mode to set temperature
programming requirements using the remote controller.
11. Child lock protection
To prevent unwanted tampering, the ROMA II can be
locked by pressing both buttons once simultaneously, (a
light touch). When locked, the screen will show: [ooo]. To
unlock, press both buttons again simultaneously.
To activate this operation, please refer to the instructions
on page 6 of this manual, see how to select the IRP mode.
8. Temperature settings in LOC (Manual) Mode:
If you scroll below 5 º C (See 4. Page 6) this symbol
appears [-] which represents anti-frost. By pressing the
left button again, the unit will show this symbol: [- - -]. To
heat up again, press the right button until the desired
temperature is reached. You can change the
temperature from a distance using the optional remote
controller when the radiator is set in LOC mode.
Settings and screen symbols:
12. Adjusting the temperature – Left button: To lower the
temperature. Right button: to raise the temperature.
[ - - ] Drawing power to reach/maintain set temperature.
[ - ] Set temperature reached, not drawing power.
9. Set your comfort temperature in GIF and IRP Modes:
[ooo] Keys locked.
Unlike other electric heaters, the ROMA II enables you to
set your required comfort temperature level when it is
connected to a pilot wire programmer (GIF Mode) or to
the iControl remote programmer (IRP Mode).
[ - - -] Radiator off (Standby).
LOC - Functioning in normal stand-alone mode.
GIF – Set to function with a pilot wire programmer.
10. Changing the screen brightness:
IRP - Set to function with the remote programmer.
With the radiator off [- - -] hold the left button. Screen
brightness will decrease from maximum intensity to the
minimum intensity, returning again to maximum intensity,
and so on. When the intensity is to your liking, release the
button. For your viewing comfort, after 2 minutes of nonuse, the screen light goes off. It is just signaling radiator
off / on (Radiant). Touch any key to turn the light back on.
What if:
The screen is completely off:
Check to see if there is an electricity supply to the radiator
(Correctly wired, switched on at the plug socket or spur
point, the circuit is live, and that the fuse is ok).
The program schedule is not executed:
Check that the IRP mode on the radiator is set. Repeat the
time setting and download the program with the remote
controller by verifying that each transmission is confirmed
by the radiator screen flashing. In any case, wait one
minute until the program schedule is operation.
8
All Rights on this USER GUIDE are Reserved © No reproduction is permitted - Intelli Heat and i-Green are patented brands
INSTALLATION – USER GUIDELINES
TO START
Check that the radiator is correctly connected to the
electricity supply. Then, test the various functions of the
controls. For temperature control and programming,
please refer to pages 6, 7 and 8 of this manual.
ELECTRICAL WIRING
We strongly advise that all electrical installation be carried
out by an appropriately qualified electrician.
These radiators are "CLASS II" double insulated.
In the event of faulty operation, first check that the
appliance is properly connected to the power supply. If
everything seems to be in order, you should first contact
the person who installed your system, if they are unable
to assist, you should then contact the supplier or the
manufacturer.
The electric cable of this radiator does not include an
Earth wire. Earthing is prohibited, ground connection is
strictly forbidden. For thermostats that are equipped with
a pilot wire which is for connection to a pilot wire
programmer, it is essential to ensure that the LIVE (LINE)
and NEUTRAL wires are correctly connected.
SAFETY INSTRUCTIONS
TO AVOID RISK OF ELECTROCUTION:
Do not tamper with, modify or dismantle a radiator, the
thermostat or any associated control or electrical system.
Do not put any metal object into the thermostat.
COLOUR CODE: Power connection: BROWN to LIVE (LINE),
GREY to NEUTRAL. The BLACK wire, if used, is to be
connected to a PILOT WIRE programmer ONLY.
NEVER connect the BLACK PILOT WIRE to an EARTH,
The electrical cable is connected to the system by the
manufacturer, it is not replaceable and is supplied as a
standard length, it should not be extended or shortened.
LIVE or NEUTRAL connection. The black pilot wire is a
signal wire. It is only to be used for connection to an
external programmer.
Do not pull the electrical cable, twist it or wedge it behind
or in the fins of the radiator.
Connection of the PILOT WIRE to any LIVE (LINE),
NEUTRAL or EARTH connection will destroy the
thermostat. If the black pilot wire is not to be connected
to an external pilot wire programmer, it must be correctly
isolated and insulated to ensure that this does not
unintentionally occur.
Should the electrical cable become damaged or the
electrical installation was not carried out correctly or in
accordance with the regulations, you are at risk of
suffering serious wounds which could be life threatening.
The ROMA II is fully compatible with our ZoneRay and
iGreen pilot wire programming systems.
If the electrical cable is damaged, it must be replaced by
the manufacturer or by one of their after sales service
personnel, or by a fully qualified electrician who is familiar
with these type of systems.
WARNING: To avoid overheating, never cover a radiator
and never position it below a power socket.
CAUTION
PLEASE NOTE
These radiators are filled with an accurate quantity of a
special Thermodynamic fluid. Any repairs that require the
fluid tank to be opened must only be carried out by the
manufacturer or by one of their approved after sales
service personnel. The manufacturer must be contacted in
the event of any leakage of fluid.
Before any installation or work on an electrical circuit,
you must cut off the power supply from the circuit
breaker or from the main circuit breaker.
Always double check, to ensure that no associated circuit
or power supply is live before you install the radiator.
9
All Rights on this USER GUIDE are Reserved © No reproduction is permitted - Intelli Heat and i-Green are patented brands
ELECTRICAL INSTALLATION GUIDELINES
ESSENTIAL TARIFF INFORMATION
INSTALLATION REGULATIONS
ECONOMY 10 (UNRESTRICTED) is recommended to ensure
minimal running costs, Economy 7 is NOT suitable. If you
change your tariff from Economy 7 to another tariff you
MUST ensure that the circuits supplying Intelli Heat
radiators provide an unrestricted supply of electricity.
ELECTRIC RADIATORS IN WET ROOMS
Kitchens and Bathrooms
1. All electrical installation must comply with the current
regulations, standards and code of practice in effect in the
country where the product is to be installed.
These radiators are “IP24” rated and therefore protected from
splash water.
2. The electrical connection of these radiators must be
carried out using a standardized junction box. In both
kitchens and bathrooms, the connection box must be
installed at least 25 cm above the floor.
3. These radiators must be supplied with 230 V 50 Hz
single-phase and neutral. No other power supply can be
used.
These radiators are “Class II” insulated, therefore earthing is
prohibited.
These radiators can be installed in bathrooms volumes 2 and 3
provided that it is positioned at least 60cm away from any splash
area, i.e. wash hand basin, bath-tub and shower tray.
The circuit supplying the radiator in wet room must be protected
by a 30 mili-amp Residual Currented Device to ensure safety.
BATHROOM ZONES
4. Each radiator must be supplied with a dedicated power
cable protected with a 10 amp circuit breaker for
appliances ranging from 500 W to 2000 W power rating.
The radiator must be installed with the main switch and other
control devices outside of the bathroom.
CAUTION
These radiators are double insulated therefore they are
not earthed and the radiator cable does not include an
earth wire (yellow green).
The radiator should not be
installed beneath a wall outlet.
Each radiator cable has a Live (BROWN) Neutral (GREY)
and a BLACK wire, which is the PILOT WIRE.
NEVER CONNECT or allow the accidental connection of the
BLACK PILOT WIRE to the Live, Neutral or Earth
connections of the power supply. If this occurs it will
damage the thermostat beyond repair.
A radiator installed in a wet room must be connected to the
electricity supply using standardizes junction box without the use
of a socket outlet. Earthing is prohibited.
A USEFUL TIP!
The black wire is for connection to an external
programmer only, this could be a hard wired wireless
system, please contact Intelli Heat for advice on such
systems.
If a pilot wire programmer system is not used, the black
wire must be properly isolated/insulated to avoid any
connection to the live, neutral or earth of the power
supply.
Installation that involves simply positioning a radiator next to an
existing power supply will keep the cost of installation down. For
example: By replacing an electric storage or panel heater with
your new Intelli Heat radiator in the same position. However
should you decide to position a radiator where there is not a
power supply, the cost of the installation will be higher.
Therefore, if convenient, it's best to plan your installation
according to the available power supply points.
10
All Rights on this USER GUIDE are Reserved © No reproduction is permitted - Intelli Heat and i-Green are patented brands
WALL MOUNTING INSTRUCTIONS
INSTALLATION
1
4
14 cm
Fixing point for
BRACKET
(a)
20 cm
(a) Top view of radiator showing position of fixing brackets
Position the bracket 14 cm in from the vertical line, use it
as a template to mark the position of the screw holes, drill
holes, fix bracket using appropriate rawlplugs and screws.
Draw a horizontal line on the wall 20cm from the floor.
Use a spirit level to ensure that the line is perfectly level.
2
5
14 cm
FIX 2nd
BRACKET
50 cm
20 cm
Repeat the process as per (4) detailed above. Then put
the radiator on the two bracket supports, the bracket
arm extends between the first two metal fins.
Draw another horizontal line 50cm above the first line.
These are the levels the brackets are to be fixed. Again,
use a spirit level to ensure the line is perfectly level.
3
6
10 cm
Fins seen from above
BRACKET
POSITION
10 cm
The bracket arm extends
between the first two
metal fins of the radiator
Radiator width
Accurately measure the width of the radiator and draw 2
vertical lines each side on the wall at the position where
the radiator is be installed. The ends of the radiator must
be at least 10cm away from a right angled wall or any
item of furniture to ensure proper functioning.
Draw a vertical line between two elements at the centre
of the radiator. Remove the radiator from the wall; then
fix the 3rd bracket to the wall using the appropriate
rawlplugs and screws. Replace the radiator to rest on the
bracket support arms.
RESPECT SAFETY
Never open or interfere with any electrical housing or closed circuits.
Any interference by unauthorized persons will render your warrantee invalid.
Please ensure that all instructions are fully understood and adhered to.
11
All Rights on this USER GUIDE are Reserved © No reproduction is permitted - Intelli Heat and i-Green are patented brands
GENERAL GUIDELINES
THERMOSTAT & PROGRAMMER GUIDELINES
RADIATOR WALL MOUNTING INSTALLATION
Please read these instructions thoroughly
before installing and using a radiator.
A) If under a shelf: Minimum 100 mm.
B) Distance from wall or furniture: Minimum 100mm.
C) Distance from floor: Minimum 100mm - Max 150mm.
FOR YOUR SAFETY
The installation must comply with the current
regulations and best trade practice applicable to the
country where it is fitted.
The thermostat is class II protected against light
splashes, it can be installed in zone 2 and 3 in
bathrooms but do not splash water onto the
thermostat or any electrical connection.
Install a calibrated earth-leak circuit breaker in
accordance with current norms.
never touch the thermostat when in the shower or
bath or when wet.
Never cover the ventilation holes on the thermostat.
Never clean the thermostat with water or a liquid
cleaner.
Take good care of your
radiator, and it will take care of you.
CONNECTING TO THE ELECTRICITY SUPPLY
When installing/removing the regulator, verify that the main power supply is switched off.
We strongly recommend that the thermostat's electric cable is connected to the main power supply using
a junction box (switched fused spur), Place the junction box at least 25cm above the floor, install the
junction box behind or next to the thermostat; however it can be fitted with an electrical plug and
plugged into an electrical socket.
The power supply circuit must be sectioned. Sectioning must be done using a multi-polar devise
sectioning all the power supply terminals. The sectioning distance between the contacts of each terminal
must be at least 3mm.
ELECTRICAL WIRING:
WARNING: Never connect or allow the accidental connection of the BLACK PILOT WIRE to the Live,
Neutral or Earth connections of the power supply. If this occurs it will damage the thermostat beyond
repair. Such connection will render your warrantee invalid.
12
All Rights on this USER GUIDE are Reserved © No reproduction is permitted - Intelli Heat and i-Green are patented brands
ANTI-DISASSEMBLY SPRINGS
To avoid any risk of accidents, we recommend that you fit the anti-disassembly springs (if
supplied). Fix the springs on the top radiator brackets after it is installed. Press on the bottom
of the spring until it engages in the security position.
Pull the spring to engage in the security position.
SPECIFICATIONS
685 x 580
WARRANTY
The ROMA II includes a free warranty, five years on the main body and two years for all
electronics. This warranty is valid from the delivery date of your purchase. This warranty
covers any fault that may arise due to the faulty manufacture of the product. It does not
cover any fault that may be caused by miss-use, accidental or intentional damage caused
by the purchaser or other persons after purchase, or incorrect installation. Please ensure
that you keep all documentation relating to this product including your invoice as this will
be required should you need to use this warranty. Thank you for choosing our product and
we wish you a lasting, trouble free and enjoyable use of your new INTELLI HEAT product.
13
All Rights on this USER GUIDE are Reserved © No reproduction is permitted - Intelli Heat and i-Green are patented brands
PLEASE RECORD THE DETAILS OF YOUR PURCHASE
Date of purchase:
____________________________________________
Date order received: ____________________________________________
System purchased:
____________________________________________
____________________________________________
SUPPLIER DETAILS
Company name:
____________________________________________
Telephone numbers: ____________________________________________
Email address:
____________________________________________
Contact name:
____________________________________________
INSTALLER DETAILS
Date of installation: ____________________________________________
Company name:
____________________________________________
Telephone numbers: ____________________________________________
Email address:
____________________________________________
Contact Name:
____________________________________________
NOTES
14
All Rights on this USER GUIDE are Reserved © No reproduction is permitted - Intelli Heat and i-Green are patented brands
PROVISION FOR ADDITIONAL NOTES
15
All Rights on this USER GUIDE are Reserved © No reproduction is permitted - Intelli Heat and i-Green are patented brands
©
INTELLI HEAT Ltd, Unit 18 Napier Place
Stephenson Way, Thetford, Norfolk IP24 3RL
T: 0845 163 0055
F: 0845 163 0045
E: [email protected]
www.intelligentheat.co.uk/support
www.i-green.co.uk
16
All Rights on this USER GUIDE are Reserved © No reproduction is permitted - Intelli Heat and i-Green are patented brands