1
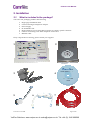
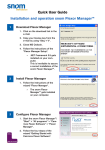
UTA-151
User Manual
VoIPon Solutions www.voipon.co.uk [email protected] Tel: +44 (0) 1245 600560
Introduction
Congratulations on becoming an owner of a Camrivox UTA-151. Camrivox are confident that
you will be pleased with the features and benefits it offers to you.
In addition to enabling low cost Internet phone calls, the UTA-151 is packed with additional
features to offer a richer experience. For example, CTI (Computer Telephony Integration)
features allow you to use your telephone in conjunction with your PC. You can synchronise
your Outlook address book with the UTA-151 so that you can telephone people by spelling
out their name rather than dialling their number. Furthermore, features such as Hop on /
Hop off allow you to take advantage of VoIP from other phones such as mobile phones.
- ii -
VoIPon Solutions www.voipon.co.uk [email protected] Tel: +44 (0) 1245 600560
Contents
1.
2.
3.
4.
5.
6.
Safety information........................................................................................................................1
1.1.
Safety advice........................................................................................................................1
1.2.
Emergency calling ..............................................................................................................1
Installation.....................................................................................................................................2
2.1.
What is included in the package?.....................................................................................2
2.2.
Voice Connect PC Application .........................................................................................3
2.2.1. Installation ......................................................................................................................3
2.2.2. Uninstall/removal .........................................................................................................3
2.3.
Operating systems other than Windows.........................................................................3
2.4.
Connecting the UTA-151 for the first time......................................................................4
2.5.
Configuration instructions ................................................................................................4
2.6.
Buttons and LED indicators ..............................................................................................5
Phone Calls ...................................................................................................................................6
3.1.
Receiving calls.....................................................................................................................6
3.2.
Making outgoing calls........................................................................................................6
3.2.1. Making a VoIP call.........................................................................................................6
3.2.2. Making a PSTN call .......................................................................................................7
3.3.
Failsafe mode ......................................................................................................................8
3.4.
Advanced Telephone Functions .......................................................................................8
3.4.1. Recall / Hook-flash .......................................................................................................8
3.4.2. Putting a call on hold ....................................................................................................8
3.4.3. Transferring calls ...........................................................................................................9
3.4.4. Do not disturb ................................................................................................................9
3.4.5. Call return .....................................................................................................................10
3.5.
Management Web Pages .................................................................................................11
3.5.1. Accounts........................................................................................................................11
3.5.2. Call history....................................................................................................................11
3.5.3. Address book................................................................................................................11
3.5.4. Call management .........................................................................................................12
Computer Telephony Integration (CTI)..................................................................................14
4.1.
Click-to-dial .......................................................................................................................14
4.2.
Networks with more than one UTA-151 unit...............................................................14
4.3.
Outlook synchronisation .................................................................................................14
Interactive Voice Response (IVR).............................................................................................14
5.1.
Dial by name .....................................................................................................................14
5.2.
Management URL read-out ............................................................................................15
Troubleshooting .........................................................................................................................16
6.1.
Resetting to factory defaults............................................................................................16
6.2.
Software upgrade .............................................................................................................16
6.3.
Diagnostic messages ........................................................................................................17
Appendix A – Hardware Specification.............................................................................................18
Appendix B – Copyright notices .......................................................................................................19
Camrivox Ltd. .................................................................................................................................19
Vovida Networks, Inc. ...................................................................................................................19
The Internet Software Consortium...............................................................................................20
- iii -
VoIPon Solutions www.voipon.co.uk [email protected] Tel: +44 (0) 1245 600560
UTA-151 User Manual
1. Safety information
1.1.
Safety advice
For your safety, please adhere to the following instructions:
•
•
•
•
•
•
•
1.2.
Do not obstruct the ventilation holes of the UTA-151, or place anything on top of it.
Place the UTA-151 on top of a smooth flat surface such as a table top.
Do not open the UTA-151, this could expose you to dangerous voltages.
Only use the provided power supply.
If the device or power supply appear damaged, do not use them and contact your
supplier for a replacement.
Keep your unit dry, out of direct sunlight, and away from sources of heat.
The telephony ports on the UTA-151 can carry dangerous voltages, do not touch or
insert foreign objects into the connections, and only connect approved telephony
devices.
Emergency calling
While the Camrivox UTA-151 contains features designed to facilitate emergency calling,
Camrivox does not guarantee it is suitable for this purpose and is not liable for any failure to
contact the emergency services. Users should ensure they have a secondary system with
which they can make emergency calls.
© Camrivox Ltd. 2006
Page 1 of 20
VoIPon Solutions www.voipon.co.uk [email protected] Tel: +44 (0) 1245 600560
UTA-151 User Manual
2. Installation
2.1.
What is included in the package?
Your UTA-151 packaging includes the following:
1.
2.
3.
4.
5.
6.
7.
Single page installation sheet
UTA-151 Analogue Telephone Adaptor
Power Supply
PC Installation CD
Phone adaptor for converting RJ11 connector to country specific connector
Cable for connecting UTA-151 to telephone wall socket
Ethernet cable
If any components are missing, please contact your supplier.
1
2
3
4
5
© Camrivox Ltd. 2006
6
7
Page 2 of 20
VoIPon Solutions www.voipon.co.uk [email protected] Tel: +44 (0) 1245 600560
UTA-151 User Manual
2.2.
Voice Connect PC Application
2.2.1. Installation
Before using the UTA-151 you should install the Camrivox Voice Connect application on your
PC. This application helps to configure the UTA-151 and after installation offers Computer
Telephony Integration features (see section 4 for further information on CTI).
The Voice Connect application runs on any Microsoft Windows PC running the Microsoft
.NET 2.0 framework. Most modern PCs already come with .NET pre-installed but if missing,
it can be installed automatically during the installation process. To use the CamriVox UTA151 with operating systems other than Windows please refer to section 2.3.
To install the CamriVox Voice Connect application, simply insert the installation CD into your
PC’s CDROM drive. The installer should automatically run. If this is not the case, browse the
files on your computer in Windows Explorer, double-click on the CDROM drive, and run the
setup.bat program manually.
When the Voice Connect installer runs, a window should appear to guide you through the
installation process. The installer comes with sensible default settings, so in most cases
repeatedly clicking on next should be sufficient. However, you may wish to override the
default settings if you choose.
After installation the Voice Connect application should appear in the bottom right of your
Windows desktop in the Windows tray icon area as follows:
2.2.2. Uninstall/removal
There are two ways to uninstall the Voice Connect application. You can insert the installation
CD a second time and a window will appear asking if you wish to remove the application.
Alternatively, the Voice Connect application can be removed by going to the Windows Control
Panel, going to Add/Remove programs and them removing Voice Connect.
2.3.
Operating systems other than Windows
CamriVox products can be used on systems other than Windows, for example Linux or Apple
Macs. While the Voice Connect PC application will not be available, it is still possible to access
and configured the UTA-151 through a web browser.
To access the UTA-151 in this way you must first launch a Web Browser such as Firefox. Now
the URL of the UTA-151 must be entered. To discover the management URL pick up the
telephone attached to the UTA-151. After the message which starts “Entering failsafe mode
because Internet telephony is unconfigured….” press ‘#’ on the telephone. An audio message
will be played describing the URL that must be entered. Enter this URL into your web
browser and once at the management web page, follow the steps in section 2.5 for
configuration instructions.
© Camrivox Ltd. 2006
Page 3 of 20
VoIPon Solutions www.voipon.co.uk [email protected] Tel: +44 (0) 1245 600560
UTA-151 User Manual
2.4.
Connecting the UTA-151 for the first time
The UTA-151 should be connected as shown in the single page Installation Sheet provided in
the packaging. Please refer to these instructions for help on cabling.
The Installation Sheet shows the UTA-151 connected inline with a PC, and this is often the
easiest way to install the UTA-151. By taking the existing Ethernet cable going to the PC and
using it for the UTA-151, you can be more certain that the Internet connection is valid.
However, if it is not convenient for you to install the UTA-151 in this network orientation,
you are free to connect it in any manner as long as the PC and the UTA-151 are on the same
local network.
Once the cables are connected you can use the telephone and UTA 151 to make normal
“PSTN” calls over your land line. But in order to take advantage of VoIP you must configure
the UTA-151.
Once the UTA-151 and PC are on the same network and powered, a window should appear
from the Voice Connect application on the PC asking if you wish to configure the UTA-151.
Select the option to Configure Now and a Web Browser will be launched to configure the
unit:
2.5.
Configuration instructions
Step 1 – Select your country. The UTA-151 will automatically detect which country you are
in, but if you wish you can override this by choosing an alternative country from the pulldown menu. Once you are happy with your country selection, select “next”.
If your server provider is not automatically selected – follow step 2 else move to step 3.
Step 2 – Select service provider. Select your service provider from the drop down list
provided. If you service provider is not shown you can enter details for your service provider
by clicking on the manual settings link.
Step 3 – Enter user name and password. You must now configure your VoIP account settings
so that you can make voice calls over the Internet. Your supplier should have provided you
with a user name and password, either by email or by post. Enter these details along with
(optionally) your own name into the web page, then select “next”.
The above is the only configuration required in order to use your UTA-151. Subsequent
telephone calls will now default to using VoIP instead of PSTN (land line). You can confirm
that the VoIP connection is working by checking that the VoIP LED indicator has stopped
flashing or by returning to the main menu page to see a Green tick and the message “UTA151 is connected and working properly, for more information click here.” in the messages
area.
© Camrivox Ltd. 2006
Page 4 of 20
VoIPon Solutions www.voipon.co.uk [email protected] Tel: +44 (0) 1245 600560
UTA-151 User Manual
2.6.
Buttons and LED indicators
Your UTA-151 has a number of buttons and LED indicators. The function of each indicator is
described in the table below:
Indicator
Line
VoIP
Description
Answer phone / voicemail button and LED indicator. Pressing this button
will direct all incoming calls (both land line and VoIP) to your VoIP
voicemail. This can be useful on occasions when you do not wish to be
disturbed, or when you are away but expecting an important call and wish
to check the message remotely (through your VoIP providers voicemail
system). Directing calls to voicemail using the voicemail button will divert
calls immediately, ie. the telephone will not ring at all. See section 3.5.4 for
additional information on voicemail configuration.
Call divert button and LED indicator. Pressing this button will direct
incoming land line calls to a specified number of your choice. An example of
when this can be useful is on occasions where you are away but expecting
an important call and want it directed to your mobile phone. Pressing the
call divert button will direct calls to the specified number immediately, the
phone will not ring. See section 3.5.4 for additional information on call
diverting.
This indicator is used to indicate when a call is being made over PSTN (land
line) and not VoIP. For incoming calls this may not be of significance but for
outgoing calls it is useful to know how the call is being made, and therefore
how expensive it is.
This indicator is used to indicate when a call is being made over VoIP.
Again, for incoming calls this may not be of significance but for outgoing
calls it is useful to know how the call is being made, and therefore how
expensive it is.
The VoIP indicator flashes when the unit is to idle to signify that there is a
problem with VoIP, and the unit will likely be in failsafe mode. See section
3.3 for further information.
© Camrivox Ltd. 2006
Page 5 of 20
VoIPon Solutions www.voipon.co.uk [email protected] Tel: +44 (0) 1245 600560
UTA-151 User Manual
3. Phone Calls
3.1.
Receiving calls
Receiving phone calls on the UTA-151 is extremely straightforward, but there are some
features to note:
•
•
•
•
•
3.2.
The LINE and VoIP indicators (see section 2.6) will flash to indicate which line the
incoming call is received on.
If your telephone is Caller-ID capable the number (and possibly name) of the caller
will be displayed on your telephone. Please see section 4.3 for instructions on
synchronising your UTA with your Microsoft Outlook address book. If the number of
the incoming call is in your address book, the UTA-151 will automatically convert the
number to name in your address book.
If the Call Divert or Voicemail buttons have been pressed then the incoming call will
be redirected immediately and the telephone will not ring (see section 3.5.4 for
further details).
If Call Divert or Voicemail is active, but the buttons have not been pressed, then the
call will be redirected, but after a user specified number of rings (see section 3.5.4 for
further details).
If a call is received in the middle of another call, a periodic call-waiting beep will be
played in the existing call. You can switch between the two calls by pressing the hook
button or the Recall button on your telephone. Please see section 3.4 for more
information on this and other advanced call functions.
Making outgoing calls
3.2.1. Making a VoIP call
By default, calls will be made using VoIP; however this can be overridden by pressing the
telephone hook button or the Recall button (see section 3.2.2 for more information).
When making a VoIP call the following points should be noted:
•
•
•
•
To dial another VoIP user, simply dial their number.
To dial a land line number, dial the number as normal, but always remember to
prefix it with the area code (even if the number is a local number).
To dial a VoIP user using a SIP URI, you must use the UTA-151’s address book
feature (see section 3.5.3) as a URI cannot be entered using your phone’s numeric
keypad. A SIP URI is where another person has given you their phone number in the
form sip:[email protected].
By default the UTA-151 will give you 4 seconds to complete dialling a number after
the last digit has been pressed. However, if you dial the number quickly and want to
be connected immediately you can dial ‘#’ at the end of the number to tell your
UTA-151 no more digits will follow (and not to wait 4 seconds).
© Camrivox Ltd. 2006
Page 6 of 20
VoIPon Solutions www.voipon.co.uk [email protected] Tel: +44 (0) 1245 600560
UTA-151 User Manual
3.2.2. Making a PSTN call
By default, outgoing calls are made over VoIP. But in some situations you may prefer for the
call to be made over your land line. For example, to dial the emergency services. To force a
call to go out over your land line instead of VoIP, do the following:
1.
2.
3.
4.
5.
6.
•
Lift your telephone receiver.
The dial-tone you hear will be your VoIP dial-tone.
Now press the Recall button on your telephone to indicate you wish to make a land
line call. See section 3.4.1 on how to use the Recall button.
After pressing Recall you will hear another dial-tone that is probably very similar to
the dial-tone heard in step (2), but the new dial-tone is from your land-line.
Any number you dial at this second dial-tone will be made over your land-line and
not over VoIP.
To return back to normal, so that calls are made using VoIP, simply hang-up the
phone at the end of your land line call.
Remember you can use the LED indicators (described in section 2.6) to check whether
or not your call is made over VoIP or your land line.
© Camrivox Ltd. 2006
Page 7 of 20
VoIPon Solutions www.voipon.co.uk [email protected] Tel: +44 (0) 1245 600560
UTA-151 User Manual
3.3.
Failsafe mode
In some situations it is not possible to make VoIP calls, for example, if your Internet
connection goes down, or if there is a power cut. In such situations your UTA-151 will enter a
failsafe mode. The purpose of this mode is to enable your telephone to make phone calls,
albeit over your land line rather than VoIP, even in the event of problems.
If ever failsafe mode is entered you will hear a recorded diagnostic message describing the
problem (except in the power failure case). This should help you to resolve the problem. See
section 6.3 for more information on these diagnostic messages.
3.4.
Advanced Telephone Functions
One of the advantages of VoIP is that it offers advanced telephony functions such as:
•
•
•
•
•
•
Putting a call on hold.
Call waiting
Making two simultaneous calls.
Transferring calls.
Do not disturb.
Call return.
3.4.1. Recall / Hook-flash
To access certain VoIP functions it is necessary to perform a Recall or Hook-flash. The
majority of phones have a dedicated button for this purpose. The button is often labelled
“Recall” or sometimes just “R” (note: not to be confused with Redial which is a different
button to Recall).
For phones that do not have a Recall button it is possible to simulate it by doing what is
known as a “Hook-flash”. As its name suggests a Hook-flash is performed by briefly tapping
the button that is pressed when you replace the receiver to hang-up. In effect when doing a
Hook-flash, although you tap the button with you hand, you momentarily hang-up the call,
instantly lifting the receiver as soon as it is put down.
3.4.2. Putting a call on hold
There are two common situations where it is convenient to place a call on hold:
1.
2.
To answer a second incoming call that comes in during an existing call (known as
call-waiting).
To dial a second person in the middle of an existing call.
In both cases the current caller is placed on hold by pressing the Recall button described in
section 3.4.1.
After the current caller is placed on hold, you will either be connected to the incoming call
(case 1 above), or you will be presented with a VoIP dial-tone enabling a second person to be
dialled (case 2 above).
As described in section 3.1, you are informed of a second incoming call (call-waiting) by a
series of periodic beeps during the existing call.
You can switch back to the person on hold, or repeatedly go between two callers by pressing
the Recall button multiple times.
© Camrivox Ltd. 2006
Page 8 of 20
VoIPon Solutions www.voipon.co.uk [email protected] Tel: +44 (0) 1245 600560
UTA-151 User Manual
3.4.3. Transferring calls
It is possible to transfer an incoming call to another number. You can do this in two ways:
1.
2.
Attended transfer – where you speak to the recipient of the transferred call before
transferring the incoming call to them.
Blind transfer – where you transfer a call immediately without speaking to the
recipient of the call (the transferee).
The process of performing an attended transfer is very similar to placing a call on hold to dial
two people as described in section 3.4.2. The process would likely be as follows:
1.
2.
3.
4.
5.
6.
The phone rings, and you pick-up to speak to the new caller.
You decide that they need to be transferred to another person.
You place the caller on hold by pressing the Recall button (described in section 3.4.2).
You are presented with a dial-tone enabling you to call the person to whom you wish
to transfer the call (the transferee).
You dial the number of the transferee and wait for them to answer the call.
After speaking to the transferee and confirming they wish to receive the transferred
call, you simply hang-up your phone to connect the other two parties.
A blind transfer is similar to an attended transfer but works as follows (steps 5 and 6 are
different from the steps above):
1.
2.
3.
4.
5.
6.
The phone rings, and you pick-up to speak to the new caller.
You decide that they need to be transferred to another person.
You place the caller on hold by pressing the Recall button (described in section 3.4.2).
You are presented with a dial-tone enabling you to call the person to whom you wish
to transfer the call (the transferee).
You dial the number of the transferee. However, before dialling the number you
prefix it with 90 and dial ‘#’ at the end. So for example, to perform a blind transfer
to the number 123456, you would dial 90123456#.
Before speaking to the transferee (while the phone is still ringing) simply hang-up
your phone to connect the other two parties. The incoming caller will be connected
while the phone is ringing, and will be the first person to speak to the transferee.
Note that for billing purposes you may be billed for the call to the transferred number, even
though you do not have a conversation with them.
3.4.4. Do not disturb
The do not disturb feature can be enabled in two ways:
1.
2.
Pressing the voicemail button as described in section 2.6.
Dialling 20, and then hang up.
You can tell if do not disturb is enabled by examining the voicemail LED indicator, or by
listening to the dial-tone. A special “stuttered” dial-tone is played if do not disturb is enabled.
The preferred and easiest method for enabling do not disturb is method 1 above. Method 2
differs in that if do not disturb is enabled by dialling 20, then only VoIP calls will not
disturb you – incoming land line calls will still ring the phone.
To cancel do not disturb, do one of the following:
1.
2.
Press the voicemail button as described in section 2.6.
Dial 80, and then hang up.
© Camrivox Ltd. 2006
Page 9 of 20
VoIPon Solutions www.voipon.co.uk [email protected] Tel: +44 (0) 1245 600560
UTA-151 User Manual
3.4.5. Call return
Call return enables you to ring back the VoIP caller who most recently called you. It is used
by simply dialling 69. It saves you the time of having to dial the full number to return the
call.
© Camrivox Ltd. 2006
Page 10 of 20
VoIPon Solutions www.voipon.co.uk [email protected] Tel: +44 (0) 1245 600560
UTA-151 User Manual
3.5.
Management Web Pages
The primary method for managing and configuring your UTA-151 is through a Web Browser.
To go to the web page of your UTA-151 you must double-click on the Voice Connect icon at
the bottom right corner of your Windows desktop. See section 2.2 for information on the Voice
Connect application.
Shortly after double-clicking on Voice Connect you will be taken to the UTA-151 home page.
The web page is divided into two areas. At the top of the page is a “messages” area where
important status information is displayed. Examples of status messages appearing in this area
are:
• Information on whether or not your VoIP connection is operational. If it is not
working, a link is provided to help diagnose any problems.
• If a new software upgrade is available for your UTA-151 a link will be provided to
install it.
Under the message area of the web page is the main configuration page; the following
sections describe the options on this page.
3.5.1. Accounts
In this section you can reconfigure your VoIP account settings. You may wish to do this for
several reasons:
1. To correct a mistake in your original configuration.
2. To switch to an alternative VoIP account.
3. To update your name but leave your other account settings unchanged.
3.5.2. Call history
In the call history subsection of the UTA-151 web pages you can view recently received calls,
and recently dialled numbers. Viewing recently received calls is useful if you have been away
from your phone for a while and wish to check if you have missed any calls.
For both received and dialled calls you can dial the number to return the call by clicking the
number on the web page. Your phone will briefly ring to confirm the mouse click. At this
point you can lift the phone receiver and the number will be dialled automatically for you.
3.5.3. Address book
Your UTA-151 has a built-in address book, and this is accessed through the address book web
page from the main UTA-151 web page. This has several purposes:
1.
2.
3.
To look up the name of incoming calls, and present the name instead of number.
Allowing you to speed dial numbers from the address book.
Allowing you to dial SIP URIs.
You can add entries to the address book using the web interface, but you can also import
numbers from your Microsoft Outlook contacts on your PC, see section 4.3 for further details.
Once a name and number are in the address book you can also use IVR to dial the number,
see section 5.1 for further details.
© Camrivox Ltd. 2006
Page 11 of 20
VoIPon Solutions www.voipon.co.uk [email protected] Tel: +44 (0) 1245 600560
UTA-151 User Manual
3.5.4. Call management
The call management section of the UTA-151 web pages allow you to tailor what happens to
incoming land line calls. This is closely tied to the buttons on the UTA-151 as described in
section 2.6.
A number of different actions are possible for an incoming call:
1.
2.
Ring the phone as normal; eventually ringing-out to voicemail if the call is not
answered in time.
Allow the phone to ring a specified number of times, and then do one of the
following:
•
•
•
Redirect to voicemail
Divert to a specified number
Enter hop on/off mode (if the incoming call was over a land line)
Note that only one of the above (voicemail, divert, hop on/off) can be used at once.
Hop on/off
This useful feature allows you to take advantage of VoIP from other phones such as a mobile
phone. The basic idea is that you can use the UTA-151 to bridge between a land line and
VoIP.
So for example, you wish to make an international call from you mobile phone. This call
would be much cheaper using VoIP but your mobile phone cannot do VoIP. The solution is to
phone up the UTA-151 from your mobile, and then get the UTA-151 to connect you to the
international number over VoIP. You are billed on your mobile phone for a call to your UTA151, and billed for the international call on your VoIP account. But the combined cost should
be much cheaper than making a single international call on your mobile; especially if the
VoIP call is to another VoIP user and completely free. This example uses a mobile phone, but
the hop on/off feature is useful from many different types of phone.
Before using hop on/off you must select the following on the call management web page:
•
•
•
•
Enable unanswered call actions.
Enter the number of rings after which you wish the call to be answered automatically.
Select hop on/off.
Enter a valid pin number.
Now if a call is received from a land line (not VoIP) the UTA-151 will answer the call
automatically after the specified number of rings. A voice prompt will ask you to enter your
pin number, specified by you on the management web page, preventing unauthorised access.
After entering the pin number successfully, you will be presented with a VoIP dial-tone. Now
you can dial the number you really want and make a call over VoIP from your mobile phone.
Note, on most mobile phones it is possible to fully automate the process above and store the
full number sequence (including pin number) as one number in the mobile phone’s address
book. This makes it equally convenient to dial the number using hop on/off as it would be
dialling it direct from the mobile phone. If you need to insert a pause in the dialling most
mobile phones allow you to put a special character in the number sequence to cause a delay.
Please refer to your mobile phone documentation for further details.
© Camrivox Ltd. 2006
Page 12 of 20
VoIPon Solutions www.voipon.co.uk [email protected] Tel: +44 (0) 1245 600560
UTA-151 User Manual
Call divert
To enable call divert you must select the following on the call management web page:
•
•
•
•
Enter the phone number to which calls should be diverted.
Enable unanswered call actions.
Enter the number of rings after which you wish the call to be answered automatically.
Select divert to call divert number.
Now if a call is received, after waiting the specified number of rings, the UTA-151 will divert
the call to the specified number. Note that the VoIP account will be billed for the diverted
part of the call.
Voicemail
To enable redirect to voicemail you must select the following on the call management web
page:
•
•
•
Enable unanswered call actions.
Enter the number of rings after which you wish the call to be answered automatically.
Select divert to voicemail.
Now if a call is received, after waiting the specified number of rings, the UTA-151 will divert
the call to voicemail. Conveniently the same voicemail account can be used for both your
VoIP line and your land line.
© Camrivox Ltd. 2006
Page 13 of 20
VoIPon Solutions www.voipon.co.uk [email protected] Tel: +44 (0) 1245 600560
UTA-151 User Manual
4. Computer Telephony Integration (CTI)
After installing the Voice Connect application described in section 2.2 you are able to share
telephony functions between your PC and UTA-151.
4.1.
Click-to-dial
This feature allows you to dial any phone number or SIP URI that is on your Windows
desktop. For example, you could have received the phone number in an email or found it on a
web page.
Simply highlight the phone number on the screen, and copy it to the clipboard (usually by
pressing Ctrl-C, or right-clicking and choosing Copy from the menu). After copying the
number to be dialled, right-click on the Voice Connect icon in the bottom right of your
desktop. A menu will appear with an option allowing you to dial the number. After clicking
on the option your phone will give a brief confirmation ring. At this point lift the phone
receiver and the number will be dialled automatically for you.
4.2.
Networks with more than one UTA-151 unit
It is possible to have more than one UTA-151 on your network at once. This is often the case if
you have a separate unit for the home office, one for the main home number, and perhaps
another for the children.
The Voice Connect application provides a way of going to the individual management web
pages for each of the units. To do this, right-click on the Voice Connect icon in the bottom right
of your desktop. A menu will appear allowing you to select the “Show Peers” option. A “Peer
Devices” window will open showing all units on the network. From here you can right-click
on a unit and choose the configure option from the menu. This will launch the web page for
that unit.
4.3.
Outlook synchronisation
As mentioned in section 3.5.3 your UTA-151 has a built-in address book. It is possible to add
entries to this address book manually using the configuration web pages, but often a quicker
method is to import your existing contacts from Microsoft Outlook.
To import contacts from Outlook go to the “Peer Devices” window as described in section 4.2.
Then right-click on the unit to which you wish to send the address book. From the menu
select “Synchronise with Outlook”. A progress window will appear showing you the
progress of the import, after which your UTA-151 will hold a copy of your Outlook address
book.
This copy of your address book on your UTA-151 is independent of your PC. You can turn off
your PC and the UTA-151 will still be able to access all address book functions.
5. Interactive Voice Response (IVR)
IVR is the term used to describe voice menus from which options are chosen using the
numbers on your telephone. This allows extra functions to be accessed on your UTA-151.
5.1.
Dial by name
This function is closely tied to the address book mentioned in sections 3.5.3 and 4.3. It allows
you to dial a number from your address book by spelling out the name. It works in a similar
way to predictive text when sending text messages on a mobile phone. You spell out the
© Camrivox Ltd. 2006
Page 14 of 20
VoIPon Solutions www.voipon.co.uk [email protected] Tel: +44 (0) 1245 600560
UTA-151 User Manual
name to dial until you have spelt out enough characters that a unique match can be made
from your address book.
To access the dial by name option, dial # after lifting the receiver. A voice prompt will ask
you to spell out the name to dial on your phone number pad. Keep spelling out characters
until a match has been made.
Once a match has been made, stop spelling out characters. At this point, if the address book
only has one number for the name, the number will be dialled. However, if several alternative
numbers are available for Work, Home or Mobile, you will be prompted to press 9 (Work), 4
(Home) or 6 (Mobile) respectively to choose which number to dial.
5.2.
Management URL read-out
Normally it is best to get to the management web page of your UTA-151 using the Voice
Connect application. However, you can launch the web page manually yourself without
running the Voice Connect application. This process uses the IVR menu and is described in
section 2.3.
© Camrivox Ltd. 2006
Page 15 of 20
VoIPon Solutions www.voipon.co.uk [email protected] Tel: +44 (0) 1245 600560
UTA-151 User Manual
6. Troubleshooting
6.1.
Resetting to factory defaults
Occasionally it is useful to be able to restore your UTA-151 back to its factory default state.
This will erase all your settings and address book entries, so must only be done if you are
absolutely sure it is necessary.
To reset your UTA-151 to its factory default state select the “UTA-151” option from the main
management web page, and then select “Reset Settings”.
6.2.
Software upgrade
From time to time new software upgrades will become available for your UTA-151. As
mentioned in section 3.5 the main management web page has a “messages” area which will
inform you of new updates. But you can also check manually by going to the "UTA-151"
option from the main management web page, and then select the “Firmware update” link.
Please note that during firmware update you must not remove power
from the UTA-151, or damage could occur. You should always use the
management web pages to reboot your unit – do not remove the power
cable. When in doubt, wait several minutes to let the unit go idle before
removing the power.
© Camrivox Ltd. 2006
Page 16 of 20
VoIPon Solutions www.voipon.co.uk [email protected] Tel: +44 (0) 1245 600560
UTA-151 User Manual
6.3.
Diagnostic messages
If there is a problem with your UTA-151, a diagnostic message will be played when you try to
make a call through the phone handset. The table below lists common messages and the
likely remedy for the problem:
Message
…Ethernet cable unplugged.
…there is no Internet
connection available.
…network settings are being
determined.
…Internet telephony is
unconfigured.
…Internet telephony user name
or password is incorrect.
© Camrivox Ltd. 2006
Diagnosis and Remedy
You have not plugged in an Ethernet cable to the UTA-151
for it to connect to the Internet. If the UTA end of the cable
is plugged in, check the other end of the cable, is the other
end powered-up? Does the Ethernet connection LED light
up next to the cable? If not, check your cable.
The cables are plugged into your UTA correctly but it is
not able to connect to your broadband access device such
as your DSL modem or cable modem. Check your modem
is powered and configured to grant the UTA access.
The cables are plugged into your UTA correctly but it not
able to automatically configure its network settings. Check
that the DHCP server is correctly configured in your
modem. If you have a PC connected to the LAN port of the
UTA, check that it can access the Internet.
The cables are plugged into your UTA correctly, and it is
able to connect to your modem, but you have not
configured your VoIP account settings. Please see sections
2.4 and 2.5 for instructions on how to configure your
UTA-151. You will not be able to make VoIP call until a
user name and password has been entered.
The cables are plugged into your UTA correctly, and it is
able to connect to your modem, and you have configured
it. However, there is a problem with the configuration and
you have likely made a mistake in the user name or
password. See sections 3.5 and 3.5.1 for further
information on how to re-enter your user name and
password.
Page 17 of 20
VoIPon Solutions www.voipon.co.uk [email protected] Tel: +44 (0) 1245 600560
UTA-151 User Manual
Appendix A – Hardware Specification
Interfaces:
WAN interface
LAN interface
FXO port
FXS port
LEDs
Buttons
Ethernet (10/100)
Ethernet (10/100)
PSTN access including PSTN failsafe
Attach telephone handset.
Voicemail alert, email alert,
VoIP line, PSTN line, Call-divert,
WAN activity, LAN activity, Power
Call Divert, Do not Disturb/Voicemail Access
Management:
Configuration, diagnostics, and firmware upgrade locally or by operator.
Telnet or HTTP/Web.
Through telephone handset.
Password controlled.
Quality of Service (QoS):
Type of Service (ToS)
Unique Amrivox QoS features to prioritise voice traffic over LAN data traffic.
Power-On Self Test (POST) and diagnostics.
Voice algorithms and protocols:
SIP, RTP, SDP
VAD, CNG, G.168 echo canceller
Packet Loss Compensator
G.711, G.726, G.729
Adaptive Jitter Buffer minimises voice latency
DTMF detection, generation, and relay
FAX and modem support
PBX features:
Receive PSTN calls and VoIP calls at the same time
Call hold, transfer, blocking, waiting, and forwarding
Distinctive ring-tones, based on Caller ID
Call statistics
Caller ID
Dial-by-name IVR
IP features:
DHCP client, DNS client
ICMP, TCP/UDP/IP
NAT traversal and STUN
SNTP
HTTP
RIP and RIPv2
Product Physical Data:
Measurements: 160 x 120 x 30 mm
Weight: 250grams (9 ounces)
Environmental:
5C - 40C operating temperature
5% - 90% non-condensing humidity
Power Supply (external):
Input 100 - 240 VAC; 50/60 Hz; 0.5 A
Output 5.0 VDC; 1.5 A
© Camrivox Ltd. 2006
Page 18 of 20
VoIPon Solutions www.voipon.co.uk [email protected] Tel: +44 (0) 1245 600560
UTA-151 User Manual
Appendix B – Copyright notices
Camrivox Ltd.
Copyright © 2006 Camrivox Ltd, all rights reserved. The contents of this publication may not
be reproduced in any part or whole, transcribed into any language, or transmitted in any
form or by any means, electronics, mechanical, magnetic, optical, chemical, photocopying,
manual, or otherwise, without the prior written permission of Camrivox Ltd.
Vovida Networks, Inc.
Camrivox products include software from Vovida Networks Inc, under the following
conditions:
The Vovida Software License, Version 1.0
Copyright (c) 2000 Vovida Networks, Inc.
All rights reserved.
Redistribution and use in source and binary forms, with or without
modification, are permitted provided that the following conditions are
met:
1. Redistributions of source code must retain the above copyright
notice, this list of conditions and the following disclaimer.
2. Redistributions in binary form must reproduce the above copyright
notice, this list of conditions and the following disclaimer in the
documentation and/or other materials provided with the distribution.
3. The names "VOCAL", "Vovida Open Communication Application Library",
and "Vovida Open Communication Application Library (VOCAL)" must not be
used to endorse or promote products derived from this software without
prior written permission. For written permission, please contact
[email protected].
4. Products derived from this software may not be called "VOCAL", nor
may VOCAL" appear in their name, without prior written permission of
Vovida Networks, Inc.
THIS SOFTWARE IS PROVIDED "AS IS" AND ANY EXPRESSED OR IMPLIED
WARRANTIES, INCLUDING, BUT NOT LIMITED TO, THE IMPLIED WARRANTIES OF
MERCHANTABILITY, FITNESS FOR A PARTICULAR PURPOSE, TITLE AND NONINFRINGEMENT ARE DISCLAIMED. IN NO EVENT SHALL VOVIDA NETWORKS, INC.
OR ITS CONTRIBUTORS BE LIABLE FOR ANY DIRECT DAMAGES IN EXCESS OF
$1,000, NOR FOR ANY INDIRECT, INCIDENTAL, SPECIAL, EXEMPLARY, OR
CONSEQUENTIAL DAMAGES (INCLUDING, BUT NOT LIMITED TO, PROCUREMENT OF
SUBSTITUTE GOODS OR SERVICES; LOSS OF USE, DATA, OR PROFITS; OR
BUSINESS INTERRUPTION) HOWEVER CAUSED AND ON ANY THEORY OF LIABILITY,
WHETHER IN CONTRACT, STRICT LIABILITY, OR TORT (INCLUDING NEGLIGENCE OR
OTHERWISE) ARISING IN ANY WAY OUT OF THE USE OF THIS SOFTWARE, EVEN IF
ADVISED OF THE POSSIBILITY OF SUCH DAMAGE.
This software consists of voluntary contributions made by Vovida
Networks, Inc. and many individuals on behalf of Vovida Networks, Inc.
For more information on Vovida Networks, Inc., please see
http://www.vovida.org/.
© Camrivox Ltd. 2006
Page 19 of 20
VoIPon Solutions www.voipon.co.uk [email protected] Tel: +44 (0) 1245 600560
UTA-151 User Manual
The Internet Software Consortium
Camrivox products include software from the Internet Software Consortium, under the
following conditions:
Copyright (c) 1995, 1996, 1997, 1998 The Internet Software Consortium.
All rights reserved.
Redistribution and use in source and binary forms, with or without
modification, are permitted provided that the following conditions are
met:
1. Redistributions of source code must retain the above copyright
notice, this list of conditions and the following disclaimer.
2. Redistributions in binary form must reproduce the above copyright
notice, this list of conditions and the following disclaimer in the
documentation and/or other materials provided with the distribution.
3. Neither the name of The Internet Software Consortium nor the names
of its contributors may be used to endorse or promote products derived
from this software without specific prior written permission.
THIS SOFTWARE IS PROVIDED BY THE INTERNET SOFTWARE CONSORTIUM AND
CONTRIBUTORS ``AS IS'' AND ANY EXPRESS OR IMPLIED WARRANTIES,
INCLUDING, BUT NOT LIMITED TO, THE IMPLIED WARRANTIES OF
MERCHANTABILITY AND FITNESS FOR A PARTICULAR PURPOSE ARE DISCLAIMED.
IN NO EVENT SHALL THE INTERNET SOFTWARE CONSORTIUM OR CONTRIBUTORS BE
LIABLE FOR ANY DIRECT, INDIRECT, INCIDENTAL, SPECIAL, EXEMPLARY, OR
CONSEQUENTIAL DAMAGES (INCLUDING, BUT NOT LIMITED TO, PROCUREMENT OF
SUBSTITUTE GOODS OR SERVICES; LOSS OF USE, DATA, OR PROFITS; OR
BUSINESS INTERRUPTION) HOWEVER CAUSED AND ON ANY THEORY OF LIABILITY,
WHETHER IN CONTRACT, STRICT LIABILITY, OR TORT (INCLUDING NEGLIGENCE OR
OTHERWISE) ARISING IN ANY WAY OUT OF THE USE OF THIS SOFTWARE, EVEN IF
ADVISED OF THE POSSIBILITY OF SUCH DAMAGE.
This software has been written for the Internet Software Consortium by
Ted Lemon <[email protected]> in cooperation with Vixie Enterprises. To
learn more about the Internet Software Consortium, see
``http://www.vix.com/isc''. To learn more about Vixie Enterprises, see
``http://www.vix.com''.
© Camrivox Ltd. 2006
Page 20 of 20
VoIPon Solutions www.voipon.co.uk [email protected] Tel: +44 (0) 1245 600560