1
KMZFactory v1.11
User Manual
© John Romaya July 2014
KMZFactory v1.10 User Manual 22nd July 2014
Table of Contents
Why use KMZFactory ?
The KMZFactory dialog
Opening a map file
Source file information
Revert button
Draw Order
Geo-referencing parameters
Cropping
Tiling parameters
Output options
Map projection
Large image files
Building a map image library
1
2
3
5
6
6
7
9
11
12
13
14
15
Appendix A:- Geo-referencing an image with Google™ Earth
Very large image overlays may not appear in Google™ Earth
Appendix B:- Mercator projection correction
Appendix C:- Deleting unnecessary tiles with Google™ Earth
A.1
A.4
B.1
C.1
i
KMZFactory v1.10 User Manual 22nd July 2014
Sourcecode Acknowledgements
KMZFactory was developed with the aid of the following software:1) The Independent JPEG Group's JPEG software
http://www.ijg.org/
2) The libtiff software package by Sam Leffer and others
http://www.remotesensing.org/libtiff/
3) zip/unzip by Lucian Wischik (a repackaged form of the zlib code by Jean-Loup Gailly
and Mark Adler and others)
http://www.codeproject.com/useritems/zip_utils.asp
http://www.gzip.org/zlib
Commercial Credits
Google™ Earth is a service provided by Google Inc. (“Google”), located at 1600
Amphitheatre Parkway, Mountain View, CA 94043, United States.
Garmin® International, 1200 E. 151st Street, Olathe, KS 66062-3426, United States
OpenStreetMap (http://www.openstreetmap.org/) provides map data © OpenStreetMap
contributors, CC BY-SA which for the U.K. includes Ordnance Survey data © Crown
copyright and database right 2010
ii
KMZFactory v1.11 User Manual 22nd July 2014
Why use KMZFactory ?
KMZFactory is a utility for making custom maps for Garmin® GPS devices. Such
devices come with a low-detail worldwide basemap and it is possible to purchase
additional maps at greater detail. These maps can however be costly and map coverage
and availability worldwide is somewhat patchy. Garmin® have introduced the concept of
"Custom Maps" which allows you to upload your own map to the GPS device. The map
needs to be in the form of a digital image which has been geo-referenced to locate its
position accurately on the globe. Geo-referencing may be conveniently achieved using
Google™ Earth (see Appendix A - Geo-referencing with Google™ Earth). The output
from Google™ Earth is a ".kmz" file which contains the map image and geo-referencing
co-ordinates which allow the Garmin® GPS device to display the image in the correct
location on the globe.
But there are some important limitations to Garmin® Custom Maps:1) If the map is more than 1000x1000 pixels in size there will be a loss of resolution
when it is uploaded to the GPS device.
2) The map should be no more than 3Mb in size.
3) There can be no more than 100 Custom Maps on the GPS device.
Limitations 1) and 2) above mean that it is not possible to show much more than a
1000x1000 pixel image in a Custom Map. What KMZFactory does is allow a much
larger Custom Map size (in pixels and file size). It will split a large geo-referenced
image into a number of separate "tiles", each tile being no more than a certain size (for
example 1000x1000 pixels). It will geo-reference each component tile separately and it
will combine all the tiles and geo-referencing data into a single ".kmz" file which can be
uploaded to the Garmin® GPS device.
When a map image is processed in this way it is then possible to create a Custom Map
which consists of anything up to 100 map tiles, each of 1000x1000 pixels. If the tiles are
arranged in a 10x10 square this means that a Custom Map can cover an extent of 10,000
x 10,000 pixels.
Unfortunately, the Garmin® imposed limitation of 100 Custom Maps per device refers to
each individual map tile, not the composite ".kmz" files, so while KMZ factory largely
circumvents limitations 1) and 2) above, it does nothing to avoid the third limitation of
the total number of Custom Map images allowed on the GPS device.
1
KMZFactory v1.11 User Manual 22nd July 2014
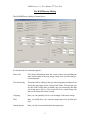
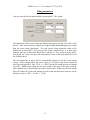
The KMZFactory Dialog
The full KMZFactory dialog is shown below:-
It is divided into five functional panels:Source file
This shows information about the current source map including the
name and location of the map image, image size in pixels and georeferencing data.
Geo-referencing
This panel allows editing of the geo-referencing data which precisely
locates the map image on the surface of the Earth. The operator may
use the fields in this panel to modify the geo-referencing data that
was in the source file, or, if the source file was a simple image, the
data can be entered here from scratch.
Cropping
Here you can optionally select a sub-rectangle of the source image.
Tiles
Here you define how you want the output map to be divided into
tiles.
Output options
Here you select some details about the output map.
2
KMZFactory v1.11 User Manual 22nd July 2014
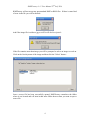
Opening a map file
When you first start KMZFactory the only thing you can do is select a map file:-
You may choose three types of file:1) KMZ file
This is a geo-referenced image of the type created by Google™ Earth. A KMZ file
contains geo-referencing data together with the image in a single file. KMZFactory
will only accept KMZ files which contain a single image.
2) KML file
This is another type of geo-referenced image and this type of file can also be created
using Google™ Earth. However, a KML file contains just geo-referencing data and a
link to the image which is stored in a separate file. KMZFactory will only accept
KML files which contain a single image.
3) Image file
KMZFactory can deal with two types of images; jpeg and tiff. If you select an image
file by itself KMZFactory will need you to provide some additional information; the
latitude and longitude of the centre of the image and the horizontal and vertical scales
of the image in metres per pixel.
3
KMZFactory v1.11 User Manual 22nd July 2014
KMZFactory will not accept any non-standard KMZ or KML files. If there is some kind
of error in the file you will be notified:-
And if the image file is neither a jpg or a tiff it will also be rejected:-
If the file contains more than image you will be prompted to select an image to work on.
Click on the Overlay name of the image and then click the "Select" button:-
Once a source file has been successfully opened, KMZFactory remembers the folder
where it was located and will start in that same folder the next time you want to open a
source file.
4
KMZFactory v1.11 User Manual 22nd July 2014
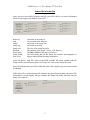
Source file information
Once you have successfully opened a map file you will be able to see some information
about it in the upper panel named "Source file":-
KMZ file
Path
Image
Image tag
Image size
Rotation
Draw Order
North, South,
East, West
The name of the map file
The location of the map file
The name of the image file
The name of the map
The size of the image in pixels
The rotation of the image (-180 to +180 degrees)
The Draw Order of the map (see below)
Geo-referencing data for the image; the latitudes and longitudes in
degrees which define the image boundaries
In the list above, "map file" refers to the KMZ or KML file which contains both the
image and the geo-referencing data, and "image file" refers to the image file alone.
Since this information is specified within the source file it appears greyed out and cannot
be changed.
If the source file is a simple image file (without any geo-referencing data), the source file
information is much simpler and just displays the Image file name and Path and the
Image size in pixels:-
5
KMZFactory v1.11 User Manual 22nd July 2014
Revert button
The "Revert" button appears in the upper "Source file" panel when a source file has been
successfully opened.
When you first open a file, KMZFactory sets some initial values for geo-referencing
parameters (centre latitude and longitude, rotation and metres per pixel) based on the
values defined in the source file. If the source file is a simple image, which does not
contain geo-reference data, they are set to some reasonable initial default values.
The operator may then change the geo-referencing parameters if necessary.
If the "Revert" button is clicked, the initial geo-referencing values are restored from the
source file information.
Draw Order
If there are two maps which overlap, they are drawn according to "Draw Order", which is
a number which can take values between 0 and 100. A map with a Draw Order of zero is
not drawn, but all other Draw Orders are visible. A map with a higher Draw Order will
always be drawn on top of, and will obscure, a map with a lower Draw Order. The Draw
Order can be useful if you have two maps of the same area drawn at different scales. For
example, you may have a large scale map of the whole of Iceland and a highly detailed,
much smaller map just of the Reykjavik area. If you give the map of Iceland a Draw
Order of 20 and the map of Reykjavik a Draw Order of 30, you can be sure that the
detailed map of Reykjavic will always be superimposed over the top of the map of
Iceland.
6
KMZFactory v1.11 User Manual 22nd July 2014
Geo-referencing parameters
When a map source file has been successfully opened, geo-referencing parameters are
initialized based on data contained in the source (see also "Revert button" above):-
You may change any of these values if you wish. KMZFactory allows you to modify the
initial geo-referencing of your map image in two ways:Latitude / Longitude box
This is the same method that is used by Google™ Earth. The locations of the top and
bottom edges of the image are specified using the "North" and "South" latitude values
and the right and left edges of the image are specified by the "East" and "West" longitude
values respectively.
The two items below ("Units" and "Rotate") apply to all types of geo-referencing data:-
Units
You may display Latitude and Longitude values either in decimal notation or as degrees,
minutes and seconds (in which case the values are separated by colons):-
7
KMZFactory v1.11 User Manual 22nd July 2014
Latitude is expressed in degrees north or south of the Equator (which is latitude 0). A
positive value denotes a northerly latitude and a negative value denotes a southerly
latitude. In a similar way a positive longitude denotes a point East of the Greenwich
Meridian while a negative value indicates a westerly longitude.
Rotate
Specify a rotation of the image as a value between -180 and +180 degrees. Positive
values denote an anti-clockwise rotation and negative values cause a clockwise rotation.
Centre co-ordinates and scaling
Alternatively you can also specify the precise Latitude and Longitude of the exact centre
of the image together with the scaling factor of the image in metres per pixel, which is
specified separately for the width (X) and height (Y) of the image.
The PAR value gives the Pixel Aspect Ratio of the image. If you want to display the
image in true scale (i.e. so that the map is not compressed either vertically or
horizontally), you may need to stretch or compress each pixel horizontally. The PAR
then gives the ratio of the horizontal length of each pixel divided by the vertical.
You may prefer to specify the scaling factor as pixels/kilometre, rather than metres/pixel
and you can select either method using the “Scaling” drop-down list:-
When you change the scaling from metres/pixel to pixels/kilometer (or vice-versa), the X
and Y scaling values are converted appropriately (but the PAR is unaffected).
KMZFactory remembers your preferred setting when you quit.
8
KMZFactory v1.11 User Manual 22nd July 2014
Cropping
You may not need to use the complete source file. For example, you may have a "master
image" of an area which is very large and you may just need a small part of the large
map. The number of tiles in a Custom Map is limited and so it makes sense to be as
thrifty as possible when constructing them.
When you first open a source file, KMZFactory assumes you want to use the whole
image so the "Cropping" panel is initially disabled:-
If you click on the "Enable cropping" checkbox you open the full panel:-
You can specify a cropping indent in pixels for the left, top, right and bottom of the
image. The width and height of the cropped image are also shown and may be edited. in
the above example, the image has not been cropped and so the cropped width and height
(5,320 x 4,615 pixels) reflect the full size of the original image.
Cropping an image in this way is unsatisfactory because it is not clear from these indent
numbers what the result of the cropping is when it is applied to the source image.
For this reason, a graphical interface has been added so that you can see exactly where
the cropping will occur. You can access this interface by clicking on the "Crop window"
button...
9
KMZFactory v1.11 User Manual 22nd July 2014
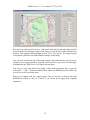
Here the crop window has been set to 1,000 pixels from the left and right edges and 400
pixels from the top and bottom edges of the image, so that the body of the park has been
isolated. The cropped width and height are now 3320 x 3815 pixels. The cropped region
is delimited by the black and white dashed rectangle on the image.
You can zoom in and zoom out of the image using the plus and minus keys and if you are
zoomed in you can pan around by using the cursor arrow keys (up, down, left and right).
Holding down the "Shift" key as well makes moving faster.
You can set a crop value directly by typing a value in the appropriate box, or you can
click on the "+" and "-" buttons on either side in which case holding down the "Shift" key
as well moves the crop border faster.
When you are happy with the cropped region, click on "Accept" to return to the main
KMZFactory dialog, or click on "Cancel" if you decide not to apply these cropping
boundaries.
10
KMZFactory v1.11 User Manual 22nd July 2014
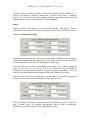
Tiling parameters
You may specify how the map should be tiled using the "Tiles" panel:-
The dimensions of the source image are displayed greyed out (in this case 5320 x 4615
pixels). If the source has been cropped, the cropped width and height appear here, rather
than the source image dimensions. You may specify tiling parameters either as tile
dimensions in pixels (887 x 923 pixels per tile in the example above) or as how many
columns and rows of tiles there should be (6 columns x 5 rows in the example above).
The greyed out "Total" item gives the total number of tiles in the final output file (30 in
the example above).
The tile dimensions in pixels will be automatically adjusted to fit the source image
exactly. In the example above the source image is 5,320 pixels wide and 6 columns of
tiles have been specified. Now 5,320 ÷ 6 = 886.67 but the tile width in pixels is rounded
up to 887. KMZFactory adjusts the tile pixel widths at the edge of the map so that the
total width always exactly matches the source image width. In this case the four middle
tiles will each be 887 pixels wide and the two tiles at the start and end of each row will be
886 pixels wide (4 x 887 + 2 x 886 = 5,320).
11
KMZFactory v1.11 User Manual 22nd July 2014
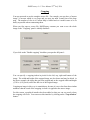
Output options
The Output options section appears at the bottom of the KMZFactory dialog:-
The Image Tag item should be filled in with the name of the map. The "Projection" item
specifies the map projection of the source map (see below). The Draw Order item
specifies the Draw Order of the map (see above). You may specify the quality of the JPG
tiles as a number between 0 and 100. The default is 80.
When you have completed all the fields on the dialog you can click on the "Create KMZ
File" button.
The default name for the KMZ file will be the Image Tag with "KF" appended. You can
change the filename to whatever you wish, but if you choose an existing file name you
will see a warning message:-
It may take a few seconds to create the KMZ file, particularly if the source image is large.
Usually, some extra information is stored as comments within the KMZ file which can
have any name you want. The information includes the name of the source image, any
cropping parameters, image dimensions etc… But some Garmin units may not recognize
the extra comment information and as a result the custom map will not be recognized. If
you check the “Maximize compatibility” box a stripped-down KMZ file will be created
without any of that extra information. For maximum compatibility you should choose a
short, simple name which only includes characters A-Z, a-z and 0-9, and does not include
any special characters like spaces or underscores. The resulting KMZ map and all the
tiles it contains will be renamed according to the filename you type when you save your
final KMZ file, regardless of the name of the original source image. If you choose a nonstandard filename, you will see a warning message but the file will still be created.
Once a KMZ file has been successfully created, KMZFactory remembers the folder
where it was located and will save files in that same folder the next time you want to
create a new KMZ file.
12
KMZFactory v1.11 User Manual 22nd July 2014
Map projection
The surface of the earth is a slightly flattened sphere while maps are two dimensional
images, so any flat map of the earth is a "projection" of the curved surface of the earth
onto a flat image. KMZFactory has no way of knowing what type of map projection is
used in the source file you provide, so you must specify it in the "Map projection"
selection box in the "Output options" panel in the lower section of the KMZFactory
interface.
KMZFactory can deal with the following types of map projection:Equi-rectangular
In an equi-rectangular map projection the Earth's horizontal lines of latitude form the
horizontal lines of the grid of the map and the curving lines of longitude of the Earth are
straightened out to form the vertical lines of the grid of the map. This is the type of
projection which is used by Google™ Earth image overlays.
Mercator
Most online mapping services, such as Google™ Maps and Bing Maps, provide Mercator
projection maps.
In a Mercator projection the map can be thought of as a sheet of paper wrapped into a
cylinder around the equator of the earth. Features on the surface of the Earth are
projected onto the cylindrical map. Since this introduces a distortion which increases the
further you travel from the equator, a varying and compensatory compression is applied
in the vertical direction so that local features remain more or less the same shape.
Mercator projection distortions only become important when the vertical extent of the
mapped area is large (over 100km).
KMZFactory applies a correction factor to Mercator projection source maps when it
creates the .kmz output file so they match Google™ Earth image overlays much more
closely (see Appendix B - Mercator projection correction).
When you geo-reference a Mercator projection map you must ensure that the extreme top
and bottom edges of the map are correctly positioned. Due to the Mercator projection
there will be an increasing discrepancy towards the centre of the map which you can
safely ignore as KMZFactory will correct for this.
13
KMZFactory v1.11 User Manual 22nd July 2014
Large image files
Large image files can use considerable memory resources. KMZFactory can deal with
large image files providing you have enough memory available on your PC, but it may
take some time (anything up to one minute) to process large images.
If you encounter an out-of-memory error…
...you should try closing down any other programs running on your PC and if that fails
you should reboot your PC and try again directly with KMZFactory, before running any
other programs.
KMZFactory has the following absolute image size limits depending on the amount of
memory you have on your PC:Anything over 4Gb RAM
Anything over 3Gb RAM
Anything over 2Gb RAM
Anything over 1Gb RAM
14
30,000 x 30,000 pixels
25,000 x 25,000 pixels
20,000 x 20,000 pixels
15,000 x 15,000 pixels
KMZFactory v1.11 User Manual 22nd July 2014
Building a map image library
The .kmz files created by KMZFactory are convenient for uploading to a GPS device
because they contain all the geo-referencing data as well as all the individual map tile
images in a single file.
But if you have a lot of large source map images, each of which you want to crop and use
to make several .kmz files, it is more efficient to use a .kml file to geo-reference each
master map image. A .kml file is actually a text file which contains geo-referencing data
as well as a reference to the image file name, without containing the image itself. If you
use a .kml file to geo-reference your image you can still access the image directly
because it exists as a separate file and you can also edit the .kml file as a standard text
file. If, on the other hand, you create a .kmz file, it will be much larger because it
contains a copy of the original image as well as the geo-referencing data. But in the case
of a .kmz file the copy of the original image contained within it is not directly accessible.
You can make a .kml file from Google™ Earth. If you have loaded an Overlay Image
you can then save it as a .kml file (see Appendix A - Geo-referencing an image with
Google™ Earth, Step 5). Two files will be created, a copy of the Overlay Image and a
.kml file which contains the geo-referencing data in plain text. You will probably want to
delete the superfluous copy of the Overlay Image.
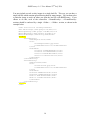
You can edit a .kml file by right-clicking on the file and selecting "Open with..." and then
choosing a text editor (like Wordpad for example). Here is a typical .kml file:<?xml version="1.0" encoding="UTF-8"?>
<kml xmlns="http://www.opengis.net/kml/2.2"
xmlns:gx="http://www.google.com/kml/ext/2.2"
xmlns:kml="http://www.opengis.net/kml/2.2"
xmlns:atom="http://www.w3.org/2005/Atom">
<GroundOverlay>
<name>Regents Park</name>
<Icon>
<href>RegentsPark.jpg</href>
<viewBoundScale>0.75</viewBoundScale>
</Icon>
<LatLonBox>
<north>51.53940639688562</north>
<south>51.52178963840426</south>
<east>-0.1394591449124616</east>
<west>-0.1719023277407772</west>
</LatLonBox>
</GroundOverlay>
</kml>
The image file name "RegentsPark.jpg" has been highlighted in the above example. You
may wish to edit the filename so that you can keep all your map images in a convenient
location. So for example you could change the filename to "./Images/RegentsPark.jpg".
You can use .kml files in this way to organize your collection of map images and still
have them in a geo-referenced form which can be readily accesssed by KMZFactory.
15
KMZFactory v1.11 User Manual 22nd July 2014
You may include several overlay images in a single kml file. This way you can have a
single kml file which contains georeferencing data for many images. You can then select
a particular image to work on when you open the kml file with KMZFactory. If you
choose to do this, each of the consecutive <GroundOverlay>…</GroundOverlay>
sections should be enclosed by a single <Folder>…</Folder> section, as shown in the
example below.
<?xml version="1.0" encoding="UTF-8"?>
<kml xmlns="http://www.opengis.net/kml/2.2"
xmlns:gx="http://www.google.com/kml/ext/2.2"
xmlns:kml="http://www.opengis.net/kml/2.2"
xmlns:atom="http://www.w3.org/2005/Atom">
<Folder>
<GroundOverlay>
<name>Regents Park</name>
<Icon>
<href>RegentsPark.jpg</href>
<viewBoundScale>0.75</viewBoundScale>
</Icon>
<LatLonBox>
<north>51.53940639688562</north>
<south>51.52178963840426</south>
<east>-0.1394591449124616</east>
<west>-0.1719023277407772</west>
</LatLonBox>
</GroundOverlay>
<GroundOverlay>
<name>Iceland</name>
<Icon>
<href>Iceland.jpg</href>
<viewBoundScale>0.75</viewBoundScale>
</Icon>
<LatLonBox>
<north>54.49468528701576</north>
<south>54.21968836422165</south>
<east>-1.685179344515426</east>
<west>-2.157268374672597</west>
</LatLonBox>
</GroundOverlay>
</Folder>
</kml>
16
KMZFactory v1.11 User Manual 22nd July 2014
Appendix A - Geo-referencing an image with Google™ Earth
Step 1) Digitize the image.
First of all you need to digitize the
map you want to use. The map should
either be in the public domain or be
free of copyright or you should have
the permission of the copyright owner
to use the map. For this example we
will be using an image of Regent's
Park, London from OpenStreetMap
(http://www.openstreetmap.org). The
map should be saved as a digital image
(for example as a .jpg image, or a
lossless format such as tiff).
Step 2) Create an Image Overlay
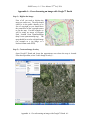
Open Google™ Earth and locate the approximate area where the map is located.
From the top toolbar, select "Add->Image Overlay":-
Appendix A - Geo-referencing an image with Google™ Earth A.1
KMZFactory v1.11 User Manual 22nd July 2014
Step 3) Link the image to the overlay
In the "New Image Overlay" window provide an appropriate name ("Regent's Park"
in this case) and click on the "Browse" button to link your image to the overlay. In
this case the image is called "RegentsPark.jpg":-
The map image should now appear over the Google™ Earth imagery. If you select
the "Location" tab of the "New Image Overlay" dislog box you will see the coordinates which define the North, South, East and West geo-referencing of the image.
If you wish, you may also set the Draw Order of the Overlay (a number between 0
and 100 which determines how Overlays appear when they overlap). The Draw
Order value appears on the "Altitude" tab.
Appendix A - Geo-referencing an image with Google™ Earth A.2
KMZFactory v1.11 User Manual 22nd July 2014
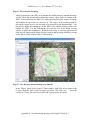
Step 4) Geo-reference the image
Adjust (georeference) the JPEG so it matches the satellite imagery beneath the image
overlay. Move the green marks to adjust the corners, edges, center or rotation of the
JPEG. If you hold down the "Shift" key while adjusting one of the corners the image
will maintain its aspect ratio as you resize it. The image can be scrolled around by
moving the central cross or you can rotate it by mving the green diamond shape. You
may need to adjust the transparency of the JPEG so the satellite imagery can be seen
beneath the JPEG. Use the Transparency bar near the top of the Image Overlay
window to adjust the transparency. When the map image is correctly georeferenced
click the OK button on the Image Overlay window and the image should be present
in the "Places" panel of the Google™ Earth window.
Step 5) Save the geo-referenced image as a .kmz file
In the "Places" panel of the Google™ Earth window, right click on the name of the
overlay ("Regent's Park" in this example) and select "Save Place As…". Save the
overlay as a ".kmz" file and select a name and location for the saved file.
Appendix A - Geo-referencing an image with Google™ Earth A.3
KMZFactory v1.11 User Manual 22nd July 2014
Very large image overlays may not appear in Google™ Earth
You may find that an image will not display in Google™ Earth.
There is a size limitation to Image Overlays in Google™ Earth. This depends on the
graphics card on your PC. You can find this limit from the "About Google Earth" item
on the Google™ Earth "Help" menu:-
The "Max Texture Size" (in this example 8192x8192 pixels) is the maximum size for
Image Overlays.
Any image which is larger than this limit will not display in Google™ Earth.
If you want to geo-reference an image which is larger than this limit there are two
workarounds you can use:i) Make a lower resolution image.
You can make a lower resolution version of the image. For example, if your image is
10,000 x 10,000 pixels, make an image which is 8,000 x 8,000 pixels and geo-reference
this, now visible image, accurately in Google™ Earth. Once this is done, go to "Step 3)
Link the image to the overlay" in the previous description and link to the full resolution
image. Then save this overlay in the usual way. Although you have geo-referenced a
lower resolution image the values should still be pretty accurate, providing you have not
had to reduce the resolution too much.
Appendix A - Geo-referencing an image with Google™ Earth A.4
KMZFactory v1.11 User Manual 22nd July 2014
ii) Geo-reference north, south, east and west separately.
Alternatively, you can cut out the extreme top left corner of your image and georeference it in the usual way. Then make a note of the "north" and "west" co-ordinates
from the "Location" tab of the Google™ Earth Image Overlay dialog. In a similar way,
cut out the extreme bottom right corner of the image and make a note of the "south" and
"east" co-ordinates.
If the corners cannot be accurately geo-referenced (if they are in the sea, or in a
featureless region for example) you will have to select some other region along the edge
of the image and geo-reference each edge separately.
You can then enter these values for "north", "south", "east" and "west" into the
KMZFactory geo-referencing panel.
The Google™ Earth Image Overlay dialog gives co-ordinates in degrees, minutes and
seconds accurate to two decimal places of the seconds of arc (e.g. 51° 32' 21.86" N).
Although KMZFactory includes many more decimal places in the seconds field, the
Google™ Earth value is nevertheless extremely precise, giving a location which is
accurate to around 5 mm on the surface of the Earth.
Appendix A - Geo-referencing an image with Google™ Earth A.5
KMZFactory v1.11 User Manual 22nd July 2014
Appendix B - Mercator projection correction
Consider the following map of Iceland which has been geo-referenced as an image
overlay. The black outline shows the position of the coastline according to
Google™ Earth:-
While the registration of the map is correct at the top and bottom of the image, the
registration is poor towards the middle as becomes apparent when we look at a detail of
the coastline there:-
The map is not in correct registration here
because the source image was obtained from
OpenStreetMap, which uses a Mercator
projection while Google™ Earth expects
image overlays to use Equi-rectangular
projection. This introduces a distortion in the
vertical scale, which is usually not a problem,
but which becomes noticeable in cases like
this where the vertical extent of the map is
several hundred kilometers.
Appendix B - Mercator projection correction B.1
KMZFactory v1.11 User Manual 22nd July 2014
Providing the map is correctly registered at the extreme top and bottom, KMZFactory is
able to apply a correction factor to Mercator projection maps when it divides the map up
into tiles, by applying a compensatory stretching factor to the tiles in the vertical
dimension. Here is the same map after being tiled into 5x5 tiles by KMZFactory:-
This time the map is in good registration not just at the top and bottom of the image, but
also at the middle:-
The Mercator projection correction depends
on correct registration of the source map at
the extreme top and bottom of the image and,
providing this has been done, the resulting
map shows a significant improvement in
registration.
Appendix B - Mercator projection correction B.2
KMZFactory v1.11 User Manual 22nd July 2014
Appendix C - Removing unnecessary tiles with Google™ Earth
Garmin® GPS devices allow a limited total number of Custom Map tiles, typically 100.
This is a useful, but not limitless, resource and so it is useful to be able to remove
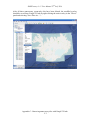
unnecessary tiles in some cases. Consider the following map of Iceland which has 5 x 5
tiles:-
The map has been opened in Google™ Earth from the "File/Open" menu item and the 25
individual map tiles have been expanded in the "Places" pane by clicking on the "+"
symbol:-
Appendix C - Removing unnecessary tiles with Google™ Earth
C.1
KMZFactory v1.11 User Manual 22nd July 2014
Individual tiles may be identified by deselecting their tick mark to make them invisible.
Here, three tiles have been deselected which just show the ocean:-
Once they have been identified in this
way the individual tiles can be deleted
by right-clicking on each tile and
selecting "Delete":-
Appendix C - Removing unnecessary tiles with Google™ Earth
C.2
KMZFactory v1.11 User Manual 22nd July 2014
After all three unnecessary ocean-only tiles have been deleted, the modified overlay
should be saved from Google™ Earth by right-clicking the main overlay in the "Places"
panel and selecting "Save Place As…":-
Appendix C - Removing unnecessary tiles with Google™ Earth
C.3