1
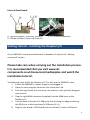
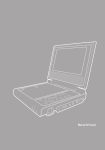
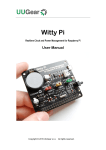
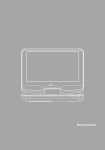
MEDIAPI+ User Manual Version 1.2 / 2015-05-14 Website: www.sb-components.co.uk Contact: [email protected] / +44 2035140914 MEDIAPI+ is a trademark of SB Components Ltd Raspberry Pi is a trademark of the Raspberry Pi Foundation 1 Welcome Congratulations on buying an SB Components MEDIAPI+. We hope you will find the case a perfect accompaniment for the Raspberry Pi model B+ and Pi 2. The MEDIAPI+ encloses and extends the basic connectivity of the Raspberry Pi 2 (and B+). Once installed the case provides 6 USB ports an IR receiver and power for an internal HDD. The primary design aim for the MEDIAPI+ is to turn the Raspberry Pi into a consumer friendly set-top box or lightweight desktop machine. For the best user experience it is recommended that an SB Components’ prepared microSD card is used which will include all the required configuration for supporting the SB Components’ MEDIA Remote. For an electronic guide to using the MEDIAPI+ along with troubleshooting tips and links to video tutorials visit www.sb-components.co.uk/products/mediapiplus. For the latest details about this and other SB Components' products please visit www.sb-components.co.uk/blog Note: When this guide refers to operation of the MEDIAPI+ it is referring to a MEDIAPI+ case with a functioning Raspberry Pi B+/Pi 2 installed. For information regarding connectivity, compatible accessories and general operation of the Raspberry Pi please visit: www.raspberrypi.org 2 Safety Information To reduce the risk of electrocution do not operate the MEDIAPI+ with the case open Do not use the MEDIAPI+ or any component of the MEDIAPI+ near water Do not block any ventilation openings Do not install near any heat sources such as radiators Protect the power cord from damage Unplug the MEDIAPI+ during thunder storms or when switched off for extended periods What’s in the box 1 x MEDIAPI+ case 1x SB Media Remote (requires 2x AAA batteries – not included) 1 x Power supply 1 x rigid HDMI connector 1 x rigid 4 pole A/V jack connector 4 x mounting screws 2 x case screws 2 x HDD mounting ties 1x 8 Gb Class 10 microSD card pre-loaded with XBMC* *Note the microSD card is an optional extra and may not be included in your purchase. 3 Case over view External Front Panel A: Double USB port. Note: these are “pass-through” ports directly from the Pi (i.e. not separately powered). B: IR receiver. Note: The red light is the power indicator not an IR signal indicator. External Rear Panel A: Power switch B: Power in C: HDMI 1.4 D: 4 pole A/V jack E: 1 x USB port F: 2 x USB port G: LAN Internal rear board A: USB port (upper). Output for HDD B: USB port (lower). Input only from (Pi). C: LAN D: 4 pole A/V E: HDMI1.4 F: USB power 4 Internal front board G: USB port (upper). Input only (from Pi) H: USB port (lower). Input only (from Pi) I, J, K: IR GPIO connectors Getting started – Installing the Raspberry Pi If your MEDIAPI+ comes preinstalled with a Raspberry Pi skip to the "Getting connected" section. Please take care when carrying out the installation process. It is recommended that you visit www.sbcomponents.co.uk/resources/mediapiplus and watch the installation tutorial. The following steps will fit the Raspberry Pi 2 (or B+) into the MEDIAPI+ case: 1. Ensure the MEDIAPI+’s power supply is not plugged in. 2. Open the case using the tab at the rear of the case’s lid. 3. Push the rigid 4 pole A/V connector into position in the specially designed case mounts. 4. Plug the rigid HDMI connector (supplied) into the HDMI port on the Raspberry Pi 5. Connect each of the two Pi’s USB ports that sit along the edge containing the GPIO pins to the front board’s USB ports (G, H). 6. Plug the rear board’s USB lead (B) into one of the Pi’s centre USB ports. 5 7. 8. 9. 10. 11. 12. 13. Connect the network cable into the Pi’s LAN socket Ease the board down into the case positioning the rigid HDMI connector into its clips and lining up the A/V connector with the Pi’s A/V socket. Plug the cases’ inner USB power connector (F) into the Raspberry Pi’s micro USB socket. Gently but firmly push the Pi toward the back of the case ensuring that the A/V jack and the HDMI connector are both correctly aligned. Use the supplied 4 mounting screws to secure the Raspberry Pi in place. Insert the micro SD card into the Pi’s SD card slot using the case’s SD card raised guide. Attach the IR receiver GPIO connectors to the appropriate GPIO pins: a. For the B+ (left to right: 12, 6, 1) b. For the Pi 2 (left to right: 12, 6, 2) Note: For the IR to work with the Pi 2 you must connect the wire labelled GPIO 1. To the GPIO 2 pin (5v). 6 Once installed the Pi and MEDIAPI+ case should like: 14. Replace the case lid and insert retaining screws (if required). 15. Connect the MEDIAPI+ as required (see “Getting connected” below) 16. Switch on the MEDIAPI+. Getting connected To connect the MEDIAPI+ to your local network and/or the internet you can use a wired or wireless connection: Using a wired connection (recommended) Connect a CAT5 network cable (not included) to the LAN port of the MEDIAPI+ and to an available LAN port on your broadband router. 7 Using a wireless connection Alternatively you can use a wireless USB dongle in one of the MEDIAPI+’s available USB ports. For information about compatible wireless dongles please visit: www.raspberrypi.org Note: For fastest internet access a wired connection is recommended. Connecting to a display You can connect the MEDIAPI+ to a display by connecting an HDMI cable (not supplied) from the HDMI OUT jack on the rear panel to the HDMI IN jack of your television/monitor. Alternatively you can use a composite audio/video cable (not included) in conjunction with the 3.5mm 4-pole jack to connect the MEDIAPI+ to a display and speaker system. Note: If using a television be sure to change the input source for your display as appropriate. Installing a USB HDD The MEDIAPI+ is designed to support a USB powered HDD within the case. This should be connected to the rear board’s USB port (A – Upper). Cable ties are included to secure the HDD via two loops built into the bottom of the case. Note: Space limitations require that care is taken when routing cables from the HDD. Always be sure no loose connectors are left unsecured within the case. 8 Once installed the Pi and MEDIAPI+ case should like: Controlling your MEDIAPI+ The simplest way to control the MEDIAPI+ is via the supplied SB Components’ Media Remote in conjunction with a correctly configured version of XBMC. If you wish to use your own specifically configured software you can still use the remote by applying the correct mapping codes. For details of the remote codes and the mapping file required please visit www.sbc-mediapi.co.uk. 9 Alternatively you can plug in a USB keyboard and mouse (not included) into available USB ports at the rear of the MEDIAPI+. Note: The SB Components’ MEDIA remote requires 2x AAA batteries. These are not included with the MEDIAPI+. Starting to use your MEDIAPI+ 1. 2. 3. 4. 5. Insert an SD card into the Raspberry Pi formatted with your preferred operating system. For a list of available operating systems please visit www.raspberrypi.org Connect the MEDIAPI+ to a monitor or TV If required connect the MEDIAPI+ to the your local network/internet Connect input devices (mouse/keyboard) as required Plug in the power adaptor to your MEDIAPI+ and connect it to the mains. Use the power switch to turn on the Raspberry Pi. Technical Specifications Power source USB ports Video Out Audio In Dimensions 5V 3000mA 9 USB ports: 3 x input USB ports (accepting power/data from an installed Raspberry Pi); 6 x output USB ports. HDMI 1.4 HDMI resolutions from 640×350 to 1920×1200. Composite video (PAL and NTSC) via 3.5 mm TRRS jack shared with audio out). Analogue via 3.5 mm phone jack; digital via HDMI. W: 19.7cm; L: 21cm; H: 3.3cm – 4.1cm 10 Warranty This SB Components product is warranted for the period of twelve (12) months from the original date of purchase, against defective materials and workmanship. In the event that warranty service is required you should return the product to the retailer from whom it was purchased. For more information and to register your purchase please visit www.sbcomponents.co.uk/products/mediapiplus. About us SB Components is a specialist manufacturer of protective cases for single board computers and microcontroller boards. Our designers are experts in producing robust, functional and elegant cases that protect and augment technology platforms. In addition to the standard products listed in this catalogue SB Components will undertake bespoke case projects. These can range from the addition of logos, or changes in colour/material of existing cases to the creation of completely bespoke engineered-from-scratch projects For more information please contact us: Tel: +44 2035140914 Email: [email protected] 11