1
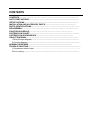
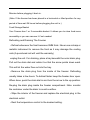
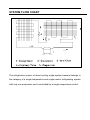
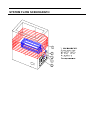
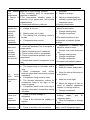
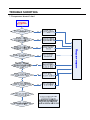
CAUTION
READ THIS MANUAL CAREFULLY TO
DIAGNOSE TROUBLE CORRECTLY
BEFORE OFFERING SERVICE .
Chest Freezer
SERVICE MANUAL
MODEL: BD-103GC
Features:
1.Deep and quick freezing.
2. Square cabinet and square lid.
3. Mechanical temperature control with power indicator.
4. High pressure foam cover for efficient Temperature preservation.
5. Eximious water disposal device.
6. Wide climate zone design.
Haier Group
CONTENTS
CONTENTS……………………………………………………………………………………..
SAFTY PRECAUTIONS……………………………………………………………………….
SPECIFICATIONS………………………………………………………………………………
INATALLATION AND ACCESSORY PARTS……………………………………………
PARTS IDENTIFICATIONS…………………………………………………………………….
DISASSEMBLY…………………………………………………………………………………
FUNCTION SCHEDULE………………………………………………………………
SYSTEM FLOW CHART………………………………………………………………………..
SYSTEM FLOW SCENOGRAPH…………………………………………………….
CIRCUIT DIAGRAM……………………………………………………………………………
1.Brief principle diagram……………………………………………………………………
2.Connect diagram…………………………………………………………………………..
NORMAL PROBLEMS ………………………………………………………………
TROUBLE SHOOTING…………………………………………………………………………...
1.Compressor doesn’t start…………………………………………………………………..
2.Poor cooling………………………………………………………………………………..
SAFTY RECAUTIONS
Read all of the instructions before using this appliance. When using this
appliance, always exercise basic safety precautions, including the
following:
1. Use this appliance only for its intended purpose as described in this
uses and care guide.
2. This freezer must be properly installed in accordance with the
installation section. Instructions before it is used, See grounding
instructions in the installation section.
3. Never unplug your freezer by puling on the power cord, Always
grasp the plug firmly and pull straight out from the outlet.
4. Repair or replace immediately, all electric service cords that have
become frayed or otherwise damaged, Do not use a cord that shows
cracks or abrasion damage along its length, the plug or the
connector end.
5. Unplug your freezer before cleaning or before making any repairs,
Note: If for any reason this product requires service, we strongly,
recommend that a certified technician perform the service.
6. If your old freezer is not being used, we recommend that you remove
the door and leave the shelves in place; this will reduce the
possibility of danger to children.
7. This freezer should not be recessed or built-in an enclosed
Cabinet. It is designed for freestanding installation only
8. Do not operate your freezer in the presence of explosive fumes.
9. Do not refreeze foods, which have been thawed completely.
9. Do not use any electrical device or any sharp instrument in
defrosting your freezer.
10.
WARNING :
Keep ventilation
Openings,in the appliance enclosure or in
the built-in structure,clear of obstruction.
WARNING :
Do not use mechanical devices or other means to accelerate
the defrosting process other than those reconnended by the manufacturer
WARNING :
WARNING :
Do not damage the refregerant circuit
Do not use electrical appliances inside the food storage
compartments of the appliance, unless they are of the type recommended by
the manufacturer
SPECIFICATIONS
CHEST
FREEZERS
Superfast freeze function.
Adjustable temperature control with power
indicator.
High pressure and microbiological foam filled
door for energy conservation.
convenient water drain.
Hi-temp indicator.
castors.
External controls.
0%HFC, 0%CFC.
Comply with RoHS.
New!!!
Type Model
BD-103GC
Commercial brand
Haier
Product description
Chest Freezer
Type of appliance
(FS=free standing / BI= built-in)
FS
Energy efficiency class
C
Climate class
ST
(N=16-32℃ ST=16-38℃ T=18-43℃)
Freezer star rating
*/***
Approvals (VDE / TÜV / IMQ / NF / ÖVE / DEMKO etc.)
CE/GS
Certifications
-
Key features
Gross capacity
l
104
Total net capacity
l
103
kg/24h
9
kWh/year
240
h
13
Freezing capacity(kg/24h)
Energy consumption/year
Max storage time at breackdown
Defrosting
(Manual-Automatic)
Manual
Kind of coolant
(R134a/R600a)
R600a
Foaming components
(R141b/C-P)
C-P
Technical data
Voltage / frequency
V/Hz
220-240~ / 50
Input power / currency
W /A
75/0.8
Lenght of cable / incl. plug
cm
150/155
Temperature range
°C
≤ -18
(from>to)
DIN 8950 resp. 8953
-
Energy consumption / year
kWh/year
240
Energy consumption (EN153) per 24 h
kWh/24 h
0.66
Cooling system:
Maximum noise level
(K=Compressor / A=Absorbtion)
K
dB(A)
45
Aesthetics
Door
Flat
Chest
straight edges
Colours:
Cabinet
white
Top
white
Door glass
-
Door frame
white
Fascia panel / Handle
(w/b/g/s)
Inside door/-drawers
(W=white
white/white(pocket)
T=transparent)
-/-
Equipment & accessories
Product classification
(Super eco/Eco/Standard)
Lid
(Number/Handle/Lock)
Type of lid
Inside walls
Standard
1/●(pocket)/-
(Hinge/Counter balanced/Sliding)
Hinge(plastic )
(Stainless steel/Aluminium/Synthethic
Aluminium
mat.)
Insulation
Lid thikness
Walls thikness
Baskets number
cm
7
cm
6.5
n°
1 (metal)
Defrost drain
●
Interior light
-
Calendar
●
Adjustable thermostat
Fast freeze lamp
Breakdown light
●
(yellow)
On light
●
(green)
●
(red)
●
Fast freeze switch
Freezer temperature warning indicator (LED / by sound)
-
Thermometer
-
(Outside / In partition)
Maximum loading level marking
Adjustable feet
Mobility wheels
-
(front / rear)
(front / rear)
n°
n°
Flush back skin evaporator
-(unable adjustable
feet)
-
Product net dimensions
cm
84.5/57/55
Height with open lid
cm
134.5
Net weight
kg
31
cm
89/62.5/58.5
Gross weight
kg
34
20 ' container load
pcs
76
40 ' container load
pcs
152
40 ' High cube container load
pcs
227
Unit dimensions
(H / W / D)
Packing dimensions & loadability
Packing dimensions
(H / W / D)
INATALLATION AND ACCESSORY PARTS
Unpacking Your Freezer
1.Remove all packaging material; this includes the foam base and all
adhesive tape holding the freezer accessories inside and outside.
2.Inspect and remove any remains of packing, tape or printed materials
before powering on the freezer.
Adjusting Your Freezer
1.Your freezer is designed for freestanding installation only. It should not be
recessed or built-in.
2.Place the freezer on a floor strong enough to support it fully loaded.
3.When moving the freezer, never tilt it more than a 45-degree angle. This
could damage the compressor and the sealed system.
4.If the freezer is tilted let it stand in an upright position for at least 24 hours
prior to plugging. This is to allow the refrigerant to settle.
·Proper Air Circulation
z To assure your freezer works at the maximum efficiency it was designed
for, you should install it in a location where there is proper air circulation,
z Plumbing and electrical connections.
z The following are recommended clearances around the freezer:
Sides…………..2”(50mm)
Top. ……………2”(50mm)
Back…………..2”(50mm)
z Do not over fill freezer for proper internal air circulation.
Electrical Requirement
z Make sure there is a suitable power Outlet
with proper grounding to
power the freezer.
z Avoid the use of cutting off the third grounding , this is a dangerous
practice since it provides no effective grounding for the freezer and may
result in shock hazard.
Install Limitations
z Do not install your freezer in any location not properly insulated or heated
e.g. garage etc,
z
Select a suitable location for the freezer on a hard even surfaces away
from direct sunlight or heat source e.g. radiators, baseboard heaters,
cooking appliances etc, Any floor unevenness should be corrected.
Operating Your Freezer
Once the freezer is in its proper place, plug it in an electrical outlet having
230 volts.
Set the temperature, on the temperature contrail knob.”min”being the
warmest and “max”being the coldest. Initially set the temperature
on”medium”. Place food inside the freezer
After using the freezer for 24
hours set the freezer to your desired setting.
In case you unplug your freezer or experience an electrical outage, allow 5
Minutes before plugging it back in.
(Note: If the freezer has been placed in a horizontal or tilted position for any
period of time wait 24 hours before plugging the unit in.)
Food Storage Basket
Your Freezer has 1 or 2 removable basket. It allows you to store food more
accessibly or you can remove it if not needed.
Defrosting and Draining The Freezer
·Defrost whenever the frost becomes 5MM thick. Never use a sharp or
metallic instrument to remove the frost as it may damage the cooling
coils.(A punctured coil will void the warranty)
·unplug the unit. For draining, place a tray beneath the outer drain plug.
Pull out the drain dial and rotate it so that the arrow points down ward.
This will let the water flow out into the tray.
·Remove the drain plug from the inside of the freezer. Defrosting
usually takes a few hours. To defrost faster keep the freezer door open.
When done, push the drain dial in and turn the arrow to the up position.
Re-plug the drain plug inside the freezer compartment. Note: monitor
the container under the drain to avoid overflow.
·Wipe the interior of the freezer and replace the electrical plug in the
electrical outlet.
·Rest the temperature control to the desired setting.
PARTS IDENTIFICATIONS
DISASSEMBLY
①Assembly and disassembly should be done after the plug is pull out
of the socket
②It should be down as instructed in the Explosive Review.
③Disassemble the Compartment grill: With the crossed
screwdriver to turn the screw in a anticlockwise manner, it could be
disassembled easily.
④Disassemble the compressor cover: With the crossed
screwdriver to turn the screw in an anticlockwise manner, and take
it out from the lower left to the upper right.
⑤Disassemble the control panel: stretch your arm into the
compartment, push the connector inside, when the clip falls off the
cabinet, take off the control panel and the connective wire cord with
an acutilingual plier.
⑥Disassemble the thermostat: take off the knob of the thermostat,
and turn the nut anticlockwise with a pinchers or clamp ,then it
could be moved.
⑦Disassemble the hinge assembly and the hinge cover: screw off
the two screws on the hinge cover, take away the cover, then screw
off the eight screws on the bottom hinge, so the whole hinge could
be moved.
⑧Move away the compressor: First take off the compressor cover,
and the wire cord. Open the pipe with the plier to let out the coolant,
then pull out the discharge and the suction
after heated by
gas jointing.
⑨Disassemble the compressor sole plate: turn off the four screws
of the compressor sole plate with a cross screw anticlockwise, then
take away the plate from the sideway.
Function Schedule
Adjustable temperature dial:
Your freezer will automatically maintain the temperature level you
select. The temperature level you select.
Min is the warmest,
Max is the coldest.
We recommend a medium setting
Do not adjust your freezer
frequently
green = CONTROL
The green control light must always be on when the is very
important to pay attention to this, because in the appliance is
connected to the mains and switched on. It event of a power failure,
the red and yellow lights stop operating and do no longer provide a
warning.
red = ALARM
If the red indicator-light goes on, there may be several reasons for this,
namely:
First start-up of appliance
fresh food
Restart after defrosting
Filling freezer with
In these cases it is normal that the red indicator-light goes on. It
goes off automatically when the interior temperature reaches approximately
–15°C.
yellow = SUPER FREEZE SWITCH
The compressor continues cooling until the SUPER FREEZE switch is
turned off again.
SYSTEM FLOW CHART
The refrigeration system of direct cooling single-system freezers belongs to
the category of a single-temperature and single-control refrigerating system
with only one evaporator and is controlled by a single temperature control.
SYSTEM FLOW SCENOGRAPH
CIRCUIT DIAGRAM
1. Brief principle diagram
Brief description of principle about Thermostat:
When the temperature in the freezer is higher and reaches the
value for starting the machine, the thermostat will be closed, the
compressor will run; When the temperature in the freezer is lower
and reaches the value for closing the machine, the thermostat will
be open, thus the compressor will be stop running.
CIRCUIT DIAGRAM
2. Connect diagram
Red light
Thermostat
Green light
compressor
Notice: BN-brown BU-Blue BK-Black
GNYE-Kelly RED-Red
Yellow light
Normal problems
Problems
Reasons
1. Fuse is broken
2. The contact of plug, socket, and cable
is not good. Cable broken.
3. The voltage is too low, 10-15% less
than rated voltage
4. The knob of temperature controller is at
“rest” position.
Compressor
5. The temperature controller is out of
can not be order.
started
6. Starting relay or thermal protection unit
is out of order or broken.
7. Wire broken of motor starting coil or
operation coil.
Compressor
starts
too
frequent,
operation
time too long,
but
temperature
drop
in
freezer is too
slow
Compressor
Removing methods
1. Check if there is short circuit
and solve it, if not, change
capable fuse
2. Check and connect tightly, or
change.
3. Use till voltage rises to rated
value or attach a stabilizer.
4. Rotate the knob to wanted
position for suitable temperature.
5. Change the controller.
6. Change starting relay or
thermal protection unit.
7. Measure using R×1 position
of avometer, if there is wire
8. The compressor motor is burned or
broken, change compressor.
rotator and stator are blocked to dead.
8. Change compressor.
9. There is leakage of high-pressure gas
valve or the shaft is embraced to dead.
9. Change compressor.
1 Adjust and make it close to
1. The distance between temperatures
evaporator cover.
sensing tube of temp. Controller and
evaporator are too big.
2.Change the temperature
2. The temperature controller is out of
controller.
order.
3.Reduce them.
3. Food stuffs in the freezer too much,
door opens too frequent and open time
too long.
4.Put the freezer to suitable place
4. The environment temperature is too
and make air circulate well.
high, humidity too high, airflow is
impeded.
5.Remove frost regularly.
5. The frost layer at the evaporator is too
thick.
6.Check or supplement
6. The refrigerant is insufficient or
refrigerant.
leakage.
7. Compressor efficiency is reduced.
7.Change compressor.
8. The drying filter is blocked.
8.Change new drying filter.
1.The knob of temperature controller has 1. Change the position to
runs without
stop,
temperature
in freezer is
too low
Compressor
buzzes and
cannot be
started,
thermal
protection
unit jump
repeatedly.
After short
time of
operation,
over load
protection
unit cuts off
Too
much
noise when
compressor
runs
There is no
frost at
evaporator
Frost
at
evaporator is
been set to “over cooling” position.
moderate.
2.The contacting point of temperature 2. Repair or change.
controller is adhered.
3.The temperature sensing probe of 3. Adjust to suitable position,
controller is not placed well, and causes
normally contact tightly with
maladjustment
evaporator cover.
4.Compressor efficiency reduced.
4.Change compressor.
1. Supplement
a
stabilizer,
1. Voltage is too low.
adjust to rated value.
2. Change starting relay.
2. Starting relay out of order.
3. Change compressor.
3. The starting coil of starting motor is
broken.
4.The shaft and piston in the
4. Compressor does not run.
compressor is blocked, please
change.
1. The voltage is too high.
1. Supplement a stabilizer and
2. Over load protection unit is not good, it
adjust its value to rated.
jumps earlier.
2. Change over load protection
3. Starter contacting point is adhered.
unit.
4. There is short circuit in compressor.
3. Change starting relay.
5. There is mechanical problem in the
4. Change compressor.
compressor.
5. Change compressor.
6. Temperature around compressor is too
6.Increase heat radiation space.
high.
1. The floor is loose.
1. Reinforce the floor.
2. The freezer body is not stable and in
2. Make the freezer body stable.
level.
3. When compressor runs, friction
3. Move the tube a little away to
between tubes and freezer body causes
avoid friction.
resonance.
4. Compressor fixing screw is loose.
4. Make the screw tight.
5. The vibration absorption cushion for
compressor fixing is too tight, or too
5. Adjust the degree of tight or
loose or ageing.
loose of vibration absorption
6. Compressor inside noise is too big or
cushion, or change cushion.
vibration absorption suspending spring
6. Change compressor.
is broken.
1. Check
leakage,
make
1. There is serious leakage of
welding
repair,
and
fill
refrigerant.
refrigerant again.
2. There is dirt blocked the capillary or
2. Clean the capillary or change
system.
filter.
1. There is some leakage of refrigerant. 1. Check leakage, make welding
2. There is dirt block, but not serious.
repair, and fill refrigerant again.
not full
3. Refrigeration quantity of compressor
is reduced.
Evaporator
frosts too
rapid, frost
1. Food put into freezer contains water.
layer too thick 2. Too much food has been stored.
or frozen to
ice
Electricity
leakage
of
freezer body,
you will feel
tingle when
touching by
hand
Electricity
leakage
fan
of
Fan too noisy
The
fan
doesn’t run
Electricity
leakage
of
temperature
controller
Temperature
controller out
of order
2Clean the capillary and filter.
3.Change compressor.
1. Please let or make food dry
after cleaning, then store it.
2. Store only corrects quantity of
food.
1. Make the ground connection
as stipulated.
2. Change compressor.
3. Check carefully step by step, if
insulation is seriously damaged,
please change; remove wet parts
and put them into drying box to
make them dry.
1. Environment temperature too high or 1. Change fan.
insulation ability of insulator is dropped.
2. There is short circuit between fan coils
or the fan coil is burned.
2.Change fan.
1. The blade of fan is blocked or fan 1. Clear obstacles around the
supporter is loose.
fan or tighten the supporter.
2. The clearance of fan axle is too big.
2. Change the fan.
1. Change the fan.
1. Check if any connection has come off.
2. Check is the fan is burned.
2. Change the fan.
1. Change
temperature
1. The service time is too long.
controller.
2. Use brush to remove dust.
2. The environment is too dirty.
3. Make the temperature dry
3. Humidity is too high.
and control the environment
humidity.
1. There is leakage of temperature
sensing medium.
Change temperature controller.
2. Damage of cam of contacting point
spring, etc.
1. Freezer body has not been connected
to the ground.
2. The compressor terminal contacts body
shell and causes short circuit.
3. When the components of electrical
system get wet, insulation ability is
dropped, electricity leaks.
The probe of
temperature
sensing tube
It has not been mounted to position or
doesn’t
Mount it again.
changed during transportation.
contact
evaporator
well
TROUBLE SHOOTING
1.Compressor doesn’t start
TROUBLE SHOOTING
2. Poor cooling
Poor cooling
Check the diaplay temperature
nomber whether it is setted at 18°C
N
Change to lower
Y
Whether the rear side and the top is
too close to the wall
Y
Whether the cellar is under
sunlight directly
Avoid these
matters which
will affect heat
radiation of
condenser and
reduce
refrigeration
ability
N
Y
Whether the cellar is near thermal
source
N
Y
Whether the room temperature is
too hoot or not
Frequent opening and extended
opening of glass door will reduce
refrigeration ability
Y
Whether the condenser is blocked
by cloth pieces or paper or dirt or
not
Y
Whether the glass door has been
closed well
N
Y
Whether the glass door door seal
bar is too dirty or sealed well
N
Remove dirt and put on a little
talcum power


![Atari MegaST Service Manual [undated]](http://vs1.manualzilla.com/store/data/006024641_1-2bcf539c2a5a062bcc4bb84267501231-150x150.png)