1
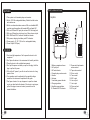
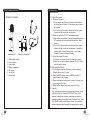
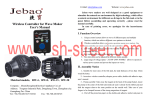
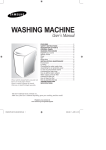
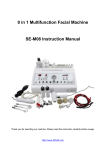
MEGAMOUTH
USER'S MANUAL
FEATURES
1. This system is with cassette player and recorder.
2. Built-in 12V2.2A rechargeable battery. Suitable for both indoor
and outdoor use.
3. Built-in one channel wireless receiver. With one handheld MIC,
one body pack transmitter with headset MIC and lapel MIC.
4. With one 6.35mm MIC input jack and one RCA line input jack.
5. With one 6.35mm line out jack and one 3.5mm phone out jack.
6. With TONE and ECHO controls. Suitable for karaoke.
7. With power, charging, low battery and RF indicators.
8. Power supply : AC, DC 12V, built-in rechargeable battery.
9. Power Output: 30W(max)
PARTS DESCRIPTION
Amplifier
5
6
7
8
9
10
11
12
13
14
4
3
MIC
LINE OUT
CAUTION
1. Free from high temperature. Don't expose the device to hot
equipment.
2. Don't place the device in the environment of humidity and dirts.
3. Place the device in the ventilated environment.
4. Don't pull the power cord while you pull out the plug. Hold the
plug to pull out Ac power.
5. Pull out the AC power if you will not use the device for a long
period of time.
6. Your operation must be subjected to the specified voltage
marked on the device and complied with this guide.
7. Don't open chassis: it is very dangerous to open the chassis
or put your hand inside the chassis. If the device is not proper,
pull out the plug at once and contact your retailer or the
nearest distributor.
1
LINEIN
2
PHONE
+
DC 12V
15
16
17
18
19
1
1. Battery compartment/cover
2. AC input jack
3. AF level indicator
4. Cassette player and recorder
5. Handle
6. Antenna
7. Low battery power indicator
8. Charging indicator
9. Amplifier power indicator
10. Wireless MIC RF indicator
11.Power switch and master
volume control
12. Tape volume control
13. Echo control
14. Tone control
15. MIC in jack
16. Line out jack
17. Line in jack
18. Phone out jack
19. DC in jack
2
PARTS DESCRIPTION
OPERATION
1. Confirm the power:
Wireless Transmitter
6
1
23
2
3
5
4
7
4
Handheld MIC
1.
2.
3.
4.
5.
6.
7.
3
Body pack transmitter
Grille(capsule inside)
Power indicator
Power switch
Battery compartment
MIC in jack
Tie clip MIC
Headset MIC
A. When use AC power:
1) Please confirm the AC power is same as that marked on
the device(Near AC in jack). Or the device may not work or
be damaged.
2) Turn on the volume control in clockwise direction, power
indicator will light to indicate normal power.
B. When use the built-in DC 12V rechargeable battery:
1) Open battery compartment. Connect rechargeable battery to
DC connector with correct polarity(Red means +, Black
means -).
2) Turn on the volume control in clockwise direction, power
indicator will light to indicate normal power. If low battery
indicator lights, it means battery power is low. Please
connect AC power to charge the battery.
C. When use external DC power:
1) DC power can be input into by DC power jack directly.
2) When use car battery, voltage should be 12V-15V. Please
note the correct polarity.
2. Recharging the battery:
A. Plug the power cable into AC power jack for recharging.
Charging time is about 10 hours.
B. When CHARGE indicator turns to GREEN from RED, it
means battery is fully charged.
C. Please recharge the battery every 2 months if you don't use
it for a long period of time.
D. Battery will be charged either main power is off or on
3. Tape play:
Turn on the power/volume control in clockwise direction, power
indicator will light red. Press the STOP/EJECT key on the
cassette. Cassette door will open. Insert tape and close the
cassette by pushing the top right corner of cassette door. Press
PLAY/PAUSE button to start playing of tape. The signal level
indicator shows the signal strength. Use power/volume control
4
OPERATION
And TAPE volume control to adjust the volume. Adjust tone
control to achieve the best sound quality.
4. Tape record:
Open the cassette door and insert a blank tape. Press the
REC key and PLAY key simultaneously to start recording.
Signal from wireless microphone, MIC in jack and Line in jack
can be recorded.
5. Wireless Microphone:
A. Insert a 9V battery into the wireless transmitter. Turn on
transmitter power switch, power LED indicator will flash
Once then off.
NOTE: When transmitter power indicator lights red, it
means the transmitter battery power is low. Please
replace with new battery.
B. RF indicator on amplifier will light.
C. Extend the antenna on the top of amplifier fully.
D. Adjust amplifier volume, tone, echo control to a suitable
level.
E. Keep transmitter at least 1m from speaker of main unit to
avoid feedback. If feedback happens, lower the volume and
move transmitter away from main unit.
6. Wired Microphone:
Plug wired microphone into MIC input jack. Keep MIC head
away from the speaker of main unit to avoid feedback.
7. External audio source:
You can play other audio device by connecting output of
other audio source to line input jack.
8. Line out:
Connect line out to external amplifier to amplify the sound.
9. Phone out: Connect phone out to earphone.
5
SPECIFICATIONS
AMPLIFIER
AMPLIFIER
Receiving Mode:
Output Impedance:
Frequency Range:
S/N Ratio:
Stability for frequency:
Power Output:
Effective Distance:
Power supply:
VHF
600
173~175MHz
60dB
+/-0.005%(-20 ~40 )
30W(MAX)
50M (open field)
AC 230V 50Hz;DC 12V-15V
TRANSMITTER
Frequency range:
Dynamic range:
Frequency Response:
Working Temperature:
Battery Voltage
Battery Life
VHF 173~175MHz
80dB
100-10KHz
-20 ~40
9V battery
about 10 hours
6