1
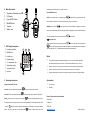
User's Manual
Mini Humidity & Temperature Meter 13/483/0
4. Safety
Read the following safety information carefully before attempting to operate this meter.
Use the meter only as specified in this manual; otherwise, the readings provided by the meter may be
impaired.
Suitable conditions for use:
Altitude up to 2000 metres
Storage and operating conditions: -20 to 60℃, RH≤90%(Non-Condensing)
EMC compliant (IEC61672-1 Class 2)
5. Specifications
Measuring
Accuracy
Resolution
Range
20%~40%RH : ±3.0%
Humidity
40%~60%RH: ±2.5%
0%~100%RH
Please read this user manual thoroughly before use
and keep it safe for future reference.
60%~80%RH: ±3.0%
0.1%RH
0%~20%RH
80%~100%RH: ±3.5%
-30℃~-10℃&F:
1. General Description
Temperature
-30℃~70℃
-22℉~158℉
and Safety Engineers, Industrial Safety Officers in a variety of industrial environments such as factories,
Response time
1 second
schools, kitchens, garages and construction sites.
Sampling rate
2 times per second
Working Temp.
-30℃to 60℃
Power Resource
9V battery
• Provides continuous readings of temperature and humidity.
Dimension(L*W*H)
165* 55* 38mm
• Stores Maximum and Minimum readings
Weight
88g
• Hold function
3. Basic User Maintenance
This device contains no user serviceable parts and repairs should only be performed by qualified
personnel. Clean by wiping the unit with a soft dry cloth, do not use abrasives or solvents on this
instruments. The battery will need to be replaced periodically, see section 10.
-10℃~70℃&F:
±0.5℃&F
This Temperature and Humidity Meter is designed to provide simple, accurate measurements for Health
2. Features
±1.0℃&F
0.1℃
6. Meter Description
automatically turn off after approx. 30 seconds of inactivity.
①
Temperature & Humidity sensor
Hold & MAX/MIN Function
②
LCD display
HOLD: After turning the meter on, momentarily press "
③
Power ON/OFF button
④
MAX/MIN button
⑤
Tripod nut
⑥
Battery cover
" button "HOLD" icon will appear on the LCD,
which indicates the data is frozen. To release the held reading, press the button again.
MAX/MIN: Press and hold "
" button for at least 3 seconds until "MAX" icon appears on the LCD to
view the current MAX reading; press the button again, "MIN" icon will appear to view the current MIN reading.
To exit the MAX/MIN mode, press and hold the button "
℃/℉ temperature units
While the meter is switched off, continuously press the
7. LCD Display Description
①
Low battery indication
②
MAX/MIN icon
③
Humidity icon
④
Humidity reading
⑤
℃/℉ temperature units
⑥
Auto power off icon
⑧
Hold icon
units will change from °C to °F. Release both buttons before the meter switches off.
Notes
①
②
Repairs or servicing not covered in this manual should only be performed by qualified personnel.
③
Wipe the unit with a dry soft cloth. Do not use abrasives or solvents on this instrument.
④
Remove the battery when the meter is to be stored for long periods of time to avoid battery leakage.
Accessories
Backlit & Power ON/OFF Function
Power OFF: Press and hold the power button"
This meter has already been calibrated before delivery. Do not revise the calibration parameters
without professional personnel and device. The recommended calibration period is one year.
8. Operating Instructions
Power ON:Press and release the power button"
button and then also continuously press the
button. Keep holding both buttons until the LCD displays the current readings and the temperature
Temperature reading
⑦
" for 3 seconds.
①
User's manual
②
9V battery
" and the LCD screen will be activated.
" for approximately 3 secs until the LCD switches off.
Brannan Thermometers & Instrumentation
Backlit:When the meter is on, press the power button "
", again and the backlight will be switch on.
Cleator Moor
Pressing the power button again will switch it off, but it will automatically turn off after approximately 30 secs
Cumbria, UK
of inactivity.
CA25 5QE
Auto power off icon, the meter will automatically turn off after approx. 15 minutes of inactivity.
Backlit: After turning the meter on, momentarily press "
" button, the backlit will be on/off, it will
www.brannan.co.uk
BRAN.2015.Rev.0