1
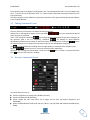
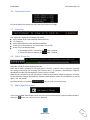
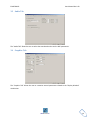
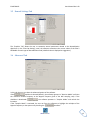
ELAD FDM-SW1
USER MANUAL
Ver. 1.0
ELAD FDM-S1
User Manual Rev 1.00
Index
1
FDM-SW1 Overview .............................................................................................................................. 4
2
Graphical User Interface (GUI) .............................................................................................................. 5
2.1
3
Display Window ............................................................................................................................ 6
2.1.1
Filter Spectrum ...................................................................................................................... 6
2.1.2
Click Options ......................................................................................................................... 7
2.1.3
Graphics Settings................................................................................................................... 7
2.1.4
Marker on screen .................................................................................................................. 7
2.1.5
Layout.................................................................................................................................... 7
2.1.6
Set/Reset Reference ............................................................................................................. 8
2.1.7
Frequency Calibration ........................................................................................................... 8
2.2
Tuning Bars.................................................................................................................................... 8
2.3
Tuning Commands Panel .............................................................................................................. 9
2.4
Receiver Commands Panel............................................................................................................ 9
2.5
DRM Info Panel ........................................................................................................................... 10
2.6
System Info Panel........................................................................................................................ 11
2.7
Status Bar .................................................................................................................................... 11
2.8
Player/Recorder .......................................................................................................................... 11
2.9
Audio/Squelch Control ................................................................................................................ 11
2.10
Signal Control Display ................................................................................................................. 12
2.11
Main Setting Buttons .................................................................................................................. 12
Setup Form .......................................................................................................................................... 12
3.1
Tuning Step Tab .......................................................................................................................... 13
3.2
Tuning Bar Tab ............................................................................................................................ 13
3.3
Audio Tab .................................................................................................................................... 14
3.4
Graphics Tab ............................................................................................................................... 14
3.5
Demod Settings Tab .................................................................................................................... 15
3.6
Advanced Tab.............................................................................................................................. 15
3.6.1
CAT ...................................................................................................................................... 16
3.6.2
Tmate .................................................................................................................................. 16
3.6.3
Panadapter .......................................................................................................................... 16
3.7
Station Memory Tab ................................................................................................................... 17
3.7.1
Xml memory file .................................................................................................................. 17
3.7.2
DX Cluster connection ......................................................................................................... 20
www.eladit.com
2
ELAD FDM-S1
User Manual Rev 1.00
3.8
Default Directory Tab .................................................................................................................. 21
3.9
About Tab .................................................................................................................................... 22
4
FDM-SW1 Hardware Setup Form........................................................................................................ 22
5
Offline Mode ....................................................................................................................................... 23
www.eladit.com
3
ELAD FDM-S1
User Manual Rev 1.00
1 FDM-SW1 Overview
Elad DFM-SW1 is a SDR (Software Defined Radio) software that is intended to be used with the Elad
FDM-Sx Receiver family.
Please check out the latest update of this document at www.eladit.com.
www.eladit.com
4
ELAD FDM-S1
User Manual Rev 1.00
2 Graphical User Interface (GUI)
The screen shot below shows the main screen (the cockpit) of the Graphical User Interface.
The GUI consists of 11 parts:
1. Display Window;
2. Tuning Bars;
3. Tuning Commands Panel;
4. Receiver Commands Panel;
5. DRM Info Panel;
6. System Info Panel;
7. Status Bar;
8. Player/Recorder;
9. Audio/Squelch Control;
10. Signal Control Display;
11. Main Setting Buttons.
www.eladit.com
5
ELAD FDM-S1
User Manual Rev 1.00
2.1 Display Window
The “Display Window” displays the spectrum of input signal.
On the lower part, information about the current setting of “Span”, “kHz/Div” and “AVG” is displayed.
When right-click is performed on the “Display Window” the software displays a pop-up menu that
contains advanced graphic options.
2.1.1
Filter Spectrum
Allows the user to select which information is displayed on the spectrum area.
www.eladit.com
6
ELAD FDM-S1
2.1.2
User Manual Rev 1.00
Click Options
Allows the user to select which kind of operation can be done when left-click is performed on the
spectrum area.
2.1.3
Graphics Settings
When this option is selected, the “Graphics Setup” form is displayed. The “Graphics Setup” form allows
the user to configure the parameters of the spectrum graph.
2.1.4
Marker on screen
This option enables the visualization of the marker on the spectrum. The amplitude value (dBm) of the
selected frequency is displayed on top-right corner of the “Display Window”.
2.1.5
Layout
Allows the user to select the visualization mode.
www.eladit.com
7
ELAD FDM-S1
2.1.6
User Manual Rev 1.00
Set/Reset Reference
When “Set Reference” is selected, the software displays as a reference curve the input spectrum
available at the moment of the selection. “Reset Reference” disables the visualization of the reference
curve.
2.1.7
Frequency Calibration
This option allows the user to modify the factory sampling frequency offset of the Elad FDM-Sx Receiver
family.
Normally this operation is not needed.
As described in the pop-up above, a reference signal at the same frequency of the L.O., has to be
provided at the antenna input of the receiver to perform the frequency calibration. Then, place the
marker on the reference (peak), press
Clicking on
and then
.
button, the software resets the sampling frequency offset to zero.
NOTE:
This operation will cause the loss of the factory calibration. Perform this operation only if you are certain
to accomplish the operation in the right way and be sure to use a precise frequency reference.
2.2 Tuning Bars
These innovative tuning bars (Patent Pending) allow the user to perform fast tuning over the whole
receiver bandwidth. Each bar is characterized by different frequency spans. By performing drag-anddrop over the different bars, the user can easily select the desired frequency using the lower bar to
select the frequency band, the middle bar to make a rough tuning and the higher bar to do fine
positioning.
The span of the higher bar corresponds to the frequency range of the spectrum, and can be modified
using the zoom buttons in the “Tuning Commands Panel”.
www.eladit.com
8
ELAD FDM-S1
User Manual Rev 1.00
The frequency step of the higher bar (displayed in the “Tuning Commands Panel”) can be changed using
the ← → arrows on the PC keyboard, while ↑ ↓ keys increase or decrease the tuning frequency by one
step respectively.
The yellow segment on the middle bar represents the portion of the spectrum displayed by the software
in the “Display Window”.
2.3 Tuning Commands Panel
The main function of this panel is to display the tuning frequency.
Double click on the frequency display or press space bar (
) to insert manually the desired
value using the PC keyboard.
If the “Lock” checkbox is selected (
) the tuning frequency corresponds to the center frequency of
the spectrum (that is the L.O. frequency), otherwise (
) it’s possible to select different
demodulation frequencies by clicking on the desired point on the spectrum. Clicking on
button
the software forces the L.O. frequency to be equal to the current demodulation frequency.
Use
to enable/disable the rounding of the tuning frequency at multiples of the frequency step.
Buttons
implement zoom in, zoom out and zoom reset respectively.
Moreover, the “Tuning Commands Panel” shows the label
when a Tmate is connected and the
label
when the CAT protocol is enabled.
2.4 Receiver Commands Panel
This panel allows the user to:
Switch On/Off the anti-aliasing filter (30 MHz Low Pass);
Switch On/Off the 20 dB attenuator;
Switch On/Off the two notch filters (at IF stage) and set their parameters (frequency and
bandwidth);
Select the demodulation mode (CW, CW SH+, CW SH-, USB, LSB, DSB, AM, SAM,FM, WB FM Stereo,
DRM);
www.eladit.com
9
ELAD FDM-S1
User Manual Rev 1.00
Set the bandwidth of the demodulation filter;
Set the AGC type
- if “AGC OFF” is selected, the user could adjust the AGC Gain manually;
-
if “AGC OFF” is selected, the software displays a warning
detected;
Switch On/Off the “Noise Reducer” and modify its velocity;
Switch On/Off the “Auto Notch” reducer and modify its velocity;
when audio clipping is
2.5 DRM Info Panel
If DRM is selected as demodulation mode, the “DRM Info Panel” is activated. It displays some
information about the DRM transmission. Clicking on
button, if an internet connection is
available, the software automatically downloads and displays the last DRM schedule from
ftp://216.92.35.131.
www.eladit.com
10
ELAD FDM-S1
User Manual Rev 1.00
2.6 System Info Panel
This panel displays the system time (UTC and local) and the CPU usage.
2.7 Status Bar
The “Status Bar” displays the following information:
Serial number of the connected Elad FDM-Sx Receiver;
L.O. Frequency;
Selected demodulation mode and filter bandwidth;
Status of the “Noise Reducer” and “Auto Notch” (On or Off);
Status of the “Panadapter Mode”
- If “Panadapter Mode” is activated, the
label is showed;
- If “Swap I/Q” option is selected, the
label is showed;
2.8 Player/Recorder
FDM-SW1 embeds an advanced player/recorder.
When the recorder is activated, the IF input signal is stored in a .wav file. Some information regarding
the settings used during the recording (file creation date, L.O. frequency, demodulation frequency
demodulation mode, filter bandwidth) is stored in the file’s header.
When the file is played, the stored information is loaded by the software. When the playback is finished,
last demodulation settings (demodulation frequency demodulation mode, filter bandwidth) are stored
again in the .wav header.
Six button function are available
(Loop, A, B, Rec, Play/Pause, Stop).
2.9 Audio/Squelch Control
In this area, the DFM-SW1 software shows the name of the selected primary sound card (Sound Card 1).
Clicking on
button, the “Volume” form is displayed.
www.eladit.com
11
ELAD FDM-S1
User Manual Rev 1.00
This form allows the user to set the volume of the two selected soundcards and the level of the FM
squelch.
2.10 Signal Control Display
In this area, the DFM-SW1 software displays the level of the input signal.
2.11 Main Setting Buttons
Button
switches on/off the demodulation.
Button
opens the “Setup Form”.
Button
opens the “Station List Form”.
Button
opens the FDM-SW1 Guide. Refer this guide to know useful shortcut key functions.
Button
opens the Windows dialog box to allows the user to select the file to play.
3 Setup Form
When the
button is clicked, FDM-SW1 displays the “Setup Form”. This form contains several
settings that control the behavior of the software.
The “Setup Form” consists of 9 tabs:
1 Tuning Step Tab;
2 Tuning Bar Tab;
3 Audio Tab;
4 Graphics Tab;
5 Demod Settings Tab;
6 Advanced Tab;
7 Station Memory Tab;
8 Default Directory Tab;
9 About Tab;
www.eladit.com
12
ELAD FDM-S1
User Manual Rev 1.00
3.1 Tuning Step Tab
In the “Tuning Step Tab”, the user can configure the frequency steps that the software sets when the ←
→ arrows on the PC keyboard are pressed. Moreover, the user can compile a table containing custom
setting (frequency step, demodulation mode, attenuator, low pass filter, Ext I/O) that the software
automatically applies if the tuning frequency falls within the user-defined frequency ranges.
3.2 Tuning Bar Tab
The “Tuning Bar Tab” allows the user to customize the frequency span of the “Middle” and “Band”
(lower) tuning bars.
www.eladit.com
13
ELAD FDM-S1
User Manual Rev 1.00
3.3 Audio Tab
The “Audio Tab” allows the user to select the soundcards and to set the AGC parameters.
3.4 Graphics Tab
The “Graphics Tab” allows the user to customize several parameters related to the “Display Window”
visualization.
www.eladit.com
14
ELAD FDM-S1
User Manual Rev 1.00
3.5 Demod Settings Tab
The “Graphics Tab” allows the user to customize several parameters related to the demodulation
algorithms. In the “Filter Bw Setting” panel, the software summarizes the current values of the filter’s
bandwidth for each type of demodulation mode (a default value is displayed as suggestion).
3.6 Advanced Tab
In this tab, the user can select the advanced options of the software.
If the
checkbox is selected (default), the software operates in “Receiver Mode” and limits
the maximum tunable frequency at the Nyquist frequency (half of the ADC sampling rate). If the
checkbox is deselected (
), the software operates in “Sampler Mode” and unlocks the
limitation.
If the “Sampler Mode” is activated, the user can force the software to highlight the multiples of the
Nyquist frequency on the spectrum by checking the
www.eladit.com
checkbox.
15
ELAD FDM-S1
User Manual Rev 1.00
Checking the
startup.
checkbox, the “FDM-SW1 Hardware Setup Form” is loaded at software
3.6.1
CAT
When the CAT control is active, the Tuning Commands Panel displays the
label. In the “CAT Panel”
the user can configure the serial communication settings.
The FDM-SW1 implements the command set of the “Yaesu Ft897” transceiver.
3.6.2
Tmate
If a Tmate is connected, the “Tmate Panel” is activated. In this panel, the user can choose among the
proposed configurations of Tmate’s button functions. When the Tmate control is active, the “Tuning
Commands Panel” displays the following labels:
if
;
if
.
3.6.3
Panadapter
If “Panadapter Mode” is activated (the “Status Bar” displays the
label), the user can configure the IF
frequency and the amplitude offset that allows the right visualization. Moreover, the flip of the
spectrum can be selected (the “Status Bar” displays the
label).
www.eladit.com
16
ELAD FDM-S1
User Manual Rev 1.00
3.7 Station Memory Tab
In the FDM-SW1, two types of memory source are available:
Xml memory file;
DX Cluster Connection
3.7.1
Xml memory file
Select “File” as Station Memory Source.
Press
button to create a new memory file.
When a new file is created or when
button is pressed, FDM-SW1 visualizes an “Edit Form”.
Press
or
button to load or unload a memory file respectively (more than one
memory file can be loaded at the same time).
www.eladit.com
17
ELAD FDM-S1
User Manual Rev 1.00
The table on the right displays all the stations that are stored in the selected memory files.
The “Station info display mode” combobox allows the user to choose among 4 types of memories
visualization on the spectrum graph:
None;
Mouse position: a label containing the station info is displayed when the mouse is positioned over a
frequency included in the selected memory files;
L.O. Frequency: a label containing the station info is displayed when the L.O. frequency corresponds
to a frequency included in the selected memory files;
www.eladit.com
18
ELAD FDM-S1
User Manual Rev 1.00
If in frequency range: a label containing the station info is displayed for each frequency included in
the selected memory files that fall within the spectrum frequency range.
When the
button is clicked, FDM-SW1 displays the “Station List Form”. Double-clicking on a line of
the table implies that the L.O. is tuned at the selected frequency.
www.eladit.com
19
ELAD FDM-S1
3.7.2
User Manual Rev 1.00
DX Cluster connection
Select “DX Cluster” as Station Memory Source.
Select a cluster from the “DXCluster” combobox or insert manually the cluster settings. The “Station info
display mode” combobox displays the same options described in the previous paragraph.
When the
Form”.
button is clicked, FDM-SW1 displays the “DX Cluster Interface Form” and the “Contact
www.eladit.com
20
ELAD FDM-S1
Press
User Manual Rev 1.00
or
button of the “DX Cluster Interface Form” to open or close the link with
the Cluster, and use
to send the string entered in the “Send” area. The “Contacts Form”
displays the users connected to the cluster. Double-clicking on a line of the table implies that the L.O. is
tuned at the selected frequency.
3.8 Default Directory Tab
The “Default Directory Tab” allows the user to configure the default directory for the recorded .wav files
and the .xml memory files.
www.eladit.com
21
ELAD FDM-S1
User Manual Rev 1.00
3.9 About Tab
The “About Tab” displays useful information about Software and Hardware.
4 FDM-SW1 Hardware Setup Form
If the option
of the “Advanced Tab” is selected, the “FDM-SW1 Hardware Setup Form” is
loaded at software startup.
Press
button to start the FDM-SW1.
Press
button to start the FDM-SW1 in “OFFLINE Mode”.
Since the FDM-SW1 is a general purpose software that works with the entire FDM_Sx Receiver family,
the hardware configuration corresponding to the connected HW has to be selected. This operation is
accomplished by clicking the
; a Windows dialog box is opened to allow the user to select the
hardware configuration file (named ExtIO_ELAD_FDMSx_yyy.dll)
NOTE:
Please check out the latest update of your hardware related .dll file at www.eladit.com.
www.eladit.com
22
ELAD FDM-S1
User Manual Rev 1.00
5 Offline Mode
If the
button of the “FDM-SW1 Hardware Setup Form” is pressed, FDM-SW1 starts in “OFFLINE
Mode”. In this case, no connection with the hardware is established, and only the playback of recorded
files is available.
www.eladit.com
23