1
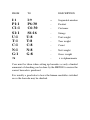
User Manual Version 1.0
Universal Label Printing Indicator
Introduction
Congratulations on your purchase of the HR2000 Label
Printing Indicator.
As you will discover, one of the HR2000’s advantages is ease
of use. The remainder of this manual provides step by step
instructions on getting the best use out of the unit.
The HR2000 uses the Intermec C4 sticky label printer.
Unpacking the box
You should find the following supplied :
One HR2000 Label Printing Terminal
Two Interconnecting leads
Floppy disk with demo label format
This User manual
The leads are labelled and are connected in the following way :
1.
A hardwired lead comes from the HR2000 to plug
directly into the rear of the C4 printer
2.
A 4 way waterproof connector on the HR2000 allows
the following to be connected :
PC with serial output
-
PC cable
Getting Started - PC software
It is first necessary to install the supplied software supplied
with your C4 label printer on the PC you wish to use to design
your labels.
When correctly installed you will have an icon placed on your
desktop called ‘Labelshop’
When the package is first run you should choose :
File
(from the menu)
Select Printer
(from the submenu)
Add
(soft button)
then
then
then
Choose the desired printer from the left scroll box
Choose the desired FREE serial port from the right box
then
OK
A serial port is usually COM1 to COM4 and you should
identify the output connector on the rear of your PC
You should now insert the supplied floppy disk and choose :
File
then
Open
then
Select the A: drive using the down arrow on the Look
In box
then
Choose the file named ‘Label _iss1’
The label format should now be displayed on the screen.
How it all works - IMPORTANT TO UNDERSTAND
It is important to understand only the FORMAT of the label is
being set up on the PC. Most of the actual information
eventually printed is subrtituted by the HR2000 just before
printing.
This means the format has to have special hooks to tell the
AD1033 what to substitute and where.
For example :
If you put HH:MM on the label format the AD1033 knows
this ia a special hook for the time and will substitute the HH
and MM with the current hours and minutes at the time of
printing.
Note when putting HH:MM on the label format you are
choosing the text position, size, font, etc but not the actual time
data itself.
The following is a complete list of hooks which are available
during label design.
Any hook underlined show the MINIMUM ammount of the
hook which may be used.
List of available formatting hooks
HH:MM
-
Time
Current time of printing (hrs and min)
PD/PM/PYYY
-
Packed on date
Packed on date (current date at printing) The year can also be 2
digit (PY) and PM and PD may be reversed for USA format
UD/UM/UYYY
-
Use by date
Use by date is the current date plus a number of useby days
which is defined within each product in the AD1033. The year
can also be 2 digit (PY) and PM and PD may be reversed for
USA format.
SD/SM/SYYY
-
Sell by date
Sell by date is the current date plus a number of sellby days
which is defined within each product in the AD1033. The year
can also be 2 digit (SY) and SM and SD may be reversed for
USA format.
P111111111 to
P666666666 -
Product
Uo to six lines of product may be put on each label. P11111 is
the first line of product and P666666 is the last line of product,
Each line of product can have a maximum of 30 characters ie P
followed by 29 ones
It is possible to have say P111111111 as the product name in
large bold characters perhaps 10 characters long, and then
P2222222222222222222 to P6666666666666666666 as say the
product ingredients perhaps 20 or 30 characters long
Some of these lines may be used for other information which is
linked to a product selection eg:
STORE AT LOW TEMPERATURE
GRADE A QUALITY
GRADE B QUALITY
C111111111 to
C666666666
-
Customer
Up to six lines of customer may be put on each label. C11111
is the first line of the customer and C666666 is the last line of
the customer.
Each line of customer can have a maximum of 30 characters.
Typically C111 will be used for the customer name and C222
to C666 will be used for the customer address.
S111111111 to
S666666666
-
String
Up to six lines of strings may be put on a label. S11111 is the
first string and S666666 is the last string.
Each line of string can have a maximum of 16 characters.
There are only six lines of strings on the AD1033, but they may
be set to be entered by the operator when the print button is
pressed,
The order of prompting is also selectable (0 for no prompting)
eg :
S11111 may be used to enter the batch number
S22
may be used to enter the operator initials
Typically the AD1033 would prompt :
BATCH:
OPERATOR:
BX1234
D.H
The label would typically show :
Batch Number :
BX1234
Operator Code :
D.H
IIIIIIIII (nine i’s)
-
Sequential number
This is a sequential number which is automatically
Incremented by the HR2000 each time a label is printed.
The HR2000 allows the number to be reset to any value.
If the label format has six I’s then a six digit sequential counter
will be created.
CCCCCCCC ccc
-
Count
Usually the decimal point is not required and ccc is usually
substituted by PCS (pieces)
Similar otherwise to displayed quantity above
TTTT,TTT ttt
-
Tare
This hook is usually used on scales and indicators
Similar otherwise to displayed quantity above
UUU.UUU uuu
-
Unit Weight
NNNN.NNN nnn
-
Nett Weight
GGGG.GGG ggg
-
Gross Weight
BARCODE HOOK
Currently there are two barcode types supported :
EAN13
EAN128
(12 digit plus 1 checksum)
(Up to 50 characters)
It is necessary to set down a barcode of the desired type and
size and define its data as all zeros.
Human readables below the barcode may be selected if desired.
The HR2000 will substitute the actual barcode data before
printing.
Other formatting features available
All of the general static features are available on the PC design
package to be used as desired eg :
General text (Upper and lower case)
Drawing lines (Any thickness)
Rectangles (Any thickness)
Image import (Logo - company heading)
Static barcodes (Any format)
Special imported text fonts
All features may be rotated through 360 degrees as desired.
Initial switch on of the HR2000
When the HR2000 is initially powered on the screen should be
visible. If it is not but the keys are beeping when pressed follow
the following procedure :
Cycle the HR2000 mains power off and on again
Press the bottom left red I/O on /off power button once
Press the F1 key once
Press the 1 key repeatedly (up to 10 times)
If nothing visible on the screen press the 2 key once then press
the 1 key repeadly up to another 10 times.
The screen should become visible during this contrast adjust.
MODE key
The mode key allows three different types of display to be
selected:
Weighing mode (Standard)
Weighing mode (Label printing)
Counting Mode
The desired mode should be selected by the operator
WEIGHING MODE KEYS :
ZERO
TARE
PRESET
NET/GROSS PRINT
-
Zero scale with no weight applied
Tare out container contents
(Or clear existing tare)
Enter a tare value
Switch between gross and nett modes
Print a label
LABEL MODE KEYS
All weighing mode keys plus :
SAMPLE
-
Generate a unit weight
COUNT MODE KEYS
All weighing mode keys plus :
SAMPLE
-
Generate a unit weight
Switching scales
The 1 or 2 key allows switching between the two platform
scales.
Downloading formats to the HR2000
From the main screen press :
MENU
then
PC communications
then
Download/Print/Save label format
The HR2000 screen will show :
Ready to receive format
Ensure the supplied PC cable is connected to the PC and the
HR2000 then from the Label design package select :
File
then
Select Printer
To ensure the package will print out the serial port you are
connected to.
Then select :
File
then
Print
(Number of labels may be set here)
then
OK
The HR2000 should display ‘recieving format’ while the
communications is taking place.
The HR2000 is capable holding up to ten formats so the format
may be save to the desired location (0-9) by selecting :
Save format
then
Enter format number (0-9)
The format will. be permanently saved in this location even
when the power is removed.
Often weighing instrument information will not be displayed
on the HR2000 until a valid label format is active.
Setting up the Product Information
Up to 100 products may be DEFINED and stored in the
HR2000 memory.
The product to be defined is selected by :
F1
then
Define Parameters
then
Define Product
then
Enter Product number (000 - 099)
The screen then shows six line of product description P1 - P6
ENTer may be pressed to move around each line
Pressing a key more than once causes up to four options for
that key to be entered.
When the desired value is shown the cursor will advance to the
next position within about 1 second.
The F1 key may be used to quickly clear to the end of the line
The << key may be used to backspace one character
When the product information is correct the Next Page may be
selected, this contains futher product information :
Sellby days
Useby days
Label format
Barcode
-
To be added to current date
To be added to current date
References a pre-stored label format
The 1 key toggle around the options
The barcode has three options :
NONE
EAN13
EAN128
When the Edit option is choosen while EAN13 is selected the
system immediatly displays a scroll list of what is required in
each element of the barcode.
The EAN128 barcode differs in that it first requests the size of
the barcode before displaying the scroll list.
Note EAN13 is numeric data only while EAN128 may be
alphanumeric.
The format for each part of the barcode may be defined in this
scroll list in a similar way to the PC label formatting.
eg :
If the first 4 elements of the barcode are desired to be the
sequential number then the start of the list would be set as
follows :
01:
02:
03:
04:
I:6
I:5
I:4
I:3
The following is a complete list of all the hooks which may be
used in the barcode.
FROM
TO
I:1
I:9
P1:1
C1:1
S1:1
U:1
T:1
C:1
N:1
G:1
:x
P6:30
C6:30
S6:16
U:8
T:8
C:8
N:8
G:8
DESCRIPTION
-
Sequential number
-
Product
-
Customer
-
Strings
-
Unit weight
-
Tare weight
-
Count
-
Nett weight
-
Gross weight
-
x is alphanumeric
Care must be taken when setting up barcodes as only a limited
ammount of checking can be done by the HR2000 to ensure the
correct barcode is produced.
It is usually a good idea to leave the human readables switched
on so the barcode may be checked.
Setting up the Customer Information
Up to 100 customers may be DEFINED and stored in the
HR2000 memory.
The customer to be defined is selected by :
F1
then
Define Parameters
then
Define Customer
then
Enter Customer number (000 - 099)
The screen then shows six line of customer description C1 - C6
The customer description is edited in a similar way to the
product description above, but there are no futher customer
pages.
Setting up String prompts
Up to 6 string prompts may be defined..
The string list is selected by :
F1
then
Define Parameters
then
Define String
There are three parts to this string prompt list :
Label :
String :
Order:
This is the user prompt label on the HR2000
This is the string printed on the label
This is the prompt order when PRINT is pressed
If order is 0 the string is not prompted but still may be used on
the label
Below is an example of a string table :
S1:
S2:
S3
Batch
Operator
Machine
2AB
DH
4
1
0
2
When the print key is pressed the Batch will first be requested
with a default of 2AB The operator can press ENTER or can
change it. 2AB will be printed on the label in the S111
position.
The Machine number will then be prompted with a default of 4
and may be changed if desired, and printed on the label in the
S222 position
The operator DH will not be prompted but may be printed on
the label in the S333 position
Setting the Sequential number
There is only one sequential number on the HR2000
The sequential number is selected by :
F1
then
Define Parameters
then
Set Sequential Number
The sequential number is simply keyed in followed by an enter.
Set Contrast / Time / Backlight
There are three options within this menu :
1. Set Contrast
The contrast may be adjusted using keys 1 and 2 as desired
2. Set Time
The current time and date are simply keyed in
3. Set Backlight
The backlight can be switched ON or OFF as desired
PC communications
There are three options within this menu :
1. Download / Print/Save label format
This was discussed previously, a format can be printed on the
PC and recieved by the HR2000. When recieved it will
automatically print on the C4 if it is connected. It can then be
saved to a format number (0-9)
If the format being sent is too large the HR2000 will inform the
user of this and the label must be reduced in complexity
(Usually reduce graphic elements)
2. Print Label format
This is a utility to reprint stored label formats
3. Save system memory
This option is currently not active.
System Setup
This option is unused in this software
Product and Customer selection
The SEL PROD key allows the user to select a product. number
(00-99) followed by a Customer number (00-99)
As the label format is contained within the product it is
important the selected product contains a label format.
Total
Individual product totals are held, When a product is selected
the main screen always shows that total.
All total can be cleared by :
MENU
then
Totals
then
Clear Totals
then
CLEAR MEM
To clear all totals !!!
The total is held in the working precision of the displayed or
weight value.
Typically this is useful for internal use to show how much of
each product has been shipped daily or weekly as desired.
Security Information - REMOVE PAGE
It is possible to set the Supplied by prompt by holding the
BACKLIGHT key down while powering on with I/O
The requested password is 2000
In the system setup menu the requested password is 2000