1
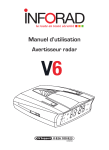
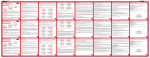
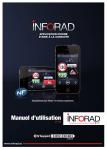
Danger Zone and Speed Camera Warning System
User manual
V 1.3
Assistance 0 844-2323411
0.05p/min
www.inforad.eu
table of contents
1 - Overview3
2 - Get to know your Smart4
3 - Before you start5
4 - Installation6
5 - Starting and stopping
7
6 - The display8
7 - The remote control9
8 - Alerts10
9 - Event notifications12
10 - Speed limiter12
11 - Menus13
12 - Configuration13
13 - SMS messages14
14 - Battery charging and autonomy
14
15 - Other items15
16 - Icons and security messages
15
17 - Specifications16
INFOCERT certifies that this device complies with NF-469-12/24 and respects
French statute N°2012-13 of January 4th 2012.
Inforad Ltd. certifies that the Inforad SMART GPS/GPRS warning system conforms
to the essential requirements and other relevant provisions of the 1995/5/EC
directive.
The «dustbin» symbol means that this product must not be disposed of with household
waste. It should undergo specific selective waste sorting. Take it to an authorised
collection point for recycling. Recycling electronic waste contributes to environmental
and health protection.
Not recommended for persons with reduced physical, sensory or mental abilities. Keep out of the
reach of children (amendment A2 of the NF 60335-1 standard).
2
www.inforad.eu
PREFACE
We would like to thank you for choosing the INFORAD Smart. We have designed the
Smart to enable you to drive safely, to avoid traffic violations, to inform you of danger
zones and speed cameras and provide access to emergency services (112).
DISCLAIMER
The Smart uses GPS and GSM/GPRS networks and emits no electromagnetic or laser
detection signals that could interfere with the operation of police or traffic measurement
instruments. Consequently, it is perfectly legal in most European countries. Nevertheless,
it is your duty to ensure its legitimacy in the country in which you intend to travel.
INFORAD cannot, under any circumstances, be held responsible for the consequences
of or damages caused by its use in countries where this type of device is prohibited.
1 - OVERVIEW
The Smart is a multi-function, community-based warning system that identifies danger
zones such as fixed and mobile speed cameras, road works, traffic jams and other road
hazards stored in its database or flagged by other Smart users (Inforad Club). It
calculates your vehicle’s position with its GPS (Global Positioning System) receiver and
updates its database in real-time using its on board mobile telephone (GSM/GPRS).
The Smart warns you of approaching danger zones and informs you of your current
speed compared to the authorised speed limit on the road you are driving on. To do this,
the Smart contains a map of the European road network and displays the name of the
road, street, trunk road or motorway with its speed limit.
The Smart enables you to set speed limits and will warn you when you exceed them.
The Smart also displays the number of fellow Smart users driving ahead of you. This
gives you a sense of accuracy for short lived danger zones such as mobile speed
cameras or traffic jams.
The Smart’s mobile telephone enables you to make emergency calls free of charge
using the common emergency telephone number 112 from anywhere in the European
Union (EU) and European Economic Area (EEA). You may also receive SMS messages
or even phone calls as your unit can be assigned with its own telephone number. (SMS
and phone call services require an optional subscription. Speak to your local dealer.).
The Smart allows you to save «Points of Interest» from your favourite trip locations.
You can share this information with other Smart users if you so wish, using the forum
available on the web site.
You will find more details and updates to services on our website through the user forums.
3
2 - GET TO KNOW YOUR SMART
2.1 - Box contents:
• A Smart device,
• A windscreen/dashboard self-adhesive suction cup mount,
• An infrared remote control,
• A steering wheel mount for the remote control,
• A 12/24V USB cigarette lighter adapter,
• A USB cable,
• A getting started guide.
2.2 - The Smart device:
1 2
3
4
5 6
7
9
8
1. Configuration menu
2. Mini-USB power supply /
recharge adapter,
3. 3-inch widescreen display,
4. Microphone,
5. Loudspeaker,
6. Infrared receiver,
7. On/Off switch,
8. Reset button,
9. GPS antenna (rear side).
2.3 - The remote control:
The Smart’s unique remote control fixes to your steering wheel and enables you to keep
your eyes on the road and both hands on the wheel.
a
b
g
a. Flag danger zone left side of road,
b. Flag danger zone right side of road,
c. Speed limiter,
d. Emergency call (112), settings,
e. Flag a Point Of Interest (POI),
f. Mounting slots,
g. Infrared transmitter,
h. Battery.
c
f
d
h
e
- Front -
4
www.inforad.eu
- Back -
2.4 - The display:
The display is divided into three distinct sections so that you can see the device’s status
at a glance.
• The status bar flags the current available resources (gps - gsm - remote control speed limiter) l’état (message box - battery level), and the settings (volume - alert
mode),
• Speed-related information (actual speed - authorised limit - self-set speed limit),
• Road-related and alert information.
Status bar
Speed related information
Road-related and alert information
2.5 - Self-adhesive suction cup mount:
The Smart’s self-adhesive mount is designed to provide exceptional grip (up to 12Gs) on
your windscreen or dashboard. Make sure to wipe clean both surfaces from time to time
to ensure continued grip if you remove your Smart frequently.
Device removal tab,
Removable bracket,
Clamp,
Stanchion,
Suction cup tab,
Self-adhesive suction cup.
3 - BEFORE YOU START
In order to make best use of your Smart, you need to activate the GPRS SIM card
by registering your device. This will give you access to information exchange services
between Smart community users.
Go to the http://www.inforad.eu web site and follow the instructions. You should also
update your Smart’s database at the same time.
5
4 - INSTALLATION
4.1 - Assembling the mount
The car mount is made up of two parts. A removable part allowing you to position your
Smart as you wish, and a fixed part, with the self-adhesive suction cup, which holds the
mount firmly in place.
To assemble your mount, simply loosen the clamp screw slightly and snap the stanchion’s
ball joint into the socket. Place the mount as desired on the clean windscreen or
dashboard, removing the suction cup’s reusable protective film first. Position the mount as
desired, lowering the suction tab on the cup. Now slightly tighten the clamp screw in order
to position the mount with the device removal tab on top. Once this is done, tighten the
clamp screw further to lock firmly in position. To remove the mount, simply lift the suction
tab on the cup, then pull the suction cup tab. You can then easily remove the mount.
N.B. :
• With certain thermal resistant windscreens, position your device near the un-treated
area (generally near the rear-view mirror) to improve the GPS signal’s reception.
• Do not over-tighten the clamp screw as you could damage or break the plastic parts.
• Make sure that the GPS antenna (9), situated on the back of the Smart, is facing
up and on the right side of the device.
4.2 - Installing the Smart in the mount
Take your Smart in one hand and grip the mount with the other. Insert the bottom of your Smart
into the mount, and then apply slight upward pressure until the device clips into the mount.
To remove your Smart from the mount, hold the mount with one hand, then gently press the
device removal tab while pulling the Smart towards you. Alternatively, you can simply slide it to
one of the sides of the mount.
IMPORTANT :
For your own safety, avoid placing your Smart, or any related accessory, on an area
of the dashboard containing an airbag. If you are using the power cable to recharge,
position it such that it does not hinder your driving and does not obstruct access to
the vehicle’s controls.
4.3 - Assembling and mounting the remote control
Take one of the supplied straps and fold it back on itself at the third hole (Fig.1).
Take the remote control holder in the other hand and pass the strap through the hole facing
you (Fig.2a) being careful to position the fold towards the inside of the holder (Fig.2b).
Fig. 1
6
www.inforad.eu
Fig. 2a
Fig. 2b
Now gently tighten the strap against the holder. The strap should not slip any more
(Fig.3). Repeat the operation for the second strap (Fig.1 à Fig.3).
Fit the holder to the desired position on the steering wheel. Pass the straps around the
wheel and slip the ends into the two free holes in the holder. Gently pull the straps so that
the holder no longer moves (Fig.4).
You can now fit the remote control. Fit the remote control so that your thumbs can easily
reach the buttons (Fig.5).
Fig. 3
Fig. 4
Fig. 5
5 - TURNING ON AND OFF
ATTENTION :
• If your Smart’s battery is flat, the device needs one minute of charging before it
will start (cf. «Charging and autonomy»).
• Make sure the battery’s protective film is removed from the remote control.
• During the initialisation sequence a screen message tells you if a new software
release is available for your device.
5.1 - First start-up:
To turn your Smart on, press the on/off switch (7).
The first time you turn it on, a welcome screen is displayed while the Smart application
system boots. You will be prompted for your language (cf. «Configuring your device»).
Once the language has been set, the Smart continues its boot sequence (cf. «Normal
start-ups»).
5.2 - Normal start-ups:
During normal start-ups, an audible welcome message
sounds and a welcome screen, asking you to press the
remote control, is displayed.
To activate the remote control, you must press any key for
15 seconds.
The main screen is displayed as soon as it detects the key.
7
If the Smart does not detect a key within 15 seconds, a
message asking you to check the remote control is displayed
for 5 seconds, after which the main screen appears.
If the « check remote control » message is displayed even
though you pressed one of the keys during the allotted time,
the remote control may be defective. Check the batteries (h)
and restart your Smart to try again.
To optimize the GPS reception, install the Smart on its cradle and make sure that the GPS
antenna (9) located on the rear side of the right upper corner is visible to the sky.
Once your Smart is operational, satellite data acquisition starts and the GPS icon (A)
remains disabled (crossed out in red) throughout the process. This may last from several
minutes depending on your location (acquisition is faster in open areas than in the city or
under tree cover). Once acquisition is complete, the GPS icon (A) is enabled (the cross
disappears), indicating that your Smart is fully functional.
5.3 - Turning the device off
To stop the device, press the «on/off» button (7).
6 - the display
Your Smart’s graphical interface has been carefully designed for maximum clarity:
A B C D E
F G H I
J
L
M
K
A.GPS acquisition status,
B.GSM/GPRS signal level,
C.Remote control status,
D.Message notification,
E.Speed limiter notification,
F.Selected protection mode,
G.Volume level,
H.Selected speed units,
N
- Standard screen -
I. Battery charge level,
J. Speed limit,
K.Road name,
L. Current speed,
M.Number of Smart users heading in the
same direction as you,
N.Time to reach the first Smart user
heading you
• GPS (A): disabled until satellite data acquisition is complete, or when GPS connection
is temporarily lost. When this icon is enabled, the number of tracked satellites is
displayed. Without a GPS signal, your Smart cannot locate your position.
• GSM/GPRS (B): displays the GSM/GPRS signal level. Disabled until GSM/GPRS data
acquisition is complete, or when the connection is temporarily lost.
8
www.inforad.eu
• Remote control (C): indicates remote control status. By default, it is
disabled at start-up. It is enabled as soon as you activate it by pressing
a key (cf. «Normal Start-up»).
- Inactive - Active -
• Messages (D): enabled when the service is available through a separate subscription.
An open envelope is displayed when one or more messages are received.
• Speed limiter (E): indicates whether you have set a personal speed
limit. If this is the case, the icon is enabled and your personal speed
limit is displayed below it. The icon is disabled if no satellite data have
been acquired.
• Alert level (F): the shield followed by the alert level informs which protection mode
has been set (cf. «Configuring your device»).
• Volume (G): disabled if the volume has been muted (cf. «Configuring your device»).
• Speed unit (H): indicates the configured units of speed (km/h or mph) (cf. «Configuring
your device»).
• Battery (I): indicates the battery charge level (cf. «Charging and autonomy»).
• Speed limit (J): indicates the actual speed limit. When this value is not available, «---»
is displayed inside the circle.
• Name of the road (K): indicates the name of the actual road. When not available, one
of the following messages is displayed:
▫▫ Cannot locate : in the event of a loss of GPS signal,
▫▫ Map incomplete : in the event of an incomplete map download,
▫▫ Out of range : if you are outside of the covered territories.
• Vehicle speed (L): in white on a green background when the vehicle is under the
speed limit (cf. «Speed camera and other warnings»).
• Number of users (M,N): indicates the Smart users currently ahead of you, and the
time to reach the first one. This value is replaced by «---» if not available.
7 - THE REMOTE CONTROL
The 5 keys on the Smart remote control provide access to the following services:
• Mobile speed camera notification: the «flag left side speed camera» (a) and «flag
right side speed camera» (b) are used to notify the presence of a mobile speed camera.
• Speed limiter (c): this key is used to set, modify, or cancel your personal speed limit.
• Telephone (d):
▫▫ Pick-up, hang-up call: when a call (available with subscription) is forwarded to
your Smart, one press of this button will pick the call up. A second will hang it
up. When in communication, the «Speed Limiter» button (c) increases the volume
and the «Points of Interest» button (e) decreases it.
9
▫▫ Sound Level: press the telephone key (d) once to transform
the «Speed Limiter» key (c) into «increase volume» and «Points
of Interest» key (e) into «decrease volume» key.
▫▫ Screen brightness level: press the telephone key (d) twice
to transform the «Speed Limiter» key (c) into «increase
brightness» and «Points of Interest» key (e) into «decrease
brightness» key.
▫▫ Conciergerie (d): appuyez trois fois sur cette touche pour être mis en relation
avec l’opérateur pour vous permettre de signaler un événement important ou
accéder aux services payants.
▫▫ Emergency call (d): press the telephone key for 10 seconds dials (112) and
puts you in contact with the police or fire brigade (WARNING: wrongful use of
this number is severely punished).
• Points of interest (e): this key allows you to save important or favourite locations
during your trips and share them with fellow Smart users in the web site forum.
8 - alerts
Your Smart is permanently updated about danger zones in your vicinity through the
mobile telephone network. These updates, enhanced by alerts from fellow Smart users,
reduce your risks from danger zones by keeping you informed with the most complete
information on hand.
Your Smart is also equipped with an embedded road network map that can pinpoint your
exact road location and thus limit false alerts from adjacent roads..
8.1 - Different types of speed cameras or danger zones:
The Smart emits various alerts (cf. «Icons and security messages» for more information:
• Confirmed danger zone (fixed speed camera),
• Dangerous cross roads (traffic light camera),
• Dangerous level crossing (level crossing camera),
• Dangerous tunnel (speed camera inside),
• A SPECS speed camera,
• Mobile speed camera flagged by Smart user (during the past 2 hours),
• Mobile speed camera whose presence is highly probable,
• Mobile speed cameras frequently present at this location at this time of day
• Possible danger zone,
• Traffic jam ahead,
• Road works ahead,
• Accident ahead,
• Obstacle ahead.
N.B. :
Alerts levels may be configured ((cf. «Configuring your device»).
10 www.inforad.eu
8.2 - Entering danger zones:
When entering danger zones, the Smart’s «roadrelated information and alert zone» informs you as
J
follows:
• What type of danger zone (N) is approaching,
• Your progress in the danger zone (P), with the N
distance to exit the zone (O).
L
O
P
The Smart will «beep» when entering the zone accompanied by a vocal message. When
leaving the zone, you will hear a second «beep» and the main display returns to normal.
Alarms and alert distances can be configured (cf. «Configuring your device»).
N.B. :
The Smart factory setting is «Smart mode» which provides alerts for fixed or certified mobile speed cameras. (cf. «Configuring your device»).
WARNING :
For quality control purposes, you will be prompted to confirm the presence of a
danger zone declared by another Smart user.
8.3 - Excessive speeding:
If you exceed the authorised limit (J) in a danger
zone, the display switches to flashing red (L) and
an alert sounds, followed by a continuous beeping. J
This beeping stops as soon as your speed drops
below the limit.
L
8.4 - Speeding threshold:
If your speed lies between ± 4% of the authorized
speed limit, the display blinks with a hashed J
orange background.
L
8.5 - Danger zone alerts:
When approaching a danger zone such as
road works, a traffic jam, an accident, etc. beep
accompanied by a danger specific message (R),
sound and icon (Q) will appear for 10 seconds.
Q
R
8.6 - Tunnel alerts:
GPS signals cannot penetrate buildings and so your location will be temporarily
lost when entering a tunnel. The Smart will display your last known speed and
authorised limit so extra vigilance is required when entering tunnels.
11
9 - EVENT NOTIFICATIONS
9.1 - Declaring danger zones:
You can notify other Smart users of unidentified danger
zones such as mobile speed cameras by pressing remote
control buttons (a) or (b).
• The «right danger zone alert» (b) is used to notify a
speed camera on the right side of the road
• The «left danger zone alert» (a) is used to notify a speed
- Confirmation mode camera on the left side of the road.
• You will be prompted to identify the type of danger zone according to the diagramme
opposite.
N.B. :
Please note that traffic jams and accidents can only be flagged on motorways.
9.2 - Other event notifications:
To notify other types of dangerous road hazards press the «Telephone» button (d) 3 times
and wait for a message requesting a final confirmation to talk to an operator.
The Smart require a acknowledgement which you can confirm by pressing shortly the
phone button again.
WARNING :
Please be careful when using the «Telephone» (d). Abuses will be invoiced. Don’t
let children play with the device. Only «Emergency» calls and bona fide alerts are
free of charge.
10 - speed limiter
The Smart enables you to set your own speed limit and alert you in the event you exceed
that limit. The personal speed limit is displayed with the icon (E).
• Engage: Drive at the desired speed and press the «Speed limiter» key (c) on your
remote control.
• Modify: Drive at the new speed and press the «Speed limiter» key (c) on your remote
control again.
• Disengage: Disable the speed limiter by pressing the «Speed limiter» key (c) on your
remote control for 2 seconds.
12 www.inforad.eu
WARNING :
Please be careful when using the “telephone”. Abuses will be invoiced. Don’t let
children play with the device. Only “Emergency” calls and bona fide alerts are free
of charge.
11 - menus
Three menus enable you to configure, manage SMS
messages and diagnose problems.
• Enter menus: press button (1) downwards or lift
upwards.
• Select menu: press button (1).
• Scroll down: press button (1) downwards.
• Scroll up: lift button (1) upwards.
• Enter selection: press button (1).
• Exit menus: select «Exit» from the list and press button (1).
- Configuration menu -
12 - Configuration:
Access the configuration menu at any time by pressing the configuration button (1). Press
again to validate your choice.
• Volume: 5 sound levels are available (mute, low, medium, high and maximum).
• Brightness: 5 bright levels are available (minimum, low, medium, high and
maximum).
• Alert types:
▫▫ Maximum: all known declared and certified danger
zones alerted accompanied by a voice message.
▫▫ Smart (default): all certified and highly probable danger
zones alerted accompanied by a voice message.
▫▫ Taxi: smart mode without voice alerts.
▫▫ Minimum : only certified and Smart user danger zones
are alerted accompanied by voice.
▫▫ Mute : all alerts disabled.
• Vehicle type: select vehicle or motorbike (needs
- Settings screen INFORAD Motorbike kit).
• Language: French, English, Spanish, Dutch, German,
Portuguese or Italian.
• Speed unit: km/h or mph.
• Automatic shutdown: turns device off when parked for a prolonged period of time.
13
13 - SMS MESSAGES
If you have subscribed to the «SMS option» you are entitled to
receive incoming SMS messages and calls. SMS messages
are displayed in the information zone on the bottom of the
screen
• An open envelope means that you have a new message,
• A closed envelope means that there are no new
messages,
• An envelope with a red cross means that the SMS service is unavailable.
An incoming SMS scrolls automatically until you press any remote control key.
13.1 - Reading SMS messages
Push button (1) and navigate through the configuration menu
to select the «SMS» section. Navigate through the SMS
directory and select the desired message. The message is
displayed using the entire screen. Lift up or press down (1) to
scroll through the message.
To exit from message push button (1) and select «exit» or
«delete message»,
To exit the SMS menu navigate until the end of the SMS list,
select «exit» and push button (1)
14 - Battery charging and autonomy
Your Smart is equipped with a lithium-ion battery of 1400mAh with autonomy from 6
to 8 hours, depending on how you use your Smart. You can use the device while it is
connected to your cigarette lighter.
Once the battery is flat (battery icon (I) crossed out with a flashing red cross), connect
the USB cable between the Smart’s connector (2) and the cigarette lighter adapter, then
insert the adapter into the vehicle’s cigarette lighter socket. You can also charge your
Smart from a mains socket using a USB mains adapter (not provided), or directly from a
computer with a USB port.
While your device is charging, the battery icon (I) flashes until the device is fully charged,
you can then use the Smart for its full battery life.
WARNING :
Your Smart is equipped with a lithium-ion battery. It must therefore be kept away
from flames to avoid explosion.
To save battery life, wait at least 2 minutes before shutting your Smart down after
turning it on.
14 www.inforad.eu
15 - OTHER ITEMS
15.1 - Caution
Do not leave your Smart in the vehicle’s cabin in direct sunlight such as on the dashboard.
Exposure to excessive temperatures can damage and considerably reduce your device’s
service life.
15.2 - Safety
The Smart includes a telephone and is thus governed by the same regulations as mobile
phones. Do not remove your Smart from its mount while driving.
15.3 - Guarantee:
Your Smart is guaranteed for 3 years, parts and labour from the date of purchase.
Excluded from this guarantee is the battery whose life is dependent on user behaviour.
Only INFORAD technicians are authorised to open the device, otherwise INFORAD
reserves the right to terminate the guarantee.
15.4 - Online technical Support technique:
If you have difficulties fitting or using your INFORAD device, see the «FAQ» section on
the http://www.inforad.eu website, or contact our customer support service by email:
[email protected] or by phone on 0 826 100 823 (0.15€/min).
16 - ICONS AND SECURITY MESSAGES
16.1 - Non-exhaustive list of icons
Danger zones
Danger
Traffic
lights
Level
crossing
SPECS
Risk zones
Tunnel
Probable
Possible
Other dangers
Accident
Road
works
Traffic
jam
School
16.2 - Non-exhaustive list of security messages
15
17 - Specifications
GPS receiver: Atlas V™ 64 channels,
GSM/GPRS module: TELIT four-band,
Processor: ARM 11 - 600Mhz,
RAM: SDRAM DDR2 64 Mo,
Mass storage: 4 Gb,
Battery: Built-in 1400 mAh rechargeable,
Autonomy: up to 8 hours,
Power supply: 5Vdc (max 500mA),
USB Cigarette lighter adapter: 12/24Vdc input, 5Vdc output, max 1A,
Remote control power supply: CR 2032 3V battery,
Remote control: Infrared,
Car-mount: self-adhesive suction cup,
Alarms: visual and audible (customizable),
Microphone: built-in,
Loudspeaker: 8 ohms 1W with volume control,
TFT screen: 3-inch (66 X 40mm), High-definition (240 X 400 pixels), 262 000 colours,
Device dimensions: Length 105mm - Width 65mm - Depth 19mm - Weight 130g,
Remote control dimensions: Length 81mm - Width 38mm - Depth 21mm - Weight 31g,
Car-mount dimensions: Length 103mm - Width 63mm - Height 96mm - Weight 49g,
Complete device weight: 214g.
INFORAD Ltd
Inforad House, Smithstown Industrial Estate,
Shannon, County Clare,
IRELAND
Tel: +353 61 719750 - Fax: +353 61 719747
Website: http://www.inforad.eu
Contact: [email protected]
Technical support: [email protected]
Assistance 0 844-2323411
0.05p/min
The features and details presented in this manual may be modified without notice as a result of technical upgrades and
the addition of new features. INFORAD would like to apologise for any errors that may occur and kindly requests you to
report any mistakes or emissions on our website. INFORAD will inform you of any significant changes and shall provide
you, free of charge, with any new software and manual updates from its website http://www.inforad.eu. The diagrammes,
photos and text herein may change without notice and are not contractual binding
Copyright 2012 INFORAD Ltd. All rights reserved.
16 www.inforad.eu