1
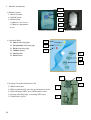
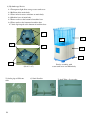
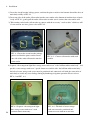
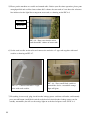
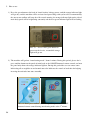
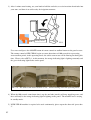
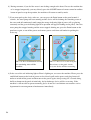
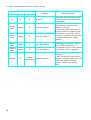
HW-CPP-01 User’s Manual
1. Content
Item
Page
Precaution before use
1
Machine Introduction
2-3
Installation
4-5
How to use
6,7,8
Troubleshooting guide
9
Product index
10
2. Precaution before use
1) Please do not pour water which exceeds 38 into the light-blue transparent water tank.
2) It is recommended that filtered water is used or supplied from r/o unit.
3) Please do not turn the power on when the light-blue transparent water tank is empty.
4) Per-use . Please pour enough purified water to 2 cm above the line indicate on the light-blue
transparent water tank.
5) Please operate the machine according to this instruction.
6) please confirm that the power cord voltage is in correct range to your country between
AC220V~240V.
7) Please do not disassemble the machine by yourself and only contact your authorized agent.
8) Consumer please review the detailed list of indications and contraindications for the use of this
equipment if in doubt please seek medical advice from your doctor.
3. Machine introduction
1-1
1) Remote control
1-1 Infrared emitter
1-2 On/Off button
1-3
1-2
1-3 Drain button
1-4 Battery cover at rear
1-5 Battery compartment
at rear
11Remote Control-Front
2) Operation Panel
2.1 Power indicating light
Remote Control-Rear
2-1
2.2 In Operation indicating light
2.3 Error indicating light
2-2
2.4 Outflow button
2.5 Drain button
2.6 Reset button
2-3
2-4
2-5
2-6
3-2
3) Leakage Circuit Breaker Power Cord
3-1 Main control unit
3-2 Turn on button (ON), press big green bottom at center
3-3 Turn off button (OFF), press small bottom at side
3-4 Orange indicating light( as showing OFF status)
3-5 Ground wire (green)
P2
3-4
3-3
3-1
3-5
4) Hydrotherapy Device
4-1 Transparent light-blue storage water tank cover
4-2 Brilliant white main body
4-3 Water inlet for water container on main body
4-4 Machine base of main body
4-5 Power socket at the bottom of machine base
4-6 Water outlet at the bottom of machine base
4-7 Anti slip footpad at the bottom of machine base
44-1
4-3
44-
4-2
4-
4(No.4-5 ~4-7)
5) Outlet pipe of Silicone
tube
P3
6) Stool Steadier
Ready assembly with
water tank cover and Main body
7) Anal Tube + L type tube
4. Installation
1) Insert the circuit breaker leakage power cord into the power socket at the bottom of machine base of
main body solidly as PIC.4-1.
2) Insert one side of the outlet silicon tube into the water outlet at the bottom of machine base of main
body as PIC.4-1, gently pull the outlet silicon tube to make sure it connect the water outlet well.
3) Take another end of outlet silicon tube to connect with the accessory” stool steadier” which we will
fix on stool for use later, please refer to PIC.4-2.
PIC. 4-1–Insert the circuit breaker leakage
power cord into the power socket. Insert
one side of the outlet silicon tube into the
PIC. 4-2 – Connect silicon tube with stool
steadier
water outlet.
4) Separate “the transparent light-blue storage water tank cover” with “brilliant white main body”, and
put this “water storage tank cover” upside-down to assemble with “the brilliant white main body” ,
the hole of water storage tank cover must be positioned and connected well with the water inlet of
main body to avoid any water leakage during hydrotherapy irrigation operation. Please refer to
PIC.4-3 and PIC. 4-4.
PIC.4-3 Separate “the transparent lightblue storage water tank cover” with
P4
“brilliant white main body”.
PIC. 4-4 - The hole of water storage
tank cover must be positioned and
connected well with the water inlet.
5) Please put the machine on a stable and smooth table. Before your first time operation. please pour
enough purified and sterilized water about 80% volume of water tank or 2 cm above the reference
line indicated on the light-blue transparent water tank, as showing on the PIC.4-6.
2 cm above
Reference
PIC.4-6 – Pour water into the water
tank about 80% volume of water tank.
6) Set the stool steadier on the toilet and connect the anal tube + L type tube together with stool
steadier as showing on PIC.4-7 .
PIC. 4-8 – Press small black switch to
PIC.4-7 – Connect anal tube + L type
tube with stool steadier.
turn off the device , meanwhile orange
light will glow.
7) Everything is now ready, plug circuit breaker leakage power cord into wall outlet, and instantly
press turn off button (small black switch) at the head of circuit breaker leakage power cord in
standby, meanwhile you will see the orange light on at the head of power cord as PIC. 4-8.
P5
5. How to use
1) Press the green button at the head of circuit breaker leakage power cord(the orange indicator light
will go out), and the machine will be activated and proceeding with system self test automatically,
the auto water outflow will stop after 10 seconds running, the orange indicator light on the side of
main body panel will be brightening constantly and the next green indicator light will be flashing
PIC. 5-1 – Press center green button to
power on the device , meanwhile orange
light will go out.
2) The machine will go into “Auto-heating mode” about 1 minute. During this period, please don’t
press outflow button on the panel of main body or the ON/OFF button of remote control, and now
the panel only shows the orange indicator light on. During this period the user can smear some
lubricating oil or surgilube on and around anus also lubricate the -nozzle of anal tube for helping
inserting the anal tube into anus smoothly.
Remote Control-Front
Outflow
button
ON/OFF button
PIC.5-2 Don’t press outflow button on operation panel and ON/OFF
button of remote control during auto-heating mode at the 1st minute.
P6
3) After 1 minute auto-heating, use your hand to hold the anal tube, to assist insertion of anal tube into
your anus, and then sit on toilet ready for irrigation treatment.
Ready insert
P5-3
User now could press the ON/OFF button of remote control or outflow button on the panel to start.
The remote control of HW-CPP-01 begins to count down timer of 100 seconds for a presetting
water outflow period, in this operating mode, the stable warm water will be flowing out during this
time. Please refer to PIC5-4. At this moment, the orange indicating light is lighting constantly and
the green indicating light flashes on the panel.
PIC.5-4 - The stable warm water between 37-39
will be flowing out in the operating mode.
4) When the 100 seconds count down time is up, the anal tube (nozzle) will stop supplying water, and
there will only be the orange indicating light in lighting on the panel. The machine now is staying
in standby mode .
5) If HW-CPP-01 machine is required to be used continuously, please repeat the aforesaid “procedure
3”.
P7
6) During treatment, if you feel the water is not feeding enough to the bowel. In case the machine has
to be stopped temporarily, you may directly press the ON/OFF button of remote control or outflow
button of panel to stop the operation, the machine will return to stand by mode.
7) If you want pack up the device after use, you can press the Drain button on the panel around 4
seconds , the water pump will start running and the device will be draining the remaining water of
the water tank off continuously until empty(the orange indicating light of power will go glowing
constantly and the green indicating light of in operation will appear flashing on the panel). Once the
water pump has stopped running and the water stopped draining out, press the Drain button on the
panel once again, to cut off the power and remove power cord from wall outlet for packing the
device up.
Drain button
Reset button
PIC.5-6 Press drain button to drain
the remaining water off the
PIC.5-7 Press for 3 seconds along the
machine.
body, the device will be recovering.
Reset button on the panel of main
8) In the case of the red indicating light or Error is lighting on, to recover the machine. Please press the
small black button on the head of power cord or directly pull out the power cord plug from wall
outlet to switch off the power and then turn on the power again, after pressing for 3 seconds along
the Reset button on the panel of main body, the hydrotherapy device will be recovering. If the
machine is still not able to operate normally, please do not use it and inform our customer service
department for an arrangement of maintenance immediately.
P8
6. Troubleshooting Guide for Easy problem solving.
Indicating on panel
Power
Error
Operation
X
flashing
1time
X
no power
Lighting
X
w/o water outflow
flashing 2
Lighting
times
X
w/o water outflow
flashing 3
Lighting
times
X
w/o water outflow
flashing 4
Lighting
times
X
w/o water outflow
Lighting
P9
X
Condition
X
flashing
w/o water outflow
continuously
Debug instruction
Pull out the plugs of leakage circuit
breaker of power cord and re-insert
to wall outlet.
1.Check that the water in water
container is enough.
2. Switch the power off and turn on
the power switch on again to restart
the machine, next press the “Reset”
button for 3 seconds, and check that
the machine returns to a waiting
condition.
3. Wait approx. 5 minutes , then reproceed with the Procedure “2 ”.
4. If problem keeps the same, inform
our customer service department.
5. Check that the water in water tank
is enough.
6. After you drain the water off and
pump has stopped running, press the
drain button again to have the
machine return to the waiting
mode..
7. Product index
1 Application
1-1
Personal health care, Salon, Clinic, Hospital, Nurse on-site sevice, Trained hydrotherapist
2 Specification
2-1
Power Adaptor Input
Universal AC100~220V
2-2
Power Consumption
400W~1200W(it’s subject to the local )
2-3
Water Yield
400 ± 200c.c/min.
2
2-4
Outflow Pressure
Below 1.2Kg/cm (2.2psi)
2-5
Inlet Temperature
5 ~38
2-6
Ambient Temperature
0 ~50
3 Mechanism
3-1
Housing Material
Plastic
3-2
Housing Colour
Storage Tank Cover : Transparent Light blue
Main Body) : Brilliant White
3-3
Dimension(LxWxH)
250mm x 160mm x 250mm
3-4
Net Weight / Gross Weight
3.5g ± 0.2 Kg
4 Accessories
4-1
AC Power Cable
1 pcs
4-2
User Manual
1 pcs
4-3
Remote Controller
1 set
4-4
Silicone tube
1 pcs
4-5
Stool Steadier
1 set
4-6
Anal Tube + L type tube
15 pcs each
5 Approbation ISO 9001:13485, CE certification, GMP certification are in processing
P10