1
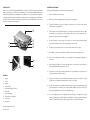
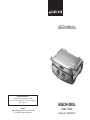
USER MANUAL
The Lakeland Guarantee....
is probably the simplest guarantee in the world!
If you are not satisfied at any time, you receive your money back!
This is our promise.
Lakeland
Alexandra Buildings, Windermere, Cumbria LA23 1BQ
Tel: 015394 88100 Web: www.lakeland.co.uk
HEALTH GRILL
Model: 13659
Helpline No: 015394 88100
INTRODUCTION
Thank you for choosing this Lakeland Health Grill. Perfect for families or entertaining, the generously sized grill
plates are large enough to cook six burgers or chicken breasts, or four panini-style sandwiches. Grilling gives a
characteristic stripe and delicious, char-grilled taste. It is healthier too, as excess fat drains away. The plates are
coated with premium non-stick and can be lifted out completely for ease of cleaning; they are also dishwashersafe. Please take a few moments to read these instructions before using your health grill for the first time, and
keep them in a safe place for future reference.
IMPORTANT SAFEGUARDS
When using this health grill, please follow these basic safety precautions.
1.
Please read all instructions before using.
2.
Make sure your electricity supply matches the voltage shown on the appliance.
3.
This grill is for household use only. It is not suitable for commercial use, or for use outdoors. The grill must
only be used for its intended purpose.
4.
Place the grill on a level, heat-resistant surface. Do not let the power cord touch any hot surfaces or hang
over the edge of your worktop, where a child could grab it. If an extension cord is needed, make sure it
matches the electrical rating shown on the appliance.
5.
Do not place the grill on or near a hot gas or electric burner, or in or near a heated oven. Keep it well away
from curtains, clothing, tea towels etc. Never place anything on top of the grill.
6.
The grill will get very hot during use. Do not touch hot surfaces; always wear oven gloves.
7.
When adding or removing food, keep hold of the handle to stop the lid from accidentally closing.
8.
Remove all food wrappings before grilling e.g. foil and clingfilm. They could damage the grill plates or
cause a fire.
9.
Always unplug the grill and let it cool down completely when not in use and before moving, cleaning or
removing the grill plates. Grasp the plug, not the cord.
9
10
10. To prevent electric shock, do not immerse the grill in water or any other liquid. Do not let the power cord
or plug get wet. Never touch with wet hands.
FEATURES
1.
Drip tray
2.
Lid lock
3.
Handle
4.
30-minute timer
5.
Temperature dial (65°C to 230°C)
6.
Ready light
7.
Non-stick grill plates
8.
Release buttons for grill plates
9.
Cord storage
10. Anti-slip feet
Operating voltage: 230V~50Hz
Power: 2000W
11. Using accessories that are not recommended by the manufacturer may cause fire, electric shock or injury.
The grill must not be operated with an external timer or remote control system.
12. The grill is not intended for use by children or infirm people unless they have been adequately supervised
by a responsible person to ensure they can use it safely. Children should be supervised to ensure they do
not play with the health grill. It must not be left unattended during use.
13. Do not use the grill if the power cord or plug show any signs of damage, or if the appliance is dropped,
damaged or working incorrectly. Call the helpline on 015394 88100 to arrange a repair by an authorised
repairer, or a replacement. Never try to repair the grill yourself as this may cause electric shock.
BEFORE USING FOR THE FIRST TIME
Carefully unpack the health grill and remove any packaging. Wipe the outside of the grill with a damp cloth, then
dry. It must not be immersed in water or any liquid.
The grill plates are easily removed for washing. If the lid is locked, slide the lock along to the open padlock
symbol. Hold the top grill plate and press the top release button to remove it. Press the lower release button
and lift out the lower grill plate. Slide out the drip tray at the back of the health grill. Wash the drip tray and grill
plates in hot, soapy water, or in the dishwasher. Rinse, then dry thoroughly and slot back into place.
USING YOUR HEALTH GRILL
This family-sized health grill cooks food from both sides, for quick and efficient results. Choose from a variety of
temperatures to suit everything from your favourite panini to a juicy steak; set the timer or select ALWAYS ON
for continuous grilling. The heating elements are precisely placed to spread heat evenly across the plates, and
the concealed drip tray catches excess fat as it runs off meat and poultry, helping to cut calories.
1.
Plug in the health grill. Select your temperature by turning the dial clockwise; the display will light up. You
may find this guide helpful.
100°C – useful for keeping grilled foods warm until serving.
150°C – for toasted sandwiches, panini etc.
200°C – for burgers, chops and chicken breasts.
230°C – try the hottest setting to sear steaks etc, whilst keeping the inside juicy and pink.
2.
Preheat the grill plates by setting the timer for 5 minutes; turn the dial clockwise. When the timer has ticked
down, a bell will ‘ping’. The green ready light should now be on, which means the grill is ready to cook.
3.
Carefully open the grill by its handle, always wearing oven gloves. Take care not to touch the hot grill plates.
Lightly brush the plates with oil and place your food on the lower grill plate. Metal utensils are best avoided
as they will scratch the non-stick. Close the lid to sandwich the food between the plates.
4.
Set the timer by turning the dial clockwise to the required number of minutes. See GRILLING GUIDE.
When the timer has ticked down to ‘0’, a bell will ‘ping’ and the grill will stop heating. If you prefer a longer
grilling time, set the timer to ALWAYS ON by turning it anticlockwise. To stop cooking, turn the dial to ‘0’.
5.
When your food is cooked, carefully open the grill by its handle and keep hold as you remove the food with
non-metal tongs or a spatula. We recommend a kitchen thermometer to check that meats and poultry are
properly cooked.
6.
Close the grill and unplug. Leave it to cool completely before removing the grill plates and drip tray for
cleaning.
GRILLING GUIDE
Please use these settings purely as a guide. All cooking times will vary, depending on the size and thickness of
your ingredients. Adjust the cooking times accordingly, and always check that food is thoroughly cooked before
serving.
FOOD
Thin beef steaks
Thick beef steaks
Burgers
Pork chops
Lamb chops
Chicken breasts
Fish fillets
Prawns
Toasted sandwich,
panini, focaccia
COOKING TIME
2-3 mins
5-7 mins
5-6 mins
5-7 mins
3-4 mins
5-6 mins
3-4 mins
2-3 mins
TEMPERATURE
230°C
230°C
200°C
200°C
200°C
200°C
200°C
200°C
2-5 mins
150°C
CARE AND CLEANING
The health grill must be switched off, unplugged and completely cool before cleaning. Wipe the outside with a
soft, damp cloth, then dry. Never immerse in water.
Slide out the drip tray. Lift out the grill plates, following the steps in BEFORE USING FOR THE FIRST TIME.
The drip tray and grill plates can be washed in hot, soapy water, or in the dishwasher. Rinse, then dry, and put
back into place. Please do not use abrasive cleaners, wire wool or scourers as they will damage the health grill.
SPACE-SAVING STORAGE
To save space in your kitchen, the health grill can be locked for storing upright. Once the grill is cool and clean,
slide the lock along to the padlock symbol. To unlock, slide the lock to the unlocked padlock symbol.
HELPFUL HINTS
•
If the grill plates do not heat up, check that you have set both the temperature and the cooking time. The
grill will not begin heating until the timer is set.
•
For the best results, choose steaks, chops, chicken breasts etc of the same thickness. Always thaw meats
and poultry before grilling, to ensure they cook right through. The health grill is not suitable for defrosting
food.
•
The grill plates are non-stick coated, but for best results we still recommend a light slick of oil.
•
After washing the grill plates, make sure that the plate with the drainage hole goes back onto the bottom
of the health grill. The drainage hole should be at the back.
PERFECT PANINI
Start with good-quality bread, such as ciabatta, and choose three or four ingredients for the filling. Cheese is
especially good for binding the sandwich together as it melts. Take care not to overfill, otherwise the bread will
be toasted before the inside has chance to cook.
Suggested fillings:
Grilled chicken, Gruyere cheese, tomato, fresh basil
Mozzarella, tomato, pesto
Feta cheese, spinach, pine nuts, roasted garlic
Smoked salmon, cream cheese, fresh dill
Sliced roast beef, Cheddar cheese, barbecue sauce
ELECTRICAL CONNECTIONS
THIS APPLIANCE MUST BE EARTHED
This appliance is fitted with a fused three-pin plug to BS1363 which is suitable for use in all homes fitted with
sockets to current specifications. If the fitted plug is not suitable for your socket outlets, it should be cut off and
carefully disposed of. To avoid an electric shock, do not insert the discarded plug into a socket.
Fitting a new plug
If for any reason you need to fit a new plug, the flexible mains lead must be connected as shown here. The wires
in the mains lead fitted to this appliance are coloured in accordance with the following code:
Earth(green/yellow)
Lightly brush the bread with olive oil, and preheat the grill to 150°C. When the ready light comes on, lightly brush
the plates with olive oil. Place the panini on the grill and close the lid. Grill for 3-4 minutes, or until golden brown.
Neutral(blue)
RECIPE IDEA
LEMON GARLIC PORK CHOPS
Serves 6
6 boneless pork loin chops
1 shallot, finely chopped
1 tablespoon Dijon mustard
1 tablespoon cider vinegar
2 cloves fresh garlic, crushed
1 tablespoon black pepper, coarsely ground
zest and juice of 1 lemon
1 tablespoon olive oil
Place the pork in a freezer bag. In a bowl, mix all the ingredients except the olive oil and pour into the bag. Fasten,
and leave in the fridge to marinate for at least 4 hours, or overnight. Take the bag out of the fridge at least an
hour before cooking.
Preheat the grill to 200°C. When the ready light comes on, lightly brush the plates with the olive oil. Place the
pork chops on the grill and close the lid. Grill for 5-7 minutes, or until thoroughly cooked.
RECYCLING YOUR ELECTRICALS
Along with many other high street retailers, Lakeland has joined a scheme whereby customers can take their
unwanted electricals to recycling points set up around the country. Visit www.recycle-more.co.uk to find your
nearest recycling point.
13amp FUSE
E
L
13amp fuse
N
Live(brown)
Connect BLUE to Neutral (N)
Connect GREEN & YELLOW to Earth (E)
Connect BROWN to Live (L)
13 amp fuse to be used
If the colours of the wires in the mains lead of this appliance do not correspond with the coloured markings
identifying the terminals in your plug, proceed as follows. The wire which is coloured green and yellow MUST
be connected to the terminal which is marked with the letter E (Earth) or coloured green. The wire which is
coloured blue MUST be connected to the terminal which is marked with the letter N (Neutral) or coloured black.
The wire which is coloured brown MUST be connected to the terminal which is marked with the letter L (Live)
or coloured red.
Before refitting the plug cover, check that there are no cut or stray strands of wire inside the plug. Use a 13 amp
BS1362 fuse. Only BSI or ASTA approved fuses should be used. If you are at all unsure which plug or fuse to
use, always refer to a qualified electrician.
Note: after replacing or changing a fuse on a moulded plug which has a fuse cover, the cover must be refitted
to the plug; the appliance must not be used without a fuse cover. If lost, replacement fuse covers can be
obtained from an electrical shop. This appliance complies with the following EEC Directives: 73/23 EEC (Low
Voltage Directive) and 89/336 EEC (EMC Directive).
0001