1
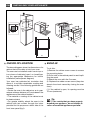
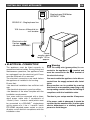
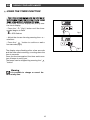
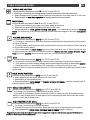
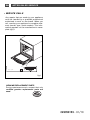
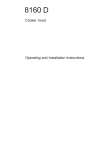
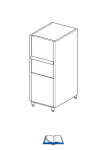
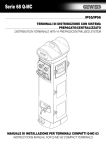
EN USER MANUAL
Oven
MO600BS*
2
TABLE OF CONTENTS
EN
NOTICES TO THE USER
• Safety Instructions
• Caring for the environment
4
5
INSTALLING YOUR APPLIANCE
• Choice of location
• Build-in
• Electrical connection
6
6
7
DESCRIPTION OF YOUR APPLIANCE
• Introduction to your oven
• Description of the accessories
• Description of your programmer
9
10
11
USING YOUR APPLIANCE
• Using the programmer
º How to set the time
º How to adjust the time
º Instant cooking
º Programmed cooking
• Using the timer function
12
12
12
13
14
16
OVEN COOKING MODES
17
TROUBLESHOOTING
18
CARING FOR AND CLEANING YOUR OVEN
• Cleaning the outer surface
• Changing the bulb
19
19
AFTER-SALES SERVICE
• Service Calls
20
3
EN
NOTICES TO THE USER
Important
— When placing dishes inside or removing
them from the oven, do not place your hands
close to the upper heating elements and use
heat-protective kitchen gloves.
Keep this user guide with your appliance. If the appliance is ever sold or transferred to another person, ensure that the
new owner receives the user guide. Please
become familiar with these recommendations before installing and using your oven.
They were written for your safety and the
safety of others.
— At the end of cooking, do not pick up oven
or grill items (grid, rotisserie,...) with your bare
hands.
— Never place aluminium foil directly in contact with the floor of the oven (see the chapter on oven description), as accumulated heat
may cause deterioration of the enamel.
• SAFETY INSTRUCTIONS
— Do not place heavy weights on the oven
door when open, and make sure that children
cannot climb or sit on it.
— This oven was designed for use by private
individuals in their homes. It is intended solely for cooking foodstuffs. This oven does not
contain any asbestos-based components.
— The oven must be turned off when cleaning
inside the oven.
— This appliance is not intended to be used by
persons (including children) with reduced
physical, sensory or mental abilities, or persons lacking experience or awareness, unless
using it with the help of a person reponsible for
their safety, or under supervision and with prior
instruction in its use.
— Please make sure children do not play with
the appliance.
— When you receive the appliance, unpack it
or have it unpacked immediately. Give it an
overall inspection. Make note of any concerns
or reservations on the delivery slip and make
sure to keep a copy of this form.
— In addition to the accessories supplied with
your oven, only use dishes capable of withstanding high temperatures (follow the manufacturer’s instructions).
— Your appliance is intended for standard
household use. Do not use it for commercial
or industrial purposes or for any other purpose than that for which it was designed.
— After using your oven, make sure that all the
controls are in their stop position.
— Do not modify or attempt to modify any of
the characteristics of this appliance. This
would be dangerous to your safety.
— Do not use your oven as a larder or to store
any items after use.
— WARNING: accessible parts may be hot
when in use. It is advisable to keep small children away from the apppliance.
— Never use steam or high-pressure devices to
clean the oven (electrical safety requirement).
— (Depending on the model): For your
safety, your oven is equipped with an AUTOMATIC STOP, if you forget to turn off your oven
by mistake. After 23 hours and 30 minutes of
continuous use, the AS (Automatic Stop) feature will be activated and your oven will turn
itself off. AS or Auto Stop will be displayed
instead of the time and a series of successive
beeps will be emitted for a short time.
— Never pull your appliance by the door handle.
— Before using your oven for the first time,
heat it while empty for approximately 15 minutes. Make sure that the room is sufficiently
ventilated. You may notice a particular odour,
or a small release of smoke. All of this is normal.
— WARNING: accessible parts may become
hot when the grill is used. It is advisable to
keep children away from the apppliance.
— When in use, the appliance becomes hot.
Be careful not to touch the heating elements
located inside the oven.
4
EN
NOTICES TO THE USER
• CARING FOR THE ENVIRONMENT
Warning
— This appliance’s packing materials are recyclable. Recycle them and play a role in protecting the environment by depositing them in
local authority containers provided for this
purpose.
— Your appliance also contains many recyclable materials. It is therefore marked with this
logo to indicate that used appliances must
not be mixed with other waste.
Recycling of the appliances organised by your manufacturer will thus
be undertaken in optimum conditions, in accordance with European
directive 2002/96/CE relating to
electrical and electronic equipment
waste. Contact your local council or your
retailer to find out the drop-off points for used
appliances that are nearest to your home.
— We thank you for your help in protecting the
environment.
Installation should only be performed
by qualified installers and technicians.
This appliance complies with the following
European directives:
- Low Voltage Directive 2006/95/CE for affixing the CE mark.
- Electromagnetic Compatibility Directive
89/336/CEE
modified
by
directive
93/68/CEE for attaching the CE mark.
- CE regulation 1935/2004 concerning materials and objects intended for contact with
food substances.
5
EN
INSTALLING YOUR APPLIANCE
560
550
585
592
70
550
• CHOICE OF LOCATION
fig.1
• BUILD-IN
The above diagrams show the dimensions of a
cabinet that will be able to hold your oven.
The oven can be installed under a work top or
in a column of cabinetry (open* or closed) having the appropriate dimensions for built-in
installation (see adjacent diagram).
To do this:
1) Remove the rubber screw covers to access
the mounting holes.
2) Drill a hole in the cabinet panel to avoid splitting the wood.
3) Attach the oven with the 2 screws.
4) Replace the rubber screw covers (they also
absorb the shock caused by closing the oven
door).
Your oven has optimised air circulation that
allows it to achieve remarkable cooking and
cleaning results if the following guidelines are
followed:
• Centre the oven in the cabinet so as to guarantee a minimum distance of 5 mm between the
appliance and the cabinet beside it.
• The material or coating of the cabinet must
be heat-resistant.
• For greater stability, attach the oven in the
cabinet with two screws through the holes
provided for this purpose on either side of the
front inner panel (fig.1).
(*) if the cabinet is open, its opening must be
70 mm (maximum).
Tip
To be certain that you have properly
installed your appliance, do not hesitate to
call on a household appliance specialist.
6
EN
INSTALLING YOUR APPLIANCE
Single-phase 20A Meter
220-240V~ 50Hz
220-240 V~ Single-phase line
16A fuse or differential circuit breaker
Electrical outlet
2 poles + earth
standard CEI 60083
Power
supply cable
length 1.50 m
approx.
• ELECTRICAL CONNECTION
Warning
The appliance must be fitted correctly to
guarantee electrical safety. During fitting and
maintenance operations, the appliance must
be unplugged from the electrical grid. Fuses
must be switched off or removed.
The electrical connections are made before
the appliance is installed in its housing.
Ensure that:
- the electrical installation has sufficient voltage,
- the electrical wires are in good condition,
- the diameter of the wires complies with the
installation requirements.
Your oven must be connected with a (standard) power cable with 3 conductors of
1.5mm2 (1 live + 1 neutral + earth) which must
be connected to a 220-240V~ single-phase
grid by means of a 1 live + 1 neutral + earth
CEI 60083 standard power socket or via an
all-poles cut-off device in compliance with the
installation rules.
The safety wire (green-yellow) is connected to the appliance’s
terminal and
must be connected to the earth terminal of
the electrical set-up.
You must enable the appliance to be disconnected from the supply network after installation.
Disconnection can be enabled by ensuring
that there is an accessible power plug or by
incorporating a switch into the fixed wiring in
compliance with the installation rules.
The fuse in your set-up must be 16 amperes.
If the power cable is damaged, it should be
replaced by the manufacturer, its after-sales
service department or a similarly qualified
person to avoid danger.
7
EN
INSTALLING YOUR APPLIANCE
Warning
We cannot be held responsible for any accident resulting from inexistent, defective or
incorrect earthing.
If the electrical installation in your residence requires any changes in order to hook up your
appliance, contact a professional electrician.
If the oven malfunctions in any way, unplug the appliance or remove the fuse corresponding
to the sector where the oven is hooked up.
8
EN
DESCRIPTION OF YOUR APPLIANCE
• INTRODUCTION TO YOUR OVEN
A
B
C
D
5
3
E
1
A
Programmer
D
Light
B
Temperature selector switch
E
Wire shelf supports
C
Function selector switch
Tip
This Guide to Installation and Use is valid for several models. Minor differences in details
and fittings may emerge between your appliance and the descriptions provided.
9
EN
DESCRIPTION OF YOUR APPLIANCE
• DESCRIPTION OF THE ACCESSORIES
• Anti-rocking safety grid (fig.1)
Rear
The grid can be used to hold all dishes and
moulds containing foodstuffs to be cooked or
browned.
It can be used for barbecues (to be placed directly on the grid).
Front
fig.1
• Multi-purpose dish (fig.2)
It serves as a cake dish and has a sloped
edge. It is used for cooking pastries such as
cream puffs, meringues, cup cakes, puff pastry, etc.
Inserted under the grid, it catches barbecue
juices and grease. It can also be used half-full
of water for double-boiler cooking methods.
Avoid placing roasts or meats directly in the
dish because this is certain to cause significant spattering on the oven walls.
fig.2
10
EN
DESCRIPTION OF YOUR APPLIANCE
• DESCRIPTION OF YOUR PROGRAMMER
A
B
C
D
E
F
G
A
Time and cooking time display
D
Cooking end time indicator
B
Temperature indicator
E
Timer indicator
C
Cooking time indicator
F
Selection touch control (cooking time and time)
G
Touch controls for setting time
11
EN
USING YOUR APPLIANCE
• USING THE PROGRAMMER
fig.1
•How to set the time
- When supplied with electricity
The display flashes at 12:00 (fig.1)
Set the time using the + and - buttons (holding
down the + or - makes the numbers go faster)
(fig.2).
fig.2
Example: 12:30
Press the “ ” touch control to validate.
The display stops flashing (fig.3).
fig.3
•How to adjust the time
fig.1
- To set the time on the clock
The function selector switch must be in the 0
position (fig.1).
Hold down the “
” button for a few
seconds until 0.00 appears. Keep held down
until the time appears again, then let go
(fig.2).
fig.2
While the time is flashing, set the time using
the selector (fig.3).
Press the “
(fig.4).
”
touch control to validate
fig.3
Warning
If there is no confirmation from the
“ ” button, the time is recorded automatically after a few seconds.
fig.4
12
EN
USING YOUR APPLIANCE
•Instant cooking
— The programmer should display only
the time.
fig.1
It should not be flashing (fig.1).
Turn the function selector to the position of
your choice.
Example: position
(fig.2).
fig.2
Your oven recommends the ideal temperature
for the chosen cooking mode (fig.3).
It is, however, possible to adjust the temperature. The temperature symbol flashes (fig.4).
Set the temperature using the + or - selector
(fig.5).
Example: temperature set to 210°C (fig.6).
fig.3
Place your dish in the oven based on the recommendations provided by the cook book.
fig.4
After these steps, the oven heats up and the temperature indicator flashes.
A series of beeps will be emitted when the oven reaches the selected temperature.
The temperature stops flashing.
fig.5
fig.6
Warning
After a cooking cycle, the cooling fan continues to operate for a period of time in order
to guarantee optimal oven reliability.
Warning
All types of cooking are done with the door closed.
13
EN
USING YOUR APPLIANCE
• PROGRAMMED COOKING
- Cooking with immediate start and programmed duration
- Select the desired cooking mode and adjust the
temperature (fig. 1).
Example: position
- Press the “
,
fig.1
temperature 200°.
” button until the cooking time
indicator flashes “
”.
fig.2
The display flashes 0:00 to indicate that you can
now adjust the setting (fig. 2).
Example: 25 mins cooking time (fig.3).
The cooking time is automatically recorded after
a few seconds.
The cooking time display stops flashing and returns to temperature mode (fig.4).
The countdown of the cooking time begins immediately after it has been set.
fig.3
After these three steps, the oven heats up:
A series of beeps will be emitted when the oven
reaches the selected temperature.
At the end of cooking (end of programmed time),
- the oven stops,
- 0:00 is displayed (fig.5),
- A series of beeps is emitted for a few minutes.
The beeps can be stopped by pressing the “ ”
button.
fig.4
fig.5
The display shows the time once again when the
function selector switch is returned to 0 (fig.6),
fig.6
14
EN
USING YOUR APPLIANCE
• PROGRAMMED COOKING
- Cooking with delayed start and chosen
cooking end time
Proceed as with programmed cooking.
- After setting the cooking time, press the
“ ” button until the end of cooking indicator
flashes “
” (fig. 1)
fig.1
The time display flashes to indicate that you
can now adjust the setting (fig. 2).
- Press the + or - touch control to set the desired cooking end time.
Example: end of cooking at 13:00 (fig.3).
fig.2
The cooking end time is automatically recorded after a few seconds.
The cooking end time display stops flashing.
After these 3 steps, the oven heating is de layed so that cooking ends at 13:00.
fig.3
At the end of cooking (end of programmed
time),
- the oven stops,
- 0:00 is displayed,
- A series of beeps is emitted for a few minutes. The beeps can be stopped by pressing
the “ ” button.
The display shows the time once again when
the function selector switch is returned to 0
(fig.4),
fig.4
In the case of programmed cooking cycles,
the cavity lights up until cooking begins, and
remains lit until cooking is finished.
15
EN
USING YOUR APPLIANCE
• USING THE TIMER FUNCTION
- Your oven’s programmer can be used as an
independent timer that allows you to count
down a time without operating the oven.
In this case, the timer display has priority over
the clock display.
- Press the “
” (fig.1) button until the timer
symbol begins to flash
fig.1
-> 0.00 flashes.
- Adjust the chosen time by pressing the + or selectors.
- Press the “
“ button to confirm or wait a
few seconds (fig.2).
fig.2
The display stops flashing after a few seconds
and the timer starts working, counting down the
time in seconds.
Once the time has expired, the timer emits a series of beeps to notify you.
The beeps can be stopped by pressing the “
” button.
Warning
It is possible to change or cancel the
timer at any time.
16
EN
OVEN COOKING MODES
*
CIRCULARE HEATING
°C min 35°C max 235°C)
(recommended temperature180°
•Cooking is controlled by the heating element located at the back of the oven and the fan
• Rapid temperature increase: Some dishes can be placed in the oven while it is still cold.
• Recomended for meat, fish, vegetables, preferably placed in a terracotta dish.
TRADITIONAL
(recommended temperature 240°C min 35°C max 275°C)
• Cooking controlled by the upper and lower heating elements.
• Requires preheating before placing the dish in the oven.
• Recommended for slow, gentle cooking: rich game... For retaining the juices in red meat
roasts. For simmering in a covered stew pan dishes that were begun on the hob (c
coq au vin,
stew).
PULSED OVEN SHELF
(recommended temperature 205°C min 35°C max 275°C)
• Cooking is controlled by the lower element combined with reduced input from the grill
and use of the fan.
• Cooking heat from the bottom with a small amount of heat from the top. Place the grid
on the lowest shelf support.
• Recommended for moist dishes (quiches, juicy fruit tarts, etc...). The crust will be thocakes, brioche, kugel roughly cooked on the bottom. Recommended for dishes that rise (c
hopf...) and for soufflés that will not be stuck by a crust formed on the top.
*
ECO
(recommended temperature 200°C min 35°C max 275°C)
• Cooking is controlled by the upper element with some heat from the lower element.
• This position provides energy saving while preserving the quality of thecooked poultry.
• Place the poultry in a terracotta dish, preferably on the grid in the first shelf
support.There is no need to preheat the oven. You can turn the poultry half-way through cookingif you wish.
HOLD WARM FUNCTION
(recommended temperature 80°C min 35°C max 100°C)
•Heat regulated by the upper element with use of fan.
•Stabilisation at low temperatures.
•Recommended for rising dough for breads, brioche, and cakes... without exceeding 40°C
(warming plates, defrosting).
GRILL FAN ASSISTED
(recommended temperature 200°C min 180°C max 230°C)
•Cooking controlled by the upper element and by the fan.
•No need for preheating. Roasts and poultry that are crispy and juicy all the way around.
Ability to roast a large piece of meat placed on the special grid with the hollow dish underneath to catch the cooking juices.
HIGH TEMPERATURE GRILL
(recommended temperature 275°C min 180°C max 275°C)
• Cooking controlled by the upper element.
• Preheat the oven for five minutes. Slide the drip tray onto the bottom shelf support.
• Recommended for grilling chops, sausages, toast or prawns placed on the grid.
* Programme(s) used to obtain the results indicated on the energy label in compliance with European standard EN 50304 and in
accordance with European Directive 2002/40/EC.
17
EN
TROUBLESHOOTING
If you have a doubt about the correct functioning of your oven, this does not necessarily mean that there is a malfunction. In any event, check the following items:
YOU OBSERVE
THAT…
POSSIBLE
CAUSES
The oven is not heating.
- The oven is not connected
to the power supply.
- Your fuse is out of order.
- The selected temperature
is too low.
The oven light is not
working.
WHAT SHOULD YOU DO?
➡ Plug in your oven.
➡ Replace the fuse in your electrical
set-up and check its capacity (16A).
➡ Increase the selected temperature.
➡ Change the bulb.
- The light is out of order.
- The oven is not connected ➡ Plug in your oven or change the
or the fuse is not working. fuse.
➡ The recommended temperature of
your choice has been reached.
- At the end of a cooking ➡ Your programmed cooking cycle is
cycle.
finished.
- During cooking.
Your oven starts bee ping.
Warning
Repairs to your appliance should only be performed by professionals. Non-standard repairs may be a source of danger for the user.
Tip
In all circumstances, if your efforts are not sufficient, contact the After-Sales Service
Department without delay.
18
EN
CARING FOR AND CLEANING YOUR OVEN
• CLEANING THE OUTER SURFACE
To clean the electronic programmer window and the oven door, use a soft cloth and a special product for glass-cleaning.
Do not use abrasive cleaning products or hard metal scrapers to clean the glass door of the oven,
as they could scratch the surface and the glass could break.
• CHANGING THE BULB
Warning
Disconnect your oven before performing any task on the bulb to avoid the risk of electric
shock and, if necessary, let the appliance cool down.
Tip
To unscrew the port and the bulb, use a rubber glove, which will make disassembly
easier.
The bulb is located on the ceiling of your oven’s
cavity.
a) Unplug the oven.
Bulb
b) Unscrew the lighting port (fig.1).
c) Unscrew the bulb in the same direction.
Bulb specifications:
- 15 W
- 220-240 V ~
- 300°C
- E 14 cap
Unscrew
d) Replace the bulb then reposition the port
and reconnect your oven.
19
View Port
fig.1
EN
AFTER-SALES SERVICE
• SERVICE CALLS
Any repairs that are made to your appliance
must be handled by a qualified professional
authorised to work on the brand. When you
call, mention your appliance’s complete reference (model, type, serial number). This information appears on the manufacturer’s nameplate (fig.1).
BRANDT APPLIANCES SAS
7 rue Henri Becquerel
92500 RUEIL MALMAISON
MADE IN FRANCE
230V ~ 50 Hz
fig.1
GENUINE REPLACEMENT PARTS
During maintenance work, request that only
certified genuine replacement parts are
used.
CZ5700193 - 01/10