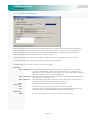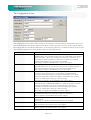
1
ANS Documentation
Applied Network Solutions
11 Banbury Avenue
Slough, Berkshire SL1 4LH
User Manual
User Manual
ANS Email Sender
y = loga x2
ANS Software
User Manual
The information recorded in this
document will provide a detailed
report of events and findings at the
clients site
ex – 1 = 1 – (1-x + (3x)2
ex
2!
If there are any questions please do
not hesitate to contact someone
within Applied Network Solutions
Tel 01753 524222
Fax 01753 517111
E-mail [email protected]
x
f(x) = e -4x
{
int i, n;
for (i=0, i<n, i++)
}
Applied Network Solutions
Page 1 of 7
ANS Documentation
Applied Network Solutions
11 Banbury Avenue
Slough, Berkshire SL1 4LH
User Manual
© Applied Network Solutions
Limited
11 Banbury Avenue
Slough Berkshire
SL1 4LH
Copyright Applied Network Solutions Limited, 2001,2002
All rights reserved. No part of this publication may be reproduced, stored in a retrieval system, or transmitted, in any form
or by any means, electronic, mechanical, photocopying, and recording or otherwise, without the prior permission of
Applied Network Solutions Limited
Page 2 of 7
ANS Documentation
Applied Network Solutions
11 Banbury Avenue
Slough, Berkshire SL1 4LH
User Manual
Contents
1. System Requirements.......................................................................................................................................... 4
2. Installation Instructions...................................................................................................................................... 4
3. Using ANS EmailSender .................................................................................................................................... 5
The Configuration Screen. ................................................................................................................................. 6
4. Un-installation .................................................................................................................................................... 7
Page 3 of 7
ANS Documentation
Applied Network Solutions
11 Banbury Avenue
Slough, Berkshire SL1 4LH
User Manual
1. System Requirements
1.
2.
3.
4.
Microsoft Windows 98, 98SE, NT4 (Server & Workstation) SP6, 2000 (Server & Pro), XP (Home & Pro)
128MB RAM
20MB Hard drive space (10MB free on system drive), plus enough TEMP space to hold the largest
attachment to be sent. 50MB recommended.
Permanent TCP/IP connection to an SMTP server (this may be over a transparent dial on demand router).
2. Installation Instructions
1.
2.
3.
4.
Run the setup. Select your required installation type (see below).
If the setup routine needs to update the Windows Installer, the machine will reboot. Once the machine
has rebooted, start setup again.
Follow the on screen prompts
Change the installation directory when prompted (if required)
NB: Due to restrictions in effect on Windows 2000 and later operating systems it is recommended that the
installation directory NOT be inside of the “Program Files” folder unless the folder permissions are changes to allow
write access to all users on the network for the “Attachments” directory.
Installation Types:
If the machine you are installing EmailSender on already has an operational SQLBase client then you can chose the
“Program only” install type and skip the following section, otherwise perform a “full install” and follow the steps
below:
1.
2.
3.
Configure the SQL.INI which is installed along with ANS EmailSender. Edit the section marked
[win32client.ws32] and modify the SERVERPATH line with the TCP/IP address of your SQLBase server
e.g. SERVERPATH=SERVER1,10.10.10.10/*
Replace the “127.0.0.1” part with the TCP/IP address of your server.
Reboot the machine and log in (if NT/2000/XP).
When the email sender starts up upon logon it will check for a default configuration, if one is found it will prompt
you to update it:
1.
2.
Enter in the correct configuration details. See usage section for more information on these items. Ensure
Database name and SMTP server name are correct before pressing OK.
Answer “Yes” to the “Save changes to INI” prompt.
At this point the Email Sender will minimise to the task bar. Installation is complete.
Page 4 of 7
ANS Documentation
Applied Network Solutions
11 Banbury Avenue
Slough, Berkshire SL1 4LH
User Manual
3. Using ANS EmailSender
The above screenshot shows what the main GUI looks like when an email is being sent. The session information
section details how many emails have been processed since the program was started. It is worth noting that this
number will be the number of emails both sent and failed combined. The scrolling blue progress bar is only an
indicator that the program is operating and not "hung" or crashed.
The Current Email section is read-only. It displays summary data about the email which is being processed.
At the very bottom of the screen the current status of the program is displayed.
The menus allow various aspects of the program to be controlled.
File menu:
Open configuration This item will read in the configuration from the "config.ini" file, located in the
program's current directory. This can be used whilst testing out configurations to
reload a known set of settings into the program, or to load changes made to the INI
file directly without having to restart the application.
Save Configuration This menu writes the current settings in use back to the config.ini file so they will be
used even after a computer restart.
Edit configuration This menu brings up the edit configuration screen, allowing the current settings to
be changed. This screen will be detailed in its own section.
Exit
Exits the program after the current email has been sent.
Scan menu:
Start
This allows the program to query the database and process emails.
Stop
This suspends the processing of email (useful if you are performing database tasks
and want to prevent ANS EmailSender from accessing the database.
Help menu:
About
Displays a brief description of the program and the version number.
Page 5 of 7
ANS Documentation
Applied Network Solutions
11 Banbury Avenue
Slough, Berkshire SL1 4LH
User Manual
The Configuration Screen.
The configuration screen is where all the settings can be changed to suit the installation environment. This can be
accessed from the File menu (Edit Configuration). All the settings correspond to an entry in the config.ini. Editing
the config.ini and choosing "Read Configuration" or restarting the application, or editing the settings in the program
and saving the configuration are both perfectly valid ways of changing settings.
Setting Name
SMTP Server
SMTP Port
Attach File Dir
Temp Dir
Scan Interval
Database
Username
Password
Description
This is the internet address of the SMTP (outbound mail) server you wish
EmailSender to use for the email. This can be any valid SMTP server which is
always accessible - this can be a machine on the LAN or an ISP's server so
long as there is either a permanent connection or some dial-on-demand
software which makes it appear to always be available.
This setting corresponds to the SMTPServer entry in the config.ini
The TCP/IP port EmailSender should use to contact the SMTP server.
Normally this will stay on 25, however if proxy servers are being used then it
may need adjustment. If in doubt contact the network administrator.
This setting corresponds to the SMTPPort entry in the config.ini
This field shows the path EmailSender is expecting any attachment files to be
located in. This path can point to any local drive or mapped network
resource, however if this directory becomes unavailable (if on a network
share) then email with attachments will fail to send. Either type a path in
directly, or double-click to bring up a directory dialog.
This setting corresponds to the AttachFileDir entry in the config.ini
This field shows the path which EmailSender will use for its temporary files.
This will often be C:\WINDOWS\TEMP or c:\temp etc, however any local
path with enough disk space to hold 1.5 times the size of the largest
attachment you intend to email out can be used. Either type a path in
directly, or double-click to bring up a directory dialog.
This setting corresponds to the TempDir entry in the config.ini
This is the number of seconds between checks for new email requests.
Recommended setting is between 60 and 180 (1 to 3 minutes).
This corresponds to the ScanInterval entry in the config.ini
Enter the name of the database which EmailSender should read the email
requests from.
This setting corresponds to the DatabaseName entry in the config.ini
This is the username EmailSender should log into the database with.
This corresponds to the Username entry in the config.ini
This is the password EmailSender should use to log into the database.
This corresponds to the Password entry in the config.ini
Page 6 of 7
ANS Documentation
Applied Network Solutions
11 Banbury Avenue
Slough, Berkshire SL1 4LH
User Manual
Once the settings have been correctly entered and saved the program will process all requests stored in the
database. Once it has processed the request the program will update the status of the request in the database
(success or failure).
Upon installation EmailSender writes an entry called ANSEmailSender in the Registry under
HKEY_LOCAL_MACHINE\Software\Microsoft\Windows\CurrentVersion\Run which starts the application every
time the machine is booted and logged in. This saves you adding it to the startup group. Although you may delete
the registry entry and place a shortcut in the startup group if you wish.
NB: When creating shortcuts remember to set the "startup in" directory to the path of the executable so that
EmailSender can find its config.ini.
4. Un-installation
To uninstall ANS EmailSender use the "Add/Remove Programs" control panel applet (Start, Settings, Control
Panel)
Page 7 of 7