1
Network User’s Guide
1
Copyright information
Copyright © 2008 Oki Data Americas, Inc. All rights reserved.
Color Access Policy Manager (CAPM) User’s Guide
P/N 59309701, Revision 1.0
Disclaimers
Every effort has been made to ensure that the information in
this document is complete, accurate, and up-to-date. The
manufacturer assumes no responsibility for the results of
errors beyond its control. The manufacturer also cannot
guarantee that changes in software and equipment made by
other manufacturers and referred to in this guide will not affect
the applicability of the information in it. Mention of software
products manufactured by other companies does not
necessarily constitute endorsement by Oki.
While all reasonable efforts have been made to make this
document as accurate and helpful as possible, we make no
warranty of any kind, expressed or implied, as to the accuracy
or completeness of the information contained herein.
Screen shots are representative only and may differ slightly
from what you see on your operating system.
The most up-to-date manuals and/or drivers are available
from: http://www.okiprintingsolutions.com
Notes
NOTE
A note appears like this. A note provides
additional information to supplement the main
text which helps you to use and understand
the product.
Trademark Information
Oki is a registered trademarks of Oki Electric Industry Company, Ltd.
Microsoftand Windows are either registered trademarks or
trademarks of Microsoft Corporation in the United States and/or other
countries.
Other product names and brand names are registered trademarks or
trademarks of their proprietors.
CAPM User’s Guide
2
Contents
Introduction. . . . . . . . . . . . . . . . . . . . . . . . . . . . . . . . . 4
To Open CAPM . . . . . . . . . . . . . . . . . . . . . . . . . . . . . . 4
System Requirements . . . . . . . . . . . . . . . . . . . . . . . . . 5
Setting Up Printers/MFPs . . . . . . . . . . . . . . . . . . . . . . 6
Add a Printer . . . . . . . . . . . . . . . . . . . . . . . . . . . . . . . 6
Delete a Printer . . . . . . . . . . . . . . . . . . . . . . . . . . . . 11
Change Configuration . . . . . . . . . . . . . . . . . . . . . . . . 12
Delete a Group . . . . . . . . . . . . . . . . . . . . . . . . . . . . 13
Setting Up Policy . . . . . . . . . . . . . . . . . . . . . . . . . . . . 14
New Policy. . . . . . . . . . . . . . . . . . . . . . . . . . . . . . . . 14
Setting Up a New Policy . . . . . . . . . . . . . . . . . . . . . 15
For an individual user (User Name tab) . . . . . . . . 15
For an Application (Application tab) . . . . . . . . . . . 18
For Specific Documents (Document tab) . . . . . . . . 19
For Individual Computers (Host Name tab) . . . . . 21
Edit a Policy. . . . . . . . . . . . . . . . . . . . . . . . . . . . . . . 23
Delete a Policy . . . . . . . . . . . . . . . . . . . . . . . . . . . . . 24
Temporarily Disable a Policy . . . . . . . . . . . . . . . . . . . 25
To Re-Enable Policies . . . . . . . . . . . . . . . . . . . . . . . . 26
Status. . . . . . . . . . . . . . . . . . . . . . . . . . . . . . . . . . . 27
Logs . . . . . . . . . . . . . . . . . . . . . . . . . . . . . . . . . . . . . . 28
Acquire Logs . . . . . . . . . . . . . . . . . . . . . . . . . . . . . . 28
To acquire the job log for a printer: . . . . . . . . . . . . 28
To change the number of logs acquired: . . . . . . . . . 28
Display Log . . . . . . . . . . . . . . . . . . . . . . . . . . . . . . . 29
A4 Equivalences . . . . . . . . . . . . . . . . . . . . . . . . . . 31
CAPM User’s Guide
3
Introduction
The Color Access Policy Manager (CAPM) utility allows you to
monitor printer usage and control printing when used with
compatible Oki printers.
Employ this utility to review recent printer usage and to
configure printers with a policy that establishes printing
privileges and restrictions based on applications, documents,
URL's and user login names.
To Open CAPM ____________________
Click Start > Programs > Okidata > Color Access Policy
Manager > Color Access Policy Manager.
CAPM User’s Guide
4
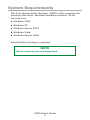
System Requirements
The Color Access Policy Manager (CAPM) utility supports the
following Microsoft® Windows operating systems, 32-bit
versions only:
• Windows 2000
• Windows XP
• Windows Server 2003
• Windows Vista
• Windows Server 2008
Administrator privilege is required.
NOTE
64-bit versions are not supported.
CAPM User’s Guide
5
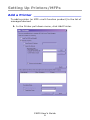
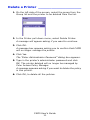
Setting Up Printers/MFPs
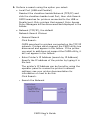
Add a Printer _____________________
To add a printer (or MFP—multi function product) to the list of
managed devices.
1. In the Printer pull-down menu, click Add Printer.
CAPM User’s Guide
6
2. Perform a search using the option you select.
• Local Port (USB and Parallel)
Deselect the checkbox beside Network (TCP/IP) and
click the checkbox beside Local Port, then click Search.
CAPM searches for printers connected to the USB or
Parallel port. Only printers that support Color Access
Policy Managers will be discovered and displayed in the
listbox.
• Network (TCP/IP), the default
Network Search Choices
- General Search
Click Search.
CAPM searches for printers connected on the TCP/IP
network. Printers which support the CAPM utility are
discovered and appear in the listbox. If the printer
you want to add does not support the CAPM utility, it
will not appear in the listbox.
- Enter Printer's IP Address (search by IP Address)
Specify the IP address of the printer by typing it in
the box.
The printer's IP Address can be found by using the
operator panel to review the printer's network
settings: see your printer documentation for
information on how to do this.
Click Search.
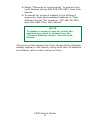
- Search the Network
CAPM User’s Guide
7
> Select “Discover on local subnet” to search from
Local Subnet (using 255.255.255.255), then click
Search.
> To search for printers located in the different
segments, type the broadcast address in “New
Address Scope” (for example, 192.168.14.255)
and click Add. Then click Search.
NOTE
To delete a scope of search, select the
address you want to delete from the
“Current Address Scope” list and click
Delete.
The printers that support the Color Access Policy Manager
feature appear in the listbox, along with their IP address
and Status, after a short period of time.
CAPM User’s Guide
8
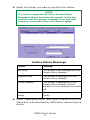
3. Select the printer you want to use from the listbox.
NOTE
If a printer supports the Color Access Policy
Manager feature but does not appear in the list,
confirm that the printer is Ready or on-line and
properly connected, then click Search again.
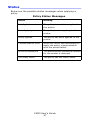
Listbox Status Meanings
Status
Meaning
No Policy
The printer is not managed by Color
Access Policy Manager.
Applied Policy
The printer is managed by Color
Access Policy Manager.
Policy Disabled
The printer is managed by Color
Access Policy Manager but the
policies for it are temporarily turned
off.
Managed by Another
Utility
The printer is managed by Another
Utility.
4. In the “Descriptive Name” box, enter a name of up to 32
characters to be displayed by CAPM when referencing the
printer.
CAPM User’s Guide
9
5. Next assign the printer to a group:
- Click “Select Existing Group”, and choose from the list
of the existing printer groups.
OR
- Click “Create New Group” and type in the name of the
group you want to add.
6. Click Add Printer.
• If the printer is not already managed by the
CAPM utility:
A message will appear asking if you want to manage it
by Color Access Policy Manager.
a.Click Yes.
A dialog box appears asking you to enter the printer's
Administrator Password.
b.Type in the administrator password and click OK.
The printer added will now be managed by Color
Access Policy Manager.
• If the printer is currently managed by Print Job
Accounting
A message will appear asking if you want to manage it
by the CAPM utility.
a.Click Yes.
You will be requested to enter the printer's
Administrator Password.
b.Type in the administrator password and click OK.
The Enter Job Accounting Server ID box appears.
c.Type in the Server ID and click OK.
The printer added will now be managed by the CAPM
utility.
7. To display the Job Accounting Server IDs, click “Server
ID” in the Help menu of the Print Job Accounting
software.
A message appears asking if you want to delete Job
Account ID. If you click OK, the Job Account ID is deleted
CAPM User’s Guide
10
Delete a Printer ___________________
1. On the left side of the screen, select the group from the
Group list and the printer to be deleted from the list.
2. In the Printer pull-down menu, select Delete Printer.
A message will appear asking if you want to continue.
3. Click OK.
A message box appears asking you to confirm that CAPM
will no longer manage the printer.
4. Click Yes.
The “Enter Administrator Password” dialog box appears.
5. Type in the printer's administrator password and click
OK. The printer deleted will no longer be managed by
Color Access Policy Manager.
A message appears asking if you want to delete the policy
in this printer.
6. Click OK, to delete all the policies.
CAPM User’s Guide
11
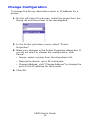
Change Configuration
To change the Group, descriptive name or IP address for a
printer:
1. On the left side of the screen, select the group from the
Group list and the printer to be reconfigured.
2. In the Printer pull-down menu, select “Printer
Properties”.
3. Make your changes in the Printer Properties dialog box. If
you do not want to change the configuration, click
Cancel.
- Group: select a group from the drop-down list.
- Descriptive Name: up to 32 characters.
- Change Address: click “Change Address” to change the
port or the IP address for the printer.
4. Click OK.
CAPM User’s Guide
12
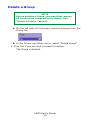
Delete a Group
NOTE
Before deleting a Group, you must first remove
all the printers assigned to the Group (see
“Delete a Printer" above).
1. On the left side of the screen, select the group from the
Group list.
2. In the Printer pull-down menu, select “Delete Group”.
2. Click Yes if you are sure you want to delete.
The Group is deleted.
CAPM User’s Guide
13
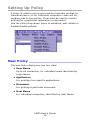
Setting Up Policy
A Policy is used to set up and monitor/maintain profiles for
individual users—or for individual computers—who will be
sending jobs to the printer, It can also be used to restrict
printing for a particular application or document.
Use the Policy drop-down menu to establish, edit, delete or
enable/disable policies,
New Policy _______________________
The new Policy dialog box has four tabs:
• User Name
Up to 60 characters, for individual users identified by
Login Name.
• Application
For printing from specific applications.
• Document
For printing a particular document.
• Host Name
For individual computers, identified by Host Name.
CAPM User’s Guide
14
Each tab allows the following printing parameters to be
established:
• Mono Only
Color printing is not allowed. If it can, the printer converts
color jobs to monochrome before printing. Otherwise,
color printing jobs are cancelled.
• Color Permitted
Color printing is allowed.
• No Printing
No printing at all is allowed.
Setting Up a New Policy
For an individual user (User Name tab)
NOTE
To set the general policy for unregistered
users, click "OtherLoginNames" in the listbox
to the right:
1. From the Policy pull-down menu, select New Policy.
2. On the User Name tab, enter the User Name in one of
four ways:
CAPM User’s Guide
15
• Manual
Type the person’s Login name in the “Enter User Name”
box.
• Printer’s Log
Click this to display the Job Log for the printer. Select
the name from the User column.
• File
Select the file for importing the user name and click
Open; the list of imported user names appears. The
import file describes the user name for each user in a
line. Select from the list the user name you want to
add.
• Server/Networks
Select the server for importing the user name; the list
of imported user names appears. If you do not have
access to importing the user name from the server, the
Enter Password dialog box will appear. Select from the
list the user name you want to add.
3. Select the radio button beside the Access Level you wish
to establish:
4. Click Add.
5. Click Apply
The Select Printer dialog box appears.
CAPM User’s Guide
16
6. Add to the “Selected Printer” list a printer to which you
wish to apply the new policy.
NOTE
To add a printer to the “Selected Printer” list,
select its Group from the Group list, then
select the printer or printers from the Printer
list. Click Add.
To delete a printer from the “Selected Printer”
list, select it (you can select more than one)
and click Delete.
7. Click Apply.
The confirmation message appears.
NOTE
For the meaning of the information in the
Status column, see the “Policy Status
Messages” table on page 27.
8. Click OK,
The “Enter Administrator Password” dialog box appears.
9. Type in the printer's administrator password and click
OK.
The policies will be applied to the printers in the “Selected
Printer” list.
10. Click Close.
CAPM User’s Guide
17
For an Application (Application tab)
NOTE
To set the policy for unregistered applications,
click "OtherApplications" in the listbox to the
right:
1. From the Policy pull-down menu, select New Policy.
2. On the Application tab, enter the application name either
by typing it manually (up to 60 characters) in the “Enter
Application Name” box, or by selecting it from the
Printer’s Log listbox.
3. Select the radio button beside the Access Level you wish
to establish:
4. Click Add.
5. Click Apply
The Select Printer dialog box appears.
NOTE
For the meaning of the information in the
Status column, see the “Policy Status
Messages” table on page 27.
CAPM User’s Guide
18
6. Add to the “Selected Printer” list a printer to which you
wish to apply the new policy.
NOTE
To add a printer to the “Selected Printer” list,
select its Group from the Group list, then
select the printer or printers from the Printer
list. Click Add.
To delete a printer from the “Selected Printer”
list, select it (you can select more than one)
and click Delete.
7. Click Apply
The confirmation message appears.
8. Click OK,
The ““Enter Administrator Password” dialog box appears.
9. Type in the printer's administrator password and click
OK.
The policies will be applied to the printers in the “Selected
Printer” list.
10. Click Close.
For Specific Documents (Document tab)
NOTE
To set the policy for unregistered documents,
click "OtherURLs" in the listbox to the right:
1. From the Policy pull-down menu, select New Policy.
2. On the Document tab, enter the document name either
by typing it manually (up to 80 characters) in the “Enter
CAPM User’s Guide
19
Document Name / URL” box, or by selecting it from the
Printer’s Log listbox.Incude the file name extension (e.g.,
“.doc”) in the name. You can use the Asterisk symbol (*)
as a wild card.
NOTES
Use of * elsewhere or ** is not acceptable as
a wild card.
Document names are not case sensitive.
3. Select the radio button beside the Access Level you wish
to establish:
4. Click Add.
5. Click Apply
The Select Printer dialog box appears.
NOTE
For the meaning of the information in the
Status column, see the “Policy Status
Messages” table on page 27.
CAPM User’s Guide
20
6. Add to the “Selected Printer” list a printer to which you
wish to apply the new policy.
NOTE
To add a printer to the “Selected Printer” list,
select its Group from the Group list, then
select the printer or printers from the Printer
list. Click Add.
To delete a printer from the “Selected Printer”
list, select it (you can select more than one)
and click Delete.
7. Click Apply
The confirmation message appears.
8. Click OK,
The “Enter Administrator Password” dialog box appears.
9. Type in the printer's administrator password and click
OK.
The policies will be applied to the printers in the “Selected
Printer” list.
10. Click Close.
For Individual Computers (Host Name tab)
NOTE
To set the policy for unregistered computers,
click "OtherHostNames" in the listbox to the
right:
1. From the Policy pull-down menu, select New Policy.
CAPM User’s Guide
21
2. On the Host Name tab, enter the computer’s host name
either by typing it manually (up to 60 characters) in the
“Enter Host Name” box, or by selecting it from the
Printer’s Log listbox
3. Select the radio button beside the Access Level you wish
to establish:
4. Click Add.
5. Click Apply
The Select Printer dialog box appears. Add to the
NOTE
For the meaning of the information in the
Status column, see the “Policy Status
Messages” table on page 27.
“Selected Printer” list a printer to which you wish to apply
the new policy.
NOTE
To add a printer to the “Selected Printer” list,
select its Group from the Group list, then
select the printer or printers from the Printer
list. Click Add.
To delete a printer from the “Selected Printer”
list, select it (you can select more than one)
and click Delete.
6. Click Apply
CAPM User’s Guide
22
The confirmation message appears.
7. Click OK,
The “Enter Administrator Password” dialog box appears.
8. Type in the printer's administrator password and click
OK.
The policies will be applied to the printers in the “Selected
Printer” list.
9. Click Close.
Edit a Policy ______________________
NOTE
For the meaning of the information in the
Status column, see the “Policy Status
Messages” table on page 27.
1. Select from the Group list the group to which the printer
belongs, then select from the Printer list the printer
which contains the policy you want to edit.
2. In the Policy drop-down menu, select Edit Policy.
The Policy dialog box displays the policy acquired from the
printer.
3. Click the tab for which you wish to make changes.
4. In Policy listbox on the right, select the Login Name,
Application, Document Name/URLs or Host Name for
which you wish to make changes.
5. Click the radio button for the revised type of access you
want, then click Change.
6. CLick Apply.
7. Select the appropriate Group from the Group drop-down
list, then click the appropriate printer(s) from the listbox.
8. Click Add.
The printer(s) appear in the Selected Printer listbox on the
right.
9. Click Apply. then click OK
CAPM User’s Guide
23
10. Type in the printer’s administrator password and click
OK.
Policy Applied appears in the Status column of the listbox.
11. Click Close yo go back to the Policy dialog box.
12. To make additional changes, click another tab. If you are
through making changes, click Close.
Delete a Policy _________________________________
NOTE
For the meaning of the information in the
Status column, see the “Policy Status
Messages” table on page 27.
1. In the Policy drop-down menu, select Delete Policy.
The Select Printer dialog box appears.
2. Select the appropriate Group from the Group drop-down
menu, then in the listbox select the printer(s) you wish
to delete and click Add.
The printer(s) appear in the “Selected Printer” listbox on
the right.
3. Select the printer(s) in the “Selected Printers” listbox
that you wish to disable, then click Delete.
The selected printer(s) disappear from the listbox.
4. Click Close.
CAPM User’s Guide
24
Temporarily Disable a Policy _______________
NOTE
For the meaning of the information in the
Status column, see the “Policy Status
Messages” table on page 27.
To temporarily turn off the policies for a selected printer:
1. In the Policy drop-down menu, select Disable Policy.
The Select Printer dialog box appears.
2. Select the appropriate Group in the Group drop-down
list, then in the listbox select the printer(s) for which you
wish to temporarily disable the Policy settings. Click Add.
The printer(s) appear in the “Selected Printer” listbox on
the right.
3. Select the printers in the “Selected Printers” listbox that
you wish to disable, then click Apply.
The confirmation message appears.
4. Click OK.
The “Enter Administrator Password” dialog box appear
5. Type in the printer's administrator password and click
OK.
The policies of the printers in the [Selected Printer] list
change Status to Policy Applied.
6. Click Close.
CAPM User’s Guide
25
To Re-Enable Policies ________________________
NOTE
For the meaning of the information in the
Status column, see the “Policy Status
Messages” table on page 27.
To turn back on the policies that have been temporarily turned
off for a printer or printers:
1. In the Policy drop-down menu, select Enable Policy.
The Select Printer dialog box appears.
2. Select the appropriate Group in the Group drop-down
list, then in the listbox select the printer(s) for which you
wish to re-enable the Policy settings. Click Add.
The printer(s) appear in the “Selected Printer” listbox on
the right.
3. Select the printers in the “Selected Printers” listbox that
you wish to re-enable, then click Apply.
The confirmation message appears.
4. Click OK.
The “Enter Administrator Password” dialog box appear
5. Type in the printer's administrator password and click
OK.
The policies of the printers in the “Selected Printer” list
change Status to Policy Applied.
6. Click Close.
CAPM User’s Guide
26
Status ___________________________
Below are the possible status messages when applying a
policy.
Policy Status Messages
Status
Meaning
Not Applied
The policy has not been applied to
the printer.
Now Applying
The policy is now applying to the
printer.
Policy Applied
The policy has been applied to the
printer.
Communication Error
When the utility was attempting to
apply the policy, communication
with the printer failed.
Incorrect password
The administrator password entered
for the printer is incorrect.
Too many items
The policy has too many items.
CAPM User’s Guide
27
Logs
Acquire Logs ______________________
To acquire the job log for a printer:
NOTE
Acquiring a job log for a printer generates a
report of the most recent jobs sent to that
printer. The default number of jobs to be
acquired is 100, but any number from 1 to
1000 can be specified (see below),
1. Select the appropriate Group from the Group drop-down
list, then in the listbox select the printer whose log you
wish to acquire.
2. In the Log drop-down menu, click Acquire Logs.
A message confirming that the logs have been
successfully acquired will be displayed.
The job log for that printer will appear in the CA{M
window.
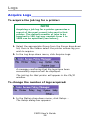
To change the number of logs acquired:
1. In the Option drop-down menu, click Setup….
The Setup dialog box appears.
CAPM User’s Guide
28
2. Type in the maximum number of logs to be acquired
(from 1 to 1000). and click OK.
NOTE
Some printers have less memory available for
storing job logs and may not be able to provide
the maximum number of job logs specified.
Display Log _______________________
To display the latest job log acquired from a printer, select the
appropriate Group from the Group drop-down list, then in the
listbox click the printer whose log is to be displayed. "
NOTE
There are items that are not supported by
some printers and drivers. The column below
any item that is not supported will be left
blank.
Item
Meaning
#
Log ID
User
User name
Document
Name of the document printed.
Application
Name of the application used for printing.
Note that some applications do not report their
name, or may provide a different name for different
versions of the application. Document names and
file extensions can also be used to establish rules
for applications, For example, *.pdf can be used as
a Document name for jobs printed from Acrobat
Reader.
Host
Name of the host computer from which the print job
was sent.
Page
Number of pages printed (A4/Letter size
equivalence).
CAPM User’s Guide
29
Item
Meaning
Color
Number of pages printed in color (in A4/Letter size
equivalence).
Mono
Number of pages printed in monochrome (in A4/
Letter size equivalence).
Date/Time
Time when the printer finished printing.
At the bottom of the CAPM screen there is a Summary of jobs
printed for the selected printer. "
Item
Meaning
Total Jobs
Total of acquired logs
Total Page
Counts
Total pages printed, from the logs acquired
(in A4/Letter size equivalence)
Color Page
Counts
Total pages printed in color, from the logs acquired
(in A4/Letter size equivalence)
Mono Page
Counts
Total pages printed in monochrome, from the logs
acquired (in A4/Letter size equivalence)
A4 Equivalence
(see below)
Convert the size of paper actually printed into A4
equivalence.
CAPM User’s Guide
30
A4 Equivalences
Paper Size
A4 Equivalence
Letter
1
Executive
1
Legal14
1
Legal13.5
1
Legal13
1
Tabloid Extra
2
Tabloid
2
A3Wide
2
A3
2
A4
1
A5
1
A6
1
B4
2
B5
1
Com-9 Envelope
1
Com-10 Envelope
1
Monarch Envelope
1
DL
1
C6
1
C5
1
C4
1
Postcard
1
Double postcard
1
Index Card
1
Custom (210 mm or shorter)
1
Custom (longer than 210 mm)
2
CAPM User’s Guide
31