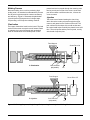
1
Celanex , Vandar , Impet and Riteflex ® ® Thermoplastic Polyesters Processing and Troubleshooting Guide (PE-6) ® ® Typical Injection Molding Parameters Molding Parameter Celanex ®* Vandar ®** Impet ® Riteflex® Mold Temperature °C (°F) 38 - 121 (100 - 250) 38 - 121 (100 - 250) 110 - 121 (230 - 250) 24 - 93 (75 - 200) Melt Temperature °C (°F) 227 - 260 (440 - 500) 238 - 282 (460 - 540) 271 - 299 (520 - 570) 171 - 266 (340 - 510) Screw Speed, rpm 60 - 125 60 - 125 60 - 125 60 - 125 Back Pressure, psi 0 - 50 0 - 100 0 - 25 0 - 100 Fast Medium to Fast Medium to Fast Fast Low to Medium Low to High As Needed Low to Medium 0.125 0.125 0.125 0.125 - 0.250 Feed Zone 232 - 249 (450 - 480) 232 - 254 (450 - 490) 260 - 271 (500 - 520) 154 - 243 (310 - 470) Center Zone 238 - 254 (460 - 490) 238 - 260 (460 - 500) 271 - 277 (520 - 530) 171 - 249 (340 - 480) Injection Speed Injection Pressure Cushion, Inches Barrel Settings °C (°F) Front Zone 243 - 260 (470 - 500) 243 - 266 (470 - 510) 277 - 282 (530 - 540) 171 - 254 (340 - 490) Nozzle 249 - 260 (480 - 500) 249 - 271 (480 - 520) 277 - 288 (530 - 550) 171 - 260 (340 - 500) ** For parameters specific to Celanex “16” series grades, refer to Table 3.2, Chapter 3. ** For parameters specific to Vandar Grades 6000, AB100, AB875, and 9114 see Table 3.3, Chapter 3. Typical Extrusion Processing Parameters Parameters Celanex ® Vandar ® Impet ® Riteflex® Zone 1 232 - 271 (450 - 520) 232 - 271 (450 - 520) 254 - 271 (490 - 520) 182 - 199 (360 - 390) Zone 2 232 - 271 (450 - 520) 232 - 271 (450 - 520) 254 - 271 (490 - 520) 188 - 204 (370 - 400) Zone 3 232 - 271 (450 - 520) 232 - 282 (450 - 540) 260 - 282 (500 - 540) 188 - 204 (370 - 400) Zone 4 238 - 271 (460 - 520) 238 - 288 (460 - 550) 266 - 288 (510 - 550) 193 - 210 (380 - 410) Zone 5 238 - 271 (460 - 520) 238 - 288 (460 - 550) 266 - 288 (510 - 550) 193 - 210 (380 - 410) Barrel Settings °C (°F) Adapter °C (°F) 238 - 271 (460 - 520) 238 - 288 (460 - 550) 266 - 288 (510 - 550) 193 - 210 (380 - 410) Die °C (°F) 238 - 271 (460 - 520) 238 - 293 (460 - 560) 271 - 293 (520 - 560) 199 - 221 (390 - 430) Melt Temperature °C (°F) 238 - 271 (460 - 520) 238 - 293 (460 - 560) 271 - 293 (520 - 560) 199 - 221 (390 - 430) i Foreword This processing and troubleshooting guide (PE-6) contains updated information on injection molding and extrusion parameters for the Ticona Polyester products, and was written to help processors, tool builders, and part designers take full advantage of their excellent material properties and processing characteristics. They comprise the following: ■ Celanex® Thermoplastic Polyesters ■ Vandar® Thermoplastic Alloys ■ Impet® Thermoplastic Polyesters ■ Riteflex® Thermoplastic Polyester Elastomers For more information on design and material characteristics of polyesters, consult the following Ticona publications which can be obtained by calling Product Information Services at 1-800-833-4882. ■ Designing With Plastic: The Fundamentals, Design Manual (TDM-1) ■ Celanex® Thermoplastic Polyester – Short Term Properties (CX-4) ■ Celanex® “16” Series Polyesters ■ Vandar® Thermoplastic Alloys – Short Term Properties (VN-4) ■ Impet® Thermoplastic Polyester – Short Term Properties (IP-4) ■ Riteflex® Thermoplastic Polyester Elastomer – Short Term Properties (RF-4) Material Safety Data Sheets (MSDS) for specific grades of Celanex®, Vandar®, Impet®, and Riteflex® polyesters have been developed by Ticona. MSDS sheets provide valuable safety, health, and environmental information. Before processing these products, read and thoroughly understand the appropriate MSDS. They may be obtained by calling Customer Services at 1-800-526-4960. ii Table of Contents Chapter 1. Overview General . . . . . Celanex® Thermoplastic Polyester . Vandar® Thermoplastic Alloys . . ® Impet Thermoplastic Polyester . . Riteflex® Thermoplastic Polyester Elastomer . . . . . . . . . . . . . . . . . . . . . . . . . 1-1 1-1 1-3 1-3 1-4 Chapter 2. Mold Design, Equipment Selection and Preprocessing Mold Design . . . . . . . Conventional Runners . . . . . Gates . . . . . . . Venting . . . . . . . Mold Cooling . . . . . . Melt Flow . . . . . . . Mold Shrinkage . . . . . . Runnerless Molds . . . . . . Annealing . . . . . . Molding Process . . . . . . Plastication . . . . . . Injection . . . . . . Molding Equipment . . . . . . Screw Design . . . . . . Nozzle . . . . . . . Nonreturn Valves . . . . . . Clamping Systems . . . . . Mold Construction . . . . . Resin Storage . . . . . . Use of Regrind . . . . . . Drying Resin . . . . . . . Drying Equipment . . . . . Drying Process . . . . . . General Drying Guidelines . . . . . . . . . . . . . . . . . . . . . . . . . . . . . . . . . . . . . . . . . . . . . . . . . . . . . . . . . . . . . . . . . . . . . . . . . . . . . . . . . . . . . . . . . . . . . . . . . . . . 2-1 2-1 2-1 2-4 2-4 2-4 2-4 2-6 2-7 2-8 2-8 2-8 2-9 2-9 2-10 2-10 2-10 2-10 2-11 2-11 2-11 2-11 2-13 2-13 Chapter 3. Processing – Injection Molding General . . . . Safety and Health Information . ® Celanex Polyester Molding Conditions Drying Requirements . . Melt Temperature . . Mold Temperature . . Injection and Holding Pressure . Injection Speed . . . Cycle Time Back Pressure and Screw Speed . Startup . . . . Shutdown . . . . . . . . . . . . . . . . . . . . . . . . . . . . . . . . . . . . . . . . . . . . . . . . . . . 3-1 3-1 3-2 3-2 3-2 3-2 3-2 3-2 3-2 3-3 3-3 3-3 . . . . . . . . . . . . . . . . . . . . . . . . iii . . . . . . . . . . . . . . . . . Table of Contents Chapter 3. Processing – Injection Molding (Continued) Vandar® Alloy Molding Conditions . . Drying Requirements . . . Melt Temperature . . . Mold Temperature . . . Injection and Holding Pressure . . Injection Speed . . . . Cycle Time . . . . Back Pressure and Screw Speed . . Startup . . . . . Shutdown . . . . Impet® Polyester Molding Conditions . . Drying Requirements . . . Mold Temperature . . . . Riteflex® Polyester Molding Conditions Drying Requirements . . . Mold Temperature . . . Injection and Holding Pressure . . Injection Speed . . . . Screw Speed and Cushion . . Shutdown . . . . . . . . . . . . . . . . . . . . . . . . . . . . . . . . . . . . . . . . . . . . . . . . . . . . . . . . . . . . . . . . . . . . . . . . . . . . . . . . . . . . . . . . . . . . . . . . . . . . . . . . . . . . . . . . . . . . . . . . . . . . . 3-4 3-4 3-4 3-4 3-4 3-5 3-5 3-5 3-5 3-5 3-6 3-6 3-6 3-7 3-7 3-7 3-7 3-7 3-7 3-7 Chapter 4. Troubleshooting – Injection Molding Introduction . . . . . Troubleshooting Guide . . . . . . . . . . . . . . . 4-1 4-1 Chapter 5. Processing – Extrusion General . . . Safety and Health Information . Drying Requirements . . Equipment . . . Extruder Barrel . . Screw Design . . Breaker Plate and Screens Dies . . . Processing Procedures . Startup . . . Purging and Shutdown . Wire Coating . . Cooling Trough . . Tube Extrusion . . Vacuum Tank . . Sheet Extrusion . . Polishing Roll Stand . . . . . . . . . . . . . . . . . . . . . . . . . . . . . . . . . . . . . . . . . . . . . . . . . . . . . . . . . . . . . . . . . . . . . . . . . . . . . . . . . . . . . . . . . . . . . . . . . . . . . . . . . . . . . . . . . . . . . . . . . . . . . . . . . . . . . . . . . 5-1 5-1 5-1 5-1 5-1 5-1 5-2 5-2 5-2 5-2 5-2 5-4 5-4 5-5 5-5 5-6 5-6 Chapter 6. Troubleshooting – Extrusion Introduction . . . . Troubleshooting Guide . . . . . . . . . . . . . . . . 6-1 6-1 iv Table of Contents List of Tables Table 1.1 Celanex Grades and Processing Methods . . . . . . 1-2 Table 1.2 Vandar Grades and Processing Methods . . . . . . 1-3 Table 1.3 Impet Grades and Processing Methods . . . . . . 1-3 Table 1.4 Riteflex Grades and Processing Methods . . . . . . 1-4 Table 2.1 Runner Size Recommendations . . . . . 2-1 . . 2-4 . . 2-4 . Table 2.2A Size Recommendations, Rectangular Edge Gate for Celanex , Impet , and ® Vandar® (Higher Modulus Grades) Polyesters . ® . . Table 2.2B Size Recommendations, Direct Gate (From Secondary Sprue in 3-Plate Mold) for Celanex®, Impet®, and Vandar® (Higher Modulus Grades) Polyesters Table 2.3 Shrinkage – Celanex Polyesters . . . . . . . 2-5 Table 2.4 Shrinkage – Vandar Alloys . . . . . . . . 2-6 Table 2.5 Shrinkage – Impet Polyesters . . . . . . . . 2-6 Table 2.6 Shrinkage – Riteflex Polyester Elastomers . . . . . . 2-6 Table 2.7 Drying Guidelines . . . . . . 2-13 Table 3.1 Typical Injection Molding Parameters . . . . . . 3-1 Table 3.2 Molding Conditions for Celanex Polyester . . . . . . 3-2 Table 3.3 Molding Conditions for Vandar Alloys . . . . . . 3-4 Table 3.4 Molding Conditions for Impet Polyester . . . . . . 3-6 Table 3.5 Molding Conditions for Riteflex Polyester Elastomer . . . . . 3-7 Table 4.1 Troubleshooting Guide – Injection Molding . . . . . . 4-1 Table 5.1 Barrel Length-to-Diameter Ratios . . . . . . 5-1 Table 5.2 Typical Lengths of Feed, Transition, and Metering Zones . . . . 5-2 Table 5.3 Typical Extrusion Temperature Ranges for Celanex Polyester . . . . 5-3 Table 5.4 Typical Extrusion Temperature Ranges for Vandar Alloys . . . . 5-3 Table 5.5 Typical Extrusion Temperature Ranges for Impet Polyester . . . . 5-3 Table 5.6 Typical Extrusion Temperature Ranges for Riteflex Polyester Elastomer . . . 5-3 Table 6.1 Troubleshooting Guide – Extrusion . . 6-1 ® ® ® ® . . . ® ® ® ® ® ® ® ® . v . . . Table of Contents List of Figures Figure 2.1 Balanced Runner and Cavity Layout . . . . . . 2-1 Figure 2.2A Various Gate Types Used in Injection Molds . . . . . . 2-2 Figure 2.2B Various Gate Types Used in Injection Molds . . . . . . 2-3 Figure 2.3 Gate and Mold Design Affect Part Strength . . . . . . 2-3 Figure 2.4 Flow vs. Wall Thickness for Celanex 3300 . . . . . . 2-4 Figure 2.5 Molding Sequence, Single Stage Reciprocating Screw Injection Molding Machine . 2-8 Figure 2.6 Single Stage Reciprocating Screw Injection Molding Machine . . . . 2-9 Figure 2.7 Recommended Metering Screw . . . 2-9 . . . Figure 2.8 Check Ring Nonreturn Valve Used on Reciprocating Screw Injection Molding Machines . 2-10 Figure 2.9 Internal Ball Check Nonreturn Valve Used on Reciprocating Screw Injection Molding Machines 2-10 Figure 2.10 Hopper Dryer Unit . . . . . . . . . 2-12 Figure 5.1 Typical Screw Design . . . . . . . . . 5-1 Figure 5.2 Polyester in Wire Coating . . . . . . . . 5-4 Figure 5.3 Polyester in Tube Extrusion . . . . . . . . 5-5 Figure 5.4 Polyester in Sheet Extrusion . . . . . . . . 5-6 vi vii Chapter 1 Overview General Celanex PBT also offers outstanding processing characteristics including: Chapter 1 contains an overview of the four polyester product groups available from the Ticona Corporation: Celanex® Thermoplastic Polyesters, Vandar® Thermoplastic Alloys, Impet® Thermoplastic Polyesters, and Riteflex® Thermoplastic Polyester Elastomers. Brief descriptions of each product group are followed by a table which identifies the various grades within the product group and processing methods best suited for each grade. ■ Fast cycles. ■ Absence of volatiles during processing. ■ The significant advantage of accepting high levels of reprocessed product (up to 50% for certain grades). Rigidity, heat resistance, creep resistance, and electrical properties are among the superior performance characteristics that differentiate Celanex thermoplastic polyester from other engineering thermoplastics. Celanex® Thermoplastic Polyesters Polybutylene terephthalate (PBT), the polymer from which Celanex products are compounded, is semicrystalline and is formed by the polycondensation of 1,4 – butanediol and dimethyl terephthalate. The base polymer can be compounded with various additives, fillers, and reinforcing agents. Because of their composition and degree of crystallinity, these products exhibit a unique combination of properties that includes: Celanex resins are supplied in unreinforced grades and in grades formulated with glass-fiber and minerals. Some products are categorized as flame retardant (UL94 V-0); others are general purpose. ■ High strength, rigidity, and toughness. ■ Low creep (even at elevated temperatures). ■ Outstanding resistance to high temperatures. ■ Minimal moisture absorption. ■ Exceptional dimensional stability. ■ Resistance to a wide range of chemicals, oils, greases, and solvents. ■ Excellent electrical properties. 1-1 Table 1.1 Celanex® Grades and Processing Methods (Continued) Table 1.1 lists grades of Celanex® Thermoplastic Polyesters and recommended processing methods. Processing Methods Type of Material and Grade Table 1.1 Celanex® Grades and Processing Methods High Impact 1632Z Processing Methods Type of Material and Grade Unreinforced 1300 Injection Molding Extrusion • 1400A • 1600A • • 1602Z • • 1700A • • 2000 • 2000-2 • 2000-3 • Injection Molding • 1642Z • 1662Z • 4202 • 4300 • 4302 • 4305 • 306 • Good Surface Finish 5200-2 • 5300-2 • 7862Z • Low Warp, General Purpose J235 2000-2K • 2001 • • 2002 • • J600 • 2002-2 • • LW2333R • 2002-3 • • LW6443R • 2003 • LW6362R • 2003-2 • LW7345R • 2003-3 • 6400-2 • 2004-2 • 6406 • 2008 • • 6407 • 2012-2 • • 6500 • 2016 • • Glass Reinforced, General Purpose 1462Z Low Warp, Flame Retardant 7304 • • • 7305 • 3200 • 316 • 3200-2 • 7700-2 • 3201 • 3201-2 • 3202-2 • 3300 • 3300-2 • 3400-2 • Glass Reinforced, Flame Retardant 3112-2 • • 3116 • • 3210-2 • 3216 • 3310-2 • 3316 • 1-2 Extrusion Vandar® Thermoplastic Alloys Impet® Thermoplastic Polyesters Vandar products are thermoplastic polyester alloys possessing: Impet products are thermoplastic polyesters made with up to 100% post consumer recycled polyethylene terephthalate (PET). They possess outstanding physical properties and superior thermal and chemical resistance. ■ Outstanding ductility and stiffness combined with the excellent chemical and environmental resistance properties of polyesters. ■ High impact strength at ambient and low temperatures. Impet polyesters are ideal for high performance applications that require toughness, rigidity, exceptional dimensional stability and excellent electrical properties, and have flame retardance ratings of UL94 HB. The unreinforced and higher flexibility grades possess high impact with a flexibility between that of thermoplastics and elastomers. Unfilled Vandar 8000 has a flammability rating of UL94 V-0 as low as 0.85 mm (0.033 in.) part thickness. The remainder of the Vandar products are rated UL94 HB. The Impet grades are reinforced with glass fibers or with combinations of mineral/glass fibers. Table 1.3 lists grades of Impet polyesters and recommended processing methods. Vandar alloys are also available in grades formulated with glass fiber and minerals. Filled grades improve modulus and strength while maintaining excellent toughness. Table 1.3 Impet Grades and Processing Methods Table 1.2 lists grades of Vandar alloys and recommended processing methods. Processing Methods Table 1.2 Vandar Grades and Processing Methods Processing Methods Type of Material and Grade Unreinforced General Purpose 2100 2500 4602Z 6000 Unreinforced and Flame Retardant 8000 Glass Reinforced 4361 4612R 4632Z 4662Z AB875 Unreinforced Higher Flexural Modulus 8929 9114, 9116 AB100 Mineral Reinforced 2122 Injection Molding • • • • • • • • • • • • • • • • • • Injection Molding Extrusion Glass Reinforced 320R • • 330R • 340R • Glass/Mineral Reinforced 610R Extrusion • • • • Type of Material and Grade 1-3 • 630R • 830R • • Riteflex® Thermoplastic Polyester Elastomer Table 1.4 Riteflex Grades and Processing Methods Processing Methods Riteflex products are a family of copolyester polymers, which combine many desirable features of thermoset rubbers with the processing ease of engineering plastics. These products are tough, tear resistant, resist flex fatigue, and perform over a broad temperature span. Type of Material and Grade Riteflex elastomers are resistant to many chemicals including acids and bases, common solvents, oils, and greases. They are also abrasion resistant. The harder versions exhibit enhanced heat and chemical resistance while the softer materials possess good low temperature mechanical properties. Injection Molding 635 • 640 • 647 • 655 • 663 • 677 • Extrusion * The last 2 digits denote the Shore D hardness, e.g. Grade 640 has a Shore D hardness of 40. Table 1.4 lists grades of Riteflex elastomers and recommended processing methods. 1-4 • • • Chapter 2 Mold Design, Equipment Selection and Preprocessing Mold Design Runner length should be kept at a minimum. Parts requiring close dimensional control in multi-cavity molds should have balanced runner systems. Close tolerance parts should not be designed into family mold layouts. The Ticona family of engineering thermoplastic polyester resins may be successfully molded in conventional two- and three-plate molds, stack molds, and in a wide variety of hot runner and insulated runner molds. Gates Conventional Runners Various types of gates used in injection molds are shown in Figures 2.2A, 2.2B, and 2.3. Full round runners are recommended, and trapezoidal are second best. Rectangular or half round runners may also be used, but they are less efficient. Suggested sizes for full round runners are provided in Table 2.1. D Table 2.1 Runner Size Recommendation Part Thickness (Inches) Runner Length (Inches) Min. Runner Diameter (Inches) 0.020 - 0.060 Up to 2 0.0625 0.020 - 0.060 Over 2 0.125 0.060 - 0.150 Up to 4 0.125 0.060 - 0.150 Over 4 0.1875 0.150 - 0.250 Up to 4 0.250 0.150 - 0.250 Over 4 0.3125 D Cold Slug Well Extension Figure 2.1 Balanced Runner and Cavity Layout Generous radii should be provided in the runner system where the sprue joins the runner. On multiple-cavity molds with primary and secondary runners, the primary runner should extend beyond the intersection of the secondary runner in order to provide a cold slug well for the runner flow front. This length should be at least equal to the basic runner diameter, D (See Figure 2.1). 2-1 SPRUE: A simple design for single cavity molds and symmetry on circular shapes. Suitable for thick sections. SIDE or EDGE: A simple design for multicavity molds. Suitable for medium and thick sections. PIN (3 plate tool): Used to minimize finishing where edge gating is undesirable and for automatic degating. Only suitable for thin sections. RESTRICTED or PIN: Provides simple degating and finishing. Only suitable for thin sections. TAB: Used to stop jetting when other means are not available and when a restricted gate is desired. Also enables area of greatest strain to be removed from the molding. DIAPHRAGM: Used for single cavity concentric moldings of ring shape with medium or small internal diameter. INTERNAL RING: Similar to diaphragm gate. Used for molds with large internal diameters or to reduce (sprue/runner) to molding ratio. EXTERNAL RING: Used for multicavity concentric moldings of ring shape or where diaphragm gate cannot be used. Figure 2.2A Various Gate Types Used in Injection Molds 2-2 SECTION B-B C B B SECTION C-C VERTICAL RING Symmetrical gating at one end of components with long holes, e.g. knife handles. TUNNEL OR SUBMARINE SUBMARINE GATE DESIGN RECOMMENDED DESIGN C FLASH Provides simultaneous filling over the whole length of the mold to give even shrinkage along the length. 30 ° 45 ° POOR DESIGN PL Narrow angle submarine gate will break off on mold opening 60° PL Wide angle (60°) submarine gate will provide clean break in small size gate area. Figure 2.2B Various Gate Types Used in Injection Molds POOR DESIGN 35 Fibers broken (Gate enters thin section opposite wall) Gate location should be selected carefully to minimize possible part distortion or adverse effects on part dimensions due to anisotropic shrinkage (see “Mold Shrinkage”, page 2-4). For best results, the gate should be located so as to achieve balanced flow in all directions, and minimum flow length from the gate to the extremities of the part. Where this is not possible, the gate should be located so that the flow direction is along the axis of the most critical dimension, since the mold shrinkage is considerably less in the direction of flow, particularly in glass fiber reinforced grades. GOOD DESIGN 35 Radiused gate located so fibers can turn without breaking Figure 2.3 Gate and Mold Design Affect Part Strength To minimize breakage and reduction in length of the glass fibers in the reinforced grades, it is desirable to gate the part in a thick rather than a thin-walled section, and to incorporate radii where the runner joins the gate. This is illustrated in Figure 2.3. Gate size recommendations, keyed to part thickness, are given in Tables 2.2A and 2.2B. 2-3 Table 2.2A Size Recommendations, Rectangular Edge Gate for Celanex®, Impet® and Vandar® (Higher modulus grades) Polyesters Part Thickness Gate Dimensions (Inches) (Inches) Depth Width Land Length Less than 0.030 To 0.020 To 0.040 0.040 0.030 - 0.090 0.020 - 0.060 0.030 - 0.090 0.040 0.090 - 0.125 0.060 - 0.085 0.090 - 0.130 0.040 0.125 - 0.250 0.085 - 0.165 0.130 - 0.250 0.040 Melt Flow Table 2.2B Size Recommendations, Direct Gate (From Secondary Sprue in 3-Plate Mold) for Celanex®, Impet® and Vandar® (Higher modulus grades) Polyesters Part Thickness (Inches) Gate Diameter (Inches) Land Length (Inches) Less than 0.125 0.030 - 0.050 0.040 0.125 - 0.250 0.040 - 0.120 0.040 Polyester resin is extremely fluid in the melt state and therefore flows well in a mold. However, rapid crystallization imposes limitations on how far the resin will flow in filling a mold. Among the process variables that influence flow are melt temperature, mold temperature, injection pressure and composition. Wall thickness also influences resin flow. Thicker sections allow for larger flow than thinner sections. Figure 2.4 shows the influence of wall thickness on flow. Mold Shrinkage As with all other crystalline resins, the mold shrinkage of polyester is anisotropic. Shrinkage in the direction of material flow is always less than in the transverse direction. Venting Because of the rapid mold filling qualities of polyester resins, adequate mold venting is necessary to preclude the burning of material from compressed air. Vents should be located at the edge of the cavity furthest from the gate. Suggested vent size is 0.001 inch deep x 0.125 inch wide. These vents should be cut in the mold parting line from the edge of the cavity to the outside of the mold. Vents should be deepened, beginning 0.125 inch from the cavity. Venting is particularly critical at knit-lines and the last segment of the cavity to fill. Injection Pressure 18,500 psi Flow, Inches 15.0 Mold Cooling 14,200 psi 10,600 psi 10.0 5.0 Productivity and part quality are directly influenced by proper mold cooling. Polyester resins, when cooled below the melting point, solidify rapidly with the potential for achieving fast molding cycles. This requires a well designed mold cooling system that provides a uniform mold temperature with cooling channels near thicker part sections, and (when possible) directly in mold inserts and cores. For proper mold temperature control, a separate temperature controller for core and cavity is recommended. Temperature controls capable of reaching 121°C (250°F) will provide sufficient flexibility for most molding applications. Mold Temp. @ 66°C (150°F) Melt Temp @ 249°C (480°F) 0 .020 .040 .060 Thickness, Inches Figure 2.4 Flow vs. Wall Thickness for Celanex 3300 2-4 .080 Variables that significantly affect part shrinkage during molding include: Table 2.3 Celanex Grade Shrinkage Celanex® Polyester ■ Melt/mold temperatures. ■ Injection pressure. ■ Flow direction, gate/runner design and size. ■ Part or wall thickness and size. ■ Presence (low shrinkage) or absence (high shrinkage) of fibrous reinforcements. To accurately design molds, it is strongly recommended that the mold/design engineer determine shrinkage of the actual part by using prototype tooling before making the final tool. Grades In/In Flow Direction (%) Unreinforced 0.018 - 0.020 1.8 - 2.0 Unreinforced Flame Retardant 2016 0.025 - 0.030 2.5 - 3.0 Glass Reinforced, General Purpose 3200, 3201 0.005 - 0.007 0.5 - 0.7 3202 0.004 - 0.006 0.4 - 0.6 1462Z, 3300, 3400 0.003 - 0.005 0.3 - 0.5 Glass Reinforced, Flame Retardant 3112 Measurements of the material to be used should be made on prototype parts having the same geometry as the final part. Shrinkage measurements on a spectrum of molding conditions should be included to define the range of variations. Note that changes in gating, weld lines, mold cooling, etc. may change shrinkage of the final part versus the prototype part. Contact your local Ticona representative or call Product Information Services at 1-800-833-4882 for further information on part shrinkage before molds are sized to final dimensions. 0.005 - 0.007 0.5 - 0.7 3116 0.010 - 0.014 1.0 - 1.4 3210, 3216 0.004 - 0.006 0.4 - 0.6 3310 0.003 - 0.005 0.3 - 0.5 3316 0.003 - 0.005 0.3 - 0.5 High Impact 1632Z, 4202 0.003 - 0.007 0.3 - 0.7 4300, 4302 0.003 - 0.005 0.3 - 0.5 0.004 - 0.006 0.4 - 0.6 0.003 - 0.005 0.3 - 0.5 0.002 - 0.005 0.2 - 0.5 J235 0.004 - 0.006 0.4 - 0.6 J600, LW6443R 0.004 - 0.006 0.4 - 0.6 6400, 6406 0.004 - 0.006 0.4 - 0.6 0.003 - 0.005 0.3 - 0.5 Good Surface Finish 5200 5300, 7862Z Low Warp, General Purpose 6407, 6500 Note: In designing molds, extreme care must be exercised when using shrinkage data from ISO or ASTM test specimens. These data should be used only as a guide for plastic material property comparisons. (See Tables 2.3 - 2.6). Low Warp, Flame Retardant 7305, 7316 7304, 7700 0.005 - 0.007 0.5 - 0.7 7716 0.002 - 0.005 0.2 - 0.5 * Data obtained from laboratory test specimens. 2-5 Runnerless Molds Table 2.4 Shrinkage – Vandar® Alloys Grades In/In Flow Direction (%) Unreinforced, General Purpose 2100, 2500, 4602Z 0.017 - 0.022 1.7 - 2.2 0.005 - 0.009 0.5 - 0.9 Unreinforced ,Flame Retardant 8000 6000 0.025 - 0.028 2.5 - 2.8 Glass Reinforced 4361 0.002 - 0.005 0.2 - 0.5 4612R 0.006 - 0.008 0.6 - 0.8 4632Z 0.004 - 0.006 0.4 - 0.6 4662Z 0.003 - 0.005 0.3 - 0.5 0.015 - 0.020 1.5 - 2.0 Unreinforced, Higher Flexural Modulus 8929 9056, 9114, 9116 0.011 - 0.016 1.1 - 1.6 9500 0.011- 0.016 1.1 - 1.6 0.013 - 0.015 1.3 - 1.5 Mineral Reinforced 2122 Continuing increases in the costs of labor, materials, etc. have been a driving force for cost reductions in processing and the production of moldings of better quality at lower prices. This, in turn, has sparked a new interest in automation including the use of runnerless molds. The increased demand for such molds has resulted in a rapid expansion of runnerless molding technology and a proliferation of commercially available runnerless molds. Runnerless molds, as the name implies, are molds in which no sprues and runners are produced with the parts. The material being molded is kept in a plasticized state all the way from the heating cylinder of the injection molding machine to the gate in the mold cavity and only molded parts are removed from the mold each time the press opens. No sprues or runners are produced, and therefore none need to be reprocessed as in conventional molding. Runnerless molding provides excellent opportunities for material and cost savings, with many additional benefits. Product quality and productivity can be improved, and there is little or no scrap to regrind. Polyester compounds have been successfully molded in virtually all types of commercially available runnerless molds. As with other thermoplastic resins, runnerless molds should have adequate temperature control and be designed with generously rounded bends in the runner system. Sharp bends in the runner system as well as other areas where resin may hang up and degrade over a period of time of elevated temperatures should be avoided. Table 2.5 Shrinkage – Impet® Polyesters Grades In/In Flow Direction (%) Glass Reinforced 320R 0.004 - 0.0070 0.4 - 0.7 330R 0.001 - 0.0030 0.1 - 0.3 340R 0.001 - 0.0020 0.1 - 0.2 0.005 - 0.0080 0.5 - 0.8 630R 0.003 - 0.0050 0.3 - 0.5 830R 0.001 - 0.0030 0.1 - 0.3 Mineral Filled 610R For more information on runnerless molding, contact your local Ticona representative or call Product Information Services at 1-800-833-4882. Table 2.6 Shrinkage – Riteflex® Polyester Elastomers In/In Flow Direction (%) 640 0.009 - 0.011 0.9 - 1.1 655 0.014 - 0.016 1.4 - 1.6 677 0.018 - 0.022 1.8 - 2.2 Grades * Data obtained from laboratory test specimens, 0.125 inch thick. 2-6 Annealing Annealing time depends primarily on part thickness, part geometry and processing conditions. It is good practice to determine minimum annealing time and then add a “safety factor”. This can be done by placing several parts in the oven and removing them one at a time at predetermined intervals. After a cooling time of at least 24 hours, the parts are measured, and the point at which the dimensions show no further change is the minimum annealing time. The main purpose of annealing is to stabilize part dimensions by accelerating the effects of stress relaxation. Few applications require annealing. Polyester resin parts properly designed and molded in a hot, 93 - 121°C (200 - 250°F) mold have sufficient dimensional stability for all but the most exacting requirements. A “rule of thumb” annealing time for most polyester resin parts is 1-3 hours in air, depending on part thickness. It is suggested that the minimum annealing time be determined for a specific part as described above. However, if resin parts are to be used at higher temperature (over 93°C or 200°F), and dimensional stability is required, then annealing is recommended. Annealing relieves residual stresses in moldings, causing most “stress relaxation” shrinkage to occur in the annealing operation rather than in service. Typical shrinkage encountered in glass fiber reinforced grades during annealing is up to 0.002 inch/inch in the flow direction and 0.003 inch/inch in the transverse direction. This is in addition to the mold shrinkages shown in Tables 2.3 - 2.6. Caution: In some cases, stress relief through annealing can lead to part warpage, especially if shrinkage is nonuniform. Multiple test parts should be produced initially to determine if this problem arises. Polyester resin parts may be annealed in an air circulating oven capable of maintaining uniform temperature throughout its interior. Recommended annealing temperature is 204±2.8°C (400 ±5°F). 2-7 Molding Process pressurized and conveyed through the metering zone forming a melt pool in front of the screw. As the melt pool accumulates a sufficient shot size, it forces the screw to retract. Because molding is so crucial to producing high quality parts, it is essential to understand the process and to select equipment which ensures consistency and efficiency. Figure 2.5 illustrates the plastication (A) and injection (B) sequences of a single stage, reciprocating, screw injection molding machine. Injection The screw moves forward seating the check ring which forces the molten polymer through the sprue, runners, and gates into the cavities of the mold. The part conforms to the shape of the mold cavities and the cooled mold helps to solidify the plastic into a solid form. The mold opens and the part is ejected, usually with the aid of ejection pins. Plastication The hopper feeds dried resin into the barrel. The feed section of the screw conveys the resin forward. Resin is melted by the heat of the barrel and mechanical shear of the transition zone. Molten plastic is then Feed Hopper Screw Drive On D Limit Switches (adjustable) A. Plastication Oil Feed Hopper Screw Drive Off C B. Injection Limit Switches (adjustable) Oil Figure 2.5 Molding Sequence, Single Stage Reciprocating Screw Injection Molding Machine 2-8 Molding Equipment and metering zone. The feed and metering zones both maintain constant root diameters while the transition zone employs an involuted taper. Polyester resins can be processed without difficulty in different types of screw injection molding machines. For reference purposes, a typical single stage reciprocating screw injection molding machine is shown in Figure 2.6. Since polyester materials are fast cycling, a machine should have a high plasticating capability to achieve optimum cycle times. Some general guidelines are: For best results, machines should be selected so that the shot weight is in the 50% range of rated machine capacity. This minimizes residence time and prevents excessive thermal degradation. ■ Metering zone: 3 - 4 flights ■ Zone distribution: 50% feed zone 25% transition zone 25% metering zone Screw Design The metering type screw generally recommended for polyester resins is shown in Figure 2.7. The bottom portion of this illustration shows the three major sections of the screw – the feed zone, transition zone, ■ L/D ratio: 16:1 to 24:1 ■ Compression ratio: 3:1 to 4:1 Injection Cylinder Feed Hopper Heater Bands Nozzle Nonreturn Flow Valve Assembly Rotating and Reciprocating Screw Screw-Piston Shaft Figure 2.6 Single Stage Reciprocating Screw Injection Molding Machine Overall Length Valve Flight Length Metering Depth Metering Zone Feed Depth Transition Zone Outside Diameter Feed Zone Figure 2.7 Recommended Metering Screw 2-9 Shank Length If you have any problems or questions regarding proper screw design, contact Product Information Services at 1-800-833-4882 or the manufacturer of your equipment. screw injection molding machines. These valves are shown in both the plastication and injection cycles of the molding process. Clamping Systems Nozzle A simple, free flow type nozzle with an independent heater band temperature controller is recommended. Free flowing nozzles require melt compression (suckback) control on the machine. The clamp keeps the mold closed by either a toggle mechanism or by a hydraulic cylinder. Polyester resins can be processed on either type. The clamp force should be 3 to 4 tons per square inch of projected surface area (including runners). Nonreturn Valves Mold Construction Figures 2.8 and 2.9 show the check ring and internal ball check nonreturn valves used on reciprocating The recommended mold steel hardness for all polyester products is H 13. C D C C C Check Ring Closed Check Ring Open Plastication Injection Figure 2.8 Check Ring Nonreturn Valve Used on Reciprocating Screw Injection Molding Machines C C C C Plastication Injection Figure 2.9 Internal Ball Check Nonreturn Valve Used on Reciprocating Screw Injection Molding Machines 2-10 Resin Storage Drying Resins During storage, avoid climatic temperature and humidity extremes which can lead to excessive moisture adsorption on the surface of virgin and regrind material. Avoiding these extremes are particularity important when storing regrind because of its very large surface area. In any case, virgin and regrind materials must be dried to recommended moisture levels before molding begins. It is extremely important to thoroughly dry virgin and regrind material and minimize exposure to ambient air before molding parts. High moisture levels can: ■ Cause processing problems. ■ Create surface imperfections including voids. ■ Degrade the material causing significant reduction of mechanical properties. Use of Regrind Drying Equipment Properly dried polyester compounds have excellent thermal stability during molding. This permits the successful use of regrind in the molding process. Regrind should be: Because of the importance of properly dried polymer, we strongly recommend using dehumidifying hopper dryers such as the unit shown in Figure 2.10. Hot air ovens should not be used because: ■ Free of contamination. ■ Trays filled to a depth of more than 1 to 1.5 inches can cause inadequate drying. ■ Combined with virgin resin in the ratio of no more than 25% regrind to 75% virgin resin (see note below for exceptions). ■ Drying time is extended because of poor heat transfer. ■ Dried together with the virgin resin before molding. ■ Different materials being dried in the same oven can be inadvertently mixed causing contamination. Note: Celanex® thermoplastic polyester grades 2016, 3116, 3126, 3216, 3226, and 3316 have been approved by Underwriters Labs for regrind usage up to 50%. The UL94 V-0 rating is retained with part thicknesses as small as 0.75 mm (0.030 inch). If hot air ovens are absolutely necessary, they should be used following the above precautions, as long as the recommended moisture level is reached. (See Table 2.7 on pg 2-13). 2-11 1. Vacuum Loader 2. Drying Hopper 3. Filter 4. Process Air Blower 5. Desiccant Cartridge 6. Dehumidified Air Reheater 7. Regeneration Blower 8. Regeneration Heater Figure 2.10 Hopper Dryer Unit (Reprinted with permission of Novatec™, Inc. Baltimore MD) 2-12 Drying Process General Drying Guidelines Figure 2.10 shows a typical hopper dryer unit. A vacuum loader (1) drops resin into the insulated drying hopper (2) on demand. Heated, dehumidified air enters the drying hopper, penetrating the resin and carrying moisture vapor up to the return line outlet. Moisture-laden air passes through a filter (3) to remove fines or very small particles before the air re-enters the desiccant cartridge. This filter must be kept clean! To produce acceptable moisture levels when drying virgin or regrind material in a dehumidifying hopper drier, use the guidelines provided in Table 2.7. For drying polyester materials, dew points should be maintained between -30°C and -40°C. If polymer is to be dried overnight, temperatures can be reduced to 102°C (215°F) for Celanex®, Impet® and most Vandar® polyesters. For the very flexible Vandar® and Riteflex® polyesters, use 93°C (200°F) for overnight drying. For best results, these moisture levels must be achieved and maintained while processing all polyester products. To save energy, the heated air should be recirculated. The process air blower (4) forces moisture-laden air through on-stream desiccant cartridges (5) where moisture is trapped. The dehumidified air is then reheated (6) and delivered back to the drying hopper. While the desiccant cartridge is on stream removing moisture, another cartridge is being regenerated. Separate regeneration blowers (7) and heaters (8) are used for that purpose. Table 2.7 Drying Guidelines (Use dehumidifying dryer) Product Type Temperature Drying Time Moisture Level Celanex 121°C (250°F ) 4 hours less than 0.02% Vandar 107°C (225°F) 3 to 4 hours less than 0.02% Vandar 9114* 68°C (155°F) 4 hours or overnight less than 0.02% Impet 135°C (275°F) 4 hours less than 0.01% Riteflex 107°C (225°F) 4 hours less than 0.05% * To successfully dry Vandar 9114, it is critical that the dew point be -30°C or lower. 2-13 2-14 Chapter 3 Processing – Injection Molding General Safety and Health Information For all polyester products, the molder must control processing parameters carefully to produce high quality molded parts. The quality of the finished part depends as much on proper processing as it does on part design. Before starting the injection molding process, obtain and read the appropriate polyester Material Safety Data Sheet (MSDS) for detailed safety and health information. They may be obtained by calling Customer Services at 1-800-526-4960. Chapter 3 contains basic guidelines for injection molding Celanex® thermoplastic polyester, Vandar® thermoplastic alloy, Impet® thermoplastic polyester, and Riteflex® thermoplastic polyester elastomer. Use process controls, work practices, and protective measures described in the MSDS sheets to control workplace exposure to dust, volatiles, etc. Typical injection molding parameters for each product group are summarized in Table 3.1. This is followed by more specific molding information on the various grades within each product group. When molding an unfamiliar grade or if problems arise during processing that cannot be corrected using the troubleshooting guide in Chapter 4, contact your local Ticona representative or call Product Information Services at 1-800-833-4882. Table 3.1 Typical Injection Molding Parameters Molding Parameter Celanex* Vandar** Impet Riteflex Mold Temperature °C (°F) 38 - 121 (100 - 250) 38 - 121 (100 - 250) 110 - 121 (230 - 250) 24 - 93 (75 - 200) Melt Temperature °C (°F) 227 - 260 (440 - 500) 238 - 282 (460 - 540) 271 - 299 (520 - 570) 171 - 266 (340 - 510) Screw Speed, rpm 60 - 125 60 - 125 60 - 125 60 - 125 Back Pressure, psi 0 - 50 0 - 100 0 - 25 0 - 100 Injection Speed fast medium to fast medium to fast fast Injection Pressure low to medium low to high as needed low to medium Cushion, Inches 0.125 0.125 0.125 0.125 - 0.250 Barrel Settings °C (°F) Feed Zone 232 - 249 (450 - 480) 232 - 254 (450 - 490) 260 - 271 (500 - 520) 154 - 243 (310 - 470) 238 - 254 (460 - 490) 238 - 260 (460 - 500) 271 - 277 (520 - 530) 171 - 249 (340 - 480) Center Zone Front Zone 243 - 260 (470 - 500) 243 - 266 (470 - 510) 277 - 282 (530 - 540) 171 - 254 (340 - 490) Nozzle 249 - 260 (480 - 500) 249 - 271 (480 - 520) 277 - 288 (530 - 550) 171 - 260 (340 - 500) ** For parameters specific to Celanex “16” series grades, see Table 3.2 (page 3-2). ** For parameters specific to Vandar Grade 6000, AB100, AB875 and 9114, see Table 3.3 (page 3-4). 3-1 Table 3.2 Molding Conditions for Celanex Polyester Celanex Grades Molding Parameter 3116, 3216, 3316 All Other Celanex Grades Mold Temperature °C (°F) 66 - 93 (150 - 200) 38 - 121 (100 - 250) Melt Temperature °C (°F) 238 - 249 (460 - 480) 238 - 260 (460 - 500) Screw Speed, rpm 60 - 125 60 - 125 Back Pressure, psi 0 - 25 0 - 50 Injection Speed fast fast Injection Pressure, psi as needed to fill mold low to medium Cushion, Inches 0.125 0.125 Barrel Settings °C (°F) Feed Zone 238 - 249 (460 - 480) 232 - 249 (450 - 480) Center Zone 243 - 254 (470 - 490) 238 - 254 (460 - 490) Front Zone 243 - 254 (470 - 490) 243 - 260 (470 - 500) Nozzle 249 - 260 (480 - 500) 249 - 260 (480 - 500) Celanex® Thermoplastic Polyester Molding Conditions Low mold temperatures are sometimes used to help prevent sink or warpage. Table 3.2 contains recommended molding conditions for all grades of Celanex thermoplastic polyester. Injection and Holding Pressure Drying Requirements Because of its ease of flow, Celanex polyesters require only moderate injection pressures (typically in the range of 50 - 75% of machine maximum). Celanex resins should be dried to a moisture level equal to or less than 0.02% before injection molding. Refer to pages 2-11 through 2-13 for more information on drying. Holding pressures are typically in the range of 60 - 80% of the injection pressures. Since Celanex polyester crystallizes rapidly, holding pressures (and holding time) are dependent on part thickness. Very thin-walled parts may require only moderate holding pressure while thick-section parts may require high holding pressure and long holding times. Melt Temperature The melt temperature should be 238 - 260°C (460 - 500°F). Avoid melt temperatures in excess of 271°C (520°F). Provide adequate ventilation in the molding area. Also, keep barrel residence time to a minimum for optimum part properties. Injection Speed Fast fill speed is desirable because Celanex polyester solidifies very rapidly once it enters the mold cavity. In some cases, reduced fill speed can help cure warpage problems induced by orientation of the glass fibers in the material. Mold Temperature Mold temperatures for Celanex polyesters are generally in the 38 - 121°C (100 - 250°F) range. For unfilled resins, use 38 - 66°C (100 - 150°F). For glass reinforced resins, use 66 - 93°C (150 - 200°F). Cycle Time Because Celanex polyester solidifies rapidly, cycle times can be extremely short. Plunger forward times need only be long enough to deliver the molten charge to the mold and hold the material under pressure until the gate freezes. Unlike most other glass reinforced resins, Celanex polyester yields a smooth, glossy finish even when molded in a relatively cold mold. Higher mold temperatures are used to obtain the ultimate in surface gloss and uniformity, maximize crystallinity, and minimize mold and post-mold part shrinkage. 3-2 The part should be sufficiently set up so that when it is ejected any impact does not cause dents or any other distortions. Consequently, overall cycle time is a function of part size and wall thickness. Generally, cycles for Celanex polyester molding vary from as little as 5 seconds for small thin-walled parts, to 40 - 45 seconds for large thick-walled parts. Cycle times over 45 seconds are encountered only in rare instances where molds must be opened/closed slowly due to special coring, or where inserts must be loaded into the mold. Shutdown Back Pressure and Screw Speed 2. Turn cylinder heaters off with the nozzle maintained at molding temperature. For brief shutdown periods (10 - 15 minutes): 1. Lower material temperature to 232 - 238°C (450 - 460°F). 2. Purge the machine periodically, preferably on cycle, to prevent excessive residence time in the cylinder. For longer shutdown periods: 1. Remove the Celanex material from the barrel. Use low back pressure and minimum screw speed when molding glass fiber reinforced Celanex polyester in a screw machine. High back pressures and high screw speeds tend to reduce the length of the glass fibers in the material, causing a reduction in physical properties. Generally, screw speeds should be 25 - 50 rpm. Back pressure should be less than 50 psi. 3. Purge the machine until the material temperature is no higher than 232°C (450°F). Then, shut down the machine. When shutting down a screw machine, leave the screw in the forward position. If a mass of molten material is left in front of the screw at shutdown, restarting the machine will be delayed until the solidified slug of material (in front of the screw) is remelted. Startup Before using Celanex polyesters, purge the machine to remove any other type of plastic previously run. Polymers suitable for purging are low or high density polyethylene, polypropylene, and polystyrene. For parts requiring subsequent painting or adhesive application, use low molecular weight PBT (such as Celanex 1400) to purge the machine. When the cylinder is completely free of the material used for purging, raise cylinder temperatures to 232 - 243°C (450 - 470°F) before feeding Celanex polyester into the machine. After several shots to clear residual foreign polymer, set the desired molding temperatures and start the regular molding on cycle. 3-3 Vandar® Thermoplastic Alloy Molding Conditions Mold temperatures for glass filled grades can be higher; up to 93°C (200°F). Table 3.3 contains recommended molding conditions for all grades of Vandar alloys. Injection and Holding Pressure Because of ease of flow, grades 8929, 9056, and 9116 require only moderate injection pressures (typically in the range of 50 - 75% of machine maximum). Unreinforced grades (2100, 2500, 4602Z, 6000) and glass filled grades (4316, 4612R, 4632Z, 4662Z) require higher injection pressures. Drying Requirements Vandar alloys should be dried to a moisture level equal to or less than 0.02% before injection molding. Refer to pages 2-11 through 2-13 for more information on drying. Melt Temperature Holding pressures are typically in the range of 60 - 80% of the injection pressures. Since Vandar alloys crystallize rapidly, holding pressures (and holding time) are dependent on part thickness. Very thin-walled parts may require only moderate holding pressure while thick-section parts may require high holding pressure and long holding times. For unreinforced grades 6000, 8929, 9056, and 9116, preferred melt temperatures are: ■ 260 - 282°C (500 - 540°F) for grade 6000. Do not exceed 293°C (560°F). ■ 238 - 266°C (460 - 510°F) for grades 8929, 9056, and 9116. Do not exceed 271°C (520°F). To maximize toughness of parts molded of Vandar alloys, avoid overpacking the material. ■ For other grades of Vandar alloys see Table 3.3. Mold Temperature To maximize impact strength of parts made of Vandar alloys, use mold temperatures below 49°C (120°F). Table 3.3 Molding Conditions for Vandar® Alloys Vandar Grades Molding Parameter Mold Temperature °C (°F) Melt Temperature °C (°F) AB100 9114** AB875 21-52 (70-125) 29-52 (85-125) 21-52 (70-125) 6000 All Other Grades 38-121 (100-250) 38-121 (100-250) 199-210 (390-410) 218-227 (425-440) 188-216 (370-420) 260-282 (500-540) 238-266 (450-510) Screw Speed, rpm to match cycle Back Pressure, psi 60-125 60-125 0-50 0-100 0-100 Slow, Continuous medium to fast fast Start with short shots, increase until fill and add 200 psi medium to high medium to high* 0.125-0.250 0.125 0.125 199 (390) 204 (400) 177-199 (350-390) 243-254 (470-490) 232-243 (450-470) Center Zone 204 (400) 210 (410) 185-207 (365-405) 249-260 (480-500) 238-249 (460-480) Front Zone 210 (410) 216 (420) 191-213 (375-415) 254-266 (490-510) 243-254 (470-490) 210 (410) 216 (420) 193-216 (380-420) 260-271 (500-520) 249-260 (480-500) Injection Speed Injection Pressure, psi Cushion, Inches Barrel Settings °C (°F) Feed Zone Nozzle * Vandar grades 8929 and 9116 require moderate injection pressure (50-75% of machine capacity). ** Vandar 9114 may require a reverse barrel profile. 3-4 Injection Speed cylinder is completely free of the material used for purging, raise cylinder temperatures to the recommended ranges (see Table 3.3) before feeding Vandar alloy into the machine. After several shots to clear residual foreign polymer, set the desired molding temperatures and start the regular molding on cycle. Fast fill speed is desirable for the higher modulus Vandar alloys because they solidify very rapidly once they enter the mold cavity. In some cases, reduced fill speed can help cure warpage problems induced by orientation of the glass fibers in the material. For specific recommendations see Table 3.3. For initial molding, start with short shots and increase pressure until filled. Then raise the pressure by an additional 100 psi. Cycle Time Because Vandar alloys solidify rapidly, cycle times can be extremely short. Plunger forward time need only be long enough to deliver the molten charge to the mold and hold the material under pressure until the gate freezes. Shutdown For brief shutdown periods (10 -15 minutes): 1. Ensure that the material temperature is no higher than 232°C (450°F) [no higher than 215°C (420°F) for AB100, AB875 and 9118] The part should be sufficiently set up so that when it is ejected any impact does not cause dents or any other distortions. Consequently, overall cycle time is a function of part size and wall thickness. Generally, cycles for Vandar alloy moldings vary from as little as 5 seconds for small thin-walled parts, to 40 - 45 seconds for large thick-walled parts. Cycle times over 45 seconds are encountered only in rare instances where molds must be opened/closed slowly due to special coring, or where inserts must be loaded into the mold. 2. Purge the machine periodically, preferably on cycle, to prevent excessive residence time in the cylinder. For longer shutdown periods: 1. Remove the Vandar material from the barrel. 2. Turn cylinder heaters off with the nozzle maintained at molding temperature. 3. Purge the machine until the material temperature is no higher than 232°C (450°F). Then shut down the machine. Back Pressure and Screw Speed Little back pressure and minimum screw speed should be used in molding glass fiber reinforced Vandar in a screw machine. High back pressures and high screw speeds tend to reduce the length of the glass fibers in the material, causing a reduction in physical properties. Back pressure need only be high enough to compact the molten material in front of the screw as the screw rotates and retracts; the screw speed need only be fast enough to retract the screw before the mold opens. Generally, screw speeds used are in the 25 to 50 rpm range. A normal back pressure level should be under 50 psi. When shutting down a screw machine, leave the screw in the forward position. If a mass of molten material is left in front of the screw at shutdown, restarting the machine will be delayed until the solidified slug of material (in front of the screw) is remelted. Startup Before using Vandar alloys, purge the machine to remove any other type of plastic previously run. Polymers suitable for purging are low or high density polyethylene, polypropylene, and polystyrene. For parts requiring subsequent painting or adhesive application, use low molecular weight PBT (such as Celanex 1400) to purge the machine. When the 3-5 Impet® Thermoplastic Polyester Molding Conditions Drying Requirements Impet polyester should be dried to moisture levels below 0.01% before injection molding. Refer to pages 2-11 through 2-13 for more information on drying. Table 3.4 contains recommended molding conditions for all grades of Impet polyester. It is extremely critical that moisture levels below 0.01% be maintained before injection molding. Therefore, it is recommended that a dehumidifying hopper dryer (as discussed on page 2-12) be used on the injection molding machine. Table 3.4 Molding Conditions for Impet® Polyesters Molding Parameter All Impet Grades Mold Temperature °C (°F) 110 - 121 (230 - 250) Melt Temperature °C (°F) 271 - 299 (520 - 570) Mold Temperature Screw Speed, rpm 50 - 75 Back Pressure, psi 0 - 25 Injection Speed medium to fast Injection Pressure, psi as needed Mold temperatures below 93°C (200°F) may lead to incomplete crystallization and dimensional changes, especially if finished parts are subjected to post-mold elevated temperature use. Cushion, Inches 0.125 Barrel Settings °C (°F) Feed Zone 260 - 271 (500 - 520) Center Zone 271 - 277 (520 - 530) Front Zone 277 - 282 (530 - 540) Nozzle 277 - 288 (530 - 550) 3-6 Riteflex® Thermoplastic Polyester Elastomer Molding Conditions Injection Speed Table 3.5 contains recommended molding conditions for all grades of Riteflex polyester elastomer. For all grades of Riteflex polyester elastomers, the injection speed of the machine should be at a medium setting. Drying Requirements Screw Speed and Cushion Riteflex polyester should be dried to a moisture level equal to or less than 0.05% before injection molding. Refer to pages 2-11 through 2-13 for more information on drying. Screw speed should be 60 - 125 rpm and the cushion/pad should be 0.125 - 0.250 inch. Shutdown When a machine is being shut down from molding Riteflex polyester, the nozzle and barrel heaters should be maintained at the molding temperature. The machine should be first purged with polyethylene or polypropylene. After no more Riteflex polyester elastomer issues from the nozzle, the heating cylinder should be completely purged of Riteflex polyester elastomer and the machine may be shut down. Mold Temperature Begin at the lower end of the molding temperature range, using short shots. Injection and Holding Pressure Keep injection pressure low when starting the molding cycle; this will produce short shots. Gradually increase pressure by 50 - 100 psi until the cavity fills completely. As complete parts are ejected from the mold, raise injection pressure approximately 100 psi, making sure the material does not flash. Table 3.5 Molding Conditions for Riteflex® Polyester Elastomer Riteflex Grades Molding Parameter Mold Temperature °C (°F) 640 24 - 52 (75 - 125) 655 677 24 - 52 (75 - 125) 38 - 93 (100 - 200) Melt Temperature °C (°F) 182 - 204 (360 - 400) 221 - 238 (430 - 460) 238 - 266 (460 - 510) Screw Speed, rpm 60 - 125 60 - 125 60 - 125 Back Pressure, psi 0 - 50 0 - 50 0 - 100 Injection Speed fast fast fast Cushion, Inches 0.125 - 0.250 0.125 - 0.250 0.125 Barrel Settings °C (°F) Feed Zone 163 - 182 (325 - 360) 199 - 216 (390 - 420) 232 - 243 (450 - 470) 182 - 199 (360 - 390) 216 - 232 (420 - 450) 238 - 249 (460 - 480) Center Zone Front Zone 182 - 204 (360 - 400) 216 - 238 (420 - 460) 243 - 254 (470 - 490) Nozzle 182 - 204 (360 - 400) 216 - 238 (420 - 460) 249 - 260 (480 - 500) 3-7 3-8 Chapter 4 Troubleshooting – Injection Molding Introduction Adjustments should be moderate and the machine should be allowed to line out before any further adjustments are made. Check that the machine is operating within the parameters recommended for the specific grade of resin. For example, stock melt temperature should be confirmed on air shots collected at typical cycle times. Many processing problems are caused by easily corrected conditions such as inadequate resin drying, incorrect temperatures and/or pressures, etc. Often, solutions to these problems can be found by following the recommendations in Table 4.1. Try them in the order in which they are listed under each problem category. Table 4.1 Troubleshooting Guide – Injection Molding Problem and Corrective Action Celanex Short Shots, Poor Surface Finish Increase feed Vandar Impet Riteflex • • • Increase injection pressure • • • • Use booster and maximum ram speed • • Decrease cushion • • • • Raise cylinder temperature • • • • Raise mold temperature • • • • Increase overall cycle time • • Check shot size vs rated machine shot capacity; if shot size exceeds 75% of rated (styrene) shot capacity, move to larger machine • • Increase size of sprue/runners/gates • • • Increase injection time • Increase injection speed • • Increase/decrease feed to maintain proper cushion • Check cavity vents for blockage • Increase booster time • Increase screw speed (unfilled grades only) • Increase back pressure (unfilled grades only) • Use lubricated resin • Flashing Lower material temperature by: Lowering cylinder temperature • • • • Decreasing screw rotational speed • • Lowering back pressure • • Decrease injection pressure • • • • Decrease overall cycle time • • • • Decrease plunger forward time • Check mold closure for possible obstruction on parting line surface • • • • 4-1 Table 4.1 Troubleshooting Guide – Injection Molding (Continued) Problem and Corrective Action Celanex Flashing (Continued) Improve mold venting Vandar Impet Riteflex • • Check machine platens for parallelism • • Move mold to larger (clamp) press • • Check parting line of mold for wear • Splay Marks Dry the material before use Check for contamination such as water or oil leakage into the mold cavity • • • • • • • • Check for drooling • Decrease injection speed • • Raise mold temperature • • • Lower material temperature by: Lowering cylinder temperature • • Decreasing screw rotational speed • Lowering back pressure • Lower nozzle temperature • Decrease overall cycle time • Open the gate(s) • Move mold to smaller shot size machine • Discoloration Purge heating cylinder Lower material temperature by: Lowering cylinder temperature • • • • • • Decreasing screw rotational speed • • Lowering back pressure • Lower nozzle temperature • • • Decrease overall cycle time • • • • Check hopper and feed zone for contamination • • • • Check cylinder and plunger or screw fit for excessive clearance • Provide additional vents in mold • • Move mold to machine with smaller shot size (50-75% of capacity for all polyesters) • • • • • Check ram and feed zone for proper cooling • • Nozzle Drool Lower nozzle temperature Lower material temperature by: Lowering cylinder temperature • • • • • • • • Decreasing screw rotational speed • Lowering back pressure • Decrease residual pressure in cylinder by: Reducing plunger forward time and/or back pressure • • Increasing decompress time (if machine has this control) • • Decrease overall cycle time • • • 4-2 Table 4.1 Troubleshooting Guide – Injection Molding (Continued) Problem and Corrective Action Celanex Vandar Impet Decrease die open time • • • Use nozzle with positive shutoff valve • • • Dry the material before use • • Nozzle Drool (Continued) Reduce back pressure Riteflex • • • Use nozzle with smaller orifice • • Use reverse-taper nozzle or nozzle valve • • Nozzle Freeze-off Insulate nozzle from mold • • • Raise nozzle temperature • • • • Decrease cycle time • • • Increase injection pressure • Decrease injection pressure • Raise mold temperature • • • • Use nozzle with larger orifice • • • • Use reverse-taper nozzle • Burn Marks Decrease injection speed • • Decrease booster time • • Decrease injection pressure • • • Improve venting in mold cavity • • • • Change gate position and/or increase gate size to alter flow pattern • • • • • Sticking in Cavities Decrease injection pressure • Decrease plunger forward time • • • • • Raise mold temperature • Decrease injection time • Decrease injection speed • Decrease hold time • Decrease booster time • Adjust feed for constant cushion • • • Decrease injection hold time • Increase mold closed time • • • • Lower mold temperature • • • • Lower cylinder and nozzle temperature • • • • Check mold for undercuts and/or insufficient draft • • • • Use proper mold release • Sticking on the Core Increase injection pressure • Increase booster time • Increase injection speed • Decrease mold closed time • Decrease core temperature • 4-3 Table 4.1 Troubleshooting Guide – Injection Molding (Continued) Problem and Corrective Action Sticking on the Core (Continued) Check mold for undercuts and/or insufficient draft Celanex Vandar Impet Riteflex • • • • Sticking in Sprue Bushing Raise mold temperature • Decrease injection pressure • Decrease hold time • • • Decrease injection time • • • Decrease booster time • • Increase mold closed time • • • • Increase mold temperature at sprue bushing • • • Raise nozzle temperature • • • • Check sizes and alignment of holes in nozzle and sprue bushing (holes in sprue bushing must be larger) • • • • • • • • • • • • Check mold and nozzle design • Provide more effective sprue puller Weld Lines Increase injection pressure Increase injection forward time • Increase injection speed • • • Raise mold temperature • • • Raise material temperature by: Raising cylinder temperature • • Increasing screw rotational speed • Increasing back pressure • Vent the cavity in the weld area • Provide an overflow well adjacent to weld area Change gate position to alter flow pattern Unmelted Pellets Increase melt temperature • • • • • • • • • • • • • Increase back pressure • Dry/preheat the resin • Use a press with proper screw design (see “Screw Design” on page 2-9 for guidelines) • • • • Check to be sure that the nonreturn check valve is working properly to prevent back flow • Move the mold to a press with a larger shot capacity • Sinks and Voids Increase injection pressure Increase injection forward time • • • • • Increase injection hold time • • Use booster and maximum ram speed • • Raise mold temperature (for voids only) • • • • Lower mold temperature (for sinks only) • • • • Decrease cushion • • • Increase injection speed • • 4-4 Table 4.1 Troubleshooting Guide – Injection Molding (Continued) Problem and Corrective Action Celanex Sinks and Voids (Continued) Increase feed/maintain proper cushion Vandar Impet Riteflex • Increase size of sprue/runners/gates • • • Relocate gates closer to heavy sections • • • • • Warpage, Part Distortion Equalize temperature in both halves of the mold (eliminate hot spots) • • Check mold for uniform part ejection • • • Check for proper handling of parts after ejection • • • Raise tool temperature • Increase gate and runner size • Increase fill speed • Increase injection hold time • Increase plunger forward time • • Increase cooling time • Try increased pressure and decreased pressure • • Try higher and lower mold temperature • • Increase mold closed time • • • Lower material temperature by: Lowering cylinder temperature • Decreasing screw rotational speed • Lowering back pressure • Try differential mold temperatures to counteract warp • Jig the part and cool uniformly • • • • • • Check for contamination • Brittleness Dry the material before use • • Check for contamination • • • Lower melt temperature and/or residence time • Lower material temperature by: Lowering cylinder temperature • • • Decreasing screw rotational speed • • • Lowering back pressure • • • Lower mold temperature • • • • Raise mold temperature Reduce amount of regrind in feed • • • • • • Delamination Raise temperature of mold and/or material • • Check for and eliminate any contamination • • Dry the material before use • • Increase injection speed • 4-5 Table 4.1 Troubleshooting Guide – Injection Molding (Continued) Problem and Corrective Action Celanex Vandar Impet Riteflex Set uniform cycle times • • • • Maintain uniform feed and cushion from cycle-to-cycle • • • • Eliminate any shot-to-shot machine variation • Fill the mold as rapidly as possible • • • • Check machine’s hydraulic and electrical systems for erratic performance • • • • Increase gate size • • • • Balance cavities for uniform flow • Reduce number of cavities in the mold • Poor Dimensional Control Add vents • • • Check for damaged check ring • 4-6 Chapter 5 Processing – Extrusion General Extruder Barrel Chapter 5 contains basic processing guidelines for extruding Celanex® thermoplastic polyesters, Vandar® thermoplastic alloys, Impet® thermoplastic polyesters, and Riteflex® thermoplastic polyester elastomers. When extruding an unfamiliar grade or if problems arise during processing that cannot be corrected using the troubleshooting guide in Chapter 6, contact your local Ticona representative or call Product Information Services at 1-800-833-4882. Standard extruders, having barrel length-to-diameter ratios equal to or greater than those shown in Table 5.1, are recommended for processing polyesters. Higher L/D ratios provide a more homogeneous melt and higher output rate for a given extruder size. Screw Design Screw designs should have a compression ratio between 3:1 and 4:1 (the ratio between the feed zone channel depth and the metering zone channel depth). As shown in Figure 5.1, the feed zone screw depth should be approximately 0.400 inch deep, while the metering zone screw depth should gradually reduce to approximately 0.100 inch. Safety and Health Information Before starting the extrusion process, obtain and read the appropriate polyester Material Safety Data Sheet (MSDS) for detailed safety and health information. They may be obtained by calling Customer Services at 1-800-526-4960. Use process controls, work practices, and protective measures described in the MSDS sheets to control workplace exposure to dust, volatiles, etc. Table 5.1 Barrel Length-to-Diameter Ratios Product L/D Ratios Celanex 30:1 Drying Requirements Vandar 30:1 Celanex, Vandar, Impet, and Riteflex polyesters must be dried to proper moisture levels before extruding. Refer to pages 2-11 through 2-13 for more information on drying. Impet 30:1 Riteflex 20:1 It is extremely critical that moisture levels below 0.01% be maintained before extruding Impet polyester. Therefore, it is recommended that a dehumidifying hopper dryer (as discussed on page 2-13) be used on the extruding machine. For drying polyesters, dewpoints should be maintained between -30°C and -40°C. Metering Section Transition Section Feed Section Equipment For maximum resistance to abrasion and corrosion, extruder screws, breaker plates, screens, adapters, and dies should all be made of corrosion-resistant metals. Screw depth 0.100 inch Figure 5.1 Typical Screw Design 5-1 Screw depth 0.400 inch Dies Recommended lengths of the feed, transition, and metering zones (each representing a percentage of the total screw length) are shown in Table 5.2. Dies must be streamlined, having no areas where material can be trapped or hung up. Thermoplastic materials exposed to high temperatures for prolonged periods degrade and contaminate subsequent extruded product. Table 5.2 Typical Lengths of Feed, Transition and Metering Zones Processing Procedures Final extrudate quality can be greatly affected by even small changes in the temperature of the melt. Generally speaking, the slower the extrusion rate (longer residence), the greater effect these changes will have. Therefore, a variable voltage (or proportioning) controller is best for keeping the melt thermally homogeneous. Zone Distribution (%) Product Feed Transition Metering Celanex 33 33 33 Vandar 33 33 33 Impet 33 33 33 Riteflex 25 25 50 Pressure changes during production indicate changes in viscosity and output rate of the melt. Diaphragm type transducers, which measure fluctuations in pressure, are recommended. Feed zone length should comprise at least 25% of the total screw length. A long and gradual transition section of at least 25% is also recommended, since sharp or short transition sections can cause high barrel pressures and higher melt temperatures due to high shear (especially at higher speeds). Startup In starting up an empty machine, set temperature controllers for the die, adapter, and barrel using the appropriate temperatures provided in Tables 5.3. through 5.6. When they reach their operating temperatures, bring the remaining barrel temperatures up to the proper settings. After they have held the proper temperature for 20 - 30 minutes, turn the screw on at low RPM and start feeding polyester into the hopper. Carefully check both the ammeter and pressure gauges. As melt appears at the die, it may be hazy. At that time, temperature and head pressure should start to stabilize. Length of the metering zone and the screw depth are critical in maintaining optimum control of melt temperature and output consistency. Too long or shallow a metering zone increases the melt temperature due to shear, while short and deep metering zones can result in pressure fluctuations (surging) and nonuniform output. A typical polyethylene type screw design meets the requirements for processing polyesters. Screws designed for nylon, where the transition zone is of proper length, have also been successful. Purging and Shutdown A machine should never be shut down while polyester remains in it. A medium-to-high density polyethylene should be used to purge the extruder. Temperature controllers should remain set at running conditions. Purge all of the polyester from the extruder. Continue running until all of the purge is out of the machine. Then shut down. Breaker Plate and Screens Screens (usually 80 - 100 mesh) are recommended for processing Celanex, Vandar, and Riteflex polyesters. Screens are used to protect the die from being damaged by foreign matter and to increase back pressure, especially when mixing fillers or pigments. A breaker plate, usually incorporated at the end of the screw, is used to support the screens. 5-2 Table 5.3 Typical Extrusion Temperature Ranges for Celanex® Polyester Celanex Grades Parameters 1602Z, 2002, 2002-2, 2002-3, 2012-2, 2016, 3112-2, 3116 1600A, 1700A, 2001 232 - 249 (450 - 480) 243 - 271 (470 - 520 Barrel Settings °C (°F) Zone 1 Zone 2 232 - 249 (450 - 480) 249 - 271 (480 - 520 Zone 3 232 - 249 (450 - 480) 249 - 271 (480 - 520) Zone 4 238 - 254 (460 - 490) 249 - 271 (480 - 520) Zone 5 238 - 254 (460 - 490) 249 - 271 (480 - 520) Adapter °C (°F) 238 - 254 (460 - 490) 249 - 271 (480 - 520) Die °C (°F) 238 - 260 (460 - 500) 249 - 271 (480 - 520) Melt Temperature °C (°F) 238 - 260 (460 - 500) 243 - 271 (470 - 520) Table 5.4 Typical Extrusion Temperature Ranges for Vandar® Alloys Vandar Grades 2100, 2122, 2500, 4602Z, 8000, 8929, 9116 6000 232 - 249 (450 - 480) 243 - 260 (470 - 500) Zone 2 232 - 249 (450 - 480) 243 - 260 (470 - 500) Zone 3 232 - 249 (450 - 480) 249 - 271 (480 - 520) Zone 4 238 - 254 (460 - 490) 254 - 277 (490 - 530) Zone 5 238 - 254 (460 - 490) 254 - 277 (490 - 530) Adapter °C (°F) 238 - 254 (460 - 490) 254 - 277 (490 - 530) Die °C (°F) 238 - 260 (460 - 500) 260 - 282 (500 - 540) Melt Temperature °C (°F) 238 - 260 (460 - 500) 260 - 282 (500 - 540) Parameters Barrel Settings °C (°F) Zone 1 Table 5.5 Typical Extrusion Temperature Ranges for Impet® Polyester Table 5.6 Typical Extrusion Temperature Ranges for Riteflex Polyester Elastomer and Vandar 9118 and AB100 Impet Grades Parameters Barrel Settings °C (°F) Zone 1 320R, 610R Parameters 254 - 271 (490 - 520) Barrel Settings °C (°F) Zone 1 All Riteflex Grades 182 - 199 (360 - 390 Zone 2 254 - 271 (490 - 520) Zone 3 260 - 282 (500 - 540) Zone 2 188 - 204 (370 - 400) Zone 4 266 - 288 (510 - 550 Zone 3 188 - 204 (370 - 400) 266 - 288 (510 - 550) Zone 4 193 - 210 (380 - 410) Adapter °C (°F) 266 - 288 (510 - 550) Zone 5 193 - 210 (380 - 410) Die °C (°F) 271 - 293 (520 - 560) Adapter °C (°F) 193 - 210 (380 - 410) Melt Temperature °C (°F) 271 - 293 (520 - 560) Die °C (°F) 199 - 221 (390 - 430) Melt Temperature °C (°F) 199 - 221 (390 - 430) Zone 5 5-3 Wire Coating Since streamline design is critical to avoid degradation, the die face must have no areas where material can hang up. Cone length (the distance between the die face and the point where the polyester coats the wire) is very important. Generally speaking, it is between 1/2 and 2 inches, and is determined by trial-and-error. Too long a cone may sag and set before drawing is finished, while too short a cone can produce pinholes and tearing. In wire coating, the extruded tube of polyester forms a cone at the die, into which the wire passes. The wire is completely coated as it passes through the cross head. The draw-down ratio is defined as the ratio between the cross-sectional area of the tube at the die face, to the cross-sectional area of the finished coating. Draw down ratio for polyesters should be between 6:1 and 10:1. See Figure 5.2. Before the coated wire enters the water cooling trough, it passes through an air cooling gap which is important in shrinking the coating on the wire. This governs adhesion of the insulation and should be balanced with the proper cone length to insure the desired integrity of the coating. A a Cone Cooling Trough A water cooling trough is used to reduce the melt temperature and harden the coating. The water temperature in the trough is critical. Too low water temperatures of 4 - 16°C (40 - 60°F) will freeze the polyester coating into a semi-crystalline or amorphous state. Post crystallization of the polyester coating can occur and cause it to take a “set” on the spool or winding reel. A water temperature of 38 - 54°C (100 - 130°F) reduces post crystallization and eliminates or reduces spool-set, giving better mechanical properties. Wire Draw-down ratio = A a Cross Head Figure 5.2 Polyester in Wire Coating 5-4 Tube Extrusion Vacuum Tank Polyester can be readily extruded into tubing up to 0.375 inch (9.5 mm) without requiring special equipment. Control of the polyester melt temperature is important. If too high, it can reduce the melt strength, causing irregular wall thickness. Too low a melt temperature can result in poor tube finish, uneven dimensions, and weld lines. Use the temperature ranges given in Tables 5.3 through 5.6 as starting points. A vacuum sizing tank is generally used for tubing 0.50 inch (12.7 mm) or larger. The vacuum in the water cooling trough causes the tube to expand to the sizing die set to the required outside tube dimensions. As before, melt and vacuum tank temperatures are most important because polyester is a semi-crystalline material with a relatively narrow melt-freeze range. The same type of dies and temperature ranges used in wire coating are used in free extrusion of tubing. The extruded tube of resin is pulled through one or more sizing rings which are immersed in the water cooling trough (see Figure 5.3). Sizing Dies Water Trough Haul-off Unit Die Take-up Reel Unit Low-pressure Air Supply Figure 5.3 Polyester in Tube Extrusion 5-5 Sheet Extrusion Polishing Roll Stand As shown in Figure 5.4, polyester sheeting is extruded with standard equipment including an extruder, a sheet die, a polishing roll stand, pull rolls, edge-trim knives, tension rolls, and a winder unit. Polishing rolls will improve the surface finish of the sheet. Normal temperatures of the rolls are as follows: ■ Top Roll: 38 - 77°C (100 - 170°F) ■ Center Roll: 38 - 71°C (100 - 160°F) A flex lip coat hanger type die is best suited for sheet extrusion. Unlike the “T” type dies, it does not have stagnant areas that allow material to hang up and cause degradation. The flex lip must be adjusted to provide a uniform flow across the face of the die. Good temperature control across the die face is also necessary. ■ Bottom Roll: 38 - 71°C (100 - 160°F) Final roll temperatures and heat transfer are governed mainly by the internal cleanliness of these rollers. The air gap must be as small as possible and the melt bank (between the nip rolls) must also be very small. Too large a melt bank causes stress in the sheeting, while too small a melt bank results in nonuniform sheet thickness. Die Edge-Trim or Slitting Pull Rolls Tension Rolls Die Take-up Unit Polishing Roll Stand Melt Bank Figure 5.4 Polyester Sheet Extrusion 5-6 Chapter 6 Troubleshooting – Extrusion Troubleshooting Often, solutions to these problems can be found by following the recommendations in Table 6.1. Try them in the order in which they are listed under each problem category. As with injection molding, many extrusion processing problems are caused by easily corrected conditions such as inadequate resin drying, incorrect temperatures, and/or pressures, etc. Table 6.1 Troubleshooting Guide - Extrusion Process Problem Typical Cause Corrective Action Blistering Cooling too quickly. Bubbles Celanex Vandar Impet Riteflex Slow down cooling rate. • • • • Moisture in material. Dry material to proper moisture level before use. • • • • Trapped air. Raise rear barrel temperature. • Use correct screw. • Degradation of resin due to high temperatures and/or long holdup time. Resin moisture content too high. Breaks, pinholes, tears Coatings non-adherent Use more back pressure. • • Check controllers. • • Lower temperatures. • • • Increase extrusion rate. • Use correct screw. • • • • Look for hang-ups in extruder and die. • • • • Check functioning of controller heaters and thermocouples. • • • • Dry material to proper moisture level before use. • • • • • Draw-down ratio too high. Reduce draw-down ratio. • • • Contamination. See “Contaminated Extrudate”. • • • Short cone, too fast a draw. Lengthen cone, reduce draw rate. • Material temperature too low. Raise melt or die temperature. • Poor blends of pigments or fillers. Blend more homogeneously before extrusion. Cooling too fast. • • • • • • • • • • Use correct screw. • • • • Reduce pigment or filter loading. • • • Lengthen air gap. • • • Slow down extrusion rate. • • • Degradation of resin. See “Bubbles”. • • Cone too long (cooling too soon before it coats). Shorten cone. • 6-1 • • • Table 6.1 Troubleshooting Guide – Extrusion (Continued) Problem Typical Cause Corrective Action Contaminated extrudate Poor handling of resin. Diameter fluctuates Celanex Vandar Impet Riteflex Protect resin, keep clean. • • • • Dirty extruder. Remove all resins and clean. • • • • Extruder corrosion. Use corrosion-resistant parts which contact melted resin. • • • • Dirty regrind. Clean extruder. • • • • Use clean regrind, dried to proper moisture level. • • • • Check tension control. • • • Raise pressure on tractor treads. • • • Raise screw speed. • • • Raise back pressure with screen pack. • • • Use variable transformers with time proportioning controllers. Make sure controllers are “ON” most of the time. • • Too slow a draw rate. Reduce cone length. • • • Too much tension on sizing plates (tube extrusion) or sizing die. Shorten sizing die length by eliminating a plate or two. • • Use water or water and soap lubricant at sizing die. • • Lower temperature at rear barrel. • • Cool throat of hopper. • • Variation in take-off speed. Surging. Heat cycles. Uneven feed to extruder. Check uniformity of extrusion rate (cross head pressure). Moisture. Out of round (deformed, nonconcentric) Misshapen die. Varying cooling rate. Coating sets after sagging. Take-up pressure too high. Dry material to proper moisture level before use. • • • • • • Replace die. • • • Correct guider tip. • • • Fix depth of water submersion. • • • Center the die. • • • Lower melt temperature. • • • Step up rate of draw-down by increasing extruding speed, increasing draw-down ratio, or shortening cone length. • • • Cool faster by reducing air gap from die to water trough or by raising output. • • • Put slack in wire line. • • • Lower capstan tension. • • • Lengthen cooling so extrudate is set before take-up. • • • 6-2 Table 6.1 Troubleshooting Guide – Extrusion (Continued) Problem Typical Cause Corrective Action Out of round (deformed, nonconcentric) Continued Die off-center. Center die. Out of round (buckling or folding) Extruder overloading Guider tip too flexible. Rough finish Vandar • • Impet Riteflex • Use shorter guider tip. • • • Use bigger tip with same diameter hole. • • • Hole in guider tip not small enough for wire diameter. Use guider tip with smaller hole. • • • Hang-up on die face or guider tip. Remove imperfections. • • • Melt tension varies. Make hole in guider tip smaller or center the die. • • • Too fast a draw rate . Lengthen cone (reduce vacuum) for slower draw rate short cone). • • • Draw-down ratio too high. Reduce draw-down ratio. • • • Compared with ratio of guider tip size to wire size, ratio of die size to coated wire size is too low. Increase the draw ratio. • • • Feed section has too deep a flight depth. Use screw with shallower feed. • • • • Use lubricant. • • • • Rear temperature too low. Increase rear temperature. • • • • Check rear zone thermocouple and controller. • • • • • • • • Wedging of pellets between Raise rear temperature. flight land and barrel. Shrink back Celanex Wire stretching. Reduce tension on wire. • • Orientation too great during draw-down. Preheat the wire. • • Raise the draw rate (shorter cone). • • Reduce draw-down ratio. • • Enlarge air gap or lower quench rate. • • Increase die and melt temperatures. • • Contamination. See “Contaminated Extrudate”. • • • • Dirty or poorly finished die. Inspect finish on die and tip. Look for burrs and remove. • • • • Melt fracture caused by excessive shear. Raise die temperature. • • • • Widen die opening. • • • • Lower extrusion rate. • • • • • • Increase melt temperature. • • Wrong rate of draw. Change cone length. • • Material on die face. Clean. • • Wire vibrating. Use dampening pads or guides. 6-3 • • • • • Table 6.1 Troubleshooting Guide – Extrusion (Continued) Problem Typical Cause Corrective Action Surging Slipping drive belts. Inadequate melt reservoir. Celanex Vandar Impet Riteflex Secure belts. • • • • Use different screw to adjust. • • • • Slow down screw speed. • • Make die opening smaller. • • • • • • • • • Check controller in feed zone. • • • • Reduce rear temperatures. • • • • Increase cooling in feed throat (water). • • • • Change to screw with longer feed section. • • • • Raise temperature in rear zone. • • • • Barrel temperature too low. Raise temperature settings. • • • • Compression ratio of screw too low. Increase back pressure. • • • • Change screw. • • • • Material bridging in transition section. Sheet sticking to roll Check temperature cycling. • Increase back pressure. Material bridging in feed section. Unmelted pellets or particles in extrudate • Watt density in heater too low. Increase wattage. • • • • Change heater bands. • • • • Cold spots in extruder sections. Get more heat to area along barrel extension to die neck. • • • Roll too hot. Material too hot. Check thermocouples and controllers for accuracy. • • • • Insulate exposed areas to prevent heat loss. • • • • Reduce roll temperature. • • • • Reduce melt temperature. • • • • Inspect functioning of controller heaters and thermocouples. • • • • 6-4 NOTICE TO USERS: To the best of our knowledge, the information contained in this publication is accurate, however we do not assume any liability whatsoever for the accuracy and completeness of such information. Further, the analysis techniques included in this publication are often simplifications and, therefore, approximate in nature. More vigorous analysis techniques and/or prototype testing are strongly recommended to verify satisfactory part performance. Anyone intending to rely on such recommendation or to use any equipment, processing technique or material mentioned in this publication should satisfy themselves that they can meet all applicable safety and health standards. It is the sole responsibility of the users to investigate whether any existing patents are infringed by the use of the materials mentioned in this publication. Any determination of the suitability of a particular material for any use contemplated by the user is the sole responsibility of the user. The user must verify that the material, as subsequently processed, meets the requirements of the particular product or use. The user is encouraged to test prototypes or samples of the product under the harshest conditions likely to be encountered to determine the suitability of the materials. Material data and values included in this publication are either based on testing of laboratory test specimens and represent data that fall within the normal range of properties for natural material or were extracted from various published sources. All are believed to be representative. Colorants or other additives may cause significant variations in data values. These values are not intended for use in establishing maximum, minimum, or ranges of values for specification purposes. We strongly recommend that users seek and adhere to the manufacturer’s or supplier’s current instructions for handling each material they use. Please call 1-800-833-4882 for additional technical information. Call Customer Services at the number listed below for the appropriate Material Safety Data Sheets (MSDS) before attempting to process these products. Moreover, there is a need to reduce human exposure to many materials to the lowest practical limits in view of possible adverse effects. To the extent that any hazards may have been mentioned in this publication, we neither suggest nor guarantee that such hazards are the only ones that exist. Celanex®, Vandar®, Impet®, and Riteflex® thermoplastic polyesters are not intended for use in medical or dental implants. Products Offered by Ticona Celcon and Hostaform acetal copolymer (POM) Celanese Nylon 6/6 Celanex thermoplastic polyester Impet thermoplastic polyester Vandar thermoplastic polyester alloys Riteflex thermoplastic polyester elastomer Celstran, Fiberod, and Compel long fiber reinforced thermoplastics Encore recycled thermoplastic molding resins Fortron polyphenylene sulfide (PPS) GUR specialty polyethylene (UHMWPE) GHR very high molecular weight high density polyethylene (HDPE) Topas cyclic olefin copolymer (COC) Vectra liquid crystal polymer (LCP) Duracon™ acetal copolymer (POM) and Duranex™ thermoplastic polyester are offered by Polyplastics Co., Ltd. Fortron is a registered trademark of Fortron Industries. Technical Information: 1-800-833-4882 Customer Services: 1-800-526-4960 Ticona 90 Morris Avenue Summit, New Jersey 07901-3914 (908) 598-4000 1999 Ticona Printed in U.S.A. 99-324/2M/1199