1
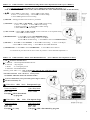
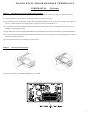
T H - 2 0 0 5 E X C E L P R O G R A M M A B L E T H E R M O S TAT
USER MANUAL
(E-Series)
PART-1-1 CHOOSING LOCATION FOR INSTALLATION
For obtaining thermostat’s best performance upon using, recommend user to follow up with precaution listed below.
(1). Place thermostat on wall inside the room approximate 1.5 meter above floor.
(2). Avoid position where temperature sensing easily interfered by ambience, such as, directly exposed to Sun-Light, too
near to any Heat-Generate devices/refrigerator, right next to entrance/exit/window, etc.
(3). Prevent thermostat from installed at position that furniture may interfere air-flow, stagnant air-flow location is not
suitable for installing thermostat.
(4). Keep thermostat away from high humid ambience, high humidity is hazardous to thermostat’s operational duration,
(5). It’s crucial, before installing thermostat, make sure house renovation is finished, no tacky painting/plaster is right on
thermostat’s installing position.
(6). To level thermostat prior to installation is not necessary.
PART-1-2 STRAT INSTALLATION
(1). How to open top housing
(2). How to install battery (For Battery Model only) 2 x AA
1
PART- 1-3-1
USER SETTING - ON SCREEN (Setting effective after adjustment,no need to press “RESET”)
***** SYSTEM SWITCH SWITCHED TO ‘OFF” PRIOR TO FOLLOWING SETTING *****
(FOR THF-2005-1H-B-0 & TH-2005-1H-B-0, SW3 SWITCHED TO “SET” POSITION BEFORE START SETTING)
(1).℃/℉ --- 1.Press ‘SET” to enter select. 2. Press ‘OK” to enter setting,
3. Press ‘+/-‘to choose setting 4. Press OK to confirm setting.
5. Press ’SET’ again for next user setting.
(2).24H/12H --- Setting procedure same as above 5 procedures
(3).SET DATE ---1.Press ‘SET’ to SET DATE. 2. Press ‘OK’ to enter setting.
3. Press ‘+/-‘to adjust. 4. Press ‘OK’ for next setting.
5. Repeat procedure 3. 6. Press OK to confirm setting.
7. Press ‘SET’ for next user setting
(4). SET CLOCK ---1.Press ‘SET’ to SET CLOCK. 2. Press ’OK’ and ‘+/-‘ to required setting.
3. Press OK to confirm setting.
(5).DIFFERENTIAL ---1. Press SET to select ‘SET DIFFERENTIAL’
2. Press OK to enter setting. 3. Press ‘+-‘to adjust.
4. Press OK to confirm setting. 5. Press SET to select next USER SETTING.
(6).FILTER--- 1. Press SET to select FILTER. 2. Press OK to enter setting. 3. Press ‘+/-‘to adjust.
4. Press OK To confirm setting. 5. Press SET to next USER SETTING.
(7).SET RETURN ---1.Press SET to select SET RETURN. 2. Press OK to return and run.
** Continuous to press SET can let user to select any of above 7 items and make adjustment. **
PART- 1-3-2
USER SETTING - SELECTION BY DIP SWITCH
(Press “RESET” after adjustment to effect)
(1).SW1:For Entire TH-2005-Series
Φ 1--HP/SHC :Heat-Pump/Standard Heat & Cool
2--7d/5-2d :Day-Program
3--P6/P4 :6 or 4 Program period
4--FAN D/E:Fan Disable/Enable
**Factory preset “SW1 1 to 4-0111. on model THF-2005-1H-B-0 & TH-2005-1H-B-0
- 1110 on rest of models other than above.
**DO NOT CHANGE SW1-1 & SW1-4 Factory Preset
ON MODEL THF-2005-1H-B-0 & TH-2005-1H-B-0
Φ System 3-minute delay start protection(operate logic as below)
Φ Fan 90-second delay off
Φ-1 When Select
SHC
Mode
Under Cool Mode
Cool→ON
Fan →ON
Fan Speed:Hi/Lo determined
by program.
Φ-2 When Select
HP
Under Cool Mode
Cool→On
Fan →On
Fan Speed:Lo only.
Mode
Fan Operate Logic
Under Heat Mode
Heat→ON
Fan→ OFF
Fan Operate Logic
Under Heat Mode
Heat→On
Fan →On
Fan Speed:Hi/Lo determined by program
2
Φ-3 When Select
SHC
Mode
Under Cool Mode
Cool→YES
Φ-4 When Select
Under Heat Mode
Heat→NO
HP
Mode
SHC
Mode
Under Cool Mode
Cool→YES
Φ-6 When Select
Under Cool Mode
Cool→YES
System 3-minute delay start protection operate logic
Under Heat Mode
Heat→YES
Under Cool Mode
Cool→YES
Φ-5 When Select
System 3-minute delay start protection operate logic
Fan 90-Second delay off operate logic
Under Heat Mode
Heat→NO
HP
Mode
Fan 90-Second delay off operate logic
Under Heat Mode
Heat→YES
(2).SW3:For THF-2005-1H-B-0 & TH-2005-1H-B-0 Only
RUN PROG.:Begin to run program (after setting adjustment
completed)
SET
:User Setting (Switched to this position before
changing Factory preset)
(3).JP1:For Entire TH-2005-Series
To select either thermostat temperature-control determinant by
Room-Sensor (Internal Sensor) or Remote-Sensor.
PART- 1-4-1
WIRING -PART-A For THF-2005-1H-B-0 & TH-2005-1H-B-0 only.
Unscrew to take safety cover off and to proceed wiring as illustration
3
PART- 1-4-2
WIRING -PART-B For Entire TH-2005-Seires Except THF-2005-1H-B-0 & TH-2005-1H-B-0
WINDOW CONTACT: Terminal 7 & 8 Connected by wire at manufacturing, when 『Disconnected,
Heat/Cool/Fan Output will be Cut-Off. This special made mechanism for extensional
ON/OFF control purpose. Please do not take wire off terminal 7 & 8 unless
WINDOW-CONTACT Function shall be in use.
4
PART- 2-1
START TO PROGRAM THERMOSTAT
A. TH-2005 KEY PAD
1.
Set key:Setting Selection
2.
+/- key:’+’ Increase or skip to next. ’━’ Decrease or return to previous
3.
ok key:Press to enter setting or return to program executing.
4.
RESET key:Reset (Thermostat shall return to its Factory-Preset if this key is pressed)
B.PROGRAM REVIEW: MOVE SYSTEM SWITCH AWAY FROM “OFF”
(1).Press SET to enter.
(2).Press ‘+ or -‘to review each Temperature/Time Setting (Program)
D. PROGRAM SETTING: MOVE SYSTEM SWITCH AWAY FROM “OFF” AND START SETTING.
(1).Weekdays/Weekend, Temperature and Time setting in sequence.
For 7-d Program
Press SET to select program setting, setting starting from Mo-MORN (Monday-Morning).
1. Press OK to enter Monday-Morning Temperature setting. (P1 Temp. setting))
2. Press ‘+/-‘to adjust temperature setting
3. Press OK to finish Monday-Morning Temperature setting and begin Time-setting for Mo-MORN.
4. Press ‘+/-‘to adjust Time setting (for Mo-MORN, P1 Time setting)
5. Press OK to complete whole Mo-MORN Temp. & Time Setting.
6. Press ‘+/-‘for next (Mo-Day) Temp. & Time setting. (P2 of Monday)
5. Repeat procedure 1 to 5, to complete setting of rest of programs on Monday and entire setting
Throughout whole 7-day.
For 5+2d Program
Presses SET to select program setting, Monday through Friday are bound in program setting.
1. Press OK to enter 1st Temperature\Time (P1 of 5d), Press ‘+ or -‘to adjust setting.
(Operational logic same as procedure 1 to 5 stated in 7-d Program).
2. To adjust setting for Saturday & Sunday by same operational logic in adjusting 7d.
Mode 5+2d
Weekday
Mon. ~ Fri.
Time
P4
Factory Preset
Temperature
Switch on heat
Switch on cooling
MORN(P1)
6:00
70℉(21℃)
75℉(24℃)
DAY(P2)
8:30
60℉( 15.5℃)
85℉(29.5℃)
EVEN(P3)
4:30 PM
70℉( 21℃)
75℉(24℃)
NIGHT(P4)
10:30 PM
65℉ (18.5℃)
80℉(26.5℃)
Saturday
Time
MORN(P1)
Temperature
Switch on heat
Switch on cooling
7:00
70℉ (21℃)
75℉ (24℃)
DAY(P2)
8:30
70℉(21℃)
85℉ (29.5℃)
EVEN(P3)
4:30 PM
70℉ (21℃)
75℉(24℃)
NIGHT(P4)
10:30 PM
65℉(18.5℃)
80℉(26.5℃)
Sunday
Time
MORN(P1)
Temperature
Switch on heat
Switch on cooling
7:00
70℉(21℃)
75℉ (24℃)
DAY(P2)
8:30
70℉(21℃)
85℉ (29.5℃)
EVEN(P3)
4:30 PM
70℉(21℃)
75℉ (24℃)
NIGHT(P4)
10:30 PM
65℉(18.5℃)
80℉ (26.5℃)
Reminder:1. To program’s logic, each day’s ending time is at 11:59 in 12H-Format, 23:59 in 24H-Format,
therefore;do not set 12:00 PM for NIGHT(P4) nor 24:00 for NIGHT(P6).
5
2. Thermostat is designed to run programs by sequential order, do not set program either “overlap”
In time sequence, nor non-sequential Time-setting in program setting, this will lead chaos to
Thermostat’s operational logic.
Mode 7-d
Mon, Tue, Wed,
Thu, Fri
Time
MORN(P1)
DAY(P2)
NOON(P3)
BREAK(P4)
EVEN(P5)
NIGHT(P6)
6:00
8:30
12:00pm
2:00pm
4:30pm
10:30pm
Saturday
Time
MORN(P1)
DAY(P2)
NOON(P3)
BREAK(P4)
EVEN(P5)
NIGHT(P6)
7:00
8:30
12:00pm
2:00pm
4:30pm
10:30pm
Sunday
Time
MORN(P1)
DAY(P2)
NOON(P3)
BREAK(P4)
EVEN(P5)
NIGHT(P6)
7:00
8:30
12:00pm
2:00pm
4:30pm
10:30pm
P6
Factory Preset
Temperature
Switch on heat
Switch on cooling
70℉(21℃)
75℉(24℃)
60℉( 15.5℃)
85℉(29.5℃)
70℉ (21℃)
75℉(24℃)
60℉ (15.5℃)
85℉(29.5℃)
70℉( 21℃)
75℉(24℃)
65℉ (18.5℃)
80℉(26.5℃)
Temperature
Switch on heat
Switch on cooling
70℉(21℃)
75℉ (24℃)
70℉(21℃)
75℉ (24℃)
70℉(21℃)
75℉ (24℃)
70℉(21℃)
75℉ (24℃)
70℉(21℃)
75℉ (24℃)
65℉(18.5℃)
80℉ (26.5℃)
Temperature
Switch on heat
Switch on cooling
70℉(21℃)
75℉ (24℃)
70℉(21℃)
75℉ (24℃)
70℉(21℃)
75℉ (24℃)
70℉(21℃)
75℉ (24℃)
70℉(21℃)
75℉ (24℃)
65℉(18.5℃)
80℉ (26.5℃)
When choose P4,
NOON and
BREAK
will vanish from
screen.
Reminder:1. To program’s logic, each day’s ending time is at 11:59 in 12H-Format, 23:59 in 24H-Format.
Therefore;do not set 12:00 PM for NIGHT(P4) nor 24:00 for NIGHT(P6).
2. Thermostat is designed to run programs by sequential order, do not set program either “overlap”
In time sequence, nor non-sequential Time-setting in program setting, this will lead chaos to
Thermostat’s operational logic.
(2).Choose specified day in week for setting or change setting.
Press SET to select setting, continuous press‘+‘to desired Day/Time. (On LCD Display, users shall see ”REVIEW” in Flashing)
1. Press OK to enter setting.
2. Press ‘+ or -‘to change setting/adjust setting
3. Press OK to enter “review program”.
4. Press ‘+ or -‘to choose desired Day/Time for next setting.
(3).Copy (available in 7-d mode only) - 2 methods to enter Copy mode
A. Select any day in week, and start SETTING its entire Temperature/Time of that day, upon finishing entire
Temperature/Time setting of the day, Press OK to confirm setting and then Press SET to enter COPY MODE.
1. Press OK to choose Copy Program” FROM (read what’s flashing on LCD)”.
2. Press ‘+ or -‘to choose a “DAY” as program copy basis
3. Press OK again to choose Copy Program “TO (read what’s flashing on LCD).
4. Press ‘+ or -‘to choose a “DAY” as program copy basis.
5. Press OK to confirm setting. (on top of LCD, user shall see flashing “COPY”).
6. Press SET to return (read flashing on LCD).
7. Press OK to run programs.
B. Continuous press ”SET” 2 times under any Temperature/Time setting (Program) to enter COPY MODE, and to follow
Operational procedure listed above.
6
4). MANUAL – 4 functions comprised in this category. Move System switch away from “OFF”
A. Temporary Override- Change current Temperature setting until next program’s executing.
1. Press OK to enter, Continuous Press SET to desired function for setting adjusting, Press OK again.
2. Press ‘+ or -‘to adjust Temperature. (Temp. Set in flashing)
3. Press OK to run Temporary Override function.
4. Upon Temporary Override is in executing, Press OK shall terminate its executing.
B. Comfort Override- Change current temperature setting and hold new setting for required hours.
Thermostat to operate by its original programmed parameter upon
Comfort Override executing ceased.
1. Press OK to enter, Continuous Press SET to desired function for setting adjusting, Press OK again.
2. Press ‘+ or -‘to adjust Temperature. (Temp. Set in flashing)
3. Press OK to select executing time of comfort-override
4. Press ‘+ or -‘to adjust Time (minimum 1 hour).
5. Press OK to run Comfort Override.
6. Upon Comfort Override is in executing, Press OK shall terminate its executing.
C. Permanent Hold Temperature- Change current temperature setting and to execute new setting
Until it is called off.(by press OK)
1. Press OK to enter, Continuous Press SET to desired function for setting adjusting, Press OK again.
2. Press ‘+ or -‘to adjust Temperature.(Temp. Set in flashing)
3. Press OK to run Permanent Hold Temperature function.
4. Upon Permanent Hold Temperature is in executing, Press OK shall terminate its executing.
D. Hold Temperature Until.(Vacation Hold)- Change current temperature setting and to execute
New setting until specified date.
1. Press OK to enter, Continuous Press SET to desired function for setting adjusting, Press OK again.
2. Press ‘+ or -‘to adjust Temperature.(Temp. Set in flashing)
3. Press OK to select executing duration of Hold-Temperature Until. to
4. Press ‘+ or -‘to select Month. Press OK again to adjust Day, Press‘+ or -‘to select DAY.
5. Press OK to run Hold Temperature Until.
6. Upon Hold Temperature Until. is in executing, Press OK shall terminate its executing.
7