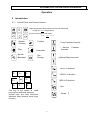
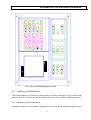
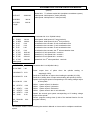
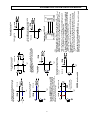
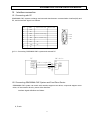
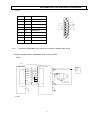
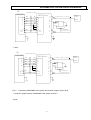
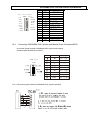
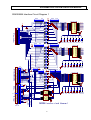
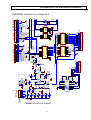
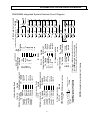
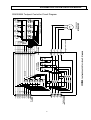
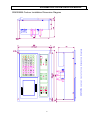
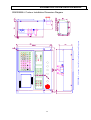
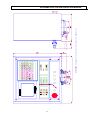
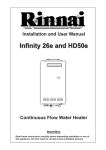
1
GSK928MA
Milling Machine CNC System
User Manual
GSK CNC Equipment
The operating manual describes all matters concerning the operation of the system in detail as
much as possible. However, it is impractical to give particular descriptions of all unnecessary
and/or unavailable works on the system due to the text size limit of the manual, specific operations
of the product and other causes. Therefore, the matters not specified herein may be considered
impractical or unavailable.
This operating manual is the property of GSK CNC Equipment Co., Ltd. All rights reserved. It is
against the law for any organization or individual to publish or reprint this manual without the
express written permission of GSK and the latter reserves the right to ascertain their legal
liability.
Dear user,
We are really grateful for your patronage and purchase of GSK928M milling CNC system made by
GSK CNC Equipment Co., Ltd.
Company Profile
As an industrial base of numerical control (NC) products in south China and an enterprise undertaking the
state’s Plan 863 “Middle-grade Numerical Control System Industrialization Supporting Technology”, GSK
has been committed to the development and manufacture of NC systems for machine tools and
servo/step motor drive units for years. GSK actively promotes machine tool NC innovation and offers NC
technical training and trade services of numerical controlled machine tools – integrating science,
engineering and trading. Our products support more than 50 domestic manufacturers of machine tools
with after-sales service network through the country. With a yield in the lead in China for four years in
succession, GSK series products are in great demand in the domestic demand and have sold as far as to
Southeast Asia at high cost-performance ratio.
Field Technical Support Service
Field support services are available when you encounter problems insolvable through telephone. GSK
CNC Equipment Company Limited will designate a technical support engineer to the field to solve
technical problems for you.
All specification and designs are subject to change without notice。
Sincerely thanks for your friendly support for our products.
Contents
Programming
1 Introduction.................................................................................................................................................. 5
1.1
Axis Definition ..................................................................................................................................... 5
1.2
Machine zero........................................................................................................................................ 5
1.3
Reference point ................................................................................................................................... 5
1.4
Coordinate System ............................................................................................................................. 5
1.5
Programming Coordinates ................................................................................................................ 6
1.6
Input Unit and Range of Coordinate ................................................................................................. 6
1.7
Program Configuration....................................................................................................................... 6
1.8
Tool Path of Rapid Positioning ......................................................................................................... 8
1.9
Offset of System Coordinate ............................................................................................................. 8
1.10
Initial and Modal of System.............................................................................................................. 8
1.11
Initial Status of System..................................................................................................................... 8
1.12
Start of Program ................................................................................................................................ 9
1.13
End of Program ................................................................................................................................. 9
1.14
Main Program and Subprogram...................................................................................................... 9
1.15
Backlash Compensation ................................................................................................................10
1.16
R Reference Plane...........................................................................................................................10
2 S, T, M Function, D, H, F, FEED%............................................................................................................11
2.1
S Function ..........................................................................................................................................11
2. 2
T Function .........................................................................................................................................11
2.3
M Function (Auxiliary Function)......................................................................................................11
2.4
D, H Function .....................................................................................................................................13
2.5
F, Feed%.............................................................................................................................................13
3 G Function (Preparatory Function).........................................................................................................14
3.1
G Function for Defining Programming State of the System .......................................................14
3. 2
G0 Rapid Positioning (Modal, Initial) .............................................................................................14
3. 3
G1 Linear Interpolation (Modal)......................................................................................................15
3.4
G2, G3 Circular Interpolation (Modal).............................................................................................15
3. 5
G4 Dwell.............................................................................................................................................16
3. 6
G10 G11 Rough Milling in Concave Groove of Inner Circular ...................................................16
3. 7
G12 /G13 Finish Milling of Inner Circle..........................................................................................17
3. 8
G14 /G15 Fine Milling of Outer Circle ............................................................................................18
3. 9
G22 System Parameter Setting (Modal) ........................................................................................18
3.10
G23 Conditional Jump....................................................................................................................19
3.11
G27 Machine Zero Inspection........................................................................................................19
3.12
G28 Rapid Traverse to Reference Point via Middle Point..........................................................20
3.13
G31 Rapid Return to the R Reference Plane ...............................................................................20
3.14
G34/ G35 Rough Milling of the Rectangle–concave Groove.....................................................20
2
3.15
G36/ G37 Fine Milling Within the Rectangle-concave Groove ..................................................21
3.16
G38/ G39 Finish Milling Outside of the Rectangle ......................................................................22
3.17
Summary to G Function of Fixed Cycle .......................................................................................22
3.18
G73 High Speed Drilling Cycle ......................................................................................................24
3.19
G74 Tapping Cycle with Left-hand................................................................................................24
3.20
G81 Drilling Cycle............................................................................................................................25
3.21
G82 Drilling Cycle............................................................................................................................25
3.22
G83 Deep Hole Drilling (Perking)Cycle ........................................................................................26
3.23
G84 Right-hand Tapping cycle......................................................................................................26
3.24
G85 Boring Cycle ............................................................................................................................27
3.25
G86 Boring Cycle (drilling along head) ........................................................................................27
3.26
G89 Boring Cycle ............................................................................................................................28
3.27
G92 Floating Coordinate System Setting ....................................................................................28
4 Parameter Programming..........................................................................................................................29
Operation
5 Introduction................................................................................................................................................31
5.1
Control Panel and Function buttons ..............................................................................................31
5.2
Adjusting of LCD Brightness...........................................................................................................32
5.3
Indicators and Function Keys .........................................................................................................32
5.4
Operation Mode and Incremental Input..........................................................................................35
5.5
Resetting Power On ..........................................................................................................................35
5.6
Operation of Menu.............................................................................................................................35
5.7
Main Menu for the System ...............................................................................................................36
6 Parameter Setting......................................................................................................................................37
6.1
Description of Parameter .................................................................................................................37
7 Manual Mode..............................................................................................................................................43
7.1
Manual Operation..............................................................................................................................43
7.2
Display (Disp).....................................................................................................................................45
7.3
Zero Return Function (ZERO) ........................................................................................................46
7.4
Command Function (COMM)...........................................................................................................47
8 Auto Mode ..................................................................................................................................................49
8.1
Auto Operation ..................................................................................................................................49
8.2
Display Function (Disp) ....................................................................................................................51
8.3
Command Function (Comm) ...........................................................................................................51
8.4
Run to Current Block in Dry Run and Positioning Run ...............................................................53
8.5
Escape from Auto Mode (end).........................................................................................................54
8.6
Executing a Part Program................................................................................................................54
8.7
Execution Order in Auto Mode........................................................................................................55
8.8
Run Times of Part Program .............................................................................................................55
8.9
DNC Operation...................................................................................................................................56
8.10
Power Down Protection..................................................................................................................56
3
9 Dry Run Mode ............................................................................................................................................57
10 Edit Mode..................................................................................................................................................58
10.1
Full Screen Edit (1-EDIT) ................................................................................................................58
10.2
List of Program (2-LIST) .................................................................................................................60
10.3
Program Copy (3-COPY) ................................................................................................................61
10.4
Part Program Memory Area Lock (4-LOCK) ................................................................................61
10.5
Part Program Memory Area Unlock (5-UNLOCK).......................................................................61
10.6
Deleting a Program (6-DEL) ...........................................................................................................62
10.7
Initialization of Part Program Memory Area (7-P INIT) ...............................................................62
11 Communication Mode ............................................................................................................................63
12 Notes and Procedure of Operation.......................................................................................................66
Connection
13 Interface Overview ..................................................................................................................................67
13.1
Interface Layout...............................................................................................................................67
13.2
Total Frame ......................................................................................................................................67
13.3 Total Connection Graph...................................................................................................................68
14 Interface function ....................................................................................................................................68
14.1
Interface Specification....................................................................................................................68
14.2
Interface Pin list and Interface Method.........................................................................................68
15 Interface connection ...............................................................................................................................71
15.1 Connecting with PC.............................................................................................................................71
15.2 Connecting GSK928MA CNC System and Feed Drive Device ......................................................71
15.3
Connecting GSK928MA CNC system and Toolpost ..................................................................77
15.4
Connecting GSK928MA CNC System and Manual Pulse Generator(MPG) ............................78
15.5
Connecting with spindle Encoder.................................................................................................79
15.6
CNC system Switching Value Input..............................................................................................79
15.7
Switching Value Output of the CNC System ...............................................................................81
Appendix A:
Introduction for GSK928MA ...............................................................................................83
Appendix B:
System Parameter List........................................................................................................85
Appendix C:
M Function Word List..........................................................................................................87
Appendix D:
G Function Word List ..........................................................................................................89
Appendix E:
Error Word List and Troubleshooting...............................................................................91
GSK928MA Machine Zero Return Mode ......................................................................................................94
GSK928MA Interface Circuit Diagram 1.......................................................................................................95
GSK928MA Interface Circuit Diagram 2.......................................................................................................96
GSK928MA Integrated System External Circuit Diagram..........................................................................97
GSK928MA Toolpost Controller Circuit Diagram .......................................................................................98
GSK928MA Contour Installation Dimension Diagram ...............................................................................99
GSK928MA-L Contour Installation Dimension Diagram..........................................................................100
4
GSK928MA CNC SYSTEM OPERATION MANUAL
Programming
1
1.1
Introduction
Axis Definition
This is the CNC system with three or four coordinates for the milling machine and drill machine etc.
A rectangular coordinate system combined of X axis, Z axis, Y axis and C(or A)axis is used to
execute the positioning and interpolation operation in this CNC system. X axis is denoted to left
and right direction and Y axis to clockwise and counterclockwise direction for milling machine in the
horizontal plane, Z axis is denoted to vertical one for worktable(or milling cutter)and C (A) axis is
an additional one(the 4th axis).
Whether A or C is used as the 4th axis in programming axis is confirmed by the C bit of No.10
system parameter No.10. A positive direction is defined to the tool moving away from the workpiece;
otherwise it is negative direction as follows:
Y
Z
刀具
X
工件
机床
1.2
Machine zero
Machine zero is a fixed point close to the proximity switch on a machine tool. Usually the reference
point is set at the maximum stroke of X, Y, Z axis in the positive direction. Do not use its function,
supported by the system without installing the machine zero. There must be a machine zero
deceleration switch before machine zero. It is unavailable for the 4th axis to use the machine zero
function
1.3
Reference point
The position used for executing part programs is defined to reference point), namely, the starting
point of tool or the origin point of machining [instead of (0, 0) of coordinate system].
1.4
Coordinate System
In this system, a program is programmed based on the workpiece coordinate system (that’s to say
the workpiece coordinate system is equal to the programming coordinate system), it is suggested
that the user should position the X , Y, Z axis’s zero with G0 instruction at the first block in the
program. It can also define a floating coordinate system by instruction G92 in the program, and for
5
GSK928MA CNC SYSTEM OPERATION MANUAL
the convenience of programming, G92 can be used repeatedly in the program. The system will
remember the position of machine zero and reference point. After executing the instruction G27
(return to the machine zero and test the step out), G28 (return to the reference point through the
specified point), M02, M30, M31, the system will be changed from the floating coordinate system to
the workpiece coordinate system.
Parameter from No.61 to No.84 is the position of G54 toG59 coordinate system in the reference
workpiece coordinate system, which can be modified to change the position of No.1 to No.6
workpiece coordinate system in the reference workpiece coordinate system. And the coordinate of
current coordinate system can also be set in Manual mode.
If the current coordinate system is not the reference workpiece coordinate system, the
corresponding code of current coordinate system will be displayed at the bottom of the screen in
the Manual or Auto mode: G92/G54/…/G59.
In “Manual mode”, the current coordinate system can be switched “instruction” operation, and the
workpiece coordinate system can also be selected by G54~G59 instruction in program. After
execution of G27/G28/M02/M30 instruction or machine zero return, the system will be switched to
reference workpiece coordinate system.
When the workpiece coordinate system is selected by G54~G59 instruction in part program, the
instructions can be in the same program block with interpolation and rapid positioning G instruction ,
and it will be executed firstly.
1.5
Programming Coordinates
We can program with absolute coordinates (G90) and relative (incremental) coordinates (G91),
incremental coordinates are contrast to the current position’s coordinate.
1.6
Input Unit and Range of Coordinate
Rectangle coordinate is used in the system.
The least input unit of the coordinate value is 0.01mm. The maximum instruction value is
±99999.99.
Axis name
1.7
Least output unit
X axis
Least input unit
0.01mm
Z axis
0.01mm
0.01mm
Y axis
0.01mm
0.01mm
A(C) axis
0.01mm
Actual move depending on the design of machine
0.01mm
Program Configuration
The part program consists of a number of program blocks. Each block specifies the S function of
the spindle speed, tool function (H for tool length compensation, D for tool corner radius
compensation), miscellaneous function (M function) and preparation function (G function) for rapid
positioning and cutting feed. And each block consists of a number of words; the word begins with
an English character followed by a value. The block begins with word N (block number), followed
by other words, and ends with Enter key.
Each block must consist of a sequence number for indicating the CNC operation sequence at the
6
GSK928MA CNC SYSTEM OPERATION MANUAL
beginning of the block and a <Enter> code for indicating the end of the block. A Letter N followed
by a numerical value specifies the sequence number.
For example:
N10 G0 X50 Y100 Z20 ↙
N20 G91 G0 X-30 Z-10 ↙
N30 G1 Z-50 F40 ↙
N40 G17 G2 X-10 Y-5 R10 ↙
N50 G0 Y60 Z60 ↙
N60 G28 X0 M2 ↙
Block No.10, rapid positioning
Block No.20, relative programming, rapid positioning
Block No.30, linear interpolation (linear cutting)
Block No.40, circular interpolation
Block No.50, rapid positioning
Block No.60, return to starting point, program ending
For the above, N30,G1,Z-50,F40 etc. are called for words, the beginning character of word stands
for significance of word, and the following digits are the word value. For the expression of value
range, here N4 represents that the word value range is 4-bit integer(0~9999). And the range for
X±5.2 is from -99999.99 to +99999.99. (i.e. maximum 5 integral bit and maximum 2 decimal bit, +
and- sign is allowable)
The configuration of one block of program in this system is designated as follows:
/ N5 X±5.2 Y±5.2 Z±5.2 A±5.2 C±5.2 I±5.2 J±5.2 K±5.2 U5.2 V5.2 W5.2 P5 Q5.2 R±5.2 D1 H1 L5
F5.2 S2 T1 M2
/
Optional block skip code. When a slash is specified at the beginning of a block, this block
is an optional block. When the optional block skip indicator on the operation panel is
light, the information in the block with a slash heading will be ignored in Auto mode, and
One touch of the <skip> key can switch off the optional skip function.
N
Block sequence number ranged from 0 to 65535; it is a default, and it must be the first
sign of the block if it contains N. (It can be omitted in DNC.)
Preparatory function, several G instructions for defining states and one G instruction for
acting
can be specified in the same block
X ,Y,Z
,A,C
Coordinate value ranging from –99999.99 to 99999.99 in each axis;
Absolute(G90) or relative(G91) value;
Whether A or C is available in programming to the forth axis is confirmed by the C bit of
No.10 parameter.
I,J,K
The position K of the center of circle, which is relative to the starting point in circular
interpolation.
K is denoted to the spindle speed in tapping.
P
Dwell time; Parameter number; Program number;
R
Arc radius, the reference plane(R plane) in the fixed cycle
D
L
The number for tools(0~9);used for the tool radius compensation;
H
Repetition count ranges from 0∼65535;The number of holes to be drilled;
F
The number for length of tools(0~9);used for the tool length compensation;
Cutting feedrate, the unit is mm/min or mm/r;
S
Spindle speed;
T
The function of tool change;
7
GSK928MA CNC SYSTEM OPERATION MANUAL
M
↙
Auxiliary function for the starting and stop of spindle ,water pump and the inputting and
outputting by user;
Enter code, End of block code;
Free format is used for program block. Except the requirement of the beginning with “/”, “N”, other
word (a letter following by a numerical value) may be put in any sequence. And the block ends with
the ENTER sign.
1.8
Tool Path of Rapid Positioning
The sequence of rapid positioning is as follows:
It’s Z axis, X axis, Y axis, the 4th axis in turn when the direction of Z axis is positive.
It’s X axis, Y axis, the 4th axis, Z axis in turn when the direction of Z axis is negative.
It’s X axis, Y axis, the 4th axis in turn when there is no positioning in Z axis.
1.9
Offset of System Coordinate
The offset of the system coordinate (coordinate offset in X, Y, Z, C axis direction) can be set by
parameter No. 55, 56, 57, and 58 respectively, which can be redound to adjust the machining
remainder conveniently, without modifying the program.
1.10
Initial and Modal of System
Initial status is defined that t the programming status before the program runs. It is the default
status of the system when power-on. The modal is defined that the corresponding word is valid
after the instruction is specified until another block is specified. Another meaning for the modal: the
word does not be input again in the following block for the same function after it is set.
1.11
Initial Status of System
The initial status of this system after power on is listed as follows:
Item
Status
Description
Programming mode
G90
Programming with the absolute coordinate
G17
Selecting X-Y plane for circular interpolation
G40
Canceling tool radius compensation
G49
Canceling tool length compensation
Using reference coordinate system
Item
Modal G code
Status
Description
G80
Modal data in non-fixed cycle
G94
Speed state in feed per minute
G98
Return starting point in fixed cycle
G0
Rapid positioning
8
GSK928MA CNC SYSTEM OPERATION MANUAL
Rapid traverse rate
Depending on parameter No.1 (G0
SPD)
Cutting feedrate
Depending on parameter No.2 (G1
F)
Current status:
Item
Description
Work
value
coordinate
Spindle
1.12
Current coordinate, the tool position after the latest
Auto operation or Manual operation.
Current status
Start of Program
At the beginning of program executing, the tool nose tool should be at the position in which the tool
be changed. It is suggested that G00 X_ Y_Z_ should be programmed in the first block of the
program to position the tool to the starting point in absolute coordinate; otherwise the program will
not run normally.
1.13
End of Program
Usually, M2, M30, or M31 is specified in the last block of the program to end the executing of the
program;
M2: Indicating the end of the program and stopping the spindle, turning off the coolant pump.
M30: End of program.
M31: End program and restart the program;
Before executing these instructions, make sure the tool back to the starting point of the workpiece
coordinate system with the execution of G28 instruction. After the execution of the program, the
system will return to workpiece coordinate system with the cancellation of tool offset.
1.14
Main Program and Subprogram
Subprogram comprised by a number of program blocks is contained in the main program is
identified by the sequence number of the first block of it. At the last block of the subprogram, M99
must be specified. Subprogram is generally arranged after M2 or M30 of the main program. The
subprogram can be called by M98 instruction.
Three-embedded subprogram call at most can be executed using M98 instruction in this CNC
system.
For example:
subprogram call using M98 instruction
N40 P1000 L10 M98 ↙
…
N1000 G1 X-6 ↙
N1010 X-30 Z-30 ↙
N1020 Z-20 ↙
N1030 X-10 Z-30 ↙
N1040 G0 X45 Z80 M99 ↙
10 times the subprogram No.1000 is to be repeated.
…
beginning of subprogram
end of subprogram
9
GSK928MA CNC SYSTEM OPERATION MANUAL
1.15
Backlash Compensation
The backlash compensation value is stored as system parameter in the system parameter memory
area, Parameter No. 11, 12,13,14 are used for X ,Y, Z and the 4th axis backlash compensation
respectively. If the compensation value of each axis is set to 0.00, it means no compensation, if it is
set other than 0.00 in this case, the backlash compensation will be given automatically by the CNC
system (circular interpolation can backlash compensate automatically if the circular interpolation
automatically exceeds the quadrant).
1.16
R Reference Plane
R reference plane is laid high from some height of X-Y plane. It ‘s higher than the workpiece but
not too high, which can be redound to lift the cutting tool in Z direction and rapid traverse in X,Y
direction at R reference plane while fixed cycle processing is in progress machining (drilling or
groove rough milling). It can be defined by program using R word.
10
GSK928MA CNC SYSTEM OPERATION MANUAL
2
2.1
S, T, M Function, D, H, F, FEED%
S Function
S function is namely the S word in a block used for specifying the spindle speed.
When using 4-bit switching value encoder output to specify the spindle speed:
Set No. 54 to be of 4-bit switching value encoder output corresponding to 0.00, S0~S15 to control
the spindle speed. At the same time, S0~S255 corresponds to output 0~10V analog voltage.
When using analog signals (0~10V) to specify the spindle speed:
S function can be used directly to specify the spindle speed (rev per minute) by setting No. 54,
No.59 (the spindle speed when outputting 5V voltage signal) and S function is directly used for the
spindle speed. Please read the chapter: Parameter Setting.
2. 2
T Function
T function is used for the control of tool change on the toolpost, in which the tool number is
expressed by a digit from 0~8(The current tool can be directly used as No.0 tool without rotating
the toolpost).
It is relative to the No.98 parameter of the CNC system:
When the No.98 parameter is less than or equal to 0.00, it means that the automatic toolpost for
tool change is not fixed on the machine and the T function can be executed in Manual mode, but
the locking time of the toolpost reverse rotation is very short, and the T word will not be shown
without the execution of T function in the operation interface of Auto, Manual, Dry run mode etc..
While the Auto mode is running to the T function word, the system will pause, and the manual tool
change can be performed by operator. Press <RUN> key to go on program execution after the tool
change is done.
When the No.98 parameter is more than 0.00, it means that the automatic toolpost for tool change
has been fixed on the machine and the No.98 parameter represents the locking time (usually 1s) of
toolpost reverse rotation. If the tool number expressed by digits is not the current tool when T
function is being executed, the toolpost will be rotated to the required tool by the system
instructions.
2.3
M Function (Auxiliary Function)
M0 — Program ends. After executing other instructions of the block, stop the spindle, and cut off
the coolant, point to the next block without the further running, waiting for pressing the RUN
key to go on running the block.
M2 — End of program. Stop the spindle, switch off the coolant, and cancel the coordinate offset
specified by G92 and the tool offset to return to the initial block. After executing M2
instruction, the system will be switched to the reference workpiece coordinate system.
M3 — Spindle clockwise rotation;
M4 — Spindle counterclockwise rotation;
M5 — Spindle stop;
11
GSK928MA CNC SYSTEM OPERATION MANUAL
M6 — Invalid compatible function;
M8 — Coolant On;
M9 — Coolant Off;
M12 — Pause: waiting for pressing <RUN> key. (pressing <emergency> key to stop running).
M20 —Setting the outputting of user 1 to 1;
M21 —Setting the outputting of user 1 to 0;
M22 —Setting the outputting of user 2 to 1;
M23 —Setting the outputting of user 2 to 0;
M24 —Setting the outputting of user 3 to 1;
M25 —Setting the outputting of user 3 to 0;
M27 — The system coordinate to be zero, and cancel the machine zero return.
the coordinate value of the 4th axis (A or C axis)
.
M28 — Reset
M30 — End of program and cancellation of tool offset and return to the start block of the program
(without running). After a block containing M30 is executed, the CNC system will be
switched to the reference workpiece coordinate system
M31 — End of program, processing cycle. Cancel the tool offset and return to the initial program.
After executing M31, the system is switched to the reference workpiece coordinate system.
M32 — Lubrication On;
M33 — Lubrication Off;
M60 —When the output of user 1 is 1, the system waits; when the output of user 1 is 0, the system
executes the other blocks in the same block or the next block.
M61 — When the output of user 1 is 0, the system waits; when the output of user 1 is 1, the system
executes the other blocks in the same block or the next block.
M60/M61 may be in the same block with G function and be executed firstly which can
improve the process execution speed instead of G90/G91 instruction.
M90 — The program skips to the block specified by D when the output of user 1 is 0.
Format : N_ M90 P_
P is the skipping block number (If the input is 1, executing the next block by sequence
number)
M91 — The program skips to the block specified by D when the output of user 1 is 1.
Format:
N_ M90 P_
P is the skipping block number (If the input is 0, executing the next block by sequence
number)
M92 — Unconditional skip to the block specified by D,
Format: N_ M90 P_
P is the skipping block number
M93 —Skipping when output of user 2 is 0.
Format: N_ M90 P_
P is the skipping block number (If the input is 1, execute the next block in order)
M94 —Skipping when output of user 2 is 1.
12
GSK928MA CNC SYSTEM OPERATION MANUAL
Format: N_ M90 P_
P is the skipping block number (If the input is 0, execute the next block in order)
M98 — Calling of subprogram
Format: N_ D_ L_ M98
P is the start block number of subprogram, L is calling times (omission for once), and
three-loop subprogram call at most can be executed using M98 instruction.
M99 — End and return of subprogram.
Note: 1) M0, M2, M30, M31, M99 after G function is executed;
2) M90, M91, M92, M93, M94, M98 is the single format (other G function can't be with G90,
G91 function at a time)
3) Other M function which is in the same block with other functions will be executed first (i.e.
It will be executed before G function).
2.4
D, H Function
D — Cutting tool radius number (0~9) which is used for tool radius compensation. The tool
radius value of D1-D9 can be set by parameter 15-23 respectively.
H — Cutting tool length number (0 ~ 9) which is used for and being used in tool length
compensation. The tool length value of H1-H9 can be set by parameter 24-32 respectively.
The tool radius number can be specified by D word (D1-D9, D0 means tool radius value is 0) in
program. The function of tool radius compensation is fit in V3.0 version software and above of the
system. And all software versions are used for the tool radius compensation of circle groove and
rectangle groove processing cycle.
The tool length number can be specified by H word (H1-H9, H0 means tool length value is 0) in
program and does tool length compensation with G43 or G44.
2.5
F, Feed%
F word can be used freely in the block for specifying cutting feedrate. F is effective till the new
value of F is set (The rapid traverse speed and the initial cutting feedrate can also be set by
Parameter NO.1 and No.2).
F: 0.01~3000.00 mm/min
FEED% is used as feedrate override, range: 0%,10%,20%,......, 150%, which can be adjusted
by pressing <↑Feed%> key and <↓Feed%>key. The feedrate override can be adjusted in
running.
13
GSK928MA CNC SYSTEM OPERATION MANUAL
3
3.1
G Function (Preparatory Function)
G Function for Defining Programming State of the System
Programming state of system is specified by these G functions as follows. They are modal which
means they are valid unless the programming state is changed. The initial is the programming state
that the part program is to be executed. The following G can be used in one program block with
other G functions and at most 6 G functions can be used in the same block.
G17 — Initial state, select X-Y plane for circular interpolation
G18 — Select Z-X plane for circular interpolation
G19 — Select Y-Z plane for circular interpolation
G40 — Initial state, cancel tool radius compensation
G43 — Tool length compensation +
G44 — Tool length compensation –
G49 — Initial state, cancel tool length compensation
G54 — Initial state, select the 1st workpiece coordinate system
G55 — Initial state, select the 2nd workpiece coordinate system
G56 — Initial state, select the 3rd workpiece coordinate system
G57 — Initial state, select the 4th workpiece coordinate system
G58 — Initial state, select the 5th workpiece coordinate system
G59 — Initial state, select the 6th workpiece coordinate system
G80 — Initial state, cancel the modal data of fixed cycle (use G98 instruction simultaneously)
G90— Initial state, do programming with absolute coordinate. X, Y, Z word values mean the
absolute coordinate values.
G91— programming with incremental coordinate. X, Y, Z word values mean the incremental
coordinate values (the increment relative to the starting point of the current block).
G94— Initial state, set the feedrate per minute. The unit of cutting feedrate set by F word is
mm/min, i.e. the millimetres of feeding per minute
G95 — Set the feedrate per rev. The unit of cutting feedrate set by F word is mm/r, i.e. the
millimetres of feeding per rev of spindle. The spindle pulse encoder (1200 pulses per rev)
must be fixed firstly before using G95 function.
G98 — Initial state, return to the start plane in fixed cycle.
G99 — Return to the R reference plane in fixed cycle.
G09,G60,G61,G64 :Invalid compatible function.
3. 2
G0 Rapid Positioning (Modal, Initial)
Format : N_ G0 X _Y_ Z _ C_( or A_)↙
X, Y,Z, C(or A) is the coordinate absolute value (G91) or relative value(G90) of end point to be
positioned in work coordinate system. The needless axis can be omitted. The rapid traverse speed
is specified by parameter No.1 and can be modified by pressing parameter key. The sequence of
positioning is as follows:
Position Z, X, Y, 4th axis in turn when Z axis is positive (the cutter rising off the workpiece).
14
GSK928MA CNC SYSTEM OPERATION MANUAL
It’s the X, Y, the 4th, Z axis in turn when the Z axis is negative.
Whether A or C is valid in programming to the 4th axis is specified by C bit of parameter NO.10.
3. 3
G1 Linear Interpolation (Modal)
Format : N_ G1 X _Y_ Z _ C_( or A_) ↙
X, Y, Z is the end point coordinate absolute value or relative value to be interpolated in work
coordinate system. The axis that has no movement can be omitted.
F is feedrate, if it is omitted, the last feedrate F which has been executed will be used. The feedrate
of initial state (initial modal data) can be specified by system parameter No.2.
Whether A or C is valid in programming to the 4th axis is specified by C bit of system parameter
NO.10.
3.4
G2, G3 Circular Interpolation (Modal)
Format :
N_
Or:
N_
G17
G18
G19
G17
G18
G19
G2
G3
G2
G3
X_ Y_ ↙
Z_ X_
R_ F_ ↙
Y_ Z_ ↙
X_ Y_ I_ J_↙
Z_ X_ I_ K_
F_ ↙
Y_ Z_ J_ K_↙
The first type of format is that the programming is done by arc radius R; the second type of format
is that the programming is done by the position that the circle center relative to the starting point
(current position):
G2:
G3:
X,Y, Z:
I:
J:
K:
R:
Clockwise direction (CW)
Counterclockwise direction (CCW), see diagram
The end point coordinate value (absolute coordinate value
for G90, incremental coordinate value for G91) of arc in
work coordinate system, can be omitted for the axis with no
moving
Distance with X-direction from starting point to center point.
Distance with Y-direction from starting point to center point.
Distance with Z-direction from starting point to center point.
Radius of arc. If R>0, the arc is less than or equal to 180° is
commanded;
Else, if R<0, the arc is more than or equal to 180°
G17,G18,G19
Select X-Y plane, Y-Z plane, Z-X plane respectively.
F:
Feedrate along the arc, which can be omitted In circular
interpolation, the tool is feeding by cutting speed. In circular
15
GSK928MA CNC SYSTEM OPERATION MANUAL
interpolation, the tool is automatically cross quadrant with
the backlash compensation.
G17 — X-Y plane
Y
G18 — Z-X plane
X
Z
G3
G2
3. 5
G19 — Y-Z plane
G3
X
G2
G3
Z
G2
Y
G4 Dwell
Format: N_ G4 P_ ↙ or
N_ G4 X_ ↙
The unit of P is 1%s, and X is s:
e.g.
P250 is 2.5s, X1.5 is 1.5s.
3. 6
G10 G11 Rough Milling in Concave Groove of Inner Circular
Format:
G10—CCW rough milling inner circle:
N_
G11— CW rough milling inner circle:
N_
R
Z
I
W
Q
K
V
D
G10
R_ Z_ I_ W_ Q_ K_ V_ D_ F_ ↙M02
G11
R_ Z_ I_ W_ Q_ K_ V_ D_ F_ ↙M02
The position of R reference plane. It is absolute coordinate value in Z direction in G90 and
relative plane far from the starting point in Z direction of current block in G91, which is easy
to position in X-Y direction on R plane rapidly and lift tool in Z direction.
The height of concave groove. It is absolute coordinate value in G90 and position relative to
R plane in G91.
The radius of concave groove. It must longer than the radius of the current tool.
The first cutting height.(blow R reference plane)W>0.
The increment in each cutting in Z direction. Q>0
The width increment in cutting. It’s usually shorter than the diameter of tool. K>0.
The distance far from the last machining plane in fast cutting. W>V>0.
The number of tool radius (1-9), which can be specified by parameter No.15 to 23. D0 means
tool radius value is 0.
R, Z, W, V and Q are modal data in fixed cycle.
The process of rough milling inner circle for concave groove is as follows:
(1) Move the tool to R reference plane in Z direction rapidly.
(2) Cut the height of W downward (cutting speed).
(3) Mill an I-radius circle helically with the increment of K every time (compensation for the radius
of tool is specified automatically by system).
(4) Return to R reference plane rapidly in Z direction.
(5) Orient to the center of the circle in X-Y direction rapidly.
16
GSK928MA CNC SYSTEM OPERATION MANUAL
(6) Orient to the plane V from the last machining plane in Z direction rapidly.
(7) Cut the height of (Q+V) downward in Z direction.
(8) Repeat above procedure No. (3) to (7) to finish cutting the total height.
(9) Return to the starting point in Z direction (G98) or R reference plane (G99).
"r" in following graph is the radius of tool relative to D (compensation for the radius of tool is
specified automatically by system).
3. 7
G12 /G13 Finish Milling of Inner Circle
Format:
G12—CCW fine mill inner circle.
G13—CW fine mill inner circle.
G12
N_
I_ J_ D_ F_ ↙
G13
I
J
D
The radius of the circle
The distance between the starting point and the center of the circle
The tool radius number (1-9), which can be specified by parameter No.15 to 23. D0 means
the radius value is 0.
The end point of the tool:
G12:1→2→3→4→5→6
G13:6→5→4→3→2→1
The letter r in following graph is the radius of tool relative to D (compensation for the radius of tool
is specified automatically by system).
r
4
I
Y
X
J
1
2
6
5
3
17
GSK928MA CNC SYSTEM OPERATION MANUAL
3. 8
G14 /G15 Fine Milling of Outer Circle
Format:
G14—CCW fine milling of outer circle.
G14
N_
I_ J_ D_ F_ ↙
G15—CW fine mill of outer circle
G15
.
I The radius of the circle
J The distance between the starting point and the center of the circle
D The tool radius number (1-9), which can be specified by parameter No.15 to 23. D0
means the radius value is 0.
The path of the tool:
G14:1→2→3→4
G15:4→3→2→1
The letter r in following graph is the radius of tool relative to D (The compensation for the radius
of tool is specified automatically by system).
Y
3
1
x
r
4
2
I
3. 9
J
G22 System Parameter Setting (Modal)
Format: N_ G22 P_ L_ X_ Y_ Z_ ↙
P=1~99 : System parameter number, refer to chapter of system parameter setting for details.
X, Y, Z: The data used to calculate
L=0~19 : Calculation factors as follows:
L=0: Set the system parameter No.P =0”.
L=1: Set system parameter No.P =X;
L=2: Set system parameter No.P=-X.
L=3: Set system Parameter No.P= Abs (X); (the absolute value of X)
L=4: Set system parameter No.P=original
L=5: Set system parameter No.P=original
L=6: Set system parameter No.P =X+Y
18
value + X
value - X
GSK928MA CNC SYSTEM OPERATION MANUAL
L=7: Set system parameter No.P =X-Y
L=8: Set system parameter No.P =-X+Y
L=9: Set system parameter No.P =-X-Y
L=10: Set system parameter No.P =2X
L=11: Set system parameter No.P =X/2
L=12: Set system Parameter No. P=X * (The value of lower byte of Y); The value of lower
byte: 0.00—0.25
L=13: Set system parameter No.P =X / (The value of lower byte of Y); The value of lower
byte: 0.00—0.25
L=14: Set system parameter No.P =X*Y/Z
L=15: Set system parameter No. P=Root(X*Y)
L=16: Set system parameter No. P=Root(X**2+Y**2)
L=17: Set system parameter No. P=Root(X**2-Y**2)
L=18: Set system parameter No. P=max (X,Y)
L=19: Set system parameter No. P=min (X,Y)
L=20: Set system parameter No. P=mod(X,Y)
The data which range are integers from -2147483648 to 2147483648 are stored by 4 bytes in the
system. While calculating by parameters, be sure to use the effective data. It is 1 for the system
while 0.01 is displayed.
Notice: The calculation is done all by integers in the system, and 0.01 corresponds to 1 of the
internal integers which range from -999999999 to 999999999.
3.10
Format:
G23 Conditional Jump
N_ G23 P_ X_ Y_ Z_ L_ ↙
P: System parameter number 1~99;
L: Sequence number of the block jump to(range: 0~65535);
X, Y, Z: Conditional value (there should be at least one conditional value to be specified in the
block):
If one of the conditions below is satisfied, control will jump to the block with sequence number
specified by L, else, control executes the next block sequentially.
If X is specified and the value of parameter = X, jump to No. L block;
If Y is specified and the value of parameter >Y, jump to No. L block;
If Z is specified and the value of parameter <Z, jump to No. L block;
3.11
G27 Machine Zero Inspection
Format: N_ G27↙
The tool offset will be cancelled and system will return to workpiece coordinate system in G27. The
system will be positioned to the machine zero and the stepout will be inspectioned by system.
Before executing G27 instruction, make sure that the tool is in the negative direction of the
reference point deceleration signal. If machine zero hasn’t been built by machine tool builder or the
machine zero return operation has never been executed, alarm E45 will be displayed. If any step
has been detected lost after the system executes the machine zero return, alarm E41/E42 /E43 will
19
GSK928MA CNC SYSTEM OPERATION MANUAL
be displayed. When Bit E41 of Parameter No.10 is 0 and stepout is detected, alarm E41/E42/E43
will be displayed. When Bit E41 of parameter No.10 is 1 and only the deviation is larger than
0.02mm, alarm E41/E42/E43 will be displayed.
The system does not detect the stepout when G27, M28 instructions are in the same block, i.e.
alarm E41/E42 /E43 will not be displayed. After the execution of G27/G28/M02/M30 instruction or
machine zero return and reference point return operation, the system will be switched to the
reference workpiece coordinate system.
3.12
G28 Rapid Traverse to Reference Point via Middle Point
Format: N_ G28 X_ Y_ Z_ A_(or C_)↙
This instruction is used to position the tool to the middle point, and then to traverse to the reference
point at rapid traverse speed. The tool offset compensations is cancelled after reference point
return.
After the execution of G27/G28/M02/M30 instruction or machine zero return and reference point
return operation, the system will be switched to the reference workpiece coordinate system.
3.13
G31 Rapid Return to the R Reference Plane
Format: N_G31 ↙
Return to the R reference plane in Z direction rapidly.
3.14
Format:
G34/ G35 Rough Milling of the Rectangle–concave Groove
G34 —CCW milling
G35—CW milling
G34
N_
R_ Z_ I_ J_ K_ W_ Q_ V_ U_ D_F_ ↙
G35
R
The position of R reference plane. It’s the absolute value in G90 and the position relative to
the starting point of the current block in G91.
Z
The height of groove. It’s the absolute value in G90 and the position relative to the R
reference plane.
W
The cutting height in first milling, W>0.
Q
The incremental height in each cutting, Q>0.
V
The distance from the last machining plane when moving the tool rapidly, V>0.
K
The incremental width in each cutting and usually shorter than the radius of the tool, K>0.
I
The width of the rectangle-concave groove in X direction, I>0.
J
The width of the rectangle-concave groove in Z direction, J>0.
U
The corner radius of the rectangle-concave groove, U≥0.
D
The tool radius number (1-9), which can be specified by parameter No.15 to 23. D0
means the radius value is 0.
R, Z, W, V, Q is the modal data in the fixed cycle.
The process is as follows (the rectangle center is the starting point):
(1) Moving down to the R reference plane in Z direction.
20
GSK928MA CNC SYSTEM OPERATION MANUAL
(2) Cutting the height W at cutting feedrate.
(3) Milling the rectangular plane with the increment K from center to outside. (The compensation
for the radius of tool is specified by system automatically.)
(4) Return to the R reference plane rapidly in Z direction.
(5) Orienting to the center of the rectangle rapidly in X-Y direction.
(6) Moving down in Z direction and orienting to the position with the distance V from the last
machining plane.
(7) Cutting the length (Q+V) down in Z direction.
(8) Repeating the above procedure No. (3) to (7) to finish machining the rectangular plane for the
total cutting height.
(9) Rapid return to the starting point in Z direction (G98) or to the R reference plane (G99).
In following graph r is the radius of tool relative to D (The compensation for the radius of tool is
specified automatically by the system).
Y
X
r
J
k
U
I
3.15
Format:
G36/ G37 Fine Milling Within the Rectangle-concave Groove
G36—CCW milling
G37—CW milling
I, J
K
U
D
G36
N_
G37
I_ J_ D_ K_ U_ F_ ↙
The width of the rectangle along X and Y axis respectively
The distance between the starting point of program and the rectangle side in X direction.
The chamfer radius. There is no chamfer when U is omitted.
The tool radius number (1-9), which can be specified by parameter No.15 to 23. D0
means the radius value is 0.
The cycle process: G36:1→2→3→4
G37:4→3→2→1
The letter r in following graph is the radius of tool relative to D (The compensation for the radius of
tool is specified automatically by the system).
21
GSK928MA CNC SYSTEM OPERATION MANUAL
r
1
r
Y
3
J
4
X
2
U
I
3.16
K
G38/ G39 Finish Milling Outside of the Rectangle
Format :G38—CCW milling
G39—CW milling
I,J
K
U
D
G38
N_
G39
I_ J_ K_ U_ D_ F_ ↙
The width of the rectangle along X and Y axis respectively
The distance between the starting point of program and the rectangle side.
The chamfer radius.
The tool radius number (1-9), which can be specified by parameter No.15 to
23. D0 means the radius value is 0.
The tool path:
G38:1→2→3→4
G39:4→3→2→1
The letter r in following graph is the radius of tool relative to D (The compensation for the
radius of tool is specified automatically by system).
3
K
Y
U
1
J
4
X
2
r
I
3.17
Summary to G Function of Fixed Cycle
Circular concave groove rough milling cycle, rectangular concave groove rough milling cycle,
drilling cycle, boring cycle and taping cycle can be realized by G function of fixed cycle,
which is comprised of G10,G11,G34,G35,G73~G89. The usual process is as follows:
(1) Orienting to the hole rapidly in X-Y plane (This function is not involved within G10, G11,
G34, and G35).
(2) Moving down to the R reference plane rapidly in Z direction (The R reference plane is
between the starting point and the X-Y plane of workpiece and close to the workpiece
22
GSK928MA CNC SYSTEM OPERATION MANUAL
plane).
(3) Milling the first height in Z direction.
(4) Milling the height with the increment every time in Z direction.
(5) Operation in hole bottom or plane.
(6) Return to the R reference plane or to the starting point (G98) alongZ axis.
(7) Circulate from (1) to (6) to perform drilling of the holes on the line if L word is in the
program (This function is not involved within G10, G11, G34, G35).
The usual format is as follows:
G98
N_
G_ X_ Y_ R_ Z_ W_ Q_ P_ U_ V_ L_ K_ F_ ↙
G99
X, Y
The position of the hole in X-Y plane.
R
The coordinate value of the R reference plane (It’s the absolute position in G90 and the
position relative to the starting point in G91).
Z
The hole depth(It’s the absolute value in G90 and the position relative to the R reference
plane in G91).
W
The first cutting depth (calculate it from the R reference plane, W>0).
Q
The increment of cutting depth in Z direction.
P
The delay time in the hole bottom(unit: 1/100s)
U
The distance of lifting the tool during high speed drilling cycle (G73).U>0
V
The distance from the last machining plane in high speed drilling cycle(G73) or deep hole
drilling cycle(G83), V>0.
L
Drilling cycle of holes with the numbers L from the starting point (the starting point of the
K
block) to the position with the XY coordinate
The spindle speed per minute in G74, G84. It’s used to calculate the speed in
acceleration and deceleration in tapping.
F
The machining speed.
R Z W Q U V word is the modal value in fixed cycle. If they are specified in advance and not
changed, they needn’t to be input again in the sequential blocks with the G function of fixed cycle.
They can be cancelled by G80 instruction.
It can return to the starting point of the block by using G98 instruction in Z direction after the cycle
(initial and modal).
It can return to the R reference plane in Z direction by using G99 instruction after the cycle (modal).
If there is L word in the fixed cycle of G73-G98, L holes will be machined circularly on the line from
the current X-Y plane to the end point with X-Y coordinate specified by the block. The distance
between each adjacent hole is equal. There is no hole in the current position (the starting point of
the block) and the last hole will be located in the end point. The illustration is as follows:
23
GSK928MA CNC SYSTEM OPERATION MANUAL
End point
Starting
point
起点
3.18
终点
L4
G73 High Speed Drilling Cycle
Format: N_ G73 X_ Y_ R_ Z_ W_ Q_ U_ V_ F_ ↙
X,Y
The hole position in X-Y plane.
R
The coordinate value of the R reference plane (It’s the absolute position
in G90 and the position relative to the starting point of the block in G91).
Z
The hole depth(It’s the absolute value in G90 and the position relative to
the R reference plane in G91).
W
The first cutting depth (calculating it from the R reference plane), W>0.
U
The distance of rapid lifting of cutters, U>0
V
The distance to the last machining plane in rapid cutting, U>0, U≥V
Q
The increment of cutting depth in Z direction, Q>0.
R Z W U V Q is the modal data in fixed cycle.
The cycle process is as follows:
(1) Rapid positioning to the X-Y plane.
(2) Rapid traverse down to the R reference plane in Z direction.
(3) Cutting a depth equal to W firstly in Z direction.
(4) Rapid traverse up a distance U.
(5) Rapid traverse a distance (U-V) down.
(6) Cutting a depth (Q+V) down.
(7) Repeating the procedure No. (4), (5), (6), till tool feeds to the bottom of the hole in Z
direction.
(8) Rapidly return to the starting point (G98) or the R reference plane (G99).
(9) If there is L word in the block, then repeating the procedure No.(1)-(8) to complete L holes.
3.19
Format:
G74 Tapping Cycle with Left-hand
Metric
I_
N_ G74 X_ Y_ R_ Z_
P_ K_ ↙
Inch
J_
X,Y
The position of X-Y plane.
R
The coordinate value of the R reference plane (It’s the absolute position in
G90 and the position relative to the starting point in G91).
Z
The hole depth (the absolute position in G90 and the position relative to the
R reference plane in G91).
24
GSK928MA CNC SYSTEM OPERATION MANUAL
I
J
P
For metric thread, tooth: 0.01~12.00(mm).
For inch thread, tooth: 2.12~200.00.
Number of initial pulse in tapping (0-1119) (When the machine installed with
a 1200pulses/ rev. encoder).Usually P can be omitted (i.e. P0).
K
It is the spindle speed per minute, and it is used to calculate the speed in
acceleration and deceleration in tapping.
R and Z are the modal data of the fixed cycle.
A 1200pulses/ rev. spindle encoder should be fixed for tapping.
The operation procedure:
(1) Positioning the hole in X-Y plane.
(2) Rapidly traversing down to the R reference plane.
(3) Spindle rotating counterclockwise.
(4) Tapping to the hole bottom.
(5) Stopping the spindle.
(6) The spindle rotating clockwise and tapping up to the R reference plane.
(7) Stopping the spindle.
(8) Rapidly return to the starting point (G98) or the R reference plane (G99).
(9) If there is L word I in the block, then repeat the procedure (1)~(8)
3.20
to complete holes.
G81 Drilling Cycle
Format: N_ G81 X_ Y_ R_ Z_ F_ ↙
X,Y
The position of X-Y plane.
R
The coordinate value of the R reference plane (It’s the absolute position in G90 and the
position relative to the starting point in G91).
Z
The hole depth(It’s the absolute value in G90 and the position relative to the R reference
plane in G91).
R and Z are the modal data.
The operation procedure:
(1) Positioning the hole in X-Y plane.
(2) Rapidly traversing down to the R reference plane.
(3) Drilling down in Z direction.
(4) Rapidly return to the starting point (G98) or the R reference plane (G99).
(5) If There is L word in the block, then repeating the procedure (1)~(4) to complete L holes.
3.21
G82 Drilling Cycle
Format:
N_ G82 X_ Y_ R_ Z_ P_ F_ ↙
X,Y
The position of X-Y plane.
R
The coordinate value of the R reference plane (It’s the absolute position in G90 and the
position relative to the starting point in G91).
Z
The hole depth(It’s the absolute value in G90 and the position relative to the R reference
plane in G91).
R and Z are the modal data of fixed cycle.
25
GSK928MA CNC SYSTEM OPERATION MANUAL
The operation procedure:
(1) Positioning the hole in X-Y plane.
(2) Rapidly traversing down to the R reference plane.
(3) Drilling down in Z direction and pausing for the time specified by P at the hole bottom.
(4) Rapidly return to the starting point (G98) or the R reference plane (G99).
If There is L word in the block, then repeating the procedure (1)~(4) to complete L holes.
3.22
G83 Deep Hole Drilling (Perking)Cycle
Format:
N_G83 X_ Y_ R_ Z_ W_ Q_ V_ F_ ↙
X,Y
The position of the hole in X-Y plane.
R
The coordinate value of the R reference plane (It’s the absolute position in
G90 and the position relative to the starting point of the block in G91).
Z
The hole depth(It’s the absolute value in G90 and the position relative to the
R reference plane in G91).
W
The first cutting depth (calculated from the R reference plane, W>0).
V
The distance to the last machining plane during rapidly traversing W>V>0.
Q
The machining increment in Z direction.
R W V Q are modal data of fixed cycle, Z is the non-modal data. If Z is omitted in the block,
the tool will feed for W value, then rapidly move counterclockwise and stop. No alarm occurs in the
CNC system.
The operation procedure:
(1) Positioning in X-Y plane.
(2) Rapidly traversing down to the R reference plane.
(3) Cutting a depth W firstly.
(4) Rapidly traversing up back to the R reference plane.
(5) Rapidly traversing down to the position with the distance V from the end machining
plane.
(6) Drilling a depth (Q+V) down.
(7) Repeating the procedure (4) ~ (6) to reach the hole bottom.
(8) Rapidly return to the starting point or the R reference plane.
(9) If There is L word in the block, then repeating the procedure (1)~(8) to complete L holes.
3.23
Format:
G84 Right-hand Tapping cycle
Metric
N_ G84 X_ Y_ R_ Z_
Inch
X,Y
R
I_
P_ K_↙
J_
The position of X-Y plane.
The coordinate value of the R reference plane (It’s the absolute position
in G90 and the position relative to the starting point in G91).
26
GSK928MA CNC SYSTEM OPERATION MANUAL
Z
The hole depth(the absolute position in G90
the R reference plane)
and the position relative to
I
J
P
For metric thread, tooth: 0.01~12.00(mm).
For inch thread, tooth: 0.01~200.00(teeth/inch).
Number of initial pulse in tapping (0-1119) (when the machine installed
with a 1200pulses/ rev. spindle encoder).Usually P can be omitted (i.e.
P0).
K
It is the spindle speed per minute for thread cutting, and is used to
calculate the speed in acceleration and deceleration in tapping by the
system.
R and Z are the modal data for fixed cycle.
A 1200pulses/ rev. spindle encoder is used in tapping.
The operation procedure:
(1) Positioning the hole in X-Y plane.
(2) Rapidly traversing down to the R reference plane.
(3) The spindle rotating clockwise.
(4) Tapping to the hole bottom.
(5) Stopping the spindle.
(6) The spindle rotating counterclockwise and tapping up to the R reference plane.
(7) Stopping the spindle.
(8) Rapidly return to the starting point (G98) or the R reference plane (G99).
If There is L word in the block, then repeating the procedure (1)~(8) to complete L holes.
3.24
G85 Boring Cycle
Format:
N_G85_ X_ Y_ R_ Z_ F_ ↙
X,Y
The position of X-Y plane.
R
The coordinate value of the R reference plane (It’s the absolute position in G90 and the
position relative to the starting point in G91).
Z
The hole depth(It’s the absolute value in G90 and the position relative to the R reference
plane in G91).
R and Z are the modal data.
The operation procedure:
(1) Positioning the hole in X-Y plane.
(2) Rapidly traversing down to the R reference plane.
(3) Drilling down in Z direction with the speed specified by F word.
(4) Rapidly traversing up to the R plane with the speed specified by F word.
(5) If There is L word in the block, then repeating the procedure (1)~(4) to complete L holes.
(6) Rapidly return to the starting point in G98.
3.25
Format:
X,Y
G86 Boring Cycle (drilling along head)
N_ G86 X_ Y_ R_ Z_ F_ ↙
The position of X-Y plane.
27
GSK928MA CNC SYSTEM OPERATION MANUAL
R
The coordinate value of the R reference plane (It’s the absolute position in G90 and the
position relative to the starting point in G91).
Z
The hole depth(It’s the absolute value in G90 and the position relative to the R
reference plane in G91).
R and Z are the modal data.
The operation procedure:
(1) Positioning the hole in X-Y plane.
(2) Rapidly traversing down to the R reference plane.
(3) Drilling down in Z direction at the speed specified by F.
(4) Stopping the spindle.
(5) Rapidly return to the R reference plane (G99) or the starting point (G98).
(6) If There is L word in the block , then repeating the procedure (1)~(5)
3.26
to complete L holes.
G89 Boring Cycle
Format:
N_ G89 X_ Y_ R_ Z_ P_ F_ ↙
X,Y
R
The position of X-Y plane.
The coordinate value of the R reference plane (It’s the absolute position in G90
and the position relative to the starting point in G91).
Z
The hole depth(It’s the absolute value in G90 and the position relative to the
starting point in G91).
R and Z are the modal data.
The operation procedure:
(1) Positioning the hole in X-Y plane.
(2) Rapidly traversing down to the R reference plane.
(3) Drilling down in Z direction at the speed specified by F and pausing at the hole bottom
for the time specified by P.
(4) Rapidly traversing up to the R reference plane at the speed specified by F in Z direction.
(5) If There is L word in the block, then repeating the procedure (1)~(4)
holes.
(6) Rapidly return to the starting point in G98.
3.27
to complete L
G92 Floating Coordinate System Setting
Format:
N_ G92 X_ Y_ Z_ C(or A)_↙
X, Y, Z, and C:
the floating coordinate value of current position.
An absolute positioning must be executed at the initial block of part program. For the convenience
of the programming, the floating coordinate system can be freely defined in the program. The
system can automatically execute the conversion between reference point and machine zero.
Furthermore, the system can automatically return to the workpiece coordinate system after
executing G27, G28, M02, M30, M31 or return to the machine zero and reference point.
28
GSK928MA CNC SYSTEM OPERATION MANUAL
4
Parameter Programming
The parameter programming use the value of the system parameter as the value of certain words
in the program block, A changeable parameter value can make the program flexible and versatile
by applying the function of parameter programming (parameter can be modified by G22).
Combining with the G23 function to skip, some complex cutting cycle and special cycle part
programs for user can be achieved.
There are a total of 99 parameters available in this system. The number of the parameter is ranged
for 1∼99. For the parameter No.1~84,attention should be paid in programming for the influence of
the parameter change to the relative function of the system. And parameter No.85∼99 can be used
flexible in parameter programming by user.
The words X, Y, Z, U, V, W, Q, F, I, J, K, R can be specified in parameter programming. The format
of these words in parameter programming is expressed as follows:
Word letter + * + Parameter number.
Note: Only integer can be calculated in system, 0.01 corresponds to the interior integer 1.The
range of parameter value is -999999999 to 999999999. Be cautious to use G22 for preventing it
from overflowing.
For example :
N200 G0 X*70 Y*71 ↙
The value of the X is the value of parameter No.70; the value of the Y is the value of the parameter
No. 71.
Example: using parameter programming to achieve the triangle cutting cycle. The coordinate value
of the starting point of the cycle in X-Y plane is (200.00, 300.00) and the tool has been positioned
to the starting point. The program is as follows:
N10 G0 X200 Z300 Z0↙
(Rapidly positioning )
N30 G22 P62 X8 L1 ↙
N40 G23 P62 Z150 L60 ↙
(Setting parameter No.62 P62=8.00 : The first cutting
depth in X direction)
(judging: whether the total cutting depth in X direction<150.00? )
N50 G22 P62 X150 L1 ↙
N60 P61 X*62 Y200 Z150 L14 ↙
( false, cutting depth
P62=150.00 )
(Parameter No.61: cutting depth in Y direction P61 =
L62*200/150)
N90 P60 X*62 L2 ↙
N100 P79 X*61 L2 ↙
N110 G91 G0 X*60 ↙
N120 G1 X*62 Y*79 ↙
N130 G90 G0 Y*61 ↙
N140 G23 P62 X150 L180 ↙
(Parameter No.60 P60= - P62 )
(Parameter No.79 P79= - P61 )
(Rapidly moving in X direction)
(Cutting slantwise)
(Rapidly traversing to starting point in Y direction)
(If the total cutting depth in X direction =150, cycle ends)
N150 G22 P62 X8 L4 ↙
N160 M92 D40↙
N180 M2↙
(The cutting depth in X direction + 8.00 )
(Skipping to the block No.40, i.e. N40)
(Cycle ending: Stopping the spindle, end of program)
29
GSK928MA CNC SYSTEM OPERATION MANUAL
Y
Rapid
快速traversing
300
Feedrate
进给速度
200
100
X
100
200
30
300
GSK928MA CNC SYSTEM OPERATION MANUAL
Operation
5
Introduction
5.1
Control Panel and Function buttons
Page change keys and cursor move keys for edit mode
<Page Up> <↑> <Page Down>
Cursor move keys for edit mode
<→> <↓> <←>
Coolant
Spindle
Forward
Spindle
Stop
Lubrication
Spindle
Backward
Tool
Change
↑Auto Feedrate Override
Manual
Override
↓
Feedrate
↑↓Manual Step Increment
MPG in X direction
Z+
Y+
MPG in Y direction
X-
X+
4+
4-
Y-
MPG in Z direction
Z-
Run
The key in the center is <rapid
moving>key and state indicator.
Round keys are feed directions
selection keys.(manual move keys
for axis)
Pause,F
31
暂停
运行
回车
回零
退出
删除
跳段
单段
冷却
润滑
换刀
正转
停止
反转
参数
显示
命令
插入
上档
功放
GSK928MA CNC SYSTEM OPERATION MANUAL
The Layout for GSK928MA Operation Panel
5.2
Adjusting of LCD Brightness
This system adopts LCD screen as monitor which has a lattice 160X128. In any non-edit mode,
press <A/X> and < I/U> keys can adjust the brightness of the LCD to obtain the best display effect.
5.3
Indicators and Function Keys
<Spindle clockwise> key and indicator: In Manual or Auto mode, When <spindle clockwise> key is
32
GSK928MA CNC SYSTEM OPERATION MANUAL
pressed or M03 is executed, the indicator is on. It means the spindle is in a
clockwise state.
<Spindle stop> key and indicator: When <spindle stop> key is pressed or M05 is executed in Auto
mode or in Manual mode, the indicator for <Spindle clockwise> and <Spindle
counterclockwise> is not on. It means the spindle is in a stop state.
<Spindle counterclockwise> key and indicator: In Manual or Auto mode, pressing this key (spindle
speed being input) or M04 is executed, the indicator is on. It means
the spindle is in a counterclockwise state.
<Coolant> key and indicator: Pressing this key in Manual or Auto mode or M8, M9 is executed; the
indicator is on or off. It means the coolant is in an open (on) or close (off) state.
<Lubrication> key and indicator: Pressing this key in Manual or Auto mode or M32, M33 is
executed, the indicator is on or off. It means the lubrication is in an open (on) or
close (off) state.
<Tool change>key: The T function is relative to the parameter No.98:
When the parameter No.98≤0.00, it means the automatic toolpost has not
been fixed on the machine, and T function can be executed in Manual mode,
but the reverse rotation locking time of the toolpost is very short. And T code
will not be shown without the execution of T function in Manual, Auto, and Dry
run mode. When it is running to the T word in the Auto mode, the system will
pause. And manual tool change can be performed by operator. Press <RUN>
key to go on the execution of the program after the tool changing.
When the parameter No.98>0.00, it means the automatic toolpost has been
fixed on the machine, and the parameter No.98 represents the reverse rotation
locking time of the toolpost. (usually 1s).
When T function is executing, if the number for tool expressed by digits does not
correspond to the current tool, the toolpost will be rotated by system control to
the required tool.
<MPG in X direction> key and indicator: when this key is pressed in Manual mode, X axis can be
moved by MPG, and the indicator is ON/OFF.
< MPG in Y direction>key and indicator: when this key is pressed in Manual mode, Y axis can be
moved by MPG, and the indicator is ON/OFF.
< MPG in Z direction> key and indicator: When this key is pressed in Manual mode, Z axis can be
moved by MPG, and the indicator is ON/OFF.
Manual move keys will not be valid when MPG takes effect
<Rapid traverse> key and indicator: In Manual mode, the indicator will switch between on and off.
When the indicator is on, the manual speed is the rapid positioning speed
specified by parameter No.1 (G0 SPD). When the indicator is not on, the manual
speed is the cutting feedrate set by parameter No.2 (G1 F). In the MPG mode, the
MPG feeding rate is 10 when the <rapid feed> indicator is on (ten steps for the
corresponding axis for a scale of MPG), 1 for the indicator off (one step for the
corresponding axis for a scale of MPG).
<X-> <X+> <Z-> <Z+> <Y-> <Y+> key: function keys for manual feed of axes.
Note: It is invalid for manual feed keys in MPG mode.
<↑Feedrate override> and <↓Feedrate override> keys: Increasing or decreasing the cutting
33
GSK928MA CNC SYSTEM OPERATION MANUAL
feedrate override for Auto mode. (0%,10%,……,150%)
Selecting the manual feedrate in Manual mode
<↑Step Increment> <↓Step Increment>Keys: Selecting the step increment for Manual mode.
<→><←><↑><↓> keys: Cursor shift keys for editing
<←> also be used as backspace key in data inputting .
<Page Up >, <Page Down> keys:
paging down or up for editing
<Ins> key: In Edit mode, using this key to switch the inserting or amending function<Del> key: In
edit mode, using this key to delete the number, word and block; in data input in Manual
mode, using this key to cancel the data input; when selecting the menu, using this key
to escape.
<Par> key: Setting parameter in Manual, Dry run or Auto mode.
<Disp> key: By pressing this key to display detail information of the system status in Manual, Dry
run mode or Auto mode.
<Comm> key: By pressing this key to call Instructions menu in Manual, Dry run, Auto or edit mode.
<Enter>key: By pressing this key to confirm the data input, end one block; when selecting menu
item, using this key to cancel the selecting.
<Esc> key: By pressing this key to escape from the current menu selecting or exit the current
status or operation mode.
<Zero/Reference point>key: By pressing this key to execute the machine zero return and the
reference point return function or starting point return function, and
cancel the system coordinate offset and tool offset.
<Drive> key and indicator: When the indicator is on, the control power supply will be output to
stepper motor or servomotor. When the indicator is off, the control power supply to stepper
motor or servomotor is disabled. Selecting the drive state by pressing this key, and
pressing twice to switch on (from disabled to enabled) or switch off the drive (against
misoperation).
<Single> key and indicator: The program being executed is in single block, i.e. the program pauses
after executing a block by pressing <RUN> key once. When the single block indicator is
off, it means the continuous running state, such as Auto or Dry run mode. The program
will be continuously executed by pressing <RUN> key without stopping between
sequential blocks, till the end of the program. Switch between the single state and the
continuous state can be achieved by pressing the <Single> key.
<Skip> key and Indicator: Switch between the invalid state and the valid state for block skipping
can be achieved by pressing the <Skip> key. When the indicator is on, the block skipping is
valid and the optional block (with “/” ahead) is skipped (without executing); and Indicator off
for the invalid of the block skipping, the optional block (with “/” ahead) is executed.
<Shift> key and indicator: Some keys have two characters on their key top, by pressing < Shift>key
to make the indicator on, then press the key with two characters to input the shift character.
If <Shift> key is not pressed (with indicator off), the key with no shift character will be input.
Switch in shift state can be achieved by pressing <Shift> key. It’s valid only once.
<Run> key: Press this key to start the process running, some functions need to be confirmed by
pressing <Run> key to be executed.
<Feed hold>key: when this key is pressed in Auto or Manual mode, the feeding or the program
executing will stop. In Manual mode, the axial feeding will stop. In Auto mode,
34
GSK928MA CNC SYSTEM OPERATION MANUAL
alarm No. E19 will be displayed after tool stops, press <Run> key to go on the
running, press <Esc> key to interrupt the program executing without the stopping
of the spindle). Manual mode will be called by the system to execute the
machine zero return and reference point return etc. (the system will exit the
manual mode to return to Auto mode).
The functions of <Run> key and <Feed hold>key can be used respectively by external interface.
5.4
Operation Mode and Incremental Input
This system is operated in menu mode. The main menu will be displayed when the system is reset
by power. Various operations with machine zero return and reference point return and command
submenus can be selected in the main menu mode. In the various operations, some function keys
can also be used to perform some functions except the command submenu:
In the parameter setting interface, relative value (incremental value) can be input while inputting
the value (coordinate, speed, offset value etc.) with decimal fraction manually:
Press <Page Up >, <Page Down> keys before inputting, if D is displayed before cursor, it means
the relative value is to be input. If D is not displayed, it means the actual value is to be input. The
relative value is either positive or negative, while the relative value is being input: the actual input
value=original value+ the relative value input
5.5
Resetting Power On
The system will be reset after power on. The following process will be executed step by step after
resetting:
①System memory testing, if error occurs in system memory testing, the corresponding
alarm(E68,E69,E95,E96,E98,E99) will be displayed;
② System parameter area testing (if error occurs, alarm E94 will be displayed, in this case,
press any key to initialize the parameter area);
③Part program area testing,( if error occurs, alarm E93 will be displayed, in this case, press any
key to initialize the part program area.
④ Displaying main menu if above mentioned tests are finished properly;
The state of I/O interface when resetting is as following:
Value of all output are “0” when resetting.
The tool offset, system coordinate offset and system coordinate value will not be changed when
resetting.
5.6
Operation of Menu
The operation method of main menu, operation mode menu, reference point return and machine
return menu, command menu are all the same. After the menu is being displayed, press the
numerical key 1~7 to select the corresponding function of the menu, and the function of the
menu will not be executed if one of the keys of <Del>, <Exit>, <Enter>is pressed,
35
GSK928MA CNC SYSTEM OPERATION MANUAL
5.7
Main Menu for the System
GSK
1-MANUAL
2-AUTO
3-DRY RUN
4-EDIT
5-COM
6-PAR SET
7-CNC VER
GUANGZHOU
GSK928MA
After turning on the power and pressing the
<Reset> key, or exiting from any operation
mode, the main menu will be displayed.
Press numerical key <1>~<6> to select
the operation mode.
Press <7> to display the edition version of
the system at the bottom of the screen: M
V1.18 1-02 Pressing any key to return to
main menu.
36
GSK928MA CNC SYSTEM OPERATION MANUAL
6
Parameter Setting
There are totally 99 parameters in this CNC system with power down protection. In main menu,
press <6> key to enter into parameter setting screen, in Auto mode, Dry run mode and Manual
mode, press <Par> key to enter parameter setting screen.
Parameters are displayed in 10 pages and 10 parameters in each page. In each screen, the
Number, current value and the English meaning (abbreviation) of the parameters are displayed.
The Chinese meaning of the cursor position parameter is displayed at the bottom of the LCD
screen.
Parameter setting operation:
1. Press <Page Up >, <Page Down> keys to change the pages, each one of those 10 pages
is an option for user.
2. Press <↑> or <↓> key to move the cursor to the parameter to be modified.
3. Press < Enter> key to modify the current parameter:
Input the new value of the parameter (or input the relative value by pressing
<Page Up >, <Page Down> keys to display D) and then press < Enter> key to
confirm it;
4. To initialize the parameter area, press <0> key and then press <Enter> key, “ INIT Y_” will
be displayed. Press <Y> key to perform the initialization operation: The backlash data, tool
offset value and the deceleration/ acceleration data of each axis and all other parameters
will be reset;
5.The desired parameter can be positioned immediately by pressing two of the numerical keys
(ranging from 01 to 80).
6.Press [ESC] key to exit parameter setting (with the parameter taking effect) and return to the
main menu screen or the call mode.
6.1
Description of Parameter
PAR SET
*****
01_ G0 SPD
Parameter No.01 ~ 10 (initial value)
5000.00
02 G1 F
03 STEP1
50.00
0.00
Rapid traverse: for rapid positioning of G0 and Manual
rapid traverse
Cutting feedrate: For G1 and Manual lower feed
Step increment: No.1 gear in Manual mode.
04 STEP2
0.01
Step increment: No.2 gear in Manual mode.
05 STEP3
0.1
06 STEP4
1.00
07 STEP5
10.00
08 STEP6
100.00
09 STEP7
200.00
10 X+Y+Z+C+ 10100011
RAPID
Step increment: No.3 gear in Manual mode.
Step increment: No.4 gear in Manual mode.
Step increment: No.5 gear in Manual mode.
Step increment: No.6 gear in Manual mode.
Step increment: No.7 gear in Manual mode.
System status: alarm of each axis and direction
specification
37
GSK928MA CNC SYSTEM OPERATION MANUAL
Parameter No.1: Rapid traverse speed for program. Usually, it is unnecessary to use H word to
specify the rapid traverse speed in programming.
In Manual mode, the speed is the reference speed for rapid traverse, which can be adjusted by
rapid traverse speed override: (25%, 50%, 75% and 100%)
In Auto mode, rapid traverse speed override is not available.
Parameter NO.2: Setting the initial feedrate for part programs, in Manual mode, it is used to set the
reference feedrate of tool movement. (Feedrate override in Manual mode: 10%, 20% to 150%),
Feedrate override in Auto mode is 0%,10%,20%,至150%.
Parameter No.3-9: 7-gear step increments setting in Manual mode.
Parameter No.10: 16-bit Parameter for various status setting of the system, each bit can be
modified by inputting 1 or 0, one can only press enter key to modify the last 8 bits after modifying
the previous 8 bits. Move <←> or <→> key to position the cursor to the corresponding bit to be
modified.
Parameter NO.10 is not influenced by initialization.
Each bit’s description of parameter No.10 is as follow:
X + Y +
Z + C+
The 4th axis direction:
0, 1 for motor rotation direction
th
C0A1:The 4 axis selection, 0=C-axis, 1=A-axis
Z direction: 0,1 for motor rotation direction
Z axis alarm detection: 1= detecting Y axis driver alarm input 0=no
detection
Y axis motor rotation direction: 0, 1
Y axis driver alarm detection: 1= detecting Z axis driver alarm input 0=no detection
X axis motor rotation direction: 0, 1
X axis driver alarm detection: 1= detecting X axis driver alarm input 0=no detection
B J
DE FGHI
ID-I: Reserved
ID-H: Reserved
E41 alarm
Dwell in rapid
Lock
Display Language
Over stroke signal detection
Emergent stop signal detection
ID-I
Reserved
ID-H
Reserved
E41
alarm(machine
zero detection)
0: Alarm when any stepout is detected;
1: Alarm only when stepout over 0.02mm is detected
Dwell in rapid traverse
0:Dwell for 0.1s in G00;
1:No dwell in G00
Lock
0:
38
GSK928MA CNC SYSTEM OPERATION MANUAL
1: Parameter No.10-14,39-54,59 are locked(modification disabled)
Display Language
1: English 0: Chinese
Over stroke
detection
signal
1: Detection enable; 0; detection disable
Emergent stop signal
detection
1: Detection enable; 0: detection disable
SET PAR
11
GAP X
12
GAP Y
13
GAP Z
14
GAP C
15
T-D1
16
T-D2
17
T-D3
18
T-D4
19
T-D5
20
T-D6
Backlash
Parameter No.11-20 (initial value)
0.00
0.00
0.00
0.00
0.00
0.00
0.00
0.00
0.00
0.00
Backlash compensation: X axis (0~2.55)
Backlash compensation: Y axis (0~2.55)
Backlash compensation: Z axis (0~2.55)
Backlash compensation: 4 axis (0~2.55)
Tool radius of T1(0-99.99)
Tool radius of T2(0-99.99)
Tool radius of T3(0-99.99)
Tool radius of T4(0-99.99)
Tool radius of T5(0-99.99)
Tool radius of T6(0-99.99)
Parameter No.21-30 (Initial value)
PAR SET
21_ T-D7
22 T-D8
23 T-D9
24 T-H1
25 T-H2
0.00
0.00
0.00
0.00
0.00
26
T-H3
0.00
Radius: Tool radius of T 7(0-99.99)
Radius: Tool radius of T 8(0-99.99)
Radius: Tool radius of T 9(0-99.99)
Length: Tool length value of T 1(0-999.99)
Length: Tool length value of T 2(0-999.99)
Length: Tool length value of T 3(0-999.99)
27
28
T-H4
T-H5
0.00
0.00
Length: Tool length value of T 4(0-999.99)
Length: Tool length value of T 5(0-999.99)
29 T-H6
30 T-H7
Radius
0.00
0.00
Length: Tool length value of T 6(0-999.99)
Length: Tool length value of T 7(0-999.99)
Parameter No.31-40 (Initial value)
PAR SET
31 T-H8
32 T-H9
33 X+LMT
0.00
0.00
99999.99
34 X-LMT
-99999.99
35 Y+LMT
99999.99
36 Y-LMT
-99999.99
Length: Tool length value of T 8(0-999.99)
Length: Tool length value of T 9(0-999.99)
Stroke limit:
X+ software stroke limit (workpiece coordinate
system)
Stroke limit: X- software stroke limit (workpiece coordinate system)
Stroke limit:
Y+ software stroke limit (workpiece coordinate
system)
Stroke limit: Y- software stroke limit (workpiece coordinate system)
Stroke limit:
Z+ software stroke limit (workpiece coordinate
39
GSK928MA CNC SYSTEM OPERATION MANUAL
37 Z+LMT
99999.99
38 Z-LMT
-99999.99
39 X BEG
40 Y BEG
Length
360.00
360.00
Parameter No.41 to 50(initial value)
PAR SET
41 Z BEG
42 C BEG
43 X UP
44 Y UP
45 Z UP
46 C UP
47 X TOP
48 Y TOP
49 Z TOP
50 C TOP
Initial speed
PAR SET
51 M-TIME
system)
Stroke limit: Z- software stroke limit (workpiece coordinate system)
Initial speed: initial speed of X axis (mm/min)
Initial speed: initial speed of Y axis (mm/min)
300.00
460.00
0.40
0.40
0.40
0.40
5000.00
5000.00
5000.00
5000.00
Initial speed: initial speed of Z axis (mm/min)
Initial speed: initial speed of the 4th axis (mm/min)
Acceleration time constant: X axis acceleration time
Acceleration time constant: Y axis acceleration time
Acceleration time constant: Z axis acceleration time
Acceleration time constant: the 4th axis acceleration time
Speed limit: X axis speed limit(mm/min)
Speed limit: Y axis speed limit(mm/min)
Speed limit: Z axis speed limit(mm/min)
Speed limit: the 4th axis speed limit(mm/min)
Parameter No.51 to 60(initial value)
1.00
Pulse:
52 M5WAIT1
0.50
53 M5WAIT2
0.00
54 S128=5V
0.00
55 OFST X
56 OFST Y
57 OFST Z
58 OFST C
59 S129
0.00
0.00
0.00
0.00
0.00
60_ RUN-NB
Pieces
0.00
output time of pulse when the spindle starting or
stopping(0-2.55s).
Dwell time: dwell time of output when braking the spindle (0-2.55s).
Dwell time: holding time of output when braking the spindle (0-2.55s)
Speed: the first gear speed corresponding to 5V analog voltage output
of the spindle
Offset: system offset in X direction.
Offset: system offset in Y direction.
Offset: system offset in Z direction.
Offset: system offset in the 4th axis direction.
Speed: the second gear speed corresponding to 5V analog voltage
output of the spindle
Pieces: program running times (2 bits of the decimal fraction for the
program number).
The software stroke is used for limiting the stroke in Manual or Auto mode in workpiece coordinate
system.
40
GSK928MA CNC SYSTEM OPERATION MANUAL
The setting of the initial speed and acceleration time (acceleration time =deceleration time)
constant of each axis can make the axis movement smooth.
Note: Acceleration time constant is used to set the acceleration time from 120mm/min to
10000mm/min in linear acceleration or deceleration control; the unit of time constant is second. It is
suggested that exponential acceleration or deceleration control should be used that the actual
acceleration time will be longer than the setting time, which can be reduced for the acceleration
time of axes by the practice.
When parameter No.1 is set enough large, positioning can be done with the maxium speed (limited
speed) in each axis direction.
When Parameter No.51 is set for 0, the spindle stop and start signals are lasting signals, otherwise
it is pulse signal.
When parameter No.52, 53 are set for 0, spindle brake signal will not be output, if parameter No.53
is not set for 0, as soon as M05 signal is output, it will dwell for the time set by parameter No.52
and output brake signals and dwell for the time set by parameter No.53.
When parameter No. 54 is set for 0, instruction S0-S255 is corresponding to the analog output of
the spindle between 0V and 10V. (S255: 5V)
When using analog spindle, parameter No.54 can be set for 0 to execute S128 function (spindle
clockwise, which corresponds to 5V analog voltage). If S function is executed later, rotation per
minute can be used for it. i.e. if 1200 r/m speed is needed, use the the execution of S1200. There
maybe are some deviations in practice.
When the two-gear analogue spindle is in use, parameter No. 59 can be set like parameter No.54,
Two-gear analog spindle is used if the parameter No.54, 59 both are not set for 0. It can be
switched by inputting 2 by the user. The first gear speed will be used when inputting 2 by user for
0(off), and inputting 2 for 1(on), the second speed will be used.
In order to adjust machining allowance or machining precision, offset is usually set for a small
value.
PAR SET
61_ G54 X
62 G54 Y
63 G54 Z
64 G54 C
65 G55 X
66 G55 Y
67 G55 Z
68 G55 C
69 G56 X
70 G56 Y
COODINATE
PAR SET
0.00
0.00
0.00
0.00
0.00
0.00
0.00
0.00
0.00
0.00
91_ OTHER7
92 OTHER8
93 OTHER9
94 OTHER10
95 OTHER11
96 OTHER12
97 OTHER13
98 OTHER14
99 OTHER15
41
0.00
0.00
0.00
0.00
0.00
0.00
0.00
0.00
0.00
GSK928MA CNC SYSTEM OPERATION MANUAL
Parameter No.61 to 84 is set for the position of G54~G99 coordinate system in the reference
workpiece coordinate system. The position of the 1st to the 6th workpiece coordinate system in
reference workpiece coordinate system can be changed by modifying the parameter. And current
coordinate system can also be set in Manual mode.
When the parameter No.98≤0.00, it means the automatic toolpost has not been fixed on the
machine, and T function can be executed in Manual mode, but the reverse rotation locking time of
the toolpost is very short. And T code will not be shown without the execution of T function in the
Manual, Auto, and Dry run mode. When it is running to the T word in the Auto mode, the system
will pause. And manual tool change can be performed by operator. Press <RUN> key to go on the
execution of the program after the tool changing.
When the parameter No.98>0.00, it means the automatic toolpost has been fixed on the machine,
and the parameter No.98 represents the reverse rotation locking time of the toolpost. (Usually 1s).
When T function is executing, if the number for tool expressed by digits does not correspond to the
current tool, the toolpost will be rotated by system control to the required tool.
Parameter No.85 to No.99 is used for programming of parameter. Other parameters from No.1 to
15 are not listed.
42
GSK928MA CNC SYSTEM OPERATION MANUAL
7
Manual Mode
7.1
Manual Operation
Manual mode can be selected from system main menu or called under Auto mode. When
Manual mode is selected:
MANUAL
E61
Alarm number is displayed at the top right corner
I0.00
F5000.00
I: current step increment; F: the current feedrate
X
12.30
Current X axis’s absolute coordinate value
Y
Z
32.60
0.00
Current Y axis’s absolute coordinate value
C0.00
U
V
W
23.50
22.68
3.22
S1200
D0 H0
Current Z axis’s absolute coordinate value
C or A : the 4th axis’s current absolute coordinate value
U,V,W: the movement amount after Manual mode was
selected
S: actual spindle speed D: current tool radius number
H: tool length number, if G92 is set, G92 will be
displayed.
If the current coordinate system is not the workpiece reference coordinate system, the
corresponding codes G92/G54/……/G59 of the current coordinate system will be displayed in the
coordinate display screen of Auto and Manual mode.
Function keys under Manual mode:
<Spindle clockwise> key and the indicator: By pressing <Spindle clockwise> key and then enter
spindle speed to rotate the spindle in clockwise direction. When spindle clockwise key is pressed
or M03 is executed, the indicator is on.
<Spindle stop> key and the indicator: When <spindle stop> key is pressed, the spindle will be
stopped. When <Spindle stop> key is pressed or M05 is executed, the indicators of <Spindle
clockwise> and <Spindle counterclockwise> is not on which means the spindle is stopped.
<Spindle counterclockwise> key and the indicator: When < Spindle counterclockwise> key is
pressed or M04 is executed, this indicator is on which means the spindle is rotating
counterclockwise.
<Coolant> key and the indicator: When pressing this key or M08 (M09) is executed, the indicator
is on (off), it means coolant is switched on (off).
<Lubrication> key and the indicator: By pressing this key to turn on or turn off the lubrication. When
the lubrication is switched on or M32 (M33) is executed, the indicator is on (off).
<Tool change>: When the parameter No.98≤0.00, it means the automatic toolpost has not been
fixed on the machine, and T function can't be executed in Manual mode. When it is running to
the T word in the Auto mode, the system will pause. And manual tool change can be performed
by operator. Press <RUN> key to go on the execution of the program after the tool changing.
43
GSK928MA CNC SYSTEM OPERATION MANUAL
When the parameter No.98>0.00, it means the automatic toolpost has been fixed on the machine,
and the parameter No.98 represents the reverse rotation locking time of the toolpost (usually 1s).
When T function is executing, if the number for tool expressed by digits does not correspond to the
current tool, the toolpost will be rotated by system control to the required tool.
<X MPG>: Press this key to make the indicator ON/OFF, when the indicator is on, it means MPG is
effective on X axis.
<Y MPG > Press this key to make the indicator ON/OFF, when the indicator is on, it means MPG is
effective on Y axis.
<Z MPG > Press this key to make the indicator ON/OFF, when the indicator is on, it means MPG is
effective on Z axis.
<Rapid traverse> key and the indicator: By pressing this key to turn on or off the indicator, when
this indicator is on, the moving speed in Manual mode is the rapid positioning speed set by
parameter No.1. When this indicator is not on, the moving speed in Manual mode is the feeding
speed set by parameter No.2.
In MPG mode. When this indicator is on, the MPG is 10(a scale for MPG corresponding to 10 steps
in the corresponding axis, i.e. 0.10). When this indicator is not on, it corresponds to 1 step in the
corresponding axis, i.e. 0.01.
<X-> <X+> <Z-> <Z+> <Y-> <Y+> key: Manual feed axis direction selection. It can be operated by
the step value I and speed F displayed on the second line of the screen. When the step increment
is I0.00, it is continuous moving, namely, pressing moving key to begin move, releasing it to stop
moving. When the step increment is not I0.00, pressing the move key to move the distance of I in
the corresponding direction, and stopping moving by pressing <Feed hold> key in the process.
Note: when the MPG is in use, the manual move key is invalid.
<↑ Feedrate override): if < Rapid traverse > is not on, using the parameter No.2 to multiply the
current rate(10%,20%,……,150%) to get the speed F. If < Rapid traverse >
is on, using the parameter No.1 to multiply the current rate(10 % ,20
%,……,150%) to get the speed F.
<↓Feedrate override>: if < Rapid traverse > is not on, using the parameter No.2 to multiply the
current rate(10%,20%,……,150%) to get the speed F. If < Rapid traverse
> is on, using the parameter No.1 to multiply the current rate(10%,20
%,……,150%) to get the speed F.
<↑Step Increment> <↓Step Increment>Keys: Press these keys to select the step increment.
<S>key: By pressing this key followed by numerical value to execute spindle rotation function:
Pressing <S>key, “S_ “ will display at the bottom of the screen, key in the value and then
press <Enter>, the new S function will be executed.
There are two types of output interface to control spindle rotation: 4-bit code output and
0-10V analog voltage output.
When the 4-bit code is output, parameter No.54 must be set for 0, while the value of S
ranging from 0 to 15. When using analog spindle, set parameter No.54 for 0 and Manual
mode (spindle clockwise and inputting 128 for S corresponding to 5V analog output). The
last line of the screen displays the corresponding spindle speed per minute, input the value
to the parameter No.54. If the S function (Manual and Auto) is executed later, speed per
44
GSK928MA CNC SYSTEM OPERATION MANUAL
minute can be used for S. (e.g. S800 represents the spindle speed is 800 r/m). When
two-gear analog spindle is used, parameter No.59 can be set like No.54.
Inputting of 2 by user can be used to switch two gear analog spindle speeds.
<M>key: By Pressing M key followed by the following Value, and then press <Enter> key, the
corresponding M function will be executed:
3, 4, 5, 8, 9, 20, 21, 22, 23, 24, 25, 27, 28, 32, 33.
Before pressing < Enter> key, press < Esc >key will cancel the inputting. M27 can be used for the
system reset while new system is being installed.
<Par> Key: By pressing this key to view or set system parameter.
<Disp> key: By pressing this key to display the system status.
<Machine zero return/reference point return> key: By pressing this key to select its menu screen
(Reference point return or machine zero return).
<Comm>key: By pressing this key to select command menu screen. (Positioning or coordinate
setting)
<Run>key: By pressing this key to run one program after the machine zero return and reference
point return operation is done.
<Feed hold>key: When this key is pressed, the tool movement will be stopped.
<Esc> key: By pressing this key to return to main menu screen or Auto mode screen from Manual
mode (when Manual mode is called in Auto mode).
7.2
Display (Disp)
In Manual mode, press <Disp>key to display: (Press any key to return to Manual mode):
MANUAL
DISP
******
M. ZER
X120.00
P. ZER
X100.00
Y220.00
Y200.00
Z330.00
Z300.00
C0.00
M. ZER: The coordinate value of machine zero in
the workpiece coordinate system (no sense for
non- machine zero)
P. ZER: The coordinate value of reference point
L.POS
X 0.03
Y 1.00
Z 0.00
C 0.00
aaaaa
cccc
PPR
L.POS: The starting point of the last block
bbbbbbbb
ddd
2400
The current status of the I/O interface
RPM
1230.58
The current spindle speed (r/min)
(Number of pulses *2) per rev input from spindle
encoder
Current status of I/O interfaces:
aaaaaa: Bit No.1-4: T1, T2, T3, T4.
45
GSK928MA CNC SYSTEM OPERATION MANUAL
Bit No.5 and 6: user input NO.1, user input No.2
bbbbbbbb: Bit No. 1, 2, 3: X, Z, Y machine zero input;
Bit No. 4, 5, 6: Alarm input of Z, X, Y driver.
Bit No.7, 8: positive/negative direction over stroke signals input.
cccc: Bit No.1, 2, 3: machine zero return deceleration signal input of X-, Z- and Y axis.
Bit No. 4: Emergent stop signal input.
ddd: Bit No.1: Z signal input (revs signal) of spindle encoder.
Bit No.2: A signal input of spindle encoder (1200pulse/rev) or manual pulse encoder.
Bit No.3: MPG direction signal input (MPG is effective by conversion of AB signal).
7.3
Zero Return Function (ZERO)
Press〈Zero〉key, the following screen displays:
ZERO
1-X M.ZERO
2-Y M.ZERO
3-Z M.ZERO
4-XYZ M.ZERO
5-PRG ZERO
X axis machine zero return
Y axis machine zero return
Z axis machine zero return
X, Y, Z axis machine zero return
Program reference point return
Press numerical key (1-5) to select the corresponding item, “*” will be displayed behind the
selected item, and “RUN_” will be displayed on the right top of the screen, Press <Run> key to
perform Zero return operation.
When Item 5 is selected to execute the reference point return, the incremental coordinate value
(from current position) of the program reference point will be displayed at the bottom of the screen.
When machine zero return is performed, the machine zero coordinate will remain in the system.
G27 can be executed to return to the machine zero and inspection whether lost stop occurred or
not (if stepout occurred, alarm E41/E42/E43 will be displayed).
If the machine zero return function is performed by pressing <Machine zero return/reference point
return> key, the stepout cannot be inspected, but the deviation due to stepout can be eliminated.
The machine zero return/reference point return is performed at rapid traverse speed (In Auto mode,
the machine zero return/reference point is performed at rapid traverse speed specified by G00),
machine zero return/reference point will cancel the tool offset, and the system will return to
workpiece coordinate system.
If <Feed.Hold > is pressed in the machine zero return/reference point return, alarm E64 will be
displayed.
Usually, the machine zero is set at the maximum stroke position in the positive direction of each
axis. In machine zero return/reference point return, the system will move in the positive direction
rapidly until it reaches the deceleration signal of machine zero return/reference point return, after it
escapes from the deceleration signal and has detected the zero signal to get to its middle position
46
GSK928MA CNC SYSTEM OPERATION MANUAL
and take it as the machine zero.
There is no machine zero function in the 4th (A or C) axis.
7.4
Command Function (COMM)
Press〈Comm〉key, the following screen displays:
MANUAL
*****
COMM
1-MOVE
2-SET XYZ
3—COORDINATE
SYSTEM
0-6_
Press one of <Esc>, <Del>, <Enter> key to return to Manual mode.
Press numerical key 1-3, the corresponding item will be selected, and the selected item will
display with “*”on the right:
1 MOVE:
When item 1 is selected, "X…" will be displayed at the bottom of the screen ,“ X…” is the current
position, key in the numerical value(Position to go) :
(1) Absolute move of tool: key in the numerical value directly and then press <Enter>key.
(2) Incremental move of tool: press <page up> or<page down> key in the operation panel, till “D_”
is displayed instead of “X_”, key in the value, and then press <Enter>key.
(3) Press <Enter > key without numerical value keyed in, no movement is to be performed in X axis.
After X axis value is keyed in. "Y “ will be displayed, key in the Y axis value ( the same with X
axis), control will move the tool to the position with keyed in coordinate value at rapid traverse
speed.
(4) Similar to X value, key in the Z axis or the 4th axis (A or C) value, then press <Enter> key to
confirm it. When the 4th axis value is input, the system will rapidly move to the specified position
with the current speed in Manual mode. Note: During operation of X, Y and Z axis value input,
positioning will not be executed if <Esc> key is pressed.
2 SET X Y Z
Coordinate system setting (once the coordinate system has been set, the system will clear the
sign of machine zero, which means the machine zero return is not executed.)
This function is used to set a new workpiece coordinate system (if G92 was set, this function is
used to set the floating coordinate system), the current position is set with a keyed in coordinate
value, and thus a new coordinate system is set.
47
GSK928MA CNC SYSTEM OPERATION MANUAL
The current absolute coordinate position of XYZC will be displayed at the bottom of the screen,
input respectively (similar to command 1-input by moving) to complete the coordinate setting of
the workpiece in current coordinate system.
When new workpiece coordinate system is set, the actual position of reference point is keep
unchanged. Just the value of the coordinate of the reference point has been changed
respectively with the relative position unchanged.
If the current coordinate system is one of G54-G59(the 1st to 6th workpiece coordinate system),
the system will update the parameter No.61-84 automatically after the coordinate is set by
command 2.
3-Coordinate system: (selecting the current coordinate system)
Input 0 for workpiece reference coordinate system, input 1~6 for the 1st to 6th workpiece
coordinate system.
48
GSK928MA CNC SYSTEM OPERATION MANUAL
8
Auto Mode
8.1
Auto Operation
Auto mode is used for program running for part machining. When Auto mode is select from main
menu, (if alarm E92 is displayed, it indicates that there is no program stored in the part program
memory area. In this case, press any key to return to main menu. Otherwise, the following
message will be displayed:
RUN P.. The number of the latest program is displayed (0-99).
_
Key in the number of the program to be executed (0-100).
If the program with keyed in number is empty, alarm E86 will be displayed, press any key to re-key
in the program number.
If <ESC> key is pressed during input, system will return to main menu.
If < Enter > key is pressed without keying in any number, the current program displayed will be
executed.
If number 100 is input, system will enter DNC mode. (Machining model: connecting with PC by
RS232 serial port, with machining while as transmitting)
Prompt: "DNC INPUT._ " and wait for PC to transmit program. When finishing transmitting or 1KB
program being transmitted, Auto mode is entered (press <Run> key to start running).During waiting
of program transmitting, D key can be pressed to exit DNC mode and return to the main menu.
In Auto mode, the screen displays:
AUTO
E62
N30 G1 X3 W-5 F300
N40 G2 U-30 W8 R50
N50 G1 U-20 Z30
Alarm number will be displayed at the top right corner
Program content
The first block is the previous
The middle block is the current block
block
executed
The 3rd block is the next block unexecuted.
X
Y
30.65
20.33
Z
100.36
X, Y, Z is the absolute coordinate of Current position
U
0.00
S1600
V
0.00
D0 H0
W
0.00
C
0.00
F300.00
%100
U, V,W:
Remainder of positioning or interpolation
S: Spindle speed
D: Current tool radius number
H: Tool length number
C( or A): Absolute coordinate value of the 4th axis
F: Current cutting feedrate: %100 feedrate override
When the “AUTO B” is displayed on the left top of the screen, it means Dry run mode; “AUTO C”
displayed means Dry run is executed to the specified block. While the Auto mode is in waiting
status, functions can be achieved by pressing the following keys:
49
GSK928MA CNC SYSTEM OPERATION MANUAL
<Spindle clockwise> key and the indicator: By pressing <Spindle clockwise> key and then enter
spindle speed to rotate the spindle in clockwise direction. When spindle clockwise key is pressed
or M03 is executed, the indicator is on.
<Spindle stop> key and the indicator: When <spindle stop> key is pressed, the spindle will be
stopped. When <Spindle stop> key is pressed or M05 is executed, the indicators of <Spindle
clockwise> and <Spindle counterclockwise> is not on which means the spindle is stopped.
<Spindle counterclockwise> key and the indicator: When < Spindle counterclockwise> key is
pressed or M04 is executed, this indicator is on which means the spindle is rotating
counterclockwise.
<Coolant> key and the indicator: When pressing this key or M08 (M09) is executed, the indicator is
on (off), it means coolant is switched on (off).
<Lubrication> key and the indicator: By pressing this key to turn on or turn off the lubrication. When
the lubrication is switched on or M32 (M33) is executed, the indicator is on (off).
<Tool change>: When the parameter No.98≤0.00, it means the automatic toolpost has not been
fixed on the machine, and T function can't be executed in Manual mode. When it is running to the T
word in the Auto mode, the system will pause. And manual tool change can be performed by
operator. Press <RUN> key to go on the execution of the program after the tool changing.
When the parameter No.98>0.00, it means the automatic toolpost has been fixed on the machine,
and the parameter No.98 represents the reverse rotation locking time of the toolpost. (Usually 1s).
When T function is executing, if the number for tool expressed by digits does not correspond to the
current tool, the toolpost will be rotated by system control to the required tool.
<S>key: By pressing this key followed by numerical value to execute spindle rotation function:
Pressing <S>key, “S_ “ will be displayed at the bottom of the screen, key in the value and then
press <Enter>, the new S function will be executed.
There are two types of output interface to control spindle rotation: 4-bit code output and 0-10V
analog voltage output.
When the 4-bit code is output, parameter No.54 must be set for 0, while the value of S ranging
from 0 to 15. When using analog spindle, set parameter No.54 for 0 and Manual mode (spindle
clockwise and inputting 128 for S corresponding to 5V analog output). The last line of the screen
displays the corresponding spindle speed per minute, input the value to the parameter No.54. If the
S function (Manual and Auto) is executed later, speed per minute can be used for S. (e.g. S800
represents the spindle speed is 800 r/m). When two gear analog spindle is used, parameter No.59
can be set like No.54.
Inputting of 2 by user can be used to switch two gear analog spindle speeds.
<M>key: By Pressing M key followed by the following Value, and then press <Enter> key, the
corresponding M function will be executed:
3, 4, 5, 8, 9, 20, 21, 22, 23, 24, 25, 27, 28, 32, 33.
Before pressing < Enter> key, press < Esc >key will cancel the inputting.
<Par> Key: By pressing this key to view or set system parameter.
<Disp> key: By pressing this key to display the system status.
<Zero> key: By pressing this key to select Zero return menu screen (Reference point return or
machine zero return).
<Comm>key: By pressing this key to select command menu screen.
<Esc>: when < Esc> key is pressed “ESC Y_ " will be displayed at the right top of the screen,
50
GSK928MA CNC SYSTEM OPERATION MANUAL
Press<Y> key to exit the Auto mode and control returns to main menu.
<Run>: By pressing this key to run the program.
<Feed.Hold>: By press the key to hold the feed of tool, when this key is pressed during Auto
operation, alarm E19 will be displayed.
<↑Feedrate> or <↓Feedrate>:
In Auto mode, no matter the program is running or not, the cutting feedrate can be adjusted by
pressing <↑Feedrate> or <↓Feedrate> key. The cutting feed multiplier will be adjusted in real time
in running. The actual feed speed is that the current feed speed F is multiplied by the multiplier(0
% ,10 % ,……,150 % ). When the multiplier is 0, the interpolation will be stopped while the
interpolation is being executing.
<↑Feedrate> increasing the current speed by 10%(maximum 150%)
<↓Feedrate>decreasing the current speed by 10%( moving stop till to 0%)
8.2
Display Function (Disp)
In Auto mode, when the program is not running, press <Disp> key, and the following message will
be displayed:
AUTO****
DISP
M.ZER
X120.00
Y220.00
Z330.00
C0.00
L.POS
X 0.03
Y 1.00
Z 0.00
C 0.00
G90G17 G1
G94
M98 N500
L30
20
P.ZER
X100.00
Y200.00
Z300.00
C0.00
M.ZER
Machine zero in workpiece coordinate system
(no sense for non- Machine zero)
Position of Workpiece coordinate system zero in P.ZER
position of reference point
L.POS:
The starting point of the latest block
Current block
D0 H0 G43
D900
State of M98 performing will be displayed if subprogram is
called.
Total calling times of M98,executed times
Press any key to return to the state of running waiting in Auto mode.
8.3
Command Function (Comm)
When the control is in the state waiting for program running (the program running is held), press <
Comm> key, the following message will be displayed:
51
GSK928MA CNC SYSTEM OPERATION MANUAL
AUTO
COMM
1-MANUAL
2-EDIT
3-TEST M.ZERO
4-B TO CURRENT
5 -RUN AT POSITION
6 -NEXT BLOCK
By pressing <Esc>key, <Del>key or <Enter> key to exit from command function screen and back to
the waiting state.
Press numerical key 1 to 6 to select the corresponding function.
▲ 1-MANUAL
Manual operation called.
Refer to chapter of Manual mode for the detail of manual operation. Auto mode can be returned
after Exiting from mode.
▲ 2-EDIT
Current part program editing
When Edit mode is called, the cursor is in the current program block (the block latest executed),
Edit function is enabled in DNC operation.
Note: when the control return to Auto mode from Edit mode, the block that cursor is in will be
treated as current block.
▲ 3-TEST M.ZERO
Machine zero return inspection.
(Before this function is being executed, make sure that the tool is in the negative direction of the
zero deceleration signal)
This function is used to inspection whether stepout has occurred or not, the system prompts: Y_
Press <Y> key: the system will rapidly position to the machine zero and inspection its deviation to
the reserved machine zero of the system.
If Alarm E45 is displayed, it means that the machine zero return operation has not been performed
after power on (or the machine zero has not been fixed on the machine).
If alarm E41 or E42 or E43 is displayed, it means machine zero return has been completed but
stepout has occurred in X axis or Y axis or Z axis.
Press any other key will cancel the machine zero return inspection.
There is no machine zero return function in the 4th axis.
▲ 4-B TO CURRENT
Dry running of the part program from the start of the program to current block
When this item is selected, the system prompts: Y_
Press <Y> Key to execute the Dry running of the program to the current block.
52
GSK928MA CNC SYSTEM OPERATION MANUAL
Pressing any other key will cancel the operation and return to the waiting state in Auto mode.
(Block numbers executed is displayed at the bottom of screen in DNC mode. 0.01 is corresponding
to 1.)
▲ 5 -RUN AT POSITION
The relative movement, which is between the current position and the starting point of the current
block, is displayed at the bottom of screen.
Prompts: RUN_
Press <RUN> key to position to the starting point of the current block by linear interpolation and
executing the current block.
Press any other keys to return to Auto mode without executing it.
▲ 6 -NEXT BLOCK Prompts: Y_
Press <Y>key to skip to next block.
Press any other keys to return to Auto mode without executing it.
This instruction can be executed to skip incompatible block in DNC mode.
8.4
Run to Current Block in Dry Run and Positioning Run
This function is used to start the machining of a part from a certain block, which is not the first of
the program. It is very useful for restarting an interrupted machining.
In some situation, when we want to restart a machining, we do not want to restart from the head of
the program, by using this function, we can restart it from a certain point (which is starting point of
interrupted block or a starting point of a certain block we want the machining to be restarted).
In DNC mode, the blocks which have been executed will be recorded by the system, it may rapidly
position to the 15th blocks from the start of the blocks that have been executed to go on machining
if the system has been stopped by some reasons.
1. If the machine zero is used, error caused by stopping etc. should be cancelled by return to
machine zero in Manual mode.
2. Move the tool to the starting point of machining by Manual mode
3. Entering into Manual mode,
Entering into EDIT in Auto mode by the 2nd function of <Comm>and position the cursor to the block
corresponding to machining position. Return to Auto mode (the block the cursor is in is the current
block). (The 2nd function of <Comm> is not required in DNC)
4. Calling B TO CURRENT:
The system runs from the beginning of the program to the specified block (not executed) and stops
in Dry run mode (executing the program without performing real action and movement).
5. Calling RUN AT POSITION to machine practically.
The function must be used carefully to ensure that the workpiece coordinate system is not changed
and the machining position in the mid process is consistent with the programming position of the
block selected
53
GSK928MA CNC SYSTEM OPERATION MANUAL
8.5
Escape from Auto Mode (end)
In Auto mode, when control is in the state of waiting for program executing, Press <Esc> key, “ESC
Y_ " will be displayed in the first line of the screen. Repress <Y> key, the control will escape from
Auto mode and return to main menu. If press other keys, the control will not exit from Auto mode.
8.6
Executing a Part Program
When control is in the state of waiting for program executing, by pressing running key, the part
program will be executed from current block.
* If error (the block content is not conforming to the programming) occurred in the current block,
alarm E25 will be displayed E25, by pressing any key to return to the state of waiting for program
executing.
* If system error occurs, “E. RUN_” will be displayed, press <Run> key to run the program and
ignore the error, press any other key to cancel the program executing.
* If the program has not been executed before this executing operation, and the current block is not
the first block of the program, “ E35 RUN_ “ will be displayed, by pressing <Run> key to run the
program and ignore the alarm, press any other key to cancel the program executing.
* If the current block was interrupted (< feed hold> key was pressed during its executing and E19
alarm was displayed) in previous operation,” E77 RUN_ " will be displayed to indicate that the
starting point of the current block has been changed. In this case, do not run the program to avoid
accident. It is better to move the tool to the starting point of the current block in Manual mode and
run it or execute it by RUN AT POSITION function.
In this case, pressing <RUN>key to execute the program (ignoring the starting point of the block),
press other key to return to the state of waiting for executing.
▲ If the above-mentioned error does not occur, the control goes to program running state.
▲ During program running, if <Feed.hold> is pressed, “ E19_” will be displayed at the right
top of the screen that means the feed is holding. During feed holding, user can change the
spindle speed by manual start-stop control (by <Spindle clockwise>< Spindle stop>< Spindle
counterclockwise >keys on the panel).
Press < Run> key to go on running. If the spindle is stop when < Run> key is pressed, “M05_ " will
be displayed on the right top of the screen.
Press < Run> key one more time to go on running, press other key to return to the alarm E19.
Pressing <.Esc > or <Del> key: exiting running and entering into machine zero return and
reference point return of Manual mode (error occurring in the block will make the system to return
to Auto mode),
When the system is in feed hold state, feedrate can be adjusted by
pressing<↑Feedrate><↓Feedrate > keys; the spindle start and stop can be controlled by pressing
<Spindle clockwise> < Spindle stop> < Spindle counterclockwise >keys.
▲
Feedrate override adjusting during Auto operation:
Cutting feedrate can be adjusted by pressing <↑Feedrate> or<↓Feedrate>key in real time.
▲ During running, <Single> key and <Skip> key is effective :
54
GSK928MA CNC SYSTEM OPERATION MANUAL
By pressing <Single> key to make the indicator for <Single> on or off. When the indicator is on (in
single mode), after a block is executed, the system will be in a state of wait for executing. When the
indicator is off, after a block is executed, the system will go on executing the following block without
stopping till the end of the program (the program will be ended by M2, M30, M31 functions)
By pressing <Skip> key to make the indicator for <Skip> on or off. When the indicator is on, the
block headed with “/” will not be executed. When the indicator is off, the block headed with “/” will
be executed.
▲ When M12 is being executed, “M12_” will be displayed, the program will be executed by
pressing <Run> key.
Error E19 will be displayed if <Feed hold>key is pressed and the system will be in a state of waiting
for executing. If other key is pressed it will be ineffective.
▲ While T function is being executed:
If the parameter No.98 ≤0,(without fixing automatic toolpost), “Ta” will be displayed(a for tool
number). The system will go on executing program if <RUN> key is pressed. If <Feed hold>key is
pressed, Error E19 will be displayed and the system will be in a state of waiting for executing. If
other key is pressed it will be ineffective.
When the parameter No.98>0.00, it means the automatic toolpost has been fixed on the machine,
and the parameter No.98 represents the reverse rotation locking time of the toolpost. (Usually 1s).
When T function is executing, if the number for tool expressed by digits does not correspond to the
current tool, the toolpost will be rotated by system control to the required tool.
8.7
Execution Order in Auto Mode
When more than one instruction is specified in a block, the instructions will be executed in the
following ways: (If M12 is specified in a block with other instructions, M12 will be executed first)
1) When an S word is specified with other instructions in the same block, executing the other
instructions upon completion of the S function execution;
2) If T function is specified with the other instructions in the same block, executing the other
instructions upon completion of the T function execution;
3) If one of the following M word is specified, executing the other instructions upon completion of
the M function execution:
M3, 4,5,8,9,20-25,27,28,32,33,60,61;
4) If F word is specified, new rapid positioning and feeding speed will be set;
5) Executing G function;
6) If one of the following M words is specified, executing the other instructions upon completion of
instructions as following execution,
M0, 2, 30, 31, 90-94, 98, 99.
8.8
Run Times of Part Program
When M02 or M30 or M31 in the last block of the program is executed, parameter No.60 will be
renewed to indicate the running times. The integer section of parameter No.60 indicates the total
55
GSK928MA CNC SYSTEM OPERATION MANUAL
running times of the program executed, the decimal section of this parameter indicates the number
of program. When a new program is being executed, parameter No.60 will be reset automatically.
8.9
DNC Operation
Firstly position the tool to starting point of machining(reference point)in Manual mode and define
the program of No. 100 in Auto mode (No.100 program corresponds to DNC). The system prompts:
DNC INPUT..._
It means system is in DNC mode and waiting for transmitting of program.
(If error E68 is displayed, DNC mode cannot be entered for less than 5120 bytes free memory till
deleting some program in Edit mode.)
PC: enter DOS or WINDOWS98 operating system and skip to the catalog consisting of file
DNC1.EXE (serial port 1) and file DNC2.EXE (serial port2), then run DNC1 or DNC2 in DOS
system.
System Prompt:
DNC FILE: _
Input the catalogue and file name to transmit program and program content of GSK928MA which
has been transmitted will be displayed on screen simultaneously. The part program will be filtered
by DNC1.EXE and DNC2.EXE files:
1. Ridding the lines headed with characters O: (or %$)
2. Ridding the 3-bit or above digits to be the 2-bit decimals
Note: Press <Crtl> + <C> on PC to cancel program transmitting.
The system will return to DOS system after finishing transmitting.
After receiving the program transmitted or the content over 500 bytes, GSK928MA system will
enter into the waiting status of Auto mode. All functions in Auto mode except EDIT can be called for.
The program in DNC mode can be run by pressing <RUN> key.
Note: Press D to cancel waiting during transmitting.
Press <Page Up> to switch renewing of the coordinate value displaying.
The running of DNC will be quicker and smoother without the renewing of the coordinate value.
8.10
Power Down Protection
If the power down happens in the waiting or running status in Auto mode, after reset, the position of
the starting point of the program, the system coordinate value, the tool status are the same to ones
in power down. But due to the inertia of the machine and the drive of the step motor, small
deviation may occur between the actual position and the stored system coordinate data.
If the power is down in Dry run mode or C mode (i.e. B TO CURRENT function), the system
coordinate is usually not consistent with the actual position.
56
GSK928MA CNC SYSTEM OPERATION MANUAL
9
Dry Run Mode
Dry run mode (3- BLANK under Main menu) is used for inspecting the grammar error of the
program. Before machining is started, the Dry run is performed to inspection whether the words
and blocks are matched to the program and the correctness of the word values by which to get the
end point coordinate value of each block instead of doing the specific interpolation calculation and
inputting and outputting. The system does no action.
The execution of blocks can change the coordinate of the system and program status by which the
logic errors of programming can be inspected by system.
Except the interpolation and I/O control, the use of Dry run mode is similar to that of Auto mode.
But the difference is as follows:
1) The 1st function <MANUAL> of <Comm> is unavailable for Dry run mode.
2) The 3rd function < TEST M.ZERO > of <Comm> is unavailable for Dry run mode.
3) When the 4th function < B TO CURRENT > of <Comm> is used, the pressing of <Y>key for
confirmation is not required as that in Auto mode.
4) “Auto B” will be displayed on the left top of the screen in Dry run mode.
5) Dry running can be stopped by pressing <Single> key with the indicator on.
In Dry run mode, the actual position of system is usually not consistent with the coordinate of the
system. When entering Dry run mode, the data of system coordinate, tool status, reference point of
program will be protected by system, and they will be recovered when exiting the Dry run mode. If
the power is down in Dry run mode, the data can’t be recovered after resetting by power.
57
GSK928MA CNC SYSTEM OPERATION MANUAL
10
Edit Mode
This CNC system provides 27K bytes memory storage for part program. Maximum of 100 programs
can be stored in the part program memory. (0 to 99). The program is stored by ASCII codes with the
length limited by memory size.
Select Edit Mode (System main menu: 4-EDIT):
EDIT
****
To exit from Edit mode, press <Del>, <Esc>, <Enter> or <0> key.
Key in the option Number (1-7) to select the option.
1-EDIT
2-LIST
3-COPY
4-LOCK
5-UNLOCK
6-DEL
7-ProINIT
10.1
Full Screen Edit (1-EDIT)
When Full Screen Edit mode is selected, the following is displayed:
EDIT P3 _ Current program number
Key in the number of the program to be edited, press <Enter>key to enter into Full Screen Edit
mode(press <Esc> key to return to main menu).(if EDIT is called in Auto mode or Dry run mode,
the Full Screen Edit screen will be displayed directly):
The program content displaying:
EDIT P3
---TOP--N10_
X110
Z50
↙
N20
....
W-20
EDIT
No.3 program
The start of No.3 program
Content of the program;
End sign of the block(<Enter>key)
If new program is to be edited, the following message will be displayed:
58
GSK928MA CNC SYSTEM OPERATION MANUAL
- -TOP- ▓
- - END- --TOP--▓
The start of the program;
Cursor is flickering (insert status); N10 will be inserted automatically by
pressing<Enter> key;
---END-The end of the program.
Descriptions of program edit keys:
<Ins>: Insert key, switch the input status between modifying and inserting.
In inserting status, the cursor is flickering with full light (inserting for initial entering), the letters or
digits being inputting will be inserted to the front of the cursor. In modifying state, the cursor is
flickering with the bottom line. The letter of digit in the cursor position will be replaced by the
letter or digit being input.
<Del> key: Delete the character in cursor position. If the cursor is in the position of the letter, the
letter and the digits following will be deleted (i.e. deleting a word). If the cursor is in the
beginning of the block headed with N, the whole block will be deleted (logic line ended with the
<Enter>sign).
<↑> key: This key is used to shift the cursor to the previous line.
<↓> key: This key is used to shift the cursor to the next line.
<←> key : This key is used to shift the cursor to the previous character.
<→> key: This key is used to shift the cursor to the next character.
<Page up>key: This key is used to shift the cursor to the previous page.
<Page down>key: This key is used to shift the cursor to the next page.
<Shift>+ <↑>: (press <shift> key first, then press<↑> key) shifting the cursor to the start of the
previous block;
<Shift>+ <↓> : Shifting the cursor to the start of next block.
<Shift>+ <Page up/down> key: Shifting the cursor to the start or the end of the program.
At the start of the program, the following message is displayed:
---TOP--the start of program
At the end of the program, the following message is displayed:
---END--the end of program and program number
<Comm>key: When the <Comm> key is pressed; the sub menu is displayed:
COMM
1-SERCH
2-INSERT P
3-N STEP
Press
<Esc>, <Del> or <Enter> key to return to Full Screen Edit mode.
Key in the item number ( 1~3 ) to select the item:
1-SERCH
59
GSK928MA CNC SYSTEM OPERATION MANUAL
Word or character searching
A special word or character is searched for from the current positioning the clockwise direction:
Prompt: search _
Keying in the word to be searched (10 characters at most)
COMM
1-SERCH
_
2-INSERT P
3-N STEP
Press < enter> key to start the search. If the word or character is found, the cursor will be
positioned to the corresponding position. If the special word was not found, Alarm E86 is displayed,
press any key to return to the Full screen edit mode.
2-INSERT P
Inserting a program before the cursor location:
Prompt: INSERT _
Input the program number to be inserted;
COMM
1-SERCH
2-INSERT P _
3-N STEP
If the program to be inserted is empty, alarm E86 will be displayed, press any key to return to the
full screen edit mode.
If the program to be inserted is exactly the program being edited, “SAME P” will be indicated and the
insertion is prohibited, press any key to return to full serene edit mode.
3-N STEP
Set increment value of auto sequence number.
Prompt:
step of block 10 _
current step, inputting new step(0~100)
COMM
1-SERCH
2-INSERT P
3-N STEP 10 _
If the value input is larger than 100, the current value will not be changed.
<Esc> key: if <ESC> key is pressed in full screen edit mode, control will return to the previous main
menu in Edit mode.
When called by Auto/Dry run mode, it will return to Auto or Dry run mode and the block that the
cursor is in will be taken as the current block.
Note:
1) When the cursor is in the end of the program, if < Enter> key is pressed, the new sequence
number generated will be inserted after the current position if the increment value of the
sequence number is not zero;
2) If the current program to be edited is empty, press <Enter> key, the sequence number of the first
block is inserted automatically;
3) If the increment value is set for 0, the step will be set for 10 when the edit mode is re-selected.
10.2
List of Program (2-LIST)
The following message is displayed:
60
GSK928MA CNC SYSTEM OPERATION MANUAL
FREE 22230 3 P
Indicating the free space of the part program memory and the number of
the programs.
If there is program in the program memory, press any key to display (pressing <Del> or <Esc> to
exit) (return if program memory is empty):
P01 - 40
P1 program with 40 blocks
.......
P68 - 105
P68 program with 105 blocks
Press page up/down key to display more program message;
Press<Esc>, <Del> and <Enter> to return to the last menu.
10.3
Program Copy (3-COPY)
The following message is displayed: Prompt:
COPY P_ P_
EDIT
****
1-EDIT
2-LIST
3-COPY
P_
4-LOCK
5-UNLOCK
6-DEL
7-P INIT
P_ is flickering
Enter the number of the source program (0∼99);
Then input the number of the destination program (0∼99);
If the source program is empty, go on input the number of the source program;
Alarm E90 will be displayed if program memory is full, press any key to go on;
If the destination is not empty, the following message is displayed:
OVER Y_
Press <Y> to cover the source program, press any other key to escape;
If the copy operation is correct, one can continue the next copy operation.
10.4
Part Program Memory Area Lock (4-LOCK)
If the part program memory area is locked, the program in the memory area cannot be edited but
can be viewed. When 4_lock is selected, Y_ is displayed, press < Y> key to confirm the Lock
operation, press any key to cancel lock operation.
10.5
Part Program Memory Area Unlock (5-UNLOCK)
When 5-UNLOCK is selected, the Part program Memory Area is unlocked.
Only in unlock mode, can part program be input and modified.
Prompt: unlock program memory
Pressing U N L K <Enter> key sequentially:
61
GSK928MA CNC SYSTEM OPERATION MANUAL
“OK” will be displayed, and press any key to exit (unlocked);
If the key out of the above-mentioned is pressed or is not pressed sequentially, it will return back
directly (locked).
10.6
Deleting a Program (6-DEL)
When 6-DEL is selected, the following message is displayed:
Prompt:
DEL P_
Key in the program number(0~99), if <Esc> key is pressed, it will exit(exiting if inputting value is
more than 99);
Prompt:
Y_
Press <Y> key, the program with the keyed in number will be deleted (no deleting for pressing
other key).
10.7
Initialization of Part Program Memory Area (7-P INIT)
When 7- P INIT is selected, the following message will be displayed:
P INIT Y_
Press <Y> key, the Part program memory area will be initialized. Press any other key to cancel the
initialization operation.
Explanation for errors (pressing any key to go on after displaying):
E86 Word is not found in editing or the program to be copied is empty;
E88 Memory is locked, inputting and modifying is prohibited in editing;
E90 Inserting is disabled for the program full memory;
E91 Inspecting fault for current program.
62
GSK928MA CNC SYSTEM OPERATION MANUAL
11
Communication Mode
Communication mode is used for data transmission between the CNC of GSK928ma and the
Personal computer (PC). A cable is necessary for this operation.
When Communication Mode is selected (main menu 5), the following message is displayed:
COM
*****
1-FROM PC
2-TO PC
To cancel this operation, press <Del>, <Esc> or <Enter> key to return to the main menu.
Selecting the communication mode by keying in the number1~2 respectively:
▲
1-FROM PC
Inputting program data from PC, when this mode is selected, the following message is displayed:
Prompt:
COM
*****
1-FROM PC
BEGIN P_
Key in the number(0~99) of the first program (if the number keyed in is out of range or <ESC> key
is pressed, the input operation will be cancelled):
COM
*****
1-FROM PC
BEGIN P6
END P_
Key in the number(0~99) of the last program(if the number keyed in is out of range or <ESC> key
is pressed, the input operation will be cancelled):
COM
*****
1-FROM PC
BEGIN P6
END P_
DEL
Y_
IN
Y_ is flickering
Press Y to delete the programs “..." will flicker at the bottom of the screen to indicate the input
operation is in process. Start the output operation with the PC to perform the communication. Press
63
GSK928MA CNC SYSTEM OPERATION MANUAL
other key to exit without inputting.
▲
2-TO PC:
Prompt:
BEGIN P_
Key in the number(0~99) of the first program (0~99), if the number
keyed in is out of range or <ESC> key is pressed, the input operation
will be cancelled);
END P_
Key in the number(0~99) of the last program(if the number keyed in is
out of range or <ESC> key is pressed, the input operation will be
cancelled);
Y_
If the program from the first one to the last one is empty, the input
operation will be cancelled;
Press<Y> key, “…” will be displayed which means that the program is being
output(the PC should be in inputting state);
If other key is pressed, no outputting is being on and return to the last menu.
z During data inputting operation, the program number which is being received is displayed.
When transmission is completed, the buzzer buzzes. If < Esc> key is pressed during
transmission, the transmission will be interrupted.
z During data outputting operation, the program number which is being sent is displayed. When
transmission is completed, the buzzer buzzes. If < Esc> key is pressed during transmission,
the transmission will be interrupted.
The transmission between GSK928MA CNC system and PC is done by the RS232C serial
connection. The special cables and software CD for tools can be provided to the user as the
optional parts of the GSK928MA CNC system. The transmission of the part program can be done
by the execution of 928A.EXE file in the software CD.
1.PC => GSK928A;
2.GSK928A => PC;
Operation procedure:
Connect GSK928MA by the serial port of PC, and make the GSK928MA system to be in
communication mode. Start DOS or the WINDOWS operating system of PC, and execute the file
928A.EXE to select the item by the prompt in the screen(The file 928A2.EXE communicates using
serial port 2 of PC):
1. PC => GSK928MA;
2. GSK928MA => PC;
The first and the last program numbers (0∼99) should be input when programs are being
transmitted from PC to GSK928MA CNC system. The part programs in PC must be stored in the
current directory with the file name PRGxx.GSK. (xx is the program number 00∼99). The
transmission can be interrupted by pressing Ctrl+ C key. Information indication is displayed during
the transmission. The file PRG00.GSK ~ PRG99.GS can be edited by the edit tools of PC.
* PC: PRG00.GSK ~PRG99.GSK:
N10 X100 Y50 Z200
N20 G2 X51.56 Y-32.78 R712.5 F60
..........
..........
N900 G91 G28 X0 M2
64
GSK928MA CNC SYSTEM OPERATION MANUAL
The program file format of PRG00.GSK ~PRG99.GSK is as following: (one line, one block)
N10 X100 Y50 Z200
N20 G2 X51.56 Y-32.78 R712.5 F60
..........
..........
N900 G91 G28 X0 M2
65
GSK928MA CNC SYSTEM OPERATION MANUAL
12
Notes and Procedure of Operation
Before using this system, set the following parameters properly:
Parameter NO.1 (The initial rapid traverse speed in Auto mode): G0 SPD
Parameter No.2 (the initial cutting feedrate in Auto mode): G1 F
Parameter NO.10: Alarm, movement direction for each axis, types of acceleration/ deceleration,
enable / disable inspection of axis stroke limits and emergent stop signal
Parameter NO.11-14(backlash compensations of X, Y, Z and the 4th axis): GAP X--GAP C
Tool radius and length
System offset of each axis
Acceleration and deceleration control parameter for each axis
Time parameter for output interface
System coordinate offset (parameters No. 55 to 58)
General procedure of CNC from part programming to part machining:
1) Prepare the program from a part drawing, and input the programs to the CNC via Edit mode.
2) Inspect whether the logic of program is right in Dry run mode; modify the mistake block in
Edit mode.
3) Prepare the tools for machining and the workpiece for trial run
4). Enter into Manual mode, move the tool to the desired position by handle and MPG, set the
system coordinate using <Comm> No.2 in Manual mode;
5) Enter into Manual mode, run the part program for trial run;
6). Modify the program in edit mode;
7).Repeat the procedure from 4th step to 6th step till the program requirement is completely met.
If Machine zero is available, Zero sign must be cancelled by M27 instruction before setting the
coordinate system.
After workpiece coordinate system being set, perform machine zero return operation to make the
system store the position data of the machine zero. Stepout of step motor can be detected by
G27 instruction at the end of the program.
The starting point of the part program needs not to be reset after the CNC system is re-powered. In
this way, the program can be run after machine zero return operation is performed.
Note: It is suggested that G00 X... Y… Z... instruction should be used in the first block of the
program to give an absolute coordinate positioning.
66
GSK928MA CNC SYSTEM OPERATION MANUAL
Connection
13
Interface Overview
13.1
Interface Layout
13.2
Total Frame
67
GSK928MA CNC SYSTEM OPERATION MANUAL
13.3
14
Total Connection Graph
Interface function
14.1
Interface Specification
14.2
Interface Pin list and Interface Method
68
GSK928MA CNC SYSTEM OPERATION MANUAL
69
GSK928MA CNC SYSTEM OPERATION MANUAL
70
GSK928MA CNC SYSTEM OPERATION MANUAL
15
Interface connection
15.1 Connecting with PC
GSK928MA CNC system exchange and transmit data between communication interface(X2) and
PC, and its interface signal is as follows:
Pin
1
Name
2
NC
RXD
NC
3
4
5
6
Specification
Direction
GND
7
TXD
NC
RTS
8
9
CTS
NC
Data receiving
3:RXD
5:TXD
1:GND
Data transmitting
NC
NC
§15.1.1 Connecting GSK928MA CNC system and external PC
PC
CNC device
RS232
Cable length<15m
RXD 2
TXD 3
GND 5
X1
5 TXD
3 RXD
1 GND
PE
15.2 Connecting GSK928MA CNC System and Feed Drive Device
GSK928MA CNC system can match with reaction stepper motor driver, compound stepper motor
driver, AC servomotor driver by motor driver interface.
Interface signal definitions as follows:
X, Z axis:
71
GSK928MA CNC SYSTEM OPERATION MANUAL
Pin
Name
Specification
1
ZALM
Z axis driver alarm input terminal
2
XPU
X axis pulse
3
XEN
X axis enabling(or amplifying)
4
ZPU
Z axis pulse
5
COM
Common earthing
6
5V
Power supply
7
XO
X axis zero pulse
8
24V
Power supply
9
XALM
X axis driver alarm input terminal
10
XDIR
X direction
11
ZEN
Z axis
12
ZDIR
Z direction
13
COM
Common earthing
14
5V
Power supply
15
ZO
Z zero pulse
1:ZALM
9:XALM
2:XPU
10:XDIR
3:XEN
11:ZEN
4:ZPU
12:ZDIR
5:COM
6:5V
7:XO
8:24V
enabling(or amplifying))
13:COM
14:5V
15:ZO
72
GSK928MA CNC SYSTEM OPERATION MANUAL
Y axis :
15.2.1
Pin
Name
Specification
3
5V
Power supply
6
YAL
Y axis alarm
7
COM
Common earthing
8
24V
Power supply
9
DV
Amplifying
10
YPU
Y axis pulse
11
YDR
Y direction
14
YO
Y axis zero pulse
15
COM
Common earthing
3:5V
6:YAL
7:COM
8:24V
9:DV
10:YPU
11:YPR
14:YO
15:COM
Connecting GSK928MA CNC system and compound stepper motor driver
Connection graph between GSK928MA CNC system and DY3
X axis:
X5:
<15m shield cable
GSK928MA
2
10
3
9
6
13
Metal shell
DY3 driver
XPU
XDR
CPDir-
DV
EN-
XAl
ALM
CP+
+5V
Dir+
EN+
COM
COM
9
10
11
L
N
Power supply to driver
Single
phase
AC220V
PE
U
V
W
P
D
6
1
2
3
14
R
T
Metal shell
Y axis:
73
Motor
power
supply
Compound
stepper motor
GSK928MA CNC SYSTEM OPERATION MANUAL
X6:
<15m shield cable
GSK928MA
10
YPU
YDR
DV
11
9
6
Yal
3
+5V
15
COM
DY3 driver
CPDir-
L
N
9
10
11
ENALM
CP+
3
COM
14
Metal
shell
Single
phase
AC220V
PE
U
V
W
P
D
6
1
2
Dir+
EN+
Power supply to driver
Motor
power
supply
Compound
stepper motor
R
T
Metal
shell
Z axis:
X5:
<15m shield cable
GSK928MA
4
12
11
1
14
13
Metal
shell
15.2.2
DY3 driver
ZPU
ZDIR
CPDir-
DV
ZAL
EN-
10
11
+5V
ALM
CP+
Dir+
6
1
2
EN+
3
COM
COM
14
9
L
N
Power supply to driver
Single
phase
AC220V
PE
U
V
W
P
D
Motor
power
suply
R
T
Metal
shell
Compound
stepper motor
Connecting GSK928MA CNC system and reaction stepper motor driver
Connection graph between GSK928MA CNC system and DY3
X axis:
74
GSK928MA CNC SYSTEM OPERATION MANUAL
X5:
GSK928MA
2
10
3
9
6
13
<15m shield cable
DF3 driver
XPU
XDR
CPDir-
DV
FREE-
XAL
+5V
COM
Metal
shell
ALM
CP+
IN
2
4
AC220V
5
7
OUT
1
Dir+
3
FREE+ 8
COM
9
Power supply to driver
AC220V
Screw fan
AC220V
A+
AB+
BC+
C-
Metal
shell
Single
phase
Motor
power
supply
Reaction stepper motor
Y axis:
X6
GSK928MA
10
11
9
6
3
15
Metal
shell
<15m shield cable
DF3 driver
YPU
YDR
CPDir-
DV
FREE-
YAL
ALM
CP+
+5V
Dir+
COM
FREE+
COM
IN
2
4
AC220V
5
OUT
7
1
AC220V
Power supply for driver
AC220V
Screw fan
3
A+
AB+
BC+
C-
8
9
Metal
shell
Motor
power
supply
Reaction
stepper motor
Z axis:
75
Single
phase
GSK928MA CNC SYSTEM OPERATION MANUAL
X5
GSK928MA
<15m shield cable
DF3 driver
4
12
11
1
ZPU
ZDR
CPDir-
DV
FREE-
ZAL
+5V
14
2
4
AC220V
5
OUT
7
1
AC220V
Dir+
3
FREE+
8
COM
9
COM
13
ALM
CP+
IN
Metal
shell
A+
AB+
BC+
C-
Metal
shell
Power supply to driver
Single
phase
AC220V
Screw fan
Motor
power
supply
Reaction
stepper motor
15.2.3 Connecting GSK928MA CNC system and AC servo driver
Connection graph between GSK928MA CNC system and AC servo driver
X axis:
<15m shield
cable
X5:
GSK928MA
2
10
3
9
6
8
13
XPU
/PULS
XDR
/SIGN
SON
AlM
DV
XAL
+5V
PULS
SIGN
+24V
COM+
COM
COM
ZCOM
RSTP
DG
DG
FSTP
7
Metal
shell
X0
CZ
GSKDA98 driver
R
S
T
6
7
21
Power supply to driver
AC220V
15
18
19
Encoder feedback signal
8
PE
U
V
W
P
D
3
5
10
4
17
22
2
r
t
Metal
shell
Y axis:
76
Threephase
Motor
power
supply
AC servomotor
GSK928MA CNC SYSTEM OPERATION MANUAL
X6:
GSK928MA
10
11
9
6
3
8
15
<15m shield cable
GSKDA98 driver
YPU
/PULS
YDR
/SIGN
SON
AlM
DV
YAL
PULS
SIGN
+5V
+24V
COM+
COM
COM
ZCOM
RSTP
DG
14
DG
FSTP
CZ
Y0
Metal
shell
R
S
T
6
7
21
Power supply to driver
15
18
Threephase
AC220V
Encoder
feedback
signal
19
8
PE
U
V
W
P
D
3
5
10
4
17
22
2
Motor
power
supply
AC
servomotor
r
t
Metal
shell
Z axis:
X5:
GSK928MA
4
12
11
1
14
8
13
<15m shield cable
ZPU
/PULS
ZDR
/SIGN
SON
AlM
DV
ZAL
+5V
PULS
SIGN
+24V
COM+
COM
COM
ZCOM
RSTP
DG
15
Metal
shell
15.3
Z0
DG
FSTP
CZ
GSKDA98 driver
R
S
T
6
7
21
Power supply to driver
AC220V
15
18
19
Encoder feedback signal
8
PE
U
V
W
P
D
3
5
10
4
17
22
2
Metal
shell
Motor
power
supply
r
t
Connecting GSK928MA CNC system and Toolpost
Connection graph between GSK928MA CNC system and toolpost
Interface signal definitions as follows:
77
Threephase
AC
servomotor
GSK928MA CNC SYSTEM OPERATION MANUAL
X6 Y axis toolpost
DB15
1:TL2:TL+
3:5V
4: T4
5: T2
6:YAL
7:COM
8:+24V
15.4
female
9:DV
10:YPU
11:YDR
12:T3
13:T1
14:YO
15:COM
Pin
1
Name
TL-
Definition
Toolpost CCW
2
TL+
Toolpost CW
3
5V
5V power supply
4
T4
No. 4 tool
5
T2
No. 2 tool
6
YAL
Y axis alarm
7
COM
Common earthing
8
24V
24V power supply
9
DV
Amplifying
10
YPU
Y axis pulse
11
YDR
Y direction
12
T3
No.3 tool
13
T1
No.1 tool
14
YO
Y axis zero return
15
COM
Common earthing
Connecting GSK928MA CNC System and Manual Pulse Generator(MPG)
Connection graph between GSK928MA CNC system and toolpost
Interface signal definitions as follows:
15.4.1 Connection graph between GSK928MA CNC system and MPG
78
GSK928MA CNC SYSTEM OPERATION MANUAL
15.5
Connecting with spindle Encoder
Connecting GSK928MA CNC system with the spindle encoder by X3 interface to control the
lubrication switch. Interface signal definitions as follows:
15.5.1 Connection graph between GSK928MA CNC system and the spindle encoder
The spindle encoder is only used for CNC turning system
Spindle
encoder
<15m shield
cable
CNC
side
1
Z
MZO
2
3
4
5
0V
COM
A
MPU
5V
5V
6
7
8
9
15.6
CNC system Switching Value Input
GSK928MA CNC system has 16 channels switching value input. Interface signal definitions as
follows:
79
GSK928MA CNC SYSTEM OPERATION MANUAL
X7 input
DB15
Pin
Name
1
Y0
2
X0
3
ST
4
SP+
Positive limit
5
M91
User input 1
6
YDC
Y deceleration
7
XDC
1 : Y0
female
9 : Z0
2 : X0
10 : SP
3 : ST
11 : SP-
4 : SP+
12 : M93
5 : M91
13 : ES
6 : YDC
14 : ZDC
8
+24V
15 : COM
9
Z0
7 : XDC
8 : +24V
10
SP
11
SP-
12
M93
13
ES
14
ZDC
15
15.6.1
COM
Function
Y zero pulse
X zero pulse
Start
X deceleration
Power supply+
Z zero pulse
Stop
Negative limit
User input 2
Emergent stop
Z deceleration
Common earthing
Input signal connection
1) The CNC system detects the machine state and signal direction through the signal input:
from machine to CNC system
2) SP is the signal for external dwell operation key; ST is the signal for external cycle start
key; ESP is the signal for emergent stop button
.
SP , ST use the normally-open contact of mechanical contact switch; ESP uses the
normally-close contact of locked mechanical contact switch. The sketch map of connection is
as follows:
0V
ST
SP
ESP
X7 input
interface
3) XDC, YDC,ZDC signals are the deceleration signals of machine zero return for X,Y, Zaxis
respectively which use the normally-close contacts of switch. They are effective when
80
GSK928MA CNC SYSTEM OPERATION MANUAL
breaking off with OV. The corresponding parameter: see parameters No.10, 55, 56.
4) XO, YO, ZO signals are the machine zero signals for X,Y, Z axis respectively, They are
effective when switching on with OV.
5) SP+, SP- signals are the positive and negative limit signals of switch for X-,Y-, Z-axis
respectively which use the normally-close contact of switch, They are effective when breaking
off with OV. The corresponding parameter: see parameter No.10.
6) M90/M91,M93/M94 signals are all the input signals by user. It is as follows:
M90: If user 1 input 0, it jumps. Format : N_ D_ M90 ↙
the user input 1, it executes next block.)
M91: If user 1 input 1, it jumps. Format : N_ D_ M91 ↙
the user input 1, it executes next block.)
M93: If user 2 input 0, it jumps. Format : N_ D_ M93↙
the user input 1, it executes next block.)
M94: If user 2 input 1, it jumps. Format : N_ D_ M94 ↙
the user input 0, it executes next block.)
15.7
D is the block number to jump to( If
D is the block number to jump to( If
D is the block number to jump to( If
D is the block number to jump to( If
Switching Value Output of the CNC System
GSK928MA CNC system has 16 channels switching value output. Interface signal definitions are
as follows:
Pin
Name
1
S8
2
S2
3
M20/21
User output 1
4
M24/25
User output 3
10:S4
5
SBK
Spindle brake
11:S1
6
M4
Spindle CCW
7
M3
Spindle CW
8
+24V
9
SVC
Analog spindle
10
S4
Spindle speed 4
11
S1
Spindle speed 1
X1 output
DB15 female
9:SVC
1: S8
2: S2
3:M20/21
4:M24/25
12:M22/23
5:SBK
13:M8/9
6:M4
14:M5
7:M3
15:COM
8:+24V
Function
Spindle speed 8
Spindle speed 2
Power supply +
12
M22/23
13
M8/9
Coolant switch
14
M5
Spindle stop
15
COM
Common earthing
User output
15.7.1 Connection of output signal
1)
The CNC output signal is used for driving the relay and indicator in machine and controlling
81
GSK928MA CNC SYSTEM OPERATION MANUAL
the actions of machine, its signal direction is from CNC system to machine
2) Except for SVC signal, all the other signals are drived by ULN2803 COMistor array with max.
loading current 200mA. When the signal is effective, the COMistor will be switched on with
the common terminal voltage +24 V.
3)
Spark inhibitor must be used when inductance loading such as relay etc. is connected along
the machine. And spark inhibitor must be close to loading(within 20cm). when the
capacitance loading is connected along machine , current-limiting resistor must be
connected in series.
4)S01, S02, S04, S08 signals are used when multi-speed motor is selected for the spindle
which can be controlled for 16 gears speed in code mode
5) M instructions of M03, M04, M05 for spindle
M03 is for spindle forward, M04 is for spindle backward, M05 is for spindle stop. The
corresponding parameters: see parameters No.45, 46, 47.
6) M08, M08 Coolant ON/OFF
M08 is for coolant ON,M09 is for coolant OFF(no output of interior signal).
7) SVC signal
The signal (0~10V DC voltage) is used for speed control of spindle motor when using
converter for the timing of machine spindle. The corresponding parameters: see parameters
No.48, 52.
8) SBKsignal
SBK is the signal for spindle brake. The corresponding parameters: see parameters No.45,
46, 47.
9) M20/M21/M22/M23/M24/M25 is the signal for user output which is defined as follows:
M20:
M21:
M22:
M23:
M24:
Set for 1 for user1 output
Reset for user1 output
Set for 1 for user2 output
Reset for user2 output
Set for 1 for user3 output
82
GSK928MA CNC SYSTEM OPERATION MANUAL
Appendix A:
Introduction for GSK928MA
GSK928MA CNC system adopt with the double CPU system comprised by 8-bit SCM (89C51)
and 16-bit SCM (80C196) from INTEL Company. The Chinese-English menu operation mode is
applied in its software design, and in hardware the interface of I/O which has abundant functions
and a good capability of anti-disturbance have been processed by photoelectric isolator. The main
performance of it is as following:
·28KB program area: 100 part program with the number 0~100 and power down protection;
·RS232 interface: For transmission of program with PC;
·Monitor: 160*128 LCD, operation prompt with Chinese-English menu mode for various functions;
·Additional axis: The added control functions of the 4th axis;
·User interface: Added user input port 2 and user output port 3 which can be judged or set by
program besides the S, T, M function interface;
·Optional MPG: ×1, ×10 handle rate for the easy movement for each axis;
·Machine zero: Stepout of running can be detected by the special machine zero detecting
function to ensure the machining precision except for the machine zero rapid return function;
Spindle control: CW and CCW rotation start-stop control, 4-bit code or 2 shift speed by D/A
frequency controller;
Parameter programming: Complex machining cycle and special application can be achieved by
the combination of the parameter and part program;
Drilling and tapping: Drilling and tapping cycle, multi-hole drilling cycle;
Circular and rectangle groove cycle: Rough and finish milling cycle for circular concave groove
with the tool radius compensation, finish milling cycle for outer circle, rough and finish milling for
rectangle groove, finish milling outside rectangle;
Circular interpolation: Programming by I, J, K or R, crossing quadrant automatically, automatic
backlash compensation, automatic acceleration-deceleration control and optimum algorithm, good
finish;
Optimum interpolation algorithm: The theoretical error of line, arc, any curve interpolation< 0.01mm,
good finish;
·F function: Setting from the range of 0.01~3000.00 mm/min, 0.01~2.00 mm/r;
·Feedrate override: Real time adjustment from the range of 0%,10%,20%,……,150%;
·Edit function: Full screen edit with the functions of insertion, rewriting, canceling digit and words,
block, program number being generated automatically, program copying etc.;
Manual function: 15 grade manual speed, 7 grade modifiable manual increment, rapid positioning
by the increment and absolute coordinate provided
·Dry run mode: Especially for the inspecting, debugging, and modification of the part program;
·Auto mode: Abundant operations and practical instructions with the status and data of G, F, S, T, M
functions being displayed in real time; For the pre-process and the interpolation calculation of data
by two CPU chips, the transmitting between blocks is rapid with no halting occurring in ordinary
CNC system;
The automatic counting function for the workpiece;
Convenient adjustment of system coordinate offset for the programming and the machining
83
GSK928MA CNC SYSTEM OPERATION MANUAL
allowance
Smooth and stable control of acceleration/deceleration, which can be adjusted by parameters
84
GSK928MA CNC SYSTEM OPERATION MANUAL
Appendix B:
System Parameter List
01
02
03
10
G0 SPD
G1 F
STEP1
X+ Y + Z
Moving rate of G0 rapid positioning, and rapid traverse speed in Manual mode
Cutting feedrate for G1, feedrate for Manual mode
Step increment: Step increment for 1st gear in Manual mode
+C+
System status: Direction setting for each axis; setting for emergent stop,
over stroke, language, types of acceleration or deceleration
11
12
13
15
23
24
29
33
34
35
36
37
38
39
40
41
42
43
44
45
46
47
48
49
50
51
52
53
54
55
56
57
58
GAP X
Backlash compensation(0~2.55) of X axis.
GAP Y
Backlash compensation(0~2.55) of Y axis.
GAP Z
Backlash compensation(0~2.55) of Z axis.
T-D1
Radius: radius value of tool No. 1
T-D9
Radius: radius value of tool No. 9
T-H1
Length: length value of tool No. 1
T-H9
Length: length value of tool No. 9
X+LMT Stroke limit : X+ software stroke limit.
X-LMT Stroke limit: X- software stroke limit.
Y+LMT Stroke limit: Y+ software stroke limit.
Y-LMT
Stroke limit: Y- software stroke limit.
Z+LMT Stroke limit: Z+ software stroke limit.
Z-LMT
Stroke limit: Z- software stroke limit.
X BEG
Initial speed of X axis (mm/min)
Y BEG
Initial speed of Y axis (mm/min)
Z BEG
Initial speed of Z axis (mm/min)
C BEG
Initial speed of the 4th axis (mm/min)
X UP
Acceleration time constant of X axis(s, the time from F120 to F10000)
Y UP
Acceleration time constant of Y axis(s, the time from F120 to F10000)
Z UP
Acceleration time constant of Z axis(s, the time from F120 to F10000)
C UP
Acceleration time constant of the 4th axis(s, the time from F120 to F10000)
X TOP X axis speed limit (mm/min)
Y TOP Y axis speed limit (mm/min)
Z TOP Z axis speed limit (mm/min)
C TOP the axis speed limit (mm/min)
M-TIME
Pulse: pulse output time of M03, 04, 05. (s)
M5WAIT1 Dwell time: brake output dwell time for M05(s.)
M5WAIT2 Dwell time: brake output retaining time for M05 (s)
S128=5V Speed: the 1st spindle speed when output analog voltage is 5V
OFST X Offset: X axis offset value of system coordinate.
OFST Y Offset: Y axis offset value of system coordinate
OFST Z Offset: Z axis offset value of system coordinate
OFST C Offset: the 4th axis offset value of system coordinate
S129 speed: the 2nd spindle speed when output analog voltage is 5V, effective for 1 when 2 is
input
60 RUN-NB Parts count: Counts the times of program running
59
85
GSK928MA CNC SYSTEM OPERATION MANUAL
61 G54 X Coordinate: positions of G54-G59 in (the 1st to the 6th) workpiece coordinate system for
parameter No.61-84
85 OTHER1 Parameter No. 1 to 15: reserved for parameters No.85-99 for user.
98 OTHER15 Parameter No.98: used as the locking time of toolpost reverse rotation
86
GSK928MA CNC SYSTEM OPERATION MANUAL
Appendix C:
M Function Word List
M0
— Program ends. Stop the spindle and the coolant after other instructions are executed. And
enter into the next block without the further executing. Waiting for the execution for the
next block till <Run> key is pressed.
M2 — End of program. Stop the spindle and coolant, cancel the coordinate and tool offset
specified by G93 and in case of G92, the system returns to machine coordinate system
and start block of the program (with no execution).
M3 — Spindle clockwise rotation;
M4 — Spindle counterclockwise rotation;
M5 —Spindle stop;
M6 —Invalid compatible function;
M8 — Coolant On;
M9 — Coolant Off;
M12 —Waiting for executing: Go on running by pressing <Enter> key (stops for pressing <Feed
hold> or <Emergency> key).
M20 —set for "1” for user 1 output;
M21 — User1 option output reset;
M22 —set for "1” for user2 output;
M23 — User2 option output reset;
M24 —set for "1” for user 3 output;
M25 —User3 output reset;
M27— Reset the system coordinate value, and cancel the machine zero sign (machine zero return
operation has not been performed)
M28 — Reset the coordinate value of the 4th axis (A or C-axis).
M30 — End of program. Cancel tool offset and return to the start block of the program and wait;
M31 — End of program. Cancel tool offset and return to the start block of the program and execute
it;
M32 — Lubrication On;
M33 — Lubrication Off;
M60 —Inputting 1 by user1 for waiting, 0 for the other instruction execution of the current and next
block;
M61 —Inputting 0 by user1 for waiting, 1 for the other instruction execution of the current and next
block;
M90 — Control jumps when User1 input is 0,
Format: N_ M90 P _↙
execute next block);
, P is the block number to jump to(If the input is 1, control will
M91 — Control jumps when User1 input is 1,
Format: N_ M91 P _↙
execute next block);
, P is the block number to jump to(If the input is 0, control will
M92 — Unconditional jumping, when M92 is executed, control jumps to the block specified by D,
Format: N_ M92 P_↙,
P is the block number to jump to;
87
GSK928MA CNC SYSTEM OPERATION MANUAL
M93 —Control jumps when User2 output is 0.
Format: N_ M93 P_↙ P is the block number to jump to(If the input is 1, control will
execute next block)
M94 —control jumps when User2 output is 1.
Format: N_ M94 P_↙ P is the block number to jump to(If the input is 1, control will
execute next block);
M98 — Calling of subprogram,
Format:
N_ D_ L_ M98↙ P is the start block number of subprogram, L is the calling
times(1 for omission);
M99 — End and return of subprogram;
88
GSK928MA CNC SYSTEM OPERATION MANUAL
Appendix D:
G Function Word List
G0
G1
Positioning:
Linear cutting:
G2
CW circular cutting:
N_ G0 X_ Y_ Z_ ↙
N_ G1 X_ Y_ Z_ F_ ↙
G3
G2
N_
CCW circular cutting:
G3
G4
Dwelling:
G17
G18
G19
N_G4 P_↙
X_ Y_
X_ Z_
Y_ Z_
R_ Z_ I_ W_ Q_ K_ V_ D_ F_
CW rough milling in inner circle:
G11
CCW finish milling in inner circle
G12
N_
G13
CW finish milling in inner circle:
G14
CCW finish milling in outer circle:
G15
CW finish milling in outer circle:
I_J_D_F_↙
G13
G14
N_
G17
G18
G19
G22
G23
G27
G28
G29
G31
I_J_D_F_↙
G15
Selecting X-Y plane
Selecting Z-X plane
Selecting Y-Z plane
System Parameter setting
N_ G22 P__ L_ X_Y_Z_↙
Conditional Jump
N_ G23 X_ Y_ Z_ P_ L_ ↙
Machine zero Return Inspection
N_ G27 X_ Y_ Z_ ↙
Return to Reference Point via Middle Point
N_ G28 X_ Y_ Z_ ↙
Positioning via the Middle Point of G28
N_ G29 X_ Y_ Z_ ↙
Return to the R Reference Plane
N_ G31 ↙
G34 CCW rough milling inside the rectangle
G35
N_
CWrough milling inside the rectangle
G36
CCW finish milling inside the rectangle
G34
R_ Z_ I_ J_ K_ W_ Q_ V_ U_ D_ F_ ↙
G35
G36
N_
G37
↙
G10
N_
G12
I_ J_
or I_ K_ F_
J_ K_
or N_G4 P_↙
G10 CCW rough milling in inner circle:
G11
R
CW finish milling inside the rectangle
I_ J_ K_ U_ D_ F_↙
G37
89
GSK928MA CNC SYSTEM OPERATION MANUAL
G38 CCW finish milling outside the rectangle
G38
N_
G39
G40
G44
G49
G54
G55
G56
G57
G58
G59
I_ J_ K_ U_ D_ F_↙
CW finish milling outside the rectangle
G39
Cancelling tool radius compensation G43 Tool length compensation +
Tool length compensation Cancelling tool length compensation
Selecting the 1st workpiece coordinate system
Selecting the 2nd workpiece coordinate system
Selecting the 3rd workpiece coordinate system
Selecting the 4th workpiece coordinate system
Selecting the 5th workpiece coordinate system
Selecting the 6th workpiece coordinate system
G73
High Speed Drilling Cycle
N_ G73 X_ Y_ Z_ R_ W_ Q_ U_ V_ F_↙
(Metric)
I_
G74 Tapping Cycle with Left-hand
N_ G74 X_ Y_ R_ Z_
P_ K_ ↙
(Inch)
J_
G85 Boring Cycle
N_ G85 X_ Y_ R_ Z_ F_↙
G86 Counterboring Cycle
N_ G86 X_ Y_ R_ Z_ F_↙
G89 Boring Cycle
N_ G89 X_ Y_ R_ Z_ P_ F_↙
G90 Programming with absolute coordinate value
G91 Programming with incremental coordinate value
G92 Floating coordinate system setting
N_ G92 X_ Y_ Z_↙
G94 Feedrate per minute (initial, modal)
G95 Feedrate per rev (modal)
G98 Return to original plane
G99 Return to R reference plane
G9, G60, G61, G64
Invalid compatible functions
90
GSK928MA CNC SYSTEM OPERATION MANUAL
Appendix E:
E1:
E2
E3
E4
E5
E6
E7
E8
E9
E10
E11
E12
E13
E14
E15
E17
E19
E21
E23
E24
E25
E26
P);
E27
E32
E35
E37
E41
E42
E43
Error Word List and Troubleshooting
Pointer error, the address of the block does not point to the corresponding memory area;
Treatment: Return to main menu and re-enter the Auto mode
End of a program (with no content following);
Necessary words are not specified in the block;
No sequence number;
An unallowable word was specified in the current block;
The word was followed by an illegal value;
An word was specified repeatedly;
Necessary word for G function or M function was not specified;
Unusable word was specified;
Unusable G word was specified;
Unusable S word was specified;
Unusable T word was specified;
There is no executable word in the current block;
Unusable M word was specified;
The current block is too long or there are no contents or no End of Block sign (Enter sign) in
it;
Word I, K or R was not specified in block containing circular interpolation instruction;
Feed stops, the <feed hold> key on the operation panel was pressed during operation;
The M30, M31 or M2 word was not specified at the end of the program;
The program calling layer is more than 3 or M99 executing error (M99 is executed under no
M98);
M99 executing error (when M99 instruction is being executed, M99 can not be executed
again);
Part program error, program is unexcitable;
M99 executing error, when return data of M98 is false (inconsistent to the calling value of L,
Skipping or subprogram calling or return error, block specified was not found;
Circular interpolation word error: Both I and K are zero or the end point is not on the circle,
sometimes it was caused by calculation error and can be modified by reducing or increasing
0.01 for the respective parameter;
Program was not executed from the first block of the program;
Treatment: Do not execute the program by pressing <Run> key, it is suggested that G00 X,
Y and rapid absolute positioning for Z axis is specified in the first block;
Return for the unavailable position signal for the tool when T function is being executed;
Treatment: Inspection the tool number, toolpost signal or the system hardware.
G27 execution and Machine zero return error: Machine zero return completed, stepout in X
direction was detected; see bit E41 of parameter No.10;
G27 execution and Machine zero return error: Machine zero return completed, stepout in Y
direction was detected; see bit E42 of parameter No.10;
G27 execution and Machine zero return error: Machine zero return completed, stepout in Z
direction was detected; see bit E43 of parameter No.10;
91
GSK928MA CNC SYSTEM OPERATION MANUAL
E45
E48
E49
E50
E53
E54
E55
E56
E61
E62
E63
E64
E67
E68
E69
E71
E72
E74
E77
E78
E79
E86
Machine zero return function has not been executed and G27 can’t be executed or Machine
zero return can’t be detected;
In Auto mode of Dry run mode, when COMM-4 is to be executed(dry run to specified block,
i.e. C state), M2, M30 or M31 is being executed and control cannot be located to the
specified block;
Spindle stop error (tapping);
Value of S function can’t be more than 225 when parameter No.54 is set for 0;
R reference plane is not defined or under the machining plane in fixed cycle;
There is no Z value in the fixed cycle or the plane corresponding to the Z value is above the
reference plane(R plane), or below U≤0, V≤0, W>Z, or the value is incorrect;
Word value is deficient in fixed cycle;
U<V in G73 operation;
X axis driver power not ready(the detection of the driver alarm signal is disable when the
corresponding bit of parameter No.10 is set for 0);
Y axis driver power not ready(the detection of the driver alarm signal is disable when the
corresponding bit of parameter No.10 is set for 0);
Z axis driver power not ready (the detection of the driver alarm signal is disable when the
corresponding bit of parameter No.10 is set for 0);
Machine machine zero return and reference point return error: machine zero deceleration
signals can’t be detected after 20000.00mm movement has been made in positive direction.
Or machine zero signal couldn’t be detected in a movement of 60mm after deceleration
signal was detected. Or< Feed.Hold > key was pressed during machine machine zero return
and reference point return;
Emergent stop. If emergent stop signal was detected, the spindle stop signal will be sent to
stop the spindle;
Treatment: The emergent stop bit of parameter No.10 can be set for 0 and system will not
detect the input of emergent stop signal;
Release the external emergent stop key or switch on the emergent stop signal input;
80C196 EPROM (29C010) chip error, contact the machine tool dealer for service;
89C51 EPROM (29C010) chip error, contact the machine tool dealer for service;
Over stroke (software) of the end point of axis movement; programming error, over stroke in
Manual mode
Treatment : Initialize the parameter area or modify the software stroke limit (Parameter
No.31~34), reset the system coordinate by M27 instruction;
Spindle can’t be stopped in tapping operation till exceeding thread bottom 20.00mm;
Over stroke of movement, positive or negative stroke limit input signal break off has been
detected;
Treatment : Move the tool in the opposite direction of the over stroke to go back to the limit in
Manual mode, set the limit bit of Parameter No.10 for 0 if over stroke input signal is disabled;
The block to be executed was interrupted by Feed hold function; error will occur if this block
is executed forcefully;
An unusable word is specified in G function block;
System data access error (81C55);
In Edit mode, the word to be searched was not found, or the program with specified program
92
GSK928MA CNC SYSTEM OPERATION MANUAL
E88
E89
E90
E91
E92
E93
E94
E95
E96
E98
E99
number was found empty;
Part program memory area locked and program cannot be edited;
Data error when part program is input via communication mode;
The part program memory area is full;
Part program error, inspection and modify the part program carefully;
The is no program in part program memory area and Auto mode is disabled;
The Part program memory area has not been initialized, system will initialize the program
memory area automatically;
System parameter area error, the system will initialize it;
Memory for 80C196 error, contact the machine tool dealer for service;
RAM error of 81C55 inspecting by 80C196, contact the machine tool dealer for service;
RAM error of 81C55 inspecting by 89C51, contact the machine tool dealer for service;
System RAM error (62256), contact the machine tool dealer for service.
93
GSK928MA CNC SYSTEM OPERATION MANUAL
GSK928MA Machine Zero Return Mode
94
GSK928MA CNC SYSTEM OPERATION MANUAL
GSK928MA Interface Circuit Diagram 1
95
GSK928MA CNC SYSTEM OPERATION MANUAL
GSK928MA Interface Circuit Diagram 2
96
GSK928MA CNC SYSTEM OPERATION MANUAL
GSK928MA Integrated System External Circuit Diagram
97
GSK928MA CNC SYSTEM OPERATION MANUAL
GSK928MA Toolpost Controller Circuit Diagram
98
99
显示
命令
插入
运行
暂停
回车
回零
退出
删除
跳段
单段
GSK928MA contour installation dimension diagram
换刀
润滑
停止
反转
冷却
正转
参数
上档
功放
GSK928MA CNC SYSTEM OPERATION MANUAL
GSK928MA Contour Installation Dimension Diagram
润滑
换刀
停止
反转
显示
命令
插入
运行
暂停
回车
退出
删除
回零
单段
GSK928MA-L contour installation dimension diagram
冷却
正转
参数
上档
跳段
功放
GSK928MA CNC SYSTEM OPERATION MANUAL
GSK928MA-L Contour Installation Dimension Diagram
100
101
显示
命令
插入
回车
回零
退出
删除
跳段
单段
Max. dimension
Aviation socket
GSK928MA Intergrated contour installation dimension
参数
上档
功放
GSK928MA CNC SYSTEM OPERATION MANUAL
Add: No.52, 1st . Street, Luochong North Road, Luochongwei, Guangzhou, 510165, China
Website: http://www.gsk.com.cn
Tel: 86-20-81796410/81797922
E-mail: [email protected]
Fax: 86-20-81993683
All specification and designs are subject to change without notice
August.
2006/Edition 2
Suit for software version:V06.03.23
September. 2006/Printing