1
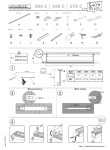
www.schdev.com.ar
HRR 2
Model:
0101.00
Rev doc: 00.en
Probador de motores IAC e inyectores
User Manual
Connecting the power supply
Connecting terminal block
Selección del tipo de prueba
Prueba de motor paso a paso e IAC
Prueba de inyector
Agregado de conectores adicionales
PAP/IAC
Inyectores
Problemas frecuentes
Cortocircuitos
Advertencias generales
Garantía
Pág. 1
Pág. 2
Pág. 2
Pág. 2
Pág. 3
Pág. 3
Pág. 4
Pág. 4
Pág. 5
Pág. 6
Pág. 6
Pág. 7
Power supply
The device need 12Vdc to work. The device have 2 alligator
type terminals to connect to a car battery.
This tool was NOT designed to work with batteries chargers
without connection to their respective battery.
1/8
Connecting terminal block
In the rear part of the device you can see a green terminal block.
Here you must attach the cable adapter.
Selecting type of test
When the device is powered up, the device start into search
mode. When the device is in search mode, you can see that the LEDs
blink in pairs, and the type of test is automatically selected when you
plug the spare part that you want test.
When you want test only ONE injector, the system primarily
select as IAC valve, you must press RESET button to select injector
test.
If you change the tested element, you will need press RESET
button to ensure the new autodetect routine.
Testing stepper motors and IAC
To test the valve press the side buttons (one open, other close).
-In stepper motor mode a short touch move a SINGLE STEP,
this permit fix the starting point of stepper.
-A long touch move the motor in fast speed, used to
assembly/disassembly and see if working properly.
-If you press both side buttons, the HR2 will start a continous
movemente opening and closing.
2/8
Injector test
Plug the injectors into connectors. If only one injector will be
tested press the RESET button.
Presing the left button (PULSE), start the test.
The test simulate the motor rotation at 5.000 RPM, but
into different touch will change the duty time, as you can see
into following figure.
While a test is running, the right button works as
STOP. In other words the test will be stopped.
If no running test, the right button will start the 1
minute test, ussefull to verify and compare the apropiate gas
flow.
Adding extra conectors
This device can be usede with all stepper motors, IAC valves,
and all injector that we can test at develop moment.
However is factory equiped with the most common connectors
in the car market. You can ask additional connectors, only with
photos, trademark, model and motor type into our web page.
You can make your own cable set when you need. The
connections must be under the following guide using a
pluggable terminal block of 8 positions:
3/8
Steppers motors:
Connect looking that one coil meet into
terminals 1 and 4 of terminal block. And
the another coil into terminals 2 and 3. If
the motor has not continuous movement,
you can try inverting 1 and 4 terminals.
IAC and injectors:
Connect in the way that te positive connect with the pin1 of
terminal block, an the negative with the terminal A of the
terminal block. The second injector to terminal 2 and B. The
third to terminal 3 and C, and the fourth to terminal 4 and D.
Positive Negative
Injector 1
1
A
Injector 2
2
B
Injector 3
3
C
Injector 4
4
D
4/8
Most common trouble solutions
The device does not power up.
- Verify the right connection to 12V.
Blink the leds, first MM and GM and after IAC and Iny.
-The device is waiting that you plug the element to test.
All LEDs blink simultaneously.
-Something plugged is in short circuit or the consumption is more that
the admitted.
A stepper motor does not have a continuous movement, and
the motor is good.
-If you are 100% sure that the motor is good, you can try changing the
polarity of one of the coils. (1-4 if is MM like, or 1-2 if is GM like).
Short Circuits
This device have overcurrent and short circuit protection. In the
case of overcurrent or short circuit, the test is suspended an all
LEDs will blink. To continue working you must press RESET
button.
The device can be damaged with short circuits, and
the damages cancel the warranty.
5/8
General Warnings
-Do not wet the device, do not use chemicals to clean. Only a
slightly damp cloth.
-This device must do not enter in touch with hydrocarbons.
(Oil, Gas, Diesel, alcohol, etc etc etc)
-Do not test motors or injectors in short circuit.
-Do nos connect the device to any voltage different to 12V.
-Do not plug more than one injector in each output.
Note: The content of this manual can be changed in any
moment without notice. ---- SCHdev take all rights to make
the all changes that consider convenient to the manual and
product with the end to improve.
Note 2: All mentioned trademarks in this manual are propriety
of their respective owners and only are mentioned with the only
idea that the customer identify correctly the components.
6/8
Warranty conditions
-General condition of warranty
SCHdev, warrant the right working of this product.
The warranty is for the following 3 (three) months starting in the purchase date,
this cover the materials and had handwork defects.
If while warranty is running, the device fail, SCHdev will repair the product.
The repair work is done into SCHdev placement and the shipping cost will be
charged to the customer.
All acesories that not are manufactured by SCHdev, the warranty are keeped by
the respectives providers.
This warranty is the only gived by SCHdev, so any other claim are exluded.
- Conditions
The warranty only will be recognized with the presentation of this certificte
with the date of purchase, or the bill of purchase. The present warranty only
will work with the customer that are at day with the payments.
- Execution of warranty
1.- Periodic controls, mainteniance, reparations, and pieces substitutions of
pieces or spare parts as result of normal usage.
2.- Any malfunction due bad usage, shocks, or usage out of specifications and
any deffect not produced by defect of construction.
3.- Product, installed, modified, repaired, mounted or handled by personal
unathorized by SCHdev.
4.- Accidents due to force majeure or other causes (water, fire, lightning,
electromagnetic fields, etc.) that do not depend SCHdev.
.
7/8
You can see other SCHdev products
LPA3: Automatic lights turning ON
GLC1: Lazo cerrado para vehículos a GNC
GNC2: Digital indicator for NGV cars
SCH dev
Tel: 54 11 4639-5945
8/8
http://www.schdev.com.ar
El araucano 1389 Cap Fed - Argentine