1
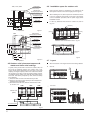
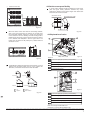
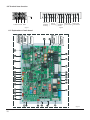
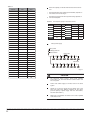
INSTALLATION MANUAL X-POWER Full DC Inverter Outdoor Unit Thank you very much for purchasing our air conditioner, Before using your air conditioner , please read this manual carefully and keep it for future reference. Caution:The manual is applicable for the cooling&heating and cooling only outdoor unit.The cooling&heating indoor unit is applicable for the cooling&heating and the cooling only outdoor unit;the heating capacity of the indoor unit will be effective only when the indoor unit connect to the cooling&heating outdoor unit. CONTENTS PAGE PRECAUTIONS........................................................................................1 CONSTRUCTION CHECKPOINTS..............................................................2 ACCESSORIES........................................................................................3 OUTDOOR UNIT INSTALLATION..............................................................3 REFRIGERANT PIPE..............................................................................10 ELECTRIC WIRING................................................................................17 TRIAL RUN.............................................................................................23 CUSTOMER DETAILS..............................................................................25 Install according to this installation instructions strictly. If installation is defective, it will cause water leakage, electrical shock fire. When installing the unit in a small room, take measures against to keep refrigerant concentration from exceeding allowable safety limits in the event of refrigerant leakage. Contact the place of purchase for more information. Excessive refrigerant in a closed ambient can lead to oxygen deficiency. Use the attached accessories parts and specified parts for installation. Otherwise, it will cause the set to fall, water leakage, electrical shock fire. Install at a strong and firm location which is able to withstand the set's weight. If the strength is not enough or installation is not properly done, the set will drop to cause injury. 1. PRECAUTIONS The appliance shall be installed in accordance with national wiring regulations The appliance shall not be installed in the laundry. Precautions before reading the Installation manual. This Installation manual is for the outdoor unit. Refer to the indoor unit Installation manual for indoor parts installation. Please read the power source unit Installation manual to install the power source unit. Please refer to the refrigerant distributor Installation manual to install the refrigerant distributor. The safety precautions listed here are divided into two categories. In either case, important safety information is listed which must be read carefully. WARNING Failure to observe a warning may result in death. The appliance shall be installed in accordance with national wiring regulations. CAUTION Failure to observe a caution may result in injury or damage to the equipment. After completing the installation, make sure that the unit operates properly during the start-up operation. Please instruct the customer on how to operate the unit and keep it tained. Also, inform customers that they should store this Installation manual along with the owner's manual for future reference. WARNING Before obtaining access to terminals, all supply circuits must be disconnected. The appliance must be positioned so that the plug is accessible. The enclosure of the appliance shall be marked by word, or by symbols, with the direction of the fluid flow. For electrical work, follow the local national wiring standard, regulation and this installation instructions. An independent circuit and single outlet must be used. If electrical circuit capacity is not enough or defect in electrical work, it will cause electrical shock fire. Use the specified cable and connect tightly and clamp the cable so that no external force will be acted on the terminal. If connection or fixing is not perfect, it will cause heat-up or fire at the connection. Wiring routing must be properly arranged so that control board cover is fixed properly. If control board cover is not fixed perfectly, it will cause heat-up at connection point of terminal, fire or electrical shock. If the supply cord is damaged, it must be replaced by the manufacture or its service agent or similarly qualified person in order to avoid a hazard. An all-pole disconnection device which has at least 3mm separation distance in all pole and a residual current device(RCD)with the rating of above 10mA shall be incorporated in the fixed wiring according to the national rule When carrying out piping connection, take care not to let air substances go into refrigeration cycle. Otherwise, it will cause lower capacity, abnormal high pressure in the refrigeration cycle, explosion and injury. Be sure only trained and qualified service personnel to install, repair or service the equipment. Improper installation, repair, and maintenance may result in electric shocks, short-circuit, leaks, fire or other damage to the equipment. Installation manual 1 The appliance is not intended for use by young children or infirm persons without supervision. Do not modify the length of the power supply cord or use of extension cord, and do not share the single outlet with other electrical appliances. Otherwise, it will cause fire or electrical shock. Young children should be supervised to ensure that they do not play with the appliance. Carry out the specified installation work after taking into account strong winds, typhoons or earthquakes. Improper installation work may result in the equipment falling and causing accidents. Don't install the air conditioner in the following locations: There is petrolatum existing. There is salty air surrounding (near the coast). (Except for the models with corrosion-resistant function) The temperature of refrigerant circuit will be high, please keep the interconnection cable away from the copper tube. There is caustic gas (the sulfide, for example) existing in the air (near a hot spring). The power cord type designation is H07RN-F. Equipment complying with IEC 61000-3-12. The Volt vibrates violently (in the factories). In buses or cabinets. If the refrigerant leaks during installation, ventilate the area immediately. Toxic gas may be produced if the refrigerant comes into the place contacting with fire. In kitchen where it is full of oil gas. There is strong electromagnetic wave existing. There are inflammable materials or gas. After completing the installation work, check that the refrigerant does not leak. Toxic gas may be produced if the refrigerant leaks into the room and comes into contact with a source of fire, such as a fan heater, stove or cooker. There is acid or alkaline liquid evaporating. Other special conditions. The insulation of the metal parts of the building and the air conditioner should comply with the regulation of National Electric Standard. CAUTION The cooling&heating indoor unit is applicable for the cooling&heating and the cooling only outdoor unit;the heating capacity of the indoor unit will be effective only when the indoor unit connect to the cooling&heating outdoor unit. This A/C is a kind of amenity unit. Don’t install it at the place where for storing machine, precise instrument, food, plant, animal, artwork or any other special used occasion. Ground the air conditioner. Do not connect the ground wire to gas or water pipes, lightning rod or a telephone ground wire. Incomplete grounding may result in electric shocks. 2. CONSTRUCTION CHECKPOINTS Acceptance and Unpacking After the machine arrives, check whether it is damaged during the shipment. If the surface or inner side of the machine is damaged, submit a written report to the shipping company. Check whether the model, specification and quantity of the equipment conform to the contract. After removing the outer package, please keep the operation instructions well and count the accessories. Refrigerant pipe Be sure to install an earth leakage breaker. Failure to install an earth leakage breaker may result in electric shocks. Connect the outdoor unit wires , then connect the indoor unit wires. You are not allowed to connect the air conditioner with the power source until wiring and piping the air conditioner is done. While following the instructions in this Installation manual, install drain piping in order to ensure proper drainage and insulate piping in order to prevent condensation. Improper drain piping may result in water leakage and property damage. Install the indoor and outdoor units, power supply wiring and connecting wires at least 1 meter away from televisions or radios in order to prevent image interference or noise. Depending on the radio waves, a distance of 1 meter may not be sufficient enough to eliminate the noise. Installation manual 2 Check the model and name to avoid mistaken installation. An additionally purchased refrigerant distributor (manifold adapter and manifold pipe) must be used for installing the refrigerant pipes. The refrigerant pipes must have the specified diameter. Nitrogen of a certain pressure must be filled into the refrigerant pipe before welding. The refrigerant pipe must undergo heat insulation treatment. After the refrigerant pipe is installed completely, the indoor unit cannot be powered on before performing the airtight test and creating a vacuum. The air-side and liquid-side pipes must undergo the airtight test and vacuum extraction. Airtight test The refrigerant pipe must undergo the airtight test [with 3.9 MPa(40kgf/CM2) nitrogen]. Creating a vacuum Be sure to use the vacuum pump to create a vacuum of the connective pipe at the air side and liquid side concurrently. 3. ACCESSORIES Table.3-1 Refrigerant replenishment If the length is greater than the reference pipe, the refrigerant replenishment quantity for each system should be calculated through the formula obtained according to the actual length of pipe. Record the refrigerant replenishment quantity, actual length of pipe and the height difference of the indoor & outdoor unit onto the operation confirmation table of the outdoor unit in advance for future reference. Name Model All of units Outline Function Outdoor unit installation manual 1 Outdoor unit owner’s manual 1 Be sure to deliver it to the customer Indoor unit owner’s manual 1 Be sure to deliver it to the customer Toggling flathead screw 1 For toggling of indoor and outdoor units Gauge point subassembly 1 For purpose of airtight test units 90° mouthing elbow 1 For connecting pipes Seal plug 8 For pipe cleaning Connective pipe accessory 1 Connect to the side of liquid pipe Bolt bage 1 Stone for service Switching pipe (Air side) 1 (the qty. of 12, 14HP are 2) Electric wiring Select the power supply capacity and wire size according to the design manual. The power cable of the air conditioner is generally thicker than the power cable of the motor. In order to prevent misoperation of the air conditioner, do not interleave or entwine the power cablewith the connection wires (low-voltage wires) of the indoor/outdoor unit. Power on the indoor unit after performing the airtight test and making a vacuum. For details of setting the address of the outdoor unit, see Outdoor unit address bits. Trial run Before operation, remove the six pieces of PE foaming which are used at the rear of the unit for protecting the condenser. Be careful not to damage the fin. Otherwise, the heat exchange performance may be affected. Perform the trial run only after the outdoor unit has been powered on for over 12 hours. Connect to the air pipe side,use when it is needed 4. OUTDOOR UNIT INSTALLATION 4.1 Outdoor unit combination Table.4-1 HP Mode Max Qty.of HP indoor unit Max Qty.of indoor unit Mode 13 26 10HP+16HP 43 10 10HP×1 16 28 14HP×2 46 12 12HP×1 20 30 14HP+16HP 50 14 14HP×1 23 32 16HP+16HP 53 16 16HP×1 26 34 10HP×2+14HP 56 18 8HP+10HP 29 36 10HP×2+16HP 59 20 10HP+10HP 33 38 10HP+12HP+16HP 63 22 10HP+12HP 36 40 10HP+14HP+16HP 64 24 10HP+14HP 39 42 14HP×3 64 8 8HP×1 Installation manual 3 Table.4-2 4.3 Selecting installation position Max Qty.of indoor unit Mode HP HP Max Qty.of indoor unit Mode 44 14HP×2+16HP 64 56 10HP+14HP+16HP×2 64 46 14HP+16HP×2 64 58 14HP×3+16HP 64 48 16HP×3 64 60 14HP×2+16HP×2 64 50 8HP+10HP+16HP×2 64 62 14HP+16HP×3 64 52 10HP×2+16HP×2 64 64 16HP×4 64 54 10HP+12HP+16HP×2 64 Ensure that the outdoor unit is installed in a dry, well-ventilated place. Ensure that the noise and exhaust ventilation of the outdoor unit do not affect the neighbors of the property owner or the surrounding ventilation. Ensure that the outdoor unit is installed in a well-ventilated place that is possibly closest to the indoor unit. Ensure that the outdoor unit is installed in a cool place without direct sunshine exposure or direct radiation of high-temp heat source. Do not install the outdoor unit in a dirty or severely polluted place, so as to avoid blockage of the heat exchanger in the outdoor unit. 4.2 Dimension of outdoor unit Unit:mm 8ǃ10 HP Do not install the outdoor unit in a place with oil pollution or full of harmful gases such as sulfurous gas. Do not install the outdoor unit in a place surrounded by salty air. (Except for the models with corrosion-resistant function.) 4.4 Base for outdoor unit A solid, correct base can: Avoid the outdoor unit from sinking. Avoid the abnormal noise generated due to base. Base types Steel structure base Concrete base (see the figure below for the general making method) Outdoor unit Fig.4-1 12ǃ14ǃ16 ǃ18 HP Unit:mm Φ10 Expansion bolt Rubber shocking proof mat Solid ground or roofing Concrete basement h=200mm 200mm ŐPP Fig.4-3 CAUTION The key points to make basement: The master unit’s basement must be made on the solid concrete ground . Refer to the structure diagram to make concrete basement in detail, or make after field measurements. Fig.4-2 Installation manual 4 In order to ensure every point can contact equality, the basement should be on completely level. If the basement is placed on the roofing, the detritus layer isn’t needed, but the concrete surface must be flat. The standard concrete mixture ratio is cement 1/ sand 2/ carpolite 4, and add Φ10 strenthen reinforcing steel bar, the surface of the cement and sand plasm must be flat, border of the the basement must be chamfer angle. Centering position illustration of each connective pipe (Unit: mm) 1) 8HP, 10HP Before construct the unit base, please ensure the base is directly supporting the rear and front folding edges of the bottom panel vertically, for the reason of these edges are the actual supported sites to the unit. In order to drain off the seeper around the equipment, a discharge ditch must be setup around the basement. Please check the affordability of the roofing to ensure the load capacity. When piping from the bottom of the unit, the base height should no less than 200mm. 5 Position illustration of screw bolt (Unit: mm) Liquid side (The connected pipe diameter Φ12.7) % Gauge point (Cooling only type without) $ Detect the pressure/ Refrigerant replenishment Oil balance pipe & ' For parallel connect the modular units Gas side (The connected pipe diameter Φ25.4) 15×23 long u-shape hole Fig.4-4 Unit: mm Table.4-3 R amplification Fig.4-5 HP SIZE 8θ10 12θ14θ16θ18 A 830 1120 B 960 1250 C 736 736 D 765 765 2) 12HP, 14HP, 16HP, 18HP 3ǃ3 Installation manual 5 Liquid side 12HP, 14HP, 16HP (The connected pipe diameter Φ15.9) Gauge point (Cooling only type without) Detect the pressure/ Refrigerant replenishment Oil balance pipe For parallel connect the modular units Gas side (The connected pipe diameter Φ31.8) 4.6 Installation space for outdoor unit Ensure enough space for maintenance. The modules in the same system must be on the same height.(see the Fig.4-8) When installing the unit, leave a space for maintenance shown in Fig.4-9. Install the power supply at the side of the outdoor unit. For installation procedure, see the power supply device Installation manual. In case any obstacles exist above the outdoor unit, refer to Fig.4-14. (Air-out ) Fig.4-6-1 P1 amplification 18HP (Air-in ) (Air-in ) Gauge point (Cooling only type without) Detect the pressure/ Refrigerant replenishment Gas side Installation and maintenance surface Fig.4-8 (The connected pipe diameter Φ31.8) Oil balance pipe For parallel connect the modular units 100mm~500mm Liquid side >1000mm 100mm~500mm (The connected pipe diameter Φ19.1) >1000mm >1000mm Top view of the outdoor unit Fig.4-9 +3 +3 Front 100-500mm Fig.4-10 Tow rows Indoor unit A Indoor unit B Indoor unit C >1m Front >1m >1m Fig.4-7 6 Front >800mm Outdoor unit (38HP) Installation manual >1m >1m +3 One row >800mm A system, which provide with more than two outdoor units, will be set as the followings method: The outdoor units in this system should place sequentially from the large to the small capacity; the largest capacity outdoor unit must be mounted at the first branch joint site; and set the largest capacity outdoor unit address as the master Unit, while the other setting as the Slave Unit. Take 38HP (composed by 10HP, 12HP and 16HP) as an example: 1) Place the 16HP at a side of the first branch joint site. 2) Place the unit from the large capacity to the small (See the detail placement illustration) 3) Set 16HP as the main unit, while the 12HP and the 10HP as the aux. unit. When the outdoor unit is higher than the surrounding obstacle >1m 4.5 Outdoor units’ placement sequence & master and slave units’ settings 4.7 Layout >1m Fig.4-6-2 P2 amplification The 1st branch joint >1000mm Front Front Front 100-500mm Fig.4-11 4.8 Set the snow-proof facility More than two rows >1m In snowy areas, facilities should be installed to prevent snow. (See the figure below) (defective facilities may cause malfunction.) Please lift the bracket higher and install snow shed at the air inlet and air outlet. >800mm Front >1m Front Front Front >1m >1m >1m Front Front 100-500mm Snow shed for air inlet Snow shed for air outlet Fig.4-12 Snow shed for air inlet When the outdoor unit is lower than the surrounding obstacle, refer to the layout used when the outdoor unit is higher than the surrounding obstacle. However, to avoid cross connection of the outdoor hot air from affecting the heat exchange effect, please add an air director onto the exhaust hood of the outdoor unit to facilitate heat dissipation. See the figure below. The height of the air director is HD (namely H-h). Please make the air director on site. Fig.4-15 4.9 Explanation of valve >1m + K + >1m K >1m Front Front 100-500mm Fig.4-16 12HP, 14HP, 16HP Table.4-4 Fig.4-13 If miscellaneous articles are piled around the outdoor unit, such articles must be 800mm below the top of the outdoor unit. Otherwise, a mechanic exhaust device must be added. Connect the liquid pipe (accessory, field installation) Oil balance pipe Connect the gas pipe Gauge point(Cooling only type without) Low pressure float valve D A C B Front view Side view A A B Front view B Front view A >45° B >300mm C >1000mm D Airflow deflector Fig.4-17 18HP Fig.4-14 Connect the liquid pipe (accessory, field installation) Connect the gas pipe Oil balance pipe Gauge point(Cooling only type without) Stop valve Note: For a single module that is not necessary to connect with oil balance pipe. Installation manual 7 4.10 Mount the air deflector Unit: mm Table.4-6 (If the static pressure of outdoor unit is over 20Pa, The unit need be customized.) 8HP, 10HP Installation illustration 8000 Example A ŏ'ŏ 920 Example B Support 940 C 920 Fig.4-18 A Radius B Support 90 100 C A Radius D 725 B 100 Air outlet louver dimension (optional) Fig.4-22 Air outlet louver dimension (optional) 725 Fig.4-19 12 ST3.9 self-threading screws Remove the iron filter firstly 12 ST3.9 self-threading screws Remove the iron filter firstly 393 765 Fig.4-23 Fig.4-20 243 330 243 960 12-Φ3.2 10 330 Fig.4-24 243 393 Table.4-7 243 330 243 10 765 243 12-Φ3.2 960 8000 Fig.4-21 Installation manual 8 Unit: mm 10 Curve diagram of static pressure, air flow volumn. Air pressure curve diagram (take down the mesher) 411 u fa De 12400 he lt t 12200 c fa 12000 , ion ed sit iz po m e sto rv cu se e Re to b %φ ed be et $φ 12600 411 11600 213 411 1250 Table.4-8 Unit: mm 11400 0 10 20 30 40 Static pressure (Pa) 8000 50 ŏ'ŏ Fig.4-25 Curve diagram of static pressure, air flow volumn. 12HP, 14HP, 16HP,18HP Installation illustration Example A 12-Φ3.2 Fig.4-29 s ry to 11800 411 10 765 12800 213 393 Air volumePK 1210 12HP Air pressure curve diagram Air volumePK (take down the mesher) Support , ion ed sit po omiz rve cust se Re be to &φ , d n e o i be d sit ze po mi rve sto se cu Re be %φ to ed be lt t fau se De ory $φ fact the Fig.4-26 14200 14000 13800 13600 13400 13200 13000 12800 12600 0 20 C B 40 60 80 Static pressure (Pa) Fig.4-30 A Radius 725 100 14HPǃ16HPǃ18HP Air volumePK Fig.4-27 t ult e fa ry s De cto $φ e fa th 12 ST3.9 self-threading screws 16600 16400 16200 16000 15800 15600 15400 15200 0 10 20 n, io ed sit iz po om t e rv us se e c Re o b %φ ed t be Air outlet louver dimension (optional) Air pressure curve diagram (take down the mesher) 30 Static pressure (Pa) 40 50 Fig.4-31 Remove the two iron filter firstly Fig.4-28 Installation manual 9 Example B Support NOTE C 1290 Before install the air deflector, please ensuring the mesh enclosure has been took off, otherwise the air supply efficiency would be block down. Once mounting the shutter to the unit, air volume, cooling (heating) capacity and efficiency would be block down, this affection enhance along with the angle of the shutter. Thus, we are not recommend you to mount the shutter, if necessary in use, please adjust the angle of shutter no larger than 15°. 1210 A Radius B Only one bending site to be allowanced in the air duct (see as above figure), otherwise, misoperation may led out. Install the flexible connector between the unit and the air pipe, for avoiding to produce vibration noise Air outlet louver dimension (optional) Fig.4-32 725 12 ST3.9 self-threading screws Remove the two iron filters firstly 5. REFRIGERANT PIPE 5.1 Length and drop height permitted of the refrigerant piping Table.5-1 Permitted value Fig.4-33 411 411 213 411 1250 Fig.4-34 Table.4-9 Unit: mm 8000 Installation manual 10 Drop height 765 213 393 411 1000m (Please refer to the caution 5 of conditions 2) L1+L2+L3+L4 +L5+L6+L7+L8 +L9h+a+b+c +d+e+f +g+h+i+j L1+L5+L8+L9+j Actual length 175m Equivalent length 200m(Please refer to caution 1) (Pipe diameter requirements, please refers to table. 5-4 or 5-5) Total pipe length (Total extended length) Pipe length 3.2 Piping Maximum piping (L) Pipe(between the farthest indoor unit and first branch joint) length 40/90*m(Please refer to caution 5) Indoor unit- Outdoor unit up outdoor unit drop height Outdoor unit down 70m 110m Indoor unit to indoor unit drop height 30m L5+L8+L9+j (Please refer to caution 3) (Please refer to caution 4) N1 (140) a N2 (140) b C L1 L2 A Indoor unit L3 B D L4 d c N4 (140) N3 (140) Pipe ( between the farthest indoor unit and outdoor unit) equivalent length L≤200m The first branch joint L5 Indoor unit to intdoor unit drop height h≤30m unit and outdoor unit H≤70m (*1.Level differences above 50 m are available on request) Drop height between indoor Outdoor unit (one or more outdoor units) Pipe ( between the farthest indoor unit and first branch joint) length L≤40/90*m L6 E N5 (140) e F L7 L8 L9 H h f N6 (71) N7 (71) G g I i N8 (140) j N9 (56) N10 (56) Fig.5-1 *1.Level difference above 50m are not supported by default but are available on request for customized.(if the outdoor unit is above the indoor unit.) ŐPP ŐPP Fig.5-2 CAUTION 1. The reduced length of the branch joint is the 0.5m of the equivalent length. 2. The inner units should as equal as possible to be installed in the both sides of the U-shape branch joint. 3. When the outdoor unit is on the top position and the difference of level is over 20m, it is recommended that set a oil return bend every 10m in the air pipe of the main pipe, the specification of the oil return bend refers to Fig.5-2. 4. When the outdoor unit is on the low positon, H≥40m, the liquid pipe of the main pipe need to increase one size. 5. The allowable length of the fist branch joint which connected to the indoor unit should be equal to or shorter than 40m. But when the following conditions are all meeted, the allowable length can extended to 90m. Conditions 1. It is needed to increase all the pipe diameters of the the main distribution pipe which between the first and the last branch joint assembly. (Please change the pipe diameter at field) If the pipe diameter of the main slave pipe is the same as the main pipe, then it is not needed to be increased. Examples 1 ///MŏP//////// Need to increase the pipe diameter of the distribution pipe Increasing size as the following ºĮººĮººĮº ºĮººĮººĮº ºĮººĮººĮº ºĮººĮº Installation manual 11 Table.5-2 Conditions Pipe name 2. When counting the total extended length, the actual length of above distribution pipes must be doubled.(Expect the main pipe and the distribution pipes which no need to be increased. ) Code (As per the Fig. 5-3) Main pipe /////////hDEFGHIJKLMŏP L1 Indoor unit main pipe L2~L9 Indoor unit aux. pipe a, b, c, d, e, f, g, h, i, j Examples Indoor unit branch joint assembly Reference Figure. 5-1 A, B, C, D, E, F, G, H, I L, M Outdoor unit branch joint assembly Outdoor unit connective pipe Conditions g1, g2, g3, G1 3. The length from the indoor unit to the nearest branch joint assembly ŏP DEFMŏP(Pipe diameter requirements, please 5.3 Size of joint pipes for indoor unit refers to table .5-9) Examples Size of joint pipes for 410A indoor unit Table.5-3 Reference Figure .5-1 Capacity of indoor unit A(×100W) Conditions 4. The distance difference between [the outdoor unit to the farthest indoor unit] and [the outdoor unit to the nearest indoor unit] is ŏP. Size of main pipe(mm) Available branch joint Gas side Liquid side A<166 Φ15.9 Φ9.5 BJF-224-CM(i) 166≤A<230 Φ19.1 Φ9.5 BJF-224-CM(i) 230≤A<330 Φ22.2 Φ9.5 BJF-330-CM(i) 330≤A<460 Φ28.6 Φ12.7 BJF-710-CM(i) 460≤A<660 Φ28.6 Φ15.9 BJF-710-CM(i) 660≤A<920 Φ31.8 Φ19.1 BJF-710-CM(i) 920≤A<1350 Φ38.1 Φ19.1 BJF-1344-CM(i) 1350≤A<1800 Φ41.3 Φ22.2 BJF-E1344-CM(i) 1800≤A Φ44.5 Φ25.4 BJF-E1344-CM(i) The farthest indoor unit 1 The nearest indoor unit 1 ////M///DŏP Examples Reference Figure .5-1 5.2 Select the refrigerant piping type W3 (10) W2 (12) e.x.1: Refer to Fig.5-3 , the capacity of downstream units to L2 is 140×4=560, i.e. the gas pipe for L2 is Φ28.6, liquid pipe is Φ15.9. W1 (16) N1 (140) a N2 (140) b C L3 B g1 g2 0 d c N3 L2 / G1 D L4 g3 L1 L5 ( N4 (140) (140) $ L6 N5 (140) e F L7 L8 L9 H h f G g N6 (71) N7 (71) I j i N8 (140) N9 (56) N10 (56) Fig.5-3 Installation manual 12 5.4 Size of joint pipes for outdoor unit Base on the following tables, select the diameters of the outdoor unit connective pipes. In case of the main accessory pipe large than the main pipe, take the large one for the selection. Example: parallel connect with the three outdoor units 16+16+14 (the total capacity is 46HP), all indoor units total capacity is 1360, provided that the equivalent length of all pipes are ≥90m, according to the Table5-5 the main pipe diameter areΦ38.1/Φ22.2; in according to all indoor unit capacity 1360, we could find out the master unit diameter isΦ41.3/Φ22.2 base on Table.5-3. Take the large one for the selection, we final confirm the main pipe diameter is Φ41.3/Φ22.2. 5.5 Branch pipes for outdoor unit Table.5-6 Outdoor unit pipe connective opening dimension(mm) Model Gas side Liquid side 8HP, 10HP Φ25.4 Φ12.7 12HP, 14HP, 16HP Φ31.8 Φ15.9 18HP Φ31.8 Φ19.1 5.6 Branch pipes for indoor unit Table.5-4 Model Size of joint pipes for 410A outdoor unit When the equivalent length of all liquid pipes < 90m, the size of main pipe(mm) Gas side Liquid side 8HP Φ22.2 Φ9.53 BJF-330-CM(i) 10HP Φ22.2 Φ9.53 BJF-330-CM(i) 12~14HP Φ25.4 Φ12.7 BJF-330-CM(i) Φ28.6 Φ12.7 BJF-710-CM(i) 16HP The 1st branch joint Base on Table.5-7 and Table.5-8 select the multi connecting pipes of outdoor unit. Before installation, please read the Outdoor Unit branch joint Installation Manual carefully. Table.5-7 Outdoor unit multi-connective pipe assembly (Illustration) Outdoor unit Qty. Illustration 2 units J J Main pipe / 18~22HP Φ28.6 Φ15.9 BJF-710-CM(i) 24HP Φ28.6 Φ15.9 BJF-710-CM(i) 26~32HP Φ31.8 Φ19.1 BJF-710-CM(i) 34~48HP Φ38.1 Φ19.1 BJF-1344-CM(i) 50~64HP Φ41.2 Φ22.2 BJF-E1344-CM(i) 66~72HP Φ44.5 Φ25.4 BJF-E1344-CM(i) 3 units J J J / 4 units J J Main pipe 0 * J J Main pipe / Table.5-5 Model 0 * 1 * Size of joint pipes for 410A outdoor unit When the equivalent length of all liquid pipes ≥ 90m, the size of main pipe(mm) Gas side Liquid side The 1st branch joint Table.5-8 Outdoor unit multi-connective pipe assembly Outdoor unit Qty. Outdoor unit connective Parallel connect with the branch pipe diameter joint assembly 8HP Φ22.2 Φ12.7 BJF-330-CM(i) 10HP Φ25.4 Φ12.7 BJF-330-CM(i) 12~14HP Φ28.6 Φ15.9 BJF-710-CM(i) 12~18HP: Φ31.8/Φ15.9 16HP Φ31.8 Φ15.9 BJF-710-CM(i) g1, g2, g3: 18~22HP Φ31.8 Φ19.1 BJF-710-CM(i) 24HP Φ31.8 Φ19.1 BJF-710-CM(i) G1: Φ38.1/Φ19.1 26~32HP Φ38.1 Φ22.2 BJF-1344-CM(i) g1, g2, g3, g4: 34~48HP Φ38.1 Φ22.2 BJF-1344-CM(i) 50~64HP Φ44.5 Φ25.4 BJF-E1344-CM(i) 66~72HP Φ54.0 Φ25.4 BJF-E1500-CM(i) g1, g2 2 units 3 units 8, 10HPΦ25.4/Φ12.7; 8, 10HP: Φ25.4/Φ12.7; L: BJC-02-CM(i) L+M: 12~18HP: Φ31.8/Φ15.9; BJC-03-CM(i) 8, 10HP: Φ25.4/Φ12.7; 4 units 12~18HP: Φ31.8/Φ15.9; Main pipe Refer to Table. 5-4 or 5-5 for main pipe dimension L+M+N: BJC-04-CM(i) G1: Φ38.1/Φ19.1; G2: Φ41.3/Φ22.2 Note: The pipe assemblies in above table is special for this model, must be purchased separately. Installation manual 13 6) The main pipe L9 with N9, N10 downstream indoor units that total capacity is 56+56=112, the pipe L9 diameter is Φ15.9/Φ9.5, thus select BJF-224-CM(i) for the branch joint I. 5.7 Example 1) Take (16+12+10) HP that composed by three modules as an example to clarify the pipe selection. 7) The main pipe L8 with N8ЊN10 downstream indoor units that total capacity is 140+56+56=252, the pipe L8 diameter is Φ22.2/Φ9.5, thus select BJF-330-CM(i) for the branch joint H. 2) Take Fig.5-4 as an example. Provided that the equivalent length of all pipes in this system is larger than 90m. Table.5-9 8) The main pipe L5 with N5ЊN10 downstream indoor units that total capacity is 140×2+56×2+71×2=534, the pipe L5 diameter is Φ 28.6/Φ15.9, thus select BJF-710-CM(i) for the branch joint E. Unit: mm When branch joint’s Indoor unit length ŏ10m capacity A(×100W) When branch joint’s length˚10m Liquid side Gas side Gas side 9) The main pipe A with N1ЊN10 downstream indoor units that total capacity is 140×6+56×2+71×2ω1094, thus select BJF-1344CM(i. for the branch joint A. Liquid side A≤45 Φ12.7 Φ6.4 Φ15.9 Φ9.5 A≥56 Φ15.9 Φ9.5 Φ19.1 Φ12.7 C Main pipe (Refer to Table.5-3, Table.5-5): Main pipe L1 in the Fig.5-4, which upstream outdoor units total capacity is 10+12+16ω38, base on table.5-5, the gas/liquid pipe diameter are Φ38.1/Φ19.1, total capacity of the downstream indoor unit is 140×6+56×2+71×2ω1094, base on table.5-3, the gas/liquid pipe diameter are Φ38.1/Φ19.1, take the large one for your selection, final confirm the main pipe diameter is: gas/liquid pipe Φ38.1/Φ22.2. A The branch joint at the inside of the unit. There are a~j branch joints at the inside of the unit, the branch joint diameter should be select as per Table. 5-9. B Main pipe at the inside the unit (Refer to Table. 5-3) D 1) The main pipe L3 with N1, N2 downstream indoor units that total capacity is 140×2=280, the pipe L3 diameter is Φ22.2/Φ 9.5, thus select BJF-330-CM(i) for the branch joint C. 2) The main pipe L4 with N3, N4 downstream indoor units that total capacity is 140×2=280, the pipe L4 diameter is Φ22.2/Φ 9.5, thus select BJF-330-CM(i) for the branch joint D. 3) The main pipe L2 with N1~N4 downstream indoor units that total capacity is 140×4=560, the pipe L2 diameter is Φ28.6/Φ 15.9, thus select BJF-710-CM(i) for the branch joint B. 1) The outdoor unit linked by Pipe g1 is 10HP, parallel connects with outdoor unit. refer to Table.5-8 the connective pipe diameter is Φ25.4/Φ12.7; The outdoor unit linked by Pipe g2 is 12HP, parallel connects with outdoor unit.refer to Table.5-8 the connective pipe diameter is Φ31.8/Φ15.9; The outdoor unit linked by Pipe g3 is 16HP, parallel connects with outdoor unit. refer to Table.5-8 the connective pipe diameter is Φ31.8/Φ15.9. 4) 5) Parallel connect the outdoor units 2) The upstream of G1 is the two parallel connected outdoor units, refer to Table.5-8 select the three parallel connected outdoor unit, the pipe diameter isΦ38.1/Φ19.1. The main pipe L7 with N6, N7 downstream indoor units that total capacity is 71×2=142, the pipe L7 diameter is Φ15.9/Φ 9.5, thus select BJF-224-CM(i) for the branch joint G. 3) Parallel connect the three outdoor units, refer to Table.5-8 should select BJC-03-CM(i) for outdoor unit connective pipes (L+M). The main pipe L6 with N5ЊN7 downstream indoor units that total capacity is 140+71×2=282, the pipe L6 diameter is Φ22.2/ Φ9.5, thus select BJF-330-CM(i) for the branch joint F. W3 (10) W2 (12) W1 (16) N1 (140) a N2 (140) b C L3 B g1 g2 0 d c N3 L2 / G1 D L4 g3 L1 L5 ( N4 (140) (140) $ L6 N5 (140) e F L7 L8 L9 H h f G g N6 (71) N7 (71) I j i N8 (140) N9 (56) N10 (56) Fig.5-4 Installation manual 14 5.8 Remove dirt or water in the piping 5.10 Vacuum with vacuum pump Make sure there is no any dirt or water before connecting the piping to the outdoor units. 1) Use the vacuum pump which vacuum level lower than -0.1MPa and the air discharge capacity above 40L/min. Wash the piping with high pressure nitrogen, never use refrigerant of the outdoor unit. 2) The outdoor unit is not necessary to vacuum, don’t open the outdoor unit gas and liquid pipe shut-off valves. 3) Make sure the vacuum pump could result as -0.1MPa or below after 2 hrs or above operation. If the pump operated 3 hrs or above could not achieve to -0.1MPa or below, please check whether water mix or gas leak inside of the pipe. 5.9 Gas tight test 1) Upon set up the indoor unit pipeline, please connect the Hipressure pipe with shut-off valve firstly. Connect with vacuum pump 2) Weld the pipe at the low pressure side to the meter connector. Perform the pump (last for 2 hrs or above) 3) Use the vacuum pump discharging air inside the liquid side shut-off valve and meter connecter, until to the -1kgf/CM2. 4) 5) Close the vacuum pump, charge 40kgf/CM2 nitrogen gas from the piston of shut-off valve and from the meter connector. Pressure inside should be maintained at there no less than 24 hrs. Upon the airtightness test, do a good welding between float valve and pipe at the low pressure side. When get the vacuum level -0.1MPa, the pump should keep running for 20-60 mins Shut down the vaccun pump 1. Close-off the valve of vacuum meter. 2. Cut off the connection between pressure meter and vacuum pump. 3. Close the vacuum pump. Place the vaccum state unused (1 hrs or above) Outdoor unit Liquid side of shut-off valve Fig.5-5 Gas side of float valve CAUTION Don’t mix up the different refrigerants or abuse the tools and measurements which directly contact with refrigerants. Nitrogen Liquid pipe Indoor unit Gas pipe Nitrogen Don’t adopt refrigerant gas for air vacuuming. If vacuum level could not get to -0.1MPa, please check whether resulted by leakage and confirm the leakage site.If no leakage, please operate the vacuum pump again 1 or 2 hrs. Pressure meter connector Fig.5-5 CAUTION ● ● ● ● ● Pressurized nitrogen˄3.9MPa˗40kgf/CM2˅is used for airtightness test. It is not allow to bring pressure on the float valve directly. (See Fig. 5-5˅ It is not allow to use oxygen, combustible gas or toxic gas to conduct the airtightness test. When welding, please use wet cloth insulating the low pressure valve for protection. For avoid the equipment be damaged, the pressure maintainedtime should not last too long. 5.11 Refrigerant amount to be added Calculate the added refrigerant according to the diameter and the length of the liquid side pipe of the outdoor/indoor unit connection. The refrigerant is R410A. Table.5-10 Pipe size on liquid side Refrigerant to be Added per meter Φ6.4 0.022kg Φ9.5 0.057kg Φ12.7 0.110kg Φ15.9 0.170kg Φ19.1 0.260kg Φ22.2 0.360kg Φ25.4 0.520kg Φ28.6 0.680kg Installation manual 15 5.12 The Installation key points of connective pipes between outdoor units 1) Connect the pipes between outdoor units, the pipes should place horizontally (Fig.5-6,Fig.5-7), it is not allow the concave at junction site(Refer to Fig.5-8). 2) All connective pipes between the outdoor units are not allowed to over than the height of every outlets of the pipes(Refer to Fig.5-9). × Wrong way Fig.5-9 3) The branch joint must be installed horizontally, error angle of it should not large than 10°. Otherwise, malfunction will be caused. U-shaped branch joint $ √ Correct way Fig.5-6 A direction view Wrong Correct e e Horizontal surface Fig.5-10 4) For avoid oil accumulate at the outdoor unit, please install the branch joints properly. ĸCorrect way × Wrong way Installation manual 16 Fig.5-7 Fig.5-8 Fig.5-11 No. Display content (Normal display) Reserve Note Current of inverter compressor A Actual value Current of inverter compressor B Actual value Opening angle of EXV A Actual valuer Opening angle of EXV B Actual valuer High pressure Actual valueh Reserve Qty. of Indoor units Qty. of the working Indoor units Actual value Priority mode 6. ELECTRIC WIRING Night noise control mode Static pressure mode 6.1 Sw2 query instructions DC voltage A Actual valuer Use application of the SW2 spot check DC voltage B Actual valuer Reserve Reserve ιι Fig.5-12 Table.6-1 No. Display content (Normal display) Outdoor unit address Outdoor unit itself capacity Modular outdoor unit qty. Qty.setting of indoor units Total capacity of outdoor unit Total requirement of indoor unit capacity Total requirement of main unit corrected capacity Performance mode Note Check end Available for main unit Available for main unit Capacity requirement Available for main unit Available for main unit Capacity requirement This outdoor unit actual operation capacity Speed of fan A 0, 1, ……,14,15 Speed of fan B 0, 1, ……,14,15 T2B/T2 average temp. Actual value T3 pipe temp. Actual value T4 ambient temp. Actual value Discharge Temp.of Inverter compressor A Discharge Temp.of Inverter compressor B Actual value Display code 8.8.8 That can communicate with indoor units The display contents as followings: ˄˅Normal display:When standby, the high positon displays the adress of the outdoor unit,and the low position displays the Qty.of indoor units that can communicate with outdoor unit .When it is operating, it will display the rotation frequency of the compressor. ˄˅Operation mode: 0-OFF; 2-Cooling; 3-Heating; 4-Constraint cooling. ˄˅Fan speed: 0-stop; 1~15: speed increase sequentially, 15 is the max. fan speed. ˄˅EXV opening angle: Pulse count=display value×8; ˄˅Priority mode: 0-heating priority mode ; 1-cooling priority mode; 2-open the priority mode first ; 3-respond the heating mode only ; 4respond the cooling mode only. ˄˅Night noise control mode:0-Night noise control mode ; 1- silent mode ; 2-most silent mode;3-no priority ˄Static pressure mode:0-Static pressure is 0 Mpa ; 1-Static pressure mode is low pressure ; 2-Static pressure mode is medium pressure ; 3-high static pressure mode is high pressure. Actual value Installation manual 17 6.2 Terminal base function $ % & 1 Outdoor units centralized monitoring To 380-415V 3N~ 50Hz Network accounting Fig.6-1 Indoor units centralized controls Indoor units Outdoor units communication communication Fig.6-2 Outdoor power dial switch Outdoor address dial switch Query button Constraint cooling Quantity setting dial switch of indoor units 6.3 Explanation of main board Fig.6-3 Installation manual 18 Explanation of main board CAUTION Table.6-2 Content No. 1 Discharge temp. sensed port of the inverter compressor A 2 Discharge temp. sensed port of the inverter compressor A or B ● 3 Reserve 4 Reserve 5 6 7 8 9 10 Reserve Power input of the No.2 transformer 13 Loading output terminal 14 Loading output terminal 15 Loading output terminal 6 6 Power output of the No.1 transformer Activation port of inverter module B Port for inverter module A voltage inspection 21 Activation port of inverter module A 22 ON/OFF signal input port for system low pressure inspection 23 ON/OFF signal input port for system high pressure inspection 21 S2 definition 6 21 21 Night time selection is 6h/12h 6 21 Night time selection is 8h/10h 6 Night time selection is 8h/12h Reserve Inspection port for outdoor ambient temp. and condensator coil S3 definition 6 28 Control port of DC fan A 29 Control port of DC fan B Night time selection is 6h/10h (Default the Factory Set) 6 Input port for system high pressure inspection Communication ports between outdoor units Starting time is set to about 12 minutes (Default the Factory Set) 21 31 6 Starting time is set about 10 minutes 6 21 30 (1& 6 6 Power output of the No.2 transformer 20 27 6 S1 definition 21 Port for inverter module B voltage inspection 26 6 Fig.6-4 19 25 (1& 6 Loading output terminal EXV B driving port 24 6 6 Power input of the No.1 transformer 12 18 (1& (1& 6 6 Phase inspection port EXV A driving port 17 6.4 Dial codes definition Wiring port for communication between indoor and outdoor units, indoor unit network, outdoor unit network and network accounting 11 16 Before debugging the power supply connected port of the main control panel, it must set the indoor and outdoor units addresses. There are high electric in the electric control box, don’t touch except for the professionals. ● Night silent mode (Default the Factory Set) 6 21 Silent mode Current inspection port of the inverter compressors A and B Power supply connected port of the main control panel 6 21 Most silent mode 6 21 None silent mode Installation manual 19 S4 definition S11 definition 6 Static pressure mode is 0 MPa (Default the Factory Set) 21 6 21 8, 10 HP outdoor unit setting 6 Static pressure mode is low pressure (Reserve position, use for customized unit) 21 6 21 6 21 6 21 Static pressure mode is medium pressure (Reserve position, use for customized unit) 12, 14, 16 HP outdoor unit setting 6 21 18 HP outdoor unit setting Static pressure mode is high pressure (Reserve position, use for customized unit) ENC 1 definition S5 definition ( 1& 6 21 Heating priority mode (Default the Factory Set) Outdoor unit address setting switch Effective to 0-3 0 Stand for main unit 1-3 Stand for slave uint 6 21 Cooling priority mode ENC 2 definition ( 1& 6 21 Open the Priority mode first Outdoor unit capacity setting switch Effective to 0-5 0-5 Stand for 8HP-18HP 6 21 Only Respond the heating mode (1& 6 21 ENC 3 and S12 definitions 6 21 Setting the numbers of indoor unit to be 0-15 Only Respond the cooling mode (1& 6 21 S6 definition 6 21 ( 1& 21 Automatic search addressing 6 Setting the numbers of indoor unit to be 16-31 Setting the numbers of indoor unit to be 32-47 6 21 6 21 Nonautomatic search address way of the original (The communication digital indoor units) (Default the Factory Set) Clean the indoor unit addresses (Effective to automatic search-ing new digital indoor uints) S7 definition 6 21 Reserve S8 definition 6 21 Reserve S10 definition 6 21 Reserve Installation manual 20 ( 1& 6 21 Setting the numbers of indoor unit to be 48-63 ENC 4 definition (1& Network address setting dial switch Effective to 0-7 0-7 stand for 0-7 6.5 Electric wiring system and installation CAUTION With power facilities Outdoor unit power supply 380-415V 3N~ 50Hz Please select power supply for indoor unit and outdoor unit separately. Leakage protector Leakage protector Manual switch Manual switch Outdoor unit GND Outdoor unit GND The power supply should have specified branch circuit with leakage protector and manual switch. The power supply, leakage protector and manual of all the indoor units connecting to the same outdoor unit should be universal. (Please set all the indoor unit power supply of one system into the same circuit. It should turn on or shut down the unit at the same time, otherwise, the service life would affect seriously, even the unit may not turn on.) D Outdoor unit Branch box Outdoor unit Please put the connective wiring system between indoor unit and outdoor unit with refrigerant piping system together. It is suggested to use 3-core shielded wire as signal wire between indoor and outdoor units, multi-core wire is unavailable. Outdoor unit Power facilities 1 (with leakage protector) D Outdoor unit Leakage protector Manual switch Outdoor unit E Outdoor unit Branch box 6.5.1 Outdoor unit power wiring Outdoor unit Separate Power Supply (without power facility) (See Table.6-3) Outdoor unit Power supply 10HP 12HP 14HP 16ǃ18HP GND GND GND GND (with leakage protector) Item 8HP GND Power facilities 2 Table.6-3 Model GND Fig.6-5 Please comply with relevant National Electric Standard. Power wiring should be done by professional electrician. GND Min. Power wire diameter (mm2) Wiring of mental and synthetic resin Manual switch (A) Size Grounding Capacity (Continuous length wire of pipe m) 4×10 mm2 (<20 m) 1×10 mm2 4×16 mm2 (<50 m) 4×10 mm2 (<20 m) 4×16 mm2 (<50 m) 380-415V 4×10 mm2 (<20 m) 3N~ 50Hz 4×16 mm2 (<50 m) 4×16 mm2 (<20 m) 4×25 mm2 (<50 m) 4×16 mm2 (<20 m) 4×25 mm2 (<50 m) Fuse 32 25 1×10 mm2 40 30 1×10 mm2 50 40 1×16mm2 50 40 1×16mm2 63 50 Leakage protector 100mA 0.1sec or less NOTE Select power cord for these five models separately according to relevant standard. 8HP, 10HP, 12HP, 14HP16HP18HP The wiring diameter and the length in the table indicate the condition that the voltage dropping range is within 2%. If the length exceeds the above figure, please select the wire diameter according to relevant standard. GND Fig.6-6 Select the wire diameter Power wiring refer to the main wire (a) connecting to branch box and the wiring (b) between branch box and power facilities. Please select the wire diameter according to the following requirement. Diameter of main wire (a) Depends on the total horsepower of outdoor unit and following table. E.g In system:(8Hp×1unit+8Hp×1unit+10Hp×1unit) Total Hp=26Hp→(Table.6-4)→size of wire=35mm2(within 50m) Wiring(b):between branch box and power equipment. Depends on the number of combined outdoor unit. If fewer than 5, the diameter is the same as that of main wire (a); if more than 6, there will be 2 electric control boxes, and the diameter of wiring depends on the total horsepower of outdoor units connecting to each electric control box and following table. Select wire diameter (≥) (table.6-4) (unit :mm2) Installation manual 21 Table.6-4 Total HP <20m <50m 8 10 16 10 10 16 12 10 16 14 16 25 16 16 25 18 16 25 20 16 25 22 16 25 24 25 35 26 25 35 28 25 35 30 35 50 32 35 50 34 35 50 36 35 50 38 35 50 40 35 50 42 50 70 44 50 70 46 50 70 48 50 70 50 70 95 52 70 95 54 70 95 56 90 110 58 90 110 60 90 110 62 90 110 64 90 110 66 90 110 68 90 110 70 90 110 72 90 110 Select the capacity of manual switch and fuse of the branch box. See following table when without power facilities, depends on the outdoor unit it connecting to. See table.6-5 below when there is power facility, depends on the total horsepower. Table.6-5 Total horsepower, capacity of manual switch and fuse Total (HP) Manual switch (A) Fuse(A) Total (HP) Manual switch (A) Fuse(A) 100 80 32 25 30~34 10 40 30 36~40 110 90 12~14 50 40 42~44 125 100 16~18 63 50 46~50 150 125 20~22 80 63 52~60 200 150 24~28 90 70 62~72 250 200 8 Indoor power supply Indoor power Leakage protector Manual switch Branch box Indoor unit Fig.6-7 CAUTION Set refrigerant piping system, signal wires between indoor-indoor unit, and that between outdoor-outdoor unit into one system. Power must unified supply to all indoor units in the same system. Please do not put the signal wire and power wire in the same wire tube; keep distance between the two tubes. (Current capacity of power supply: less than 10A--300mm, less than 50A--500mm.) Make sure to set address of outdoor unit in case of parallel multi-outdoor units. Installation manual 22 6.8 6.6 Control system and Installation Example for power wire connection Power(380-415V 3Na50Hz) L1 L2 L3 N The control line should be shielded wire. Using other wiring shall create signal interference, thus leading to error operation. $ % & 1 The shielded nets at the two sides of shielded wires are either grounded to the earth, or connected with each other and jointed to the sheet metal along to the earth. Branch Box Control wire could not be bound together with refrigerant pipeline and power wire. When power wire and control wire is distributed in parallel form, keep gap between them above 300mm so as to preventing signal interference. Outdoor unit(master unit) $ % & 1 + + ( 3 4 ( $ % & 1 + + ( 3 4 Outdoor unit(slave unit) ( $ % & / Control wire has polarity, so be careful when connecting. 1 3 4 ( $ % & ' ( / 1 3 4 ( $ & ' ( Branch Box Branch Box 3 4 ( / 1 3 4 ( $ % & ' ( & ' ( Branch Box Signal wire between indoor unit and wire controller $ The shield net should be grounded at the wiring terminal of outdoor unit. The inlet and outlet wire net of indoor communication wire should be connected directly and could not be grounded, and form open circuit at the shield net of final indoor unit. + + ( Indoor unit % Signal wire between indoor units NOTE 1 Signal wire between outdoor units Signal wire between indoor/outdoor unith Indoor unit Indoor unit Control wire could not form closed loop. 6.7 Outdoor unit(slave unit) % & ' ( Wire controller $ % & ' ( $ Wire controller % Wire controller Fig.6-9 7. TRIAL RUN 7.1 Inspection and confirmation before commissioning Signal wire of indoor/outdoor units Check and confirm that refrigeration pipe line and communication wire with indoor and outdoor unit have been connected to the same refrigeration system. Otherwise, operation troubles shall happen. Signal wire of indoor/outdoor unit adopts 3-core shielded wire ( ≥0.75mm2) which has polarity, please connect it correctly. Outdoor unit Outdoor unit Outdoor unit Outdoor unit (master unit) (slave unit) (slave unit) (slave unit) Power voltage is within ±10% of rated voltage. (All shield terminals of shield wires connect to COMM terminal ) (P Q E) Check and confirm that the power wire and control wire are correctly connected. (H1 H2 E) (H1 H2 E) (H1 H2 E) Check whether wire controller is properly connected. (H1 H2 E) Signal wire between outdoor units Before powering on, confirm there is no short circuit to each line. To closed end of shield wire 34( Check whether all units have passed nitrogen pressure-keeping test for 24 hours with R410A: 40kg/CM2 . Signal wire of indoor/outdoor units Confirm whether the system to debugging has been carried out vacuum drying and packed with refrigeration as required. matching resisitor group control 3 4 (open) 7.2 The indoor unit at the terminal of communication system should parallel connect a impedance between port P and port Q. Preparation before debugging Calculating the additional refrigerant quantity for each set of unit according to the actual length of liquid pipe. Keep required refrigerant ready. Fig.6-8 Keep system plan, system piping diagram and control wiring diagram ready. Record the setting address code on the system plan. Turn on power switches outdoor unit in advance, and keep connected for above 12 hours so that heater heating up refrigerant oil in compressor. Installation manual 23 Turn on air pipe stop valve, liquid pipe stop valve, oil balance valve and air balance valve totally. If the above valves do not be turned on totally, the unit should be damaged. A [ kg] B [ m3] Countermeasure against overhigh thickness Check whether the power phase sequence of outdoor unit is correct. Install mechanical ventilator to reduce the refrigerant thickness under critical level. (ventilate regularly) All dial switch to indoor and outdoor unit have been set according to the Technical Requirement of Product. 7.3 ≤ Critical thickness˖0.3 [kg/m3] Install leakage detector alarming device related to mechanical ventilator if you can not regularly ventilate. Fill the name of connected system b. Leakage detector alarming device related to mechanical ventilator To clearly identify the connected systems between two or more indoor units and outdoor unit, select names for every system and record them on the nameplate on the outdoor electric control box cover. Indoor unit OA Model(indoor unit) Room Name Eg: Indoor unit (A) of the first system on second floor is recorded as:-2F-1A a:Ventilation peristome Fig.7-3 Fig.7-1 7.4 Caution on refrigerant leakage The room for air conditioner should be big enough that refrigerant leakage can not reach the critical thickness. Besides this, you can take some action on time. Critical thickness-----the max thickness of Freon without any harm to person. R410A critical thickness:0.3 [ kg/m3] Outdoor unit Indoor unit Room full of leaking refrigerant (All the refrigerant has leaked) Fig.7-2 Calculate the critical thickness through following steps, and take necessary actions. Calculate the sum of the charge volume (A[kg]) Total refrigerant volume=refrigerant volume when delivered(nameplate)+superaddition Calculate the indoor cubage (B[m3]) (as the minimum cubage) Installation manual 24 Turn over to customer Be sure to deliver the Installation Manual of the indoor unit, and the outdoor unit to the user. This air conditioner adopts R410A as refrigerant, which is safe and noncombustible. Calculate the refrigerant thickness. 7.5 8. CUSTOMER DETAILS Branch Address : …………………………………………………………… …………………………………………………………… …………………………………………………………… Telephone : …………………………………………………………… Person to be contacted : …………………………………………………………… Dealer address : …………………………………………………………… …………………………………………………………… …………………………………………………………… Telephone : …………………………………………………………… Person to be contacted : …………………………………………………………… …………………………………………………………… Signature of the Dealer with Seal. In all correspondence/communication state your name, address, the serial number of your air conditioning unit, date of purchase and dealer’s name (include address), location of unit and description of problem, for prompt and immediate attention Name of Customer : …………………………………………………………… Address : …………………………………………………………… …………………………………………………………… …………………………………………………………… Sr.No. of the Unit : …………………………………………………………… Sr.No. of the Compressor : …………………… Invoice No Date of purchase:……………… : …………………………………………………………… Installation manual 25 202000172354H ⡸ᵜᴤᦒ᰾㓶˄ᵜ亥нࠪ㨢᷇ˈӵѪ⭥ᆀ᮷ẓ䈤᰾˅ ֣՚,ԟӱدவߑֺդ०୪નݔଚ୪નͺ ֣՚ԟ澞 ֣՚-ԟӱ. dӣ࠷ֺ՚ԟӱOͧ٫ґࠓӣ࠷գݷޞ੮ d.6ځثङӣ࠷ֺ՚澞