1
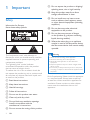
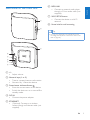
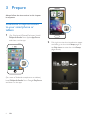
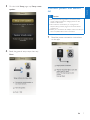
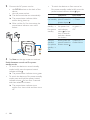
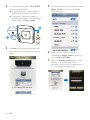
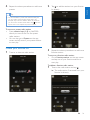
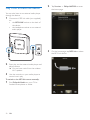
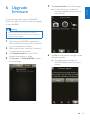
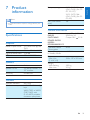
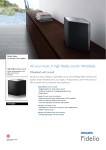
Always there to help you
Register your product and get support at
www.philips.com/welcome
Question?
Contact
Philips
User manual
AW3000
1Important
2
Safety2
Notice3
2 Your Wireless Hi-Fi Speaker
4
Introduction4
What's in the box
4
What else you need
4
Overview of the main unit
5
3Prepare
Download Philips AirStudio to your
smartphone or tablets
Connect power and switch on
4 Connect AW3000 to your home
Wi-Fi network
Option 1: Set up wireless connection
to a non-WPS router through an
iOS device
Option 2: Set up through a non-WPS
Wi-Fi router and Android device
Option 3: Set up wireless connection
to a WPS router
Option 4: Set up wired connection
through an Ethernet cable
5Play
Stream audio to AW3000
Listen to Internet radio stations
through AW3000
Play from an external device
9 Appendix 1: Mount the device
onto wall
28
10 Appendix 2: Understand
meanings of LED colors
29
6
6
7
9
9
12
14
15
16
16
19
22
6 Upgrade firmware
23
7 Product information
25
25
8Troubleshooting
26
Specifications
English
Contents
EN
1
1Important
i Do not expose the product to dripping /
splashing water, rain or high humidity.
j Keep this product away from direct
sunlight, naked flames or heat.
Safety
Information for Europe:
Know these safety symbols
k Do not install near any heat sources
such as radiators, heat registers, stoves,
or other electrical equipment (including
amplifiers).
l Do not place any other electrical
equipment on the product.
m Do not place any sources of danger
on the product (e.g. objects containing
liquids, burning candles).
n Where the mains plug or an appliance
coupler is used as the disconnect device,
the disconnect device shall remain readily
operable.
The 'exclamation mark' calls attention to
features for which you should carefully read the
supplied literature to prevent operating and
maintenance problems.
The 'lightening bolt' symbol indicates
uninsulated components within the product
that can cause an electric shock.
To reduce the risk of fire or electric shock, do
not expose the product to rain or moisture and
do not place any objects filled with liquids, such
as vases, on the product.
a Read these instructions.
b Keep these instructions.
c Heed all warnings.
d Follow all instructions.
e Do not use this product near water.
f Clean only with dry cloth.
g Do not block any ventilation openings.
Install in accordance with the
manufacturer's instructions.
h Do not remove the casing of this product.
2
EN
Warning
•• Never remove the casing of this apparatus.
•• Never lubricate any part of this apparatus.
•• Never place this apparatus on other electrical
equipment.
•• Keep this apparatus away from direct sunlight, naked
flames or heat.
•• Ensure that you always have easy access to the power
cord, plug or adaptor to disconnect this apparatus from
the power.
Risk of overheating! Never install this apparatus
in a confined space. Always leave a space of
at least four inches around this apparatus for
ventilation. Ensure curtains or other objects
never cover the ventilation slots on this
apparatus. This product complies with the radio
interference requirements of the European
Community.
This product complies with the requirement of
the 1999/5/EC directive.
Modifications
Modifications not authorized by the
manufacturer may void user's authority to
operate this product.
Your product is designed and manufactured
with high quality materials and components,
which can be recycled and reused.
Environmental information
All unnecessary packaging has been omitted.
We have tried to make the packaging easy to
separate into three materials: cardboard (box),
polystyrene foam (buffer) and polyethylene
(bags, protective foam sheet.)
Your system consists of materials which can
be recycled and reused if disassembled by
a specialized company. Please observe the
local regulations regarding the disposal of
packaging materials, exhausted batteries and old
equipment.
Android is a trademark of Google Inc. Use of
this trademark is subject to Google permissions.
Class II equipment symbol:
CLASS II apparatus with double insulation, and
no protective earth provided. Note
•• The type plate is located on the bottom of the
apparatus.
When this crossed-out wheeled bin symbol is
attached to a product it means that the product
is covered by the European Directive 2002/96/
EC.
Please inform yourself about the local separate
collection system for electrical and electronic
products.
Please act according to your local rules and
do not dispose of your old products with your
normal household waste. Correct disposal of
your old product helps to prevent potential
negative consequences for the environment and
human health.
EN
3
English
Notice
2 Your Wireless
Hi-Fi Speaker
Congratulations on your purchase, and
welcome to Philips! To fully benefit from the
support that Philips offers, register your product
at www.philips.com/welcome.
If you contact Philips, you will be asked for the
model and serial number of this apparatus. The
model number and serial number are on the
bottom of the apparatus. Write the numbers
here:
Model No. __________________________
Serial No. ___________________________
Introduction
With this wireless Hi-Fi speaker, you can:
• stream audio from your iOS or
Android device.
• listen to Internet radio stations or
online music services.
• stream audio from a PC/Mac installed
with Media Manager downloaded from
www.philips.com/mediamanager.
• play music from other audio devices
through the MP3-LINK socket.
What's in the box
Check and identify the contents of your
package:
• Wireless Hi-Fi speaker with built-in
Wi-Fi
• 1 x AC power adaptor
• Quick start guide
• Safety sheet
4
EN
What else you need
To stream audio wirelessly to AW3000, you
need:
• a certified Wi-Fi router
• an iOS or Android device, such as an
iPod touch/iPhone/iPad or an Android
phone or tablet; or a PC/Mac enabled
with Wi-Fi
• the Philips AirStudio app available on
Apple App Store (for iOS devices)
or Google Play Store (for Android
devices)
Your AW3000 should be connected to the
same local network as your iOS/Android device
or PC/Mac through the Wi-Fi router.
a
English
f MP3-LINK
• Connect an external audio player
through a 3.5mm audio cable (not
supplied).
Overview of the main unit
g WI-FI SETUP button
• Connect the device to a Wi-Fi
network.
h Screw hole for wall mounting
b
Tip
•• You can go to Appendix 1 for details about wall
mounting (see 'Appendix 1: Mount the device onto
wall' on page 28).
c
h
g
f
e
d
a +/• Adjust volume.
b Numeric keys (1 to 5)
• Tune to a preset Internet radio station.
• Numeric key 1: Reset the device.
c Power/status indicator/button
• Show the current status of the device.
• Switch the device on or to normal/Eco
standby mode.
d DC IN
• Connect the power adaptor.
e ETHERNET
• (Optional) Connect to a wireless
router through an Ethernet cable (not
supplied).
EN
5
3Prepare
Always follow the instructions in this chapter
in sequence.
Download Philips AirStudio
to your smartphone or
tablets
1
(For iPod touch/iPhone/iPad users) Install
Philips AirStudio from Apple App Store,
and then run the app.
(For users of Android smartphones or tablets)
Install Philips AirStudio from Google Play Store
and then run the app.
6
EN
2
Flick right to view the introduction pages
and then go to the initial Setup page, or
tap Skip intro to enter the initial Setup
page directly.
On the initial Setup page, tap Setup a new
speaker.
Connect power and switch
on
English
3
Caution
•• Risk of product damage! Make sure that the power
supply voltage matches the voltage printed on the
bottom of the device.
•• Risk of electric shock! When you unplug the AC
adaptor, always pull the plug from the socket. Never
pull the cord.
•• Before you connect the AC adaptor, make sure that you
have completed all the other connections.
1
4
Read the power connection instructions
on the app.
Read the general setup steps, then tap
Next.
EN
7
2
Connect the AC power cord to
• the DC IN socket on the back of the
device.
• the wall power socket.
»» The device switches on automatically.
»» The power/status indicator blinks
amber during boot-up.
»» After a while, for first-time setup, the
power/status indicator turns solid
amber.
DC
3
IN
Tap Next on the app screen to continue.
Switch between normal and Eco power
standby mode
• To switch the device to normal standby
mode, briefly press the power button/
indicator above .
»» The power/status indicator turns green.
•
To switch the device to Eco power standby
mode, press and hold the power button/
indicator above for less than 3 seconds
and then release the button.
»» The power/status indicator turns
amber for a short while and then turns
off.
8
EN
•
To switch the device on from normal or
Eco power standby mode, briefly press the
power button/indicator above again.
Operation
On -> Nor- Briefly press the
mal standby power button/indicator above .
On/Normal Press and hold
standby -> the power butEco power ton/indicator
standby
above for less
than 3 seconds
and then release
the button.
Normal
Briefly press the
standby/
power button/inEco power dicator above .
standby ->
On
LED status
Amber/white
-> Green
Amber/white
or green ->
Off
Green/Off ->
Amber/white
To connect AW3000 to your existing home WiFi network, you need to apply your home Wi-Fi
settings to AW3000.
Choose your best setup method based on the
preconditions listed below.
Platform
of your
mobile
device
iOS
Type
of your
Wi-Fi
router
NonWPS
Other
requirement
Setup method
No
Choose option
1 (see 'Option
1: Set up wireless connection
to a non-WPS
router through
an iOS device'
on page 9).
Choose option
2 (see 'Option 2: Set
up through a
non-WPS Wi-Fi
router and
Android device'
on page 12).
Choose option
3 (see 'Option 3:
Set up wireless
connection to a
WPS router' on
page 14).
Choose option
4 (see 'Option
4: Set up wired
connection
through an
Ethernet cable'
on page 15).
Android NonWPS
No
Either
WPS
iOS or
Android
No
Either
Either
iOS or nonAndroid WPS
or
WPS
You have
an Ethernet cable.
Before connection of AW3000 to your home
Wi-Fi network, make sure that:
ayour Wi-Fi router is powered on and
working properly.
bAW3000 has been powered on and
booted up successfully (see 'Connect
power and switch on' on page 7).
cyou have jotted down your Wi-Fi
password.
Once connected successfully, AW3000 will
remember your home Wi-Fi settings. Then
you can play music or listen to Internet radio
via Philips AirStudio whenever AW3000 is
powered on and connected to your home WiFi network automatically.
Option 1: Set up wireless
connection to a non-WPS
router through an iOS device
1
2
Before setup, make sure that your iOS
device is connected to your home Wi-Fi
network.
Read the Wi-Fi setup instructions on the
app.
EN
9
English
4 Connect AW3000
to your home WiFi network
3
As instructed, briefly press WI-FI SETUP
on the back of AW3000.
»» The power/status indicator starts to
blink amber and white alternately.
5
As instructed, exit the app, and then select
Philips_Install from the list of available
Wi-Fi networks.
»» A new Wi-Fi network created by
AW3000 will appear, with the network
name (SSID) of Philips_Install.
WiFi SETUP
< 30S
< 3S
4
Tap Next on the above app screen, and
then read how to proceed with network
setup.
6
7
10
EN
Make sure that your iOS device is
connected to Philips_Install, and then go
back to Philips AirStudio.
Wait until Speaker found appears at the
bottom on the above app screen.
»» After a short while, a password input
box appears automatically.
Enter the password of your home Wi-Fi
network, tap Done to finish input, and then
tap Next.
10Wait until the power/status indicator on
AW3000 turns solid white.
»» The following app screen appears.
»» AW3000 is connected to your home
Wi-Fi network successfully.
* If your Wi-Fi password contains such special
characters as #/:/;/', you need to change your
password.
9
Name your speaker as you like, and then
tap OK to connect AW3000 to your
home Wi-Fi network.
Tip
•• After successful network setup, you can tap Rock n'
Roll on the above app screen to get ready for music
play directly. For more details, go to the 'Play' section
(see 'Play' on page 16).
EN
11
English
8
Option 2: Set up through a
non-WPS Wi-Fi router and
Android device
1
4
Before setup, make sure that your Android
device is connected to your home Wi-Fi
network.
2
Read the Wi-Fi setup instructions on the app.
5
3
As instructed, briefly press WI-FI SETUP
on the back of AW3000.
»» The power/status indicator blinks
amber and white alternately.
»» A new Wi-Fi network created by
AW3000 will appear, with the network
name (SSID) of Philips_Install.
WiFi SETUP
< 3S
12
Tap Next on the above app screen.
»» Your Android device starts to connect
with the new Wi-Fi network created
by AW3000 automatically.
EN
< 30S
Wait until the speaker is found.
7
Select your home Wi-Fi network and then
tap Next.
Enter the password of your home Wi-Fi
network, and then tap Next.
8
9
Name your speaker as you like, and then
tap OK to connect AW3000 to your
home Wi-Fi network.
English
6
Wait until the power/status indicator on
AW3000 turns solid white.
»» The following app screen appears.
»» AW3000 is connected to your home
Wi-Fi network successfully.
* If your Wi-Fi password contains such special
characters as #/:/;/', you need to change your
password.
EN
13
Note
3
•• After successful network setup, you can tap Rock n'
Roll on the above app screen to get ready for music
play directly. For more details, go to the 'Play' section
(see 'Play' on page 16).
Option 3: Set up wireless
connection to a WPS router
1
Tap WPS Setup? on the app screen .
As instructed, press and hold WI-FI SETUP
on the back of AW3000.
»» The power/status indicator blinks
amber and green alternately.
WiFi SETUP
> 4S
4
Press the WPS button on your home Wi-Fi
router.
WPS
2
Read the WPS setup instructions.
14
EN
Wait until the power/status indicator on
AW3000 turns solid white, then tap Next
on the app screen..
»» The following app screen appears.
»» AW3000 is connected to your home
Wi-Fi network successfully.
Option 4: Set up wired
connection through an
Ethernet cable
English
5
Note
•• If you use wired connection, you just need to select
Speaker already setup on the initial Setup page (see
'Download Philips AirStudio to your smartphone or
tablets' on page 6).
1
2
If you have tried wireless connection,
before setup of wired connection, you
need to reset the wireless Hi-Fi speaker
(see 'Troubleshooting' on page 26).
Connect an Ethernet cable (not supplied)
to:
• the ETHERNET socket on the back of
the device
• one of the Ethernet ports on your
home Wi-Fi router
Tip
12V=1A
To Modem
LAN4
LAN3
LAN2
LAN1
Reset
•• For some Wi-Fi routers, you may need to hold the
WPS button for Wi-Fi connection or enable the WPS
PBC function from the router configuration pages. See
the user manuals of the specific routers for details.
•• After successful network setup, you can tap Rock n'
Roll on the above app screen to get ready for music
play directly. For more details, go to the 'Play' section
(see 'Play' on page 16).
ETHER
NET
3
ETHER
NET
Wait until the power/status indicator turns
solid white.
»» AW3000 is connected to your home
Wi-Fi network successfully.
EN
15
5Play
4
After both the device and speaker icons
appear, hold and drag the icon of your
device towards the speaker to set up
connection between them.
Stream audio to AW3000
Stream from your iOS or Android
smartphone or tablet
1
2
3
16
Make sure that your iOS/Android device is
connected to the same Wi-Fi network as
AW3000.
Run Philips AirStudio on your iOS or
Android smartphone or tablet.
If the following screen does not appear,
select Speaker already setup on the initial
Setup page.
»» Your smartphone or tablet starts to
search for the speaker on the same
Wi-Fi network.
EN
5
Select a list mode to show music available
for streaming.
Select your favorite music to start play.
1
2
Download Media Manager from www.
philips.com/mediamanager.
English
6
Find the license key available on the quick
start guide, then install Media Manager
onto your PC/Mac.
Tip
•• If the power/status indicator flashes white, it indicates that
the speaker is muted. Adjust volume on the speaker or
your iOS/Android device to resume sound output.
•• If you find that either the device or speaker icon does
not appear at step 3, you can tap
-> Refresh to
refresh the screen display.
Stream from your PC/Mac
To stream music from your PC/Mac to
AW3000, you need to install a DLNA certified
media sharing software (such as Media Manager
available on www.philips.com/mediamanager or
Windows Media Player 11+) onto your PC/Mac
first. In this way, your PC/Mac can work as a
media sharing server that streams music to the
wireless Hi-Fi speaker.
3
4
5
Make sure that your PC/Mac and AW3000
are connected to the same Wi-Fi network.
Run Media Manager on your PC/Mac.
Select the available music source.
EN
17
6
Select AW3000 as the media player.
7
Select a song from the list to start play.
You can also control music play from your iOS/
Android device.
1
2
Make sure that your iOS/Android device
and PC/Mac are connected to the same
Wi-Fi network as AW3000.
Run Philips AirStudio on your iOS or
Android device.
3
4
5
Hold and drag the Media Manager icon
towards the speaker to set up Wi-Fi
connection.
Tap the Media Manager icon to show
music available for streaming.
Select a song from the list to start play.
Tip
•• It may take longer time for your iOS/Android device to
show music from your PC/Mac.
•• If you find that either the device or speaker icon does
not appear at step 3, you can tap
refresh the screen display.
18
EN
->
Refresh to
1
2
4
Run Philips AirStudio on your iOS or
Android smartphone or tablet.
Tap Services -> Philips AW3000 to enter
the home page.
5
3
If the following message pops up, tap I
agree to allow Internet access.
English
Listen to Internet radio
stations through AW3000
Search for an Internet radio station by its
name or location, language etc.
On the home page, tap Internet radio to
select the Internet radio source.
EN
19
6
To tune to an Internet radio station, select
and tap its name in the result list.
2
Tap a row in the list where you want to
add the preset station. For example, if you
want to assign preset number 2 to this
station, tap the second row.
»» A message pops up, in which the station
name and preset number are shown.
Philips AW3000
Preset Internet radio stations
1
20
Tune to an Internet radio station and tap
.
»» A list of preset radio stations appears.
EN
3
Tap OK in the message box to confirm.
»» The station is added into your list of
preset radio stations.
Repeat the above procedures to add more
presets.
2
Tap to add the station into your favorite
list directly.
Tip
•• You cannot delete a preset radio station directly, but
you can replace it with another radio station. For
example, if you want to delete a station at preset #3,
you can tune to another radio station, tap , and then
tap the 3rd row to replace the previous station.
To tune to a preset radio station
• Press numeric keys (1-5) on AW3000
directly to tune to the first five preset
radio stations.
• You can also go to Presets on the app
screen and tap one of your preset stations
to start play.
Create your favorite list
1
Tune to an Internet radio station.
3
Repeat the above procedures to add more
favorite stations.
To tune to a favorite radio station
• Go to Favorite stations on the app screen
and tap one of your favorite stations to
start play.
To delete a favorite radio station
1
Tune to the radio station and tap .
»» The radio station if removed from your
favorite list directly.
EN
21
English
4
Play from an external device
2
Tap Services -> Philips AW3000 to enter
the home page.
You can also listen to an external audio player
through the device.
1
Connect an MP3 link cable (not supplied)
to:
• the MP3-LINK socket on the back of
the device.
• the headphone socket on an external
audio player.
MP3 LINK
3
2
3
Start play on the external audio player and
adjust volume.
»» You can hear music from the wireless
Hi-Fi speaker.
Use the controls on your audio player to
control music play.
To switch to the MP3 link source manually:
1
22
Run Philips AirStudio on your iOS or
Android smartphone or tablet.
EN
On the home page, tap MP3 link to select
the MP3 link source.
5
Tap Internet Radio on the home page.
»» If a new firmware is available. A
firmware upgrade prompt pops up
automatically.
English
6Upgrade
firmware
To improve the performance of AW3000,
Philips may offer you new firmware for upgrade
of your AW3000.
Warning
•• Always connect your AW3000 to AC power for
firmware upgrade. Never power off your AW3000
during firmware upgrade.
1
2
3
4
Make sure that AW3000 is powered on
and connected to the same Wi-Fi network
as your smartphone or tablet.
Make sure that your home Wi-Fi network
is connected to the Internet.
Run Philips AirStudio on your iOS or
Android smartphone or tablet.
Tap Services -> Philips AW3000 to enter
the home page.
6
Tap OK on the prompt message to start
firmware upgrade.
»» The power/status indicator on
AW3000 flashes amber during this
process.
EN
23
7
Wait until the firmware upgrade process
finishes, then tap OK on the prompt
message to restart the device.
2
If a new firmware is available, tap OK on
the prompt message to start firmware
upgrade.
»» The power/status indicator on
AW3000 flashes amber during this
process.
You can also check and upgrade the firmware
manually.
1
24
On the home page, tap ->Firmware
upgrade -> Check Online to check for
new firmware.
EN
3
Wait until the firmware upgrade process
finishes, then tap OK on the prompt
message to restart the device.
Note
•• Product information is subject to change without prior
notice.
Frequency range
PBC (one button
push)
2412 - 2462 MHz
(CH1-CH11) (for /79,
/37, /55, /97)
2412 - 2472 MHz
(CH1-CH13) (for /12,
/10, /05)
Yes
General information
Specifications
Amplifier
Rated Output Power
Frequency Response
Signal to Noise Ratio
MP3 Link
2 X 18 W RMS @ 10%
THD
80 Hz - 18 kHz, ±3 dB
> 86 dB
800 mV RMS 20 kohm
Speakers
Speaker Impedance
Speaker Driver
Sensitivity
8 ohm
2 x dome tweeters, 2 x
3.5” woofers
82 dB/m/W
AC power
PHILIPS
SWITCHING
POWER SUPPLY
MODEL:
EFS05001800250 CE
Operation Power
Consumption
Power Consumption
in Standby Mode
Dimensions
- Main Unit
(L x W x H)
Weight
- With Packing
- Main Unit
Input: 100 ~ 240 V,
50/60 Hz 2A
Output: 18 V 2.5 A
40 W
< 0.5 W
358 x 137 x 203 mm
3.05 kg
2.1 kg
Wireless
Wireless standard
Wireless security
802.11b/g
WEP, 10 or 26 hex digit
keys
WPA (TKIP) or WPA2
(TKIP / AES) with
8 - 40 ASCII printable
characters passphrase
EN
25
English
7Product
information
8Troubleshooting
Warning
•• Never remove the casing of this apparatus.
To keep the warranty valid, never try to repair
the system yourself.
If you encounter problems when using this
apparatus, check the following points before
requesting service. If the problem remains
unsolved, go to the Philips web site (www.
philips.com/welcome). When you contact
Philips, ensure that the apparatus is nearby
and the model number and serial number are
available.
No power
•• Make sure that the AC power plug of the
device is connected properly.
•• Make sure that there is power at the AC
outlet.
•• Check whether the device is in Eco
standby mode (see 'Connect power and
switch on' on page 7). No sound
•• Check whether the device is muted. The
power/status indicator flashes white when
the device is muted. Adjust volume on
the Philips AirStudio app or on AW3000
directly.
•• If you have chosen the wired connection,
check whether the Ethernet cable has
been connected properly and securely
(see 'Option 4: Set up wired connection
through an Ethernet cable' on page 15).
•• Check the Wi-Fi network connection.
Set up the network again if needed (see
'Connect AW3000 to your home Wi-Fi
network' on page 9).
•• If the audio source is an external audio
player, adjust volume on the audio player
directly.
No response from the device
•• Restart AW3000, and then set up the
Wi-Fi network for AW3000 again (see
'Option 1: Set up wireless connection to a
non-WPS router through an iOS device'
on page 9).
•• Disconnect and reconnect the AC power
plug, and then switch on the device again.
Wi-Fi network connection failed
•• This device does not support the WPSPIN method.
•• Enable SSID broadcast on the Wi-Fi router.
•• Keep away from potential sources of
interference which may affect Wi-Fi signal,
such as microwave ovens.
•• Make sure that the SSID name of your
home router consists of alphanumeric
characters, with no space or special
characters like %/#/*/# inserted. The
network password should not consist of
#/:/;/'.
•• If you choose to rename your AW3000
manually on the Philips AirStudio app, do
not use special characters or symbols.
•• For some new types of Wi-Fi routers, a
network name (SSID) may be created
automatically when you use WPS for
connection. Always change the default
network name (SSID) to a simple one that
consists of alphanumerical characters, and
also change the Wi-Fi security mode to
secure your network.
Wired network connection failed
•• If you have tried wireless connection,
before setup of wired connection, you
need to reset the wireless Hi-Fi speaker.
Follow the procedures below to reset the
device:
1
2
3
26
EN
Unplug the power cord.
Hold the numeric key 1 and plug the
power cord again.
»» The power/status indicator flashes
amber, then turns solid amber, and after
a while starts to flash amber again.
Release the numeric key 1.
•• Do not release the numeric key 1 until the power/
status indicator flashes amber for a second time.
Occasional breaking of music streaming
Do one or all of the following:
•• Move AW3000 closer to your Wi-Fi router.
•• Remove any obstacles between AW3000
and your Wi-Fi router.
•• Avoid using Wi-Fi channel which is
overlapped by the nearby Wi-Fi network.
•• Check if your network speed is fast enough
(in cases where multiple devices share the
same router, the wireless performance may
be affected). Turn off the other devices
connected to your home router.
•• Enable the Quality of Service (QoS)
option (if available on the Wi-Fi router).
•• Turn off other Wi-Fi routers.
The power/status indicator remains red. What
can I do?
•• You need to recover the device with an
Ethernet cable.
1
2
3
Make sure that your router is connected to
the Internet.
Connect the device to the router through
an Ethernet cable (see 'Option 4: Set up
wired connection through an Ethernet
cable' on page 15).
Wait for automatic recovery of the device,
which may take up to 10 minutes.
Music streaming failed with PC/Mac
•• Temporarily disable the firewall and
security software to see whether it blocks
the ports that the media sharing software
(Media Manager) uses to stream content.
See the help documentation of your
firewall and security software on how to
unblock the ports used by wireless media
sharing.
•• When you use iPod Touch/iPhone/iPad/PC/
Mac for music streaming, if the music play
breaks or stops, try to restart your iPod
Touch/iPhone/iPad, media sharing software,
or AW3000.
•• Video streaming or FTP downloads may
overload your router and therefore may
cause interruptions during music streaming.
Try to reduce the load of your router.
EN
27
English
Note
9 Appendix 1:
Mount the
device onto wall
1
2
Find a suitable place on a wall and use a
pencil to mark the chosen location with
your purchased bracket.
Follow the instructions supplied with the
purchased bracket to drill holes as marked.
Caution
•• Risk of product damage! Always consult professional
personnel to safely mount the product onto wall.
Warning
•• Risk of injury! Make sure that no supply ducts such as gas,
water or electricity are harmed when you drill the holes.
The AW3000 has a ¼" - 20 UNC (depth: 0.35")
mounting hole at the back of the device.
0.35’’
1/4’’ -20UNC
Through this hole, you can easily mount the
device onto wall with a suitable mounting
bracket. The mounting bracket is not included
and you need to purchase one. Please follow
the instructions included with your purchased
wall mounting bracket.
Note
•• The wall mounting bracket described below is for
reference only.
•• Make sure that the mounting screw of your purchased
wall mounting bracket matches the size of the hole at
the back of AW3000, that is, ¼ inch (6.75mm).
•• Make sure that the wall mounting bracket supports at
least 25 lbs (11.3 kg).
28
EN
3
Insert the mounting screw on the bracket
into the hole at the back of AW3000, then
turn the rotating handle to tighten the
screw.
LED color
Blinking
amber
Solid
amber
White
and
amber
alternately
Green
and
amber
alternately
Solid
white
Blinking
white
Solid
green
Solid red
English
10Appendix 2:
Understand
meanings of
LED colors
Meaning
The speaker is booting up or
firmware upgrade is in progress.
The speaker is not connected to
any network.
The speaker is in wireless setup
mode, assisted by the AirStudio
app. Follow the set-up instructions
on the app.
Wireless setup by the WPS
method has been triggered or is
ongoing.
The speaker is connected to a
Wi-Fi network and is ready for
wireless music streaming.
The speaker is muted.
The speaker is in normal standby
mode (see 'Connect power and
switch on' on page 7).
The speaker is malfunctioning. You
need to recover the speaker (see
'Troubleshooting' on page 26).
EN
29
Specifications are subject to change without notice
© 2013 Koninklijke Philips Electronics N.V.
All rights reserved.
AW3000_10_UM_V2.0