1
Aventail E-Class SRA 10.7
WorkPlace User Guide
| 1
Notes, Cautions, and Warnings
NOTE: A NOTE indicates important information that helps you make better use of your system.
CAUTION: A CAUTION indicates potential damage to hardware or loss of data if instructions are
not followed.
WARNING: A WARNING indicates a potential for property damage, personal injury, or death.
© 2013 Dell Inc.
Trademarks: Dell™, the DELL logo, SonicWALL™, SonicWALL GMS™, SonicWALL
ViewPoint™, Aventail™, Reassembly-Free Deep Packet Inspection™, Dynamic Security for
the Global Network™, SonicWALL Aventail Advanced End Point Control™ (EPC™),
SonicWALL Aventail Advanced Reporting™, SonicWALL Aventail Connect Mobile™,
SonicWALL Aventail Connect™, SonicWALL Aventail Native Access Modules™, SonicWALL
Aventail Policy Zones™, SonicWALL Aventail Smart Access™, SonicWALL Aventail Unified
Policy™, SonicWALL Aventail™ Advanced EPC™, SonicWALL Clean VPN™, SonicWALL
Clean Wireless™, SonicWALL Global Response Intelligent Defense (GRID) Network™,
SonicWALL Mobile Connect™, SonicWALL SuperMassive™ E10000 Series, and all other
SonicWALL product and service names and slogans are trademarks of Dell Inc.
2014 – 01
P/N 232-001831-00
2 | Aventail E-Class SRA WorkPlace User Guide
Rev. B
Table of Contents
WorkPlace Overview . . . . . . . . . . . . . . . . . . . . . . . . . . . . . . . . . . . . . . . . . . . . . . . . . 5
The Network Explorer Page . . . . . . . . . . . . . . . . . . . . . . . . . . . . . . . . . . . . . . . . . 6
Access Methods and Resources . . . . . . . . . . . . . . . . . . . . . . . . . . . . . . . . . . . . . . . . 7
Logging In to WorkPlace . . . . . . . . . . . . . . . . . . . . . . . . . . . . . . . . . . . . . . . . . . . . . . 8
Changing Your Password. . . . . . . . . . . . . . . . . . . . . . . . . . . . . . . . . . . . . . . . . . . 9
Entering Credentials Using the Virtual Keyboard . . . . . . . . . . . . . . . . . . . . . . . . 10
Logging Out of WorkPlace . . . . . . . . . . . . . . . . . . . . . . . . . . . . . . . . . . . . . . . . . . . 10
Accessing Network Resources. . . . . . . . . . . . . . . . . . . . . . . . . . . . . . . . . . . . . . . . . 10
Using Shortcuts . . . . . . . . . . . . . . . . . . . . . . . . . . . . . . . . . . . . . . . . . . . . . . . . . 11
Using the Intranet Address Box . . . . . . . . . . . . . . . . . . . . . . . . . . . . . . . . . . . . . 12
Using Bookmarks . . . . . . . . . . . . . . . . . . . . . . . . . . . . . . . . . . . . . . . . . . . . . . . . . . 14
Adding Bookmarks . . . . . . . . . . . . . . . . . . . . . . . . . . . . . . . . . . . . . . . . . . . . . . 14
Reordering Bookmarks . . . . . . . . . . . . . . . . . . . . . . . . . . . . . . . . . . . . . . . . . . . 15
Deleting Bookmarks . . . . . . . . . . . . . . . . . . . . . . . . . . . . . . . . . . . . . . . . . . . . . 15
Working with Folders and Files . . . . . . . . . . . . . . . . . . . . . . . . . . . . . . . . . . . . . . . . 15
Using the Java-based Network Explorer . . . . . . . . . . . . . . . . . . . . . . . . . . . . . . 15
Using the HTML-based Network Explorer . . . . . . . . . . . . . . . . . . . . . . . . . . . . . 21
Virtual Assist. . . . . . . . . . . . . . . . . . . . . . . . . . . . . . . . . . . . . . . . . . . . . . . . . . . . . . . 26
What is Virtual Assist? . . . . . . . . . . . . . . . . . . . . . . . . . . . . . . . . . . . . . . . . . . . . 26
Using Virtual Assist from the Technician View . . . . . . . . . . . . . . . . . . . . . . . . . . 27
Using Virtual Assist from the Client View . . . . . . . . . . . . . . . . . . . . . . . . . . . . . . 36
Using Virtual Assist in Unattended Mode . . . . . . . . . . . . . . . . . . . . . . . . . . . . . . 44
Cache Cleaner and Secure Virtual Desktop . . . . . . . . . . . . . . . . . . . . . . . . . . . . . . 45
Using Cache Cleaner . . . . . . . . . . . . . . . . . . . . . . . . . . . . . . . . . . . . . . . . . . . . 45
Using Secure Virtual Desktop . . . . . . . . . . . . . . . . . . . . . . . . . . . . . . . . . . . . . . 46
Troubleshooting . . . . . . . . . . . . . . . . . . . . . . . . . . . . . . . . . . . . . . . . . . . . . . . . . . . . 48
Viewing Connection Status Information . . . . . . . . . . . . . . . . . . . . . . . . . . . . . . . 48
Viewing Security Zone Information . . . . . . . . . . . . . . . . . . . . . . . . . . . . . . . . . . 48
Troubleshooting Tips . . . . . . . . . . . . . . . . . . . . . . . . . . . . . . . . . . . . . . . . . . . . . 48
Contact Information . . . . . . . . . . . . . . . . . . . . . . . . . . . . . . . . . . . . . . . . . . . . . . . . . 51
Table of Contents | 3
GNU General Public License (GPL) Source Code . . . . . . . . . . . . . . . . . . . . . . . . . .
Limited Hardware Warranty . . . . . . . . . . . . . . . . . . . . . . . . . . . . . . . . . . . . . . . . . . .
End User Product Agreement. . . . . . . . . . . . . . . . . . . . . . . . . . . . . . . . . . . . . . . . . .
Third-party Packages . . . . . . . . . . . . . . . . . . . . . . . . . . . . . . . . . . . . . . . . . . . . . . . .
4 | Aventail E-Class SRA WorkPlace User Guide
51
51
58
66
Chapter 1
Getting Started
The WorkPlace application enables you to securely access private network resources—
including Web sites, Web and client/server applications, terminal servers, and shared folders
or files—from a Web browser. This section provides an overview of working with WorkPlace.
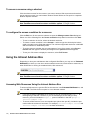
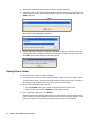
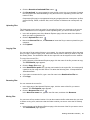
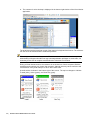
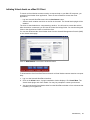
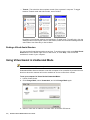
WorkPlace Overview
When you start WorkPlace, the home page displays any shortcuts that your administrator has
configured for you. You can click these links for direct access to Web content, applications, or
shared folders and files. Some elements, such as the Network Explorer page, personal
bookmarks, or the Intranet Address box, may not be available depending on how the home
page is configured.
This heading area can be customized by
your system administrator
View online help, use Virtual Assist, view
connection status, or log out
Shortcuts to resources
Type a network resource name here (optional)
Manage personal bookmarks (optional)
Network folders (optional)
Note
Your WorkPlace pages may look different than the examples shown in this document. If your
E-Class SRA appliance was upgraded after version 10.6.2, by default the WorkPlace pages
are displayed in the format used in previous versions. The administrator can update the
WorkPlace to the new format, but doing so resets the WorkPlace pages to the factory
default.
WorkPlace Overview | 5
The WorkPlace home page includes connection status information indicating which access
methods are currently enabled and the session start time. You can click the Details link in this
area to view your security zone status (if applicable) and see information that can be helpful in
troubleshooting problems. For more information about access methods, see “Access Methods
and Resources” on page 7. For more information about security zones, see “Viewing Security
Zone Information” on page 48.
You can click the Assistance button to use the Virtual Assist feature to request assistance. See
the Virtual Assist on page 26 for more information.
Depending on how your administrator has configured WorkPlace, the home page may include
a Personal Bookmarks area that enables you to save and access your own collection of
links to URLs and other resources, such as file shares. To manage your bookmarks, click the
pencil icon. For more information, see Using Bookmarks on page 14.
Note
To navigate to and from different pages in WorkPlace, use the navigation tools in WorkPlace
(tabs or links) instead of your Web browser’s Back and Forward buttons. Clicking the
browser’s navigation buttons prompts you to terminate your WorkPlace session.
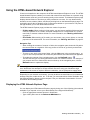
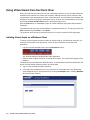
The Network Explorer Page
Your system administrator can make the Network Explorer page available to you, giving you
access to all the Windows network folders or files for which you have permissions. There are
two versions of Network Explorer, one Java-based for most computers, and the legacy HTML
based Network Explorer for small form factor devices and computers without Java.
The Java based Network Explorer displays the file system on the local machine in the left pane
and the remote location in the right pane. The right pane allows you to browse network domains
and computers, and their associated file shares. Using the two panes, you can manipulate files
and copy between the remote and local file systems. Users can also set up bookmarks from
within Network Explorer to quickly navigate through networks from the portal level.
In the HTML based Network Explorer, the navigation pane at the left displays a list of resources
available on your network; the pane on the right enables you to work with folders and files.
6 | Aventail E-Class SRA WorkPlace User Guide
Access Methods and Resources
WorkPlace enables you to access different types of resources. The specific resources available
depend on the access methods currently enabled, as shown in the connection status area in
WorkPlace. The following table describes the various access methods and the types of
resources each one enables you to access.
Access method
Resources available
Web
• Web content and Web-based applications that can be
accessed through a browser. Examples include general Web
sites (such as intranets), Outlook Web Access, and Domino
Web Access.
Web and client/server
• Web content and Web-based applications that can be
accessed through a browser.
• Client/server applications, thin client applications, and terminal servers. Examples include Outlook, Citrix, and Windows
Terminal Services.
Full network access
• Web content and Web-based applications that can be
accessed through a browser.
• Client/server applications, thin client applications, and terminal services.
• Native Windows file access through Network Neighborhood.
• Mapped network drives.
For more system status information, click Details. You’ll see what Dell SonicWALL E-Class
SRA agents are available on your device and what security zone (community) you have been
assigned to. Your system administrator may also make WorkPlace shortcuts available that
allow you to download and install additional clients (for example, Connect Tunnel and Connect
Mobile).
Access Methods and Resources | 7
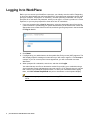
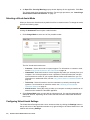
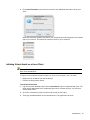
Logging In to WorkPlace
Before you can access your WorkPlace resources, your identity must be verified. Depending
on how your administrator has configured WorkPlace, this might mean selecting a specific login
group (for example, “Employees” or “Partners”), and then providing credentials. You may be
prompted for a username and password, which you can type in or enter by means of a virtual
keyboard, or you may be prompted for some other form of credentials.
1.
If you are presented with a Log in to prompt, select the appropriate group from the list.
(This information is provided by your system administrator.) If the list does not contain the
appropriate name, select Other from the list, and then type the group name in the box below
the Log in to box.
2.
Click Next.
3.
If configured by your administrator, the Acceptable Use Policy screen (AUP) appears. The
AUP displays specific messages or instructions you will need to agree to. Click Accept to
continue. If you do not accept the license agreement, you will not be able to access
WorkPlace.
4.
When prompted for credentials, enter them, and then click Login.
Your administrator can offer an alternative method for providing your credentials using a
virtual keyboard. Some administrators may even require it if, for example, there is concern
that a user’s login credentials might be stolen. To enter your credentials without typing
them, click Use virtual keyboard and point to characters on the keyboard display.
Note
Keyboard entry may not be accepted when using RDP in full screen mode on Mac
OS X.
8 | Aventail E-Class SRA WorkPlace User Guide
Note
5.
Windows users are prompted to install the Access Manager, which takes care of installing
agents and clients through the browser. Once it is installed, you automatically receive client
updates. Click Continue, then click Run and accept the software if any security warnings
appear.
•
The URL you use to log in to WorkPlace is provided by your system administrator.
Depending on how your administrator has configured WorkPlace, all other open browser
windows may automatically close at WorkPlace startup, leaving only the WorkPlace
browser window open.
Your administrator can configure the Access Manager to start automatically when the
operating system starts (Windows only).
In some cases, you may be prompted to accept a security warning before WorkPlace can
start. For more information, see “Using Cache Cleaner” on page 45.
•
•
•
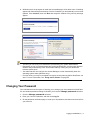
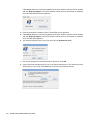
Changing Your Password
Your administrator has the option of allowing you to change your own password in WorkPlace.
If a user-initiated password change is allowed, you’ll see the Change password checkbox.
1.
Click the Change password checkbox.
2.
Enter your current credentials, and then click Log in.
3.
On the password notification page, re-enter your old password, and then enter and confirm
your new one.
Logging In to WorkPlace | 9
Entering Credentials Using the Virtual Keyboard
The administrator can offer you an alternative method of providing your credentials in
WorkPlace using a virtual keyboard. Some administrators will require it if, for example, there is
concern that a user’s login credentials might be stolen.
1.
Click the Use virtual keyboard checkbox: a keyboard is displayed in WorkPlace. (If
your administrator requires that you use the virtual keyboard, it is already displayed.)
2.
Click the letters for the username. To enter a capital letter, first click the Shift key on the
virtual keyboard.
3.
Use your mouse to move the cursor to the password box, and then click the letters for your
password.
Logging Out of WorkPlace
When you have finished working with network resources using WorkPlace, you should log out
to close your session.
To log out, click the Log out button in the upper-right area of the WorkPlace page.
Note
Logging out of WorkPlace ends your WorkPlace session, but it does not log you out of any
applications that are running on your computer. To increase security, it is good practice to
close any browser windows in use by applications before you log out of WorkPlace,
especially if you are working on a computer that is shared with other users.
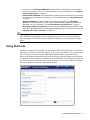
Accessing Network Resources
You can use several methods to access a specific resource. Depending on how your
administrator has configured WorkPlace, some access methods may not always be available.
•
Shortcuts: The WorkPlace home page displays any shortcuts that your administrator has
configured for you. You can click these links to directly access selected Web applications,
network shares or folders, or terminal servers. For more information, see “Using
Shortcuts” on page 11.
10 | Aventail E-Class SRA WorkPlace User Guide
•
•
•
•
Note
You can use the Intranet Address box at the bottom of the page to access a Web
resource, a network resource, or a terminal server. For more information, see “Using the
Intranet Address Box” on page 12.
Personal Bookmarks: You may be able to create your own bookmarks for quick access
to resources such as URLs and file shares. For more information, see “Using Bookmarks”
on page 14.
Access methods: To find out what access agents are running, click Details in
WorkPlace. Your administrator may also make client installation packages available for
download. For more information, see “Access Methods and Resources” on page 7.
Browsing network resources: You can use the WorkPlace Network Explorer page
to browse a Windows network, including shared folders and files. For more information, see
“Working with Folders and Files” on page 15.
Accessing some items may require you to log in, if special permissions are required for that
item. WorkPlace first attempts to access network share resources using your WorkPlace
login credentials; if the resource requires different credentials, you are prompted to supply
them.
Using Shortcuts
WorkPlace shows the shortcuts that your administrator has configured for you. How they are
organized—in groups, or on different pages—is up to your administrator. You can click these
links to directly access Web content, applications, shared folders, or terminal servers.
Shortcuts to Windows Terminal Services or Citrix resources provide an Edit icon to allow you
to change the screen resolution, if enabled by your administrator. Any changes you make will
be used every time you click the shortcut for that resource. If you do not make any changes,
the screen resolution set by your administrator is used.
Accessing Network Resources | 11
To access a resource using a shortcut
Click the shortcut name for the resource you want to access. Web resources and terminal
server resources open in a new browser window. Shared folders or files open in a separate
Network Explorer window.
Note
If using Google Chrome to access a Web resource and a blank page appears, disable the
Use hardware acceleration when available option in Google Chrome.
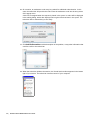
To configure the screen resolution for a resource
Click the Edit icon for the resource shortcut to open the Manage custom links dialog box.
Select one of the following from the Screen resolution drop-down list and then click Save:
•
•
•
•
To use a resolution in the list, select the desired resolution.
To create a custom resolution, select Custom... and then type the desired pixel values
(width x height) into the fields that appear. The minimum supported resolution is 640x480
and the maximum is 4096x2048 pixels.
To set the resource window size as a percentage of your client screen, select Screen
Percent and then type the desired percentage into the percent field that appears.
To use your full screen to display the resource, select Full Screen.
Using the Intranet Address Box
Depending on how your administrator has configured WorkPlace, you may see an Intranet
Address box, which you can use to access network resources, terminal server resources, or,
when WorkPlace is running in translated mode, Web resources.
Note
If using Google Chrome to access a Web resource and a blank page appears, disable the
Use hardware acceleration when available option in Google Chrome.
Accessing Web Resources Using the Intranet Address Box
To access a Web resource, type the URL for the resource in the Intranet Address box, and
then click GO. The Web resource opens in a new browser window.
Note
•
•
If you are accessing a standard HTTP resource, you do not need to type http:// at
the beginning of the URL. However, if you are accessing a secure Web (HTTPS)
resource, you must include the https:// protocol identifier in the URL (https://
intranet.example.com).
To access a Web resource on a non-standard port (other than port 80), include the port
number after the resource’s host name. For example, intranet.example.com:443 and
intranet.example.com:8080/SAP are both valid entries.
12 | Aventail E-Class SRA WorkPlace User Guide
Accessing Network Resources Using the Intranet Address Box
To go directly to a server, computer, or network folder, type the item’s path in the Intranet
Address box, and then click GO. Network Explorer opens in a new browser window,
displaying the contents of the requested folder or file.
When specifying a resource name, use the Windows Universal Naming Convention (UNC)
name, in the format \\ComputerName\ShareName\Path\FileName. For example, to view the
contents of the \sales\proposals folder on the common server, type the following in the
Intranet Address box:
\\common\sales\proposals
Note
•
•
WorkPlace does not support unqualified host names for network resources; you must
type the full UNC name when entering a network resource name in the Intranet
Address box.
Typing an unqualified host name in the Intranet Address box is interpreted as a Web
resource, not a network resource. For example, if you have a Web resource named
intranet.example.com, simply type intranet in the Intranet Address box to access it.
Accessing Terminal Servers Using the Intranet Address Box
To go directly to a terminal server resource, type its URL in the Intranet Address box, and
then click GO. The resource opens in a new browser window.
When specifying a terminal server resource URL, you must include the appropriate protocol
identifier. If a terminal server resource contains multiple hosts, you are prompted to type the
host name or IP address of the specific resource you want to access.
Terminal server type
Identifier
Sample Intranet Address box entry
Windows Terminal Services
rdp://
rdp://private.xyzcompany.com/wts_server
Citrix
citrix://
citrix://private.abccompany.com/
citrix_farm
Accessing Network Resources | 13
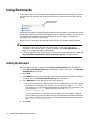
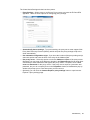
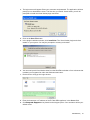
Using Bookmarks
Depending on how your administrator has configured WorkPlace, the home page may include
an area where you can save and access personal links to resources such as URLs and file
shares.
Click here to edit your
personal bookmarks
WorkPlace bookmarks are similar to standard Web browser bookmarks or favorites lists, except
that they are stored on the E-Class SRA appliance, not on a specific computer. You can access
and manage your WorkPlace personal links whenever you are logged in to WorkPlace,
regardless of the computer you are using.
When you click a bookmark, the specified resource opens in a separate browser window.
Note
•
•
To access file shares through WorkPlace bookmarks, you must be running a E-Class
SRA access agent, such as one of the tunnel clients, or you must configure the
bookmark to use a special URL. For more information, see “Adding Bookmarks” on
page 14, or contact your system administrator.
If using Google Chrome to access a Web resource and a blank page appears, disable the
Use hardware acceleration when available option in Google Chrome.
Adding Bookmarks
After you add a bookmark, it appears in the Personal Bookmarks group in WorkPlace.
1.
In the Personal Bookmarks group in WorkPlace, click the pencil icon. The Manage
bookmarks page appears.
2.
Click New.
3.
In the Name box, type a short, descriptive name for the bookmark. This name will appear
as the link text in the Personal Bookmarks group in WorkPlace.
4.
In the Address box, type the URL or path for the resource:
– To create a bookmark for a URL, type the URL in host/path format. If you are creating
a bookmark for a standard HTTP resource, you do not need to type http:// in the
URL. However, if you are creating a bookmark for a secure Web (HTTPS) resource, you
must include the https:// protocol identifier in the URL (https://
intranet.example.com).
– To create a bookmark for a file share resource, type the file share path in Windows
Universal Naming Convention (UNC) format (\\ComputerName\ShareName\Path\File).
For example, to add a bookmark for the sales\proposals folder on the common server,
type \\common\sales\proposals.
5.
Click Save.
14 | Aventail E-Class SRA WorkPlace User Guide
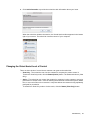
Reordering Bookmarks
You can control the order of your bookmarks (for example, to place the most frequently used
bookmarks at the top of the list).
1.
In the Personal Bookmarks group in WorkPlace, click the pencil icon. The Manage
bookmarks page appears.
2.
Select the check box to the left of any bookmarks you want to move, and then click Move
Up or Move Down. Each click of the button moves the selected bookmarks one position
in the list.
3.
Click Save.
Deleting Bookmarks
You can delete bookmarks that you no longer need.
1.
In the Personal Bookmarks group in WorkPlace, click the pencil icon. The Manage
bookmarks page appears.
2.
Select the check box to the left of any bookmarks you want to delete, and then click
Delete.
3.
Click Save.
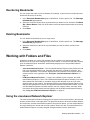
Working with Folders and Files
WorkPlace enables you to work with network files and folders on a network using a Web
browser much as if you were working locally on the network. To access file and folder utilities,
click on Network Explorer. WorkPlace automatically displays one of two possible Network
Explorer interfaces:
•
•
Java based Network Explorer – The Java based Network Explorer has a similar look and
feel to the Windows Explorer tool, featuring drag and drop, multiple file selection, and
bookmark capabilities. The interface displays the local computer in the left pane and the
remote location in the right pane. See “Using the Java-based Network Explorer” on
page 15.
HTML based Network Explorer – If Java is not available on the computer, the HTMLbased Network Explorer is used. The HTML-based Network Explorer enables you to work
with network files and folders on a network using a Web browser much as if you were
working locally on the network. The Network Explorer page displays shared folders or files
that you have permission to access, and provides access to file and folder utilities. You can
use this Network Explorer to browse domains, servers, shares, folders, and files. Small
form-factor devices and mobile devices typically use the HTML-based Network Explorer.
See “Using the HTML-based Network Explorer” on page 21.
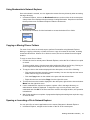
Using the Java-based Network Explorer
The Java-based Network Explorer displays the file system on the local machine in the left pane
and the remote location in the right pane. The right pane allows you to browse network domains
and computers, and their associated file shares. Using the two panes, you can manipulate files
and copy between the remote and local file systems. Users can also set up bookmarks from
within Network Explorer to quickly navigate through networks from the portal level.
Working with Folders and Files | 15
Network Explorer leverages the Java platform browser plug-in to increase usability by
mimicking the common Windows Explorer interface, featuring drag and drop and multiple file
selection capabilities. With the help of the HTTPS protocol, Network Explorer securely transfers
encrypted files and information to and from the EX-Series appliance. The appliance
communicates this data to the individual machines on the remote network.
Note
To use the Java-based Network Explorer, you must have JRE installed on your local
computer. JRE Version 1.6.0 Update 24 or newer is recommended. To download the latest
Java and JRE versions, visit http://www.java.com. If the latest Java and JRE versions are
not installed, an HTML-based Network Explorer is used, as explained in Using the HTMLbased Network Explorer on page 21.
The administrator must enable Network Explorer for users to use it. The remote computer must
have shared folders for files to be copied or moved. Sharing policy must be set from within the
remote computer’s own operating system.
In Network Explorer, each pane has its own controls and displays a Location Bar, which shows
the current path of each window. Entering a path in the Location Bar will take you to the
specified location. Use backward slashes in the path for a Windows resource; otherwise, use
forward slashes.
The remote pane may take some time to refresh, since the application needs to poll the EXSeries appliance for its contents. During such a procedure, the remote pane is grayed out and
a "Cancel" button is displayed. Clicking the Cancel button will cancel the current operation and
revert the remote pane to the previous location.
Note
If the contents of the local or remote pane extend beyond the size of the window, a scroll bar
will appear in the respective pane. You can scroll the window by using the scroll bar or by
using a mouse wheel.
Object properties can be retrieved by right-clicking the item and selecting Properties. A window
displaying the attributes of the object will appear.
16 | Aventail E-Class SRA WorkPlace User Guide
About the Network Explorer Toolbars
Each pane has a toolbar with a set of icons for commonly used operations. Hovering the mouse
cursor over these icons displays convenient tool tips to the user. Dragging the toolbar by the
dotted line on the left side of it, or by an empty area at the right, undocks the toolbar into its own
window. To re-dock the toolbar, simply close the window.
The toolbar for the remote pane includes the Bookmarks button, while the local pane does not.
Bookmarks serve as useful shortcuts to quickly access different network locations. Users can
create bookmarks by using the bookmark option on the right-click menu.
The buttons on the toolbar, from left to right, provide the following functions:
•
•
•
•
•
•
•
•
•
Back: Traverses back in the history. Sets the current view of the window to the previous
location in history. This icon is dimmed if there is no previous history location. Network
Explorer maintains a 20-operation history for each pane.
Forward: Traverses forward in history. This icon is dimmed if there are no forward
locations in history.
Up: Traverses up the directory tree to the parent directory of the current view. This icon is
dimmed if the current view is of the root directory or if the parent directory cannot be
resolved.
Sort: Reverses the order of the listed files.
Refresh: Refreshes the current view by either polling the local file system or remote
network via the appliance. The refresh icon is dimmed in the remote window while its
contents are being refreshed.
New Folder: Creates a new folder within the respective file system. Clicking this icon will
bring up the "New Folder" dialog box, allowing the user to assign a name to the new folder.
This icon is dimmed when the location of the window is such that a new folder cannot be
created. (eg. Root of a Windows filesystem, domain list, machine list)
Copy: Copies the selected file(s)/folder(s) to the location of the remote window. Clicking
this icon will bring up the "Copy" or "Move” dialog box that will show the status information
of the copy procedure. If the file being copied already exists, a new dialog will show up
asking the user whether or not the existing file should be replaced. The copy icon is dimmed
when there are no selected files/folders to copy (eg. Nothing selected, drive or domain is
selected). It is also dimmed if the remote location cannot accept files copied to it (eg.
domain list, machine list).
Delete: Deletes the selected files or folders.
Bookmarks: (Remote pane only) Displays the list of bookmarks. You can create
bookmarks by using the bookmark option on the right-click menu.
Creating Bookmarks in Network Explorer
Bookmarks allow you to avoid lengthy navigations through a remote directory hierarchy,
clicking one folder at a time. Creating a bookmark lets you bypass the hierarchy when
accessing the target directory.
Working with Folders and Files | 17
1.
In the right pane of Network Explorer, navigate to the remote location for which you would
like to create a bookmark.
2.
To set a bookmark to the current directory, right-click in an empty location in the remote
directory and select Add Bookmark from the right-click menu.
3.
Enter a name for the new bookmark in the New Bookmark window that displays, then
click OK.
4.
To set a bookmark for a specific file or folder, right-click the file or folder name and then
select Add Bookmark from the right-click menu.
5.
Enter a name for the new bookmark in the New Bookmark window that displays, then
click OK.
Your bookmarks will also appear in the Personal Bookmarks area of the WorkPlace home
page.
18 | Aventail E-Class SRA WorkPlace User Guide
Using Bookmarks in Network Explorer
Once a bookmark is created, use it to bypass the remote directory hierarchy when accessing
the target directory.
1.
In Network Explorer, click on the Bookmarks button on the tool bar in the remote pane.
A drop-down menu displays with the message Loading Bookmarks. Keep the mouse within
the drop-down menu as Network Explorer loads the bookmarks.
2.
Once the list is loaded, click the bookmark to access the desired file or folder.
Copying or Moving Files or Folders
For ease of use, there are several ways to perform file transfers using Network Explorer.
Moving or copying a directory or folder will move or copy all contents of the folder, including
nested sub-directories. When a file or folder is moved, the item is deleted from the original
location.
To copy or move files or folders:
1.
In either the local or remote pane of Network Explorer, select the file or folder to be copied
or moved.
To select multiple items, click the items while holding the Shift or the Ctrl key. Clicking on
an item again while holding the Ctrl key will de-select it from the group.
2.
To copy the item to the location displayed in the other pane, do one of the following:
– Click-and-drag the item across the center boundary. You can also drop the item onto a
folder name to copy it into that folder.
– Click the Copy button on the toolbar in the pane with the selected item.
– Right-click the item and select Copy from the right-click menu.
3.
To move the item to the location displayed in the other pane, right-click the item and select
Move from the right-click menu.
4.
If user credentials are required to create or replace a file in the target directory, an
authentication window is displayed. To begin the copy or move process, enter your
credentials and click OK. If the item cannot be moved to the target location, the operation
is disallowed.
5.
Wait for the operation to complete. A progress bar displays the waiting time required to copy
or move the files.
Opening or Launching a File in Network Explorer
You can open files or launch applications on the remote filesystem in Network Explorer.
1.
In Network Explorer, navigate to the location of the file in the remote pane.
Working with Folders and Files | 19
2.
Double-click on the desired file to launch it with the proper application.
3.
If activating a file on the remote machine, Network Explorer will first download the file to a
temporary folder on your local machine and then open it. In the Launching dialog box, click
Open to proceed.
The progress of the download is displayed.
4.
After the download completes, a message is displayed saying that you should save any
changes to the file in an appropriate directory, as the file is opened in a temporary location.
Click OK to proceed with opening or launching the file.
Deleting Files or Folders
You can delete files or folders in Network Explorer.
1.
In either the local or remote pane of Network Explorer, select the item you wish to delete.
To select multiple items, click the items while holding the Shift or the Ctrl key. Clicking on
an item again while holding the Ctrl key will de-select it from the group.
2.
Do one of the following to delete the item:
– Click the Delete button on the toolbar in the pane with the selected item.
– Right-click the item and select Delete from the right-click menu.
3.
In the confirmation dialog box, click Delete.
Network Explorer will completely delete the file or folder from the remote machine. In the
case of a folder, all files and folders under that resource will be recursively deleted. These
items are not sent to the recycle bin on either machine and are not recoverable.
20 | Aventail E-Class SRA WorkPlace User Guide
Using the HTML-based Network Explorer
If Java is not installed on the computer, the HTML-based Network Explorer is used. The HTMLbased Network Explorer enables you to work with network files and folders on a network using
a Web browser much as if you were working locally on the network. The Network Explorer page
displays shared folders or files that you have permission to access. You can browse these
domains, servers, shares, folders, and files by clicking links on the Network Explorer page. The
navigation pane at the left displays a list of resources available on your network. The pane on
the right enables you to work with folders and files.
The HTML Network Explorer page provides two modes of operation:
•
•
Folder mode: When working in folder mode, you can browse available folders and their
contents, upload a file to a folder, download multiple files as a compressed file, create a
new folder, or rename or delete a folder. For more information, see “Working with Folders”
on page 22.
File mode: When working in file mode, you can rename, copy, move, delete, or view the
properties of the selected file. For more information, see “Working with Files” on page 23.
Navigation Tips
•
When viewing the contents of a server or folder, the navigation pane shows the full path to
the current folder as a hyperlink. Click any portion of the link to go directly to that folder.
•
To move up one level to the parent folder, click the Up button in the navigation pane:
If you do not have permissions to access the parent folder, this button does not appear.
To update the contents of the navigation pane, click the Refresh button:
This ensures that you are viewing the latest version of a network resource. For example, if
you create a new file or folder and it does not show up in the navigation pane, click the
Refresh button to update the display.
•
Note
Accessing some items may require you to log in, if special permissions are required for that
item. WorkPlace first attempts to access network resources using your WorkPlace login
credentials; if the resource requires different credentials, you are prompted to supply them.
Depending on your network environment, you may be able to access folders on your networked
desktop computer, mobile device, etc. To do this, you must make those folders available using
the Windows Sharing feature on that computer. See your Windows documentation for more
information about sharing folders.
Displaying the HTML Network Explorer Page
You can display the HTML Network Explorer page by doing one of the following (the methods
available to you depend on how your administrator has configured WorkPlace):
•
•
Click an appropriate network shortcut in WorkPlace.
Type a UNC path name in the Intranet Address box.
Working with Folders and Files | 21
Working with Folders
When working with folders, you must have the correct permissions to perform certain actions;
these are the same permissions you would need if you were working directly on the network.
The folder page may include an option for uploading files from your computer to the current
folder. If WorkPlace is not configured to allow uploading files, you will not see this option. For
more information, see Uploading Files on page 25.
Viewing the Contents of a Folder
When you click a folder name, a page appears displaying that folder’s contents. You can
perform a number of different actions within the current folder, such as sorting items and
creating, renaming, and deleting folders.
To view the contents of a folder
In the left navigation pane of the Network Explorer page, click the name of the folder you want
to view. Any subfolders contained in the current folder are displayed in the left navigation pane.
Any files contained in the current folder are displayed on the right.
Sorting Items in a Folder
You can sort the items in the current folder.
In the right pane of the Network Explorer page, in the top row, click Name, Size, or Date to
sort the folder’s contents. The available sort methods are as follows:
Sort method
What it does
Name
Sorts items by file name, alphabetically.
Size
Sorts items by file size, smallest to largest.
Date
Sorts items by the last time they were changed, oldest to newest.
Creating Folders
You can create a folder within the current folder.
1.
In the left navigation pane of the Network Explorer page, click the name of the folder in
which you want to create a new folder.
2.
Click the New Folder button:
3.
In the New Directory Name box, type the name of the folder you want to create, and
then click OK.
Renaming Folders
You can rename the current folder.
1.
In the left navigation pane of the Network Explorer page, right-click the name of the folder
to rename.
2.
Select the Rename option from the right-click menu.
3.
In the Rename to box, type a new name for the folder, and then click OK.
22 | Aventail E-Class SRA WorkPlace User Guide
Deleting Folders
You can delete the current folder if it is empty (to delete a folder that is not empty, first delete
the files in it; see “Deleting Files” on page 26). You are prompted to confirm before deleting
the folder.
1.
In the left navigation pane of the Network Explorer page, click the name of the folder to
delete.
2.
Click the Delete folder button:
3.
Click Delete.
Working with Files
When working with files, you must have the correct permissions to perform certain actions;
these are the same permissions you would need if you were working directly on the network.
Opening Files
You can open a file to display its contents; however, any changes that you make to the file will
not be saved to the network. To modify the contents of a file, you must download a copy of the
file to your computer, save your changes to the copied file, and then upload the new version of
the file to the network.
1.
To open a file, double-click the file that you want to open.
When you open a file, Web content opens in a new browser window, while other files open
in their native applications.
If the application required to open a file cannot be found, you are prompted to save or open
the file.
Note
Certain types of files, such as executable files or data files with proprietary file formats, must
be downloaded or saved (they cannot be opened directly).
Searching for Files
You can search for files in the current folder and any subfolders. The search results are
displayed as a list of links; you can click a link to display a file.
WorkPlace supports the use of wildcards when searching for files, which is useful if you do not
know the full or exact name of the file you are searching for. The supported wildcard characters
are “?” and “*”. The question mark (?) represents exactly one character, and the asterisk (*)
represents any number of characters, including none (zero characters). For example:
Wildcard
What it matches
p*.txt
Any file that begins with p and has a .txt extension (for example, prices.txt or
p.txt)
*.txt
Any file that has a .txt extension (for example, prices.txt or
sales_forecast.txt)
pe?t.txt
Any file that begins with pe followed by any other single character, ends with
t, and has a .txt extension (for example, peat.txt or pest.txt)
Working with Folders and Files | 23
To search for files:
Note
1.
In the left navigation pane of the Network Explorer page, click the name of the folder that
you want WorkPlace to search.
2.
Click the Search button:
3.
In the Search for files box, type the search criteria for the files.
4.
Select the Search subfolders check box to recursively search all folders within the
current folder. If this check box is not selected, only the current folder is searched.
5.
Click Search. The search function returns a maximum of 250 results per search. If a
search returns too many results, narrow your search parameters and try again.
The search function is configured to time out after five minutes. If a search times out, narrow
your search parameters and try again.
Viewing File Details
When you click a file name, a page appears displaying information such as the file size and
creation date. It also lets you perform a number of actions on the current file, such as
downloading, copying, renaming, or deleting it.
To view file details, click the appropriate file name in the right pane of the Network Explorer
page:
Downloading Files
You can download the current file to your local computer.
1.
In the right pane of the Network Explorer page, click the file name of the file you want to
download. The File Details page appears.
2.
Click the Download file button:
In most Web browsers, a dialog box appears prompting you to save or open the file.
Downloading Multiple Files as a Compressed File
You can download multiple files from a folder to your local computer as a compressed file (in
.zip format). This provides a convenient way to download a group of files in a single file, while
minimizing download time over slower network connections.
Only the files in the current folder are downloaded; you cannot include subfolders in a
download.
To download a folder as a compressed file
1.
In the left navigation pane of the Network Explorer page, click the name of the folder that
contains the files you want to download.
2.
In the right pane, select the check boxes next to any files that you want to include in the
download. To select all files in a folder, select the check box at the top of the pane.
24 | Aventail E-Class SRA WorkPlace User Guide
3.
Click the Download selected files button:
4.
Click Download. You are prompted to open the file or save it to your computer. Creating
the compressed file and downloading it may take some time, depending on the size and
number of files.
Compressed files can be uncompressed using any program that can uncompress .zip files,
such as WinZip, PKZIP, or StuffIt. Also, some versions of Windows can uncompress .zip
files.
Uploading Files
The folder page may include an option for uploading files from your computer to the current
folder. If WorkPlace is not configured to allow uploading files, you will not see this option.
1.
In the left navigation pane of the Network Explorer page, click the name of the folder to
which you want to upload the file.
2.
Click the Upload file button:
3.
Next to the Source file box, click Browse to locate the file you want to upload from your
computer.
4.
Click Upload.
Copying Files
You can copy a file to another folder on your network. You can also rename the file at the same
time you copy it. Before copying a file, make sure that the folder to which you want to copy the
file already exists. The destination folder for the copied file can be anywhere on the network.
To copy the current file:
1.
In the right pane of the Network Explorer page, click the name of the file you want to copy.
The File Details page appears.
2.
Click the Copy file button:
3.
In the Destination path box, type the new location for the copied file. You must specify
a path for the file using the UNC name. This takes the following form: \\ComputerName\
ShareName\Path.
4.
If you want to rename the file, type a new file name in the Destination file box.
5.
Click Copy.
Renaming Files
You can rename the current file.
1.
In the right pane of the Network Explorer page, click the name of the file you want to
rename. The File Details page appears.
2.
Click the Rename file button:
In the New file name box, type the new file name, and then click Rename.
Moving Files
You can move a file to another location. You can also rename the file at the same time you move
it. Before moving a file, make sure that the folder to which you want to move the file already
exists.
1.
In the right pane of the Network Explorer page, click the name of the file you want to move.
The File Details page appears.
Working with Folders and Files | 25
2.
Click the Move file button:
3.
In the Destination path box, type the new location for the file. You must specify a path
for the file using the UNC name. This takes the following form: \\ComputerName\
ShareName\Path.
4.
If you want to rename the file, type the new file name in the Destination file box.
5.
Click Move.
Deleting Files
You can delete one or more files from a folder. You are prompted to confirm the deletion.
To delete a single file
1.
In the right pane of the Network Explorer page, click the name of the file you want to delete.
The File Details page appears.
2.
Click the Delete file button:
3.
Click Delete.
To delete multiple files
1.
In the left navigation pane of the Network Explorer page, click the name of the folder that
contains the files to delete.
2.
In the right pane, select the check boxes to the left of any files that you want to delete. To
delete all of the files in the folder, select the check box at the top of the list.
3.
Click the Delete selected files button:
4.
Click Delete.
Virtual Assist
This section describes the Virtual Assist feature from both the technician and client point of
view.
What is Virtual Assist?
Dell SonicWALL’s Virtual Assist is a remote support tool that enables an administrator or help
desk technician to assume control of a user’s PC or laptop to provide remote technical
assistance. With the user’s permission, the technician downloads the executable to the user’s
computer, then gains instant access to the computer to diagnose and fix a problem remotely.
There are two versions of Virtual Assist, the User/Customer View and the Technician View. The
customer is the person requesting assistance on their computer. The technician is the person
providing assistance.
Note
As of release version10.6.0, both user and technician must be running the same version of
the Virtual Assist client, due to incompatibility with earlier versions.
Virtual Assist is fully supported on Windows platforms. Virtual Assist is certified to work on
Windows 8/8.1, Windows 7, and Windows Vista. MAC OS and Linux clients are supported as
standalone executables with full functionality. The Technician App is only supported on
Windows systems.
26 | Aventail E-Class SRA WorkPlace User Guide
A Virtual Assist session consists of the following sequence of events:
1.
The technician launches Virtual Assist from the Aventail WorkPlace.
2.
The technician monitors the Assistance Queue for customers requesting assistance.
3.
The customer requests assistance by one of these methods:
– Logging into the Aventail WorkPlace and clicking on the Assistance button.
– Receiving an email invitation from the technician and clicking on the link to launch
Virtual Assist.
4.
The Virtual Assist application installs and runs on the customer’s system.
5.
The customer appears in the Virtual Assist Assistance Queue.
6.
The technician clicks on the customers name and launches a Virtual Assist session.
7.
The technician’s Virtual Assist window now displays the customer’s entire display. The
technician has complete control of the customer computer’s mouse and keyboard. The
customer sees all of the actions that the technician performs.
8.
If at anytime the customer wants to end the session, they can take control and click on an
End Virtual Assist button in the bottom right corner of the screen.
9.
When the session ends, the customer resumes sole control of the computer.
Using Virtual Assist from the Technician View
Technicians can connect to the SSL VPN appliance through two methods:
• If you are on the same LAN as the appliance, you can connect directly using the appliance’s
internal IP address.
• If you are not on the same LAN as the appliance, connect through OnDemand Tunnel, and
then point your browser to the appliance.
Note
If you already have the Virtual Assist client installed, you can launch it, then log in through
the client interface. However, as the Virtual Assist client will not prompt for a password
change, do not use this method with a new technician user account where the “User must
change password at next login” option is enabled.
Installing the Virtual Assist Application
To launch a Virtual Assist session as a technician, perform the following steps.
1.
Log in to the appliance management console and click Virtual Assist from the main
navigation page.
2.
Under the Downloads heading, click the Download link for the technician application.
3.
A file opening dialog box appears for the VASAC.exe file. Click Save File.
Virtual Assist | 27
4.
An Open File - Security Warning pop-up window displays for the application. Click Run.
The Virtual Assist client installs and launches. For the login procedure, see “Launching a
Virtual Assist Technician Session” on page 31.
Selecting a Virtual Assist Mode
When you first launch Virtual Assist, by default it will be in customer mode. To change the mode,
perform the following steps.
Note
Virtual Assist is not supported on Macintosh PCs software version 10.6 or 10.7. Instead,
clicking the Assistance button opens a blank window.
1.
Click Change Mode to select one of four possible modes.
The four Virtual Assist modes are:
– Customer - Select this mode to request support. For information on customer mode,
see the Using Virtual Assist from the Client View on page 36.
– Unattended - Select this mode to receive support help while you are away from your
computer. You will be prompted to enter a password, which the technician can then
enter and assume control of your system without further confirmation from you. For
information on unattended mode, see the Using Virtual Assist in Unattended Mode on
page 44.
– Technician - Select this mode to service customers by remotely controlling their
systems. For information on technician mode, see Launching a Virtual Assist
Technician Session on page 31.
– Virtual Access - Select this mode to make your computer remotely accessible at all
times from the Aventail E-Class SRA appliance.
2.
Click Change Mode again to login with the selected mode. You may be presented with
additional screens, depending on the mode selected.Aventail E-Class SRA WorkPlace
User Guide
Configuring Virtual Assist Settings
The Virtual Assist Settings window can be accessed either by clicking the Settings button in
the top left corner of the application window or by right-clicking on the Virtual Assist icon in the
taskbar and selecting Settings.
28 | Aventail E-Class SRA WorkPlace User Guide
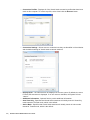
The Virtual Assist Settings window has three panes:
•
Proxy Settings - Allows users to configure a Proxy server to access the E-Class SRA
appliance. There are three options for configuring proxy settings.
•
Automatically detect settings - To use this setting, the proxy server must support Web
Proxy Auto Discovery Protocol (WPAD), which can push the proxy settings script to the
client automatically.
Use automatic configuration script - If you know the location of the proxy settings script,
select this option and enter the URL of the script in the Address field.
Use proxy server - Select this option to enter the Address and Port of the proxy server.
Optionally, you can enter an IP address or domain in the Bypass Proxy field to allow direct
connections to those addresses that bypass the proxy server. If required, enter a User
name and Password for the proxy server. If the proxy server requires a username and
password, but you do not specify them in the Properties window, a NetExtender pop-up
window will prompt you to enter them when you first connect.
Optionally, you can click the Internet Explorer proxy settings button to open Internet
Explorer’s proxy settings page.
•
•
•
Virtual Assist | 29
•
Connection Profiles - Displays all of the Virtual Assist connection profiles that have been
used on this computer. To remove a profile, select it and click the Remove button.
•
Connection Settings - Allows users to customize how they are identified in Virtual Assist
and the default settings of Virtual Assist customer sessions.
•
Display Name - The name that will be displayed in the user queue. By default, the users
E-Class SRA username is displayed. If no user name is available, the system will use
“vauser.”
Additional Information - Optional field to provide additional information.
Auto View Only - Specifies that Virtual Assist sessions will initially launch in View-Only
mode instead of Trusted mode, which is the default.
Active Mode - Specifies that Virtual Assist sessions will initially launch in Active mode
instead of Trusted mode, which is the default.
•
•
•
30 | Aventail E-Class SRA WorkPlace User Guide
•
Full Color/Gray Scale- If you specify Auto View Only, you can also choose whether to
display the Virtual Assist window in full color or gray scale (black and white).
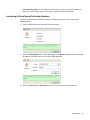
Launching a Virtual Assist Technician Session
To launch a Virtual Assist technician session to remotely assist customers, perform the
following steps.
1.
Launch Virtual Assist and select the Technician Mode.
2.
Click the Change Mode button at the lower right. In the Server pull-down menu, select the
IP address or domain name of the E-Class SRA appliance.
3.
Enter the Username and Password for the technician account on the appliance.
Virtual Assist | 31
4.
Click Login.The Select Domain window displays.
5.
Select the Domain that the username is configured for and click OK.
6.
The Virtual Assist standalone application launches. The Technician toolbar appears.
You can also access the Technician toolbar by clicking on the Assistance button in Aventail
Workplace
7.
Click the Viewer icon to expand to the Virtual Assist desktop.
The technician is now ready to assist customers.
32 | Aventail E-Class SRA WorkPlace User Guide
Performing Virtual Assist Technician Tasks
To get started, the technician logs into the E-Class SRA appliance and launches the Virtual
Assist application from the Home menu.
Note
Each technician can only assist one customer at a time.
By default, the Virtual Assist window launches with the Virtual Assist toolbar at the top; the rest
of the window is dedicated to the customer’s screen.To display the most common panes, either
click Expand or click View > Classic Layout. This will display the following panes:
Email Invite
Logging
• Chat
• Service
You can also use the Invite, Chat, and Service buttons on the toolbar to initiate these functions.
•
•
From the Virtual Assist application, the technician can assist customers by performing the
following tasks:
•
•
•
Inviting Customers by Email on page 33
Assisting Customers on page 33
Using the Virtual Assist Taskbar and Tab Controls on page 35
Inviting Customers by Email
1.
To invite a customer to Virtual Assist, use the email invitation form on the left of the Virtual
Assist window. If it is not displayed, click the Invite button in the toolbar. A popup window
will appear.
2.
Enter the customer’s email address in the Customer E-mail field.
3.
Optionally, enter Technician E-mail to use a different return email address than the default
technician email. Some mail servers require that an email address be entered, and that it
be on a valid domain.
4.
Optionally, enter an Additional Message to the customer.
5.
Click Invite. The customer will receive an email with an HTML link to launch Virtual Assist.
Customers requesting assistance will appear in the Assistance Queue, and the duration of time
they have been waiting will be displayed.
Assisting Customers
A pop-up window in the bottom right task bar alerts the technician when a customer is in the
assistance queue. The customer queue is also displayed in the Service window.
1.
Double-click on a customer’s user name to begin assisting the customer.
Virtual Assist | 33
2.
The customer’s entire desktop is displayed in the bottom right window of the Virtual Assist
application.
The technician now has complete control of the customer’s keyboard and mouse. The customer
can see all of the actions that the technician performs.
Note
After taking control of the user’s system the Technician cannot access functions that require
administrator privileges unless the user logs in with administrator privileges. In some cases, it is
necessary for the user to complete a task before the Technician can continue.
During a Virtual Assist session, the customer is not locked out of their computer. Both the
technician and customer can control the computer, although this may cause confusion and
consternation if they both attempt “to drive” at the same time.
A small tool bar is shown in the bottom right of the screen. The top bar changes to indicate
Trusted (blue), Active (green), and View Only (gray).
34 | Aventail E-Class SRA WorkPlace User Guide
The tool bar contains the following customer options:
•
•
•
Status (Trusted/Active/View Only)- Toggles between modes to indicate the current status.
Trusted indicates the whether the customer’s site is in a Trusted zone, and Active indicates
the customer is currently being assisted. In View Only mode the technician can view the
customer’s computer but cannot control it.
Chat - Initiates a chat window with the technician.
End Virtual Assist - Terminates the session.
Using the Virtual Assist Taskbar and Tab Controls
The Technician’s view of Virtual Assist includes a Taskbar with a number of options.
Invite - Displays the Email Invite pane.
• Chat - Displays the chat window to communicate with the customer.
• Service - Displays the service queue of customers awaiting service.
• Logging - Displays the log window.
• Viewer - Displays or hide the entire Virtual Assist window.
• Options - Displays Connection Profile and Connection Settings options.
• Expand - Displays the Email Invite, Service, Logging, and Chat panes.
• About - Displays the version information for the Virtual Assist client.
Other functions can be performed by:
•
•
•
•
•
Clicking the _ button in the bottom right corner of the Taskbar will minimize the view so only
the titles of the buttons are displayed, and not the icons.
Clicking the folder icon on the collapsed Taskbar will restore the icon view.
Clicking the x in the top right of the corner closes Virtual Assist.
Selecting View > Tab Controls for Current Customer displays additional shortcuts and
controls:
The following options appear at the top of the Virtual Assist window.
•
•
•
•
•
•
•
•
•
•
Full Screen - Expands the Virtual Assist window to the technicians entire monitor.
Auto Scaling - Fits the customer’s screen to the Virtual Assist window.
Zoom - Customizes the zoom of the customer’s screen.
True Size - Zooms to the actual size of the customer’s monitor resolution.
Refresh - Refreshes the customer’s screen.
File Transfer - Opens the File Transfer utility.
Chat - Opens a chat window with the customer.
Reboot Customer - Reboots the customer’s system.
Active Screens - If more than one screen is in use, you can view any of the screens or
choose to view all of them.
Request Full Control - Take full control of the customer screen without requiring
prompts. The customer will be asked to confirm this action.
Virtual Assist | 35
Using Virtual Assist from the Client View
During a Virtual Assist session, you are not completely locked out of your computer. Both the
technician and customer can control the computer, although this may cause confusion and
consternation if they both attempt to “drive” at the same time. You can resume control when the
technician is not actively typing or moving the mouse. And you can end the session at any time
by clicking the End Virtual Assist button in the bottom right corner.
Click the Chat button or enter Alt-c to open an instant message style chat session with the
technician.
The technician can also open a Chat window to communicate with you. To chat, type text in the
Chat window and press Enter or click Send.
The customer will first need to download and run the .exe file provided on the login page.
Initiating Virtual Assist on a Windows Client
To launch a Virtual Assist customer session to request help on your Windows computer, you
need the Virtual Assist client application. There are two methods to access the client
application:
•
Log into Aventail WorkPlace and click the Assistance button.
You will be prompted to download the client application.
View an email invitation and click on the link in the email. The Virtual Assist plugin will be
installed.
The steps for the first method are described here. To download the client from WorkPlace and
launch a Virtual Assist customer session to request help:
•
1.
Log in to the Aventail WorkPlace interface.
2.
If one has been configured for you, you may have an acceptable use policy agreement
(AUP) displayed to you. Accept the AUP by clicking the Accept button. (Clicking Decline
will terminate the session.)
36 | Aventail E-Class SRA WorkPlace User Guide
3.
The login screen will appear. Enter your username and password. The application will then
prompt you to download the client. The first time you launch Virtual Assist, you will be
prompted to install the Virtual Assist plugin and client.
4.
Click on the Save File button.
5.
In the plugin installation window, click Install Now. The Virtual Assist plugin and client
installs on your system. You may be prompted to restart your browser.
6.
You can now launch Virtual Assist either from the WorkPlace window or from a shortcut that
is added your Programs list under the Windows start button.
7.
Double-click to bring up the login window.
8.
Enter the hostname or IP address of the E-Class SRA appliance in the Server field.
9.
Click Request Support to be placed into the support queue. Your username will be your
default name.
Virtual Assist | 37
10. On occasion, an assistance code many be needed for additional authentication. In this
case, the technician will provide the code. Enter the assistance code into the entry areas
of the popup menu.
A ticket ID is assigned when the request is placed in the queue. Its value will be displayed
in the waiting dialog, which also displays how long the ticket has been in the queue. The
technician will be alerted that you are ready.
11. Click Add Information to add a description of the problem, or any other information that
could be useful to the technician.
12. When the technician initiates the session, the Virtual Assist toolbar appears in the bottom
right of your screen. The technician now has control of your computer.
38 | Aventail E-Class SRA WorkPlace User Guide
Initiating Virtual Assist on a Mac OS Client
To launch a Virtual Assist customer session to request help on your Mac OS computer, you
need the Virtual Assist client application. There are two methods to access the client
application:
Log into Aventail WorkPlace and click the Assistance button.
• View an email invitation and click on the link in the email. The Virtual Assist plugin will be
installed.
The client is downloaded as a compressed tgz archive. You will need to extract the archive.
After the archive is extracted, you will see the Virtual Assist App folder. You can then drag this
folder to the Applications folder to install the client.
•
You can also download the Virtual Assist client from the Aventail Management Console (AMC)
on the Virtual Assist page.
Click on Assistance to access the download menu.
To download the client from WorkPlace and launch a Virtual Assist customer session to request
help:
1.
Log in to the Aventail WorkPlace interface.
2.
Click on the Allow button. A plugin installation window displays. Click Install Now. The
Virtual Assist plugin and client installs. You may be prompted to restart your browser.
3.
You can now launch Virtual Assist either from the WorkPlace window or from a shortcut that
is added your Programs list.
Virtual Assist | 39
4.
If the Server address is not auto-propagated in the login window, enter the Server address
and click Request Support. The server address can be either an IP address or hostname
of the E-Class SRA appliance.
5.
Enter the hostname or address of the E-Class SRA server appliance.
6.
Click Request Support to be placed into the support queue. Your username will be your
default name.
You may be prompted to enter an Assistance Code
.
7.
You may be prompted to read and accept a disclaimer. Click OK.
8.
A pop-up window indicates that you are in the Virtual Assist queue. The technician will be
alerted that you are ready. Your ticket ID number will be displayed at the bottom of the
screen. Click Cancel to cancel the Virtual Assist request
.
40 | Aventail E-Class SRA WorkPlace User Guide
9.
Click Add information to provide the technician any additional information about your
issue.
When the technician initiates the session, the Virtual Assist toolbar appears in the bottom
right of your screen. The technician now has control of your computer.
Initiating Virtual Assist on a Linux Client
Note
Virtual Assist is fully tested on the Ubuntu distribution of Linux. It has not been tested on
other Linux distributions.
To launch a Virtual Assist customer session on your Linux computer, you can either:
•
•
Respond to an invitation from the Technician
Perform the steps shown below
To launch Virtual Assist:
1.
Log into Aventail WorkPlace and click the Assistance button to download the client. The
client will be downloaded as a compressed tgz archive. Extract the files. You will see a
Virtual Assist folder.
2.
Go to the command line shell. Execute sudo /install on the folder.
3.
Then type VirtualAssistGUI on the command line. The application will open.
Virtual Assist | 41
If the Server address is not auto-propagated in the login window, enter the Server address
and click Request Support. The server address can be either an IP address or hostname
of the E-Class SRA EX-Series appliance.
4.
Enter the hostname or address of the E-Class SRA server appliance.
5.
If the Server address is not auto-propagated in the login window, enter the Server address
and click Request Support. The server address can be either an IP address or hostname
of the E-Class SRA appliance.
6.
You will be prompted to enter your user name and an Assistance Code.
7.
You may be prompted to read and accept a disclaimer. Click OK.
8.
A pop-up window indicates that you are in the Virtual Assist queue. The technician will be
alerted that you are ready. Click Cancel to cancel the Virtual Assist request.
42 | Aventail E-Class SRA WorkPlace User Guide
9.
Click Add information to provide the technician with information about your issue.
When the technician initiates the session, the Virtual Assist toolbar appears in the bottom
right of your screen. The technician now has control of your computer.
Changing the Virtual Assist Level of Control
There are three levels of control that a customer can grant to the technician:
•
View Only - The technician can view the customer’s computer but cannot control it.
To switch to View Only mode, click the Status (Active) button. The Status switches to (View
Only).
•
Active - The technician can control the customer’s computer, but the customer must give
permission for certain action—such as allowing the technician to reboot the system, delete
files, or over-write files on the customer’s computer without the customer being repeatedly
prompted for permission.
To switch from View Only mode to Active mode, click the Status (View Only) button.
Virtual Assist | 43
•
Trusted - The technician has complete control of the customer’s computer. To toggle
between Trusted mode and Active mode, enter Ctrl-Alt-T.
By default, Virtual Assist sessions are launched in Trusted mode. To modify this, click the
Settings button on the top left corner of the window, select the Connection Settings tab and
select either Auto View Only or Active Mode.
Ending a Virtual Assist Session
You can end the Virtual Assist session at any time. To end the session, click on the Exit Virtual
Assist button in the bottom right corner of the screen, or enter Alt-q. This will end the
technician’s control of your computer.
Using Virtual Assist in Unattended Mode
Note
Unattended Mode is supported only on Windows clients.
Unattended Mode allows customers to set their computer to be accessible by a technician at a
later time when the customer will not be available to click to confirm their consent.
To set your computer for Virtual Assist Unattended Mode:
1.
Launch Virtual Assist.
2.
Click Change Mode, select Unattended, and click Change Mode again.
3.
Select or enter the IP address or domain name of the SSL VPN server.
44 | Aventail E-Class SRA WorkPlace User Guide
4.
Enter a Password and click Login. The Waiting window displays and shows the length of
time you have been in the queue.
5.
You need to provide the technician with the password you just defined. An easy way to do
this is to click Add Information and give the technician your password.
6.
Click the Assistance button at the top right of the main page. If the Assistance button is not
displayed, contact your administrator to enable Assistance on your WorkPlace layout.
Cache Cleaner and Secure Virtual Desktop
Your system administrator can configure WorkPlace to require Cache Cleaner or Secure Virtual
Desktop for data protection. Both Cache Cleaner and Secure Virtual Desktop provide data
security by removing sensitive information from your computer after each session. This is
especially important when you access your remote network from public computers, such as
those found in Internet kiosks or hotel business centers.
Note
Secure Virtual Desktop is supported only on Windows clients. Cache Cleaner is supported
on clients running Windows or Mac OS X.
Cache Cleaner and Secure Virtual Desktop perform cleanup actions and then exit when you do
any of the following:
Click Logout on the WorkPlace portal page
• Close the browser window in which WorkPlace is running
• Manually exit Secure Virtual Desktop
• Are inactive for a certain period of time (determined by your administrator)
Before it exits, Cache Cleaner removes all temporary data cached by any Web browser used
during your network session, including cookies, browser history, stored passwords, autocompletion text, downloaded files, and temporary files.
•
Before exiting, Secure Virtual Desktop closes any applications open within the desktop
emulator, removes all programs installed via the desktop emulator, and deletes all data
downloaded from the VPN and exits all VPN client programs. As part of the data deletion
process, Secure Virtual Desktop obfuscates the data by writing random or “zeroed” data over it.
Using Cache Cleaner
When enabled, Cache Cleaner automatically downloads and runs each time you log in to
WorkPlace. Cache Cleaner will prompt you to accept a security warning that is displayed at
WorkPlace startup.
To start Cache Cleaner
During WorkPlace startup, in the security warning dialog box that appears, click Continue.
Note
To prevent the security warning dialog box from appearing in the future, before clicking
Continue expand Show Options and select the Always trust connections to websites
identified by this certificate check box.
Cache Cleaner and Secure Virtual Desktop | 45
The Cache Cleaner icon appears in the taskbar notification area, and Cache Cleaner runs in
the background during your network session.
Cache Cleaner Icon
If configured by your administrator, you can disable Cache Cleaner. Once disabled, you can
enable it again. If this option is not allowed by your administrator, the Disable selection will be
grayed out in the right-click popup menu.
To disable Cache Cleaner
Right-click the Cache Cleaner icon and select Disable in the popup menu.
To enable Cache Cleaner
Right-click the Cache Cleaner icon and select Enable in the popup menu.
At the end of your network session, Cache Cleaner removes any temporary data stored on your
system.
To exit Cache Cleaner
Log out of WorkPlace.
Upon logout, WorkPlace advises you that it will close all browser windows. A dialog box is
displayed to notify you of this action and confirm your logout. To close all browser windows,
click OK. To leave your browser windows open, click Cancel. If you select Cancel, your cached
data will be deleted when all browser windows are closed.
Using Secure Virtual Desktop
When enabled, Secure Virtual Desktop automatically downloads and runs each time you log in
to WorkPlace. You are initially required to download and install the client component manager,
Aventail Access Manager, as part of WorkPlace portal access. Aventail Access Manager
automatically deploys Secure Virtual Desktop on your computer. This includes download and
installation the first time, but returning users do not repeat the download process unless a new
version is available.
If Secure Virtual Desktop displays a security warning at WorkPlace startup, accept the security
warning.
To start Secure Virtual Desktop
During WorkPlace startup, in the security warning dialog box that appears, click Continue.
Note
To prevent the security warning dialog box from appearing in the future, before clicking
Continue expand Show Options and select the Always trust connections to websites
identified by this certificate check box.
46 | Aventail E-Class SRA WorkPlace User Guide
When launch is complete, you will see the Secure Virtual Desktop background desktop image
and browser portal page. The Secure Virtual Desktop icon appears in the taskbar notification
area, and Secure Virtual Desktop runs in the background during your network session.
Secure Virtual Desktop icon
While running Secure Virtual Desktop, you can launch new browser windows, use browser addins, and run locally installed applications. You can save data to files within the desktop emulator
session for purposes of uploading. You can also download and install new programs within the
context of the desktop emulator. These programs are only accessible within the Secure Virtual
Desktop window.
All data transferred to the client file system via the WorkPlace portal session is protected from
access by any application running outside the desktop emulator session. This prevents opening
the file outside the context of Secure Virtual Desktop.
If enabled by your administrator, you can switch between Secure Virtual Desktop and your
normal desktop.
To switch between the Secure Virtual Desktop window and your normal desktop
Right-click the Secure Virtual Desktop icon and select Switch in the popup menu.
You can also use the right-click menu to exit Secure Virtual Desktop.
To exit Secure Virtual Desktop
Right-click the Secure Virtual Desktop icon and select Exit in the popup menu.
At the end of your network session, Secure Virtual Desktop closes any applications open within
the desktop emulator, removes all programs installed via the desktop emulator, and deletes all
data downloaded from the VPN and exits all VPN client programs. As part of the data deletion
process, Secure Virtual Desktop obfuscates the data by writing random or “zeroed” data over it.
Upon logout, WorkPlace advises you that it will close all browser windows. A dialog box is
displayed to notify you of this action and confirm your logout. To close all browser windows,
click OK. To leave your browser windows open, click Cancel. If you select Cancel, your cached
data will be deleted when all browser windows are closed.
Cache Cleaner and Secure Virtual Desktop | 47
Troubleshooting
This section describes how to troubleshoot basic connection problems.
Viewing Connection Status Information
If you are having trouble accessing your network resources through WorkPlace, your system
administrator may ask you for connection status information. You can view status information
for any enabled access methods by clicking the Details link in the connection status area in
WorkPlace. This displays the WorkPlace System status page, which includes information
that can be helpful in troubleshooting connection problems.
In the Aventail agents area of the System Status page, you can click an agent’s
Details link to view additional connection status information.
Viewing Security Zone Information
Depending on how your administrator has configured WorkPlace, the System status page
may display information about your current security zone. Your zone is determined by your
environment or the type of computer you are using to access WorkPlace. For example, if you
log in to WorkPlace from a laptop that your IT department owns and maintains, you may be
placed in a more “trusted” zone than if you are logging in from an airport kiosk.
Your zone status may determine whether an E-Class SRA data security agent (such as Cache
Cleaner or Secure Virtual Desktop) is deployed. This zone information can also be helpful in
troubleshooting WorkPlace problems.
Troubleshooting Tips
This section describes how to troubleshoot basic WorkPlace problems.
Troubleshooting Full Network Access Problems
If you are having trouble connecting to your network resources with full network access, see if
your problem is addressed in the following list of troubleshooting tips. If the problem persists,
contact your system administrator.
•
•
•
•
•
If you use a personal firewall, you must configure the firewall before you can access your
network resources. To do this, configure the firewall to allow ngvpnmgr.exe to access the
Internet, and add the remote network’s host name or IP address as a trusted host or zone.
For more information, contact your system administrator.
Depending on how your administrator has configured WorkPlace, your local network
resources may be unavailable when you are connected to the VPN. If you are unable to
access a local network resource, such as a network printer, quit the access agent or log out
of WorkPlace and then try again.
If you are a restricted user (that is, without administrative privileges), ensure that your Web
browser is configured to support Java. Note that you must be running the Java Runtime
Environment (JRE); the Microsoft JVM is not supported.
If you are an unrestricted user, ensure that your Web browser is configured to enable either
ActiveX controls or Java.
If you are prompted to enable the ActiveX control in your Web browser, be sure to click Yes.
48 | Aventail E-Class SRA WorkPlace User Guide
•
•
If you receive an error message indicating that the tunnel could not be established, contact
your system administrator for more information.
If you have full network access, you will see an icon in the taskbar notification area. If the
access agent stops running or if you experience an interruption in service, a connectionstatus alert appears above this icon. The information displayed in this alert may be helpful
in troubleshooting the problem.
Troubleshooting Agent Provisioning or Activation Problems
The first time you log in to WorkPlace, you may be prompted to install Aventail Access Manager.
It installs and manages updates for any agents required to access your network. If an error
occurs during the installation process, it is recorded in a log file that your system administrator
can use to troubleshoot the problem. Once Aventail Access Manager is installed, the only other
time you may be (briefly) aware of it is when an agent needs to be updated.
If you are having trouble installing or using an access agent, try the following:
Enable ActiveX in your Web browser.
Enable Java in your Web browser.
• Install the Java Runtime Environment (JRE) on your system.
• If you use a personal firewall, you may be prompted to block or permit access to Aventail
Access Manager when you install it, or when you try to run an access agent. This dialog
may pop up behind the WorkPlace browser window: if your login seems stalled, check to
see if a security dialog is awaiting a response from you. If you are prompted, choose to
permit access.
• Have your system administrator grant you the privileges required to install software on your
computer.
After you have corrected the problem, click Clear system profile on the System status
page to re-initialize your system, log out of WorkPlace, and then log in again.
•
•
In some cases, an access agent may not be activated due to a general connection error. If this
occurs, log out of WorkPlace and then log in again.
Troubleshooting | 49
50 | Aventail E-Class SRA WorkPlace User Guide
Appendix A
Support Information
This appendix contains the following sections:
•
•
•
•
•
Contact Information on page 51
GNU General Public License (GPL) Source Code on page 51
Limited Hardware Warranty on page 51
End User Product Agreement on page 58
Third-party Packages on page 66
Contact Information
For timely resolution of technical support questions and the latest technical support telephone
numbers, visit Dell SonicWALL on the Internet.
Support Contact Information:
Contact Support Page - http://www.sonicwall.com/us/support/contact.html
Contact Dell SonicWALL Page - http://www.sonicwall.com/us/company/286.html
GNU General Public License (GPL) Source Code
Dell SonicWALL will provide a machine-readable copy of the GPL open source on a CD. To
obtain a complete machine-readable copy, send your written request, along with a certified
check or money order in the amount of US $25.00 payable to "Dell SonicWALL, Inc." to:
General Public License Source Code Request
Dell SonicWALL, Inc. Attn: Jennifer Anderson
2001 Logic Drive
San Jose, CA 95124-3452
Limited Hardware Warranty
DELL SonicWALL
END USER LICENSE AGREEMENT Ver. 1.3
TYPE-A SOFTWARE
THIS IS A LEGAL AGREEMENT BETWEEN YOU (EITHER AN INDIVIDUAL OR AN ENTITY)
AND DELL PRODUCTS L.P. OR DELL GLOBAL B.V. (SINGAPORE BRANCH), ON BEHALF
OF DELL INC. AND ITS WORLDWIDE SUBSIDIARIES AND AFFILIATES (COLLECTIVELY,
"Dell" OR “DELL”), WHICH GOVERNS YOUR USE OF THE SOFTWARE. THE SOFTWARE
SHALL MEAN COLLECTIVELY THE SOFTWARE PROGRAM, THE ASSOCIATED MEDIA,
PRINTED MATERIALS, ONLINE OR ELECTRONIC DOCUMENTATION, AND ANY COPIES
THEREOF, TO WHICH THIS AGREEMENT IS ATTACHED OR OTHERWISE ASSOCIATED
(the “Software” or “SOFTWARE”). PLEASE READ THE TERMS AND CONDITIONS OF THIS
Contact Information | 51
AGREEMENT CAREFULLY, INCLUDING, WITHOUT LIMITATION, ANY SUPPLEMENTAL
TERMS AND CONDITIONS APPEARING OR REFERENCED BELOW, WHICH ARE HEREBY
MADE PART OF THIS END USER LICENSE AGREEMENT (COLLECTIVELY, “EULA”),
BEFORE DOWNLOADING, INSTALLING, ACTIVIATING AND/OR OTHERWISE USING THE
SOFTWARE. BY EXPRESSLY ACCEPTING THESE TERMS OR DOWNLOADING,
INSTALLING, ACTIVATING AND/OR OTHERWISE USING THE SOFTWARE, YOU ARE
AGREEING THAT YOU HAVE READ, AND THAT YOU AGREE TO COMPLY WITH AND TO
BE BOUND BY THE TERMS AND CONDITIONS OF THIS EULA AND ALL APPLICABLE
LAWS AND REGULATIONS IN THEIR ENTIRETY WITHOUT LIMITATION OR
QUALIFICATION. IF YOU DO NOT AGREE TO BE BOUND BY THE TERMS AND
CONDITIONS OF THIS EULA, THEN YOU MAY NOT DOWNLOAD, INSTALL, ACTIVATE OR
OTHERWISE USE ANY OF THE SOFTWARE AND YOU MUST PROMPTLY RETURN THE
SOFTWARE AND ANY HARDWARE TO WHICH IT IS ATTACHED, AS DIRECTED BY DELL
OR ITS RESELLER (IF APPLICABLE) FOR A FULL REFUND. IF YOU ARE AN INDIVIDUAL
REPRESENTING AN ENTITY, YOU ACKNOWLEDGE THAT YOU HAVE THE APPROPRIATE
AUTHORITY TO ACCEPT THESE TERMS AND CONDITIONS ON BEHALF OF SUCH
ENTITY.
1.
License. Subject to the terms, conditions and limitations of this EULA and timely payment
by you, Dell hereby grants you a limited, nonexclusive, nontransferable, non-assignable
license, without rights to sublicense, to install or have installed, display and use the
Software (in object code only) only on as many computers, devices and/or in such
configurations as you are expressly entitled (e.g., as set forth in the applicable Dell sales
quote). The terms and conditions of this EULA will govern use of the Software and any
upgrades, updates, patches, hotfixes, modules, routines and/or additional versions of the
Software provided by Dell, at Dell's sole discretion, that replace and/or supplement the
original Software (collectively, “Update”), unless such Update is accompanied by or
references a separate license agreement in which case the terms and conditions of that
agreement will govern. If this EULA governs your use of an Update, such Update shall be
considered Software for purposes of this EULA. Unless earlier terminated as provided
herein, the term of each individual license granted under this EULA begins on the date of
acceptance of this EULA, and continues only for such period as you have purchased, in the
case of a term license, and is perpetual if no term is specified. Customer may use only
portions of Software for which it has paid the applicable license fee.
2.
License Limitations. You may not copy the Software except for a reasonable number of
copies solely as needed for backup or archival purposes or as otherwise expressly
permitted in Section 1 “License” above. You may not modify or remove any titles,
trademarks or trade names, copyright notices, legends, or other proprietary notices or
markings on or in the Software. The rights granted herein are limited to Dell's and its
licensors' and suppliers' intellectual property rights in the Software and do not include any
other third party's intellectual property rights. If the Software was provided to you on
removable media (e.g., CD, DVD, or USB drive), you may own the media on which the
Software is recorded but Dell, Dell's licensor(s) and/or supplier(s) retain ownership of the
Software itself and all related intellectual property rights. You are not granted any rights to
any trademarks or service marks of Dell. This EULA does not apply to any third party
software that is not included as part of the Software. The use of any other software,
including any software package or file, whether licensed to you separately by Dell or by a
third party, is subject to the terms and conditions that come with or are associated with such
software.
3.
Rights Reserved. THE SOFTWARE IS LICENSED, NOT SOLD. Except for the license
expressly granted in this EULA, Dell, on behalf of itself and its licensors and suppliers,
retains all right, title, and interest in and to the Software and in all related content, materials,
copyrights, trade secrets, patents, trademarks, derivative works and any other intellectual
and industrial property and proprietary rights, including registrations, applications,
renewals, and extensions of such rights (the "Works"). The rights in these Works are valid
52 | Aventail E-Class SRA WorkPlace User Guide
and protected in all forms, media and technologies existing now or hereafter developed and
any use other than as contemplated herein, including the reproduction, modification,
distribution, transmission, adaptations, translation, display, republication or performance of
the Works, except as specifically permitted herein, is strictly prohibited. Dell, on behalf of
itself and its licensors and suppliers, retains all rights not expressly granted herein.
4.
Restrictions. Except as otherwise provided herein or expressly agreed by Dell, you may
not, and will not allow a third party to (A) sell, lease, license, sublicense, assign, distribute
or otherwise transfer or encumber in whole or in part the Software; (B) provide, make
available to, or permit use of the Software in whole or in part by, any third party, including
contractors, without Dell's prior written consent, unless such use by the third party is solely
on Customer's behalf, is strictly in compliance with the terms and conditions of this EULA,
and you are liable for any breach of this EULA by such third party (a “Permitted Third
Party”); (C) copy, reproduce, republish, upload, post or transmit the Software in any way
(D) decompile, disassemble, reverse engineer, or otherwise attempt to derive source code
(or underlying ideas, algorithms, structure or organization) from the Software program, in
whole or in part; (E) modify or create derivative works based upon the Software (except as
set forth in Section 13 – Development Tools); (F) use the Software on a service bureau,
rental or managed services basis or permit other individuals or entities to create Internet
"links" to the Software or "frame" or "mirror" the Software on any other server or wireless
or Internet-based device; (G) use Software that was loaded by Dell onto specific hardware
(an “Appliance”) separately from such Appliance; or (H) use the Software to create a
competitive offering. You may not, and will not allow a Permitted Third Party to, use the
Software in excess of the number of licenses expressly authorized by Dell. In addition, you
may not share the results of any benchmarking of the Software without Dell's prior written
consent.
5.
Compliance. You will certify in writing, upon reasonable request by Dell, that all use of
Software is in compliance with the terms of this EULA, indicating the number of Software
licenses deployed at that time. You grant Dell, or an agent selected by Dell, the right to
perform a reasonable audit of your compliance with this EULA during normal business
hours. You agree to cooperate and provide Dell with all records reasonably related to your
compliance with this EULA. If, as a result of the audit, a deficiency of greater than five
percent (5%) is found in the licensee fees paid, then you shall bear the total cost of the
audit, in addition to any other liabilities you may have.
6.
Support and Subscription Services Not Included. Dell does not provide any
maintenance or support services under this EULA. Maintenance and support services, if
any, are provided under a separate agreement, which may be located at www.Dell.com/
servicecontracts. Additionally, this EULA, in and of itself, does not entitle you to any
Updates at any time in the future.
7.
Termination. Dell may terminate this EULA immediately and without prior notice if you fail
to comply with any term or condition of this EULA or if Dell does not receive timely payment
for the licenses to the Software or for the hardware to which it is attached, if any. In addition,
Dell may terminate any license to Software distributed for free at any time in its sole
discretion. Either party may terminate this EULA at any time by providing at least ninety (90)
days prior written notice to the other party. In the event of termination of this EULA, all
licenses granted hereunder shall automatically terminate and you must immediately cease
use of the Software and return or destroy all copies of the Software. The parties recognize
and agree that their obligations under Sections 3, 4, 7, 10, 11, 12, 17, 18, 19, 20, 22 and
23 of this EULA, as well as obligations for payment, survive the cancellation, termination,
and/or expiration of this EULA, and/or the licenses granted hereunder.
8.
Export, Import, and Government Restrictions. You are advised that the Software is
subject to U.S. export laws as well as the laws of the country where it is delivered or used.
You agree to abide by these laws. Under these laws, the Software may not be sold, leased,
or transferred to restricted countries (currently Cuba, Iran, North Korea, Sudan and Syria),
Limited Hardware Warranty | 53
restricted end-users, or for restricted end-uses. You specifically agree that the Software will
not be used for activities related to weapons of mass destruction, including but not limited
to, activities related to the design, development, production or use of nuclear materials,
nuclear facilities, or nuclear weapons, missiles or support of missile projects, or chemical
or biological weapons. You understand that certain functionality of the Software, such as
encryption or authentication, may be subject to import restrictions in the event you transport
the Software from the country of delivery and you are responsible for complying with
applicable restrictions.
The Software and documentation are "commercial items" as that term is defined at 48
C.F.R. 2.101, consisting of "commercial computer software" and "commercial computer
software documentation" as such terms are used in 48 C.F.R. 12.212. Consistent with 48
C.F.R. 12.212 and 48 C.F.R. 227.7202-1 through 227.7202-4, all U.S. Government end
users acquire the Software and documentation with only those rights set forth herein.
Contractor/manufacturer is Dell Products L.P., One Dell Way, Round Rock, Texas 78682.
9.
Limited Warranty. Unless otherwise provided in the limited warranties for the Software
found at http://www.Dell.com/Warranty, Dell solely warrants that it has the right to grant the
licenses to the Software, and except as set forth in Sections 14 and 16 below, that such
Software will substantially conform in material respects to the functional specifications and
current documentation provided by Dell with the Software. This limited warranty is not
transferable and extends only for thirty (30) days from the date of delivery of the Software,
unless otherwise stated at www.Dell.com/Warranty. This limited warranty does not cover
damages, defects, malfunctions or failures caused by any unauthorized modification by
you, or your agents, of the Software; any abuse, misuse or negligent acts of you;
modification by you of any interfaces or any software or hardware interfacing with the
Software; or any failure by you to follow Dell's installation, operation or maintenance
instructions. EXCEPT FOR THE PRECEDING EXPRESS LIMITED WARRANTY, DELL
MAKES, AND YOU RECEIVE, NO OTHER WARRANTIES RELATED TO THE SOFTWARE
WHETHER EXPRESS, IMPLIED OR STATUTORY, AND DELL SPECIFICALLY
DISCLAIMS ANY IMPLIED WARRANTIES OF MERCHANTABILITY, FITNESS FOR A
PARTICULAR PURPOSE, AND NON-INFRINGEMENT. DELL DOES NOT WARRANT
THAT THE FUNCTIONS OF THE SOFTWARE WILL MEET YOUR REQUIREMENTS OR
THAT OPERATION OF THE SOFTWARE WILL BE UNINTERRUPTED OR ERROR FREE.
YOU ASSUME RESPONSIBILITY FOR SELECTING THE SOFTWARE AND THE
RESULTS ACHIEVED. YOUR SOLE AND EXCLUSIVE REMEDY, AND DELL'S ENTIRE
LIABILITY, FOR BREACH OF THE WARRANTIES PROVIDED HEREIN, IS FOR DELL, AT
ITS SOLE DISCRETION, TO EITHER USE COMMERCIALLY REASONABLE EFFORTS
TO REMEDY ANY NON-CONFORMANCE OR TO PROVIDE A REFUND OF THE
LICENSE FEES PAID BY YOU TO DELL FOR THE SOFTWARE. THIS DISCLAIMER OF
WARRANTY MAY NOT BE VALID IN SOME JURISDICTIONS AND YOU MAY HAVE
WARRANTY RIGHTS UNDER LAW WHICH MAY NOT BE WAIVED OR DISCLAIMED -ANY SUCH WARRANTY EXTENDS ONLY FOR THIRTY (30) DAYS FROM THE DATE OF
DELIVERY OF THE SOFTWARE.
10. Limitation of Liability. DELL WILL NOT BE LIABLE FOR ANY INCIDENTAL, INDIRECT,
PUNITIVE, SPECIAL OR CONSEQUENTIAL DAMAGES, ARISING OUT OF OR IN
CONNECTION WITH THIS EULA AND/OR THE SOFTWARE. DELL SHALL HAVE NO
LIABILITY FOR THE FOLLOWING: (A) LOSS OF REVENUE, INCOME, PROFIT, OR
SAVINGS, (B) LOST OR CORRUPTED DATA OR SOFTWARE, LOSS OF USE OF
SYSTEM(S) OR NETWORK(S), OR THE RECOVERY OF SUCH, (C) LOSS OF BUSINESS
OPPORTUNITY, (D) BUSINESS INTERRUPTION OR DOWNTIME, (E) LOSS OF
GOODWILL OR REPUTATION, OR (F) SOFTWARE NOT BEING AVAILABLE FOR USE
OR THE PROCUREMENT OF SUBSTITUTE SOFTWARE OR GOODS.
54 | Aventail E-Class SRA WorkPlace User Guide
NOTWITHSTANDING ANYTHING TO THE CONTRARY SET FORTH IN THIS EULA,
DELL'S TOTAL LIABILITY FOR ANY AND ALL CLAIMS ARISING OUT OF OR IN
CONNECTION WITH THIS EULA AND/OR THE SOFTWARE SHALL NOT EXCEED THE
TOTAL AMOUNT RECEIVED BY DELL FOR THE PARTICULAR SOFTWARE GIVING
RISE TO SUCH CLAIM(S).
The foregoing limitations, exclusions and disclaimers shall apply to any and all claims,
regardless of whether the claim(s) for such damages is based in contract, warranty, strict
liability, negligence, tort or otherwise. Insofar as applicable law prohibits any limitation on
liability herein, the parties agree that such limitation will be automatically modified, but only
to the extent so as to make the limitation compliant with applicable law. The parties agree
that the limitations on liabilities set forth herein are agreed allocations of risk and such
limitations will apply notwithstanding the failure of essential purpose of any limited remedy
and even if a party has been advised of the possibility of any such liability.
DELL SHALL NOT BE LIABLE TO YOU FOR ANY CLAIM BROUGHT MORE THAN TWO
YEARS AFTER THE CAUSE OF ACTION FOR SUCH CLAIM FIRST AROSE.
11. Indemnification. Except where prohibited by applicable law, Dell shall defend and
indemnify you against any third-party claim or action that the Software (specifically
excluding open source software) infringes or misappropriates that third party's patent,
copyright, trade secret, or other intellectual property rights (“Indemnified Claims”). In
addition, if Dell receives prompt notice of an Indemnified Claim that, in Dell's reasonable
opinion, is likely to result in an adverse ruling, then Dell shall at its sole discretion, (A) obtain
a right for you to continue using such Software; (B) modify such Software to be noninfringing; (C) replace such Software with a non-infringing substitute; or (D) provide a
reasonable depreciated refund for the allegedly infringing Software. Notwithstanding the
foregoing, Dell shall have no obligation under this Section for Indemnified Claims resulting
or arising from: (i) modifications of the Software that were not performed by or on behalf of
Dell; (ii) your unauthorized use of the Software, or the combination or operation of the
Software in connection with a third-party product, software, or service (the combination of
which causes the claimed infringement); (iii) your failure to incorporate free Software
updates or upgrades that would have avoided the alleged infringement; or (iv) Dell's
compliance with your written specifications or directions, including the incorporation of any
software or other materials or processes provided by or requested by you (collectively,
“Excluded Indemnified Claims”). Dell's duty to indemnify and defend is contingent upon: (a)
your providing Dell with prompt written notice of the third-party claim or action, (b) Dell
having the right to solely control the defense and settlement of such claim or action, and (c)
your cooperation with Dell in defending and resolving such claim or action. This Section
states your exclusive remedies for any third-party claim or action, and nothing in this EULA
or elsewhere will obligate Dell to provide any greater indemnity to you. You, at your
expense, shall defend and indemnify Dell against any claim, action or proceeding brought
against Dell which arises from or is in any manner connected with the Excluded Indemnified
Claims.
12. Confidentiality. You agree to: (A) not use Confidential Information except as necessary to
exercise the rights herein and (B) use best efforts to preserve and protect the confidentiality
of the Confidential Information. "Confidential Information" means any oral, written, graphic
or machine-readable information disclosed by Dell that is (i) identified as confidential; (ii)
designated in writing to be confidential or proprietary; or (iii) should be reasonably
understood to be confidential. Confidential Information includes the Software and its trade
secrets, including but not limited to source code, the development status of the Software,
the appearance, content and flow of the user interface of the Software, and the content and
documentation of the Software. Confidential Information does not include information that
is (a) publicly available other than through a breach of this EULA; (b) known to you prior to
such disclosure; or (c) subsequently lawfully obtained by you from a third party that has no
obligations of confidentiality. You agree that, without Dell's prior written consent, you will
not grant access to any Dell Confidential Information to any persons or entities except for
Limited Hardware Warranty | 55
your employees and agents who have a business need to have such access and who are
obligated to maintain the confidentiality thereof as set forth herein. These obligations do not
expire. In some, limited circumstances, Dell may need to engage a third party to fulfill its
obligations to you under this EULA. By using this Software you agree that Dell may provide
your information to such third party for that purpose. Dell may obtain information related to
your use of the Software and you agree that we may use such information in aggregate form
in an anonymous manner in support of our marketing activities related to the Software. Any
feedback, value added changes or suggestions made by you or other information that is
provided to Dell relating to the Software shall be owned by Dell and considered Dell
Confidential Information.
13. Development Tools. If the Software includes development tools, such as scripting tools,
APIs, or sample scripts (collectively “Development Tools”), you may use such Development
Tools to create new scripts and code for the purpose of customizing your use of the
Software (within the parameters set forth in this EULA and within the parameters set forth
in the Development Tools themselves) and for no other purpose. Notwithstanding anything
to the contrary set forth in this EULA, no warranty or technical support is provided for
sample scripts contained in such Development Tools or scripts or other code written by you
or any third party.
14. Evaluation Licenses. If you have received Software for evaluation purposes (“Evaluation
Software”), you may use the Evaluation Software solely for such limited evaluation period
and for internal evaluation purposes only. You acknowledge that Dell may terminate your
right to evaluate the Evaluation Software, for any or no reason, effective immediately upon
notice to you. IN ADDITION, THE EVALUATION SOFTWARE IS PROVIDED TO YOU "AS
IS" WITHOUT INDEMNITY OR WARRANTY OF ANY KIND, WHETHER EXPRESS,
IMPLIED, STATUTORY, OR OTHERWISE. NOTWITHSTANDING ANYTHING TO THE
CONTRARY IN THIS EULA, DELL BEARS NO LIABILITY FOR ANY DIRECT, INDIRECT,
INCIDENTAL, PUNITIVE, SPECIAL OR CONSEQUENTIAL DAMAGES RESULTING
FROM USE (OR ATTEMPTED USE) OF THE EVALUATION SOFTWARE THROUGH AND
AFTER THE EVALUATION PERIOD AND HAS NO DUTY TO PROVIDE SUPPORT TO
YOU.
15. Hosted and Internet-Accessible Software. Some or all of the Software may be remotely
hosted or accessible to you through the Internet (“Hosted Software”). In such case, Dell
may suspend, terminate, withdraw, or discontinue all or part of the Hosted Software or your
access to the Hosted Software upon receipt of a subpoena or law-enforcement request, or
when Dell believes, in its sole discretion, that you have breached any term of this EULA or
are involved in any fraudulent, misleading, or illegal activities. Dell may modify the Hosted
Software at any time with or without prior notice to you. Dell may perform scheduled or
unscheduled repairs or maintenance, or remotely patch or upgrade the Hosted Software
installed on its and your system(s), which may temporarily degrade the quality of the Hosted
Software or result in a partial or complete outage of the Hosted Software. Updates, patches
or alerts may be delivered from Dell servers, which may be located outside of your country.
Dell provides no assurance that you will receive advance notification of such activities or
that your use of the Hosted Software will be uninterrupted or error-free.
16. Open Source Software. The Software may come bundled or otherwise be distributed with
open source software, which is subject to the terms and conditions of the specific license
under which the open source software is distributed. THIS OPEN SOURCE SOFTWARE IS
PROVIDED BY DELL "AS IS" WITHOUT ANY WARRANTY, EXPRESS, IMPLIED, OR
OTHERWISE, INCLUDING BUT NOT LIMITED TO THE IMPLIED WARRANTY OF
MERCHANTABILITY, FITNESS FOR A PARTICULAR PURPOSE AND NONINFRINGEMENT. NOTWITHSTANDING ANYTHING TO THE CONTRARY IN THIS EULA,
AS IT RELATES TO ANY AND ALL CLAIMS ARISING OUT OF OR IN CONNECTION
WITH OPEN SOURCE SOFTWARE, DELL SHALL HAVE NO LIABILITY FOR ANY
DIRECT, INDIRECT, INCIDENTAL, PUNITIVE, SPECIAL OR CONSEQUENTIAL
56 | Aventail E-Class SRA WorkPlace User Guide
DAMAGES. Under certain open source software licenses, you are entitled to obtain the
corresponding source files. You may find corresponding source files for the Software at
http://opensource.dell.com or other locations that may be specified to you by Dell.
17. Right to Preliminary and Injunctive Relief. You agree that money damages would be an
inadequate remedy for Dell in the event of a breach or threatened breach by you of the
provisions set forth in this EULA; therefore, you agree that in the event of a breach or
threatened breach of any such provisions, Dell may, in addition to any other remedies to
which it is entitled, be entitled to such preliminary or injunctive relief (including an order
prohibiting you from taking actions in breach of such provisions) and specific performance
as may be appropriate to preserve all of Dell's rights. All rights and remedies afforded Dell
by law shall be cumulative and not exclusive.
18. Choice of Law and Language. This EULA shall be governed by the laws of the State of
Texas, USA, to the exclusion of the UN Convention on Contracts for the International Sale
of Goods. You acknowledge that the headquarters of the Dell family of companies is located
in Texas, and that the software licensed under this EULA and the related products marketed
in connection with such software were in substantial part conceived, developed, and
marketed by Dell personnel in Texas. Further, you acknowledge, agree, and stipulate that
the laws of the State of Texas bear a substantial relationship to this EULA and that the
selection of Texas law to govern this EULA and the license of the Software hereunder is
reasonable and appropriate, and you consent to the selection of such law to govern this
EULA and the relationship of the parties hereto. This EULA has been agreed only in the
English language, which version of this EULA shall be controlling regardless of whether any
translations of this EULA have been prepared or exchanged. As an exception to the
preceding sentence, if Dell provides this EULA to you only in a non-English language
version, then such non-English language version shall control. You acknowledge and
represent that you have carefully reviewed this EULA with the involvement and assistance
of your employees, advisors, and/or legal counsel fluent in the English language, that you
have consulted with local legal counsel and counsel competent to render advice with
respect to transactions governed by the law applicable to this EULA, that you have no
questions regarding the meaning or effect of any of this EULA's terms, and that you have
obtained high-quality translations of this EULA for use by you or any of your team who are
not fluent in the English language, with the understanding that you alone shall bear the risk
of any misunderstandings that may arise as a result of such translation. All communications
in connection with this EULA shall be in the English language.
Les parties ont demandé que cette convention ainsi que tous les documents qui s'y
rattachent soient rédigés en anglais.
19. Dispute Resolution and Binding Arbitration. ANY CLAIM, DISPUTE, OR
CONTROVERSY (WHETHER IN CONTRACT, TORT, OR OTHERWISE, WHETHER
PREEXISTING, PRESENT OR FUTURE, AND INCLUDING STATUTORY, COMMON LAW,
INTENTIONAL TORT AND EQUITABLE CLAIMS) BETWEEN YOU AND DELL arising out
of or in connection with this EULA, or the breach, termination or validity thereof shall be
finally settled under the Rules of Arbitration of the International Chamber of Commerce
(“ICC”) by one or more arbitrators with expertise in software licensing appointed in
accordance with such rules. The arbitration shall be conducted in the English language.
The place of the arbitration shall be a commercial center reasonably chosen by the
arbitration panel in a third country so as to ensure that the award resulting from the
arbitration shall be of an international character and enforceable under the New York
Convention on the Recognition and Enforcement of Foreign Arbitral Awards. The arbitration
panel shall be empowered to grant whatever relief would be available in court, including
without limitation preliminary relief, injunctive relief, and specific performance. Any award
of the arbitration panel shall be final and binding immediately when rendered, and judgment
on the award may be entered in any court of competent jurisdiction. Neither you nor Dell
shall be entitled to join, consolidate, or include any claims belonging to or alleged or arising
from, by, or on behalf of any third party to an arbitration brought hereunder. The individual
Limited Hardware Warranty | 57
(non-class) nature of this dispute resolution provision goes to the essence of the parties'
dispute resolution agreement, and if found unenforceable, the entire arbitration and dispute
resolution provision shall be void. Notwithstanding the foregoing, Dell may apply to any
relevant government agency or any court of competent jurisdiction to preserve its rights
under this EULA and to obtain any injunctive or preliminary relief, or any award of specific
performance, to which it may be entitled, either against you or against a non-party;
provided, however, that no such administrative or judicial authority shall have the right or
power to render a judgment or award (or to enjoin the rendering of an arbitral award) for
damages that may be due to or from either party under this EULA, which right and power
shall be reserved exclusively to an arbitration panel proceeding in accordance herewith.
20. No Waiver. No waiver of breach or failure to exercise any option, right, or privilege under
the terms of this EULA on any occasion shall be construed to be a waiver of a subsequent
breach or right to exercise any option, right, or privilege.
21. Force Majeure. Dell shall not be responsible for any delay or failure in performance of any
part of this EULA to the extent that such delay or failure is caused by fire, flood, explosion,
war, embargo, government requirement, civil, or military authority, act of God, act or
omission of carriers, failure of the Internet or other similar causes beyond its control.
22. No Assignment. Except as set forth herein, you may not assign or transfer your interests,
rights or obligations under this EULA by written agreement, merger, consolidation,
operation of law or otherwise, without the prior written consent of an authorized executive
officer of Dell. Any attempt to assign this EULA by you without such prior written consent
from Dell shall be null and void.
23. Entire Agreement. Unless you have entered into another written agreement with respect
to the Software which has been signed by you and an authorized representative of Dell and
which conflicts with the terms of this EULA, you agree that this EULA supersedes all prior
written or oral agreements, warranties or representations, including any and all other clickwrap, shrink-wrap or similar licenses or agreements, with respect to the Software. No
amendment to or modification of this EULA, in whole or in part, will be valid or binding
unless it is in writing and executed by authorized representatives of both parties. If any term
of this EULA is found to be invalid or unenforceable, the remaining provisions will remain
effective. You agree that any principle of construction or rule of law that provides that an
agreement shall be construed against the drafter shall not apply to the terms and conditions
of this EULA.
24. Notices. Notice to Dell under this EULA must be in writing and sent to the address below
or to such other address (including facsimile or e-mail) as specified in writing, and will be
effective upon receipt.
Dell Inc., Attn: Dell Legal
One Dell Way, Round Rock, Texas 78682
Last rev. 021812
Supplemental Terms and Conditions:
END OF DOCUMENT
End User Product Agreement
PLEASE READ THIS AGREEMENT CAREFULLY BEFORE USING THE SONICWALL
PRODUCT. BY INSTALLING OR USING THE SONICWALL PRODUCT, YOU (AS THE
CUSTOMER, OR IF NOT THE CUSTOMER, AS A REPRESENTATIVE/AGENT AUTHORIZED
TO BIND THE CUSTOMER) INDICATE ACCEPTANCE OF AND AGREE TO THE TERMS AND
CONDITIONS OF THIS AGREEMENT FOR AND ON BEHALF OF THE CUSTOMER. IF YOU
DO NOT AGREE TO THE TERMS AND CONDITIONS OF THIS AGREEMENT, THEN DO NOT
58 | Aventail E-Class SRA WorkPlace User Guide
USE THE PRODUCT AND RETURN IT TO THE PLACE OF PURCHASE WITH PROOF OF
PURCHASE WITHIN THIRTY (30) DAYS OF PURCHASE FOR A REFUND. IF YOU DO
PROCEED TO INSTALL OR USE THE SONICWALL PRODUCT, YOU WILL HAVE INDICATED
ACCEPTANCE AND AGREEMENT WITH THE TERMS AND CONDITIONS HEREIN.
NOTWITHSTANDING THE FOREGOING, THIS AGREEMENT SHALL NOT SUPERSEDE ANY
OTHER SIGNED AGREEMENT BETWEEN YOU AND SONICWALL THAT EXPRESSLY
GOVERNS USE OF THE SONICWALL PRODUCT. IN INSTANCES WHERE YOU PURCHASE
THROUGH A RESELLER OR DISTRIBUTOR, FINAL PRICES AND TERMS AND
CONDITIONS OF SALE, INCLUDING WITHOUT LIMITATION ANY TERMS REGARDING
PAYMENT OR RETURNS, WILL BE AS AGREED BETWEEN YOU AND THE THIRD PARTY
FROM WHICH YOU MAKE SUCH PURCHASES; HOWEVER, THE TERMS SET FORTH
HEREIN REGARDING YOUR USE OF THE SOFTWARE REMAIN APPLICABLE.
"Product" means the SonicWALL labeled hardware and related documentation ("Hardware")
and/or proprietary SonicWALL labeled software, firmware and related documentation
("Software") purchased by you (“Customer” or “you”) either directly from SonicWALL or a
Reseller. “Services” means the Support Services described below and any other services
provided with or for the Products directly by SonicWALL or its agents. “Reseller” shall mean
those entities to which SonicWALL or SonicWALL’s authorized distributors distribute the
Products for resale to end users. Except as otherwise agreed upon by the parties, this
Agreement will also cover any updates and upgrades to the Products provided to Customer by
SonicWALL directly or through a Reseller (except as may be otherwise indicated, such updates
and upgrades shall be deemed Products).
1. LICENSE(S) AND RESTRICTIONS
(a) Licenses. Subject to the terms and conditions of this Agreement, SonicWALL grants to
Customer, and Customer accepts from SonicWALL, a nonexclusive, non-transferable (except
as otherwise set forth herein) and non-sublicensable license (“License”) to:
(i) execute and use the Software on the Hardware with which the Software is provided (preinstalled) in accordance with the applicable Documentation; and,
(ii) for Software provided in standalone form (without Hardware), install, execute and use
the Software on the Hardware or hardware device(s) on which it is intended to be used in
accordance with the applicable Documentation and the License purchased. If Customer
purchased multiple copies of standalone Software, Customer’s License to such standalone
Software includes the right to install, use and execute up to the number of copies of
Software Licenses purchased.
In addition, the License includes the right to (x) make a reasonable number of additional copies
of the Software to be used solely for non-productive archival purposes, and (y) make and use
copies of the end user documentation for Hardware and/or Software provided with the Products
(“Documentation”) as reasonably necessary to support Customer’s authorized users in their
use of the Products.
(b) License Limitations. Order acknowledgments, Documentation and/or the particular type of
the Products/Licenses purchased by Customer may specify limits on Customer’s use of the
Software, and which limits apply to the License(s) granted hereunder for such Software. Such
limits may consist of limiting the number of copies of the Software, the term of the License, or
the number or amount of nodes, storage space, sessions, calls, users, subscribers, clusters,
devices, ports, bandwidth, throughput or other elements, and/or require the purchase of
separate Licenses to use or obtain particular features, functionalities, services, applications or
other items. Use of the Software shall be subject to all such limitations.
(c) For Customer’s Internal Business. Each License shall be used by Customer solely to
manage its own internal business operations as well as the business operations of its Affiliates.
Notwithstanding the foregoing, if Customer is in the regular business of providing firewall, VPN
End User Product Agreement | 59
or security management for a fee to entities that are not its Affiliates (“MSP Customers”),
Customer may use the Products for its MSP Customers provided that either (i) Customer, and
not MSP Customers, maintain control and possession of the Products, and (ii) MSP Customers
do not use the Software.if MSP Customers have possession and/or control of Products in whole
or in part, this Agreement must be provided to MSP Customers and they must agree that their
use of the Products is subject to the terms and conditions of this Agreement. Customer will not
provide, make available to, or permit use of the Software in whole or in part by, any third party,
including MSP Customers and contractors, without SonicWall's prior written consent, unless
such use by the third party is solely on Customer’s behalf, is strictly in compliance with the
terms and conditions of this Agreement, and Customer is liable for any breach of this
Agreement by such third party.Customer agrees to indemnify and hold SonicWALL harmless
from and against any claims by MSP Customers against SonicWALL relating to the Products
and/or Customer’s services for MSP Customers. “Affiliate” means any legal entity, controlled by
a party to this Agreement, but only for so long as such control relationship exists.
(d) Evaluation License. If the Software is provided by SonicWALL or a Reseller at no charge for
evaluation purposes, then Section 1(a) above shall not apply to such Software and instead
Customer is granted a non-production License to use such Software and the associated
documentation solely for Customer’s own internal evaluation purposes for an evaluation period
of up to thirty (30) days from the date of delivery of the Software, plus any extensions granted
by SonicWALL in writing (the "Evaluation Period"). There is no fee for Customer’s use of the
Software for nonproduction evaluation purposes during the Evaluation Period, however,
Customer is responsible for any applicable shipping charges or taxes which may be incurred,
and any fees which may be associated with usage beyond the scope permitted herein.
NOTWITHSTANDING ANYTHING OTHERWISE SET FORTH IN THIS AGREEMENT,
CUSTOMER UNDERSTANDS AND AGREES THAT EVALUATION SOFTWARE IS PROVIDED
“AS IS” AND THAT SONICWALL DOES NOT PROVIDE A WARRANTY OR MAINTENANCE
SERVICES FOR EVALUATION LICENSES, AND SONICWALL BEARS NO LIABILITY FOR
ANY DIRECT, INDIRECT, INCIDENTAL, PUNITIVE, SPECIAL OR CONSEQUENTIAL
DAMAGES RESULTING FROM USE (OR ATTEMPTED USE) OF THE EVALUATION
SOFTWARE THROUGH AND AFTER THE EVALUATION PERIOD AND HAS NO DUTY TO
PROVIDE SUPPORT TO CUSTOMER.
(e) Restrictions. Customer may not (i) modify, translate, localize, adapt, rent, lease, loan, create
or prepare derivative works of, or create a patent based on the Software or any part thereof, (ii)
make copies except as expressly authorized under this Agreement, (iii) copy the Software onto
any public or distributed network, (iv) modify or resell the Software, use the Software in
connection with the operation of any nuclear facilities, or use for purposes which are
competitive to SonicWALL, or (v) except as expressly authorized in Section 2(c) above, operate
the Software for use in any time-sharing, outsourcing, service bureau or application service
provider type environment. Unless and except to the extent authorized in the applicable
Documentation, Software provided with and/or as the Product, in part or whole, is licensed for
use only in accordance with the Documentation as part of the Product, and Software
components making up a Product may not be separated from, nor used on a separate or
standalone basis from the Product. Each permitted copy of the Software and Documentation
made by Customer hereunder must contain all titles, trademarks, copyrights and restricted
rights notices as in the original. Customer understands and agrees that the Products may work
in conjunction with third party products and Customer agrees to be responsible for ensuring that
it is properly licensed to use such third party products. Any Software provided in object code
form is licensed hereunder only in object code form. Except to the extent allowed by applicable
law if located in the European Union, and then only with prior written notice to SonicWALL,
Customer shall not disassemble, decompile or reverse engineer the Software in whole or in part
or authorize others to do so. Customer agrees not to use the Software to perform comparisons
or other "benchmarking" activities, either alone or in connection with any other software or
service, without SonicWALL’s written permission; or publish any such performance information
or comparisons.
60 | Aventail E-Class SRA WorkPlace User Guide
(f) Third Party Software. There may be certain third party owned software provided along with,
or incorporated within, the Products (“Third Party Software”). Except as set forth below, such
Third Party Software shall be considered Software governed by the terms and conditions of this
Agreement. However, some Products may contain other Third Party Software that is provided
with a separate license agreement, in which case such Third Party Software will be governed
exclusively by such separate license agreement ("Third Party License") and not this
Agreement. Any such Third Party Software that is governed by a Third Party License, and not
this Agreement, will be identified on the applicable Product page on SonicWALL’s website and/
or in a file provided with the Product. Except as SonicWALL may otherwise inform Customer in
writing, the Third Party License gives Customer at least the license rights granted above, and
may provide additional license rights as to the Third Party Software, but only with respect to the
particular Third Party Software to which the Third Party License applies. SUCH THIRD PARTY
SOFTWARE UNDER A THIRD PARTY LICENSE IS PROVIDED WITHOUT ANY WARRANTY
FROM SONICWALL AND ITS SUPPLIERS, INCLUDING BUT NOT LIMITED TO
WARRANTIES OF MERCHANTABILITY, FITNESS FOR A PARTICULAR PURPOSE AND
NON-INFRINGEMENT. Notwithstanding the foregoing, SonicWALL shall honor its warranty,
maintenance and support obligations in respect to the SonicWALL Products regardless of
whether the warranty, maintenance or support issue is caused in whole or in part by the Third
Party Software provided by SonicWALL with the Product.
(g) Updates/Upgrades. If Customer purchases or otherwise is eligible to receive a Software
update or upgrade, you must be properly licensed to use the Product identified by SonicWALL
as being eligible for the update/upgrade in order to install and use the Software update/
upgrade. A Software update/ upgrade replaces and/or supplements the Software Product that
formed the basis for your eligibility for the update/upgrade, and does not provide you an
additional License (copy) of the Software to use separately from the Software Product to be
updated/upgraded. You may use the resulting updated/upgraded Product only in accordance
with the terms of this Agreement.
(h) Activation Keys May Expire. Certain Products, including Security Services that provide
regular ongoing updates for Software (e.g., Security Service consisting of anti-virus signature
updates), may come with an activation key or license key (a key that must be entered to activate
the Product, “Activation Key”). If the Activation Key for a Product is not activated within five (5)
years from the date of issuance by SonicWALL, such Activation Key(s) may expire and no
longer activate the Product. Products that come with an expiring Activation Key will operate for
the contracted term of the License (or purchased Security Service), so long as the Activation
Key is activated within five (5) years from SonicWALL’s date of issuance.
2. OWNERSHIP
SonicWALL and its licensors are the sole and exclusive owners of the Software, and all
underlying intellectual property rights in the Hardware. All rights not expressly granted to
Customer are reserved by SonicWALL and its licensors.
3. TERMINATION OF LICENSE(S)
All licenses to the Software hereunder shall terminate if Customer fails to comply with any of
the provisions of this Agreement and does not remedy such breach within thirty (30) days after
receiving written notice from SonicWALL. Customer agrees upon termination to immediately
cease using the Software and to destroy all copies of the Software which may have been
provided or created hereunder.
End User Product Agreement | 61
4. SUPPORT SERVICES
SonicWALL’s current Support Service offerings (“Support Services”) and the terms and
conditions applicable to such Support Services are set forth in SonicWALL’s Support Services
Terms located http://www.sonicwall.com/us/support/Services.html and are incorporated herein
by reference. Support Services may require an additional fee. Unless otherwise agreed to in
writing, SonicWALL’s Support Services are subject to SonicWALL’s Support Services Terms
which are in effect at the time the Support Services are purchased by Customer, and these
terms and conditions will be incorporated herein by reference at that time. SonicWALL reserves
the right to change the Support Services Terms from time to time by posting such changes on
its website, which shall apply to any Support Services purchased on or after the date of such
posting.
5. SONICWALL WARRANTY
(a) Warranty. SonicWALL warrants to Customer (original purchaser Customer only) that for the
applicable warranty period (“Warranty Period”) the Hardware will be free from any material
defects in materials or workmanship and the Software, if any, will substantially conform to the
Documentation applicable to the Software and the License purchased (“Limited Warranty”).
Except as may indicated otherwise in writing by SonicWALL, the Warranty Period for Hardware
is one year from the date of registration of the Hardware Product (or if sooner, seven days after
initial delivery of the Hardware Product to Customer), and the applicable warranty period for
Software is ninety days from the date of registration of the Software Product (or if sooner, seven
days after initial delivery/download) of the Software Product to/by Customer. SonicWALL does
not warrant that use of the Product(s) will be uninterrupted or error free nor that SonicWALL will
correct all errors. The Limited Warranty shall not apply to any non-conformance (i) that
SonicWALL cannot recreate after exercising commercially reasonable efforts to attempt to do
so; (ii) caused by misuse of the Product or by using the Product in a manner that is inconsistent
with this Agreement or the Documentation; (iii) arising from the modification of the Products by
anyone other than SonicWALL; or (iv) caused by any problem or error in third party software or
hardware not provided by SonicWALL with the Product regardless of whether or not the
SonicWALL Product is designed to operate with such third party software or hardware.
SonicWALL's sole obligation and Customer's sole and exclusive remedy under any express or
implied warranties hereunder shall be for SonicWALL to use commercially reasonable efforts
to provide error corrections and/or, if applicable, repair or replace parts in accordance with
SonicWALL’s Support Services Terms. Customer shall have no rights or remedies under this
Limited Warranty unless SonicWALL receives Customer’s detailed written warranty claim within
the applicable warranty period.
(b) Disclaimer. EXCEPT FOR THE EXPRESS WARRANTIES SET FORTH ABOVE, TO THE
MAXIMUM EXTENT PERMITTED BY APPLICABLE LAW SONICWALL HEREBY DISCLAIMS
ON BEHALF OF ITSELF, ITS SUPPLIERS, DISTRIBUTORS AND RESELLERS ALL
WARRANTIES, EXPRESS, STATUTORY AND IMPLIED, APPLICABLE TO THE PRODUCTS,
SERVICES AND/OR THE SUBJECT MATTER OF THIS AGREEMENT, INCLUDING, BUT NOT
LIMITED TO, ANY WARRANTY OF MERCHANTABILITY, NON-INFRINGEMENT OR FITNESS
FOR A PARTICULAR PURPOSE.
6. LIMITATION OF LIABILITY
The Products are not designed, manufactured, authorized or warranted to be suitable for use
in any system where a failure of such system could result in a situation that threatens the safety
of human life, including without limitation any such medical, life support, aviation or nuclear
applications. Any such use and subsequent liabilities that may arise from such use are totally
the responsibility of Customer, and all liability of SonicWALL, whether in contract, tort (including
without limitation negligence) or otherwise in relation to the same is excluded. Customer shall
62 | Aventail E-Class SRA WorkPlace User Guide
be responsible for mirroring its data, for backing it up frequently and regularly, and for taking all
reasonable precautions to prevent data loss or corruption. SonicWALL shall not be responsible
for any system downtime, loss or corruption of data or loss of production. NOTWITHSTANDING
ANYTHING ELSE IN THIS AGREEMENT OR OTHERWISE, TO THE MAXIMUM EXTENT
PERMITTED BY APPLICABLE LAW, IN NO EVENT SHALL SONICWALL, ITS SUPPLIERS,
DISTRIBUTORS OR RESELLERS BE LIABLE FOR ANY INDIRECT, INCIDENTAL, SPECIAL,
PUNITIVE OR CONSEQUENTIAL DAMAGES, LOST OR CORRUPTED DATA, LOST
PROFITS OR SAVINGS, LOSS OF BUSINESS, REPUTATION, GOODWILL OR OTHER
ECONOMIC LOSS OR COSTS OF PROCUREMENT OF SUBSTITUTE GOODS OR
SERVICES, ARISING OUT OF OR RELATED TO THIS AGREEMENT, THE PRODUCTS OR
THE SERVICES, WHETHER OR NOT BASED ON TORT, CONTRACT, STRICT LIABILITY OR
ANY OTHER LEGAL THEORY AND WHETHER OR NOT SONICWALL HAS BEEN ADVISED
OR KNEW OF THE POSSIBILITY OF SUCH DAMAGES. TO THE MAXIMUM EXTENT
PERMITTED BY APPLICABLE LAW, SONICWALL'S MAXIMUM LIABILITY TO CUSTOMER
ARISING FROM OR RELATING TO THIS AGREEMENT SHALL BE LIMITED TO THE
AMOUNTS RECEIVED BY SONICWALL FOR THE PRODUCTS AND THE SERVICES
PURCHASED BY CUSTOMER, PROVIDED THAT WHERE ANY CLAIM AGAINST
SONICWALL RELATES TO PARTICULAR PRODUCTS AND/OR SERVICES, SONICWALL'S
MAXIMUM LIABILITY SHALL BE LIMITED TO THE AGGREGATE AMOUNT RECEIVED BY
SONICWALL IN RESPECT OF THE PRODUCTS AND/OR SERVICES PURCHASED BY
CUSTOMER AFFECTED BY THE MATTER GIVING RISE TO THE CLAIM. (FOR
MAINTENANCE SERVICES OR A PRODUCT SUBJECT TO RECURRING FEES, THE
LIABILITY SHALL NOT EXCEED THE AMOUNT RECEIVED BY SONICWALL FOR SUCH
MAINTENANCE SERVICE OR PRODUCT PURCHASED BY CUSTOMER DURING THE
TWELVE (12) MONTHS PRECEDING THE CLAIM).
CUSTOMER EXPRESSLY AGREES TO THE ALLOCATION OF LIABILITY SET FORTH IN
THIS SECTION, AND ACKNOWLEDGES THAT WITHOUT ITS AGREEMENT TO THESE
LIMITATIONS, THE PRICES CHARGED FOR THE PRODUCTS AND SERVICES WOULD BE
HIGHER.
7. GOVERNMENT RESTRICTIONS
Customer agrees that the Products provided under this Agreement, which may include
technology and encryption, are subject to the customs and export control laws and regulations
of the United States, may be rendered or performed either in the U.S., in countries outside the
U.S., or outside of the borders of the country in which Customer or Customer’s system is
located, and may also be subject to the customs and export laws and regulations of the country
in which the Products are rendered or received. Customer agrees to abide by those laws and
regulations. Customer agrees that it will not export or re-export the Products without
SonicWALL's prior written consent, and then only in compliance with all requirements of
applicable law, including but not limited to U.S. export control regulations. Customer has the
responsibility to obtain any required licenses to export, re-export or import the Products.
Customer shall defend, indemnify and hold SonicWALL and its suppliers harmless from any
claims arising out of Customer’s violation of any export control laws relating to any exporting of
the Products. By accepting this Agreement and receiving the Products, Customer confirms that
it and its employees and agents who may access the Products are not listed on any
governmental export exclusion lists and will not export or re-export the Products to any country
embargoed by the U.S. or to any specially denied national (SDN) or denied entity identified by
the U.S. Applicable export restrictions and exclusions are available at the official web site of
the U.S. Department of Commerce Bureau of Industry and Security (www.bis.doc.gov). For
purchase by U.S. governmental entities, the technical data and computer software in the
Products are commercial technical data and commercial computer software as subject to FAR
Sections 12.211, 12.212, 27.405-3 and DFARS Section 227.7202. The rights to use the
Products and the underlying commercial technical data and computer software is limited to
End User Product Agreement | 63
those rights customarily provided to the public purchasers as set forth in this Agreement. The
Software and accompanying Documentation are deemed to be "commercial computer
software" and "commercial computer software documentation," respectively, pursuant to DFAR
Section 227.7202 and FAR Section 12.212, as applicable. Any use, modification, reproduction,
release, performance, display or disclosure of the Software and accompanying Documentation
by the United States Government shall be governed solely by the terms of this Agreement and
shall be prohibited except to the extent expressly permitted by the terms of this Agreement.
8. GENERAL
a) Governing Law and Venue. This Agreement shall be governed by and construed in
accordance with the laws of the State of California, without giving effect to any conflict of laws
principles that would require the application of laws of a different state. The parties agree that
neither the United Nations Convention on Contracts for the International Sale of Goods, nor the
Uniform Computer Information Transaction Act (UCITA) shall apply to this Agreement,
regardless of the states in which the parties do business or are incorporated. Any action
seeking enforcement of this Agreement or any provision hereof shall be brought exclusively in
the state or federal courts located in the County of Santa Clara, State of California, United
States of America. Each party hereby agrees to submit to the jurisdiction of such courts.
Notwithstanding the foregoing, SonicWALL is entitled to seek immediate injunctive relief in any
jurisdiction in the event of any alleged breach of Section 1 and/or to otherwise protect its
intellectual property.
b) Assignment. Except as otherwise set forth herein, Customer shall not, in whole or part,
assign or transfer any part of this Agreement or any rights hereunder without the prior written
consent of SonicWALL. Any attempted transfer or assignment by Customer that is not permitted
by this Agreement shall be null and void. Any transfer/assignment of a License that is permitted
hereunder shall require the assignment/transfer of all copies of the applicable Software along
with a copy of this Agreement, the assignee must agree to all terms and conditions of this
Agreement as a condition of the assignment/transfer, and the License(s) held by the transferor
Customer shall terminate upon any such transfer/assignment.
c) Severability. If any provision of this Agreement shall be held by a court of competent
jurisdiction to be contrary to law, such provision will be enforced to the maximum extent
permissible and the remaining provisions of this Agreement will remain in full force and effect.
d) Privacy Policy. Customer hereby acknowledges and agrees that SonicWALL’s performance
of this Agreement may require SonicWALL to process or store personal data of Customer, its
employees and Affiliates, and to transmit such data within SonicWALL or to SonicWALL
Affiliates, partners and/or agents. Such processing, storage, and transmission may be used for
the purpose of enabling SonicWALL to perform its obligations under this Agreement, and as
described in SonicWALL’s Privacy Policy (www.SonicWALL.com/us/Privacy_Policy.html,
“Privacy Policy”) and may take place in any of the countries in which SonicWALL and its
Affiliates conduct business. SonicWALL reserves the right to change the Privacy Policy from
time to time as described in the Privacy Policy.
e) Notices. All notices provided hereunder shall be in writing, delivered personally, or sent by
internationally recognized express courier service (e.g., Federal Express), addressed to the
legal department of the respective party or to such other address as may be specified in writing
by either of the parties to the other in accordance with this Section.
f) Disclosure of Customer Status. SonicWALL may include Customer in its listing of customers
and, upon written consent by Customer, announce Customer's selection of SonicWALL in its
marketing communications.
64 | Aventail E-Class SRA WorkPlace User Guide
g) Waiver. Performance of any obligation required by a party hereunder may be waived only by
a written waiver signed by an authorized representative of the other party, which waiver shall
be effective only with respect to the specific obligation described therein. Any waiver or failure
to enforce any provision of this Agreement on one occasion will not be deemed a waiver of any
other provision or of such provision on any other occasion.
h) Force Majeure. Each party will be excused from performance for any period during which,
and to the extent that, it is prevented from performing any obligation or service as a result of
causes beyond its reasonable control, and without its fault or negligence, including without
limitation, acts of God, strikes, lockouts, riots, acts of war, epidemics, communication line
failures, and power failures.
i) Audit. Customer shall maintain accurate records to verify compliance with this Agreement.
Upon request by SonicWALL, Customer shall furnish (a copy of) such records to SonicWALL
and certify its compliance with this Agreement.
j) Headings. Headings in this Agreement are for convenience only and do not affect the
meaning or interpretation of this Agreement. This Agreement will not be construed either in
favor of or against one party or the other, but rather in accordance with its fair meaning. When
the term “including” is used in this Agreement it will be construed in each case to mean
“including, but not limited to.”
k) Entire Agreement. This Agreement is intended by the parties as a final expression of their
agreement with respect to the subject matter hereof and may not be contradicted by evidence
of any prior or contemporaneous agreement unless such agreement is signed by both parties.
In the absence of such an agreement, this Agreement shall constitute the complete and
exclusive statement of the terms and conditions and no extrinsic evidence whatsoever may be
introduced in any judicial proceeding that may involve the Agreement. This Agreement
represents the complete agreement and understanding of the parties with respect to the subject
matter herein. This Agreement may be modified only through a written instrument signed by
both parties.
End User Product Agreement | 65
Third-party Packages
The Aventail E-Class SRA software includes the following third-party software packages:
DHCP client:
http://roy.marples.name/projects/dhcpcd
Heimdal kerberos libraries:
http://www.h5l.org/
Cyrus SASL libraries:
http://asg.web.cmu.edu/sasl/sasl-library.html
SSH library:
http://www.libssh2.org/
OpenLDAP libraries:
http://www.openldap.org/
Apple ZeroConf responder:
http://opensource.apple.com/source/mDNSResponder/
Balabit Syslog-NG server:
http://www.balabit.com/
SSH daemon:
http://www.openssh.org/
SSL libraries:
http://www.openssl.org/
Regular expression library:
http://www.pcre.org/
Tiny SSH daemon for recovery:
https://matt.ucc.asn.au/dropbear/dropbear.html
MIT license:
http://en.wikipedia.org/wiki/MIT_license
URL retrieval library:
http://curl.haxx.se/
Java logging library:
http://www.slf4j.org/
XML/XSLT parsing library:
http://www.xmlsoft.org/
Java crypto library:
http://www.bouncycastle.org/
INI parsing library:
http://ndevilla.free.fr/iniparser/
Java HTML library:
http://jsoup.org/
RADVD specific license:
http://cvs.litech.org/viewcvs/radvd/COPYRIGHT?rev=1.2&view=markup
IPv6 routing daemon:
http://www.litech.org/radvd/
66 | Aventail E-Class SRA WorkPlace User Guide
NTP specific license:
http://www.eecis.udel.edu/~mills/ntp/html/copyright.html
NTP daemon:
http://www.ntp.org/
SNMP specific license:
http://www.net-snmp.org/about/license.html
SNMP libraries & daemon:
http://www.net-snmp.org/
LZ4 compression:
http://fastcompression.blogspot.com/p/lz4.html
Third-party Packages | 67
68 | Aventail E-Class SRA WorkPlace User Guide