1
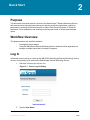
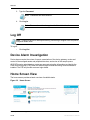
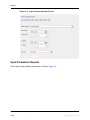
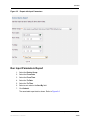
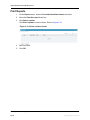
StatusScope™ Remote Monitoring
Service
User Guide
RUO-IDV-05-0879-A
February 2014
This document is provided to customers who have purchased AB SCIEX equipment to use in the
operation of such AB SCIEX equipment. This document is copyright protected and any
reproduction of this document or any part of this document is strictly prohibited, except as
AB SCIEX may authorize in writing.
Software that may be described in this document is furnished under a license agreement. It is
against the law to copy, modify, or distribute the software on any medium, except as specifically
allowed in the license agreement. Furthermore, the license agreement may prohibit the software
from being disassembled, reverse engineered, or decompiled for any purpose. Warranties are as
stated therein.
Portions of this document may make reference to other manufacturers and/or their products,
which may contain parts whose names are registered as trademarks and/or function as
trademarks of their respective owners. Any such use is intended only to designate those
manufacturers' products as supplied by AB SCIEX for incorporation into its equipment and does
not imply any right and/or license to use or permit others to use such manufacturers' and/or their
product names as trademarks.
AB SCIEX warranties are limited to those express warranties provided at the time of sale or
license of its products and are AB SCIEX’s sole and exclusive representations, warranties, and
obligations. AB SCIEX makes no other warranty of any kind whatsoever, expressed or implied,
including without limitation, warranties of merchantability or fitness for a particular purpose,
whether arising from a statute or otherwise in law or from a course of dealing or usage of trade,
all of which are expressly disclaimed, and assumes no responsibility or contingent liability,
including indirect or consequential damages, for any use by the purchaser or for any adverse
circumstances arising therefrom.
For research use only. Not for use in diagnostic procedures.
The trademarks mentioned herein are the property of AB Sciex Pte. Ltd. or their respective
owners.
AB SCIEX™ is being used under license.
© 2014 AB Sciex Pte. Ltd.
Printed in Canada.
AB Sciex Pte. Ltd.
Blk 33, #04-06
Marsiling Ind Estate Road 3
Woodlands Central Indus. Estate
SINGAPORE 739256
StatusScope™ Remote Monitoring Service
2 of 40
User Guide
RUO-IDV-05-0879-A — D5076172
Revision Log
This log shows the revisions that took place during the preparation of this manual.
Revision
Reason for Change
Date
A
First release.
February 2014
User Guide
RUO-IDV-05-0879-A — D5076172
StatusScope™ Remote Monitoring Service
3 of 40
Revision Log
StatusScope™ Remote Monitoring Service
4 of 40
User Guide
RUO-IDV-05-0879-A — D5076172
Contents
Chapter 1 Introduction . . . . . . . . . . . . . . . . . . . . . . . . . . . . . . . . . . . . . . . . . . . . . . 7
Intended Use . . . . . . . . . . . . . . . . . . . . . . . . . . . . . . . . . . . . . . . . . . . . . . . . . . . . .7
Roles and Privileges in the StatusScope Remote Monitoring Service . . . . . . . . .7
Web Site Resources . . . . . . . . . . . . . . . . . . . . . . . . . . . . . . . . . . . . . . . . . . . . . . .7
Supporting Documents . . . . . . . . . . . . . . . . . . . . . . . . . . . . . . . . . . . . . . . . . . . . .7
Chapter 2 Quick Start . . . . . . . . . . . . . . . . . . . . . . . . . . . . . . . . . . . . . . . . . . . . . . . 9
Purpose . . . . . . . . . . . . . . . . . . . . . . . . . . . . . . . . . . . . . . . . . . . . . . . . . . . . . . . . .9
Workflow Overview . . . . . . . . . . . . . . . . . . . . . . . . . . . . . . . . . . . . . . . . . . . . . . . .9
Log In . . . . . . . . . . . . . . . . . . . . . . . . . . . . . . . . . . . . . . . . . . . . . . . . . . . . . . . . . .9
Log Off . . . . . . . . . . . . . . . . . . . . . . . . . . . . . . . . . . . . . . . . . . . . . . . . . . . . . . . .10
Device Alarm Investigation . . . . . . . . . . . . . . . . . . . . . . . . . . . . . . . . . . . . . . . . .10
Home Screen View . . . . . . . . . . . . . . . . . . . . . . . . . . . . . . . . . . . . . . . . . . . . . . .10
Reports . . . . . . . . . . . . . . . . . . . . . . . . . . . . . . . . . . . . . . . . . . . . . . . . . . . . . . . .11
Run a Basic Report . . . . . . . . . . . . . . . . . . . . . . . . . . . . . . . . . . . . . . . . . . . . .11
Input Parameters Reports . . . . . . . . . . . . . . . . . . . . . . . . . . . . . . . . . . . . . . . .12
Run Input Parameters Report . . . . . . . . . . . . . . . . . . . . . . . . . . . . . . . . . . . . .13
Service Screen . . . . . . . . . . . . . . . . . . . . . . . . . . . . . . . . . . . . . . . . . . . . . . . . . .14
Choose Sort Order . . . . . . . . . . . . . . . . . . . . . . . . . . . . . . . . . . . . . . . . . . . . .15
Select an Asset . . . . . . . . . . . . . . . . . . . . . . . . . . . . . . . . . . . . . . . . . . . . . . . .15
Instrument Screen View . . . . . . . . . . . . . . . . . . . . . . . . . . . . . . . . . . . . . . . . . . .16
Access the Instrument Screen . . . . . . . . . . . . . . . . . . . . . . . . . . . . . . . . . . . . .16
Chart Screen . . . . . . . . . . . . . . . . . . . . . . . . . . . . . . . . . . . . . . . . . . . . . . . . . .17
Access Graphic View . . . . . . . . . . . . . . . . . . . . . . . . . . . . . . . . . . . . . . . . . . . .17
Alarms . . . . . . . . . . . . . . . . . . . . . . . . . . . . . . . . . . . . . . . . . . . . . . . . . . . . . . . . .18
Alarm Details . . . . . . . . . . . . . . . . . . . . . . . . . . . . . . . . . . . . . . . . . . . . . . . . . .19
Sample Queue Preview and Control . . . . . . . . . . . . . . . . . . . . . . . . . . . . . . . . . .19
Preview a Sample Queue in Progress . . . . . . . . . . . . . . . . . . . . . . . . . . . . . . .20
The Sample Queue In StatusScope Remote
Monitoring Service Mobile Application . . . . . . . . . . . . . . . . . . . . . . . . . . . . . . . .21
Select a Gateway . . . . . . . . . . . . . . . . . . . . . . . . . . . . . . . . . . . . . . . . . . . . . .22
Gateway Assets/Instruments . . . . . . . . . . . . . . . . . . . . . . . . . . . . . . . . . . . . . .22
Chapter 3 Using the StatusScope Remote Monitoring Service. . . . . . . . . . . . . 25
Service . . . . . . . . . . . . . . . . . . . . . . . . . . . . . . . . . . . . . . . . . . . . . . . . . . . . . . . .25
Asset Navigation View . . . . . . . . . . . . . . . . . . . . . . . . . . . . . . . . . . . . . . . . . . .25
Search Area . . . . . . . . . . . . . . . . . . . . . . . . . . . . . . . . . . . . . . . . . . . . . . . . . . .26
Asset List . . . . . . . . . . . . . . . . . . . . . . . . . . . . . . . . . . . . . . . . . . . . . . . . . . . . .27
Additional Service Tab Options . . . . . . . . . . . . . . . . . . . . . . . . . . . . . . . . . . . . . .28
View . . . . . . . . . . . . . . . . . . . . . . . . . . . . . . . . . . . . . . . . . . . . . . . . . . . . . . . . .28
View Missing Assets . . . . . . . . . . . . . . . . . . . . . . . . . . . . . . . . . . . . . . . . . . . .28
Home Tab . . . . . . . . . . . . . . . . . . . . . . . . . . . . . . . . . . . . . . . . . . . . . . . . . . . . . .29
Report Tab . . . . . . . . . . . . . . . . . . . . . . . . . . . . . . . . . . . . . . . . . . . . . . . . . . . . .30
View a Report . . . . . . . . . . . . . . . . . . . . . . . . . . . . . . . . . . . . . . . . . . . . . . . . .31
Report Scheduling and Delivery . . . . . . . . . . . . . . . . . . . . . . . . . . . . . . . . . . .32
User Guide
RUO-IDV-05-0879-A — D5076172
StatusScope™ Remote Monitoring Service
5 of 40
Contents
Report Options . . . . . . . . . . . . . . . . . . . . . . . . . . . . . . . . . . . . . . . . . . . . . . . . . .33
Select a Report Format . . . . . . . . . . . . . . . . . . . . . . . . . . . . . . . . . . . . . . . . . .34
Select a Language . . . . . . . . . . . . . . . . . . . . . . . . . . . . . . . . . . . . . . . . . . . . . .35
Select a Delivery Method . . . . . . . . . . . . . . . . . . . . . . . . . . . . . . . . . . . . . . . . .35
Print Reports . . . . . . . . . . . . . . . . . . . . . . . . . . . . . . . . . . . . . . . . . . . . . . . . . .36
Chapter 4 Additional Tasks. . . . . . . . . . . . . . . . . . . . . . . . . . . . . . . . . . . . . . . . . . 37
Additional Options . . . . . . . . . . . . . . . . . . . . . . . . . . . . . . . . . . . . . . . . . . . . . . . .37
Recent Assets . . . . . . . . . . . . . . . . . . . . . . . . . . . . . . . . . . . . . . . . . . . . . . . . .37
New Window . . . . . . . . . . . . . . . . . . . . . . . . . . . . . . . . . . . . . . . . . . . . . . . . . .37
New Alerts . . . . . . . . . . . . . . . . . . . . . . . . . . . . . . . . . . . . . . . . . . . . . . . . . . . .37
Preferences . . . . . . . . . . . . . . . . . . . . . . . . . . . . . . . . . . . . . . . . . . . . . . . . . . .37
Change User E-mail . . . . . . . . . . . . . . . . . . . . . . . . . . . . . . . . . . . . . . . . . . . .38
Change User Password . . . . . . . . . . . . . . . . . . . . . . . . . . . . . . . . . . . . . . . . . .38
StatusScope™ Remote Monitoring Service
6 of 40
User Guide
RUO-IDV-05-0879-A — D5076172
1
Introduction
Intended Use
The StatusScope™ Remote Monitoring Service is intended to monitor the performance
parameters of instruments in a lab and send the data to a remote server for viewing and analysis.
Roles and Privileges in the StatusScope Remote
Monitoring Service
Roles are assigned to users through the AB SCIEX StatusScope Remote Monitoring Service
server.
To help organizations make sure that only authorized personnel can view StatusScope Remote
Monitoring Service information, it is recommended that only a minimum number of qualified
personnel be assigned to the user role on the AB SCIEX StatusScope Remote Monitoring
Service server.
Web Site Resources
For software and application technical support:
[email protected]
www.absciex.com/customer-support/training
For general support information:
www.absciex.com
Supporting Documents
The following documents support this User Guide:
•
Release Notes
User Guide
RUO-IDV-05-0879-A — D5076172
StatusScope™ Remote Monitoring Service
7 of 40
Introduction
StatusScope™ Remote Monitoring Service
8 of 40
User Guide
RUO-IDV-05-0879-A — D5076172
2
Quick Start
Purpose
This document will provide a basic overview of the StatusScope™ Remote Monitoring Service
and instructions for exploring basic features for remotely monitoring instruments, improving
performance, resolving technical issues with or without Field Service Engineer or Technical
Assistance Center assistance, and enabling monitoring and control of the processed sample
queue.
Workflow Overview
This guide examines two workflow scenarios:
•
Investigating device alarms.
•
Using the StatusScope Remote Monitoring Service web and mobile applications to
manage a sample queue that is currently in progress.
Log In
Individuals must be set up as a User on the AB SCIEX StatusScope Remote Monitoring Service
server to successfully log on and use the StatusScope Remote Monitoring Service.
1. Visit https://statusscope.absciex.com.
Figure 2-1
Server Log On Dialog
2. Type the User Name.
User Guide
RUO-IDV-05-0879-A — D5076172
StatusScope™ Remote Monitoring Service
9 of 40
Quick Start
3. Type the Password.
Note: Passwords are case-sensitive.
4. Click Log in.
Note: Passwords must be changed on the first visit to the site.
Log Off
Note: Logging off does not interrupt monitoring. Monitoring is stopped if the acquisition
computer is shut down.
To log off:
•
Click Log Out.
Device Alarm Investigation
Device alarms require the review of reports, examination of the device gateway, review and
control of the managed assets and peripheral devices, and review of the sample queue.
AB SCIEX service administrators create user accounts using the information provided by the
Field Service Engineer (FSE) when the StatusScope Remote Monitoring Service software is
installed. The FSE will provide customer login details.
Home Screen View
The home screen provides a basic overview of available tasks.
Figure 2-2
Home Screen
StatusScope™ Remote Monitoring Service
10 of 40
User Guide
RUO-IDV-05-0879-A — D5076172
Quick Start
Reports
Run a Basic Report
To view the current state of instrument alarm conditions, a report is required.
1. Click Report. A list of available reports is shown. Refer to Figure 2-3.
Figure 2-3
Report Screen
2. Locate the Device Alarms Report in the list.
3. Click Run.
The Report Output Selection screen is shown. Refer to Figure 2-4.
User Guide
RUO-IDV-05-0879-A — D5076172
StatusScope™ Remote Monitoring Service
11 of 40
Quick Start
Figure 2-4
Report Output Selection Screen
Input Parameters Reports
Some reports require additional parameters. Refer to Figure 2-5.
StatusScope™ Remote Monitoring Service
12 of 40
User Guide
RUO-IDV-05-0879-A — D5076172
Quick Start
Figure 2-5
Report with Input Parameters
Run Input Parameters Report
1. Select the Device Group.
2. Select the From Date.
3. Select the From Time.
4. Select the To Date.
5. Select the To Time.
6. Select a sort order in the Sort By field.
7. Click Submit.
The associated report data is shown. Refer to Figure 2-6.
User Guide
RUO-IDV-05-0879-A — D5076172
StatusScope™ Remote Monitoring Service
13 of 40
Quick Start
Figure 2-6
Report Data
Print or save this report for later reference when examining individual system alarms.
Note: Reports can be output as HTML (for viewing in the browser), or in Excel or PDF
formats, or sent directly to your printer.
Service Screen
The Service screen displays a list of managed device configurations in various formats. Refer to
Figure 2-7.
Assets are listed on the left of the screen and can be sorted based on the criteria you select.
StatusScope™ Remote Monitoring Service
14 of 40
User Guide
RUO-IDV-05-0879-A — D5076172
Quick Start
Figure 2-7
Service Screen
Choose Sort Order
1. Select the Asset Groups field.
2. Select the criteria used to sort the list of groups.
All assets are listed in the Details pane on the right of the screen.
Select an Asset
Assets have three designations. Refer to Table 2-1.
Table 2-1
Asset Designations
Designation
Description
GW
Gateway
WS
Instrument Workstation
SQ
Sample Queue
In Figure 2-7, the instrument gateway manages three assets: the instrument (GW), the
instrument workstation (WS), and the instrument sample queue (SQ) (if available and enabled
based on user security requirements).
Refer to Service on page 25 for details on additional instrument peripherals.
User Guide
RUO-IDV-05-0879-A — D5076172
StatusScope™ Remote Monitoring Service
15 of 40
Quick Start
Instrument Screen View
Instrument details are displayed on the instrument screen.
Access the Instrument Screen
1. On the Service screen, click an asset name.
2. The instrument screen is shown. Refer to Figure 2-8.
Figure 2-8
Instrument Screen
2
4
3
5
1
6
7
8
9
Item Description
1
History Chart - Links to history chart to review historical trend of any
measured parameter. Refer to Chart Screen on page 17.
2.
Device information.
3
Action and available activities.
4
Device status. Status indicates whether the instrument is connected and
the operational state. When the instrument is disconnected, the Missing
status message is shown and the instrument image is grayed out.
StatusScope™ Remote Monitoring Service
16 of 40
User Guide
RUO-IDV-05-0879-A — D5076172
Quick Start
Item Description
5
Alarms.
6
Recent events on the monitored system.
7
Recent actions that were performed on the remote system.
8
Detailed information about each monitored performance parameter.
9
Device Service History - Section that shows recent service activities
performed on the instrument.
Chart Screen
Review historical trend data of any measured parameter.
1. On the Instrument screen, click History.
The History chart is shown. Refer to Figure 2-9.
Figure 2-9
Chart Screen
2. Select a Data item.
3. Select a Start time.
4. Select an End time.
5. Click Refresh.
The chart is updated.
Access Graphic View
A graphic view of the instrument with test point measurements and settings is available for a
quick overview of critical system parameters.
User Guide
RUO-IDV-05-0879-A — D5076172
StatusScope™ Remote Monitoring Service
17 of 40
Quick Start
•
On the instrument screen, click Details.
The Graphic View screen is shown. Refer to Figure 2-10.
Figure 2-10 Graphic View
Alarms
Alarms are listed on the Instrument Details screen. Click the Alarm label to view alarm details.
The Current Alarms screen is shown. Refer to Figure 2-11.
Figure 2-11 Alarms
StatusScope™ Remote Monitoring Service
18 of 40
User Guide
RUO-IDV-05-0879-A — D5076172
Quick Start
Alarm Details
Click the appropriate alarm name on the Current Alarms screen. The Alarm screen is shown.
Refer to Figure 2-12.
Figure 2-12 Alarm Detail Screen
1
2
3
Item Description
1
Acknowledge that the alarm has occurred.
2
Escalate the alarm.
3
Close the alarm.
Sample Queue Preview and Control
The StatusScope Remote Monitoring Service enables the user to review recently processed
sample queues in reverse order with the most recent samples at the top. Up to three days of
historic details are available.
The StatusScope Remote Monitoring Service also enables control over the samples currently in
progress. The sample and queue can be paused, aborted, or stopped. A paused sample can be
restarted using the Continue command.
Note: For safety reasons, a queue or sample cannot be started remotely.
User Guide
RUO-IDV-05-0879-A — D5076172
StatusScope™ Remote Monitoring Service
19 of 40
Quick Start
All communication between the StatusScope Remote Monitoring Service Agent and the
Enterprise Production Data Server is driven by configured poll/push rate. The result of applying
commands on a current sample might be delayed to subsequent samples, depending on sample
processing duration.
Preview a Sample Queue in Progress
1. On the instrument screen, click an asset ending in SQ (Sample Queue).
The Sample Queue screen is shown.
Figure 2-13 Sample Queue Screen
3
2
4
5
1
Item Description
1
Recent samples sorted chronologically with most recent sample first.
2
Abort Sample
3
Continue Sample
4
Pause Sample
5
Stop Sample
StatusScope™ Remote Monitoring Service
20 of 40
User Guide
RUO-IDV-05-0879-A — D5076172
Quick Start
The Sample Queue In StatusScope Remote
Monitoring Service Mobile Application
To examine the instrument sample queue in the StatusScope Remote Monitoring Service mobile
application:
1. On your mobile phone, go to https://statusscope.absciex.com/apps/mobile.
The Login screen is shown.
Figure 2-14 Mobile Application Login Screen
2. Type the User Name.
3. Type the Password.
4. Tap Sign In.
5. The Gateway screen is shown. Refer to Figure 2-15.
User Guide
RUO-IDV-05-0879-A — D5076172
StatusScope™ Remote Monitoring Service
21 of 40
Quick Start
Figure 2-15 Mobile Application Instrument Gateway Screen
Select a Gateway
Access the sample queue. Select an instrument gateway. Refer to Figure 2-15.
Gateway Assets/Instruments
Assets/instruments managed by the selected gateway is shown. Refer to Figure 2-16.
StatusScope™ Remote Monitoring Service
22 of 40
User Guide
RUO-IDV-05-0879-A — D5076172
Quick Start
Figure 2-16 Assets/Instruments Controlled by the Gateway
Select an instrument to review the instrument information, sample queue information, workstation
information, and peripheral information. For example, clicking Sample Queue shows the
instrument sample queue. Refer to in Figure 2-17.
User Guide
RUO-IDV-05-0879-A — D5076172
StatusScope™ Remote Monitoring Service
23 of 40
Quick Start
Figure 2-17 Sample Queue Review
1
2
3
4
Item Description
1
Stop the sample queue. A stopped sample queue must be restarted from within the
Analyst® software.
2
Abort the sample queue. An aborted sample queue must be restarted from within the
Analyst software.
3
Pause the sample queue. A paused sample queue can be resumed remotely.
4
Resume the paused sample queue.
StatusScope™ Remote Monitoring Service
24 of 40
User Guide
RUO-IDV-05-0879-A — D5076172
3
Using the StatusScope Remote Monitoring
Service
Service
When the user logs on to the StatusScope™ Remote Monitoring Service, the Service tab is
shown.
Figure 3-1
Service Tab
2
1
3
Item Description
1
Assets Navigation View
2
Search Area
3
Asset List
Asset Navigation View
The asset navigation view provides a method of accessing instrument performance data. The
asset list can be sorted by asset group, gateway, location, model, organization, region, or
system. Combinations of these options are also available. Click the + button to expand the asset
list. Refer to Figure 3-2.
User Guide
RUO-IDV-05-0879-A — D5076172
StatusScope™ Remote Monitoring Service
25 of 40
Using the StatusScope Remote Monitoring Service
Figure 3-2
Sorted Asset List
1
2
3
4
5
Item Description
1
Sorting option
2
Region
3
Organization
4
Location
5
Asset
Search Area
The search area provides a method of searching for an instrument based on specific criteria.
Refer to Figure 3-3.
Figure 3-3
Search Assets
1
2
3
4
5
Item Description
1
Asset serial number
2
Model number
3
Region (APAC, EMEA, Japan)
StatusScope™ Remote Monitoring Service
26 of 40
User Guide
RUO-IDV-05-0879-A — D5076172
Using the StatusScope Remote Monitoring Service
Item Description
4
Instrument data
5
Software upload components
1. Enter the relevant fields for the search and click Search.
Note: Search terms are not case-sensitive. Search returns exact matches
only.
Asset List
The asset list displays a list of instruments and their peripherals being monitored by the
StatusScope software. Refer to Figure 3-4.
Figure 3-4
1
Asset List
2
3
4
5
6
Item Description
1
Indicates if the connection status of the instrument.
2
Indicates the status of the instrument. Status colors and their meaning are:
• Green - good
• Blue - ready
• Aqua - running
• Yellow - unknown
• Black - missing
• Red - fault
3
The name of the instrument.
4
The organization that owns the instrument.
5
The location of the instrument.
6
User-selected language.
User Guide
RUO-IDV-05-0879-A — D5076172
StatusScope™ Remote Monitoring Service
27 of 40
Using the StatusScope Remote Monitoring Service
Additional Service Tab Options
View
View Assets with Alarms
•
Click View > Assets with alarms.
The Assets with Alarms screen is shown.
View Assets by Status
•
Click View > Assets by status.
The Assets By Status screen is shown. Refer to Figure 3-5.
Figure 3-5
Assets by Status
View Missing Assets
•
Click View > Missing assets.
The Missing Assets screen is shown. Refer to Figure 3-5.
StatusScope™ Remote Monitoring Service
28 of 40
User Guide
RUO-IDV-05-0879-A — D5076172
Using the StatusScope Remote Monitoring Service
Figure 3-6
Missing Assets
Home Tab
Users can access basic tasks and view basic asset performance data on the Home tab.
Figure 3-7
Home Tab
1
6
3
2
4
5
Item Description
1
Search for assets by organization name, asset name, asset serial number, or location.
2
View assets.
3
View troubleshooting information.
4
Access and control remote assets.
5
View usage data and asset charts.
6
List of Recent assets. Click an asset to view more information.
User Guide
RUO-IDV-05-0879-A — D5076172
StatusScope™ Remote Monitoring Service
29 of 40
Using the StatusScope Remote Monitoring Service
Report Tab
The Report tab provides an overview of the available user reports. Refer to Figure 3-8.
Figure 3-8
Report Tab
For audit report types, refer to Table 3-1.
Table 3-1
Report Types
Name
Description
Device Report
View device reports.
Organization Report
View organization reports.
User Report
View user reports.
Alarm Frequency Report
View reports based on alarm frequency.
Auditing Report
View auditing reports.
Current Analog Data Item Report
View reports based on current analog data items.
Device Alarm Occurrence By Device
Group Report
View reports based on device alarm occurrence by
device group.
StatusScope™ Remote Monitoring Service
30 of 40
User Guide
RUO-IDV-05-0879-A — D5076172
Using the StatusScope Remote Monitoring Service
Table 3-1
Report Types
Name
Description
Device Alarm Occurrence By Organization View device alarm occurrence reports based on
Report
organization.
Device Alarm Occurrence By Region
Report
View device alarm occurrence reports based on
region.
Device Alarms Report
View all device alarm reports.
Device Events Report
View all device event reports.
Device Information Report
View all device information reports.
Device Registration Report
View reports based on device registrations.
Device Rules Report
View reports based on device rules.
Device Status Report
VIew reports based on device status.
Event Frequency Report
View reports based on frequency.
Gateway Audit Log Report
View reports based on gateway audit logs.
Missing Device Report
VIew reports of missing devices.
Users Report
View reports based on users.
View a Report
1. Click the report name.
The report input parameters entry screen is shown. Refer to Figure 3-9.
2. Select parameters and conditions appropriate for each particular report.
Figure 3-9
User Guide
RUO-IDV-05-0879-A — D5076172
Common Report Fields
StatusScope™ Remote Monitoring Service
31 of 40
Using the StatusScope Remote Monitoring Service
Report Scheduling and Delivery
Reports can be scheduled to run at specific times and delivered in specific formats.
Figure 3-10 Report Schedule Screen
1
2
3
4
7
5
6
8
9
Item Description
1
Disable the schedule.
Note: Disabling a schedule does not delete it.
2
Schedule the priority.
3
Schedule the start date.
4
Schedule the start time.
5
Schedule the end date.
6
Schedule the end time.
7
Frequency of the report.
8
Schedule customization options.
9
Preset prompt values.
StatusScope™ Remote Monitoring Service
32 of 40
User Guide
RUO-IDV-05-0879-A — D5076172
Using the StatusScope Remote Monitoring Service
Schedule a Report Based on Dates
1. Click Schedule.
The Schedule screen is shown. Refer to Figure 3-10.
2. Type a Start date.
3. Type a Start time.
4. Select End by.
Note: Select No end date to run the report indefinitely.
5. Select an End by date.
6. Select an End by time.
7. Click OK.
Schedule a Report Based on Frequency
1. Click Schedule.
The Schedule screen is shown. Refer to Figure 3-10.
2. Select a Frequency category.
3. Select the appropriate frequency options.
Table 3-2
Frequency Option
Required Actions
By Day
Select the number of minutes, hours, or days
between reports.
By Week
Select the frequency of weeks and the days of the
week.
By Month
Select the day of the month and the frequency of
months or select day of the month and the frequency
of months.
By Year
Select the day of the year and the month or select the
day of the year.
By Trigger
In the Trigger name field, name the trigger for the
schedule.
4. Click OK.
Report Options
Reports can be generated and delivered in different ways. The default format is an HTML file
within the Web browser.
User Guide
RUO-IDV-05-0879-A — D5076172
StatusScope™ Remote Monitoring Service
33 of 40
Using the StatusScope Remote Monitoring Service
Select a Report Format
1. On the Report screen, select the Override the default values check box.
2. Select a format in the Formats section.
Figure 3-11 Report Formats
1
2
3
4
Item Description
1
Select a Web format. Options include:
• HTML - Delivers the report in a standard Web page.
• HTML Fragment - Delivers the report in a format that can be
embedded in another Web page.
• XHTML - Delivers the report in a format that can be converted to a
different format.
Number of rows per Web page.
Select Enable selection-based interactivity to enable:
•
•
•
•
•
Moving up and down a report.
Moving through other reports.
Searching the report.
Deliver reports based on conditions.
Use Agent notification.
2
Select PDF to deliver the report in PDF format.
3
Select Delimited text (CSV) to deliver the report in a format understood
by spreadsheet programs.
4
Select XML to deliver the report in XML format.
3. Click OK.
StatusScope™ Remote Monitoring Service
34 of 40
User Guide
RUO-IDV-05-0879-A — D5076172
Using the StatusScope Remote Monitoring Service
Select a Language
Reports can be delivered in multiple languages.
1. On the Report screen, click the Override the default values check box.
2. Click Select the languages.
3. The Select the languages screen is shown.
Figure 3-12 Select the languages Screen
4. Select a language In the Available languages section.
5. Click
.
6. Click OK.
Select a Delivery Method
Multiple delivery methods can be selected. Refer to Figure 3-13.
Figure 3-13 Delivery Options
User Guide
RUO-IDV-05-0879-A — D5076172
StatusScope™ Remote Monitoring Service
35 of 40
Using the StatusScope Remote Monitoring Service
Print Reports
1. On the Report screen, select the Override the default values check box.
2. Select the Print the report check box.
3. Click Select a printer.
The Select a printer screen is shown. Refer to Figure 3-14.
Figure 3-14 Select a printer Screen
4. Select a printer.
5. Click OK.
StatusScope™ Remote Monitoring Service
36 of 40
User Guide
RUO-IDV-05-0879-A — D5076172
4
Additional Tasks
Additional Options
Recent Assets
•
Click Recent Assets and select an asset to view a recently viewed asset.
New Window
•
Click New Window to open the current screen in a new window.
New Alerts
•
Click New Alerts to view alerts that have not been acknowledged.
Preferences
•
Click Preferences to change user preferences. Refer to Figure 4-1.
User Guide
RUO-IDV-05-0879-A — D5076172
StatusScope™ Remote Monitoring Service
37 of 40
Additional Tasks
Figure 4-1
Preferences Screen
Change User E-mail
1. Click Preferences.
The Preferences screen is shown. Refer to Figure 4-1.
2. Click Edit User Attributes.
The Update your E-mail Address and Password screen is shown.
3. Type a new E-mail address.
4. Click Submit.
Change User Password
1. Click Preferences.
The Preferences screen is shown. Refer to Figure 4-1.
2. Click Edit User Attributes.
The Update your E-mail Address and Password screen is shown.
3. Type the Current Password.
4. Type a New Password.
StatusScope™ Remote Monitoring Service
38 of 40
User Guide
RUO-IDV-05-0879-A — D5076172
Additional Tasks
5. Type the new password again in the Confirm Password field.
6. Click Submit.
User Guide
RUO-IDV-05-0879-A — D5076172
StatusScope™ Remote Monitoring Service
39 of 40
Additional Tasks
StatusScope™ Remote Monitoring Service
40 of 40
User Guide
RUO-IDV-05-0879-A — D5076172