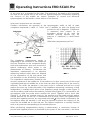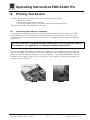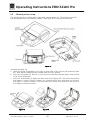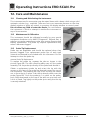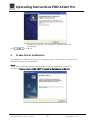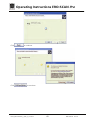
1
Operating Instructions EROCSCAN Pro
GebaEroscanPro_E_REV-A
Operating Instructions EROCSCAN Pro
Table of Contents
Page
1. Introduction .......................................................................................... 1 1.1 1.2 1.3 Instrument Description ....................................................................................... 1 Otoacoustic Emissions ........................................................................................ 2 Tympanometry ................................................................................................... 3 2. Important Safety Precautions .............................................................. 5 2.1 2.2 Disclaimer .......................................................................................................... 5 Precautions ........................................................................................................ 6 3. Getting Started ..................................................................................... 8 3.1 2.2 2.3 Unpacking the system ........................................................................................ 8 Battery Installation .............................................................................................. 9 Environmental conditions ................................................................................... 9 4. Getting familiar with the ERO•SCAN Pro ......................................... 10 4.1
4.2
4.3 Controls and display .......................................................................................... 10 Internal Probe .................................................................................................... 10 External Probes (optional) ................................................................................. 11 5. Conducting a Measurement .............................................................. 13 5.1 5.2 5.3 5.4 5.5 5.6 5.7 Quick Start ....................................................................................................... 13 Powering on the Instrument ............................................................................. 13 Selecting a Protocol or Protocol Series .............................................................. 14 Selecting an Eartip ............................................................................................ 14 Preparing the Patient ........................................................................................ 14 Conducting a measurement ............................................................................. 15 Proceeding to the next test ............................................................................... 18 6. Interpreting Results............................................................................ 19 6.1 6.2 6.3 6.4 Understanding the OAE Results Display ............................................................ 19 Understanding the Tympanometry Results Display ............................................ 19 Interpreting the Tympanometric test result ....................................................... 20 Abnormal Values .............................................................................................. 20 7. Managing Test Results ....................................................................... 21 7.1 7.2 Reviewing Test Results ...................................................................................... 21 Deleting Test Results ........................................................................................ 22 8. Printing Test Results........................................................................... 23 8.1 8.2 8.3 8.4 8.5 Connecting the cradle to a computer ............................................................... 23 Quick-Print to PDF or to the default PC printer .................................................. 24 Thermal printer set up ...................................................................................... 28 Connecting the cradle to the Printer ................................................................. 30 Printing with the Thermal Paper Printer ............................................................. 30 9. Set Up .................................................................................................. 33 9.1 9.2 9.3 9.4 9.5 9.6 9.7 9.8 9.9 9.10 Language ......................................................................................................... 33 Time/Date ........................................................................................................ 33 Display Contrast ............................................................................................... 34 Instrument Details ............................................................................................ 34 DP Early Stop.................................................................................................... 34 OAE Minimums ................................................................................................ 35 Save Mode (Patients) ........................................................................................ 35 Sounds ............................................................................................................. 36 Graph Style ...................................................................................................... 37 Reset ................................................................................................................ 37 Geba_EROSCANPro_E_REV_a_12a.docx
i
850 041/2 01/12
Operating Instructions EROCSCAN Pro
10. Customizing Protocols and Series ..................................................... 38 10.1 10.2 10.3 Creating/Editing Protocol Files .......................................................................... 38 Managing Protocols in the Instrument .............................................................. 45 Creating Series ................................................................................................. 47 11. Troubleshooting ................................................................................. 50 12. Care and Maintenance ....................................................................... 51 12.1 12.2 12.3 Cleaning and Disinfecting the Instrument ......................................................... 51 Maintenance & Calibration ............................................................................... 51 Probe Tip Replacement ..................................................................................... 51 13. System Specifications......................................................................... 53 14. Warranty, Maintenance and Service ................................................. 54 15. Replacement Parts and Upgrades ..................................................... 55 16. Safety Regulations ............................................................................. 56 Appendix A: ERO-SCAN Pro Software Installation Instructions ............ 58 Appendix B: Default Test Protocols and Protocol Series ....................... 70 Appendix C: Test Technique and Sequence ............................................ 75 Appendix D: Pass/Refer Criteria .............................................................. 77 Appendix E: High Frequency Measurements ......................................... 79 Geba_EROSCANPro_E_REV_a_12a.docx
ii
850 041/2 01/12
Operating Instructions EROCSCAN Pro
1. Introduction
The ERO•SCAN™ Pro Test Instrument is designed to be a screening device for cochlear
hearing loss and/or middle ear pathology (with optional external Tymp•OAE Probe™).
The presence of otoacoustic emissions suggests normal outer hair cell function, which in
turn correlates to normal hearing. The presence of a normal tympanogram suggests
normal middle ear function. However, a passing result using this instrument is not an
indication that the full auditory system is normal. Thus, a PASS result should not be
allowed to override other indications that hearing is not normal. A full audiologic
evaluation should be administered if concerns about hearing sensitivity persist. A REFER
test result should not be assumed to be an indicator of a lack of auditory function or the
presence of pathology; however, it should be followed with full audiologic diagnostic
testing and/or medical evaluation as appropriate.
Note: Sensitivity and specificity of this type of device are based on the test
characteristics defined by the user, and may vary depending on environmental and
operating conditions.
1.1
Instrument Description
What is the ERO•SCAN Pro Instrument?
The ERO•SCAN Pro test instrument is a hand-held device designed to provide an
objective measure of middle ear and outer hair cell function through the measurement
of otoacoustic emissions and tympanometry (using an optional external tympanometry
probe). It consists of the handheld unit, external probe(s), printer, single-use eartips and
other accessories (Figure 1). The ERO•SCAN Pro instrument may be used as a screening
tool, or in conjunction with conventional tests as part of a full diagnostic evaluation.
The ERO•SCAN Pro instrument contains
the hardware and software for
generating the test stimuli, measuring
and
displaying
the
OAE
or
tympanometry results, and storing the
results until they are printed or
downloaded to the PC software. The
plastic housing contains circuit boards
that provide the signal processing and
display the test results. The instrument
also contains 4 AA/UM-3/R6 alkaline
batteries to power the device. The
instrument uses an organic LED display
(OLED) and light-emitting diodes (LEDs)
to provide a visual display of test data
Figure 1
and test conditions to the operator.
Two membrane-type push buttons and
a 4-way navigation control located on the control panel of the device allow the user to
power the instrument on and off, control testing, and initiate printing.
Geba_EROSCANPro_E_REV_a_12a.docx
1
850 041/2 01/12
Operating Instructions EROCSCAN Pro
The probe sections of the instrument and external probes house a microphone, two
transducers, and two speaker tubes which produce test stimuli and measure the sound
pressure level (SPL) present in the sealed ear canal. Additionally, the combined
Tymp•OAE Probe™ contains a mechanical pump system and pressure sensor to control
and monitor air pressure variation in the ear canal. Each probe houses a keypad with
two buttons (right and left) which can be used to start a test with the probe. LED’s on
the probe keypad indicate ear being tested and test status.
Interface of the instrument to the ear canal is accomplished through disposable eartips
made of industrial elastomer, which fit onto the probe tip. The disposable eartips are
color coded to facilitate easy selection by size.
How are the Results Stored and Reported?
When the ERO•SCAN Pro is set in its default settings, the instrument will store the
results from one patient (most recent left and right ear test for each available protocol)
in its non-volatile memory for subsequent printing. The results are displayed via the
display on the front of the device and are stored in the device’s internal memory. After
testing is completed, results can be printed using the optional thermal paper printer or
the default PC printer via software interface. Tests can also be exported to a computer
database via optional software. Test results are stored in the non-volatile memory so the
operator can delay printing until a later time if desired.
1.2
Otoacoustic Emissions
What Are DPOAEs?
Distortion Product Otoacoustic Emissions (DPOAEs) are acoustic signals that can be
detected in the ear canal of a person with normal outer hair cell function, subsequent to
stimulation of the auditory system with a pair of pure tones at frequencies f1 and f2. The
resulting emission of interest is the
distortion product tone at the frequency
2f1-f2.
What Are TEOAEs?
Transient Evoked Otoacoustic Emissions
(TEOAEs) are acoustic signals that can be
detected in the ear canal of a person with
normal
outer
hair
cell
function,
subsequent to stimulation of the auditory
system with a series of wideband clicks.
Figure 2
What Do Otoacoustic Emissions Results Tell
Us?
Available evidence suggests that otoacoustic emissions (OAEs) are generated by the
cochlea’s outer hair cells, and that the presence of OAEs is an indication that the outer
hair cells are normal. Although OAE test data provide no indication of inner hair cell
function, or of hearing ability, current research indicates that the majority of hearingimpaired individuals will be identified by a simple OAE test. Patients who fail to generate
OAEs should be rescreened and/or referred for additional audiological testing.
Geba_EROSCANPro_E_REV_a_12a.docx
2
850 041/2 01/12
Operating Instructions EROCSCAN Pro
6
How Does the ERO•SCAN Pro Device Measure DPOAEs?
The ERO•SCAN Pro instrument generates a series of test tones, directs them into the ear
canal, and then measures the level of the DPOAE tone generated by the cochlea. By
using different test frequencies, the ERO•SCAN Pro device provides an estimate of outer
hair cell function over a wide range of frequencies.
How Does the ERO•SCAN Pro Device Measure TEOAEs?
The ERO•SCAN Pro instrument generates a series of clicks, directs them into the ear
canal, and then analyzes the spectrum of the returning signal, separating the noise and
emission. By using bandpass filters, the ERO•SCAN Pro device provides an estimate of
outer hair cell function over a wide range of frequencies.
7
How Does the ERO•SCAN Pro Device Work?
The digital signal processor in the instrument generates two pure tones (f1 and f2) for
DPOAEs or a series of wideband clicks for TEOAEs through a digital-to-analog converter.
These tones or clicks are presented to the ear via speaker tubes located in the probe. A
microphone in the probe measures the sound in the ear canal and transmits the signal
to the analog-to-digital converter. The digital signal processor then uses Fast-Fourier
Transforms (FFTs) to filter the signal into narrow frequency bands, and detects any
emissions present. The level of these emissions can be compared with the level of the
noise.
The SPL and frequencies of the test tones and the averaging time used to process the
signals can be determined by the tester through adjustable settings maintained in static
memory within the ERO•SCAN Pro instrument.
What Frequency Range of Hearing is Estimated?
DPOAEs: Approximately 1.5 kHz to 12 kHz (depending on the frequency range
selected). Since the health of the hair cells in the region of the f2 test frequency are
estimated, and a) the 2f1-f2 emission frequency is at about six-tenths of the f2
frequency, b) emissions tend to be weak below 600 Hz or so, and c) the ambient noise
tends to be highest at low frequencies, the lowest f2 test frequency that can be
routinely measured is about 1 kHz. TEOAEs: Roughly 500 Hz to 4 kHz. TEOAEs can be
reliably recorded at lower frequencies than DPOAEs, but cannot be measured reliably
above 4 kHz.
1.3
Tympanometry
What is tympanometry?
Tympanometry is the objective measurement of middle ear mobility (compliance) and
pressure within the middle ear system. During the test, a probe tone (226 or 1,000 Hz)
is presented to the ear canal by means of the Tymp OAE Probe. This tone is used to
measure the change in compliance in the middle ear system while the air pressure is
varied automatically from a positive value (+200 daPa) to a negative value (-400 daPa
max.).
How is compliance measured?
Maximum compliance of the middle ear system occurs when the pressure in the middle
ear cavity is equal to the pressure in the external auditory canal. This is the highest peak
Geba_EROSCANPro_E_REV_a_12a.docx
3
850 041/2 01/12
Operating Instructions EROCSCAN Pro
of the curve as it is recorded on the chart. The position of the peak on the horizontal
axis and on the vertical axis of the chart will provide diagnostic information regarding
the function of the middle ear system. Examples of normal and abnormal
tympanograms can be found in a later section of this manual.
What other measurements are calculated?
Gradient calculations are reported as the tympanogram width at half of peak
compliance expressed in daPa. A “limits” box is available on both the display and
printout to aid in diagnosis. Compliance
is measured with respect to an
equivalent volume of air, with the
scientific quantity milliliter (ml). Air
pressure is measured in deca-Pascals
(daPa).
What does tympanometry tell us?
Figure 3
The impedance measurement assists in
diagnosing of the condition of the middle ear
and can therefore not be compared directly
with other audiometric tests such as sound or
speech audiometry which assists in the
measurement of hearing. Furthermore the
impedance measurement is an objective
Figure 4
measuring method which does not depend
on the cooperation of the test person and
can therefore not be falsified by the patient.
The impedance measurement examines the
acoustic resistance of the middle ear. If the eardrum is hit by a sound, part of the sound
is absorbed and sent via middle ear to the inner ear while the other part of the sound is
reflected. The stiffer the eardrum is the more sound is reflected and the less sound
reaches the inner ear. Inside the probe of the impedance measuring instrument a small
loudspeaker is installed which emits a low frequency sound through a tube (Figure 3)
into the auditory canal before the eardrum. Another tube (Figure 3) is connected to the
microphone inside the probe which receives the sound. Together with a third tube
(Figure 3), all three are inserted nearly to the eardrum and are made airtight against
outside pressure by the ear tip. A manometer and a pump, which can produce both
positive and negative pressure, are connected with tube C. Less sound is reflected to the
microphone when the eardrum is stiff and the eardrum transmits the majority of the
sound via the middle ear to the inner ear. The highest compliance is normally reached
with an air pressure corresponding to the outside pressure.
When performing tympanometry during a measurement, a continuous change of
positive and negative pressure is produced by the pump of the instrument in the outer
Geba_EROSCANPro_E_REV_a_12a.docx
4
850 041/2 01/12
Operating Instructions EROCSCAN Pro
auditory canal. The compliance is measured simultaneously and shown in a diagram (the
tympanogram) which illustrates the compliance in ml or mmho over the pressure in
daPa. In Figure 4, the area for normal tympanogram curves is hatched. Here you can
see that the highest compliance is reached with normal pressure. When you create
positive and negative pressure the eardrum stiffens - the compliance decreases. So you
can draw conclusions on the condition of the middle ear from the form and the values
of the tympanogram.
NOTE: 1.02 mm H2O = 1.0 daPa.
2. Important Safety Precautions
The ERO•SCAN Pro Test System should be used only by those individuals trained to
perform the testing for which it has been designed. No person should attempt to use
this instrument without the necessary knowledge and training to understand how this
equipment is to be properly utilized and interpreted.
The ERO•SCAN Instrument probe tip must not be inserted into an ear at any time
without a disposable eartip properly affixed.
IMPORTANT
In the event of a critical system failure, the message
shown to the left will be displayed. Discontinue
use of the instrument and contact your Special
Equipment Distributor or contact MAICO Diagnostic
by phone at (888) 941-4201 or by fax at (952) 9034100.
2.1
Disclaimer
The MAICO ERO•SCAN™ Test Instrument is designed to be a screening device for
hearing loss. Sensitivity and specificity of this type of device are based on the test
characteristics defined by the user, and may vary depending on environmental and
operating conditions. The presence of otoacoustic emissions suggests normal outer hair
cell function, which in turn correlates to normal hearing. However, a passing result using
this instrument is not an indication that the full auditory system is normal. Thus, a PASS
result should not be allowed to override other indications that hearing is not normal. A
full audiologic evaluation should be administered if concerns about hearing sensitivity
persist. A REFER test result should not be assumed to be an indicator of a lack of
auditory function; however, it should be followed with full audiologic diagnostic testing.
NOTICE: Under certain circumstances, especially in low-humidity environments,
common electrostatic discharge may cause this instrument to turn itself off. This effect
causes no permanent damage, and the instrument may be turned on again by the
normal procedure of holding the DOWN button.
Geba_EROSCANPro_E_REV_a_12a.docx
5
850 041/2 01/12
Operating Instructions EROCSCAN Pro
2.2
•
•
•
•
•
•
•
•
•
•
•
•
•
•
Precautions
READ THIS ENTIRE MANUAL BEFORE ATTEMPTING TO USE THIS SYSTEM.
Use this device only as described in this manual.
Use only the disposable eartips designed for use with this instrument.
Never insert the probe tip into the ear canal without affixing an eartip.
The eartips are disposable and for single patient use only. Do not clean or reuse
eartips.
Use only disposable 1.5v AA/UM-3/R6 Alkaline batteries for the test instrument.
Do not use rechargeable cells in this device; do not mix battery types and do not
mix old and new batteries.
Remove the batteries from the instrument if it will not be used for 4 weeks or
more.
Do not immerse the unit in any fluids. See the Care and Maintenance section of
this manual for proper cleaning procedures.
Do not drop or otherwise cause undue impact to this device. If the instrument is
dropped or otherwise damaged, return it to the manufacturer for repair and/or
calibration. Do not use the instrument if any damage is suspected.
Use and store the instrument indoors only. Do not use this instrument or its
accessories in temperatures below 40°F (4°C) or above 100°F (38°C), or in
relative humidity of more than 90%.
Do not attempt to open or service the instrument. Return the instrument to the
manufacturer for all service. Opening the instrument case will void the warranty.
Do not operate the printer if the power supply has a damaged cord or plug. See
the instructions on the following page.
Do not expose the printed results to sunlight or heat. Printing on thermal paper
fades with exposure to light or heat.
Photocopies of test results should be made if the records are to be kept
indefinitely.
Geba_EROSCANPro_E_REV_a_12a.docx
6
850 041/2 01/12
Operating Instructions EROCSCAN Pro
Printer AC Power Source Precautions
• The printer AC power source converts main voltage (120V AC or 230V AC) to a
low voltage (12V DC) for powering the printer. Use only the power source
supplied for this purpose.
• This product is for indoor use only. Do not expose to water or excessive dust.
• This product is not suitable for operation in the presence of flammable anesthetic
mixture with air or with nitrous oxide.
• Do not cover the power source body as it may result in excessive heating. The
power source operates when the plug is inserted into an outlet. To turn it off,
remove the plug from the outlet. The outlet must be easily accessible and located
near the printer. Should a faulty condition occur, remove the plug from the
outlet immediately.
• High Voltage Inside! Do not remove the power supply cover! All service or
maintenance must be done by trained personnel. Return the power supply to the
manufacturer for service.
Cleaning and Disinfecting the Unit
Wipe the surface with a cloth slightly dampened with mild detergent or normal hospital
bactericides. Do not immerse the unit. Do not clean the unit with isopropyl alcohol or
other solvents.
Optional Printer Rechargeable Battery Precautions
• Do not attempt to open the battery pack. The printer battery pack contains NiMh cells. Cadmium is a potentially toxic heavy metal, and exposing the cells
increases the risk of leakage or short-circuiting.
• Do not short circuit the battery contacts. This could cause burns or a fire.
• Disconnect the printer power supply before removing or replacing the battery
pack.
• Observe local regulations for handling, transport, and disposal of Ni-Mh cells.
Regulations in many areas prohibit the disposal of Nickel-Cadmium cells.
Complete battery packs may be returned to the manufacturer for recycling.
• The battery pack must be charged for a minimum of five hours before using the
printer for the first time. Failure to fully charge the battery pack before use may
reduce the life of the battery pack.
5
Geba_EROSCANPro_E_REV_a_12a.docx
7
850 041/2 01/12
Operating Instructions EROCSCAN Pro
3. Getting Started
3.1
Unpacking the
system
Standard System Parts (OAE):
(1) ERO•SCAN™ Pro Handheld unit w/ internal
probe
(1) Cradle
(1) USB cable
(4) AA/UM-3/R6 Alkaline
batteries
(4) Internal probe tips (4/pkg)
(1) Box of disposable eartips
in assorted sizes
(1) Thermal Paper Printer
with Lithium Ion battery
installed with:
(1) Thermal printer
paper roll
(1) Printer charger
(1) Power supply cord
(1) Printer cable
(1) ERO•SCAN Pro PC
software CD
(1) Operating Manual
Additional Standard Parts for
ERO SCAN Pro with
Tymp:
(1) External TympyOAE
Probe™ with:
(1) Calibration cavity
(4) External probe tips (4/pkg)
Optional System Parts:
(1) External OAE•Probe™
(4) External probe tips (4/pkg)
Standard System Parts
Handheld
Cradle
AA Batteries
Eartip Kit
Internal Probe Tips
Printer
Thermal Paper Roll
Power supply
cord
Operating Manual
& PC Software CD
Printer Cable
Standard Parts for OAE and Tymp
Note: It is recommend that
you save the box and
packing materials in case
you need to store or ship
the system.
TympyOAE Probe
Figure 5
Ext. OAE Probe
Geba_EROSCANPro_E_REV_a_12a.docx
USB Cable
Calibration Cavity
External Probe Tips
Optional Parts
8
External Probe Tips
850 041/2 01/12
Operating Instructions EROCSCAN Pro
2.2
Battery Installation
The ERO•SCAN Pro instrument uses 4 AA/UM-3/R6
Alkaline batteries. Open the battery compartment
by sliding the battery panel down and install the
batteries as indicated on label inside the
compartment. Once the batteries are correctly in
place, slide the panel back onto its tracks to close
the battery compartment. (Figure 6)
Figure 6
2.3
Environmental conditions
The MAICO ERO•SCAN™ Pro should be operated in a quiet room, so that the
examinations are not influenced by outside noises.
Electro-medical instruments, which emit strong electromagnetic fields (e.g. microwaves radiotherapy devices), can influence the function of the MAICO ERO•SCAN™ Pro.
Therefore the use of these instruments is not allowed in close proximity to the MAICO
ERO•SCAN™ Pro.
The test room must be at normal temperature, usually 15°C / 59°F to 35°C / 95°F, to
guarantee precise measuring results. If the device has been cooled down (e.g. during
transport), please wait until it has warmed up.
Geba_EROSCANPro_E_REV_a_12a.docx
9
850 041/2 01/12
Operating Instructions EROCSCAN Pro
4. Getting familiar with the ERO•SCAN Pro
4.1 Controls and display
(Figure 7)
Power Button:
Press to power on
Press and hold to power off
Info Button:
View detailed information about the
selection
Navigator:
Up/down arrows change the selection
shown on the middle line
Left/right arrows initiate the action
shown in the bottom line of the
display.
Test Status Indicators:
Green – indicates the instrument is
ready to test
Yellow – indicates test is in progress
Amber – indicates an error condition
Figure 7
4.2 Internal Probe
The internal probe is located on the underside of the
ERO•SCAN Pro instrument (Figure 8). It allows for the
measurement of DPOAEs in the range of 1.5 kHz to 6
kHz and TEOAEs in the range of 0.7 kHz to 4 kHz.
Note: Tympanometry and high frequency DPOAE
measurements are not supported by the internal
probe of the ERO•SCAN Pro.
The internal probe consists of a patented dual isolated
spring design which prevents hand movement from
being transferred to the ear canal where it would be
measured as noise (a common problem with any truly
handheld OAE probes).
Figure 8
The internal probe assembly houses the microphone which measures the acoustic
information present in the ear canal and the tubing which carries the stimulus from the
receiver(s) to the ear canal. Interface of the instrument to the ear canal is accomplished
through disposable eartips made of industrial elastomer, which fit onto the probe tip. A
disposable internal probe tip snaps to the shaft of the spring assembly and serves as an
attachment point for the disposable eartips.
Geba_EROSCANPro_E_REV_a_12a.docx
10
850 041/2 01/12
Operating Instructions EROCSCAN Pro
4.3
External Probes (optional)
There are two types of external probe available for use with the ERO•SCAN Pro
instrument (Figure 9). Each consists of the following basic parts (Figure 10):
1. Connection cable – connects probe to ERO•SCAN Pro instrument by way of the
connector
2. Probe enclosure – contains the circuitry, one receiver, and, in the case of the Tymp•OAE
Probe, the pump and pressure sensor
3. Keypad – consists of LED status indicators and Right/Left test start buttons
4. Probe cable – connects the probe enclosure to the probe head
5. Probe head – contains the microphone and one receiver
6. Probe tip – disposable tip onto which the eartip is affixed for sealing to the ear
Figure 9
Figure 10
OAE•Probe™
The OAE•Probe allows for the measurement of DPOAEs in the range of 1.5 kHz to 12
kHz and TEOAEs in the range of 0.7 kHz to 4 kHz.
Tymp•OAE Probe™
The Tymp•OAE Probe allows for measurements of tympanometry with a 226 Hz or
1000 Hz probe tone, DPOAEs in the range of 1.5 kHz to 12 kHz, and TEOAEs in the
range of 0.7 kHz to 4 kHz.
The external probe keypads consist of a left
(indicated by L) and right (indicated by R) button
to initiate the selected test protocol or series.
Below the left and right buttons are blue (for
left) and amber (for right) LEDs which illuminate
during testing to indicate the ear under test
(Figure 11)
Figure 11
Geba_EROSCANPro_E_REV_a_12a.docx
Each probe provides a status indictor in the form
of LED(s) located on the keypad (Figure 11). In
the case of the OAE•Probe the indicator is
between the left and right buttons. On the
Tymp•OAE Probe the indicator is a row of LED’s
above the left and right buttons.
11
850 041/2 01/12
Operating Instructions EROCSCAN Pro
The LED located between the left and right buttons indicates status of the probe:
Green: Probe has been detected and
instrument is ready to test
Flashing Yellow: AutoStart in process
Solid Yellow: Testing in progress
The status indicator bar on the Tymp•OAE Probe will indicate the pressure sweep of the pump
by showing a sweeping sequence of lights.
Note: When idle (not testing) the probe status LED should be solid green. If the
LED is yellow when idle then the probe has not been detected by the
instrument. Power off the instrument, check the probe connection, and turn the
instrument on again to detect the probe. The status LED should now be solid
green.
The external probes are preferred by most users when conducting OAE measurements
for infants, young children, and other difficult to test populations such as individuals
with multiple handicaps. The external probe allows the user to insert the probe tip into
the ear and then wait until the patient is quiet before starting the test. The internal
probe may be preferred by some users for fast OAE testing of cooperative parents.
Installing the External Probe
1. Turn off the ERO•SCAN Pro and insert the external probe
plug into the socket on the top of the ERO•SCAN Pro
(Figure 12). The plug will fit only in one direction. The
arrows on the plug should face the display on the
ERO•SCAN Pro.
2. Turn on the ERO•SCAN Pro. The status indicator on the
external probe keypad will be solid greed indicating the
ERO•SCAN Pro has detected the presence of the remote
probe. Disconnect and reinsert the connector if the
status indicator on the probe is not illuminated or is
yellow rather than green. To return to using the internal
probe of the handheld, turn the instrument off,
disconnect the external probe and power up the
instrument again.
Figure 12
Note: Misalignment of the plug and socket when installing the remote probe
can cause damage to the pins in the plug and the pin receptacles in the socket.
The plug and socket should be visually inspected prior to each installation of the
remote probe. If damage is observed, contact your Special Equipment
Distributor or MAICO Diagnostic.
Geba_EROSCANPro_E_REV_a_12a.docx
12
850 041/2 01/12
Operating Instructions EROCSCAN Pro
5. Conducting a Measurement
5.1
Quick Start
Figure 13
The ERO•SCAN Pro instrument arrives preloaded with default
protocols and ready to test. Testing with the external probe
can be started with just five easy steps.
1. Turn on the instrument.
2. From the main menu (Figure 13), select the desired
protocol or series using the up or down arrows on the
navigator.
3. Select an eartip and place if fully on the probe tip.
4. Secure the probe to the patient and insert the eartip
deeply into the patient’s ear.
5. To begin a test Press the right or left arrow button on
the control panel (Figure 7) or press the L or R button
on the external probe (Figure 11).
Note: The exact sequence for these steps can be adjusted
based on user preferences, the probe being used (internal or
external), and the patient being tested (adult or pediatric).
Additional information on each step is provided below.
Important:
When Tymp•OAE Probe is connected, the pump will perform an
initialization. Do NOT insert the Tymp•OAE Probe into the ear canal while the pump is
performing this initialization. The probe should be placed in the ear canal either
BEFORE or AFTER the pump initialization.
5.2
Powering on the Instrument
To turn on the ERO•SCAN Pro instrument, press the power
button located on the handheld control panel just below
the left corner of the display window.
Figure 14
A flash screen (Figure 14) showing the firmware version
(first line), serial number (second line), and date set in the
instrument (third line) will illuminate briefly before showing
the main display (Figure 13).
Important
If testing with the external probe, be sure to connect the external probe prior to
powering on the instrument. When the probe is detected the status indicator on the
external probe keypad will be green.
If testing with the internal probe, be sure the external probe is disconnected prior to
powering on the instrument.
Geba_EROSCANPro_E_REV_a_12a.docx
13
850 041/2 01/12
Operating Instructions EROCSCAN Pro
5.3
Selecting a Protocol or Protocol Series
Protocols are individual DPOAE, TEOAE, or
Tympanometry measurements. Protocol Series are a
sequence of individual protocols linked together. A
series can be composed of any combination of DPOAE,
TEOAE, or Tympanometry protocols that are loaded
into the instrument. The series will run with just one
button press (left/right arrow on control panel or R/L
Figure 15
button on probe) to begin testing. Series are indicated
by multiplicity symbol to the left of the Series name (Figure 15).
Each instrument comes preloaded with protocols and protocol series. For a description
of the protocols and series included see Appendix B. For information on creating and
customizing protocol series see section 9.
The protocol selected will default to the last protocol or series used to conduct a
measurement. This makes it easy to switch to the other for testing. To select a different
protocol or series use the up and down arrows on the navigator located on the
instrument control panel.
5.4
Selecting an Eartip
The ERO•SCAN Pro instrument comes with a box of disposable eartips that fit a variety
of ear canal sizes. The probe tip must have an eartip attached before inserting it into an
ear canal. The eartip kit has 12 different size eartips that are color-coded for easy
selection. The determination of the appropriate eartip size should be made by persons
with proper training and experience. The eartip must seal the ear canal. The best test
results are obtained when the eartip is inserted deeply into the ear canal instead of flush
with the ear canal opening. The fit should be secure so that the probe will remain in the
ear canal even with a light tug on the probe.
Caution must be taken, however, to ensure that the eartip does not extend too deeply
into the ear canal. Use only the eartips approved for use with the instrument. Contact
your local special equipment distributor or MAICO Diagnostic for ordering information.
The eartips are disposable and should be replaced after each patient. Do not attempt to
clean or reuse these eartips.
After selecting an eartip, push it onto the probe tip until it is flush against the base of
the probe tip. The sound outlet tubes on the probe tip are recessed to minimize the
likelihood of clogging. If the probe tip does become plugged or clogged, it must be
replaced. See section 11 on care and maintenance for further information. To remove
the eartip, grasp the eartip at the base and twist it while pulling it straight off the end of
the probe tip.
5.5
Preparing the Patient
If possible, otoscopic or visual examination of the patient’s ear canals should be
performed prior to testing. Excessive cerumen or vernix in the ear canals may interfere
with the test and give invalid or incomplete results. Patients with excessive cerumen,
debris, or foreign bodies in the ear canals should be referred to an audiologist or
physician for removal of the blockage prior to testing.
Place the patient in a position that will allow easy access to the patient’s ears. The
patient should remain still and quiet while the test is being performed.
Geba_EROSCANPro_E_REV_a_12a.docx
14
850 041/2 01/12
Operating Instructions EROCSCAN Pro
Explain to the patient that the measurement is painless. The patient does not have to
respond when there are loud test sounds or when the pressure in the auditory canal
changes. The patient should be instructed not to swallow, chew or move during the
measurement.
Securing the External Probe to the Patient
The external probe is positioned on the patient using the lanyard affixed to the back of
the probe enclosure. The lanyard is designed to be used as either a neck loop or a shirt
clip (Figure 16). Selecting the style for use will depend on patient factors and the
preferences of the user.
Adjusting Lanyard
The lanyard is affixed to the probe enclosure with an auto-locking mechanism. To
adjust the lanyard position, slide the locking mechanism down (toward to the
connection cable) and hold the mechanism in the downward position while pulling the
lanyard in the desired direction. Pull the lanyard down (toward the connection cable) to
use the shirt clip or up (toward the probe cable) to use it as a neck loop. Once in
position, release the locking mechanism and pull up gently on the lanyard.
Lanyard Use
Neck Loop
Shirt Clip
Figure 16
Important: Secure the probe enclosure using the neck loop or shirt clip such that
there is no weight on the probe cable and eartip. The probe enclosure should be
positioned as close to the ear as possible
5.6
Conducting a measurement
After selecting the desired protocol or series, press the right or left arrow button on the
navigator or L or R button on the external probe keypad to begin a measurement.
Select the left arrow or L button to start a left ear test. Press the right arrow or R button
to start a right ear test.
AutoStart
The first phase in the test sequence is AutoStart which checks the fit of the probe in the
ear canal. The actual calibration and measurement will commence once an adequate
probe fit has been achieved. The sequence can be started with the probe placed in the
ear or prior to positioning the probe in the ear. This is a matter of user preference.
Geba_EROSCANPro_E_REV_a_12a.docx
15
850 041/2 01/12
Operating Instructions EROCSCAN Pro
Users of the internal probe tend to prefer to start the test before positioning the probe
in the ear.
AutoStart consists of low-frequency, alternating tones which are used to check for the following
conditions: Seal of the eartip to the ear canal, leak, blocked probe, clogged probe tip, stability of
the probe, and noise.
During AutoStart the condition of the probe in the ear is represented by the following images:
Probe not in ear or leak (Figure 17):
Figure 17
This image indicates the probe is outside the ear canal or
there is no seal. Continue to insert the probe into the ear
canal. If this condition persists, a different eartip may be
required. Be sure the eartip is securely seated deep in the
ear canal.
Probe in ear and seal detected (Figure 18):
Figure 18
This image indicates the probe is in the ear canal. The
test will start soon as long as all conditions of AutoStart
are met. If the test does not begin, that may be the
result of instability (probe is moving because fit is not
secure or the patient is too active) or there is excessive
noise present. If this image persists and testing does not
begin, refit the probe and try again. A different eartip
may be required.
Probe blocked (Figure 19):
This image indicates the probe is blocked. The eartip or
probe tip might be blocked by ear wax (cerumen) or
vernix (birth fluid) or the probe has been pushed against
the wall of the ear canal.
Figure 19
Remove the probe from the ear and check for wax/debris
then reinsert changing angle or position of the probe
until AutoStart image 2 appears. If the blocked probe
condition persists, see section10 on Troubleshooting.
Note: Do not hold the probe in the ear during OAE testing. This will introduce
noise into the measurement. Common sources of noise are environmental
(room noise), biological (patient breathing, moving, talking, chewing, etc.), or
physical (probe movement).
Testing ears with PE tubes.
To test OAE’s of individuals with PE tubes or middle ear perforations, the autostart may
need to be disabled. This is accomplished by first inserting the probe with eartip
attached into the ear canal. Be sure the fit is deep and secure to obtain a proper seal,
To disable autostart at the main menu select the ear to be tested by holding down the
right or left arrow key for 3 seconds until the green light turns off. Once the key is
released, the EROySCAN Pro will calibrate and test as usual.
Calibration
Geba_EROSCANPro_E_REV_a_12a.docx
16
850 041/2 01/12
Operating Instructions EROCSCAN Pro
The ERO•SCAN Pro will automatically perform a calibration prior to each frequency tested
(DPOAE) or at the start of each test (TEOAE).
Test Phase
During the test phase an hourglass symbol will appear
to the right of the display (Figure 20). Test results are
shown as they are collected. For more information
regarding test results see section 5.
Testing is complete when the green “READY” light is
illuminated. Both the tester and patient should remain
as still and quiet as possible until the green light turns on. The display on the
ERO•SCAN Pro test instrument will indicate the results of the test with a graphic display.
The display will be generated and shown during the test and can be reviewed after the
test is complete. The display you see might differ depending on the settings used for
the test.
Figure 20
Figure 21
Geba_EROSCANPro_E_REV_a_12a.docx
The results of the test are automatically displayed on
screen (Figure 21) and saved in memory as soon as the
test is complete. The results will be saved even if the
unit turns off or the batteries are temporarily
removed. This screen indicates the test ear and further
gives the results of the test. “PASS” on the screen
indicates the patient passed the screening, “REFER”
indicates that the patient did not pass the screening.
For additional information on test results, please see
section 5 of this manual.
17
850 041/2 01/12
Operating Instructions EROCSCAN Pro
5.7
Proceeding to the next test
Proceeding after a single protocol measurement
Figure 22
After testing has been completed the selection menu will
automatically appear in about 5 seconds (Figure 22). The
selection menu will offer the following options:
1. Left – starts a left ear test of the selected protocol
2. Right – starts a right ear test of the selected
protocol
3. Done – return to the main menu to select another
protocol or action
4. Review – return the result screen
Note: from the review display press any arrow key to bring
up the selection menu
Proceeding after a Series measurement
Figure 23
Proceeding following a Series is slightly different than what
was described above. The selection menu will offer a
different set of options (Figure 23):
1. Retest – starts the previous test in the series
2. Done – return to the main menu to perform the
following actions:
a. Repeat the entire series on the same ear
b. Test the other ear
c. Select a new protocol or series
3. Review – return the result screen
Note: from the review display press any arrow key to bring
up the selection menu
Geba_EROSCANPro_E_REV_a_12a.docx
18
850 041/2 01/12
Operating Instructions EROCSCAN Pro
6. Interpreting Results
6.1
Understanding the OAE Results Display
During OAE testing the results will appear on the screen as the test progresses. The
display shows a graph with up to 10 columns. Each frequency (DPOAEs) or frequency
band (TEOAEs) is indicated by one column (Figure 24).
The number of columns shown will vary depending on
the number of frequencies being tested with the
selected protocol. The signal-to-noise ratio (SNR) is
shown on the vertical axis so the height of each column
represents the SNR for that test frequency. For
Figure 24
example, if the column goes to the top of the display
then the SNR is 15 dB or greater.
The solid yellow columns meet the SNR pass criteria for that frequency. The darker
hashed columns do not meet the pass criteria set for that frequency. Note: if the
protocol does not have a pass criteria then all the columns will appear hashed.
To view test details such as the protocol name, date/time of test, test number, serial
number, OAE signal, noise floor value and signal-to-noise ratio (numerical data) press
the info button located on the instrument control under the bottom right corner of the
display. Use the up and down arrow buttons to scroll through the details screen. If any
details are out of the viewable area select SHIFT to extend the viewable area of the
display. When finished viewing the details, select EXIT to return to the results screen.
From the results screen (Figure 24) press any arrow key to bring up the selection
box (Figure 22). See Figures 25 and 26 for examples of the test details view.
Figure 26
Figure 25
6.2
Understanding the Tympanometry Results Display
After having completed a tympanometry
measurement you can see the results on the display
(Figure 27). On the left side of the display you see
a graph of the tympanogram. The area surrounded
by the box is valid for “normal” tympanograms.
The curve that appears on the graph represents the
movement of the ear drum. When the peak of the
Figure 27
curve appears inside the box, the screening is
generally considered a PASS. The ear canal volume
is represented on the display by the arrow on the graph directed toward the vertical axis
of the graph.
Geba_EROSCANPro_E_REV_a_12a.docx
19
850 041/2 01/12
Operating Instructions EROCSCAN Pro
To view test details such as the protocol name, date/time of test, test number, serial
number, ear canal volume, gradient, compliance, and peak pressure (numerical data)
press the info button located on the instrument control under the bottom right corner
of the display. Use the up and down arrow buttons to scroll through the details screen.
If any details are out of the viewable area select SHIFT to extend the viewable area of
the display. When finished viewing the details, select EXIT to return to the results
screen. From the results screen (Figure 24) press any arrow key to bring up the selection
box (Figure 22). See figures 28 and 29 for examples of the test details view.
Figure 28
6.3
Figure 29
Interpreting the Tympanometric test result
As a general rule, values for ear canal volume should be between 0.2 and 2.0 ml (children and
adults). A variance will be seen within this range depending on the age and ear structure of the
person. For example, a 2.0 ml or larger reading in a small child could indicate a perforation in
the tympanic membrane, while it may be a normal reading in an adult. You will become more
familiar with the normal ranges when you use the instrument.
The normal range for compliance is 0.2 ml to approximately 1.8 ml. A compliance peak within
the range indicates normal mobility of the middle ear system. A peak found outside of these
limits may indicate one of several pathologies.
Middle ear pressure should be equivalent to ambient air pressure (0 daPa on an air pressure
scale). Minor shifts of the peak compliance to the negative may occur with congestion and are
rarely to the positive side. Establish criteria for abnormal negative pressure when you become
more familiar with using the equipment. It is generally accepted that negative pressure of
greater than -150 daPa indicates a referral for medical evaluation.
6.4
Abnormal Values
It is the purpose of this section to provide samples of tympanograms which reflect abnormal
states of the middle ear mechanism. It is not the intention of this section to provide you with a
complete guide to interpreting results. Complete information regarding pathologies and
abnormal impedance testing can be found in published audiology literature.
A perforation in the tympanic membrane will cause a high ear canal volume measurement
because the instrument will measure the volume of the entire middle ear space. The EROySCAN
Pro may refuse to run the test, with the instrument indicating a seal problem, or a flat
tympanogram will be recorded since no movement will occur with a change in air pressure.
An extremely flaccid tympanic membrane or an ossicular chain discontinuity will yield a very high
peak compliance in the presence of normal middle ear pressure. Ear canal volume will be
normal.
A fixation of the ossicular chain, as in otosclerosis, will produce a tympanogram with very low
compliance in the presence of normal middle ear air pressure. Ear canal volume is normal.
Middle ear fluid such as in serious otitis media will yield a very flat tympanogram with no
definite peak and negative air pressure. A resolving case or beginning case may produce a
Geba_EROSCANPro_E_REV_a_12a.docx
20
850 041/2 01/12
Operating Instructions EROCSCAN Pro
reduced peak in the presence of severe negative middle ear pressure. The ear canal volume is
normal and the reflex is either absent or at an elevated level.
Eustachian tube dysfunction in the absence of fluid will show a normal compliance curve, but it
will be displayed to the negative side of the tympanogram. Ear canal volume will be normal.
7. Managing Test Results
The ERO•SCAN Pro saves one right and one left ear test for each protocol. Once a new test for
that ear and protocol is started, the previous results are overwritten. When testing is completed,
the results should be printed before a new patient is tested. When the test results are printed
(to PDF, PC printer or thermal printer) they are marked for deletion and will be erased when a
new test is started.
Note: the ERO•SCAN Pro can be configured to save up to 350 tests organized by patient
numbers. For more information on this option see section 8.7.
7.1
Reviewing Test Results
To review test results stored in the instrument scroll down
the main menu until Show Results is selected and press the
right ` arrow button (Figure 30).
Figure 30
From the Review Results screen select Review Results using
the right ` arrow button (Figure 31).
Figure 31
Review Results will display all tests saved in the instrument.
For each saved test the ear under test, the test outcome,
and the protocol name are shown (Figure 32).
L or R indicates the ear tested (right or left)
Figure 32
5 indicates a PASS result
6 indicates a REFER result
A dash (-) in the result box indicates no pass criteria was
established for the protocol or the test outcome was No
Seal, Noisy, or Fit Error
To view a specific test, scroll up or down to select the test
and press the right ` arrow button to Select. The result
display (Figures 24 and 27) will be shown.
From the test result display, press any arrow button to bring
up the selection box with the following options (Figure 33):
Figure 33
Geba_EROSCANPro_E_REV_a_12a.docx
Press the right ` arrow button to delete the test result
Press the up a arrow button to return to the list of saved
tests
Press the down b arrow button to return to the test result
Press the info button to view the test details
21
850 041/2 01/12
Operating Instructions EROCSCAN Pro
7.2
Deleting Test Results
Deleting a single test
To delete a single test(s) follow the steps outlined in the previous section (above) and choose
delete from the options provided on the selection menu (Figure 33).
Deleting all tests:
To delete all saved tests select Show Results from the main
menu (Figure 34).
Figure 34
Figure 35
Geba_EROSCANPro_E_REV_a_12a.docx
From the Review Results screen, use the up a and down b
arrow buttons on the control panel to select Delete All and
select the action by pressing the right ` arrow button (Figure
35). When prompted, confirm selection by pressing the
down b arrow button for Yes. To return to the Review
Results screen without deleting saved tests, press the up a
arrow for No.
22
850 041/2 01/12
Operating Instructions EROCSCAN Pro
8. Printing Test Results
There are three options for printing tests results from the ERO•SCAN Pro.
1. Quick Print to PDF
2. Quick Print to the default PC printer
3. Fast and portable printing is an option with the thermal paper printer
These printing options are explained in this section.
8.1
Connecting the cradle to a computer
Connecting to the computer will allow access to additional features such as Quick-print to PDF
or the default 8.5 x 11 PC printer and customization of protocols and series. See section 9 for
more information on customizing protocols and series. See Appendix A for software installation
instructions.
The ERO•SCAN Pro PC software must be installed prior to connecting the cradle to
the computer. See appendix A for software installation instructions.
Use the included USB cable to connect the cradle to the computer by connecting one
end of the cable to the USB port on the underside of the cradle (Figure 36) and the
other end to the desired USB port on the computer. Place the two-position button
located on the upper right of the top side of the cradle in the down position for
computer use (Figure 37)
Figure 36
Geba_EROSCANPro_E_REV_a_12a.docx
Figure 37
23
850 041/2 01/12
Operating Instructions EROCSCAN Pro
8.2
Quick-Print to PDF or to the default PC printer
Open the Print Results
application by double clicking
on the application icon. Figure
38 shows the open application.
Place the ERO•SCAN Pro gently
in the cradle.
Transfer of test data will occur
automatically when the
instrument is placed in the
cradle.
This application will print to a
PDF file or print to the default
PC printer.
Figure 38
The first time test data is transferred to the application you will be prompted to establish
your printing preferences (Figure 39). You can also set your preferences by selecting
Preferences and then Printing Test Results from the menu.
Do not automatically print test results: no action will be taken when he instrument in
placed in the cradle
Print test results to the default printer:
the test results will be sent to the
default PC 8.5 x 11 printer. There will
be no electronic copy saved.
Print test results to a PDF file in the
default directory: the test results will
be sent to a PDF file that can be
named and saved for import into
electronic medical records systems or
for printing in the future.
Note: During installation of the
application a folder will be created at
C:\_\My Documents\My Test Results.
The default directory can be changed
in the printing preferences.
Figure 39
Geba_EROSCANPro_E_REV_a_12a.docx
24
850 041/2 01/12
Operating Instructions EROCSCAN Pro
Figure 40
If the print to PDF option has been selected, you will be prompted to save the file (Figure
40). You can use the default name or a custom file name of your choice.
To view the test results, navigate to the directory where the file is saved.
Geba_EROSCANPro_E_REV_a_12a.docx
25
850 041/2 01/12
Operating Instructions EROCSCAN Pro
(Figure 41) shows a sample print out produced by the Quick Print to PDF and to the
default PC printer.
Figure 41
Geba_EROSCANPro_E_REV_a_12a.docx
26
850 041/2 01/12
Operating Instructions EROCSCAN Pro
This example shows a DPOAE test result on the top half and a Tympanometry test result on the
bottom half.
The header for each test shows the ear tested, test result, protocol name, date/time of the test,
test number, instrument & probe serial numbers.
Patient number is indicated or a blank space is provided to write in the name. (See section 8.7
for information on using numbered patients).
OAE PDF or PC Printout
Data table:
F2 = the f2 frequency
P1 = the sound pressure level of f1
P2 = the sound pressure level of f2
DP = the level of the emission in dB SPL
NF = the noise floor in dB SPL
SNR = the signal-to-noise ratio (DP level minus the noise floor)
P = indicates that the pass criteria has been met for the indicated frequency
Signal to Noise Graph:
Vertical axis = SNR (dB)
Horizontal axis = f2 frequency tested (Hz)
Green bars indicate that the pass criteria have been met. Red bars indicate that SNR
and/or DP amplitude have not been met.
DP-Gram Graph
Vertical axis = indicates the absolute value of the signal or noise in dB
Horizontal axis = f2 frequency tested (Hz)
The green line is the signal. The red line is the noise. The difference between the two
lines is the signal-to-noise ratio.
Tympanometry PDF or PC Printout
Data table:
Frequency = probe tone frequency (226 or 1,000 Hz)
Ear volume = indicates the volume of the external ear canal
Gradient = indicates graph width in daPa value (tympanometric width at 50% of the
peak)
Compliance = displays the peak compliance
Peak Pressure = displays the pressure corresponding to peak compliance
Graph:
Vertical = relative canal volume (ml) indicated by the arrow and dynamic compliance
indicated by the peak of the curve (ml)
Horizontal = pressure corresponding to peak compliance (daPa)
If the tympanogram is within the preset limits, the peak will be within the box displayed
on the screen and the test result will be Pass.
Geba_EROSCANPro_E_REV_a_12a.docx
27
850 041/2 01/12
Operating Instructions EROCSCAN Pro
8.3
Thermal printer set up
The optional printer is supplied with a data cable, thermal paper roll. The printer arrives with
the rechargeable lithium ion battery installed. See Figure 42 for overview of the printer.
Figure 42
Installing the paper roll
a. Open the printer by applying your fingers to both sides of the lid and pull upwards (Figure
43). Note that the status LED turns amber when the lid is opened.
b. Insert the new paper roll. Be sure to note the correct direction that the paper comes off the
roll as shown (Figure 44).
c. Pull out a small amount of paper and then close the lid (Figure 45). The printer should auto
feed approx 2 inches (50mm) of paper, this should ensure correct alignment and confirms
that paper is feeding smoothly. The front panel LED should turn green and the printer is
now ready to receive print data.
Figure 43
Geba_EROSCANPro_E_REV_a_12a.docx
Figure 44
28
Figure 45
850 041/2 01/12
Operating Instructions EROCSCAN Pro
Note: To order more paper, contact your local special instrument
distributor or MAICO Diagnostic.
Printer Button and Indicator Lights
A single ‘tap’ of the paper feed button wakes the printer during battery save mode
(Figure 46).
When the Paper feed button is pressed it will advance the paper until released. The
paper feed button is disabled during a print cycle. If the button is ‘double clicked’ with
the printer in an ‘awake’ status the printer will enter the self-test mode.
Figure 46
Printer LED Codes:
The 2 color LED indicator provides information regarding the status of the printer
Green: Power on
Amber: Error – Paper out, door open
Off: Printer Off (in sleep mode)
Geba_EROSCANPro_E_REV_a_12a.docx
29
850 041/2 01/12
Operating Instructions EROCSCAN Pro
8.4
Connecting the cradle to the Printer
Use the included printer connection cable to connect the cradle to the printer. Connect
the appropriate end of the connection cable into the serial data port at the rear of the
printer. Connect the opposite end of the data cable into the printer connector on the
underside of the cradle (Figure 47).
Place the two-position button located on the upper right of the top side of the cradle in
the raised position for printer use (Figure 48)
Figure 47
Figure 48
8.5
Printing with the Thermal Paper Printer
Be sure the printer power is on and the button on the cradle is in the printer position.
Place the instrument gently in the cradle. A printer icon should appear on the display
and the test results should begin printing immediately.
DPOAE Printout:
Figure 49 shows a sample DPOAE printout from the
thermal paper printer.
The header shows the protocol name in the first line
followed by the date/time of the test, test number,
instrument serial number, probe serial number, and
firmware version.
Patient number is indicated or a blank line is provided to
write in the name. (See section 8.7 for information on
using numbered patients).
The ear (Right or Left) and the test result (Pass or Refer)
will be indicated on the printout.
Figure 49
Geba_EROSCANPro_E_REV_a_12a.docx
Data table:
F2 = the f2 frequency
P1 = the sound pressure level of f1
P2 = the sound pressure level of f2
DP = the level of the emission in dB SPL
NF = the noise floor in dB SPL
SNR = the signal-to-noise ratio (DP level minus the noise floor)
P = indicates that the pass criteria has been met for the
indicated frequency
Graph:
Vertical axis = SNR (dB)
Horizontal axis = f2 frequency tested (Hz)
30
850 041/2 01/12
Operating Instructions EROCSCAN Pro
Solid bars indicate that the pass criteria have been met. Hashed bars indicate that SNR and/or
DP amplitude have not been met.
TEOAE Printout:
Figure 50 shows a sample TEOAE printout from the
thermal paper printer.
The header shows the protocol name in the first line
followed by the date/time of the test, test number,
instrument serial number, probe serial number, and
firmware version.
Patient number is indicated or a blank line is provided
to write in the name. (See section 8.7 for information
on using numbered patients).
The ear (Right or Left) and the test result (Pass or Refer)
will be indicated on the printout.
Data Table:
F = the frequency band
P = peak pressure level of the click stimulus
TE = the level of the emission in dB SPL
NF = the noise floor in dB SPL
SNR = the signal-to-noise ratio (TE level minus the noise
floor)
P = indicates that the pass criteria has been met for the
indicated frequency
Figure 50
Geba_EROSCANPro_E_REV_a_12a.docx
Graph:
Vertical axis = SNR (dB)
Horizontal axis = frequency band (Hz)
Solid bars indicate that the pass criteria have been met.
Hashed bars indicate that SNR and/or DP amplitude
have not been met.
31
850 041/2 01/12
Operating Instructions EROCSCAN Pro
Tympanometry Printout:
Figure 51 shows a sample tympanometry printout from
the thermal paper printer.
The header shows the protocol name in the first line
followed by the date/time of the test, test number,
instrument serial number, probe serial number, and
firmware version.
Patient number is indicated or a blank line is provided to
write in the name. (See section 8.7 for information on
using numbered patients).
The ear (Right or Left) and the test result (Pass or Refer)
will be indicated on the printout.
Data table:
Frequency = probe tone frequency (226 or 1,000 Hz)
Ear volume = indicates the volume of the external ear
canal
Gradient = indicates graph width in daPa value
(tympanometric width at 50% of the peak)
Compliance = displays the peak compliance
Peak Pressure = displays the pressure corresponding to
peak compliance
Figure 51
Geba_EROSCANPro_E_REV_a_12a.docx
Graph:
Vertical = relative canal volume (ml) indicated by the
arrow and dynamic compliance indicated by the peak of
the curve (ml)
Horizontal = pressure corresponding to peak compliance
(daPa)
If the tympanogram is within the preset limits, the peak
will be within the box displayed on the screen and the
test result will be Pass.
32
850 041/2 01/12
Operating Instructions EROCSCAN Pro
9. Set Up
To enter the Set Up menu, scroll down the main menu to
Set Up and select by pressing the right ` arrow button
(Figure 52).
Figure 52
Scroll through the set up menu options using the up a and
down b arrow buttons on the control panel. To change
the settings, select item to be changed by pressing the right
` arrow button.
Note: the current setting for each option is displayed after the colon.
9.1
Language
To change the language, select Language from the Set Up
menu (Figure 53). Scroll through the language options using
the up a and down b arrow buttons on the control panel.
To change the settings, select another language and press
the right ` arrow. The languages available will vary by
instrument.
Figure 53
9.2
Time/Date
To set the instrument time and date, from the set up menu
select the item showing the current date and time settings
(Figure 54). Use the right ` arrow button to enter the
Time/Date menu.
Figure 54
Use the left _ and right ` arrow buttons to select a portion
of the time or date. The selected portion of the date will
appear highlighted (Figure 55) Use the up a and down b
arrow buttons to change the selected portion of the
Time/Date.
Figure 55
The time can be showing using a 12 hour (am & pm) or 24
hour clock. To use the 12 hour clock, select am or pm in
the last portion of the time. For the 24 hour clock, select
24h in the last portion of the time.
When time and date are set as desired, press the right `
arrow button until Save` appears in the bottom right
corner of the display of the display (Figure 56). Press the
right ` arrow to save the time/date.
Figure 56
Geba_EROSCANPro_E_REV_a_12a.docx
33
850 041/2 01/12
Operating Instructions EROCSCAN Pro
9.3
Display Contrast
To change the contrast of the display, select Display from
the set up menu (Figure 57).
Figure 57
Use the up a and down b arrows to adjust the contrast.
When done adjusting the contrast press the right ` arrow
button to Save and exit (Figure 58).
Figure 58
9.4
Instrument Details
Figure 59
9.5
To view the instrument details, select Instrument Details
from the set up menu (Figure 59). Instrument details
will show the serial number of the instrument,
connected probe, firmware (embedded operating
software) version and a summary of other instrument
settings.
DP Early Stop
Figure 60
Figure 61
The user can select how the instrument will operate
when performing a DPOAE test. With the DP Early
Stop feature off, testing will be completed at all
frequencies included in the selected protocol. The test
is complete when all frequencies have been measured.
If the DP Early Stop feature is on, the measurement will
stop as soon as the instrument can determine that the
criteria for a PASS or REFER result has been met. In
this case some frequencies may not be measured, but
testing will be completed faster.
To change this setting, select DP Early Stop from the Set
Up menu (figure 60). Using the up a and down b
arrow buttons on the control panel select off (Figure
62) or on (Figure 61) and then press the right ` arrow
button to select and exit.
Figure 62
Geba_EROSCANPro_E_REV_a_12a.docx
34
850 041/2 01/12
Operating Instructions EROCSCAN Pro
9.6
OAE Minimums
Figure 63
This setting allows the user to select if minimum
amplitude values will be used as part of the pass/refer
criterion. If Use Minimums is on, a result is not
considered a pass unless the OAE amplitude is equal to
or greater than the minimum value set in the protocol.
This is in addition to meeting the other pass criteria
including the minimum SNR and the number of
passing frequencies for overall test “Pass.”
The default minimum DP amplitude is -5 dB SPL.
The default minimum TE amplitude is -12 dB SPL.
Users of diagnostic instruments can set the minimum amplitude value when creating
custom protocols. Note: if Use Minimums is on then the minimum amplitude values are
applied to all OAE protocols that have a value established within the protocol. For more
information regarding minimum amplitudes in custom protocols, see section 9.
To change this setting, select Use Minimums from the Set Up menu (Figure 63). Using
the up a and down b arrow buttons on the control panel select on or off and then
press the right ` arrow button to select and exit (see Figures 61 and 62 for an example).
9.7
Save Mode (Patients)
In the default operation mode, the ERO • SCAN Pro saves the most recent right and left
ear test for each protocol. Once a new test for that ear and protocol is started, the
previous results are overwritten. When the test results are printed they are flagged for
deletion and will be erased when a new test is completed.
Figure 64
Geba_EROSCANPro_E_REV_a_12a.docx
The user can choose to enable the Numbered Patients
feature. When Numbered Patients are enabled the
instrument will automatically add a new menu, Patient
Names, as the first screen that appears when the
instrument is powered on.
This menu will be
automatically populated with two selections, Patient 1
and No Name. To perform and save a test for Patient
1, select Patient 1 using the right ` arrow button. The
main menu with all available protocols will appear.
Select the desired protocol and conduct a
measurement as described previously in this manual.
35
850 041/2 01/12
Operating Instructions EROCSCAN Pro
Once a test has been completed for Patient 1, the instrument will automatically add
Patient 2 to the Patient Names menu. The automatic numbering will continue until the
test results are printed, at which point all the numbered patients and test results will be
flagged for deletion and then erased when a new test is started. The new test will
become the first test for Patient 1 and the automatic numbering sequence will begin
again. The instrument can hold up to 350 test results. The number of patients is not
limited.
Use the No Name place holder for tests that are not associated with a specific patient.
To change this setting, select Patients from the Set Up
menu (Figure 64). Using the up a and down b arrow
buttons on the control panel select No Patients (Figure
65) or Numbered Patients (Figure 66) and then press the
right ` arrow button to select and exit.
Figure 65
Note: The ERO•SCAN Pro also supports the upload of
patient names by way of the optional Patient
Management software.
See Patient Management
Manual (1162-0806) for more information.
Figure 66
9.8
Sounds
The ERO•SCAN Pro provides audible feedback to the
user to indicate when testing is complete.
Figure 67
Geba_EROSCANPro_E_REV_a_12a.docx
To change this setting, select Sounds from the Set Up
menu (Figure 67). Using the up a and down b arrow
buttons on the control panel select on or off and then
press the right ` arrow button to select and exit (see
figures 61 and 62 for an example).
36
850 041/2 01/12
Operating Instructions EROCSCAN Pro
9.9
Graph Style
There are two options for viewing the DPOAE test results. The standard SNR graph will
display the signal-to-noise ratio (difference between the emission and the noise floor) as
a bar for each frequency tested. The SNR graph provides a very simple method to view
the test results.
The Value graph displays the absolute values of the signal
(emission) and noise floor (Figure 68). The noise is
represented by an open bar. The signal is a represented
by a solid bar when it meets the pass criteria and as a
dashed bar when it fails to meet the pass criteria for the
protocol. The value graph provides a more complete
Figure 68
view of the test results. When viewing the value graph
the user can immediately see if noise was a contributing
factor in obtaining a Refer. For example on the test
result shown in figure 68 we can see that the measurement at 2 kHz (the bar farthest to
the right) is completely obscured by noise (no measurable signal). At 3 kHz there is
some noise in the measurement, but the measured signal at that frequency meets or
exceeds the pass criteria. At 4 kHz the signal emerging above the noise does not meet
the pass criteria. At 5 kHz there is no noise in the measurement. This is an example of
a test that should be repeated after an attempt is made to reduce noise (environmental
or patient) and obtain a better probe fit.
Note: if the value graph is select, the thermal paper printout will show the value graph.
If the SNR graph is selected, the thermal paper printout will show the SNR graph.
9.10 Reset
To restore the instrument back to the manufacturer default settings, select Reset from
the Set up menu and confirm the selection when prompted.
Geba_EROSCANPro_E_REV_a_12a.docx
37
850 041/2 01/12
Operating Instructions EROCSCAN Pro
10. Customizing Protocols and Series
Users of any instrument type can create series of protocols. Users of diagnostic
instruments can also customize individual protocols. The Print Results software
application is used to create and manage custom protocols and series. This section will
explain how to customize protocols and series. For software installation instructions see
Appendix A.
Protocols are files which contain the specific test parameters to conduct a DPOAE,
TEOAE, or tympanometry test and assign a Pass or Refer to the test result. A series is a
set of linked protocols that run in sequence by pressing one button to begin the series.
Each ERO•SCAN Pro comes preloaded with protocols and series.
10.1
Creating/Editing Protocol Files
Protocol files originate on the
computer and are then loaded to the
ERO•SCAN Pro instrument. To create
or edit a protocol file, open the Print
Results application, click on the File
menu, and then select Edit Protocol
Files (Figure 69).
Figure 69
(Figure 70) shows the protocol files
stored on the computer. This list can
consist of protocols loaded into the
instrument and protocol files which are
currently located only in the computer.
Manufacturer default protocols appear
in blue font. User created or modified
protocols appear in black font.
The right panel of the Protocols
window (Figure 70) contains a number
of buttons to perform various
functions related to creating, editing,
and managing protocol files saved on
the computer. These functions are:
Figure 70
Geba_EROSCANPro_E_REV_a_12a.docx
38
850 041/2 01/12
Operating Instructions EROCSCAN Pro
View – displays the settings and parameters for the selected protocol.
Create New – begins the process to create a new DPOAE, TEOAE or Tympanometry protocol file
Modify – opens the protocol file for editing
Remove – deletes the protocol file from the
Rename File – this allows the user to change the file name for the protocol
Copy – creates a duplicate of the selected protocol which can then be used as the starting point
for a user defined custom protocol
Choose Directory – allows the user to select change the location where custom protocol files are
saved
Done – exits the protocol window
View
To view protocol parameters,
select the desired protocol and
click the View button located
on the right panel of the
Protocol window (Figure 70).
All the measurement and pass
criteria parameters will be
displayed (see Figure 71 for an
example).
Figure 71
Creating a DPOAE Protocol
To create a new protocol file, click the Create New
button located on the right panel of the protocol
window (Figure 70).
A selection window will appear (Figure 72). Choose
the type of protocol being created (DPOAE, TEOAE,
or Tympanometry) and click Ok.
Figure 72
Geba_EROSCANPro_E_REV_a_12a.docx
39
850 041/2 01/12
Operating Instructions EROCSCAN Pro
Figure 73
(Figure 73) shows the window for creating or modifying a DPOAE Protocol.
Protocol Name: the text entered into the Protocol Name field is what will appear in the
instrument when the protocol is loaded. This should be kept to approximately 14-16
characters in length so that the full protocol name can be viewed on the instrument
display.
Evaluation Criteria: check the box if a Pass or Refer outcome should be determined for this
protocol. Indicate the number of passing frequencies required for the overall test result
to be Pass. Number of passing frequencies for a test pass can be set to any value
between 1 and 10, but cannot exceed the total number of frequencies tested.
F2: use the slider bars or type the numerical value into the text box to set the f2 frequency. The
f2 frequency is customizable in 100 Hz increments between 1.5 and 12 kHz.
Frequency Ratio: the frequency separation between the two primary tones (f2/f1). The f2/f1
ratio is adjustable between 1.1 to 1.4.
P1/P2: these settings control the intensity of the two primary tones (f1 and f2). P1 and P2 are
adjustable between 40 and 70 dB SPL. The maximum paired setting is 70/60. The
minimum paired setting is 40/40.
Averaging Time: established the length of time the OAE will be measured and averaged at each
test frequency. This is adjustable between 1 and 4 seconds. Note: Longer averaging
time generally results in better test outcomes particularly when measuring in noisy
environments, but shorter averaging times may be desirable for pediatric populations.
SNR to Pass: defines the minimum SNR required for that frequency to be considered a passing
frequency. SNR to Pass is adjustable between 3 and 10 dB
Minimum DP: defines the minimum DPOAE (signal) amplitude required for that frequency to be
considered a passing frequency. Minimum DP is adjustable between -20 and 0 dB SPL.
If the user does not wish to use minimum amplitude as part of the Pass criterion, n/a can
be selected for this parameter and/or the instrument setting for DP Minimums can be set
to off.
Geba_EROSCANPro_E_REV_a_12a.docx
40
850 041/2 01/12
Operating Instructions EROCSCAN Pro
Note: when creating or modifying a protocol, the desired setting can be established for the first
test frequency (top row) and then applied to all frequencies by clicking the Apply Values to All
Frequencies button.
Creating or Modifying TEOAE Protocols
To create a new protocol file, click the Create New
button located on the right panel of the protocol
window (Figure 70).
A selection window will appear (Figure 74). Choose
TEOAE and click Ok.
Figure 74
There are three frequency range options when
creating a new TEOAE protocol. (Figure 75)
Narrow Band – 6 frequencies (1500 to 4000 Hz)
which includes: 1500, 2000, 2500, 3000, 3500, and
4000 Hz
Wide Band – 6 Frequencies (700-4000 Hz) which
includes: 700, 1000, 1400, 2000, 2800, and 4000
Hz
Wide Band – 10 Frequencies (750-4100 Hz) which
includes: 750, 1100, 1500, 1900, 2250, 2600,
3000, 3400, 3750, and 4100 Hz
Figure 75
Note: all TEOAE test frequencies refer to the center
of the frequency band or filter.
Geba_EROSCANPro_E_REV_a_12a.docx
41
850 041/2 01/12
Operating Instructions EROCSCAN Pro
Figure 76
(Figure 76) shows the TEOAE protocol editing window.
Protocol Name: the text entered into the Protocol Name field is what will appear in the
instrument when the protocol is loaded. This should be kept to approximately 14-16
characters in length so that the full protocol name can be viewed on the instrument
display.
Target Peak Pressure: sets the target intensity for the click stimulus. Target peak pressure is
adjustable between 70 and 85 dB SPL.
Averaging Time: the maximum length of time the TEOAE measurement will run before
displaying a Pass or Refer result. The test will stop automatically once a Pass result is
obtained. The averaging time can be adjusted between 8 and 64 seconds.
Evaluation Criteria: check the box if a Pass or Refer outcome should be determined for this
protocol. Indicate the number of passing frequencies required for the overall test result
to be Pass. Number of passing frequency bands for a test pass can be set to any value
between 1 and 10, but cannot exceed the total number of frequency bands tested.
SNR to Pass: defines the minimum SNR required for that frequency to be considered a passing
frequency band. SNR to Pass is adjustable between 3 and 10 dB
Minimum TE: defines the minimum TEOAE (signal) amplitude required for that frequency band
to be considered a passing frequency. Minimum DP is adjustable between -20 and 0 dB
SPL. If the user does not wish to use minimum amplitude as part of the Pass criterion,
n/a can be selected for this parameter and/or the instrument setting for Use Minimums
can be set to off.
Geba_EROSCANPro_E_REV_a_12a.docx
42
850 041/2 01/12
Operating Instructions EROCSCAN Pro
Note: when creating or modifying a protocol, the desired setting can be established for
the first frequency band (top row) and then applied to all frequencies by clicking the
Apply Values to All Frequencies button.
Creating a Tympanometry Protocol
To create a new protocol file, click the Create New
button located on the right panel of the protocol
window (Figure 70).
A selection window will appear (Figure 77). Choose
TEOAE and click Ok.
Figure 77
Figure 78 shows the Tympanometry protocol editing window.
Protocol Name: the text entered into the Protocol Name
field is what will appear in the instrument when the
protocol is loaded. This should be kept to approximately
14-16 characters in length so that the full protocol name
can be viewed on the instrument display.
Frequency: sets the probe tone frequency for the
tympanometry measurement. The selections for probe tone
frequency are 226 and 1000 Hz.
Figure 78
Evaluate Pass or Refer: A within limits box will be shown on
the tympanometry display and print out by default for the
226 Hz probe tone measurement. The Pass or Refer
outcome will is based on the presence or absence of the
tympanometric peak within the limits box. If no limits box
or Pass/Refer outcome is desired, check the box Do not
evaluate Pass or Refer.
Setting the within limits box:
Minimum peak pressure for a pass: selects the low pressure limit for the box (-300 to
400)
Maximum peak pressure for a pass: selects the high pressure limit for the box (-300 to
400)
Minimum peak compliance for a pass: selects the low peak compliance limit for the box
(0.0 to 2.0)
Maximum peak compliance for a pass: selects the high peak compliance limit for the box
(0.0 to 2.0)
Geba_EROSCANPro_E_REV_a_12a.docx
43
850 041/2 01/12
Operating Instructions EROCSCAN Pro
Modifying a Protocol
To change the settings of an existing protocol, click the Modify button located on the right
panel of the protocol window (Figure 70). The protocol editing window for that protocol will
open. Make the desired changes and click Save.
Manufacturer default protocols cannot be modified by the user. They can, however, be copied
and used as the starting point for user defined custom protocols. See instructions below for
copying a protocol.
Removing a Protocol
To permanently delete a protocol from the directory, click the Remove button located on the
right panel of the protocol window (Figure 70).
Removing a protocol file from the directory does NOT remove it from the instrument. To
remove a protocol from the instrument, follow the instructions provided below in section 9.2.
Renaming a Protocol File
The protocol name that appears in the instrument is a parameter established within the protocol
file. The Windows file name for the protocol can and may be different than the protocol name.
For ease of managing protocols you may want to rename protocol files so that the protocol
name and file name match. To rename a protocol file, click the Rename button located on the
right panel of the protocol window (Figure 70).
Copying a Protocol File
To copy a protocol, select the protocol to be copied and click the Copy button located on the
right panel of the protocol window (Figure 70). The copied protocol file will appear in the list of
protocols with the same protocol name, but the file name will be “Copy of selected protocol”
(Figure 79).
Figure 79
Select the new copy of the existing protocol and click the Modify button located on the right
panel of the protocol window (Figure 70). To modify the protocol follow the instructions
provided above and save changes.
Geba_EROSCANPro_E_REV_a_12a.docx
44
850 041/2 01/12
Operating Instructions EROCSCAN Pro
10.2
Managing Protocols in the Instrument
To load new or modified protocols into
the instrument or to remove unused
protocols from the instrument, click on
the Instrument menu, and then select
Manage Protocols and Protocol Series
(Figure 80).
Figure 80
Figure 81
(Figure 81) shows the protocols and series in the instrument. On the right panel of the window
are the following buttons:
View: displays the selected protocol or series settings
Remove: removes the selected protocol or series from the instrument
Load: opens the directory from which the user can select a protocol file to load in the instrument
Done: exit
Geba_EROSCANPro_E_REV_a_12a.docx
45
850 041/2 01/12
Operating Instructions EROCSCAN Pro
Remove Protocol or Series
To remove a protocol or series from the instrument, select the protocol or series to be removed
and click the Remove button located in the right panel of the Protocols in Instrument window
(Figure 81). When prompted confirm the action by clicking Yes.
Removing a protocol from the instrument does not delete the file from the protocol directory on
your computer. You can reload that protocol if you change your mind in the future.
When series are removed from the instrument they are DELETED. There is no file saved on the
instrument. It is important to understand that series are created within the instrument using
protocol files that were previously loaded into the instrument. For that reason, when a series is
removed from the instrument it no longer exists in any location. A series can easily be recreated
(see instructions in the next section) if you wish to restore it in the future.
Load Protocols
To load a protocol into the instrument, click the Load button located in the right panel of the
Protocols in Instrument window (Figure 81).
Figure 82
When prompted (Figure 82) select the appropriate directory for the protocol being loaded.
Yes = directory for manufacturer default protocols
No = user modified or created protocols
Geba_EROSCANPro_E_REV_a_12a.docx
46
850 041/2 01/12
Operating Instructions EROCSCAN Pro
Figure 83
Select the protocol you wish to load and click Open (Figure 83).
A status bar will indicate that the protocol is being loaded. When complete the refreshed list of
protocols in the instrument will show the newly added protocol.
Note: Custom protocols will display an unlock symbol in front of the protocol name on
the instrument display.
Each protocol must have a unique name. When attempting to reload a protocol file
from the computer directory that has been modified from the version currently loaded in
the instrument, you must first remove the old protocol by that name and then load the
modified protocol. If the protocol being removed and reloaded was used in any series
then the series will need to be removed and recreated using the new protocol file.
10.3 Creating Series
Protocol series are a sequence of individual protocols which are linked together. A
series can be composed of any combination of DPOAE, TEOAE, or Tympanometry
protocols that are present in the instrument. Series are indicated by multiplicity symbol
to the left of the series name (Figure 15). Series help to streamline the testing process
by minimizing the number of button presses required to run multiple protocols on a
single patient. When using series, the probe can be placed in the ear canal and a group
of sequenced protocols for that ear can be started and completed by pressing only one
button to begin the right or left series.
Each instrument comes preloaded with protocols and protocol series. For a description
of the protocols and series included see Appendix B.
Geba_EROSCANPro_E_REV_a_12a.docx
47
850 041/2 01/12
Operating Instructions EROCSCAN Pro
Figure 84
The users of all instruments can create custom series.
To create a new series, click on the Instrument menu, and then select Create New Series of
Protocols (Figure 84).
Figure 85
Step 1: Type the series name into the text box provided. Series names should be kept to
approximately 12 characters in length to ensure the full protocol name will display on the
instrument.
Step 2: From the list of Available Protocols on the left of the window, select the first protocol for
the series and then click Add (Figure 85).
Geba_EROSCANPro_E_REV_a_12a.docx
48
850 041/2 01/12
Operating Instructions EROCSCAN Pro
Step 3: You will be prompted to determine when
the testing sequence should proceed to the next
protocol (Figure 86). Make a selection and click
Ok.
Always proceed = testing will proceed to the
protocol in the series regardless of test outcome
Proceed on Refer = testing will proceed to the
next protocol in the series only when the
outcome of selected test is Refer.
Figure 86
Proceed on Pass = testing will proceed to the next
protocol in the series only when the outcome of
selected test is Pass.
Note: These rules can help improve the efficiency of testing by applying the logic you
may use typically in your practice setting. For example, you may want to start with an
OAE test and only proceed with the tympanometry test when there is a Refer outcome
on the OAE test. Another option might be to start with a tympanometry test and only
proceed with the OAE test when the tympanometry result is within normal limits
(Pass). Finally, you may choose to establish a complete test battery series that runs a
several protocols in sequence regardless of the outcome of any single protocol.
Continue repeating step 2 (selecting from available protocols) and step 3 (determining how to
proceed) as described above until the series contains the desired protocols. When finished, click
Save on the Create New Series of Protocols window (Figure 85).
Confirmation that the series was successfully loaded into the instrument is
provided (Figure 87). When the instrument is removed from the cradle the
new series will appear in the list of protocols.
Figure 87
Note: if the series contains any OAE frequencies above 6 kHz or a
tympanometry protocol then the appropriate external probe must be
connect in order for the series to be shown in the instrument.
Geba_EROSCANPro_E_REV_a_12a.docx
49
850 041/2 01/12
Operating Instructions EROCSCAN Pro
11. Troubleshooting
Problem
Possible Causes
Resolution
Test will not progress
past AutoStart
Probe fit is poor and/or noise level
is too high.
Reposition or refit eartip (trying a different size if
necessary) and reduce environmental or patient
noise if possible. If problem persists, check that
the test will start in a cavity or in your own ear.
Replace probe tip.
Press firmly on the probe tip tabs until secure.
Check connector, power off the instrument and
then power on again.
Contact your special instrument distributor or
MAICO.
Clogged probe tip.
Probe tip is not fully attached.
External probe has not been
detected.
Equipment malfunction.
The external probe which
supports the test function (high
frequency DPOAE or
tympanometry) is not connected.
The protocols were removed from
the instrument using the PC
software (possible only for
diagnostic instruments).
Turn off the instrument, connect the probe and
turn the instrument on again to detect the
probe.
Instrument does not
turn on
Power button was not depressed
long enough.
Batteries are dead or installed
improperly.
The power button must be pressed for one full
second. Try again
Install new batteries according to the label in the
battery compartment.
No communication
between instrument
and computer.
Button on cradle is the printer
position.
Check that the button on the cradle is the
computer position (down).
Cradle is not connected to the
computer.
Check USB connector on the underside of the
cradle and on the computer. Be sure the cable is
fully seated in both connectors.
Check and correct communication settings. See
Appendix A for instructions.
Protocols or series are
missing from the
menu.
Communication settings within
PC software are incorrect.
Thermal printer does
not print.
Button on cradle is in the
computer position
Cradle is not connected to the
printer.
The printer is in sleep mode.
Printer battery is not charged.
Paper is not installed correctly.
There are no tests in the memory.
Geba_EROSCANPro_E_REV_a_12a.docx
50
Reload protocols using PC software.
Check that the button on the cradle is in the
printer position (up).
Check the printer connection cable on the
underside of the cradle and the back of the
printer. Be sure the cable is fully seated in both
connectors.
When the printer is ready to print the button will
be green. Press the button to wake the printer
from sleep mode.
Plug the printer in to the charger. When the
printer is ready to print the button will be green.
Press the button to wake the printer from sleep
mode.
An amber light will appear when the paper is
low or incorrectly installed. Follow the
instructions in section 8.3 to replace or
reposition the paper roll.
Confirm there are tests saved in the instrument.
Follow the instructions in section 7.1 for
reviewing test results.
850 041/2 01/12
Operating Instructions EROCSCAN Pro
12. Care and Maintenance
12.1 Cleaning and Disinfecting the Instrument
This instrument and its accessories may be wiped clean with a damp cloth using a mild
antiseptic solution (e.g., cetylcide). Take care not to put excessive pressure on the clear
display window or allow any utensil to puncture the display window or control panel.
Do not allow any fluid to enter the device. Do not immerse
the instrument in fluids or attempt to sterilize the instrument or
any of its accessories.
12.2 Maintenance & Calibration
This instrument should be calibrated annually by your special
equipment distributor or by MAICO Diagnostic. Beyond that, it
requires no regular maintenance other than routine cleaning and
battery replacement. The probe tip requires replacement only
when it becomes clogged.
12.3 Probe Tip Replacement
Probe tips are disposable and should be replaced when they
become clogged. Four replacement probe tips of each type
(internal and external) are included with this instrument. Do not
attempt to clean the probe tip.
Figure 88
Internal Probe Tip Replacement
To replace the probe tip, squeeze the tabs as shown in the
picture Figure 88. The tabs should audibly snap off the probe
assembly. Pull the probe tip directly off the probe and discard it.
Obtain a replacement probe tip and orient the tip with the
arrows on the face of the probe tip directed toward the top of
the instrument. The probe tip will only fit on one way; be careful
not to force the tip in place. Push the tip directly down onto the
probe (figure 89). Once the probe tip is in place on the probe,
push firmly downward on the top of the tabs one at a time until
a click is heard. Tug lightly on the probe tip to verify that the tip
is securely attached.
Geba_EROSCANPro_E_REV_a_12a.docx
51
Figure 89
850 041/2 01/12
Operating Instructions EROCSCAN Pro
External Probe Tip Replacement
To remove:
1. Using a small pointed object, such as a pen or small screwdriver, push in the
notches on the left and right sides of the rear of the external probe until each tab
is released (Figure 90).
2. Slide the probe tip off the front of the probe and discard (Figure 91).
To replace:
1. Align a replacement tip with the front of the probe (Figure 92). Align the tab on
the external probe tip with the notch on the probe body. The tip will only fit
in one direction. If the tip does not fit securely on the probe, remove the probe
tip and reorient it.
2. Press firmly on the tabs to snap them into place (Figure 93).
NOTE: If the probe tip is not inserted completely, the ERO•SCAN Pro will not perform a test.
Figure 90
Geba_EROSCANPro_E_REV_a_12a.docx
Figure 91
Figure 92
52
Figure 93
850 041/2 01/12
Operating Instructions EROCSCAN Pro
13. System Specifications
DPOAE SYSTEM
PRIMARY TONES:
Frequency: F2 from 1.5 kHz to 12 kHz
Intensity: Up to 6 kHz: 40/40 to 70/60 dB SPL
Over 6 kHz: 40/40 to 65/55 dB SPL
Note: Measurements conducted at 10 and 12 kHz can
lead to results with high standard deviation.
MIC SYSTEM NOISE:
ARTIFACT:
<=-20 dB SPL @ 2 kHz (1 Hz Bandwidth)
<-20 dB SPL @ 2F1-F2 Frequency
F1/F2 RATIO:
F1/F2 DIFFERENTIAL:
1.2 (default) adjustable 1.1 to 1.4
0 to 30 dB SPL
TEOAE SYSTEM
STIMULUS:
CLICK BANDWIDTH:
ANALYSIS BANDS:
ARTIFACT:
Adjustable up to 83 dB SPL Broadband Click
500 Hz to 4000 Hz
6 or 10 Bands
<-10 dB SPL
TYMPANOMETRY SYSTEM
PROBE TONE:
Frequencies: 226 Hz, 1000 Hz
Level: 85 dB SPL with in-ear calibration
AIR PRESSURE:
Range: 0.05cc to 3.0cc: +300 to -400 daPa
3.0cc or greater: at least +200 to -200 daPa
Capacity: 0.05cc to > 5.0 cc
Speed: 60 daPa/Sec. nominal
500 to 700 daPa/sec (depending on ear volume).
TEST TIME:
2.5 seconds nominal (depending on ear volume).
OVERPRESSURE LIMIT:
1.0cc ear canal volume < 3 psi (2000 daPa)
STANDARDS:
IEC60645-5
ANSI S3.39-1987
Geba_EROSCANPro_E_REV_a_12a.docx
53
850 041/2 01/12
Operating Instructions EROCSCAN Pro
14. Warranty, Maintenance and Service
The OAE-test system MAICO ERO•SCANTM Pro is guaranteed for 1 year. This warranty is
extended to the original purchaser of the instrument by MAICO through the Distributor
from whom it was purchased and covers defects in material and workmanship for a
period of one year from date of delivery of the instrument to the original purchaser.
The instrument may be repaired only by your dealer or by a service centre recommended
by your dealer. We urgently advise you against attempting to rectify any faults yourself
or commissioning non-experts to do so.
In the event of repair during the guarantee period, please enclose evidence of purchase
with the instrument.
In order to ensure that your instrument works properly it should be checked at least
once a year. This check has to be carried out by your dealer.
Send the device to your dealer or to a service centre authorized by your dealer.
Please also include a detailed description of the faults.
In order to prevent damage in transit, please use the original packing if possible when
returning the instrument.
Notice
Within the European Union it is illegal to dispose electric and electronic waste as
unsorted municipal waste. Electric and electronic waste may contain hazardous
substances and therefore has to be collected separately. According to this all MAICO
products sold after August 13, 2005, are marked with a crossed-out wheeled bin.
Article (9) of DIRECTIVE 2002/96/EC on waste electrical and
electronic equipment (WEEE) allows producers and users other
than private households to conclude special agreements
concerning the collection of WEEE. To avoid additional distribution
costs, MAICO is using this opportunity and has changed their sales
contracts. With the conclusion of the sales contract the customer
takes over the responsibility for the proper collection and treatment
according legal regulations.
Geba_EROSCANPro_E_REV_a_12a.docx
54
850 041/2 01/12
Operating Instructions EROCSCAN Pro
15. Replacement Parts and Upgrades
Replacement Parts:
MAICO #
Name:
801791
801792
705028
705029
705033
801790
705264
705077
893166
705080
897014
External OAE Probe
External OAE/Tymp Probe
Internal Probe Tip
External Probe Tip
Calibration Cavity
Printer
Adhesive Back Thermal Paper
Regular Thermal Paper
A-A Male USB Cable (Black)
Eartip Kit
AA Batteries
Software Upgrades:
MAICO #
Name:
706252
Patient Management Software
Geba_EROSCANPro_E_REV_a_12a.docx
55
850 041/2 01/12
Operating Instructions EROCSCAN Pro
16. Safety Regulations
Electrical Safety
The OAE-Test system MAICO ERO•SCANTM Pro is a battery driven low
voltage instrument.
The instruments are not intended for operation in areas with an explosion
hazard.
Measuring security
To guarantee that the instrument works properly, it has to be checked at least once a
year.
The service and calibration must be performed by an authorized service centre. In
accordance with the regulations of the EU medical directive we will drop our liability if
these checks are not done.
Device control
The user of the instrument should perform a subjective instrument check once a week.
For your own security, you should copy the printout of the test and store it in your files.
Operation
The instrument should only be handled and operated by trained personnel
(audiologists, ENT doctors or personnel with similar qualifications).
Geba_EROSCANPro_E_REV_a_12a.docx
56
850 041/2 01/12
Operating Instructions EROCSCAN Pro
Specifications are subject to change
MAICO Diagnostic GmbH
Salzufer 13/14
1058 Berlin
Telefon +49 3070 71 46 50
Telefax +49 30 70 71 46 99
e-mail: [email protected]
Internet: www.maico.biz
Geba_EROSCANPro_E_REV_a_12a.docx
57
850 041/2 01/12
Operating Instructions EROCSCAN Pro
Appendix A: ERO-SCAN Pro Software
Installation Instructions
1.
Application Installation
Insert the included software CD into your computer’s CD drive. Your computer may
automatically open a folder displaying the files on the CD. If not, navigate to the CD drive using
Windows Explorer or your preferred method.
To begin installation double click on the installer file: EroscanPro_installer_user_p1-081020.exe
Note: Do not connect the ERO-SCAN Pro cradle at this time
Click
Click
to continue
Geba_EROSCANPro_E_REV_a_12a.docx
58
850 041/2 01/12
Operating Instructions EROCSCAN Pro
If desired fill in the report header lines. This the information that will
appear on the printed test results and/or saved PDF files.
Click
to continue.
The default file location is recommend for most installations. If you wish
to designate an alternate location for the ERO-SCAN Pro Utilities program
folder you may do so at this point.
Click
to continue.
Geba_EROSCANPro_E_REV_a_12a.docx
59
850 041/2 01/12
Operating Instructions EROCSCAN Pro
Once again the default settings are recommended for the program’s
shortcuts. If you wish to specify a different location for the shortcuts you
may do so here.
Click
to continue.
If you would prefer not to have a desktop icon created you can uncheck
the box. To create an icon leave the box checked.
Click
to continue.
Geba_EROSCANPro_E_REV_a_12a.docx
60
850 041/2 01/12
Operating Instructions EROCSCAN Pro
Review your installation selections. Click Back to return to previous
screens to make changes.
Click
to continue.
This status window will show during installation. Installation may take a
few minutes.
Geba_EROSCANPro_E_REV_a_12a.docx
61
850 041/2 01/12
Operating Instructions EROCSCAN Pro
Installation is complete. The cradle driver installation will start
automatically.
Click
2.
to continue
Cradle Driver Installation
The cradle driver installation and set up is a multipart process. Please be sure to follow all the
steps in the process as outlined below.
Part 1:
Cradle driver installation will begin automatically once the PC application installation is
complete. Please be sure the cradle is NOT connected to the computer at this time.
Geba_EROSCANPro_E_REV_a_12a.docx
62
850 041/2 01/12
Operating Instructions EROCSCAN Pro
The default location is recommended for most installations. If you wish
to specify an alternate location for the driver files you may do so at this
time.
Click
to continue.
Please click
Note: This window will appear two times. Click
occurrences to continue with installation.
Geba_EROSCANPro_E_REV_a_12a.docx
63
on both
850 041/2 01/12
Operating Instructions EROCSCAN Pro
The first part of the cradle driver installation is complete.
Click
to continue.
Part 2:
Connect your ERO-SCAN Pro cradle to your PC. Your computer will detect the cradle and
prompt you to complete the installation process.
Click
to continue.
Geba_EROSCANPro_E_REV_a_12a.docx
64
850 041/2 01/12
Operating Instructions EROCSCAN Pro
Click
to continue.
Click
to continue.
Geba_EROSCANPro_E_REV_a_12a.docx
65
850 041/2 01/12
Operating Instructions EROCSCAN Pro
Click
to continue.
This completes Part 2 of the cradle installation. Step 3 will begin
automatically.
Click
to continue.
Part 3:
This final step in the installation process will start automatically.
Geba_EROSCANPro_E_REV_a_12a.docx
66
850 041/2 01/12
Operating Instructions EROCSCAN Pro
Click
to continue.
Click
to continue.
Geba_EROSCANPro_E_REV_a_12a.docx
67
850 041/2 01/12
Operating Instructions EROCSCAN Pro
Click
Click
to continue.
to continue.
Geba_EROSCANPro_E_REV_a_12a.docx
68
850 041/2 01/12
Operating Instructions EROCSCAN Pro
Software installation is complete.
3.
Cradle Connection Configuration
The first time the ERO-SCAN Pro Print Result or Patient Management application is opened you
will be prompted to configure your cradle connection.
Click
to continue.
Use the pull down arrow to display a list of communication port options. Select
the ERO*SCAN Pro Cradle. Click
to continue.
Cradle installation and configuration is complete.
Geba_EROSCANPro_E_REV_a_12a.docx
69
850 041/2 01/12
Operating Instructions EROCSCAN Pro
Appendix B: Default Test Protocols and
Protocol Series
DPOAE Protocols
DP QuickScreen
Number of frequencies: 4
F2 frequencies (as presented): 5, 4, 3, 2 kHz
P1/P2: 65/55
Averaging time: 2 seconds per frequency
SNR for a passing frequency: 6 dB
# of passing frequencies for overall PASS: 3 of 4
Ratio: 1.20
Minimum DP Amplitude (optional): -5 dB
DP Standard Screen
Number of Frequencies: 4
F2 frequencies (as presented): 2, 3, 4, 5, kHz
P1/P2: 65/55
Averaging time: 4 seconds per frequency
SNR for a passing frequency: 6 dB
# of passing frequencies for overall PASS: 3 of 4
Ratio: 1.20
Minimum DP Amplitude (optional): -5 dB
DP 1.5 to 6 kHz
Number of Frequencies: 6
F2 frequencies (as presented): 1.5, 2, 3, 4, 5, 6 kHz
P1/P2: 65/55
Averaging time: 2 seconds per frequency
SNR for a passing frequency: 7 dB
# of passing frequencies for overall PASS: 3 of 6
Ratio: 1.20
Minimum DP Amplitude (optional): -5 dB
DP Low
Number of Frequencies: 6
F2 frequencies (as presented): 1.5, 2, 3, 4, 5, 6 kHz
P1/P2: 50/40
Averaging time: 4 seconds per frequency
SNR for a passing frequency: 7 dB
# of passing frequencies for overall PASS: 3 of 6
Ratio: 1.20
Minimum DP Amplitude (optional): -5 dB
DP Wideband
Number of frequencies: 10
F2 frequencies (as presented): 1.5, 2, 3, 4, 5, 6, 7, 8, 10, 12 kHz
P1/P2: 65/55
Averaging time: 2 seconds per frequency
SNR for a passing frequency: No Pass Criteria
# of passing frequencies for overall PASS: No Pass Criteria
Ratio: 1.20
Minimum DP Amplitude (optional): none
Geba_EROSCANPro_E_REV_a_12a.docx
70
850 041/2 01/12
Operating Instructions EROCSCAN Pro
TEOAE Protocols
TE QuickScreen
Number of filter bands: 6
Frequencies (center band): 1.5, 2, 2.5, 3, 3.5, 4 kHz
Target Peak Pressure: 83 dB SPL
Averaging time: 32 seconds
SNR for a pass: 4 dB
# of passing bands for test PASS: 3
Minimum TE Amplitude (optional): -12 dB
TE Standard Screen
Number of filter bands: 6
Frequencies (center band): 1.5, 2, 2.5, 3, 3.5, 4 kHz
Target Peak Pressure: 83 dB SPL
Averaging time: 64 seconds
SNR for a pass: 4 dB
# of passing bands for test PASS: 3
Minimum TE Amplitude (optional): -12 dB
TE 700-4000
Number of filter bands: 6
Frequencies (center band): 0.7, 1.0, 1.4, 2.0, 2.8, 4.0 kHz
Target Peak Pressure: 83 dB SPL
Averaging time: 64 seconds
SNR for a pass: 4 dB
# of passing bands for test PASS: 3
Minimum TE Amplitude (optional): -12 dB
TE Low
Number of filter bands: 6
Frequencies (center band): 1.5, 2, 2.5, 3, 3.5, 4 kHz
Target Peak Pressure: 70 dB SPL
Averaging time: 64 seconds
SNR for a pass: no pass criteria
# of passing bands for test PASS: no pass criteria
Minimum TE Amplitude (optional): none
TE Wideband
Number of filter bands: 10
Frequencies (center band): 750, 1100, 1500, 1900, 2250, 2600, 3000, 3400, 3750,
4000 Hz
Target Peak Pressure: 83 dB SPL
Averaging time: 64 seconds
SNR for a pass: No pass criteria
# of passing bands for test PASS: No pass criteria
Minimum TE Amplitude (optional): none
Geba_EROSCANPro_E_REV_a_12a.docx
71
850 041/2 01/12
Operating Instructions EROCSCAN Pro
Tympanometry Protocols
Tymp 226 Hz
Minimum Peak Pressure for a Pass (daPa): -150
Maximum Peak Pressure for a Pass (daPa): 50
Minimum peak compliance for a pass (ml): 0.1
Maximum peak compliance for a pass (ml): 1.5
Tymp 226 Hz (no box)
No pass criteria
Tymp 1000
No pass criteria
Geba_EROSCANPro_E_REV_a_12a.docx
72
850 041/2 01/12
Operating Instructions EROCSCAN Pro
Configurations
DP Standard
DP QuickScreen
DP Standard Screen
DP 1.5 to 6 kHz
DP Low
DP Wideband
Tymp 226 Hz
Tymp 226 Hz (no box)
Tymp 1000
DP > Tymp 226
DP QuickScreen >> Always proceed
Tymp 226 Hz >> Always proceed
DP > Tymp 1000
DP QuickScreen >> Always proceed
Tymp 1000 Hz >> Always proceed
TE Standard
TE QuickScreen
TE Standard Screen
TE Low
TE Wideband
Tymp 226 Hz
Tymp 226 Hz (no box)
Tymp 1000
TE > Tymp 226
TE QuickScreen >> Always proceed
Tymp 226 Hz >> Always proceed
TE > Tymp 1000
TE QuickScreen >> Always proceed
Tymp 1000 Hz >> Always proceed
Clinical (DP&TE) Diagnostic
DP QuickScreen
DP Standard Screen
DP 1.5 to 6 kHz
DP Low
DP Wideband
TE QuickScreen
TE Standard Screen
TE Low
TE Wideband
Tymp 226 Hz
Tymp 226 Hz (no box)
Tymp 1000
Geba_EROSCANPro_E_REV_a_12a.docx
73
850 041/2 01/12
Operating Instructions EROCSCAN Pro
Full Series
DP QuickScreen >> Always proceed
TE QuickScreen >> Always proceed
Tymp 226 Hz >> Always proceed
OAE Series
DP Standard Screen >> Always proceed
TE Standard Screen >> Always proceed
DP > Tymp 226
DP QuickScreen >> Always proceed
Tymp 226 Hz >> Always proceed
DP > Tymp 1000
DP QuickScreen >> Always proceed
Tymp 1000 Hz >> Always proceed
Geba_EROSCANPro_E_REV_a_12a.docx
74
850 041/2 01/12
Operating Instructions EROCSCAN Pro
Appendix C: Test Technique and Sequence
Test Technique
As with any other OAE or Tympanometry instrument, there is a technique to learn when using
the ERO•SCAN Pro instrument, especially for newborns and young children. Experience with
existing systems suggests that it may take up to 3 months to become completely proficient at
selecting the proper eartip and positioning the probe.
When testing a newborn or infant, the following suggestions might be helpful: The newborn
has to be relatively quiet and calm; it is usually preferred for the infant to be asleep. A pacifier
may be used to calm the newborn, however, sucking will add noise to the test and decrease the
likelihood of a passing result. When testing a newborn, gently pull down and back on the pinna
to straighten out the ear canal. Generally the external probe is preferred for testing newborns.
Position the probe pre-amp enclosure so that there is no weight on the probe cable and it is
directed away from the newborn’s hands. Place the probe in the ear canal and, if necessary,
wait for the newborn to calm before beginning the test. Swaddling the infant in a blanket can
help prevent him/her from moving and pulling the probe out of the ear during testing.
When testing a young child, the following suggestions might be helpful: The child has to be
relatively quiet and calm. Quiet distracting toys should be used to distract the child during
testing. Ideally these toys are something the child can hold during testing. This will keep his/her
hands occupied preventing the child from pulling the probe out of the ear. Generally, the
external probe is preferred for testing young children. Secure the probe to the patient using the
lanyard neckloop or the clip being sure to keep any weight off the probe cable. Although it is a
matter of preference, many users prefer to start the test prior to inserting the probe in the ear.
This allows the tester to focus on the patient.
Test Sequence
A complete test sequence consists of an autostart, calibration and test phase. The autostart
phase determines when the calibration and test phase should proceed, while the calibration
phase calibrates the level of the tones that will be applied during the actual test phase. Artifact
rejection is employed during the test phase to reduce the effect of transient noise bursts.
Immediately after the test button is pressed, the autostart phase of the test begins. Autostart
checks both the quality and stability of the seal by measuring the response obtained from a
sequence of test tones. The stability of the seal is determined by comparing the responses
obtained over time. When the level of the response is within an acceptable range and is stable
over time, the unit proceeds to the calibration and test phase.
DPOAE
The calibration phase automatically measures the response obtained from a calibration
tone that is present prior to each set of test tones and calculates the voltage needed to
obtain the desired pressures. If one or more of the desired pressures cannot be obtained,
the instrument continues with measurement, but will display an error message at
completion of the test if appropriate.
The test phase consists of measuring the response obtained from the pairs of test
frequencies (f1, f2) applied to the receivers. Two receivers are used, with each receiver
generating one frequency in order to reduce intermodulation distortion. Frequency
domain estimates of the actual P1, P2, distortion (DP) and noise floor (NF) are obtained
via the discrete Fourier Transform, with a bin resolution of approximately 31 Hz. The NF
estimate is obtained by averaging the power in the 4 closest (+/-2) bins to the DP bin.
Geba_EROSCANPro_E_REV_a_12a.docx
75
850 041/2 01/12
Operating Instructions EROCSCAN Pro
TEOAE
The calibration phase automatically measures the peak pressure obtained from a
sequence of clicks and calculates the voltage required to obtain the target peak pressure.
If the desired peak pressure cannot be obtained, the unit will use the maximum voltage.
The test phase consists of measuring the response obtained from repeated sequences of
clicks applied to the receivers. The click sequence is 3-1-1-1 repeated twice. Signal and
noise floor estimates are obtained by adding/subtracting the two response sequences
respectively. The energy of the signal and noise floor estimates in various frequency
bands is obtained in real time and displayed once per second. The average peak pressure
of the stimulus is calculated after completion of the test.
Artifact rejection is employed during the test phase to reduce the effect of transient
noise bursts by the use of an adaptive rejection threshold. The unit attempts to accept
the quieter sections of the test, while rejecting the noisier portions of the test. When the
noise level is approximately constant during the test, the instrument will tend to accept
most of the data in the test. However, as the level of the noise becomes more variable
over time, the instrument will attempt to accept the quieter portions of the recording.
Noise estimates are obtained approximately 32 times per second and a suitable threshold
is estimated from the data. Data segments with a noise floor above this threshold are
rejected, which tends to lower the noise floor of the test. In order to reduce the
possibility of obtaining an artificially low noise floor, the minimum threshold level is
limited.
Geba_EROSCANPro_E_REV_a_12a.docx
76
850 041/2 01/12
Operating Instructions EROCSCAN Pro
Appendix D: Pass/Refer Criteria
Pass/Refer Criteria for DPOAE
The decision that a DPOAE exists is based on detecting a signal whose level is significantly above
the background noise level. This requires a statistical decision, since the random noise level in
the DPOAE filter channel can be expected to exceed the average of the random noise levels in
the four adjacent filter channels — used as the reference for comparison — roughly half the
time.
Extended measurements of the noise distributions in both the DPOAE filter channel “DP level”
and the rms average of the 4 adjacent channels “N level” indicate that the signal-to-noise ratio
(the difference between DP and N) has a standard deviation of 5.5 dB. This implies a 10%
probability of seeing a 7 dB SNR simply from the variability of the noise levels in the 2 filter sets.
Requiring an SNR of 6 dB in three out of four frequencies drops the probability of passing an ear
with moderately-severe hearing loss to less than 1%. Note: three of six frequencies at >7 dB
SNR will also ensure less than 1% probability of passing a moderately-severe hearing-impaired
infant.
Pass/Refer Criteria for TEOAE
The same basic principles that underlie DPOAE Pass/Fail criteria underlie TEOAE Pass/Fail criteria.
In the case of transients, requiring SNR of 4 dB at any three out of the six test frequencies drops
the probability of passing an ear with a moderately-severe hearing loss to less than 1%.
The SNR limits for transients are lower than the corresponding limits for distortion products
primarily because the traditional noise calculation used in TEOAE measurements (and in the
ERO•SCAN instrument) gives a 3 dB lower SNR than the calculation used for DPOAEs. Without
that difference, the numerical SNR value for a PASS with the two methods would be quite
similar.
Note: All manufacturer authorized protocols which provide a Pass/Refer outcome
have been verified in a metal cavity (the equivalent of an ear with moderate-to-severe
hearing loss) to have a less than 1% probability of passing the DPOAE or TEOAE test.
Users with the goal of detecting mild hearing loss should ensure that the minimum
amplitude setting is turned on (see section XX) and should collect normative data from
the target patient population with the ERO-SCAN Pro to verify the protocol being used
meets the screening goal.
Users creating custom protocols should collect normative data to validate any custom
Pass/Refer criteria.
Preliminary ERO•SCAN trials with newborns indicate that the tester’s technique is the single
most important variable in the pass rate on normal-hearing infants. Some testers pick up the
technique (see Operating Instructions section, page 10) with only a couple of days’ practice,
producing pass rates comparable to those for other DPOAE equipment they have used for
months; other testers take longer.
The ERO•SCAN uses a novel noise-rejection algorithm (patent pending) that permits accurate
DPOAE and TEOAE measurements in background noise and babble as high as 55-65 dB SPL (A-
Geba_EROSCANPro_E_REV_a_12a.docx
77
850 041/2 01/12
Operating Instructions EROCSCAN Pro
weighted). Briefly explained, use of available memory in the ERO•SCAN processor permits a
post-hoc statistical analysis that identifies those samples whose retention would improve the
overall accuracy. Those samples are included in the final analysis; the noisier samples are
rejected.
The improved operation in noise with the new algorithm was so substantial that we conducted a
complete replica of our original validation tests in "fully impaired ear" cavities and were able to
verify that no increase in false negatives (false passes) was introduced. Under no test conditions
was any such degradation uncovered.
The artifact rejection can only reject the noisiest samples in a measurement period. If the
ambient noise level rises too high (and/or the eartip seal is poor), then all samples will be noisy
and accurate measurements will be impossible, in which case the test result will indicate
“noisy.”
Occasional claims of extraordinarily low probabilities of missing an ear with hearing loss appear
to be based on poor statistics. As discussed by Gorga (Mayo Clinic Teleconference,1998), since
the incidence of significant hearing loss is roughly 2 per 1000, verifying a 99.7% accuracy would
require testing hundreds of thousands of babies with a given system. Thus to demonstrate that
only 3 babies out of 1000 with hearing loss were missed would require follow-up testing on
500,000 babies. To our knowledge, no one has performed such tests to date.
Geba_EROSCANPro_E_REV_a_12a.docx
78
850 041/2 01/12
Operating Instructions EROCSCAN Pro
Appendix E: High Frequency Measurements
High Frequency DPOAE Measurements
In healthy young ears, distortion product otoacoustic emissions are normally present in the 6-12
kHz region. Figure 1 shows ERO•SCAN measurements on a 12 year old. Figure 2 shows
ERO•SCAN measurements obtained on an adult male in his 60s.
The results in the figures below are consistent with our findings in testing 8 children (age 5-13
years) and
12 adults (age 50-78 years): normal emissions to 12 kHz in children (Figure 1), and no response
above 8 or 10 kHz in older adults (Figure 2).
Figure 1
Figure 2
Figure 3 (see next page)
Although sufficient data to establish age-related PASS/REFER norms are not available, highfrequency
DPOAE measurements may still prove useful in:
1. Ototoxic drug monitoring in young patients (and older patients who have measurable
OAEs)
2. Prospective studies of noise-induced hearing loss, especially in young subjects
3. Obtaining scientific data on the effect of aging on DPOAEs
39
Geba_EROSCANPro_E_REV_a_12a.docx
79
850 041/2 01/12
Operating Instructions EROCSCAN Pro
Important Considerations When Monitoring
Typical of all DPOAE and TEOAE measurements, the lower limit of measurement is determined
by noise, most of which has a Gaussian distribution. In the absence of an emission, both the
signal and reference channels contain nothing but noise. Just like tossing 10 coins
simultaneously where the long-term average will be five heads, it is not unusual to see seven or
eight heads in any one toss. Similarly, an apparent SNR of 5 dB or even 10 dB can occasionally
appear even though the long-term average SNR in a cavity is 0 dB. In the absence of an
emission, a single SNR reading will exceed 5.5 dB one time in six on the average. This is just as
true at high frequencies (8, 10, and 12 kHz) as it is at lower frequencies (2, 3, 4, 6 kHz).
However, the noise floor is slightly higher at frequencies above 6 khz. To safeguard against
mistaking noise for the signal, it is recommended that minimum DPOAE amplitudes be used as
part of any protocol measuring frequencies above 6 khz.
To give an actual example: Figure 2 on the previous page indicates the absence of emissions for
an adult. Figure 3, a subsequent test on the same subject, shows apparent emissions at 8, 10,
and 12 kHz, with displayed SNRs of 7, 5, and 4 dB, respectively. Figure 3 was selected from a
large number of tests on that ear to illustrate that such readings can occur by chance.
There appear to be no published norms for the use of high-frequency DPOAEs for ototoxic
monitoring, but we can determine the significant difference between the averaged test results
from one session to the averaged test results of another session based on known statistical
variation. Averaging the results of several DPOAE test improves the reliability compared to a
single test. This is particularly important when DPOAE test results are used to monitor changes in
hearing sensitivity at specific frequencies over two or more different sessions.
Table 1, below, gives the number of tests required for the comparison between two test
sessions.
The critical differences at two different confidence levels (80% and 95%) are shown. An 80%
confidence level is normally adequate for clinical testing while a 95% confidence level is
common for research reporting, where a reduced risk of error is normally required.
The critical difference is the difference between two measurements that probably did not occur
by chance. An example: You want to be reasonably (80%) certain that any shift beyond 5 dB
will be statistically significant. How many tests must be averaged in each session to obtain this
result? The table below indicates that the average of 6 tests in each session will give the desired
critical difference of 5.1 dB. Since a 5 dB change is normally considered clinically significant, we
suggest the use of at least six tests during each session.
If a more sensitive test is required, more tests must be averaged. For example, averaging 10 tests
in each condition gives a 3.9 dB critical difference at the same 80% confidence level. In contrast,
a 12.4 dB change would be required at the 80% confidence level when comparing a single test
from each session.
Alternately, a 50% increase in testing can be used to improve from an 80% to a 95%
confidence level at a given criterion. Example: The average of 4 tests will give a 6.2 dB critical
difference at the 80% confidence level; the average of 6 tests will provide the same 6.2 dB at
the 95% confidence level.
Table 1
Number of tests averaged
95% C.D.
80% C.D.
1
15.2
12.4
Geba_EROSCANPro_E_REV_a_12a.docx
2
10.7
8.8
3
8.8
7.2
80
4
7.6
6.2
6
6.2
5.1
10
4.8
3.9
16
3.8
3.1
850 041/2 01/12
Operating Instructions EROCSCAN Pro
Instructions for Averaging Results
For monitoring purposes, it is the DP level itself that should be averaged. The DP level indicates
the health of the outer hair cells and the middle ear, when testing in relatively quiet conditions.
The SNR is the measurement of choice in screening, where varying noise levels are present.
1. Average the DP level at each frequency of interest for the total number of tests
performed during one session.
2. Repeat the same procedure for each subsequent session. Compare the frequencyspecific average from the prior session to the average from the current session using the
critical differences provided in Table 1.
Producing the Desired Eardrum SPL
Siegel (1994) reported that large differences between eardrum SPL and the SPL measured by the
microphone in an OAE probe could occur at high frequencies. In our own measurements, we
have seen occasional differences as large as 15 dB from the combination of wavelength effects
and improper eartip seating.
Following Harris et al (1989), Siegel recommended that at high frequencies the receiver drive
required to produce the desired eardrum SPL be predicted from
a) a low-frequency probe measurement of ear canal SPL (to adjust for individual ear canal
volume differences) and
b) a previously determined receiver-to-average-eardrum calibration.
The ERO•SCAN follows Siegel’s recommendations, additionally imposing an upper limit of 70 dB
SPL measured at the microphone of the probe in order to minimize spurious distortion products.
The P1 and P2 SPL values printed by the ERO•SCAN unit are those measured by the microphone
in the probe in order to minimize spurious distortion products. These provide a check that
neither probe is blocked, but as described above may differ from actual eardrum SPLs.
Geba_EROSCANPro_E_REV_a_12a.docx
81
850 041/2 01/12
Operating Instructions EROCSCAN Pro
1162-0802 Rev A
10/08