1
INSTALLATION
MANUAL
2012 October Asia Edition
Contents
01 BEFORE STARTING
page 3
02 CONDITIONING OF MATERIALS
page 3
03 FLOOR PREPARATION
page 3
04 INSTALLATION SET OUT
page 6
05 ANTI-SLIP COMPOUND – INTER-TAC®
page 7
06 Application of Adhesive
page 7
07TacTileS
page 7
08 TacTile placement
page 8
09TacTile subfloor preparation
requirements
page 10
10 UnderFLOOR Heating
page 10
11 Laying Direction
page 10
12 Commencing the Installation
page 11
13 Access Flooring
page 11
14Stairs
page 12
15Installing Fixtures & Furniture
after Modular Carpet Installation
page 12
16Finish
page 12
17Conclusion
page 13
18 CushionBac Modular Carpet
page 13
Appendices
01 Concrete SubFLOOR Requirements
page 13
02moisture & ph test result recommendationspage 14
03Interface INSTALLATION METHODS & CODES
2
{
Interface Installation Manual
page 15
Introduction
This manual has been prepared by the
is installed before construction is
Interface technical division to assist
complete, any resulting staining, soiling,
professional contractors and layers in
contamination or damage caused by
the installation of Interface and Heuga
building construction may void the end
modular carpet.
user’s product warranty. The contractor
These instructions cover the most
common installation circumstances. If
should inform the appropriate person
of this warranty implication.
a particular installation condition is not
covered, the contractor should contact
an Interface representative.
If Interface or Heuga modular carpet
Instructions
01 BEFORE STARTING
03 FLOOR PREPARATION
It is the responsibility of the contractor to verify, before the installation,
The subfloor must be rigid, dry, smooth, flat, level, sound, clean and free
that material supplied conforms to owner’s specifications, including correct from harmful materials. When installing GlasBac® modular carpet products,
product, colour and quantity.
no bitumen based substance must come in contact with the GlasBac backing.
Labels on each carton contain important information including: product,
The subfloor must be rigid to stop modular carpet from cupping.
colour and manufacturing batch (dye lot information).
It is not recommended to mix dye lots in the same area, with the exception of
the i2 collection of products as they possess mergable dye lots.
Old carpet, under felt, loose laid vinyl, cushion backed vinyl and any old
adhesive must be removed and floor scraped clean.
™
Take particular notice of installation codes printed on cartons as this
A clean floor – Floor should be free from all dirt, dust and harmful
materials. Before applying Intertac sweep and vacuum the subfloor
indicates the manufacturers’recommended installation method. However the to remove all dust. Concrete or timber floors must be primed with an
client’s preferred installation method should be confirmed and signed off by
the installer before commencement of installation.
02 C
ONDITIONING OF
MATERIALS
The installation location and all products and materials used in
the installation, must be at temperature between 15 degrees C –
35 degrees C for a period of 48 – 72 hours before the installation
begins. The temperature must remain within this range throughout
the installation. Relative humidity in the area should be 45% ± 10%.
3
{
Interface Installation Manual
approved primer such as ARDEX P60 before application of Intertac.
A dry floor – All floors must be dry. New concrete floors must be checked
for moisture as per Interface recommendations.
Moisture content must not exceed levels as indicated in Appendix 1 of
the Interface Installation Manual. If the moisture content is above the
recommended maximum readings STOP and DO NOT PROCEED with the
installation. Seek further advice from Interface before proceeding.
A low pH floor – The subfloor should have an alkalinity level of between
pH7 & pH9 to be suitable for carpet installation (Refer to Appendix 1).
Should the pH level be outside this range STOP and DO NOT PROCEED
with the installation. Seek further advice from Interface before proceeding.
Identify the Type of Floor
New concrete floors – Must be smooth, level and dry as per Appendix 1 & 2.
Old concrete floors – Remove paint, sealer, grease, oil, adhesive and any harmful materials,
especially bituminous based substances which are not compatible with GlasBac modular carpet
products. All existing adhesive must be removed from the floor. Fill and level all cracks and holes.
Bring surface up to specification as in Appendix 1 using an approved levelling compound
in accordance with manufacturer’s directions. The selected levelling compound needs
to be compatible with the adhesive and carpet backing system.
Any existing carpet, under felt, loose laid vinyl, cushion back vinyl and all existing adhesive must be
removed and the floor scraped clean.
Vinyl Tiles – Damaged & loose vinyl tiles must be replaced or patched and all existing wax coated
products are to be removed. Any existing bituminous based adhesive or underlay are to be removed
when installing GlasBac modular carpet products.
Ensure that the bond between vinyl tiles and subfloor will last the service life of the modular carpet.
If a sealer is used, any reaction shall be the contractor and end-user’s responsibility.
Ceramic and quarry tiles – All joints are to be filled and levelled as per Appendix 1. Use rough
Sandpaper to remove surface glaze.
Wood Floors – Unless the subfloor is free from grooves, ridges, gaps, holes or similar imperfections,
the use of a hard underlay is recommended.
Underlay – The underlay should be medium density fibre boards or medium density fibrous cement sheet k
underlay and the fixing material must be compatible with the Interface modular carpet and InterNote: When installing non impervious backed
floor coverings, water based adhesives, apart
from pressure sensitive adhesives, cannot be used
on a sealed floor.
Tac adhesive. Installation shall be in accordance with the underlay manufacturer’s instructions.
Sealer / Moisture Barrier – If a sealer is used on a concrete floor it must be compatible with
vinyl and can be either a solvent or water based sealer which can be acrylic, epoxy, urethane or
chlorinated rubber. Sealers must also be used in accordance with manufacturer’s directions. If in
doubt, coat sealer on back of the tile and leave overnight. It is not suitable for use if it remains sticky.
An example of suitable products to use for sealing against Hydrostatic moisture problems would be
ARDEX - WPM300 epoxy.
An example of a suitable product to use for sealing against new build green slab moisture
problems would be ARDEX- S8 Slab Seal.
4
{
Interface Installation Manual
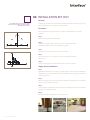
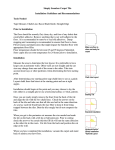
04 Installation Set Out
General
Note: Where practical there should be
uncut modular carpet tiles in door ways
and high traffic areas.
In setting up, a point in the room shall be determined from which modular carpet can be
laid to ensure that they are parallel to the longest wall.
Procedure
The procedure for setting out shall be in accordance with the following, as shown
in Figure 1.
Step 1
Mark a line EF parallel to the longest wall.
Step 2
Mark point X along line EF at a distance to ensue that the requirements
of perimeter modular carpet are a minimum of 1/3 width.
Figure 1
Step 3
Mark points J1 and J2 at a distance of 3 m each side of X.
Step 4
At J1 and J2 scribe an arc at a distance of 5 m to establish point K where
arcs intersect.
Step 5
Draw a line through points K and X which will be 90 degrees to line EF.
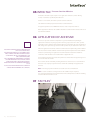
Single Room Installation
Figure 2
Step 1
Establish two chalk lines at 90 degrees as shown in Figure 1. This line may be established
slightly off centre to enable you to meet other requirements, such as placing uncut modular
carpet in traffic areas.
Step 2
Commencing only at the cross point of the two chalk lines, complete one row of modular
carpet on each side of the centre line.
Step 3
Anchor your basic installation as shown in Figure 2. Complete the body of the installation
by laying in a triangular method.
Step 4
Complete the remaining quadrants, section by section.
5
{
Interface Installation Manual
Large Area with Obstacles
Example: An Elevator
Step 1
Establish your starting point as shown in Figure 3a, with the A-B at 90 degrees.
Step 2
Pass your obstacle along line A and B with a minimum of 1 and 1/3 modular carpet. At this
Figure 3a
point you will establish line C and D, parallel to line B and A.
Step 3
Complete modular carpet between A and B. (Notice, only a single row of modular carpet is
used for this exercise).
Step 4
Continue to anchor your installation. Fill in the remaining quadrants as shown in Figure 3b.
Office Complex
Step 1
Figure 3b
The crossover point, centre corridor, centre hall is the starting point for this example as
shown in Figure 4. Line A and B should again be at 90 degree angles.
Lay a row of modular carpet on each side along chalk line A. At the entrance of each office
passed, a chalk line is projected into that office at 90 degrees. Complete your corridor
including cutting.
Step 2
Lay the modular carpet into the offices and anchor the installation. This will create line C
parallel to line A. The total installation is lined out. Complete the body of installation by
laying in a triangular method as shown in Figure 3.
Figure 4
Step 3
Complete all cut modular carpet in the corridor, including door ways. Lay and anchor
modular carpet along line C. Fill in the remaining parts.
Borders
Set out chalk lines at the required distance for the border and/or field colour modular
carpet. Ensure all 90 degree angles are correct. Use these chalk lines as wall lines and
cut modular carpet up to these lines. Cut border modular carpet in from chalk line to
compensate for any irregularities in the wall. Refer to Figure 5.
Figure 5
6
{
Interface Installation Manual
05Inter-Tac® Pressure Sensitive Adhesive
All Interface modular carpets require 100% application of Intertac, unless utilising
TacTile, or otherwise specified by manufacturer.
Intertac is a low odour, solvent free pressure sensitive adhesive.
The subfloor should be prepared to Interface recommendtaions.
An approved primer such as ARDEX P60 must be used on all porous surfaces.
Before application of Intertac the subfloor should be vacuumed and washed to remove all
dust from the subfloor.
06 Application of Adhesive
Inter-Tac is a pressure sensitive compound. For general installation requirements
application of Intertac is by long nap roller achieving a spread rate of 10-14m2 per litre
depending on the condition of the substrate. On non-porous floors the rate of application
will change and a spread rate greater than 14m2 per litre may be obtained in some cases.
Note: A new long nap roller should be used at the
start of each installation.
Note: In certain conditions, such as under hospital
beds, on ramps or in areas that may be subject
to high traffic abuse, a stronger bond to the
subfloor may be required.
For a stronger bond a higher weight of adhesive
should be applied :eg V1 notch trowel. The tile
is then installed into semi-tacked up Intertac
adhesive allowing for some adhesive transfer to
occur.
Note : Tack up time will be relevant to humidity in
the work area and general site conditions.
Adhesive application should not commence until moisture and pH readings of the subfloor
have been taken and the subfloor deemed within specified requirements. If the subfloor
moisture or pH readings are higher than recommended the installation should not
commence until remedial action is taken. Refer to Appendix 1 & 2.
It is mandatory that Inter-Tac must tack up before use. Colour must change from green to
clear and it must not transfer.
Users assume all risk and liability resulting from the use of Inter-Tac. It is recommended
that users carry out project specific trials to confirm the suitability and application of
Inter-Tac.
Note: A new long nap roller should be used at the start of each installation.
Note: In certain conditions a stronger bond to the subfloor may be required.
For a stronger bond the tile can be installed into semi-tacked up Intertac adhesive allowing
for some adhesive transfer to occur.
07TacTiles™
7
{
Interface Installation Manual
GlasBac & GlasBacRE Backing Systems – Standard TacTiles must be used in the
installation of both GlasBac and GlasBacRE carpet tile. To lift existing carpet tiles simply
peel the carpet tile from the TacTile and fit a new carpet tile to the existing TacTile.
Note: When using TacTile in a Glasbac
installation the TacTile is usable for two
installations after which a new TacTile should
be used.
Grahplex, Graphlar & CushionBac Backing Systems – Graphlex branded TacTile must be
used for the installation of Graphlex, Graphlar and CushionBac carpet tile. To lift existing
carpet tiles simply peel the carpet tile from the TacTile and fit a new carpet tile and new
TacTile.
TacTiles reach maximum bond strength after four hours.
TacTile can be installed directly over wood, ceramic, marble and stone floors with
minimum floor preparation as long as moisture and pH levels are within Interface
recommendations. Refer to Appendix 1 & 2.
Once the installation is completed and then maintained in line with Interface installation
and maintenance recommendations TacTiles will be effective for the
Note: A TacTile must be applied under every cut
tile abutting the field tiles.
Note: ALL BITUMEN BACKED PrODUCTS MUST USE
GRAPHLEX TACTILE.
Note: STANDARD TACTILE MUST BE USED FOR ALL
PRODUCTS ON GLASBAC AND GLASBACRE BACKING.
life of the installation providing they are not removed or replaced.
Rolling Loads – TacTiles can be used under areas that will be subjected to normal
commercial rolling load applications. Eg: Castor Chair, Hand Trolleys or similar.
For areas that will be subjected to heavy rolling loads such as pallet trolleys, fork lifts,
scissor lifts, etc, please contact Interface Technical Services for project specific advice.
Ramps – TacTile is not recommended for use on ramped floor areas. The use of Intertac
pressure sensitive adhesive is recommended when installing modular tile to ramped floor
areas.
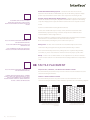
08 TacTile Placement
Note: A TacTile must be applied under every cut
tile abutting the field tiles.
For Quarter Turn / Monolithic / Non Directional Installation methods
A TacTile should be placed under every corner of each tile across the installation area and
all cut tiles abutting the field tiles.
For brick and ashlar installations , if needed,
tactiles connectors can be applied at all joints.
this is not required but left to the dealer’s
discretion when conditions suggest additional
tactiles connectors are necessary.
For Brick or Ashlar Installation methods
A TacTile should be placed on every other corner across the installation area and
all cut tiles abutting the field tiles. TacTiles should be applied based on the following diagrams.
Quarter-Turn / Monolithic / Non-Directional
Installation methods will require 4 TacTiles per
square metre
8
{
Interface Installation Manual
Brick or Ashlar Installation methods
will require 4 TacTiles per square metre
Plank Tiles
Applying TacTiles connectors
NOTE: The average number of TacTile connectors needed depends on the size of the
plank and the installation method used.
50cm x 1m Plank Averages:
• Quarter-Turn – 3 per sq mt
25cm x 1m Plank Averages:
• Quarter-Turn – 7 per sq mt
• Ashlar – 4 per sq mt
• Ashlar – 8 per sq mt
• Herringbone – 4 per sq mt
• Herringbone – 7 per sq mt
Some applications may require an additional TacTile connector in the center where
tile edges meet.
TacTiles connectors should not be used on stairs, ramps or inclines
Lay anchor rows, placing a TacTile connector at every joint. Install carpet using a step
method placing a TacTile connector at every corner.
Insert tiles based on approved installation method. TacTiles connectors should be
applied based on the following diagrams.
50CM X 1M placement
Quarter-Turn Installation
NOTE: If the subfloor exceeds the required
moisture and pH requirements the installation of
a barrier coat is recommended to prevent future
issues from rising moisture and pH.
Herringbone Installation
25CM X 1M placement
Quarter-Turn Installation
Herringbone Installation
Ashlar Installation
Failure to carry out the correct subfloor
preparation or remedial works may result in
voiding of the product warranty.
TacTiles are only available, and warranted, for
use with Interface carpet tiles. No warranty
exists for use of TacTiles with any other
manufacturers floor covering.
TacTiles
Note: TacTiles are not recommended for installation of carpet tiles to stairs
Note: A TacTile must be applied under every cut tile abutting the field tiles.
9
{
Interface Installation Manual
Note: Glasbac & GlasbacRE Tile
TacTiles will be effective for the life of the installation providing they are not
removed or replaced.
Where carpet tiles are replaced TacTiles will only be effective for 2 installation changes after
which they need to be replaced to maintain the integrity of the installation.
Note: Graphlar, Graphlex & CushionBac Tile (Graphlex TacTile must be used)
Graphlex TacTiles will be effective for the life of the installation providing they are not
removed or replaced.
Where carpet tiles are replaced TacTiles will require replacement for each
installation change to maintain the integrity of the installation.
09TACTILE Subfloor Preparation
Requirements
TacTile can be installed directly over wood, ceramic, marble and stone floors with
minimum floor preparation as long as moisture and pH levels are within Interface
recommendations. Refer to Appendix 1 & 2.
Notes on Subfloor Moisture and pH requirements
Moisture Test Method
Hygrometer (In Situ Probe or Sealed Hood meter)
Required to be 80% or less when using TacTiles alone. For use of TacTile with higher
readings refer Appendix 1 & 2.
Subfloor pH requirement
Required to be pH9 or less when using TacTiles alone. For use of TacTile with higher
readings refer Appendix 1 & 2.
10 Underfloor Heating
Interface modular carpet may be installed on internally heated floors provided that the
surface temperature will not exceed 27 degrees C.
Underfloor heating must be turned off 48 hours prior to commencement of installation
and shall not be turned on again until 48 hours after installation is completed to allow the
adhesive to set.
Note: All needle punch products must be installed
Quarter Turn.
11 LayING Direction
All Interface modular carpets should be installed as per the directions printed on the
carton. Installation methods & codes printed on the cartons are:
DIRDirectional
QTRQuarter Turn
10
{
Interface Installation Manual
RDMRandom
SPEC
Specification Methods. (Refer to diagrams on inside back cover)
If SPEC code appears on the carton please confirm with the client their preferred
installation method.
It is the installers responsibility to confirm the installation method prior to commencement
on installation.
12 Commencing the Installation
Apply Inter-Tac as recommended. Lay one row of modular carpet down each side of the
chalk line, then install the modular carpet using the stair method. This will quickly pin
point if the grid is running out of alignment.
Alignment
As modular carpet is butted against each other, continually check (with fingers)
that the joints are properly aligned. Do not install modular carpet that is out of square by
more than 1mm.
Tension
Ensure an even tension throughout the installation as this is vital to the
overall appearance.
Lack of tension and pile entrapment may cause poor performance and will impair the
appearance of the finished installation.
Over tension of the installation may cause peaking of the tile.
The cumulative space gained in GlasBac or Graphlar® modular carpet products should be
5mm, measured over 11 modular carpet squares (10 joins). Any gain less than this may
cause peaking and or buckling.
Cutting
NOTE: Modular carpet cut on an angle or a cut
edge that is exposed to heavy foot or wheeled
traffic may need to be sealed with latex.
All Interface modular carpet must be cut from the backing side by overlaying
the modular carpet, marking and cutting. A template should be used
around columns.
NOTE : When abutting Interface carpet up to a
hard surface finish or edge trim the top of the
carpet pile should be level with the top of the
hard surface or edge trim. If the carpet pile sits
higher than the hardsurface or edge trim and is
exposed to high levels of traffic this may cause
damage to the carpet edge.
Step 1 Firstly effect a light cut without attempting to cut right through.
Step 2 Then crack the modular carpet along the line cut.
Step 3 Complete by cutting right through the fibres with a straight utility or hook knife.
13 Access Flooring
Note: On access floors an application rate for
Intertac of over 14 m2 may be achieved in
some cases.
Off Grid Access Flooring Installation –
500 x 500mm modular carpet
On access floors, off grid installation will mean that the edge of the
modular carpet does not correspond with access floor panel joints.
Installation as per standard Interface modular carpet installation instructions.
11
{
Interface Installation Manual
Intertac adhesive and TacTile are both suitable for modular tile installation over access
flooring.
On access floors an application rate for Intertac of over 14m2 may be achieved in some
cases.
Note: It is important to bring the modular
carpet right up to the underside of the nosing,
flush with the tread, as this will support
the leading edge of the nosing and prevent
it rocking and coming loose. Do not bend
modular carpet over the edge of stair steps.
14Stairs
Stairnosing
Interface modular carpet cannot be installed over the nose of a stair.
A metal or rubber nosing must be installed.
Riser
Apply Inter-Tac to both the tile backing and the riser.
Allow Inter-Tac to tack up and place carpet for the riser in position.
Tread
Apply Inter-Tac to 100 per cent of tread.
The tread should be fitted after the riser to allow the tread carpet to hold the riser securely
in position.
15Installing Fixtures & Furniture
after Modular Carpet
Installation
To avoid dislodging modular carpet during furniture and fixture placement, place standard
sheets of plywood or cardboard over the complete installation.
If plastic type protection is used, any condensation is the responsibility of the contractor.
Do not position adhesive tape on pile of modular carpet.
16Finish
Edge Restraint – In the event of an open perimeter area a fixed reducer strip anchored to
the floor is recommended. The edge restraint should be the same height as the carpet and
finish level with the carpet pile ensuring a smooth transition from one surface to the other.
Nap all slivers and tuft sprouts using napping shears.
It is recommended that all 12th gauge products be checked thoroughly for tuft sprouts and
It is recommended that all 12th gauge products
be checked thoroughly for tuft sprouts and
that any noticeable sprouts are napped as part
of the finishing procedure.
that any noticeable sprouts are napped as part of the finishing procedure.
Apply a final Vacuum or Pile Lifting process.
Ensure that the overall finished appearance is consistent throughout. Correct any defects
including incorrect arrow direction.
Upon completion, a further vacuum or pile lift may be required. It is essential that lighting
be in service to allow inspection under good lighting conditions.
12
{
Interface Installation Manual
17Conclusion
These installation procedures are recommended by the manufacturer and installation
should only be carried out by experienced and competent carpet installers. Strict
adherence to these procedures will result in a quality installation under most conditions.
Any situation that can alter the installation procedure, such as the identification of defect
material or unusual installation conditions, creates a responsibility for the contractor to
notify both the owner and the manufacturer before proceeding.
Any variance from any of these instructions will become the responsibility of the
Any variance from any of these
instructions will become the responsibility of
the contractor and not the manufacturer and
shall void all other wise applicable warranties.
contractor and not the manufacturer and shall void all other wise applicable warranties.
18Interface CushionBac™
Modular Carpet
Follow the same procedure as outlined for Interface modular carpet.
19Interface Sheet Goods –
Unbacked
Apply 100% cover of ARDEXAF241 adhesive with an A2 notched trowel to a properly
prepared surface.
1Concrete Subfloor
Requirements
1 Construction
Appendices
Concrete subfloor shall be finished off true to grade and in accordance with good
building practice and shall be free from rising moisture.
2 Surface
(a) Planeness
When a straight edge 2m long is placed on the surface at any position, no part of the
surface is more than 5mm above or below the straight edge.
(b) Finish
New concrete floors shall be steel troweled to a smooth surface but not to a glass finish.
They shall be free from score marks, grooves, depressions and scraped free of foreign
materials.
Note: Refer to Moisture and pH test result
recommendation table on page 17.
3 Dryness
Before installation commences, the dryness of subfloor should be determined. For
Interface and Heuga modular carpet the moisture content measured by Hygrometer
shall not be greater than 75% RH for use of Intertac Pressure Sensitive adhesive. Where
less than 80% RH or less exists, TacTiles can also be used for installation. In cases where
slab RH measures between 80% and 90%, a sealant such as ARDEX S8 Slab Seal should
first be applied, followed by TacTiles for the installation of Interface carpet tiles.
Moisture testing should be conducted by Hygrometer RH moisture test meters either
13
{
Interface Installation Manual
In Situ Probe or Sealed Hood Hygrometers. Interface do not recommend measuring
substrate moisture content with any method other than Relative Humidity test methods.
IF THE MOISTURE CONTENT IS ABOVE THE RECOMMENDED MAXIMUM READINGS
STOP AND DO NOT PROCEED WITH THE INSTALLATION. SEEK FURTHER ADVICE FROM
INTERFACE BEFORE PROCEEDING.
4 Cleanliness
Before installation begins, foreign materials such as grease, oil, paint, existing
floorcovering and any other harmful materials, should be removed. Any surface
treatment or old adhesive that will effect the new adhesive or the holding power
of the modular carpet should be treated or removed. The floor shall be vacuumed and
washed to ensure a perfect bond.
5 Porosity
All concrete floors or floors that have been filled using a levelling compound should be
sealed using a sealer compatible with the backing system.
6 Alkalinity
Note: Refer to ASTMF710-08 for suitable pH test
procedure.
The subfloor should have an alkalinity level of between pH7 & pH9 to be suitable
for carpet installation. In cases where slab pH measures between pH9 and pH12, a
sealant such as ARDEX S8 Slab Seal should first be applied, followed by TacTiles for the
installation of Interface carpet tiles. Test by wetting the floor with distilled water then
using a pH test paper or meter.
SHOULD THE PH LEVEL BE OUTSIDE THIS RANGE STOP AND DO NOT PROCEED WITH THE
INSTALLATION. SEEK FURTHER ADVICE FROM INTERFACE BEFORE PROCEEDING.
02moisture and ph test result
recommendations
Moisture & PH Range Test
Results
Interface Installation
System
Less than 75% RH & less than pH9
TacTile
or
Intertac
Between 70% and 80% RH & less than
pH 9
TacTile
Between 80% and 90% RH & less than
pH 12
Seal substrate with ARDEX S8 Slab Seal
and install with TacTile
Above 90% RH, or above pH12
Contact Interface for site specific
advice
Note: It is critically important to test all new concrete floors and those with recently
applied levelling compounds, to determine the moisture and pH conditions prior to
commencing installation of Interface carpet tiles. Armed with the RH and pH readings,
the table above should then be used to select the correct installation system for
Interface carpet tile installations.
FAILURE TO TEST THE FLOOR MAY VOID ANY Interface WARRANTY ON THE INSTALLED
CARPET TILES.
14
{
Interface Installation Manual
03Interface Installation
Methods and Codes
DIRECTIONAL Installation – Code DIR
An arrow is printed on the back of each modular tile to indicate pile direction.
Make sure the arrows point in the same direction throughout your installation.
QUARTER TURN Installation – Code QTR
In this case, the arrows should be turned 90 degrees every other modular tile.
RANDOM Installation – Code RDM
This pattern allows installation of modular tiles without regard to arrow direction.
ASHLAR Installation
This pattern is created by offsetting the side joins of the modular tiles. All arrows should
point in the same direction.
BRICK Installation
This pattern is created by offsetting the front and back joins of the modular tiles. All
arrows should point in the same direction.
Code SPEC – Specification Methods can represent either: Directional, Quarter Turn, Ashlar or Brick Installation.
The codes printed on the cartons indicate the manufacturers’ recommended installation method. However it is the installers’
responsibility to confirm the clients’ preferred installation method prior to commencement of installation.
15
{
Interface Installation Manual
Contacts
Australia
Interface Australia
Phone: 02 8332 2400
Fax:
02 9318 1996
Email: [email protected]
Web:
www.Interface.com
Interface 24/7 National Hotline
For urgent installation, cleaning or maintenance enquiries:
Phone: 1800 785 277
New Zealand
Inzide Commercial Ltd
Phone: 0800 800 656
Email: [email protected]
Web:
www.inzide.co.nz
Singapore
Phone: +65 6478 1510
www.Interface.com
Web:
Hong Kong
Phone: +85 2 2802 0838
Email: [email protected]
Web:
www.Interface.com
China
Phone:
Phone:
Email:
Web:
+86 400 110 8687
+86 800 828 2687
[email protected]
www.Interface.com.cn
Japan
Phone: +81 3 5733 5211
Email:[email protected]
Web:www.Interface.com
Thailand
Phone: +66 2459 1052
Web:www.Interface.com
Indonesia
Phone: +62 21 582 3119
Web:www.interface.com
Korea
Phone: +822 2555 1734
Web:www.interface.com
®Interface, InterfaceFLOR, Intersept, GlasBac & System Six are
registered trademarks of Interface Inc.
®InterTac is a registered trademark of Interface Aust Pty Limited.
®Airstep is a registered trademark of Bridgestone Australia Ltd.
™ i2 is a trademark of Interface Aust Pty Limited.
Malaysia
Phone: +60 12 431 1226
Web:
www.Interface.com
Vietnam and Indochina
Phone: +668 182 29340
PN: 1905001
16
{
Interface Installation Manual
Web:
www.Interface.com