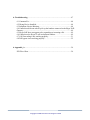
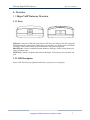
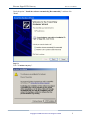
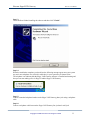
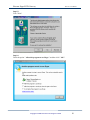
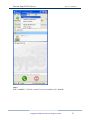
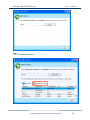
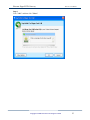
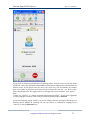
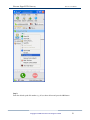
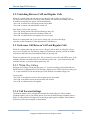
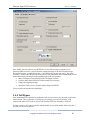
1
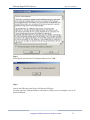
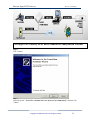
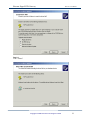
User Manual
USGPS-3800
Skype / PSTN Gateway
Built-in Answering Machine
SPG-11
All brand and product names mentioned in this manual are trademarks and/ or registered trademarks of
their respective holders.
Copyright © 2006 Pluscom Technologies Limited
Table of Content
1-Introduction.......................................................................................................... 1
2- Before You Begin ................................................................................................. 2
2.1 Package Contents ................................................................................................ 2
2.2 Requirements....................................................................................................... 2
3- Overview .............................................................................................................. 3
3.1 Skype VoIP Gateway Overview........................................................................ 3
3.1.1 Ports.......................................................................................................... 3
3.2.2 LED Description ...................................................................................... 3
4- Installing Gateway .............................................................................................. 4
4.1 Skype VoIP Gateway Installation .................................................................... 4
4.1.1Windows XP.............................................................................................. 4
4.1.2 Windows 2000.......................................................................................... 12
5- Configuration ...................................................................................................... 22
5.1Skype VoIP Gateway States ............................................................................... 22
5.1.1 Green ........................................................................................................ 22
5.1.2 Red ........................................................................................................... 22
5.1.3 No phone in the system tray..................................................................... 22
5.2 Testing Skype VoIP Gateway............................................................................ 22
5.2.1 Making and Receiving Calls .................................................................... 28
5.2.2 Setting Up Skype Speed Dial .................................................................... 28
5.2.3 Switching Between VoIP and Regular Calls ............................................. 31
5.3 Conference Call Between VoIP and Regular Calls ........................................ 31
5.3.1 Three-Way Calling .................................................................................... 31
5.3.2 Call Forward Settings................................................................................ 31
5.4 Telephone Answering Machine ...................................................................... 37
5.4.1 Interactive Voice Response (IVR ............................................................... 38
5.4.2 Local IVR Access..................................................................................... 39
5.4.3 Remote IVR Access ................................................................................. 39
5.4.4 Toll Bypass ................................................................................................. 40
5.5 Skype Voicemail............................................................................................. 41
5.6 Recorder ......................................................................................................... 41
5.7 Changing the Default Settings........................................................................ 43
5.8 Disabling Pluscom Agent ............................................................................... 46
5.9 Uninstall ......................................................................................................... 47
Copyright © 2006 Pluscom Technologies Limited
6- Troubleshooting................................................................................................... 47
6.1 Common Fix................................................................................................ 48
6.2 Wrong Device Installed…………………………………………............... 48
6.3 Softphone Version Warning………………………………………............. 48
6.4 Cannot hear dial-tone when I pick up the handset connected to theSkype VoIP
Gateway............................................................................................................. 49
6.5 Skype VoIP does not appear to be responding to incoming calls................ 49
6.6 Cannot hear the Skype™ call in telephone handset……………... ............. 49
6.7 Call Forwarding is not working properly……………................................ 51
6.8 Toll bypass is not working properly……………………………... ............. 52
6- Appendix_A ......................................................................................................... 54
IVR Flow Chart................................................................................................. 54
Copyright © 2006 Pluscom Technologies Limited
Pluscom Skype/PSTN Gateway
SPG-11 User Manual
1- Introduction
SPG-11 is Pluscom’s latest USB interface voice gateway. It supports call transfer between Skype
and PSTN and secondary dialing. SPG-11 enables ordinary desktop telephone to dial and receive
Skype calls. When the user is not available, SPG-11 can forward SKYPE call to mobile phone or
any other specified number. With SPG-11 installed on one’s computer, the user can use mobile
phone to dial pre-set user on Skype.You can manage Skype™ voice mail in regular phone.SPG11 is a bridge between SKYPE and traditional telephone (PSTN).The built in Answering Machine
with configurable greeting massage helps you record local voice mail and guides you to Forward
Calls. It has the richest functions and features among USB voice gateways available in the
market.
After you follow the simple installation you will be able to do the following:
• Continue to make and receive regular calls as you normally do
• Make and receive Skype™ calls using your standard telephone
• Forward Skype™ calls to your mobile phone
• Make Skype™ calls from your mobile phone even when you are away from your computer
• Switch between a Skype™ call and a regular phone call
• Check Skype™ voicemail from your handset
• Use the Pluscom Gateway as an Answering Machine for PSTN and VoIP calls
• Record incoming Skype™, PSTN and forwarded calls as wave (WAV) files
Copyright © 2006 Pluscom Technologies Limited
1
Pluscom Skype/PSTN Gateway
SPG-11 User Manual
2- Before You Begin
Before you begin installing and configuring your Skype Voip Gateway, make sure to check the
following :
2.1 Package Contents
The Skype VoIP Gateway package includes the
1. Pluscom Skype VoIP Gateway
2. USB Cable
3. Telephone Cable
4. AUTORUN CD-ROM
5. Quick Installation Guide
2.2 Requirements
In order to install the Skype VoIP Gateway you will need the following:
1. Skype VoIP Gateway
2. USB cable
3. RJ11 cable
4. Telephone (regular telephone, cordless phone, DECT phone …)
5. Telephone service (for conf call, 3 way calling and forwarding features)
6. Broadband internet service is recommended
7. PC with the following minimum specifications:
• Pentium 400MHz or equivalent
• Windows 2000 or XP
• Available USB port (1.0, 1.1 or 2.0)
• Skype™ version 1.1 or higher (www.skype.com) must be installed
• 128MB RAM
• 10MB available hard disk space
• CD-ROM drive to install Skype VoIP Gateway software from the supplied CD-ROM
8. Recommended PC specification for optimal performance:
• Pentium 1GHz or equivalent
• Windows 2000 or XP
• Available USB port (1.0, 1.1 or 2.0)
• Skype™ version 1.3 or higher (www.skype.com) must be installed.
• 256MB RAM
• 30MB available hard disk space
• CD-ROM drive to install Skype VoIP Gateway software from the supplied CD-ROM
Note that the Skype VoIP Gateway must be connected directly to the PC
USB port or to an AC Powered USB hub. It CANNOT be installed on a bus
powered USB hub.
Copyright © 2006 Pluscom Technologies Limited
2
Pluscom Skype/PSTN Gateway
SPG-11 User Manual
3- Overview
3.1 Skype VoIP Gateway Overview
3.1.1 Ports
USB port: Connect the USB cable to the Skype VoIP Gateway USB port. The other end of the
USB cable must be connected to a USB port on your computer, or to an AC Powered USB hub.
The Skype VoIP Gateway MUST not be connected to a bus powered USB hub.
PHONE Jack: Connect a standard telephone handset to the Skype VoIP Gateway phone jack
using a telephone cable.
LINE Jack: Connect a telephone cable between the Skype VoIP Gateway line jack and a wall
jack.
3.2.2 LED Description
Power LED: The LED stays lighted to indicate the system is power on properly.
Copyright © 2006 Pluscom Technologies Limited
3
Pluscom Skype/PSTN Gateway
SPG-11 User Manual
4- Installing Gateway
4.1 Skype VoIP Gateway Installation
DO NOT CONNECT THE SKYPE VOIP GATEWAY TO YOUR
COMPUTER UNTIL INSTRUCTED TO DO SO BY THE SKYPE VOIP
GATEWAY INSTALLATION WIZARD
The following instructions will guide you through the process of installing the Skype VoIP
Gateway.
The installation procedure is to:
• Install Skype™
• Start the Skype VoIP Gateway SW installation (step 1 below)
• Plug in the Skype VoIP Gateway WHEN INSTRUCTED TO DO SO
• Verify the installation is OK
• Connect a telephone handset to the Skype VoIP Gateway
• Connect the Skype VoIP Gateway to the wall jack. Note that this is optional and only
required for the forwarding features.
• Use your Skype VoIP Gateway to make and receive Skype™ calls
The detailed instructions follow:
If Skype™ is not already installed on your computer, visit http://www.skype.com and follow the
instructions there to install Skype™. Verify that Skype™ is working before installing the Skype
VoIP Gateway.
We strongly recommend you to update the latest Skype due to the one could
provide better performance and resolve some problems than the older one.
4.1.1Windows XP
Step 1:
Please insert the CD into your CD-ROM drive.
The CD should auto-start, displaying the following window. If it does not start, click on Start –
Run and type in CD: \autorun.exe (where CD is the drive letter of your CD-ROM drive.) Click
"USB Driver ".
Copyright © 2006 Pluscom Technologies Limited
4
Pluscom Skype/PSTN Gateway
SPG-11 User Manual
Step 2:
Click “Yes ".
Step 3:
Check the “I have read and agree to the terms and conditions as stated above “checkbox and
then click “Agree ".
Copyright © 2006 Pluscom Technologies Limited
5
Pluscom Skype/PSTN Gateway
SPG-11 User Manual
Step 4:
Please Plug In your Personal VoIP Adaptor and then click " OK ".
Step 5:
Connect the USB cable to the Skype VoIP Gateway USB port.
The other end of the USB cable must be connected to a USB port on your computer, or to an AC
Powered USB hub.
Copyright © 2006 Pluscom Technologies Limited
6
Pluscom Skype/PSTN Gateway
SPG-11 User Manual
The Skype VoIP Gateway MUST not be connected to a bus powered USB hub.
Step 6:
Check the option " Install the software automatically [Recommended] " and then click
"Next".
Step 7:
Please wait while the wizard installs the software…
Copyright © 2006 Pluscom Technologies Limited
7
Pluscom Skype/PSTN Gateway
SPG-11 User Manual
Step 8:
The wizard has finished installing the software and then click " Finish ".
Step 9:
Copyright © 2006 Pluscom Technologies Limited
8
Pluscom Skype/PSTN Gateway
SPG-11 User Manual
Check the option " Install the software automatically [Recommended] " and then click
"Next".
Step 10:
Click " Continue Anyway ".
Copyright © 2006 Pluscom Technologies Limited
9
Pluscom Skype/PSTN Gateway
SPG-11 User Manual
Step 11:
Please wait while the wizard installs the software…
Step 12:
Check the option " Allow this program to use Skype " and then click " OK ".
Copyright © 2006 Pluscom Technologies Limited
10
Pluscom Skype/PSTN Gateway
SPG-11 User Manual
Step 13:
The wizard has finished installing the software and then click " Finish ".
Step 14:
When the installation completes you should see the following message appear near your system
tray and a new telephone icon (circled in red below) in your system tray as shown below.
The telephone icon indicates that the Skype VoIP Gateway software is installed and running and
that you can start making calls via Skype™ and the Skype VoIP Gateway.
Step 15:
Connect a standard telephone handset to the Skype VoIP Gateway phone jack using a telephone
cable
Step 16:
Connect a telephone cable between the Skype VoIP Gateway line jack and a wall jack.
Copyright © 2006 Pluscom Technologies Limited
11
Pluscom Skype/PSTN Gateway
SPG-11 User Manual
4.1.2 Windows 2000
Step 1:
Please insert the CD into your CD-ROM drive.
The CD should auto-start, displaying the following window. If it does not start, click on Start –
Run and type in CD: \autorun.exe (where CD is the drive letter of your CD-ROM drive.) Click
" USB Driver ".
Step 2:
Click “Yes ".
Step 3:
Check the " I have read and agree to the terms and conditions as stated above " checkbox
and then click " Agree ".
Copyright © 2006 Pluscom Technologies Limited
12
Pluscom Skype/PSTN Gateway
SPG-11 User Manual
Step 4:
Please Plug In your Personal VoIP Adaptor and then click " OK ".
Step 5:
Connect the USB cable to the Skype VoIP Gateway USB port.
The other end of the USB cable must be connected to a USB port on your computer, or to an AC
Powered USB hub.
Copyright © 2006 Pluscom Technologies Limited
13
Pluscom Skype/PSTN Gateway
SPG-11 User Manual
The Skype VoIP Gateway MUST not be connected to a bus powered USB hub.
Step 6:
Click " Next ".
Step 7:
Check the option " Search for a suitable driver for my device [recommended] " and then click
" Next ".
Copyright © 2006 Pluscom Technologies Limited
14
Pluscom Skype/PSTN Gateway
SPG-11 User Manual
Step 8:
Check the option " CD-ROM drivers " and then click " Next ".
Copyright © 2006 Pluscom Technologies Limited
15
Pluscom Skype/PSTN Gateway
SPG-11 User Manual
Step 9:
Click " Next ".
Step 10:
Click " Finish ".
Copyright © 2006 Pluscom Technologies Limited
16
Pluscom Skype/PSTN Gateway
SPG-11 User Manual
Step 11:
Click " Next ".
Copyright © 2006 Pluscom Technologies Limited
17
Pluscom Skype/PSTN Gateway
SPG-11 User Manual
Step 12:
Check the option " Search for a suitable driver for my device [recommended] " and then click
" Next ".
Step 13:
Check the option " CD-ROM drivers " and then click " Next ".
Copyright © 2006 Pluscom Technologies Limited
18
Pluscom Skype/PSTN Gateway
SPG-11 User Manual
Step 14:
Click " Next ".
Copyright © 2006 Pluscom Technologies Limited
19
Pluscom Skype/PSTN Gateway
SPG-11 User Manual
Step 15:
Click " Yes".
Step 16:
Check the option " Allow this program to use Skype " and then click " OK ".
Copyright © 2006 Pluscom Technologies Limited
20
Pluscom Skype/PSTN Gateway
SPG-11 User Manual
Step 17:
The wizard has finished installing the software and then click " Finish ".
Step 18:
You must restart your computer before the new settings will take effect and then click " Finish ".
Step 19:
Connect a standard telephone handset to the Skype VoIP Gateway phone jack using a telephone
cable
Step 20:
Connect a telephone cable between the Skype VoIP Gateway line jack and a wall jack.
Copyright © 2006 Pluscom Technologies Limited
21
Pluscom Skype/PSTN Gateway
SPG-11 User Manual
5- Configuration
5.1Skype VoIP Gateway States
5.1.1 Green
When the Skype VoIP Gateway is installed and the software is installed properly, then you will
see a green phone in the system tray as shown below.
5.1.2 Red
If the Pluscom agent is running and the Skype VoIP Gateway is removed, then the telephone will
be red as shown below.
During an incoming or outgoing Skype call, the telephone handset will jiggle as shown below,
indicating an VoIP call is being initiated.
5.1.3 No phone in the system tray
When the Pluscom agent is not running, there is no phone in the system tray.
5.2 Testing Skype VoIP Gateway
Skype provides a useful feature to test your connection. It is called Echo123. If you send “callme”
in a chat with echo123, the echo123 service will call you and let you leave a message which will
be played back to you. This will help you verify that the Skype VoIP Gateway, Skype VoIP
Gateway driver and the telephone are all connected and installed properly.
Step 1:
Click " Contacts -> Add a Contact… ".
Copyright © 2006 Pluscom Technologies Limited
22
Pluscom Skype/PSTN Gateway
SPG-11 User Manual
Step 2:
Enter " echo123 " (Call Echo / Sound Test Service) and then click " Search ".
Copyright © 2006 Pluscom Technologies Limited
23
Pluscom Skype/PSTN Gateway
SPG-11 User Manual
Step 3:
Click " Add Selected Contact " .
Copyright © 2006 Pluscom Technologies Limited
24
Pluscom Skype/PSTN Gateway
SPG-11 User Manual
Step 4:
Click " OK " and then click "Close".
Copyright © 2006 Pluscom Technologies Limited
25
Pluscom Skype/PSTN Gateway
SPG-11 User Manual
Step 5:
Call Echo / Sound Test Service (echo123) now.
You should see the following screen, and the telephone connected to the Skype VoIP Gateway
should ring. Pick up the handset and follow the instructions. The Echo Test Service will ask you
to leave a message which will be played back immediately. This will help you verify that the
Skype VoIP Gateway, Skype VoIP Gateway driver and the telephone handset are all connected
and installed properly.
Copyright © 2006 Pluscom Technologies Limited
26
Pluscom Skype/PSTN Gateway
SPG-11 User Manual
If your voice is fine that means this device is working perfect. Now you can try to call your friend
by SKYPE. Due to the limitation of bandwidth between Internet infrastructure and customer site
Internet access. In few special case, the device can’t work very well and smooth, for example
poor voice quality or you talk to your friend, but your friend can’t hear you…etc,. Don’t worry!
That is not product issue. We suggest you try to call again till you can accept the Voice quality.
Note:
"callme" for "echo123" is a feature presented and supported by Skype – it may not be supported
in some geographic locations or due to other reasons beyond the scope of Pluscom.
In case that following typing "callme" you receive a Skype chat error message or the Skype user
interface doesn't indicate an incoming call, you can still try to establish an outgoing call to
"echo123" to test the Pluscom device.
Copyright © 2006 Pluscom Technologies Limited
27
Pluscom Skype/PSTN Gateway
SPG-11 User Manual
5.2.1 Making and Receiving Calls
You can continue to use the telephone handset connected to the Skype VoIP Gateway to make
and receive standard telephone calls as you used without any change. To make a standard phone
call, just pick up the handset and dial as you normally would. To answer (receive) a standard
phone call just pick up the handset when the phone rings.
When you receive an incoming Skype™ call, the handset connected to the Skype VoIP Gateway
will ring. If you handset supports Caller ID, then the Skype username will be
displayed on the handset’s screen where the standard caller ID information is displayed.
To answer the call, just pick up the handset and speak as you normally would. To end the
call, simply hang up the handset as you normally would.
If you have SkypeOut™, you can use the Skype VoIP Gateway connected handset to make
SkypeOut™ calls by picking up the handset, pressing ##, to indicate to the Skype VoIP Gateway
that this is not a standard call but a Skype call, dialing as per the SkypeOut™
recommended dialing sequence, 00 + country code + telephone number (e.g. 001 617
555 1212) and pressing the asterisk (*) key.
In order to make a call to a Skype™ contact, you will need to use the Skype™ program
to assign a speed dial (as described in the next section) to each person you would like to
call from the Skype VoIP Gateway connected handset. Then simply pick up the handset, press ##,
to indicate to the Skype VoIP Gateway adapter that this is not a standard call but a Skype call,
you will hear a new dial-tone, press the speed dial number (e.g. 99) and then press the asterisk (*)
key.
5.2.2 Setting Up Skype Speed Dial
This section describes how to setup speed dials in Skype™. This is required in order to
use a Skype VoIP Gateway connected handset to dial to a Skype™ contact. It is not required for
making SkypeOut™ calls using a Skype VoIP Gateway connected handset.
Step 1:
Right click on the desired contact as shown below and select Set Speed-Dial:
Copyright © 2006 Pluscom Technologies Limited
28
Pluscom Skype/PSTN Gateway
SPG-11 User Manual
Step 2:
Enter the desired speed dial number (e.g. 99) as shown below and press the OK button.
Copyright © 2006 Pluscom Technologies Limited
29
Pluscom Skype/PSTN Gateway
SPG-11 User Manual
Step 3:
You will now see an indication that the Skype™ contact has a speed dial associated with them as
shown below.
Copyright © 2006 Pluscom Technologies Limited
30
Pluscom Skype/PSTN Gateway
SPG-11 User Manual
5.2.3 Switching Between VoIP and Regular Calls
While on a regular phone call you may receive a Skype™ call or while on a Skype™ call
you may receive a regular call. The Skype VoIP Gateway will indicate an incoming call with
an audible call waiting tone and you can do the following:
• Press ‘#1’ to answer new call keeping current call on-hold
• Press ‘##’ to answer call and terminate current call
Once having 2 active calls, you may:
• Press ‘#1’ putting current call on-hold switching to other call
• Press ‘##’ terminating current call switching to other call
• Press ‘#2’ to conference the calls together (see next section)
While on a regular phone call, if you receive a Skype call, you can see the Skype
username on your telephone (if it has alphanumeric CLID display).
5.3 Conference Call Between VoIP and Regular Calls
While on a regular phone call you may receive a Skype™ call or while on a Skype™ call you
may receive a regular call. The Pluscom adapter will indicate an incoming call with an audible
tone and you can conference in the additional caller by pressing ‘#2’.
While in a conference call, you may press ‘#1’ to return to 2 active calls (with PSTN active, VoIP
on-hold), and then as described above to switch between calls (‘#1’ – put current on hold, ‘##’
terminate current), or conference them again using ‘#2’.
5.3.1 Three-Way Calling
During an active Skype call the user may press ‘#1’ to put current Skype call on-hold and get a
PSTN dial tone to establish a PSTN call. Similarly, during an active PSTN call the user may press
‘#1’ to put current PSTN call on-hold and get a VoIP dial tone to establish a Skype call
You may then:
• Press ‘#1’ to switch between active calls keeping current call on-hold
• Press ‘##’ to terminate current call and switch to call on-hold
• Press ‘#2’ to conference the calls together
5.3.2 Call Forward Settings
The Pluscom adapter can be configured to forward all incoming Skype™ calls to another
telephone number, such as your mobile phone. It can also forward incoming telephone calls to a
Skype™ or SkypeOut™ call. Right click on the Skype Agent (green telephone in the Windows
System Tray) and select configure as shown below.
Copyright © 2006 Pluscom Technologies Limited
31
Pluscom Skype/PSTN Gateway
SPG-11 User Manual
You will see the Pluscom configuration screen as shown below.
Press the Call handling tab to see the Call handling parameters as shown below.
There are two kinds of Call handling Settings:
Incoming Internet calls:
Incoming PSTN calls:
Copyright © 2006 Pluscom Technologies Limited
32
Pluscom Skype/PSTN Gateway
SPG-11 User Manual
5.3.3 Incoming Internet Calls
In order to forward incoming Skype™ calls to a telephone number such as your mobile
phone, change the Incoming Internet calls settings.
First choose the Call forward radio button and then select the telephone that should be dialed on
the telephone line.
Then select the number of rings before the forwarding takes place and press the Apply
and/or OK button as shown below.
Copyright © 2006 Pluscom Technologies Limited
33
Pluscom Skype/PSTN Gateway
SPG-11 User Manual
If you are on a PBX, you may need to press a digit to get an outside line (i.e. 9). In this case you
would enter 9,,,16175551212. You may need to experiment with the number of commas to enter.
This is related to the time it takes the PBX to provide a dial tone after pressing the outside line
digit (i.e. 9).
The instructions above describe how to forward incoming VoIP calls to the PSTN. In order to
forward incoming PSTN calls to a VoIP call, such as through SkypeOut™ or to a Skype account,
the instructions above for the “Incoming PSTN Calls” fields. For the number to dial, enter a speed
dial number (e.g. 77) associated with the Skype User without the * key (as shown above).or enter
the SkypeOut™ number (e.g. 0016175551212).
As you can see in the screenshot above, when forwarding is enabled, the driver will disable the
computer’s ability to go to standby mode. When the computer tries to go into a standby mode,
you will see the following popup:
Copyright © 2006 Pluscom Technologies Limited
34
Pluscom Skype/PSTN Gateway
SPG-11 User Manual
If the computer goes to sleep, then toll bypass will not work.To turn this feature off, uncheck the
“Disable Standby/Hibernate” check box.
When call forwarding is enabled, incoming callers will hear a voice message indicating that the
call is being forwarded. This let’s the incoming caller know what is transpiring.
Copyright © 2006 Pluscom Technologies Limited
35
Pluscom Skype/PSTN Gateway
SPG-11 User Manual
5.3.4 Incoming PSTN Calls
In order to forward incoming regular calls to a VoIP call, such as through SkypeOut™ or to a
Skype account, enter speed dial number (e.g. 77) associated with the Skype User without the *
key (as shown above).or enter the SkypeOut™ number (e.g. 0016175551212), change the
Incoming PSTN calls settings.
First select the Call forward radio button and then select the number of rings before the
forwarding takes place.
Then select the Skype™ speed dial number (e.g. 77) that should be dialed on the
telephone line and press the Apply and/or OK button as shown below.
As you can see in the screenshot above, when forwarding is enabled, the driver will disable the
computer’s ability to go to standby mode. When the computer tries to go into a standby mode,
you will see the following popup:
Copyright © 2006 Pluscom Technologies Limited
36
Pluscom Skype/PSTN Gateway
SPG-11 User Manual
If the computer goes to sleep, then toll bypass will not work.To turn this feature off, uncheck the
“Disable Standby/Hibernate” check box.
When call forwarding is enabled, incoming callers will hear a voice message indicating that the
call is being forwarded. This let’s the incoming caller know what is transpiring.
5.4 Telephone Answering Machine
Pluscom includes a telephone answering machine (TAM) and can be configured to answer
incoming VoIP and PSTN calls. The answering machine can be accessed and configured from the
local telephone handset connected to Pluscom as well as remotely by calling into the PSTN line
connected to Pluscom. The access is enabled via the Pluscom Interactive Voice Response (IVR)
system.
The Pluscom TAM can be used in conjunction with or independent of any VoIP voicemail
service you may be subscribed to. When you access the Pluscom TAM, you will be able to access
the VoIP service voicemail, if subscribed, as well as the Pluscom voice messages.
The answering machine is disabled by default. In order to enable the Pluscom TAM, bring up the
Pluscom Agent -> Call handling tab and press the Answering machine radio dial for
Incoming Internet calls (for incoming VoIP calls) and/or Incoming PSTN calls (for incoming
phone calls) and select the desired number of rings before the TAM answers as shown below.
Copyright © 2006 Pluscom Technologies Limited
37
Pluscom Skype/PSTN Gateway
SPG-11 User Manual
Note your Pin number. This can be changed and will be required in order to check messages or
change the TAM options remotely.
After all changes are made, press Apply and then OK.
At this point, the Pluscom TAM will answer incoming calls after the desired number of rings. The
caller will then hear the Outgoing message and have a chance to leave an incoming message.
Voicemail messages are stored on the computer in WAV format in the following folder:
c:\program files\Pluscom\ Pluscom Personal VoIP Gateway\IVR\VoiceMail
5.4.1 Interactive Voice Response (IVR)
The IVR system provides access to the Pluscom TAM for managing recorded messages as well as
configuring the TAM. In addition, the IVR provides access to Toll Bypass (explained in the Toll
Bypass section) and the VoIP service provider Voicemail.
The IVR system can be accessed from the local telephone handset connected to Pluscom as well
as via calling in remotely (explained in the Remote Administrative Access section).
Copyright © 2006 Pluscom Technologies Limited
38
Pluscom Skype/PSTN Gateway
SPG-11 User Manual
Not all features are supported in all modes (i.e. local access versus remote access).
See Appendix A for a detailed flow chart of the IVR system.
5.4.2 Local IVR Access
The IVR is accessed locally by picking up the Pluscom connected telephone handset, going offhook and switching to VoIP dialtone. (if you have pending VoIP service or Pluscom TAM voice
messages, the VoIP dialtone will have a stutter dial) by pressing the ‘*’ key. At this point the IVR
system will provide all the necessary voice queues for the following:
• Listen to locally Pluscom TAM recorded voice mails
• Delete locally Pluscom TAM recorded voice mails
• Access the VoIP service provider voice mail system
• Configure the Pluscom TAM (record new outgoing message, restore the factory default
outgoing message …)
You can press DTMF digits while the menu is being played if you are familiar with the menu
options and flow. There is no need to wait until the end of each voice queue. The same applies for
voice messages browsing – you may repeat the voice message (‘1’), delete the voice message
(‘2’) or skip to next voice message (‘3’), while the voice message is being played. Each menu
will be played up to 3 times (5 sec silence between repetitions), if no is action taken by user
within this time the call would disconnect with goodbye message.
5.4.3 Remote IVR Access
In order to access the IVR remotely, the Answering Machine OR Call forward option AND
Enable administrative mode option must be set for the network (Internet and/or PSTN) you would
like to call in on as shown below.
Copyright © 2006 Pluscom Technologies Limited
39
Pluscom Skype/PSTN Gateway
SPG-11 User Manual
Once enable, you can call in to your PSTN line or your VoIP account to remotely access
Pluscom. When you call in, you will hear the outgoing message or the call forward message.
During the message, you should press the ‘*’ key followed by the pin code and ‘*’ key again.
You have 3 trials to enter the pin code before the call is disconnected. Once authenticated you can
do the following by listening to and responding to the IVR voice prompts:
• Make a toll bypass call (explained in the Toll Bypass section)
• Listen to and/or delete Pluscom TAM recorded voice messages
• Change the outgoing message
• Access the VoIP service voicemail (when calling from PSTN)
Your pin code can be between 4 and 8 digits.
5.4.4 Toll Bypass
Once authenticated (as explained in the Remote IVR Access section), you can make a call on the
other network. This is referred to as toll bypass. For example, you can call in on the VoIP
network and make a PSTN call or you can call in on the PSTN line and make a VoIP call.
In order to make a call, simply enter the desired number or speed dial number followed by the ‘*’
key and you call will be placed.
Copyright © 2006 Pluscom Technologies Limited
40
Pluscom Skype/PSTN Gateway
SPG-11 User Manual
If you call in via PSTN and make a VoIP Toll Bypass call, you can terminate the call by pressing
‘##” (for quick termination) or simply hang up. If you call in via the VoIP network and make a
PSTN Toll Bypass call, you can terminate the call by ending the VoIP session.
5.5 Skype Voicemail
With Pluscom active, the attached telephone handset can be used to check for, and listen to your
Skype voicemail.
You can access your voice mail only when there is no call in progress.
In order to access your voicemail:
1. Pick up the attached telephone handset
2. Press ‘##’ to get VoIP dial tone
3. If a new Skype voice message exists the VoIP dial tone will have an intermittent beep
4. Press ‘*’ to access IVR system
5. Follow the menus to access Skype voice mail mode
6. Once in voice mail mode the first message is played automatically
7. At the end of each message a trailing ‘beep” is played
8. At the end of the last messages a trailing ‘beep-beep-beep’ is played
9. During the playing of current message and within 5 seconds following the end of message the
you can press the 1, 2, 3, 9 in order to perform the following actions:
User Action
Repeat current message
Delete current message, move to next
Keep current message, move to next
Delete all messages
Key
1
2
3
9
10. If you don’t enter any valid key within 5 sec after message has ended, the system will behave
as if you pressed ‘3’
To exit voicemail mode press ‘##” or place the attached telephone in the handset (i.e. on hook).
Alternatively, pressing ‘#1’ will also exit voicemail mode. In either case, the currently playing
message will be stopped.
5.6 Recorder
With Pluscom active, the attached telephone handset can be used to check for, and listen to
your Skype voicemail.
The call recorder is accessed and configured through the Pluscom Agent Call Recorder tab as
shown below.
Copyright © 2006 Pluscom Technologies Limited
41
Pluscom Skype/PSTN Gateway
SPG-11 User Manual
You can change the default location where the recordings will be stored by pressing the button
(with three dots) immediately to the right of the location field. The folder containing the
recordings can be accessed by pressing the Open Folder button. With the location folder open you
can access the individual recordings.
Recordings are named according to the following naming convention:
Call_<time>_<date>.wav
For example, Call_15-7-2005_11:55:45.wav.
The wave files can be played through any application that supports wave files (e.g. Windows
Media Player).
Recording is controlled by two mechanisms: automation and manual.
Manual recording has two modes:
• Through the Call Recorder screen above - controlled by pressing the record (red
dot) and stop (black square) buttons.
• From the telephone handset – controlled by pressing the #7 keys (start recording)
and #8 keys (stop recording) on the telephone handset connected to Pluscom.
Copyright © 2006 Pluscom Technologies Limited
42
Pluscom Skype/PSTN Gateway
SPG-11 User Manual
Automatic recording is controlled through the only mode as shown below.
• Record All Calls – all calls will be recorded
THE RECORDER IS STORING FILES TO YOUR HARD DISK DRIVE. WE ARE NOT
RESPONSIBLE FOR ANY ISSUES THAT ARISE FROM USING THE RECORDING
FUNCTION.
5.7 Changing the Default Settings
You can change the default settings for sending a call, activating a Skype™ call, switching
between a Skype™ call and a regular call (call waiting) and conference calling, by running the
Pluscom ™ configuration.
Right click on the Pluscom ™ agent and select Configure as shown below.
You will see the configuration tab as shown below.
Copyright © 2006 Pluscom Technologies Limited
43
Pluscom Skype/PSTN Gateway
SPG-11 User Manual
The Initiate Voip Call – press these keys to get a VoIP dial-tone. You can now dial a
SkypeOut™ call or a Skype™ speed dial call from your telephone handset.
The Send Key – press this key following the phone number (or speed dial number) when
making a VoIP call.
The Call Waiting Sequence – press these keys during a call to switch between a VoIP
and regular call. For example to switch from a regular telephone call to an incoming
Skype™ call or to switch from a Skype™ call to an incoming regular phone call.
The Conference Key Sequence – while on a Skype call and you receive a regular call or
while on a regular call and you receive a Skype call, press these keys conference together
the two calls.
The Set Phone Type selects which softphone you would like to work with.
Press the Restore Defaults button if you want to restore all sequences to their factory
shipped settings.
Copyright © 2006 Pluscom Technologies Limited
44
Pluscom Skype/PSTN Gateway
Dial Plan Rule
Initiate VoIP
Call
##
Send Key
*
Call Waiting
Sequence #1
Conference
Key Sequence
#2
Call Forward
Phone Line to
VoIP
Call Forward
VoIP to Phone
Line
Toll bypass
Phone Line to
VoIP
Toll bypass
VoIP to Phone
Line
Check for, and
listen to
Skype
voicemail
Call Recorder
SPG-11 User Manual
Explanation of the Rules
press these keys to get a VoIP dial-tone. You can now dial a
SkypeOut™ call or a Skype™ speed dial call from your telephone
handset. Example: Press ## to get a VoIP dial-tone to press ##
again to turn back to regular dial-tone.
press this key following the phone number (or speed dial number)
when making a VoIP call. Example: Press ## to get a VoIP dial-tone
+ speed dial number for example 77 + * to make a VoIP call.
press these keys during a call to switch between a VoIP and regular
call. For example to switch from a regular telephone call to an
incoming Skype™ call or to switch from a Skype™ call to an
incoming regular phone call.
press these keys during a call to conference a VoIP and regular call.
In order to forward incoming Skype™ calls to a telephone number
such as your mobile phone, please refer to the manual in detail.
In order to forward incoming regular calls to a VoIP call, such as
through SkypeOut™ or to a Skype account, enter speed dial number
(e.g. 77) associated with the Skype User without the * key (as
shown above).or enter the SkypeOut™ number (e.g.
0016175551212), please refer to the manual in detail.
When you call into your telephone line you will enter the IVR. Enter
* and the pin code followed by the * button and then enter the
Skype speed dial (e.g. 77) or the SkypeOut telephone number
(e.g. 00 + country code + telephone number) followed by the *
button. Please refer to the manual in detail
Example 1 for Skype speed dial: 1234567 + * + Pin Number + *
+ 1 + 77 + *
Example 2 for SkypeOut telephone number: 1234567 + * + Pin
Number + * + 1 + 00 + country code + telephone number *
When you Skype into the Skype VoIP Gateway, you will Enter the
IVR. Enter * and the pin code followed by the * button and then
enter the telephone number you want to dial on the PSTN line
followed by the * key. Please refer to the manual in detail
Example: Skype into the Skype VoIP Gateway + * + Pin
Number + * + 1 + telephone number + *
Repeat current message -> press 1 key
Delete current message, move to next -> press 2 key
Keep current message, move to next -> press 3 key
Delete all messages -> press 9 key
Automatic
Manual press #7 keys (start recording) press #8 keys (stop
recording)
Copyright © 2006 Pluscom Technologies Limited
45
Pluscom Skype/PSTN Gateway
SPG-11 User Manual
5.8 Disabling Pluscom ™
In order to disable Pluscom ™, right click on the Pluscom ™ agent in the system tray and
select Quit as shown below.
You can now disconnect the Skype VoIP Gateway from the PC.
Installing a New Version
When you install a new version of Pluscom software, at the end you will see a slightly different
Skype warning message as shown below. Select “Allow this program to use Skype” and press OK
as shown below:
Copyright © 2006 Pluscom Technologies Limited
46
Pluscom Skype/PSTN Gateway
SPG-11 User Manual
5.9 Uninstall
Step 1:
Click " Start -> All Programs -> Pluscom Personal VoIP Gateway -> Uninstall ".
Step 2:
Click " Yes".
6- Troubleshooting
The first step in troubleshooting is to read the readme.txt that appears in the Pluscom
program group. It contains a list of known issues for the current Pluscom driver version.
To find out the driver version, right click on the PluscomAgent (green telephone in the
system tray) and select About.
Copyright © 2006 Pluscom Technologies Limited
47
Pluscom Skype/PSTN Gateway
SPG-11 User Manual
You will see the PluscomAgent About screen below.
6.1 Common Fix
If Pluscom was working OK and suddenly stopped working properly (e.g. stops responding to
incoming rings or you cannot get a VoIP dialtone) try the following:
• Quit the Pluscom Agent (right click on the green telephone in the System Tray and select Quit)
• Quit the Skype application
• Unplug the Pluscom adaptor
• Wait 30 seconds
• Plug in the Pluscom adaptor
• Start Skype
• Start the Pluscom Agent
6.2 Wrong Device Installed
If you insert the Skype VoIP Gateway on a Windows XP SP2 PC “prior” to installing the
software, the adapter will be incorrectly installed as a Pluscom USB Modem.
Simply proceed to install the Pluscom ™ software and it will resolve the issue and install the
adapter properly.
6.3 Softphone Version Warning
If you get a Softphone Version Warning from Pluscom, then you should upgrade your
softphone to the latest version. Otherwise, Pluscom may not operate properly.
Pluscom ™ does not appear to be responding to incoming calls
There are several reasons why Pluscom ™ may not function.
• Pluscom may not work properly with some 4 wire (multiline) phones
• Make sure the Skype VoIP Gateway is connected to the PC and Pluscom Agent is running
(green phone in the Windows System Tray).
• Make sure the handset is connected to the phone jack on the Skype VoIP Gateway and not the
line jack
• If the Skype™ application was terminated for any reason while the Pluscom ™ agent
was running, you will need to exit the Pluscom ™ agent and then restart it.
• Some telephone handsets require a battery to be installed in order to ring. If your
handset supports a battery, make sure there is a battery installed and that the battery is
not depleted.
Copyright © 2006 Pluscom Technologies Limited
48
Pluscom Skype/PSTN Gateway
SPG-11 User Manual
6.4 Cannot hear dial-tone when I pick up the handset connected to the
Skype VoIP Gateway
Cannot hear dial-tone when I pick up the handset connected to the Skype VoIP Gateway
Check to make sure that the handset is connected to the correct jack on the Skype VoIP Gateway
6.5 Skype VoIP does not appear to be responding to incoming calls
There are several reasons why Skype VoIP Gateway may not function.
There are several reasons why Skype VoIP Gateway may not function.
•Skype VoIP Gateway may not work properly with some 4 wire (multiline) phones
• Make sure the Skype VoIP Gateway is connected to the PC and Pluscom Agent is running
(green phone in the Windows System Tray).
• Make sure the handset is connected to the phone jack on the Skype VoIP Gateway and not the
line jack
• If the Skype™ application was terminated for any reason while the Pluscom ™ agent was
running, you will need to exit the Pluscom ™ agent and then restart it.
• Some telephone handsets require a battery to be installed in order to ring. If your handset
supports a battery, make sure there is a battery installed and that the battery is not depleted.
6.6 Cannot hear the Skype™ call in telephone handset
Cannot hear the Skype™ call in telephone handset
Check to make sure that Skype is configured to use the Pluscom Audio device as it’s
Audio In and Audio Out Sound Device.
This is done as following:
Select Options from the Skype™ Tools Menu as shown below.
Copyright © 2006 Pluscom Technologies Limited
49
Pluscom Skype/PSTN Gateway
Copyright © 2006 Pluscom Technologies Limited
SPG-11 User Manual
50
Pluscom Skype/PSTN Gateway
SPG-11 User Manual
Now select Sound Devices as shown below.
Check the Audio In and Audio Out list boxes and make sure Pluscom Virtual Audio
device is selected.
6.7 Call Forwarding is not working properly
• Make sure that a telephone cable is plugged into the Skype VoIP Gateway jack and
to the wall phone plug
• Make sure call forwarding is configured properly in the Pluscom Agent ->
Configure -> Call forwarding tab
• Try to dial the telephone number as you have entered in the Pluscom Call
Forwarding dialog box
• If you are on a PBX, make sure you have entered enough commas after the 9 (for example) to
make sure that Pluscom waits for the dial tone before dialing the telephone number
• Make sure your computer is not going into suspend (sleep) mode. This will prevent forwarding
from working
Copyright © 2006 Pluscom Technologies Limited
51
Pluscom Skype/PSTN Gateway
SPG-11 User Manual
6.8 Toll bypass is not working properly
• Make sure that a telephone cable is plugged into the Skype VoIP Gateway line jack and
to the wall phone plug
• Make sure toll bypass is configured properly in the Pluscom Agent -> Configure -> Call
Forwarding tab
• Make sure Skype version 1.3.xx or higher is used on both sides
• Make sure your computer is not going into suspend (sleep) mode. This will prevent toll bypass
from working
Skype Username does not display on telephone handset
• Make sure that your telephone has support for Caller ID name + number display
• Note that some phones display numbers only and some phones display the name ONLY if the
name is stored in the telephone’s address book. In this case store the Skype username and speed
dial number in the address book in order for the Skype username to display.
Audio device “recognize” mistakenly
When Bluetooth driver is installed on the same system that Pluscom software is installed
on, the Bluetooth virtual audio device, known as “BTAUDIO” will overwrite Pluscom
virtual audio device.
The reason for this is that Bluetooth virtual audio device “recognize” mistakenly
Pluscom virtual audio device as part of Bluetooth virtual audio system and therefore
change the name of it in several location.
It is important to understand that although the name of Pluscom virtual audio device is
changed to “BTAUDIO” it is still the virtual audio device that is part of Pluscom
Software and the Pluscom Software stack will work fine (i.e. voice streams will be
directed ok from/to the telephone handset).
The Virtual Audio device override is happening regardless of the order of installation:
• Pluscom Software installed first than Bluetooth driver installed – the problem
occurs immediately after Bluetooth device installation.
• Bluetooth driver installed first, than Pluscom Software installed – the problem
occurs after booting the system.
Bluetooth virtual audio device renames Pluscom virtual audio device in few locations of the
operating system:
It renames Pluscom virtual audio device in sound and audio devices properties and it renames
Pluscom virtual audio device in Skype sound devices.
You can see that in the device manager Pluscom virtual audio device exists.
In order to address this issue, Bluetooth SW vendor need to change the behavior of
their device installation.
Copyright © 2006 Pluscom Technologies Limited
52
Pluscom Skype/PSTN Gateway
SPG-11 User Manual
Error message appeared saying to upgrade to a later version.
When using Skype 2.0. Error message appeared saying to upgrade to a later version.
To resolve this issue is to update the driver to 1.16.03 or later one.
Cannot work with PSTN
Skype VoIP Gateway only supports the analog signal not digital one form telecom or PBX.
Please make sure the line you connected to is analog signal.
Copyright © 2006 Pluscom Technologies Limited
53
Pluscom Skype/PSTN Gateway
SPG-11 User Manual
Appendix-A
IVR Flow Chart
*
1
End
*
End
Beep
End
Exit IVR
[ Record msg ]
Correct PIN
Please
enter your
PIN code
2
Wrong PIN
To enter the Answering
Machine system, please
press 2
1
PhoneNbr
PerformTB
To make a Toll bypass
call, please press 1
AMEnter
Wrong
PIN more
Than max
trials
2
1
WrongPin
AMGreet
Exit IVR
[ call fwd ]
You have
entered a
wrong pin
code
GoodBye
1
Your call is
being
forwarded
You have reached the
Pluscom answering
machine. Please leave
your message after the
beep
DialPinNbr
Configured to
Answering
Machine
CF
Configured to
call-forward
Thank you,
the call will
disconnect
now
End
End
Please dial the
telephone number
followed by the star key
1
Exit IVR
Disconnect
Exit
1 IVR
[ toll bypass ]
2
3
6
Incoming Incoming
PSTN
VoIP
Copyright © 2006 Pluscom Technologies Limited
54
4
5
3
Exit IVR
[Soft-phone VM]
To access the VoIP
network voice mail, please
2
VMListen
To listen to the locally
recorded voice messages,
please press 1
VMDelete
To delete all locally
recorded voice messages,
please press 2
For Answering Machine
configuration, please
press 4
1
All locally recorded
messages would be
deleted
To confirm please
press 1
to cancel please
press 2
1
2
All local
voice
messages
have been
deleted
3
3
4
4
2
All local voice
messages will be
deleted
1
To confirm please
press 1
to cancel please
press 2
2
Copyright © 2006 Pluscom Technologies Limited
VMDelNot
5
cancel confirm
6
AMConfig1
For Answering Machine
configuration, please
VMDelConfirm
4
To delete all local voice
messages, please press 2
VMDelNot
1
cancel confirm
3
To listen to local voice
messages, please press 1
SPG-11 User Manual
VMDelConfirm
Local
Handset
Access
AMConfi VMSoftPho VMDelet VMListe
ne
g1
e
n
Pluscom Skype/PSTN Gateway
All locally
recorded
voice
messages
deleted
6
6
55