1
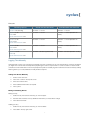
cyclus
WorkLog User Guide
WorkLog 4.1
WorkLog is a professional time tracking tool for the iPhone and iPod touch.
WorkLog adheres to Apples Human Interface Guidelines to make it as intuitive and easy to use as possible. The user
interface is in many aspects similar to other iPhone programs you already know. However, as with every pro application a
certain amount of complexity is unavoidable. Thus, even though most things in WorkLog are self explanatory, we provide this
guide here to introduce some of the basic concepts of the application and to help you getting started with WorkLog.
Please note that most settings cannot be changed within WorkLog itself. To access WorkLog settings, close the program by
pressing the home button and open the „Settings“ app. Scroll down until you find the section „WorkLog“.
1
cyclus
Content
Information about using WorkLog with iCloud
4
Logging Time
5
Working with the Timer
5
Basics
Browsing Through your Data
Switching Between Tasks
Using the QuickStart Feature
Handling Breaks
Rounding Time
Logging Time Manually
7
Adding Time Entries Manually
Editing and Deleting Entries
Deleting Entire Periods of Time
Using the QR-Reader
8
Saving and Loading Favorites
8
Categories, Clients, Projects and Custom Fields 10
Categories, Clients, Projects
10
Defining Categories, Clients or Projects
Rearranging (Sorting) Categories, Clients or Projects
Custom Fields and Hourly Rates
11
Defining Custom Fields
Working with Hourly Rates
Rearranging (Sorting) Custom Fields
Assigning Information to Time Entries
13
Defining Default Values
Reports 14
Creating and Exporting Reports
14
Report Options and Formatting
Creating and Exporting an Overview Report
Creating and Exporting a Client Specific Report
Handling Report Files
15
Transferring Reports to your Computer using iTunes
Sending Report Files by E-Mail
Transferring Reports to your Computer Using WiFi
Deleting Reports in WorkLog
Backup and Restore WorkLog Data
16
Additional Modules (In-App Purchases)
18
iCalendar Module18
Exporting Reports to the Built-In Calendar
Exporting Reports to an External Calendar
Configuring Calendar Field Contents
2
cyclus
Dropbox Module 18
Configure the Dropbox Module
QR Scanner Module
19
Configuring the QR Scanner Module
Creating QR Codes
Time Management Module
20
Configuring the Time Management Module
Location Based Tracking Module
20
Using the Location Based Tracking Module
3
cyclus
Information about using WorkLog with iCloud
WorkLog can optionally use iCloud to save your work data. There are two major advantages to enabling iCloud for WorkLog:
1.
Automatic backups: with iCloud all your data will be backed up to the cloud automatically. Should you have an issue
with your device or with WorkLog, you can simply reinstall the app and it will redownload all your data from the
cloud.
2.
Automatic sychronisation: if you are working with multiple devices, e.g. an iPhone and an iPad, all your data will be
synced automatically. You can start an entry on one device and stop it on another. If you export a report, it will
automatically become available on all your other iOS devices.
Please note the following points when using iCloud together with WorkLog:
‣ iCloud needs to be enabled in your device settings as well as in WorkLog‘s settings. The latter is typically done during the
first launch of WorkLog.
‣ Syncing can take from a few seconds up to several minutes.
‣ Your data is available even if you don‘t currently have a connection to the internet (e.g. in flight mode). Note however, that
your data will not be synced until an internet connection becomes available.
‣ If you log out of iCloud (in the device settings) your data won‘t be available anymore until you log back in.
‣ If you deactivate iCloud (in WorkLog‘s own settings) your data will still be available for local use.
‣ If you (re)activate iCloud (in WorkLog‘s own settings) you can either
- Continue with your local data. Any preexisting iCloud data will be replaced with your local data. As a consequence
all your other devices will also work with this data set from here on.
- Continue with the data in iCloud. Your local data will be discarded and WorkLog will continue with the data that
was in iCloud before the (re)activation (if any).
‣ It is possible to make conflicting changes on different devices simultaneously. iCloud can usually handle data conflicts
automatically. However in some cases synchronization can be temporarily interrupted or the result of the conflict resolution
can be unexpected.
‣ If you manually restore a backup to your device (see later) your iCloud data will be overwritten.
4
cyclus
Logging Time
The idea behind logging time in WorkLog is easy: you create one entry for each uninterrupted time interval where you work
on something. This can be as simple as pressing Start to clock-in in the morning and Stop to clock-out in the evening. Or,
you can also log time in a much more fine-grained manner, if you need to. Many lawyers for example work for a number of
clients each day and thus create a new entry whenever they start something new. Others frequently stop for a break and
restart when the break is over.
No matter how many entries you create for each day, WorkLog will handle them nicely for you.
Working with the Timer
Basics
The easiest way to log time in WorkLog is to use the timer. Hit Start when you start working, hit Stop when you stop. Of
course you don't need to keep WorkLog running in the meantime. You can close it at any time to do other things on your
iPhone and come back later.
The analog clock on the main view, will show you your work history of the last 12 hours. The gray bars indicate the hours
you‘ve worked and the blue fill indicates the (rounded) minutes of the current work hour. You can switch of the minutes in the
WorkLog section of your Settings app by setting Show Minutes to 0. If you tap the analog clock, it will toggle through
different filters, showing all work periods or just the ones specific to a certain client, project or category.
Browsing Through your Data
Whenever you press Start a new entry appears on the top of the list for the current day. In addition to the time itself, you can
add as much information to each entry as you want. Read „Categories, Clients, Projects and Custom Fields“ to find out how.
In fact work time data is organized hierarchically in WorkLog. You can drill down into lower levels by tapping on the
respective entry on the screen. Tap the back button in the top right corner on any screen to get back to the upper level.
Switching Between Tasks
Once the timer has started, the start button will change from Start to New. Let's say you have a client called „Acme Inc“. The
company requires you to provide a detailed time sheet, stating all activities, whenever you want to send a bill. In order to do
this, you have defined a number of custom fields for your client in WorkLog. One of them to track your current activity. Now,
whenever you Work for Acme Inc. and need to switch tasks quickly, you can simply hit the New button. WorkLog will create
a new entry and bring up a screen allowing you to only change the 'Activity' field (or any other field) while leaving the rest of
the information as it was.
Using the QuickStart Feature
The information you want to assign to a new entry is often the same as for the previous entry. If you come back to your office
after the lunch break, you're likely to continue where you left off. The QuickStart feature allows you to create a new entry with
the same information assigned to it as the previous entry.
How QuickStart is invoked depends on the Prompt Details setting in the WorkLog section of your Settings app:
5
cyclus
‣ Don‘t prompt: If you simply press Start, WorkLog will create a new empty entry. If you press and hold Start, QuickStart will
be invoked, bringing up a screen where you can make changes to the information if needed. When you press Save the
new entry will be created and the timer will start running.
‣ On Start: QuickStart is automatically invoked when you press Start. If you don‘t want to use QuickStart, press and hold
Start. (i.e. reversed behavior compared to Don‘t Prompt).
‣ On Stop: You‘ll be prompted to enter the details of your new entry at the end of the work period, i.e. when you press
Stop.
Handling Breaks
The easiest and most obvious way to handle breaks in WorkLog is to simply stop the timer when you stop working and to
restart it when you come back. Using the QuickStart feature to restart the timer, you won‘t have to reenter all your data for
the new entry after the break.
If you log time manually (see below) you have several possibilities:
‣ Simply deduct the break from your work time end set the end time accordingly. In addition you might want to define a
custom field where you can enter the break time for reference.
‣ Create a custom field where you can enter breaks (e.g. in minutes) and use Excel to subtract the break time from your
total work time after the export.
Rounding Time
WorkLog displays hours and minutes in the main view and hours, minutes and seconds in its reports. Internally however,
WorkLog uses sub-second precision to log and calculate time intervals.
Many people find it more convenient to only record multiples of 5 or 10 minutes instead of down to the second accurate
times. Others have their specific billing rules, e.g. they bill per every 15 minutes or parts thereof. WorkLog comes with a
comprehensive set of time rounding options which are described below. You can find the rounding (and all other) options for
WorkLog in the „Settings“ application on your iPhone.
‣ Round to
No Rounding: Times are recorded and displayed with sub-seconds accuracy. Both start and end time remain unchanged.
1 min, 5min, ..., 1h: The start time remains unchanged. The end time will be rounded in such a way that the length of the
recorded interval is a multiple of the selected rounding value.
‣ Mode
Down: The recorded interval length will be rounded down to the next multiple of the selected rounding value.
Up: The recorded interval length will be rounded up to the next multiple of the selected rounding value.
Plain: Mathematically correct rounding, e.g. 3:25 will be rounded down to 3min whereas 3:30 will be rounded up to 4min
for a rounding value of 1min.
‣ Round start time down
The start time of the entry will be placed on the last multiple of the selected rounding value.
6
cyclus
Examples
Rounding Options
Actual start and end times
Rounded start and end times
Round to: No Rounding
09:12am – 11:51am
09:12am – 11:51am
Round to: 5 min
Mode: Plain
Round start time down: OFF
09:12am – 11:51am
09:12am – 11:52am (duration: 2h
40min)
Round to: 5 min
Mode: Down
Round start time down: OFF
09:12am – 11:51am
09:12am – 11:47am (duration: 2h
35min)
Round to: 5 min
Mode: Down
Round start time down: ON
09:12am – 11:51am
09:10am – 11:45am (duration: 2h
35min)
Round to: 15 min
Mode: Up
Round start time down: ON
09:12am – 09:18am (a phone call)
09:00am – 09:15am (duration: 15min)
Logging Time Manually
Using the timer to track your work time is the easiest and most convenient way to work with WorkLog. However, sometimes
you might wish to enter times manually. Most people forget to start or stop the timer on some occasions or need to make
corrections to their entries later. In fact some people even prefer to manually log their work time at the end of the day entirely.
WorkLog allows you to add, delete and modify entries at anytime.
Adding Time Entries Manually
1.
Switch to the main view
2.
Press the + button in the top left corner
3.
Enter start and end time
4.
Enter additional information as required
5.
Press „Save“
Editing and Deleting Entries
Editing an entry
1.
Select the day that contains the entry you wish to adjust
2.
Edit start and end times and any additional information you would like to change
3.
Press Save then Done
Deleting an entry
1.
Select the day that contains the entry you wish to delete
2.
Press Edit in the top right corner
7
cyclus
3.
Press the minus sign next to the entry you wish to delete
4.
Press Delete to confirm
5.
Press Done
Deleting Entire Periods of Time
Deleting all periods for a certain day
1.
Switch to the main view
2.
Press Edit in the top right corner
3.
Press the minus sign next to the day you wish to remove
4.
Press Delete to confirm
5.
Press Done
Deleting entire periods
1.
Switch to the main view
2.
Press Edit in the top right corner
3.
Press Delete... in the top left corner
4.
Select the start and end date of the period you wish to delete
5.
Optionally select a Client, Category or Project to only delete particular entries to the selection. Select All to delete all
entries.
6.
Press Delete Period
7.
Press Delete to confirm
8.
Press Done
Using the QR-Reader
If you purchased the QR-Module you can add or stop entries by scanning a QR-Code with your camera. QR-Codes are
similar to bar codes but typically contain more information and are easier to read for phone cameras. To generate QR-Codes
which can be read by WorkLog, download the free QR-Tool from our web site. For more information read the “QR Scanner”
section.
Saving and Loading Favorites
Whenever you enter data for a new entry, you can add those settings as a favorite. This allows you to quickly add similar
entries in the future. To store entry related settings as a favorite
1.
Tab the star button at the bottom of the screen where you set the data for a new entry.
2.
Type in a name for the favorite
3.
Press Add
To load a favorite
1.
Start a new entry by pressing +, Start or New
8
cyclus
2.
Press the yellow star in the navigation bar
3.
Chose the favorite you would like to load
4.
Change any settings if required
9
cyclus
Categories, Clients, Projects and Custom Fields
Most people need to categorize their work data in some way or another. Lawyers and freelancers typically work for multiple
clients which they bill separately at the end of some predefined period. Managers often keep track of multiple projects and
need a way to see how much time they have spent on each project.
WorkLog allows you to assign a category, client or project to each time entry you create. Later, when you generate reports,
you can choose to include only one category, client or project.
Categories, Clients, Projects
Categories, clients and projects really are the same thing except that you can pull client data directly from your address
book. Apart from that difference though, it is just a matter of which expression you prefer to use for your kind of work. You
can change the name WorkLog displays in the WorkLog section of the „Settings“ application on your iPhone.
Of course you can still keep track of e.g. projects, even when you choose your primary category to be called „Clients“. You
can simply create a custom field for each client and enter your project data there (see below).
For simplicity we will use the term „Client“ for the rest of this section.
Defining Categories, Clients or Projects
To define a new client
1.
Switch to the Clients (or Categories or Projects) view
2.
Press Edit
3.
Select New Client
4.
Enter the name of the client
5.
Press Save then Done
Rearranging (Sorting) Categories, Clients or Projects
WorkLog allows you to sort your clients in one of three ways by using the buttons in the top left corner of the clients list. The
sorting modes are
‣ By date (newest first)
‣ Alphabetically
‣ Manually
To change the order of your clients manually
1.
To change the order of your clients
2.
Switch to the Clients (or Categories or Projects) view
3.
Press Edit
4.
Tap on the gray bars next to a client entry and drag it up or down
5.
Press Done
10
cyclus
Custom Fields and Hourly Rates
Custom fields can be used to track additional information together with your work time. For example you might want to keep
track of your expenses. Or you want to log your activity (e.g. „Support“ or „Meeting“) when you work for different clients.
Custom fields are also used to track your earnings by defining hourly rates.
You can create as many custom fields as you need for each Client.
Six different field types are available in WorkLog
‣ List type fields
The list type field can be assigned one out of a number of predefined options. E.g. „Meeting“ or „Support“ for a field called
„Activity“.
‣ Numerical fields
Numerical fields take numerical values. You could use them e.g. to track miles when driving to a client.
‣ Text fields
Text fields allow you to input a single line of text.
‣ Currency fields
Currency fields take an amount of money in your local currency. Useful to track expenses.
‣ Rate fields
These are used to define your hourly rates and to track earnings.
‣ Yes/No fields
Yes/No fields are either set to Yes or to No. As an example, you might want to have a Yes/No field named „Billable“ which
tells you whether a specific entry can be billed to the client or not. The default value for a Yes/No field can be set when you
define the field.
Defining Custom Fields
Custom fields are client (project/category) specific. To define a new custom field
1.
Switch to the Clients view
2.
Select the client for which you want to define a custom field
3.
Press Edit in the top right corner
4.
Select New Custom Field
5.
Enter the field name
6.
Select the field type.
7.
Press Save then Done
Alternatively, you can copy fields from another client over to your new client. This can safe you a lot of work during the initial
setup. To copy fields from another client:
1.
Switch to the Clients view
2.
Select the client to which you want to copy fields from another client
3.
Press Edit in the top right corner
4.
Select „Copy Fields“
5.
Select the client you want to copy the fields from
11
cyclus
6.
Select the fields that you would like to copy
7.
Press „Copy“
When you create a list type field you‘ll also need to define the options which can be assigned to this field. To define list type
field options do the following
1.
Switch to the Clients view
2.
Select the appropriate client
3.
Select the list type field for which you want to define options
4.
Press Edit in the top right corner
5.
Select New Option
6.
Enter the name of the new option
7.
Press Save then Done
Working with Hourly Rates
WorkLog allows you to define multiple hourly rates for each client. When you assign a rate to an entry it will be automatically
multiplied with the duration of the entry and summed up in the report.
Let‘s assume you‘re a developer and you charge $80 when you develop code an $50 when you‘re giving support. In this
case you would define a Rate field with two different options, „Developing ($80)“ and „Support ($50)“:
1.
Switch to the Clients view
2.
Select the client for which you want to define a rate field
3.
Press Edit in the top right corner
4.
Select New Custom Field
5.
Enter the field name, e.g. „Rate“
6.
Press the button with the coin stack twice to create a rate field. It should turn into an coin stack with a clock.
7.
Press Save then Done
8.
Tap the field you have just created to define your rates
9.
Press Edit
10. Press New Option
11. Enter a name (e.g. „Developing“) and a rate ($80)
12. Press Save and repeat steps 10 to 12 for additional rates (e.g. „Support“)
13. Press Done when you‘re done
At this point you have defined your rates, but you haven‘t assigned them to any time entries yet thus no earnings will show
up in your reports. To assign a specific rate to a specific entry:
1.
Select an existing time entry or start a new one using QuickStart
2.
Select your client
3.
Tap the rate field and select the rate that applies
12
cyclus
Rearranging (Sorting) Custom Fields
Just like with clients, projects and categories, the order in which custom fields appear can be changed.
To change the order of custom fields do the following
1.
Switch to the Clients view
2.
Select the client where you want to change the order of custom fields
3.
Press Edit
4.
Press the gray bars next to the field you want to move and drag them up or down
5.
Press Done
Assigning Information to Time Entries
Once you‘ve defined your custom fields you will be able to assign values to them when you log time. The standard way to
assign information to your custom fields is described below. You can also assign information when using the QuickStart
feature or the New button (see Working with the Timer for additional information).
Assigning values to custom fields is done as follows
1.
Select the day that contains the entry for which you want to assign information
2.
Select the entry for which you want to assign information
3.
The Client section (or Project/Category) shows No Client if no client has been assigned yet.
4.
Select the client you want to assign to this interval. As soon as you have selected a client, WorkLog will
automatically switch back to the entry detail view which will now show all the custom fields that are defined for this
client.
5.
Select the field you want to assign a value to
6.
Enter or select the value you want to assign
Defining Default Values
Each custom field can have a default value that will be applied as soon as you set the associated client for an entry. To
change the default value, simply tap the field while not in editing mode and select or enter the default value.
13
cyclus
Reports
Reports are one of the most essential features in WorkLog. Whenever you want to bill your clients or send your work hours
to HR, you create a report. A report contains all the work time data for a specific period. You can create overview reports
containing all data or client (project/category) specific reports containing only the data for one specific client.
Once you have created a report you can export it to a file which you can then transfer to your computer. WorkLog report files
are compatible with Microsoft Excel and many other applications.
Creating and Exporting Reports
Report Options and Formatting
WorkLog provides several options to customize reports and report files (exported reports). You can find the options in the
WorkLog section within the „Settings“ application on your iPhone.
The following options are available
‣ Sort Order
Ascending: Dates and times are listed in ascending order Descending: Dates and times are listed in descending order
‣ CSV Format
CSV is a universal file format which can be read by many applications such as Microsoft Excel. There is a somewhat
unofficial standard for how a csv file should be implemented but Microsoft uses a different approach.
Standard: Create „Standard“ csv files when exporting reports
Microsoft: Create Microsoft Excel compatible csv files when exporting reports
‣ Export end date
If you log time past midnight the end date of your entry will be different than the start date. You can choose to include the
end date in your report files in that case.
ON: The end date will always be included in the report files (e.g. 9:15 pm – 4/18/09 2:05am)
OFF: The end date will not be included in the report files (e.g. 9:15pm – 2:05am)
‣ Bi-Weekly reporting
WorkLog comes with a set of standard periods you can choose from when creating reports. When you set this option to
ON the predefined one month periods will be replaced by two weeks periods.
‣ Mail To
Enter the default e-mail destination address for your exported reports.
Creating and Exporting an Overview Report
An overview report contains all work data for a specific period, regardless of client, project or category.
To create and export an overview report
1.
Switch to the Report view
2.
Choose a report period. The report will be generated.
3.
Press Export in the top right corner. Your overview report file is now available in the Files view
14
cyclus
4.
Chose the export format for your report
Creating and Exporting a Client Specific Report
A specific report contains only the data for one single client, project or category.
1.
To create a client, project or category specific report
2.
Switch to the report view
3.
Choose a report period. An overview report will be generated.
4.
Select the client, project or category you wish to have a report for.
5.
Chose the export format for your report.
6.
Press Export in the top right corner. Your client (project, category) specific report is now available in the Files view.
Handling Report Files
Transferring Reports to your Computer using iTunes
One of the simplest ways to transfer an exported report to your computer is by using iTunes
1.
Connect your device to your computer
2.
Open iTunes and select your device in the side bar
3.
Switch to the „Apps“ tab and scroll down to the file sharing section where you will find your reports in the WorkLog
section.
Sending Report Files by E-Mail
Starting with iPhone os 3.0 or later you now have the option to send your report files by e-mail.
To send a report file by e-mail
1.
Switch to the Files view
2.
Tap on the mail icon next to the report you want to send. WorkLog will bring up the e-mail screen, prefilled with the
default address from settings, a subject line, a short informational text in the body, and the report file as an
attachment.
3.
Make any changes to the e-mail you need, then press Send.
Attention: if your not connected to the internet when you press send, your e-mail will be stored for sending and will
be sent as soon as an internet connection is available.
Transferring Reports to your Computer Using WiFi
WorkLog has a small built-in webserver which allows you to download report files directly from your iPhone over Wifi. No
data will ever be sent out to the internet. In order to download reports you must connect your computer to the same WiFi
network as your iPhone. The report files are only available while WorkLog is running.
To download files from WorkLog over WiFi
15
cyclus
1.
Connect your Mac or PC to the same WiFi network as your iPhone
2.
Switch to the Files view in WorkLog and write down the address which is displayed in the header (e.g. http://
192.168.0.4:8080)
3.
Open a web browser on your computer (e.g. Safari, Firefox or Internet Explorer) and enter the address into the
address bar. Make sure you enter the entire address exactly as displayed in the Files view (without an additional
www. in front of it). Alternatively you can open the respective Bonjour-Bookmark in Safari.
4.
You will now be presented with the list of available report files on your iPhone. Right click on a report and choose
Save as... to download the report to your computer.
You can protect access over WiFi with a password. To do this
1.
Open the WorkLog section in your Settings app
2.
Scroll down to WiFi Access
3.
Switch Password Protection to ON and enter a user name and a password
Deleting Reports in WorkLog
Once you‘ve transferred your report files to your computer you might want to delete them on the iPhone. To delete a report
file on the iPhone
Switch to the Files view
1.
Press Edit in the top right corner
2.
Press the minus sign next to the file you want to delete
3.
Press Delete to confirm
4.
Press Done
Backup and Restore WorkLog Data
iTunes creates an automatic backup of all your apps each time you sync your device. The problem is, that it keeps only one
backup and it‘s easy to overwrite this by accidental syncing after a disaster.
Due to this limitation, WorkLog has it‘s own backup and restore mechanism to supplement the one that is provided by
iTunes. You can use this to keep your data safe or to transfer your work data from one device to another. In addition you can
also use this mechanism when you upgrade from WorkLog Lite to the full version. Simply download a backup from your Lite
version and restore it to the full version.
The Dropbox module allows you to create backups automatically (see section “Dropbox Modul”).
To download a backup of your work data to your computer
1.
Connect your Mac or PC to the same WiFi network as your iPhone
2.
Switch to the Files view in WorkLog and write down the address which is displayed in the header (e.g. http://
192.168.0.4:8080)
3.
Open a web browser on your computer (e.g. Safari, Firefox or Internet Explorer) and enter the address into the
address bar. Make sure you enter the entire address exactly as displayed in the Files view (without an additional
www. in front of it).
16
cyclus
4.
Click Download Backup in the Backup section. On some Browsers you might have to right click and choose „Save
As...“. This will download your WorkLog.cds file which contains all the clients, fields and work data.
To restore a backup
1.
Connect your Mac or PC to the same WiFi network as your iPhone
2.
Switch to the Files view in WorkLog and write down the address which is displayed in the header (e.g. http://
192.168.0.4:8080)
3.
Open a web browser on your computer (e.g. Safari, Firefox or Internet Explorer) and enter the address into the
address bar. Make sure you enter the entire address exactly as displayed in the Files view (without an additional
www. in front of it).
4.
Click Select File in the Backup section, choose your WorkLog.cds backup file and click Restore. Note: the file must
be named “WorkLog.cds”.
5.
Restart WorkLog for the changes to take effect. On devices with multitasking (iOS 4) you‘ll have to quit WorkLog
from the app switcher bar: On the home screen, press the home button twice, scroll to the WorkLog icon, press and
hold it and then press the red sign in the top left corner of the icon.
17
cyclus
Additional Modules (In-App Purchases)
iCalendar Module
The iCalendar module allows you to export your work time reports to your preferred calendar. Exports to the iPhone or iPad
calendar can be done directly. For other calendars, an .ics file is created which most modern calendars are able to read.
Exporting Reports to the Built-In Calendar
Configure the iCalendar module as follows
1.
Destination: select the calendar where your entries should appear (don’t select “File”)
2.
The Name field is not relevant in this configuration
Exporting Reports to an External Calendar
If you prefer to use another calendar such as Google Calendar, you’ll have to export your report to an .ics file first. Google
calendar can then import this file.
1.
Destination: select “File”
2.
Name: enter a calendar name. You can also use the <C> token here (see further down)
Configuring Calendar Field Contents
Calendars typically provide a number of standard fields to store event related information. You can define which information
should go into which field by specifying tokens in the Calendar Field Contents section. These tokens will then be replaced
with the actual information upon export.
The following tokens are valid:
<C> Will be replaced with the name of the client, project or category. This is the only token that is also accepted in the
“Name” field.
<D> Will be replaced with the duration of the entry
<R>
Will be replaced with the revenue value
<F>
Will be replaced with all fields for this entry.
<F:fieldname>
\n
Will be replaced with the info for a single field named fieldname.
Will be replaced with a line break
Dropbox Module
The Dropbox module allows you to create automatic backups in specific intervals and to upload and share copies of your
reports. Before you can use the Dropbox module, you’ll have to link WorkLog with your Dropbox account. This will create a
separate Folder in your Dropbox account, where WorkLog has access to.
To link your Dropbox account:
18
cyclus
1.
Press the “Link Dropbox” button
2.
Enter your Dropbox login name (email) and Password
3.
Press “Sign In”
Configure the Dropbox Module
To upload reports automatically: set “Place a copy in Dropbox” to on. Each time you export a report, a copy will be placed in
your Dropbox folder.
To create automatic backups: set “Automatic Backups” to on and define a backup period. Dropbox will create a backup and
upload it after a few minutes and then again in the interval you have specified. If WorkLog cannot access Dropbox when a
backup is due, it will give you an error message and retry a few hours later. You can also manually create a backup by
pressing the “Backup Now” button.
Note that backups have to be restored manually through WorkLogs web interface.
QR Scanner Module
The QR Scanner module allows you to start and stop entries by scanning a QR code. This is useful if work with at different
locations, e.g. if you’re running a security service where you need to go to different check points or a facility service that
works at different buildings.
Once the QR Module is active, you will find an additional button on the main view of the app which you can press to initiate a
scan.
Configuring the QR Scanner Module
ID: Enter the an ID for your company. This ID will also be used when generating new QR codes so that WorkLog knows if
the code it scans belongs to you. You can enter anything you want (e.g. your company name)
Deactivate: Set to ON to deactivate the module temporarily
Review content after scan: If set to ON, WorkLog will allow you to change the information after a start scan or provide
additional details. Otherwise a new entry will be started immediately.
Creating QR Codes
If you have a Mac you can download the QR Tool from our web page to create QR codes for WorkLog.
If you don’t have a Mac you can use one of the various free online tools to create QR codes for WorkLog. WorkLog QR
Codes have the folloging format
WL;ID:x;ET:y;CN:z;
whereby x,y and z are replaced with
x: The ID that you entered in the QR module configuration
y: either the number 1 if the code is used to start a new entry or the number 2 if the code is used to stop an entry.
z: The name of the client, project or category that is associated with the entry
Example to start a new entry for Acme Inc.: WL;ID:My Company;ET:1;CN:Acme Inc.
19
cyclus
Time Management Module
The Time Management module provides additional information on your work time. You can set a target time, e.g. 40 hours
per week and WorkLog will tell you whether you’re ahead or behind your target (time balance). In addition to that, the
module adds a new field to your work time entries where you can define a break time that will be automatically subtracted
from your total work time.
Configuring the Time Management Module
Target Hours: Enter your target hours as decimal. E.g. 40.0 if your target is 40 hours (per week) or 8.5 if your target is 8h
30m (per day)
Period:
The relevant period to which your target applies (i.e. Week if the target is per week or Day if the target is per
Day). Your time balance will be updated at the end of each period.
Enabled:
Enables or disables the modules
Default Break Time: Specify a break time that is automatically applied to each of your entries
Auto Subtract Breaks: If set to ON, breaks will be automatically subtracted from your total time. If set to OFF, break times
are listed separately in your report exports.
If the time balance in WorkLog deviates from your actual time balance (e.g. due to a local holiday), you can set a new
balance manually using the “Set Time Balance...” button. WorkLog will then update your balance at the end of the next
period based on the value you entered..
Location Based Tracking Module
Location Base Tracking allows you to define locations for each of your clients, projects or categories. When you enter the
region defined for a client, WorkLog will start a new entry automatically. Accordingly, WorkLog will stop the entry (or switch to
another client) when you leave the region.
Since WorkLog uses the internal location tracking functions of iOS the effect on battery life can be kept low. The GPS
sensors are only activated when you get close to one of your defined locations. An additional advantage is, that WorkLog
does not have to be running when you enter or exit a location - iOS will wake up the app automatically if required.
The modules also includes the “breaks” functionality from the Time Management Module.
Using the Location Based Tracking Module
Once the module is enabled, each client will show a new section “Location Based Tracking” with the two items “Active” and
“Configure”. “Active” is used to enable or disable tracking for a specific client. Note that you can only set tracking for a client
to active after you have completed the location configuration.
To configure the location for a client:
1.
Press the “Configure”
2.
Set a location in the “Location” section. You can enter an address or long press a spot on the map to set the
location pin. You can fine tune the location by draging the pin around. The “Radius” button defines the radius around
the location where the timer will be active.
20
cyclus
3.
Specify an action that will occur when you enter the radius in the “On Enter” section. You will typically want to start
the timer when this happens.
4.
Specify an action that will occur when you exit the radius in the “On Exit” section. You can either stop the timer for
the associated client, stop any running timer, do nothing, or switch to another client. If you choose the latter, the
“Switch to” field allows you to specify the client to switch to.
5.
The “Time Offset” configuration allows you to specify an idle time on enter and on exit. This is useful if you don’t
want the timer to start immediately when you enter the location. Maybe you need to walk to your office first and get
a cup of coffee.
The “On Enter” time specifies the delay between when you enter the location and when the timer starts.
Accordingly, setting an “On Exit” time will move the stop time back a couple of minutes from the time when you exit
a location.
If the resulting time is negative, the entry will be discarded. This is helpful for cases where you just drive by your work
place.
Note that iOS currently allows a maximum of 20 locations to be monitored for each app.
21