1
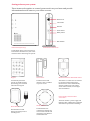
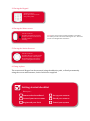
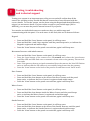
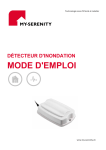
Easy to install wireless technology STARTER PACK HOME CONTROL & CARE USER GUIDE www.my-serenity.ch Getting to know your system These items work together to control, protect and care your home and provide information about its status to your online account. § Ethernet Port Learn Button SIM card Power Socket Battery Switch MAC Address Control Panel (Gateway) Control Panel Connections The main hub of the system, the Control Panel will be situated next to your router and will connect and manage the system. Keypad Door Contact Movement detector with inbuilt camera Conveniently switch the system on and off remotely by inserting your activation codes into the keypad. The Door Contact will detect if a door or window is open or closed This device is a camera that is activated by movement. When triggered by movement the camera automatically will take 3 still images. The camera works well in normal, low level light and total darkness. Power supply, cables and other accessories The Pack contains a power supply and Ethernet cable. A fixing Pack is supplied with adhesive pads and screw fixings. Water Sensor The flood detector will monitor for rising levels of standing water. Smoke Detector The Smoke Detector continuously monitors for excess levels of smoke and will trigger a Fire Alarm if smoke is detected. 1 Connect the Control Panel to your router 1. Locate your MAC address Your MAC address is located on the back of the Control Panel, make a note of it as it will be required when registering your panel online. My MAC address (12 digits): 2. Connecting to mobile network (optional) Insert the SIM Card to your panel 3. Connecting to broadband Connect your panel to your broadband router via the Ethernet cable provided. The Ethernet port is located on the back of the Control Panel. 4. Power up Connect the panel to the mains using the power cable provided. Locate the battery switch on the back of the panel under a removable plug and switch to the On position. The panel will beep (if backup battery charged only). You should see the following LED sequence: LED 1 : Green (topmost LED on front edge) LED 2 : Unlit (used for alarm indications) LED 3 : (Flashing) Amber (unit initialising) After approximately 2 minutes LED 3 will flash GREEN, indicating that the unit is network operational but not yet registered for service. If you do not see this sequence of LED’s, please see guidance in Testing, Troubleshooting and Support (at the end of this guide). 2 Create a user account and register your system 1. Account creation and registration To benefit from the MY-SERENITY home monitoring service you will need to set up your online account and register your Starter Pack. Upon registration you will automatically get the monitoring service. Open a browser window on your PC and go to the following URL: www.my-serenity.ch Go to Then click on ‘First time users’ and follow the on-screen instructions. Take note of your password during this process. 2. Finalise your account Your account is set up and you are now automatically subscribed to the monitoring service. You need to ensure that your account is fully set up so you get the most from your MY-SERENITY Home Manager service. This includes: Your Account Details Make sure that you have fully completed your profile in the My Account section, found in the top navigation and ensure that all the details are correct. Your Friends The My Friends section is not your contacts list and adding people to this list does not mean that they will be contacted. You select your contacts from your list of Friends, which means that you can allocate different people to be contacted for different events. Your Friends section is however where you need to update and manage the contact information of your Friends. Ensure the details of your friends are correct. By default the account holder becomes a Friend when the account is registered. Your Contacts You will need to allocate your contacts i.e. those people that you want the monitoring system to contact in the event of an alert. Within the account there is a section called ‘Contacts’ where you can select contacts from your list in My Friends. It is important to note that in order to allocate someone as a contact, they must first be added to your list of Friends. Your Settings You should make sure the settings for each device are correct. If settings and triggers are wrong you may end up receiving unwanted alerts, or even worse, not receiving alerts when you want them. 3 Positioning the sensors and Keypad The sensors are pre-installed and will work once powered up. To power up, remove the clear plastic activation tabs from the back of your sensors and Keypad. The sensors and Keypad are already named within the online account, however, you may wish to change the names to reflect their locations. You can do this through the My Equipment section of your online account, by editing the settings for your devices. The Keypad will be pre-programmed with a pin number ready for use. For security reasons you will need to change this once you have finished setting up your Pack. To change the PIN number for your Keypad, login to your account and go to: Home Control > Alarm Users and select Edit Alarm User Details. In future if you have more than one user for the system, you can use this section to allocate users with unique pin codes to identify them at the property. The factory pre-set PIN code is: 1234 Enter the pin code followed by the set or un-set button on the Keypad to activate or deactivate the alarm. 1. Placing the Movement Detector with inbuilt camera Suitable locations : Corners of rooms and corridors where movement will trigger the detector. Detectors should be mounted between 2 and 2.4 metres high and are designed to fit into corners. 2. Placing the Door Contact Suitable locations : Main entry/exit points to your property. The most commonly used door should be the first choice. The Door Contact sensor should be located so that the larger body of the unit is fixed to the frame and the smaller magnet to the door. NOTE: There are 2 parallel lines marked on the main body of the unit which indicate the alignment of the magnetic part. 3. Placing the Keypad Suitable locations : Ideally placed next to main entry/exist points. 4. Placing the Water sensor Suitable locations : Should be positioned so that the prongs are as near to the floor as possible without touching. NOTE: Your water sensor is splash proof due to its rubber seal which prevents water from entering the case. The water sensor is not designed for outside use. 5. Placing the Smoke Detector Suitable locations : Should be fitted to a ceiling within 30 metres of your control panel. Recommended in your hallway and/or landing but not kitchen. 6. Fixing in place The sensors and Keypad can be mounted using the adhesive pads, or fixed permanently using the screws and fasteners, both of which are supplied. Getting started checklist Have you… Connected to broadband Created your user account Registered your Pack Set up your contacts Placed your sensors Tested your system Testing, troubleshooting and technical support ! Testing your system is an important part of the process and will confirm that all the sensors are working as they should and that all contacts have been allocated with the correct details. To test the system, set the alarm using the Keypad and then deliberately trigger it to activate an alarm. Via your online account or your mobile apps (IOS or Android), you can turn the panel’s internal siren off if you prefer. You can also test individual sensors to make sure they are within range and communicating with the panel. For each sensor in the Pack, this can be done as follows: Keypad: Press and hold the ‘learn’ button on the panel, it will beep once. Press and hold the and keys together until the panel beeps twice, to indicate the Keypad is registered and within range. Press the ‘learn’ button on the panel a second time, again it will beep once. Movement Detector with inbuilt camera: Press and hold the ‘learn’ button on the panel, it will beep once. Press the learn button of the camera over 12 seconds and release the learn button until Blue LED and LED flash once to transmit a learn code to the gateway. Then wait 68 seconds. Later if the gateway detects a signal transmitted from the camera, the blue LED flashes twice to indicate that the PIR camera is successfully being learnt into the gateway. Press the ‘learn’ button on the back of the panel a second time to exit ‘learn’ mode. Door Contact: Press and hold the ‘learn’ button on the panel, it will beep once. Press and hold the clear button on the front of the Door Contact until the panel beeps twice, to indicate the Door Contact is registered and within range. Press the ‘learn’ button on the panel a second time, again it will beep once. Water Sensor: Press and hold the ‘learn’ button on the panel, it will beep once. Press and hold the clear button inside the Water Sensor until the panel beeps twice, to indicate the Water Sensor is registered and within range. Press the ‘learn’ button on the panel a second time, again it will beep once. Smoke Detector: Press and hold the ‘learn’ button on the panel, it will beep once. Press and hold the clear button on the front of the Smoke Detector until the panel beeps twice, to indicate the Smoke Detector is registered and within range. Press the ‘learn’ button on the panel a second time, again it will beep once. If the panel does not beep as described then the sensors may be out of range or out of battery power. Try repositioning the sensors closer to the panel and test them again. Alert Messaging MY-SERENITY service will send out Alert Messages after detecting an incident in your property, using different timing sequences as shown in the table below. These timings differ because life-threatening situations are treated as a priority. Alert Messaging rules: Times after initial detection Alert type Description of Alert For Burglary, Flood & Technical alarms* For Fire & Panic attack 1 Alert message Contact 1 sent email message 30 seconds later Immediately 2 Alert message Contact 2 sent email message 90 seconds later Immediately 3 Alert message Contact 3 sent email message 90 seconds later Immediately 4 Alert message Contact 4 sent email message 90 seconds later Immediately 5 Alert message Contact 5 sent email message 90 seconds later Immediately 6 Alert message Contact 6 sent email message 90 seconds later Immediately * Technical alarms are information messages sent only to max. 2 contacts Alert Frequency and Alert Response MY-SERENITY service will only send out one set of alert messages to your Contacts per incident detected. An incident is considered ‘active’ until one of your Contacts responds to an Alert Message. If no Contacts respond to the Alert Messages, MY-SERENITY will keep the incident ‘active’ for 60 minutes before automatically closing the incident. If more incidents are detected during an ‘active’ period, we will not send out further messages – this avoids confusion amongst your Contacts. However, details of new incidents from your system, and any images received from your cameras will be stored in your online account for later retrieval. Sensor settings and alarm modes For some of your sensors you have the ability to alter their settings i.e. the settings that will determine how your sensor handles activations. For example, if you want to part set your system while you sleep at night you have ability to change the sensor settings so the upstairs sensors ignore activity whilst the downstairs sensors act in the normal way. To edit any of the settings for your sensors go to the My Equipment section of your account and click on Edit. From here you will be able to select one of the following settings: Burglar – The sensor will trigger an alarm when the panel is set in home or away mode. Home omit – The sensor will be ignored when the panel is set in home mode but the same as “Burglar” in away mode. Use this setting to part set your system when you are at home but still fully set the system when you are out. Entry zone – Starts countdown period when triggered rather than instantly triggering an alarm. Use this setting for door contacts and movement detectors that you have to walk through to un-set your system upon entry. Bypass – Ignores the sensor for one set/un-set cycle only. Home Access – Ignored during entry/exit periods but sends an alarm when triggered and the panel is set in either home or away mode. 24hr* - Triggers an alarm immediately regardless of whether the panel is armed or not. * Smoke detector and water sensor only have the 24 hr attribute. You will not be able to change these settings. These sensors will always send out an emergency alarm regardless whether the panel is set or un-set. Educating your Contacts The people you add as Contacts to your account are your most important people. You should trust these people to take action should anything happen at your home. Think carefully about who is best placed to react to a MY-SERENITY alert message should you be unavailable. Make sure that all email addresses are regularly up to date. Make sure all Contacts understand what sort of messages they may receive from MY-SERENITY, how to respond and what action you would like them to take. Battery information and technical specifications The Control Panel communicates with MY-SERENITY accessories wirelessly over RF 868MHz. The internal battery is there to act as a back-up for the mains power supply, should there be a mains power failure the back-up battery will last for up to 8 hours. The battery will be recharged once mains power is restored and it is advised that the panel is connected to the mains for at least 24 hours after a power failure in order to fully charge the back-up battery again. The back-up is a 7.2V Ni-MH 600mAH battery which can be accessed and removed by opening up the panel using the screws placed in each of the four corners. When removing the battery ensure that the panel is disconnected from the mains power supply. Have you seen the complete range of products available for your MY-SERENITY system? Create your perfect connected home by adding any of the additional components to your existing system. All products are easily added to the system and wireless making them easy to install. Order your products online at: www.my-serenity.ch