1
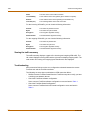
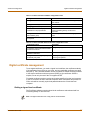
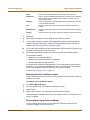
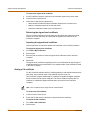
FortiClient User Guide
FortiClient User Guide
Version 1.0
March 30, 2004
© Copyright 2004 Fortinet Inc. All rights reserved.
No part of this publication including text, examples, diagrams or illustrations may be reproduced,
transmitted, or translated in any form or by any means, electronic, mechanical, manual, optical or
otherwise, for any purpose, without prior written permission of Fortinet Inc.
FortiClient User Guide
Version 1.0
March 30, 2004
Trademarks
Products mentioned in this document are trademarks or registered trademarks of their respective
holders.
Regulatory Compliance
FCC Class A Part 15 CSA/CUS
For technical support, please visit http://www.fortinet.com.
Send information about errors or omissions in this document or any Fortinet technical documentation to
[email protected].
Contents
Table of Contents
Introduction ............................................................................................................ 5
Documentation.................................................................................................................... 5
Comments on Fortinet technical documentation............................................................. 5
Customer service and technical support............................................................................. 5
Installation and Quick Start VPN Configuration ................................................. 7
FortiClient software installation ........................................................................................... 7
System requirements ...................................................................................................... 8
Supported operating systems ......................................................................................... 8
Supported FortiGate models and FortiOS versions ........................................................ 8
Quick start VPN configuration............................................................................................. 8
Configuring a FortiClient to FortiGate VPN..................................................................... 8
General Settings ............................................................................................................... 13
Entering a license key................................................................................................... 13
VPN status icons........................................................................................................... 13
VPN................................................................................................................................... 14
Configuring IKE and IPSec policies .............................................................................. 14
Configuring Virtual IP address acquisition .................................................................... 17
Configuring eXtended authentication (XAuth)............................................................... 18
Adding remote networks ............................................................................................... 19
Monitoring VPN connections......................................................................................... 19
Viewing the traffic summary.......................................................................................... 20
Troubleshooting ............................................................................................................ 20
Digital certificate management.......................................................................................... 21
Getting a signed local certificate ................................................................................... 21
Getting a CA certificate ................................................................................................. 25
Getting a CRL ............................................................................................................... 25
Logs .................................................................................................................................. 26
Configuring log settings ................................................................................................ 26
Managing log files ......................................................................................................... 26
Index ...................................................................................................................... 27
FortiClient User Guide
3
Contents
4
Fortinet Inc.
FortiClient User Guide
Introduction
The FortiClient software is a secure remote access client for Windows computers.
Using the FortiClient software, you can create VPN connections to remote networks.
Documentation
In addition to this FortiClient Installation and Configuration Guide, the FortiClient
online help provides information and procedures for using and configuring the
FortiClient software.
Information about FortiGate Antivirus Firewalls is available from the FortiGate online
help and the following FortiGate User Manual volumes:
•
Volume 1: FortiGate Administration Guide
•
Volume 2: FortiGate VPN Guide
•
Volume 3: FortiGate Content Protection Guide
•
Volume 4: FortiGate NIDS Guide
•
Volume 5: FortiGate Log Message Reference Guide
•
Volume 6: FortiGate CLI Reference Guide
Comments on Fortinet technical documentation
You can send information about errors or omissions in this document or any Fortinet
technical documentation to [email protected].
Customer service and technical support
For antivirus and attack definition updates, firmware updates, updated product
documentation, technical support information, and other resources, please visit the
Fortinet technical support web site at http://support.fortinet.com.
FortiClient User Guide
5
Customer service and technical support
Introduction
Fortinet email support is available from the following addresses:
[email protected] For customers in the United States, Canada, Mexico, Latin
America and South America.
[email protected] For customers in Japan, Korea, China, Hong Kong, Singapore,
Malaysia, all other Asian countries, and Australia.
[email protected]
For customers in the United Kingdom, Scandinavia, Mainland
Europe, Africa, and the Middle East.
For information on Fortinet telephone support, see http://support.fortinet.com.
When requesting technical support, please provide the following information:
6
•
Your name
•
Company name
•
Location
•
Email address
•
Telephone number
•
FortiClient version
•
Detailed description of the problem
Fortinet Inc.
FortiClient User Guide
Installation and Quick Start VPN
Configuration
This chapter describes the FortiClient software system requirements and installation
procedures. It also describes how to add a basic FortiClient to FortiGate VPN
configuration.
The VPN described in this chapter uses the default FortiClient settings and uses
preshared keys for VPN authentication. To customize the FortiClient VPN settings or
to use digital certificates for VPN authentication, see “VPN” on page 14 and “Digital
certificate management” on page 21.
This chapter has the following sections:
•
FortiClient software installation
•
Quick start VPN configuration
FortiClient software installation
The software may not function properly with other VPN clients installed on the same
computer. You should uninstall any other VPN clients such as SSH Sentinel before
installing the FortiClient software.
If you have an older version of FortiClient software on you computer, you do not have
to uninstall it.
To install the FortiClient software, download and run the FortiClient install program or
run the install program found on the FortiClient CD.
To complete the installation of the FortiClient software, you must reboot the computer.
Note: The FortiClient software installs a virtual network adapter. The FortiClient virtual network
adapter is not displayed in the Windows list of network adapters.
FortiClient User Guide
7
Quick start VPN configuration
Installation and Quick Start VPN Configuration
System requirements
•
PC-compatible computer with Pentium processor or equivalent
•
Compatible operating systems and minimum RAM:
•
•
•
•
Microsoft Windows NT 4.0 (SP6): 32 MB
Microsoft Windows 2000: 64 MB
Microsoft Windows XP: 128 MB
Microsoft Windows Server 2003: 128 MB
•
20 MB hard disk space
•
Native Microsoft TCP/IP communications protocol
•
Native Microsoft PPP dialer for dial-up connections
•
Ethernet for network connections
•
Microsoft Internet Explorer 5.0 or later
•
Adobe Acrobat Reader 4.0 or later for user manual
Supported operating systems
The FortiClient software supports the following operating systems:
•
Windows NT4 with Service Pack 6
•
Windows 2000 Professional
•
Windows 2000 Server
•
Windows 2000 Advanced Server
•
Windows XP Home
•
Windows XP Professional
•
Windows Server 2003
•
Windows Small Business Server 2003
Supported FortiGate models and FortiOS versions
The FortiClient software supports:
•
all FortiGate models
•
FortiOS v2.36
•
FortiOS v2.50
Quick start VPN configuration
By entering basic connection information and using the default settings, you can
quickly set up a VPN tunnel between your computer and a network behind a FortiGate
gateway.
Configuring a FortiClient to FortiGate VPN
On the VPN > Connections page, you can add, delete, edit, or rename a VPN
connection.
8
Fortinet Inc.
Installation and Quick Start VPN Configuration
Quick start VPN configuration
To add a FortiClient to FortiGate VPN, you need the following information:
•
a descriptive name for the connection,
•
the remote gateway IP address for the FortiGate gateway,
•
the remote network IP address and netmask,
•
the preshared key.
Figure 1: Creating a new VPN connection
To configure the FortiClient VPN settings
FortiClient User Guide
1
Go to VPN > Connections.
2
Select Add.
3
Enter a descriptive name for the connection.
4
Enter the Remote Gateway IP address.
This address is the IP address of the remote FortiGate gateway.
5
Enter the Remote Network information.
This is the IP address and netmask of the network behind the FortiGate gateway.
6
Enter the Preshared key.
The preshared key must be the same as the one used by the FortiGate VPN
configuration.
7
Select OK.
9
Quick start VPN configuration
Installation and Quick Start VPN Configuration
Configuring the FortiGate unit
To configure the FortiGate unit to accept FortiClient VPN connections, you need to:
•
configure the FortiGate Phase 1 VPN settings,
•
configure the FortiGate Phase 2 VPN settings,
•
add a firewall encryption policy.
The default FortiGate phase 1 and 2 VPN settings match the default FortiClient VPN
settings. You do not need to modify the default FortiGate VPN settings if you are using
a FortiClient quick start configuration.
Refer to the FortiGate User Manuals for complete information on configuring the
FortiGate unit. See the section “Documentation” on page 5 for a complete list of the
FortiGate documentation.
Testing the connection
You can test the VPN connection between the FortiClient software and the remote
FortiGate unit.
To test the connection
1
Go to VPN > Connections.
2
Select the connection you want to test.
3
Select Test.
A log window opens and begins to negotiate the VPN connection with the remote
FortiGate unit. If the test is successful, the last line of the log will read “IKE daemon
stopped”.
Note: To test the VPN connection, the FortiClient software attempts to negotiate the VPN
connection but does not actually open a VPN connection.
If the last line of the log reads “Next_time = x sec”, where x is an integer, the test was
not successful. The FortiClient software is continuing to try to negotiate the
connection. See the section on “Troubleshooting” on page 20.
4
10
Select Close.
Fortinet Inc.
Installation and Quick Start VPN Configuration
Quick start VPN configuration
Figure 2: A successful connection test
Figure 3: A failed connection test
FortiClient User Guide
11
Quick start VPN configuration
Installation and Quick Start VPN Configuration
Connecting to the remote FortiGate network
After you set up a VPN connection, you can start or stop the connection as required.
To connect to a remote FortiGate gateway
12
1
Go to VPN > Connections.
2
Select the connection you want to start.
3
Select Connect.
The FortiClient software opens a log window and begins to negotiate a VPN
connection with the remote FortiGate firewall. If the negotiation is successful and the
connection is established, the last line of the log will read “Negotiation Succeeded!”
4
Select OK or wait for the log window to close automatically.
If the last line of the log is “Negotiation failed! Please check log” and the log window
does not close automatically, then the connection attempt failed. Test the connection
to verify the configuration. See “Testing the connection” on page 10.
5
To stop the connection, select Disconnect.
Fortinet Inc.
FortiClient User Guide
Advanced Configuration
This chapter describes how to configure the detailed VPN settings the log settings.
This chapter has the following sections:
•
General Settings
•
VPN
•
Digital certificate management
•
Logs
General Settings
Use the General Settings page to:
•
set the FortiClient software to load automatically during startup,
•
enter a product license key.
You can also use the General Settings page to view:
FortiClient User Guide
•
the current version of the FortiClient software,
•
the status of the VPN service,
13
General Settings
Advanced Configuration
Figure 4: General Settings page
Entering a license key
The FortiClient software uses license keys to distinguish between evaluation software
and fully licensed software. With the evaluation version, you can only use DES for
encryption and MD5 for authentication when you configure a VPN connection.
After you register the software, you receive the license key from Fortinet.
To enter a license key
1
On the General Settings page, select Enter License Key.
2
Enter the license key in the License Key field.
3
Select OK.
VPN status icons
The FortiClient status bar on the lower right corner displays the FortiClient VPN status
icons.
The VPN service is running and there is an open connection.
The VPN service is stopped.
14
Fortinet Inc.
Advanced Configuration
VPN
VPN
You can quickly set up a VPN from your FortiClient computer to a network behind a
FortiGate unit by using the default settings. For the quick start information, see
“Configuring a FortiClient to FortiGate VPN” on page 8.
You can also modify the VPN settings if required.
If you are configuring a VPN to use digital certificates for authentication, see “Digital
certificate management” on page 21 before proceeding.
Note: Digital certificates are not required for configuring FortiClient VPN connections. Digital
certificates are an advanced feature provided for the convenience of system administrators.
This manual assumes the user has prior knowledge of how to configure digital certificates for
their implementation.
To configure advanced VPN settings
1
Go to VPN > Connections.
2
Select Add to add a new connection, or select Edit to edit an existing connection.
3
Select Advanced.
Note: The advanced settings of the FortiClient software must match the configuration settings
of the remote FortiGate unit.
The Advanced Settings dialog box appears.
Figure 5: The advanced VPN settings
FortiClient User Guide
15
VPN
Advanced Configuration
Configuring IKE and IPSec policies
Select Legacy to configure advanced settings for a VPN to a FortiGate unit running
FortiOS v2.36, and for any Cisco gateways that only support legacy settings.
Select Default to configure advanced settings for a VPN to a FortiGate unit running
FortiOS v2.50 or higher.
To modify the Legacy or Default policy settings
16
1
Go to VPN > Connections.
2
Select Add to add a new connection, or select Edit to edit an existing connection.
3
Select Advanced.
4
Under Policy, select Legacy or Default.
The policy settings appear in the IKE and IPSec boxes.
5
Under Policy, select Config.
6
In the Connection Detailed Settings dialog box, configure the following settings. Then
select OK to save the settings. You can also select Legacy or Default to go back to the
original legacy or default settings.
Fortinet Inc.
Advanced Configuration
VPN
Figure 6: Editing the detailed configuration settings
The following IKE settings correspond to the phase 1 VPN settings on the remote
FortiGate unit.
FortiClient User Guide
IKE Proposals
Add or delete encryption and authentication algorithms.
The proposal list is used in the IKE negotiation between the FortiClient
software and the remote FortiGate unit. The FortiClient software will
propose the algorithm combinations in order, starting at the top of the
list.
The remote FortiGate gateway must use the same proposals.
Mode
Select either Main or Aggressive.
Main mode provides an additional security feature called identity
protection, which hides the identities of the VPN peers so that they
cannot be discovered by passive eavesdroppers. But Main mode
requires more messages to be exchanged than Aggressive mode, and it
is difficult to use efficiently when a VPN peer uses its identity as part of
the authentication process. When using aggressive mode, the VPN
peers exchange identifying information in the clear.
17
VPN
Advanced Configuration
DH Group
Select one or more Diffie-Hellman groups from DH group 1, 2, and 5.
• When the VPN peers have static IP addresses and use aggressive
mode, select a single matching DH group.
• When the VPN peers use aggressive mode in a dialup configuration,
select up to three DH groups for the dialup server and select one DH
group for the dialup user (client or gateway).
• When the VPN peers employ main mode, you can select multiple DH
groups.
Key Life
Enter the number in seconds.
The keylife is the amount of time in seconds before the IKE encryption
key expires. When the key expires, a new key is generated without
interrupting service. P1 proposal keylife can be from 120 to 172,800
seconds.
Local ID
If you are using certificates for authentication, you can optionally enter
the local ID, which is the distinguished name (DN) of the local certificate.
The following IPSec settings correspond to the phase 2 VPN settings on the remote
FortiGate unit.
18
IPSec Proposals
Add or delete encryption and authentication algorithms.
The remote FortiGate gateway must use the same proposals.
DH Group
Select one Diffie-Hellman group from DH group 1, 2, and 5. DH group 1
is least secure. DH group 5 is most secure. You cannot select multiple
DH Groups.
The remote FortiGate gateway must use the same DH Group settings.
Key Life
Select either Seconds or KBytes for the keylife, or select both.
The keylife causes the IPSec key to expire after a specified amount of
time, after a specified number of kbytes of data have been processed by
the VPN tunnel, or both. If you select both, the key will expire when
either the time has passed or the number of kbytes have been
processed.
When the key expires, a new key is generated without interrupting
service. P2 proposal keylife can be from 120 to 172800 seconds or from
5120 to 2147483648 kbytes.
Fortinet Inc.
Advanced Configuration
VPN
The following are the advanced VPN settings.
Replay Detection
With replay detection, the FortiClient software checks the sequence
number of every IPSec packet to see if it has been previously received.
If the same packets exceed a specified sequence range, the FortiClient
software discards them.
PFS
Perfect forward secrecy (PFS) improves security by forcing a new
Diffie-Hellman exchange whenever keylife expires.
NAT Traversal
Enable this option if you expect the IPSec VPN traffic to go through
a gateway that performs NAT. If no NAT device is detected, enabling
NAT traversal has no effect.
If you enable NAT traversal, you can set the keepalive frequency.
NAT traversal is enabled by default.
Keepalive
Frequency
If NAT Traversal is selected, enter the Keepalive Frequency in seconds.
The keepalive frequency specifies how frequently empty UDP packets
are sent through the NAT device to ensure that the NAT mapping does
not change until the IKE and IPSec keylife expires.
The keepalive frequency can be from 0 to 900 seconds.
Autokey Keep Alive Enable this option to keep the VPN connection open even if no data is
being transferred.
Dead Peer Detection Enable this option to clean up dead VPN connections and establish new
VPN connections.
Configuring Virtual IP address acquisition
The FortiClient software supports two methods for virtual IP address acquisition:
dynamic host configuration protocol (DHCP) over IPSec and manual entry.
Select the DHCP over IPSec option to allow the DHCP server in the remote network to
dynamically assign an IP address to your FortiClient computer after the VPN
connection is established.
Select the Manually Set option to manually specify a virtual IP address for your
FortiClient computer. This virtual IP address must be an actual address in the remote
network.
To configure virtual IP address acquisition
FortiClient User Guide
1
Go to VPN > Connections.
2
Select Add to add a new connection, or select Edit to edit an existing connection.
3
Select Advanced.
4
In the Advanced Settings dialog box, select Acquire virtual IP address.
5
Select Config.
6
Select Dynamic Host Configuration Protocol (DHCP) over IPSec or Manually Set.
The default is DHCP.
7
If you selected Manually Set, enter the IP address and subnet mask.
8
Select OK.
19
VPN
Advanced Configuration
Figure 7: Configuring virtual IP address acquisition
Configuring eXtended authentication (XAuth)
If the remote FortiGate unit is configured as an XAuth server, it will require the
FortiClient software to provide a user name and password when a VPN connection is
attempted. The user name and password are defined by the XAuth server. They can
be saved as part of an advanced VPN configuration, or they can be manually entered
every time a connection is attempted.
To configure XAuth
1
Go to VPN > Connections.
2
Select Add to add a new connection, or select Edit to edit an existing connection.
3
Select Advanced.
4
In the Advanced Settings dialog box, select Config for eXtended Authentication.
5
In the Extended Authentication dialog box, do one of the following:
6
20
•
If you want to enter the login user name and password for each VPN connection,
select Prompt to login.
•
If you want to save the login user name and password, clear Prompt to login and
enter the user name and password.
Select OK.
Fortinet Inc.
Advanced Configuration
VPN
Figure 8: Configuring eXtended authentication
Adding remote networks
The FortiClient software can connect to more than one network behind a remote
FortiGate VPN gateway.
To add a remote network
1
Go to VPN > Connections.
2
Select Add to add a new connection, or select Edit to edit an existing connection.
3
Select Advanced.
4
In the Advanced Settings dialog box, select Add.
5
In the Network Editor dialog box, enter the IP address and subnet mask of the remote
network.
6
Select OK.
Figure 9: Add a remote network
Monitoring VPN connections
Go to VPN > Monitor to view current VPN connection and traffic information.
For the current connection, you can view the following information.
FortiClient User Guide
21
VPN
Advanced Configuration
Name
The name of the current VPN connection.
Local Gateway
The IP address of the local gateway (the FortiClient computer).
Remote
The IP address of the remote gateway (the FortiGate unit).
Time Out (sec)
The remaining lifetime of the VPN connection.
For the incoming VPN traffic, you can view the following information.
Packets
The number of packets received.
Bytes
The number of bytes received.
Encryption
The encryption algorithm and key.
Authentication
The authentication algorithm and key.
For the outgoing VPN traffic, you can view the following information.
Packets
The number of packets sent.
Bytes
The number of bytes sent.
Encryption
The encryption algorithm and key.
Authentication
The authentication algorithm and key.
Viewing the traffic summary
The traffic summary displays a graph of the incoming and outgoing VPN traffic. The
left column displays incoming traffic and the right column displays outgoing traffic. The
total number of incoming and outgoing bytes transferred is also displayed.
Troubleshooting
Most connection failures are due to a configuration mismatch between the remote
FortiGate unit and the FortiClient software.
The following are some tips to troubleshoot a VPN connection failure:
•
PING the remote FortiGate firewall from the FortiClient computer to verify you have
a working route between the two.
•
Check the FortiClient software configuration.
Some common FortiClient software configuration errors are listed in Table 1.
•
Check the FortiGate firewall configuration.
Some common FortiGate Antivirus Firewall configuration errors are listed in
Table 2.
22
Fortinet Inc.
Advanced Configuration
Digital certificate management
Table 1: Common FortiClient software configuration errors
Configuration Error
Correction
Wrong remote network information.
Check the IP addresses of the remote gateway
and network.
Wrong preshared key.
Reenter the preshared key.
Wrong Aggressive Mode peer ID.
Reset to the correct Peer ID.
Mismatched IKE or IPSec proposal
combination in the proposal lists.
Make sure both the FortiClient software and the
remote FortiGate gateway use the same
proposals.
Wrong or mismatched IKE or IPSec
Diffie-Hellman group.
Make sure you select the correct DH group on both
ends.
No Perfect Forward Secrecy (PFS) when Enable PFS.
it is required.
Table 2: Common FortiGate Antivirus Firewall configuration errors
Configuration Error
Correction
Wrong direction of the encryption policy.
For example, external-to-internal instead
of internal-to-external.
Change the policy to internal-to-external.
Wrong firewall policy source and
destination addresses.
Reenter the source and destination address.
Wrong order of the encryption policy in
the firewall policy table.
The encryption policy must be placed above other
non-encryption policies.
Digital certificate management
To use digital certificates, you need a signed local certificate, the certificate authority
(CA) certificates for any CAs you are using, and any applicable certificate revocation
lists (CRLs). The FortiClient software can use a manual, file based enrollment method
or the simple certificate enrollment protocol (SCEP) to get certificates. SCEP is
simpler, but can only be used if the CA supports SCEP.
File based enrollment requires copying and pasting text files from the local computer
to the CA, and from the CA to the local computer. SCEP automates this process but
CRLs must still be manually copied and pasted between the CA and the local
computer.
Getting a signed local certificate
The FortiClient software uses the signed local certificate to authenticate itself to a
FortiGate gateway or other devices.
Note: The digital certificates must comply with the X.509 standard.
FortiClient User Guide
23
Digital certificate management
Advanced Configuration
Generating a local certificate request
This procedure generates a private and public key pair. The public key is the base
component of the certificate request.
Note: The FortiClient software generates 1024bit keys.
To generate the local certificate request
1
Go to VPN > My Certificates.
2
Select Generate.
Figure 10: Generating a local certificate request
3
Enter a Certificate Name.
4
Under subject information, select the ID Type for the subject.
You can select from domain name, email address or IP address.
5
Enter the information for the ID type that you selected.
6
24
Domain name
If you selected domain name, enter the fully qualified domain name of
the FortiClient computer being certified.
Email address
If you selected email address, enter the email address of the owner of
the FortiClient computer being certified.
IP address
If you selected IP address, enter the IP address of the FortiClient
computer being certified.
Optionally select Advanced and enter the advanced setting information.
Fortinet Inc.
Advanced Configuration
Digital certificate management
Email
Enter a contact email address for the FortiClient computer user.
Department
Enter a name that identifies the department or unit within the organization
that is requesting the certificate for the FortiClient computer (such as
Manufacturing or MF).
Company
Enter the legal name of the organization that is requesting the certificate
for the FortiClient computer.
City
Enter the name of the city or town where the FortiClient Computer is
located.
State/Province
Enter the name of the state or province where the FortiClient computer is
located.
Country
Enter the name of the country where the FortiClient computer is located.
7
Select OK.
8
Select either File Based or Online SCEP as the enrollment method.
9
If you select file based enrollment, the private/public key pair is generated and the
certificate request is displayed in the My Certificates list with the type of Request.
Continue with “Exporting the local certificate request”.
10
If you select Online SCEP as the enrollment method, select an issuer CA from the list
provided or enter the URL of the CA server.
11
Select OK to generate the private and public key pair and the certificate request.
The FortiClient software:
•
submits the local certificate request,
•
retrieves and imports the signed local certificate,
•
retrieves and imports the CA certificate.
The signed local certificate is displayed on the Local Certificates list with the type of
Certificate. The CA certificate is displayed on the CA Certificates list. The expiration
dates of the certificates are listed in the Valid To column of each list.
Continue with “Getting a CRL” on page 25.
Exporting the local certificate request
Use the following procedure to export the local certificate request from the FortiClient
software to a .csr file.
To export the local certificate request
1
Go to VPN > My Certificates.
2
From the certificate list, select the local certificate to export.
3
Select Export.
4
Name the file and save it in a directory on the FortiClient computer.
After exporting the certificate request, you can submit it to the CA so that the CA can
sign the certificate.
Requesting the signed local certificate
Use the following procedure to copy and paste the certificate request from the
FortiClient computer to the CA web server.
FortiClient User Guide
25
Digital certificate management
Advanced Configuration
To request the signed local certificate
1
On the FortiClient computer, open the local certificate request using a text editor.
2
Connect to the CA web server.
3
Follow the CA web server instructions to:
•
add a base64 encoded PKCS#10 certificate request to the CA web server,
•
paste the certificate request to the CA web server,
•
submit the certificate request to the CA web server.
Retrieving the signed local certificate
After you receive notification from the CA that it has signed the certificate request,
connect to the CA web server and download the signed local certificate to the
FortiClient computer.
Importing the signed local certificate
Use this procedure to import the signed local certificate to the FortiClient software.
To import the signed local certificate
1
Go to VPN > My Certificates.
2
Select Import.
3
Enter the path or browse to locate the signed local certificate on the FortiClient
computer.
4
Select OK.
The signed local certificate is displayed on the Local Certificates list with the type of
Certificate showing in the certificate list. The expiration date of the certificate is listed
in the Valid To column.
Getting a CA certificate
For the FortiClient software and the FortiGate gateway to authenticate themselves to
each other, they must both have a CA certificate from the same CA.
The FortiClient computer obtains the CA certificate to validate the digital certificate
that it receives from the remote VPN peer. The remote VPN peer obtains the CA
certificate to validate the digital certificate that it receives from the FortiClient
computer.
Note: The CA certificate must comply with the X.509 standard.
To retrieve the CA certificate
1
Connect to the CA web server.
2
Follow the CA web server instructions to download the CA certificate.
To import the CA certificate
26
1
Go to VPN > CA Certificates.
2
Select Import.
Fortinet Inc.
Advanced Configuration
Logs
3
Enter the path or browse to locate the CA certificate on the FortiClient computer.
4
Select OK.
The CA certificate is displayed on the CA Certificates list. The expiration date of the
certificate is listed in the Valid To column.
Getting a CRL
A CRL is a list of CA certificate subscribers paired with digital certificate status. The
list contains the revoked certificates and the reason(s) for revocation. It also records
the certificate issue dates and the CAs that issued them.
The FortiClient software uses the CRL to ensure that the certificates belonging to the
CA and the remote VPN peer are valid.
To retrieve the CRL
1
Connect to the CA web server.
2
Follow the CA web server instructions to download the CRL.
To import the CRL
1
Go to VPN > CRL.
2
Select Import.
3
Enter the path or browse to locate the CRL on the FortiClient computer.
4
Select OK.
The CRL is displayed on the CRL list.
Logs
Use the FortiClient logging feature to configure logging of different types of events for
any or all of the FortiClient services.
Configuring log settings
You can specify the log level, log size and log entry lifetime.
To configure log settings
1
Go to Logs > Settings.
2
Select the Maximum Log Size.
The default is 512 KB. Log entries are overwritten, starting with the oldest, when the
maximum log file size is reached.
3
Select the Maximum Life Time.
The default is 0 days. Log file entries are deleted once the maximum life time has
been reached.
Note: A maximum life time of 0 days means log entries are kept until the maximum log
size is reached.
FortiClient User Guide
27
Logs
Advanced Configuration
4
Select the Log Level.
You can select Debug, Error, Information or Warning. The default is Warning.
5
Select what to log.
You can select either All events or Check to select. If you choose Check to select,
specify the types of events to log.
6
Select Apply.
Figure 11: Configuring log settings
Managing log files
The log viewer can display logs of all events or only the events associated with a
specific service. You can view, save, clear, or refresh the log entries.
To view log file entries
28
1
Go to Logs > Logview.
2
From the dropdown list, select the log entry type you want to view.
3
Use the log navigation buttons to move between log entries or to move to the top or
bottom of the log file. The most recent log entries are displayed at the top of the list.
4
Optionally select a specific log entry from the log window to view the complete log
entry information.
Fortinet Inc.
Index
Index
A
advanced VPN settings
configuring 14
authentication 19
autokey keep alive 17
B
bytes
incoming VPN traffic 19
outgoing VPN traffic 19
C
CA certificate
getting a CA certificate 25
importing 25
retrieve 25
certificate
importing a CA certificate 25
certificate request
generating 22
city
local certificate request 22
comments on Fortinet technical documentation 5
company
local certificate request 22
configuration
error 20, 21
connect
to a remote FortiGate gateway 12
to the remote FortiGate network 12
connection
testing 10
country
local certificate request 22
CRL
getting a CRL 25
importing 25
retrieve 25
customer service and technical support 5
domain name
local certificate request 22
E
email
local certificate request 22
email address
local certificate request 22
encryption
incoming VPN traffic 19
outgoing VPN traffic 19
entering a license key 13
error
configuration 20, 21
export
local certificate request 23
exporting
local certificate request 23
extended authorization (XAuth)
configuring 18
F
FortiClient to FortiGate VPN
configuring 8
FortiGate gateway
connect to 12
FortiGate models
supported by FortiClient 8
FortiGate network
connect to 12
FortiGate unit
configuring 10
FortiOS versions
supported by FortiClient 8
G
general settings 13
generate
local certificate request 22
generating a certificate request 22
D
I
dead peer detection 17
default policy settings
modifying 14
department
local certificate request 22
DH group
policy setting 15, 16
digital certificate management
certificate management 21
IKE and IPSec policies
configuring 14
IKE proposals 15
import
CA certificate 25
CRL 25
signed local certificate 24
installation 7
installation and quick start configuration 7
FortiClient User Guide
27
Index
introduction 5
IP address
local certificate request 22
IPSec policies
configuring 14
IPSec proposals 15
K
keepalive frequency 17
key
entering a license key 13
key life
incoming VPN traffic 16
outgoing VPN traffic 15
L
legacy policy settings
modify 14
license key
enter 13
entering 13
local certificate
city 22
company 22
country 22
department 22
domain name 22
email 22
email address 22
importing a signed local certificate 24
IP address 22
requesting 23
retrieving an signed local certificate 24
state/province 22
local certificate request
export 23
generate 22
local gateway 19
local id 15
log file
configuring settings 26
viewing 26
logs 26
managing log files 26
M
manage
log files 26
mode
policy setting 15
monitoring VPN connections 19
name 19
N
name
monitoring VPN connections 19
28
NAT traversal 17
O
obtaining a signed local certificate 21
operating systems
supported by FortiClient 8
P
packets
incoming VPN traffic 19
outgoing VPN traffic 19
PFS
advanced VPN setting 17
policies
configuring 14
policy settings
modifying default 14
modifying legacy 14
proposal
IKE 15
IPSec 15
Q
quick start 8
R
remote
monitoring VPN connections 19
remote FortiGate network
connect to 12
replay detection 17
request a signed local certificate 23
retrieve
CA certificate 25
CRL 25
signed local certificate 24
S
settings
general 13
signed local certificate
importing 24
requesting 23
state/province
local certificate request 22
T
test
connection 10
time out
monitoring VPN connections 19
traffic summary
viewing 20
troubleshooting 20
Fortinet Inc.
Index
V
virtual IP address acquisition
configuring 17
VPN 14
advanced settings 14
monitoring connections 19
troubleshooting 20
FortiClient User Guide
VPN connections 20
VPN settings
configuring 9
X
XAuth
configuring 18
29
Index
30
Fortinet Inc.