1
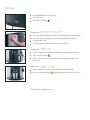
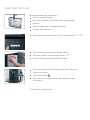
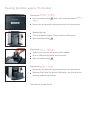
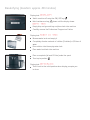
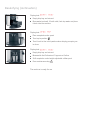
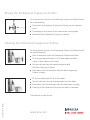
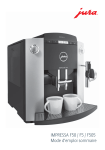
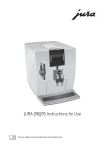
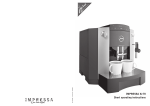
IMPRESSA F50 / F5 / F505
Short operating instructions
First use
Press power switch (I) (on rear)
Fill bean tank
Press ON / OFF key
Display text: LANGUAGE ENGLISH
Turn the Rotary Switch until the required language is displayed
Confirm selected language by pressing the Rotary Switch
Lift out water tank
Fill water tank and place back into the machine
Display text: OPEN TAP
Place a receptacle under the Professional Cappuccino Frother
Turn tap to position
Turn it back to the initial position when display prompts you
to do so
Display text: PRESS RINSE
Place receptacle under height-adjustable coffee spout
Press maintenance key
The machine is ready for use
when display prompts you to do so
Insert filter (first use)
(1)
Remove water tank and empty it
Flip up cartridge (1) holder
(2)
Insert filter cartridge (2) into water tank, applying slight
pressure
Close cartridge holder (1) (engages audibly)
Fill water tank and insert
Hold programming key P down until the display shows FILTER
Confirm setting by pressing the Rotary Switch
Turn Rotary Switch until the display shows YES
Confirm setting by pressing the Rotary Switch
Place a receptacle (at least 0.5 litre) under the Professional
Cappuccino Frother
Turn tap to position
Turn it back to the initial position when display prompts
you to do so
The machine is ready for use
Cleaning (duration: approx. 15 minutes)
Display text: READY CLEAN
Press maintenance key
down until the display shows EMPTY
TRAY
Empty drip and grounds tray and place back into the machine
Remove drip tray
Place a receptacle (approx. 1 litre) under the coffee spout
Press maintenance key
Display text: FILL TABLET
Open funnel cover for pre-ground coffee powder
Drop in JURA cleaning tablet and close cover
Press maintenance key
Display text: EMPTY TRAY
Empty drip and grounds tray and place back into the machine
Wipe out filler funnel for ground coffee with a dry cloth after the
cleaning program has finished.
The machine is ready for use
Changing the filter
After having used 50 litres of water or after two months at
the latest, the filter cartridge will be used up.
Display text: READY / FILTER
Switch machine off using the ON / OFF key
Press maintenance key
until the display shows
CHG FILTER OPEN TAP
(1)
Remove and empty water tank
Flip up cartridge holder (1)
(2)
Remove old CLARIS plus filter cartridge from the tank
Place new filter cartridge (2) into water tank, applying slight pressure
Close cartridge holder (1) (engages audibly)
Fill water tank and place back into machine
Place a receptacle (at least 0.5 litre) under the Professional
Cappuccino Frother
Turn tap to position
Turn it back to the initial position when display prompts
you to do so
The machine is ready for use
Decalcifying (duration: approx. 40 minutes)
Display text: DECALCIFY
Switch machine off using the ON / OFF key
Hold maintenance key
down until the display shows
EMPTY TRAY
Empty drip and grounds tray and place back into machine
Carefully remove the Professional Cappuccino Frother
Display text: AGENT IN TANK
Remove water tank and empty it
Completely dissolve contents of a blister (3 tablets) in 0,5 litres of
water
Pour solution into the empty water tank
Place water tank back into machine
Place a receptacle (at least 0.5 litre) under the spout
Turn tap to position
Display text: DE-SCALING
Turn it back to the initial position when display prompts you
to do so
Decalcifying (continuation)
Display text: EMPTY TRAY
Empty drip tray and reinsert
Rinse water tank well, fill with cold, fresh tap water and place
it back into the machine
Display text: OPEN TAP
Place receptacle under spout
Turn tap to position
Turn it back to the initial position when display prompts you
to do so
Display text: EMPTY TRAY
Empty drip tray and reinsert
Reassemble the Professional Cappuccino Frother
Shift receptacle under height-adjustable coffee spout
Press maintenance key
The machine is ready for use
Rinsing the Professional Cappuccino Frother
To ensure perfect function, the Professional Cappuccino Frother should
be rinsed regularly.
Dismantle the Professional Cappuccino Frother into its individual
parts
Thoroughly rinse all parts of the nozzle under running water
Reassemble the Professional Cappuccino Frother
Cleaning the Professional Cappuccino Frother
To ensure perfect function, the Professional Cappuccino Frother should
be cleaned regularly
Place a receptacle under the Professional Cappuccino Frother
Fill a second receptacle with 2.5 dl of fresh water and add a
capful of Auto-Cappuccino Cleaner
Dip the milk pipe into the second receptacle with
the Auto-Cappuccino Cleaner
Draw steam until the receptacle with the Auto-Cappuccino
Cleaner is empty
Fill the receptacle with 2.5 dl of fresh water
Dip the milk pipe into the receptacle with the fresh water
Draw steam until the receptacle with the fresh water is empty
Cleaning of the Professional Cappuccino Frother is complete
Art. 67298 – F50 GB – 05/2007
The machine is ready for use
www.jura.com