1
(Soft M: V11.1x)
(Soft T: V12.1x)
CNC 8035
INSTALLATION MANUAL
(MODELOS ·M· & ·T·)
Ref. 0706
All rights reserved. No part of this documentation may be copied, transcribed,
stored in a data backup system or translated into any language without Fagor
Automation's explicit consent.
The information described in this manual may be modified for technical reasons.
FAGOR AUTOMATION S. COOP. Reserves the right to modify the contents of
this manual without having to communicate such modifications.
The commercial trademarks belong to their respective owners.
The content of this manual and its validity for the product described here has been
verified. Even so, involuntary errors are possible, thus no absolute match is
guaranteed. Anyway, the contents of the manual is periodically checked making
and including the necessary corrections in a future edition.
The examples described in this manual are for learning purposes. Before using
them in industrial applications, they must be properly adapted making sure that
the safety regulations are fully met.
This product uses the following source code, subject to the terms of the GPL license. The applications busybox V0.60.2;
dosfstools V2.9; linux-ftpd V0.17; ppp V2.4.0; utelnet V0.1.1. The librarygrx V2.4.4. The linux kernel V2.4.4. The linux boot
ppcboot V1.1.3. If you would like to have a CD copy of this source code sent to you, send 10 Euros to Fagor Automation
for shipping and handling.
Installation manual
INDEX
About the product ................................................................................................................... I
Declaration of conformity...................................................................................................... III
Version history (M) ................................................................................................................ V
Version history (T) ................................................................................................................ IX
Safety conditions ................................................................................................................ XIII
Warranty terms................................................................................................................. XVII
Material returning terms .................................................................................................... XIX
Additional remarks............................................................................................................. XXI
Fagor documentation ...................................................................................................... XXIII
CHAPTER 1
CNC CONFIGURATION
1.1
1.1.1
CHAPTER 2
HEAT DISSIPATION
2.1
2.2
2.3
CHAPTER 3
Digital inputs and outputs ........................................................................................ 30
Analog inputs and outputs. ...................................................................................... 31
Setup ....................................................................................................................... 32
Connection of the emergency input and output....................................................... 36
MACHINE PARAMETERS
4.1
4.2
4.3
4.4
4.5
4.6
4.7
4.8
4.8.1
4.8.2
4.8.3
CHAPTER 5
Heat dissipation by natural convection .................................................................... 24
Heat dissipation by forced convection with inside fan ............................................. 25
Heat dissipation by air flow to the outside using a fan............................................. 26
MACHINE AND POWER CONNECTION
3.1
3.2
3.3
3.4
CHAPTER 4
CNC structure............................................................................................................ 1
Connectors ............................................................................................................ 4
Parameters that may be modified from the OEM program or OEM subroutine....... 42
General machine parameters .................................................................................. 44
Axis parameters...................................................................................................... 74
Spindle parameters ................................................................................................. 95
Drive parameters ................................................................................................... 109
Serial line parameters............................................................................................ 112
PLC Parameters ................................................................................................... 114
Tables................................................................................................................... 117
Miscellaneous (M) function table ....................................................................... 117
Leadscrew error compensation table................................................................. 119
Cross compensation parameter table................................................................ 121
CONCEPTS
5.1
5.1.1
5.1.2
5.1.3
5.2
5.2.1
5.2.2
5.3
5.3.1
5.3.2
5.3.3
5.3.4
5.4
5.4.1
5.4.2
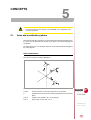
Axes and coordinate systems................................................................................ 123
Rotary axes........................................................................................................ 126
Gantry axes ....................................................................................................... 129
Incline axis ......................................................................................................... 130
Jog......................................................................................................................... 132
Relationship between the axes and the JOG keys ............................................ 132
Path-jog mode ................................................................................................... 133
Movement with an electronic handwheel.............................................................. 135
Standard handwheel.......................................................................................... 136
Path handwheel ................................................................................................. 137
Feed handwheel mode ...................................................................................... 138
"Additive handwheel" mode ............................................................................... 140
feedback system.................................................................................................... 142
Counting speed limitation .................................................................................. 143
Resolution.......................................................................................................... 144
CNC 8035
(SOFT M: V11.1X)
(SOFT T: V12.1X)
i
Installation manual
5.5
5.5.1
5.5.2
5.5.3
5.5.4
5.5.5
5.5.6
5.5.7
5.6
5.6.1
5.6.2
5.6.3
5.6.4
5.7
5.8
5.8.1
5.8.2
5.9
5.9.1
5.9.2
5.9.3
5.9.4
5.10
5.11
5.11.1
5.12
5.13
5.13.1
5.13.2
5.14
CHAPTER 6
CNC 8035
(SOFT M: V11.1X)
(SOFT T: V12.1X)
ii
PLC Resources ..................................................................................................... 196
PLC program execution......................................................................................... 197
Cycle time.............................................................................................................. 200
Modular structure of the program ......................................................................... 201
First cycle module (CY1) ................................................................................... 201
Main module (PRG) ........................................................................................... 201
Periodic execution module (PE t) ...................................................................... 202
Priority of execution of the PLC modules .......................................................... 203
PLC RESOURCES
7.1
7.2
7.3
7.4
7.5
7.5.1
7.5.2
7.5.3
7.5.4
7.6
7.6.1
CHAPTER 8
Transferring the auxiliary (miscellaneous) M functions without the AUXEND signal.. 169
Spindle .................................................................................................................. 170
Spindle types ..................................................................................................... 170
Spindle speed (S) control .................................................................................. 171
Spindle gear change.......................................................................................... 173
Spindle in closed loop........................................................................................ 175
Treatment of emergency signals ........................................................................... 180
Digital CAN servo .................................................................................................. 183
Communications channel .................................................................................. 183
Fagor handwheels: HBA, HBE and LGB .............................................................. 186
Machine safety related functions ........................................................................... 190
Maximum machining spindle speed .................................................................. 190
Cycle start disabled when hardware errors occur. ............................................ 192
Tool change via PLC ............................................................................................. 193
INTRODUCTION TO THE PLC
6.1
6.2
6.3
6.4
6.4.1
6.4.2
6.4.3
6.4.4
CHAPTER 7
Axis adjustment ..................................................................................................... 148
Drive setting....................................................................................................... 149
Gain setting ....................................................................................................... 150
Proportional gain setting .................................................................................... 151
Feed-forward gain setting .................................................................................. 152
Derivative (AC-forward) gain setting.................................................................. 153
Leadscrew backlash compensation................................................................... 154
Leadscrew error compensation ......................................................................... 155
Reference systems................................................................................................ 157
Home search ..................................................................................................... 158
Setting on systems without distance-coded feedback ....................................... 160
Setting on systems with distance-coded feedback ............................................ 162
Axis travel limits (software limits)....................................................................... 163
Unidirectional approach......................................................................................... 164
Auxiliary M, S, T function transfer......................................................................... 165
Transferring M, S, T using the AUXEND signal................................................. 168
Inputs..................................................................................................................... 205
Outputs .................................................................................................................. 205
Marks..................................................................................................................... 206
Registers ............................................................................................................... 208
Timers ................................................................................................................... 209
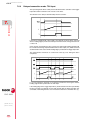
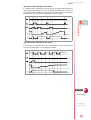
Monostable mode. TG1 input ............................................................................ 212
Delayed connection mode. TG2 input ............................................................... 214
Delayed disconnection mode. TG3 input........................................................... 216
Signal limiting mode. TG4 input......................................................................... 218
Counters ................................................................................................................ 220
Operating mode of a counter ............................................................................. 223
PLC PROGRAMMING
8.1
8.2
8.3
8.4
8.5
8.5.1
8.5.2
8.5.3
8.5.4
8.5.5
8.5.6
Module structure.................................................................................................... 226
Directing instructions ............................................................................................. 227
Consulting instructions .......................................................................................... 230
Operators and symbols ......................................................................................... 232
Action instruction. .................................................................................................. 233
Binary assignment instructions .......................................................................... 234
Conditional binary action instructions ................................................................ 235
Sequence breaking action instructions .............................................................. 236
Arithmetic action instructions ............................................................................. 237
Logic action instructions .................................................................................... 239
Specific action instructions ................................................................................ 241
Installation manual
CHAPTER 9
CNC-PLC COMMUNICATION
9.1
9.2
9.2.1
9.2.2
9.3
9.4
9.5
CHAPTER 10
General logic inputs............................................................................................... 256
Axis logic inputs..................................................................................................... 264
Spindle logic inputs................................................................................................ 269
Key inhibiting logic inputs. ..................................................................................... 275
Logic inputs of the PLC channel............................................................................ 278
General logic outputs............................................................................................ 280
Logic outputs of the axes....................................................................................... 287
Spindle logic outputs. ............................................................................................ 290
Logic outputs of key status .................................................................................... 292
ACCESS TO THE INTERNAL CNC VARIABLES
11.1
11.2
11.3
11.4
11.5
11.6
11.7
11.8
11.9
11.10
11.11
11.12
CHAPTER 12
Transferring the auxiliary (miscellaneous) M functions without the AUXEND signal ..249
Displaying messages, errors and screens............................................................. 250
Access to the PLC from the CNC .......................................................................... 252
Access to the PLC from a PC, via DNC. ............................................................... 253
LOGIC CNC INPUTS AND OUTPUTS
10.1
10.2
10.3
10.4
10.5
10.6
10.7
10.8
10.9
CHAPTER 11
Auxiliary M, S, T functions .................................................................................... 244
Auxiliary M, S, T function transfer.......................................................................... 247
Transferring M, S, T using the AUXEND signal................................................. 248
Variables associated with tools. ........................................................................... 297
Variables associated with zero offsets. ................................................................ 301
Variables associated with machine parameters ................................................... 302
Variables associated with work zones.................................................................. 303
Variables associated with feedrates ..................................................................... 304
Variables associated with coordinates ................................................................. 306
Variables associated with electronic handwheels ................................................ 308
Variables associated with feedback ...................................................................... 310
Variables associated with the main spindle.......................................................... 311
Variables associated with local and global parameters........................................ 314
Operating-mode related variables ....................................................................... 315
Other variables ...................................................................................................... 317
AXES CONTROLLED FROM THE PLC
12.1
PLC execution channel.......................................................................................... 324
12.1.1
Considerations................................................................................................... 324
12.1.2
Blocks which can be executed from the PLC .................................................... 326
12.1.3
Control of the PLC program from the CNC........................................................ 330
12.2
Action CNCEX1 ..................................................................................................... 332
CHAPTER 13
PLC PROGRAMMING EXAMPLE
13.1
13.2
13.3
Definition of symbols (mnemonics)........................................................................ 334
First cycle module.................................................................................................. 336
Main module. ......................................................................................................... 337
A
B
C
D
E
F
G
H
I
J
K
L
M
N
Technical specifications of the CNC...................................................................... 349
Probe connection................................................................................................... 353
Summary of internal CNC variables. .................................................................... 355
Summary of PLC commands................................................................................ 361
Summary of PLC inputs and outputs..................................................................... 365
2-digit BCD code output conversion table ............................................................. 371
Key codes.............................................................................................................. 373
Logic outputs of key status .................................................................................... 375
Key inhibiting codes............................................................................................... 377
Machine parameter setting chart ........................................................................... 379
M functions setting chart........................................................................................ 385
Leadscrew error compensation table .................................................................... 387
Cross compensation table ..................................................................................... 389
Maintenance .......................................................................................................... 391
APPENDIX
CNC 8035
(SOFT M: V11.1X)
(SOFT T: V12.1X)
iii
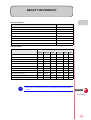
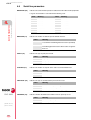
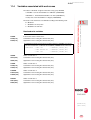
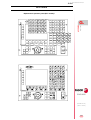
ABOUT THE PRODUCT
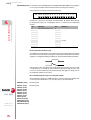
Basic characteristics.
RAM memory
256 Kb
PLC cycle time
3 ms / 1000 instructions
RS-232 serial line
Standard
DNC ( via RS232 )
Standard
5 V or 24 V probe inputs
2
Digital inputs and outputs
40 I / 24 O
Feedback inputs for the axes and spindle
4 TTL/1Vpp inputs
Feedback inputs for handwheels
2 TTL inputs
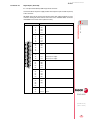
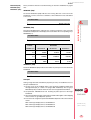
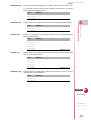
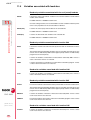
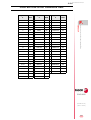
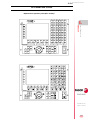
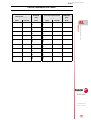
Software options.
Model
M-MON
M-MON-R
M-COL
M-COL-R
T-MON
T-COL
3
3
3
3
2
2
Opt
Opt
Opt
Opt
Opt
Opt
Electronic threading
Stand
Stand
Stand
Stand
Stand
Stand
Tool magazine management:
Stand
Stand
Stand
Stand
Stand
Stand
Machining canned cycles
Stand
Stand
Stand
Stand
Stand
Stand
Multiple machining
Stand
Stand
Stand
Stand
-----
-----
Rigid tapping
Stand
Stand
Stand
Stand
Stand
Stand
DNC
Stand
Stand
Stand
Stand
Stand
Stand
Tool radius compensation
Stand
Stand
Stand
Stand
Stand
Stand
Retracing
-----
Stand
-----
Stand
-----
-----
Color monitor
-----
-----
Stand
Stand
-----
Stand
Number of axes
Hard disk
Before start-up, check that machine carrying this CNC meets the 89/392/CEE
ruling.
CNC 8035
I
CNC 8035
II
About the product
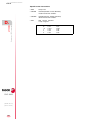
DECLARATION OF CONFORMITY
The manufacturer:
Fagor Automation, S. Coop.
Barrio de San Andrés s/n, C.P. 20500, Mondragón -Guipúzcoa- (Spain).
We declare:
We declare under our exclusive responsibility the conformity of the product:
Numerical Control Fagor
8035 CNC
Referred to by this declaration with following directives:
Safety regulations.
EN 60204-1
Machine safety. Electrical equipment of the machines.
Regulation on electromagnetic compatibility.
EN 61000-4-3
EN 55011
EN 61000-6-2
Generic regulation on emissions in industrial environments.
Radiated. Class A, Group 1.
Generic regulation on immunity in industrial environments.
EN 61000-4-2
Electrostatic Discharges.
EN 61000-4-3
Radiofrequency Radiated Electromagnetic Fields.
EN 61000-4-4
Bursts and fast transients.
EN 61000-4-6
Conducted disturbance induced by radio frequency fields.
EN 61000-4-8
Magnetic fields to Mains frequency
EN 61000-4-11
Voltage fluctuations and Outages.
ENV 50204
Fields generated by digital radio-telephones
As instructed by the European Community Directives: 73/23/CEE modified by 93/68/
EEC on Low Voltage and 89/336/CEE modified by 92/31/EEC and 93/68/EEC on
Electromagnetic Compatibility and their updates.
In Mondragón, June 15th, 2005.
CNC 8035
III
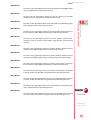
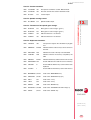
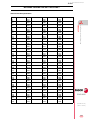
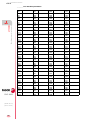
VERSION HISTORY (M)
(mill model)
Here is a list of the features added in each software version and the manuals that describe them.
The version history uses the following abbreviations:
INST
Installation manual
PRG
Programming manual
OPT
Operation manual
Software V07.1x
July 2003
First version.
Software V09.0x
February 2004
List of features
Incline axis.
Machine parameters.
Manual
INST / PRG
INST
TOOLTYPE (P167): Stop block preparation when executing a new "T".
TOOLTYPE (P167): Execute the stop signal when done with the "T" change.
FEEDTYPE (P169): Select the behavior of the feedrate for F0.
TYPCROSS (P135): On Gantry axes, cross compensation is also applied to the slave axis.
RAPIDEN (P130): Rapid key controlled by PLC.
General parameters that may be modified from OEM subroutine/program: CODISET.
Axis parameters that may be modified from OEM subroutine/program: MAXFLWE1,
MAXFLWE2.
PLC marks.
INST
Name the logic inputs and outputs with the axis name
BLOABOR: Ending the execution of a block using a PLC mark (main channel).
BLOABORP: Ending the execution of a block using a PLC mark (PLC channel).
ELIMIS: Park the spindle.
While compiling the PLC program, the outputs are initialized to zero.
Variables.
INST / PRG
SELPRO: Variable to select the active probe input.
DIAM: Variable to select the programming mode, radius or diameter.
G2/G3. There is no need to program the center coordinates if their value is zero.
M41-M44: These functions admit subroutines when the gear change is automatic.
PRG
PRG
CNC 8035
V
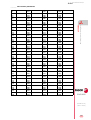
Software V09.1x
December 2004
List of features
Calculation of central unit heat dissipation .
New board "Axes2".
Automatic keyboard type identification.
Frequency filters for axes and spindles.
Machine parameters.
Manual
INST
INST
INST
INST
INST
Version history (M)
COMPMODE (P175). New tool radius compensation methods.
Axis parameters that may be modified from OEM subroutine/program: REFVALUE, REFDIREC,
FLIMIT.
Spindle parameters that may be modified from OEM subroutine/program: REFVALUE,
REFDIREC, SLIMIT.
Variables.
INST / PRG
DNCSTA: DNC communication status.
TIMEG: Status of the timer count programmed with G4
HANDSE: Handwheel's axis selector button pressed.
ANAI(n): Value of the analog inputs.
APOS(X-C): Real coordinates of the tool base, referred to part zero.
ATPOS(X-C): Theoretical coordinates of the tool base, referred to part zero.
Retracing function.
INST
If RETRACAC=2 , the retrace function does not stop at the M functions.
The RETRACAC parameter is initialized with [SHIFT][RESET].
The number of blocks being retraced has been increased to 75.
When activating tool radius compensation in the first motion block even if there is no movement
of the plane axes.
Manual intervention with additive handwheel.
G46. Maintain G46 when the home search does not involve any axis of the angular
transformation.
MEXEC. Execute a modal part-program.
Up to 319 G functions now available.
The simulations without axis movement ignore the G4.
Maintain the feedrate selected in simulation.
Software V9.12
INST
INST / OPT
INST / PRG
PRG
PRG
OPT
OPT
February 2005
List of features
Look-ahead
Manual
INST / PRG
Software V09.13
April 2005
List of features
Hirth axis pitch may be set in degrees via parameters.
Rollover positioning axis. Movement in G53 via the shortest way.
Manual
INST
INST
CNC 8035
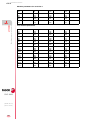
Software V09.15
June 2005
List of features
CAN servo system.
VI
Manual
INST
August 2005
List of features
Manual
The CNC supports Memkey Card + Compact Flash or KeyCF.
File explorer to show the contents of the storage devices.
Loading the version from the Memkey card o from the hard disk.
New way to search home that may be selected through g.m.p. I0TYPE=3.
Improved block search. Switching from simulation to execution.
New repositioning mode that is activated by setting g.m.p. REPOSTY=1.
Square-sine ramps on open-loop spindle.
Numbering of the local inputs/outputs of the expansion modules using plc machine parameters.
Default value of axis and spindle machine parameter ACFGAIN = YES.
Setting axis parameters FFGAIN and FFGAIN2 with two decimals.
Up to 400 (DEF) symbols now available at the PLC.
New HTOR variable that indicates the tool radius being used by the CNC.
Longitudinal axis definition with G16.
OPT
INST / OPT
OPT
INST
INST / OPT
INST/PRG/OPT
INST
INST
INST
INST
INST
INST / PRG
INST / PRG
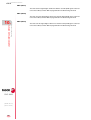
Software V11.11
Version history (M)
Software V11.01
February 2006
List of features
Handwheel feedback taken to a free feedback connector.
New variables: RIP, GGSE, GGSF, GGSG, GGSH, GGSI, GGSJ, GGSK, GGSL, GGSM, PRGSP
and PRBMOD
G04 K0. Block preparation interruption and coordinate update.
Manual
INST
INST
PRG
Software V11.13
June 2006
List of features
Smooth stop when homing the axes, it may be selected with a.m.p. I0TYPE.
Software V11.14
Manual
INST
August 2006
List of features
Selecting the additive handwheel as handwheel associated with the axis.
Manual
INST
Software V11.18
June 2007
List of features
Copy and execute programs on Hard Disk (KeyCF)
Manual
OPT
CNC 8035
VII
CNC 8035
VIII
Version history (M)
VERSION HISTORY (T)
(lathe model)
Here is a list of the features added in each software version and the manuals that describe them.
The version history uses the following abbreviations:
INST
Installation manual
PRG
Programming manual
OPT
Operation manual
Software V08.1x
July 2003
First version.
Software V10.0x
February 2004
List of features
Incline axis.
Machine parameters.
Manual
INST / PRG
INST
TOOLTYPE (P167): Stop block preparation when executing a new "T".
TOOLTYPE (P167): Execute the stop signal when done with the "T" change.
FEEDTYPE (P169): Select the behavior of the feedrate for F0.
TYPCROSS (P135): On Gantry axes, cross compensation is also applied to the slave axis.
RAPIDEN (P130): Rapid key controlled by PLC.
General parameters that may be modified from OEM subroutine/program: CODISET.
Axis parameters that may be modified from OEM subroutine/program: MAXFLWE1,
MAXFLWE2.
PLC marks.
INST
Name the logic inputs and outputs with the axis name
BLOABOR: Ending the execution of a block using a PLC mark (main channel).
BLOABORP: Ending the execution of a block using a PLC mark (PLC channel).
ELIMIS: Park the spindle.
While compiling the PLC program, the outputs are initialized to zero.
Variables.
INST / PRG
SELPRO: Variable to select the active probe input.
DIAM: Variable to select the programming mode, radius or diameter.
G2/G3. There is no need to program the center coordinates if their value is zero.
M41-M44: These functions admit subroutines when the gear change is automatic.
PRG
PRG
CNC 8035
IX
Software V10.1x
December 2004
List of features
Calculation of central unit heat dissipation .
New board "Axes2".
Automatic keyboard type identification.
Frequency filters for axes and spindles.
Machine parameters.
Manual
INST
INST
INST
INST
INST
Version history (T)
COMPMODE (P175). New tool radius compensation methods.
Axis parameters that may be modified from OEM subroutine/program: REFVALUE, REFDIREC,
FLIMIT.
Spindle parameters that may be modified from OEM subroutine/program: REFVALUE,
REFDIREC, SLIMIT.
Variables.
INST / PRG
DNCSTA: DNC communication status.
TIMEG: Status of the timer count programmed with G4
HANDSE: Handwheel's axis selector button pressed.
ANAI(n): Value of the analog inputs.
APOS(X-C): Real coordinates of the tool base, referred to part zero.
ATPOS(X-C): Theoretical coordinates of the tool base, referred to part zero.
Retracing function.
INST
If RETRACAC=2 , the retrace function does not stop at the M functions.
The RETRACAC parameter is initialized with [SHIFT][RESET].
The number of blocks being retraced has been increased to 75.
When activating tool radius compensation in the first motion block even if there is no movement
of the plane axes.
Manual intervention with additive handwheel.
G46. Maintain G46 when the home search does not involve any axis of the angular
transformation.
G151-G152. Programming in diameter or radius.
MEXEC. Execute a modal part-program.
Up to 319 G functions now available.
The simulations without axis movement ignore the G4.
Maintain the feedrate selected in simulation.
Software V10.12
INST
INST / OPT
INST / PRG
PRG
PRG
PRG
OPT
OPT
February 2005
List of features
Look-ahead.
Manual
INST / PRG
Software V10.13
April 2005
List of features
Hirth axis pitch may be set in degrees via parameters.
Rollover positioning axis. Movement in G53 via the shortest way.
Manual
INST
INST
CNC 8035
Software V10.15
June 2005
List of features
CAN servo system.
X
Manual
INST
August 2005
List of features
Manual
The CNC supports Memkey Card + Compact Flash or KeyCF.
File explorer to show the contents of the storage devices.
Loading the version from the Memkey card o from the hard disk.
New way to search home that may be selected through g.m.p. I0TYPE=3.
Improved block search. Switching from simulation to execution.
New repositioning mode that is activated by setting g.m.p. REPOSTY=1.
Square-sine ramps on open-loop spindle.
Numbering of the local inputs/outputs of the expansion modules using plc machine parameters.
Default value of axis and spindle machine parameter ACFGAIN = YES.
Setting axis parameters FFGAIN and FFGAIN2 with two decimals.
Up to 400 (DEF) symbols now available at the PLC.
New HTOR variable that indicates the tool radius being used by the CNC.
Spindle override in the whole threading cycle at 100%.
OPT
INST / OPT
OPT
INST
INST / OPT
INST/PRG/OPT
INST
INST
INST
INST
INST
INST / PRG
PRG
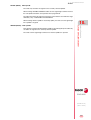
Software V12.11
Version history (T)
Software V12.01
February 2006
List of features
Handwheel feedback taken to a free feedback connector.
New variables: RIP, GGSE, GGSF, GGSG, GGSH, GGSI, GGSJ, GGSK, GGSL, GGSM, PRGSP
and PRBMOD
G04 K0. Block preparation interruption and coordinate update.
Manual
INST
INST
PRG
Software V12.13
June 2006
List of features
Smooth stop when homing the axes, it may be selected with a.m.p. I0TYPE.
Software V12.14
Manual
INST
August 2006
List of features
Selecting the additive handwheel as handwheel associated with the axis.
Manual
INST
Software V12.18
June 2007
List of features
Copy and execute programs on Hard Disk (KeyCF)
Manual
OPT
CNC 8035
XI
CNC 8035
XII
Version history (T)
SAFETY CONDITIONS
Read the following safety measures in order to prevent damage to personnel, to this
product and to those products connected to it.
This unit must only be repaired by personnel authorized by Fagor Automation.
Fagor Automation shall not be held responsible for any physical or material damage
derived from the violation of these basic safety regulations.
Precautions against personal damage
Interconnection of modules
Use the connection cables provided with the unit.
Use proper Mains AC power cables
To avoid risks, use only the Mains AC cables recommended for this unit.
Avoid electrical overloads
In order to avoid electrical discharges and fire hazards, do not apply electrical
voltage outside the range selected on the rear panel of the central unit.
Ground connection.
In order to avoid electrical discharges, connect the ground terminals of all the
modules to the main ground terminal. Before connecting the inputs and outputs
of this unit, make sure that all the grounding connections are properly made.
Before powering the unit up, make sure that it is connected to ground
In order to avoid electrical discharges, make sure that all the grounding
connections are properly made.
Do not work in humid environments
In order to avoid electrical discharges, always work under 90% of relative humidity
(non-condensing) and 45 ºC (113º F).
Do not work in explosive environments
In order to avoid risks, damage, do no work in explosive environments.
Precautions against product damage
Working environment
This unit is ready to be used in industrial environments complying with the
directives and regulations effective in the European Community
Fagor Automation shall not be held responsible for any damage suffered or
caused when installed in other environments (residential or homes).
CNC 8035
XIII
Install this unit in the proper place
It is recommended to install the CNC away from coolants, chemical products,
possible blows etc. which could damage it.
This unit complies with the European directives on electromagnetic compatibility.
Nevertheless, it is recommended to keep it away from sources of electromagnetic
disturbance such as.
• Powerful loads connected to the same AC power line as this equipment.
• Nearby portable transmitters (Radio-telephones, Ham radio transmitters).
• Nearby radio / TC transmitters.
Safety conditions
• Nearby arc welding machines
• Nearby High Voltage power lines
• Etc.
Enclosures
The manufacturer is responsible of assuring that the enclosure involving the
equipment meets all the currently effective directives of the European Community.
Avoid disturbances coming from the machine tool
The machine tool must have decoupled all those elements capable of generating
interference (relay coils, contactors, motors, etc.)
• DC relay coils. Diode type 1N4000.
• AC relay coils. RC connected as close to the coils as possible with
approximate values of R=220 Ω / 1 W and C=0,2 µF / 600 V.
• AC motors. RC connected between phases, with values of R=300 Ω / 6 W and
C=0,47 µF / 600 V
Use the proper power supply
Use an external regulated 24 Vdc power supply for the inputs and outputs.
Grounding of the power supply
The zero volt point of the external power supply must be connected to the main
ground point of the machine.
Analog inputs and outputs connection
It is recommended to connect them using shielded cables and connecting their
shields (mesh) to the corresponding pin.
Ambient conditions
The working temperature must be between +5 ºC and +40 ºC (41ºF and 104º F)
The storage temperature must be between -25 ºC and +70 ºC. (-13 ºF and 158 ºF)
Central unit enclosure (8055i CNC)
Guarantee the required gaps between the central unit and each wall of the
enclosure. Use a DC fan to improve enclosure ventilation.
Power switch
This power switch must be mounted in such a way that it is easily accessed and
at a distance between 0.7 meters (27.5 inches) and 1.7 meters (5.5ft) off the floor.
CNC 8035
XIV
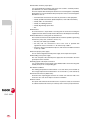
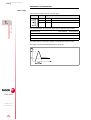
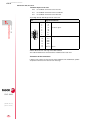
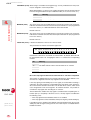
Protections of the unit itself
Central Unit
It has a 4 A 250V external fast fuse (F).
X1
X8
+24V
0V
X9
X10
X11
X12
X13
X2
X3
X4
X5
X6
Safety conditions
X7
Inputs-Outputs
All the digital inputs and outputs have galvanic isolation via optocouplers between
the CNC circuitry and the outside.
Precautions during repair
Do not open this unit. Only personnel authorized by Fagor Automation
may open this unit.
Do not handle the connectors with the unit connected to mains. Before
manipulating the connectors (inputs/outputs, feedback, etc.) make
sure that the unit is not connected to AC power.
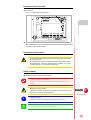
Safety symbols
Symbols which may appear on the manual.
Symbol for danger or prohibition.
It indicates actions or operations that may cause damage to people or
to units.
Warning or caution symbol.
It indicates situations that may be caused by certain operations and
the actions to be taken to prevent them.
CNC 8035
Obligation symbol.
It indicates actions and operations that must be carried out.
i
Information symbol.
It indicates notes, warnings and suggestions.
XV
CNC 8035
XVI
Safety conditions
WARRANTY TERMS
Initial warranty
All products manufactured or marketed by FAGOR carry a 12-month warranty for the
end user which could be controlled by the our service network by means of the
warranty control system established by FAGOR for this purpose.
In order to prevent the possibility of having the time period from the time a product
leaves our warehouse until the end user actually receives it run against this 12-month
warranty, FAGOR has set up a warranty control system based on having the
manufacturer or agent inform FAGOR of the destination, identification and onmachine installation date, by filling out the document accompanying each FAGOR
product in the warranty envelope. This system, besides assuring a full year of
warranty to the end user, enables our service network to know about FAGOR
equipment coming from other countries into their area of responsibility.
The warranty starting date will be the one appearing as the installation date on the
above mentioned document. FAGOR offers the manufacturer or agent 12 months to
sell and install the product. This means that the warranty starting date may be up to
one year after the product has left our warehouse so long as the warranty control
sheet has been sent back to us. This translates into the extension of warranty period
to two years since the product left our warehouse. If this sheet has not been sent to
us, the warranty period ends 15 months from when the product left our warehouse.
This warranty covers all costs of material and labour involved in repairs at FAGOR
carried out to correct malfunctions in the equipment. FAGOR undertakes to repair or
replace their products within the period from the moment manufacture begins until
8 years after the date on which it disappears from the catalogue.
FAGOR has exclusive competence in deciding whether the repair enters within the
term defined as the warranty period.
Excluding clauses
Repairs will be carried out on our premises. Therefore, all expenses incurred as a
result of trips made by technical personnel to carry out equipment repairs, despite
these being within the above-mentioned period of warranty, are not covered by the
warranty.
Said warranty will be applied whenever the equipment has been installed in
accordance with instructions, has not be mistreated, has not been damaged by
accident or by negligence and has not been tampered with by personnel not
authorised by FAGOR. If, once servicing or repairs have been made, the cause of
the malfunction cannot be attributed to said elements, the customer is obliged to cover
the expenses incurred, in accordance with the tariffs in force.
Other warranties, implicit or explicit, are not covered and FAGOR AUTOMATION
cannot be held responsible for other damages which may occur.
CNC 8035
XVII
Warranty on repairs
Warranty terms
In a similar way to the initial warranty, FAGOR offers a warranty on standard repairs
according to the following conditions:
PERIOD
12 months.
CONCEPT
Covers parts and labor for repairs (or replacements) at the network's
own facilities.
EXCLUDING CLAUSES
The same as those applied regarding the chapter on initial warranty.
If the repair is carried out within the warranty period, the warranty
extension has no effect.
When the customer does not choose the standard repair and just the faulty material
has been replaced, the warranty will cover just the replaced parts or components
within 12 months.
For sold parts the warranty is 12 moths length.
Maintenance contracts
The SERVICE CONTRACT is available for the distributor or manufacturer who buys
and installs our CNC systems.
CNC 8035
XVIII
MATERIAL RETURNING TERMS
When returning the remote modules or the central unit, pack it in its original package
and with its original packaging material. If not available, pack it as follows:
1. Get a cardboard box whose three inside dimensions are at least 15 cm (6 inches)
larger than those of the unit. The cardboard being used to make the box must
have a resistance of 170 kg (375 lb).
2. Attach the unit label indicating the owner of the unit, his/her address, the name
of the contact person, the type of unit and the serial number.
3. In case of failure, also indicate the symptom and a short description.
4. Wrap the unit in a polyethylene roll or similar material to protect it.
5. When sending the central unit, above all protect the screen
6. Pad the unit inside the cardboard box with polyurethane foam on all sides.
7. Seal the cardboard box with packing tape or industrial staples.
CNC 8035
XIX
CNC 8035
XX
Material returning terms
ADDITIONAL REMARKS
Mount the CNC away from coolants, chemical products, blows, etc. which could
damage it. Before turning the unit on, verify that the ground connections have been
properly made.
In case of a malfunction or failure, disconnect it and call the technical service. Do not
open this unit.
CNC 8035
XXI
CNC 8035
XXII
Additional remarks
FAGOR DOCUMENTATION
OEM Manual
It is directed to the machine builder or person in charge of installing and starting-up
the CNC.
USER-M manual
Directed to the end user.
It describes how to operate and program in M mode.
USER-T manual
Directed to the end user.
It describes how to operate and program in T mode.
CNC 8035
XXIII
CNC 8035
XXIV
Fagor documentation
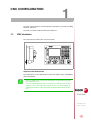
CNC CONFIGURATION
1
The CNC is prepared to be used in industrial environments, especially on milling
machines, lathes, etc.
The CNC can control machine movements and devices.
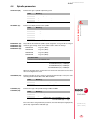
1.1
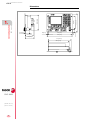
CNC structure
The central unit is located on the rear of the monitor.
Keyboard auto-identification
The keyboard has an auto-identification system that updates g.m.p. CUSTOMTY
(P92) automatically.
i
The auto-identification system of the keyboards is recognized from versions
V9.11 and V10.11 on.
If an auto-identifying keyboard is connected to a CNC that has an older
software version, the keyboard will beep. In this case, disable the autoidentification hardware of the keyboard by setting the identification switch to
zero.
CNC 8035
(SOFT M: V11.1X)
(SOFT T: V12.1X)
1
Installation manual
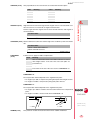
56.3 [2.21]
8.5 [0.3]
115.5 [4.54]
335 [13.2]
352 [13.9]
125 [4.92]
318 [12.51]
287.8 [11.3]
CNC 8035
(SOFT M: V11.1X)
(SOFT T: V12.1X)
2
40 [1.6]
CNC structure
CNC CONFIGURATION
273 [10.7]
1.
193 [7.6]
222.35 [8.8]
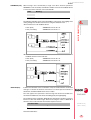
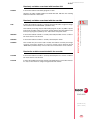
Dimensions
Installation manual
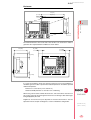
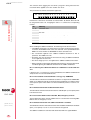
Enclosure
335 [13.2]
6 [ 0.236]
323 [12.72]
32 [1.26]
CNC structure
1.
CNC CONFIGURATION
257 [10.12]
193 [7.6]
M5x0.7
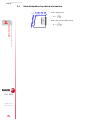
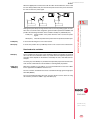
The minimum distance from each side of the monitor to its enclosure in order to
guarantee the required ambient conditions is shown below:
180 [7.087]
50 [1.968]
50 [1.968]
50 [1.968]
50 [1.968]
It is up to the installer to make sure that the enclosure has forced ventilation or
ventilation grooves in order to prevent the inside temperature to exceed the specified
ambient temperature.
Between 5º C and +50º C (41º F and 122º F)
Relative humidity between 5% and 95% non condensing
When using a fan to better ventilate the enclosure, a DC fan must be used since an
AC fan may generate electromagnetic interference resulting in distorted images
being displayed by the CRT.
CNC 8035
Brightness and contrast may be adjusted on monochrome monitors. See the
Operation manual, chapter on Diagnosis, section on Hardware configuration.
(SOFT M: V11.1X)
(SOFT T: V12.1X)
3
Installation manual
1.1.1
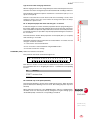
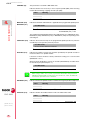
Connectors
i
From versions V11.1x and V12.1x on, there is a new axes board that includes
the recognizance of 24V at the inputs and outputs. This board will appear in
Diagnosis > Configuration > Hardware with the name of "Axes 3". This board
is not compatible with previous software versions.
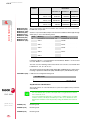
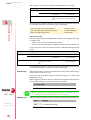
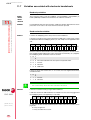
The connectors are located in the rear of the CNC.
CNC structure
CNC CONFIGURATION
1.
E
X1
C
X8
X7
+24V
0V
A
B
X9
X10
X11
X12
X2
X3
X4
X5
X6
D
CNC 8035
(SOFT M: V11.1X)
(SOFT T: V12.1X)
4
(A)
Power supply.
(B)
Ground connection.
(C)
To connect the USB hard disk (Pen Drive).
(D)
Operator panel.
(E)
To connect the communications board.
X1
For RS232 serial line connection.
X2
For digital I/O connection (I1 through I16 and O1 through O8).
X3
For probe connection.
X4
For analog spindle connection.
X5
For electronic handwheel connection.
X6
For Operator Panel connection.
X7
For digital output connection (O33 to O48).
X8
For axis analog voltage connection.
X9
For digital input connection (I65 to I88).
X10
For feedback connection of the first axis.
X11
For feedback connection of the second axis.
X12
For feedback connection of the third axis.
COMPACT FLASH
Slot for the local hard disk (KeyCF).
Installation manual
Do not open this unit. Only personnel authorized by Fagor Automation may
open this module.
Do not handle the connectors with the unit connected to mains. Before doing
it, make sure that the unit is disconnected.
The machine manufacturer must comply with the EN 60204-1 (IEC-204-1)
standard in terms of protection against electrical shock due to faulty I/O
contacts with external power supply.
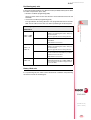
Board
Hardware protections
"Axes2" board
This "Axes2" board includes the recognition of the 24V at the
inputs and outputs. The recognition of the 24 V is available
from versions V9.1x (mill model) y and V10.1x (lathe model)
on. The "Axes2" board is compatible with previous software
versions, it will not recognize the 24V at the inputs and
outputs.
CNC structure
To know which is the axis board installed at the CNC, refer to Diagnosis >
Configuration > Hardware
1.
CNC CONFIGURATION
Hardware protections
Signal adapters
There are the following signal adapters.
SA-TTL-TTLD
Adapter for "Non-differential TTL" to "differential TTL" signals
SA-FS-P
Adapter for Fagor sinusoidal signals to Vpp signals
CNC 8035
(SOFT M: V11.1X)
(SOFT T: V12.1X)
5
Installation manual
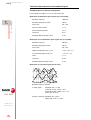
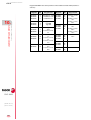
Technical characteristics of the feedback inputs
Feedback inputs for the axes and spindle
Power supply consumption of +5 V 1 A (250 mA per axis).
Work levels for differential square signal (axes and spindle).
CNC structure
CNC CONFIGURATION
1.
Maximum frequency:
1000 kHz.
Maximum gap between flanks:
460 ns.
Phase shift:
90º ± 20º.
Vmax in common mode:
± 7 V.
Vmax in differential mode:
± 6 V.
Hysteresis:
0,2 V.
Maximum differential input current:
3 mA.
Work levels for non-differential square signal (axes and spindle).
Maximum frequency:
400 kHz.
Maximum gap between flanks:
460 ns.
Phase shift:
90º ± 20º.
High threshold (logic level "1") VIH:
1.25 V < VIH < 7 V.
Low threshold (logic level "0") VIL:
-7 V < VIL < 1 V.
Vmax:
± 7 V.
Hysteresis:
0,25 V.
Maximum differential input current:
3 mA.
Work levels for sinusoidal signal (only for axes).
Maximum frequency: 500 KHz.
A and B signals
Amplitude: 0.6 ÷ 1.2 Vpp
Centered: |V1-V2| / 2 Vpp =< 6.5%
Relationship: VApp / VBpp = 0.8 ÷ 1.25
Phase shift: 90º ± 10º
CNC 8035
Reference mark (I0) Amplitude: 0.2 ÷ 0.85 V
Width: T-90º =< I0 =< T+180º
(SOFT M: V11.1X)
(SOFT T: V12.1X)
6
Installation manual
Feedback input for the handwheels
Power supply consumption of +5 V 1 A (250 mA per axis).
Work levels for differential square signal.
Maximum gap between flanks:
460 ns.
Phase shift:
90º ± 20º.
Vmax in common mode:
± 7 V.
Vmax in differential mode:
± 6 V.
Hysteresis:
0,2 V.
Maximum differential input current:
3 mA.
Work levels for non-differential square signal.
Maximum frequency:
200 kHz.
Maximum gap between flanks:
460 ns.
Phase shift:
90º ± 20º.
High threshold (logic level "1") VIH:
1.25 V < VIH < 7 V.
Low threshold (logic level "0") VIL:
-7 V < VIL < 1 V.
Vmax:
± 7 V.
Hysteresis:
0,25 V.
Maximum differential input current:
3 mA.
1.
CNC structure
200 kHz.
CNC CONFIGURATION
Maximum frequency:
CNC 8035
(SOFT M: V11.1X)
(SOFT T: V12.1X)
7
Installation manual
Connectors and connection
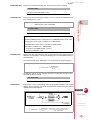
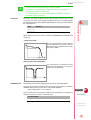
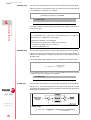
Power supply
3-prong male Phoenix connector, 7.65 mm pitch.
Pin
CNC structure
CNC CONFIGURATION
1.
Signal and function
1
+ 24 V
Power supply.
2
0V
Power supply.
3
Chassis
Shield.
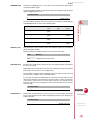
Use an independent external power supply with the following specifications:
Nominal voltage
20 V minimum
Ripple:
4V
Nominal current:
2A
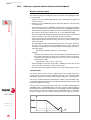
Current peak on power-up:
8A
30 V maximum
The central unit has a protection against overvoltage that activates at 36 V.
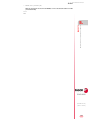
The supply current has the following shape on power-up:
CNC 8035
(SOFT M: V11.1X)
(SOFT T: V12.1X)
8
Installation manual
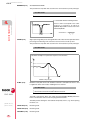
RS232
It is a 9-pin SUB-D type male connector to connect the RS 232 C serial port.
The cable shield must be connected to the metallic hood at each end.
Signal
1
DCD
2
RxD
3
TxD
4
DTR
5
GND ISO
6
---
7
RTS
8
CTS
9
---
All the pins of this connector are opto-isolated.
Cable length
EIA RS232C standards specify that the capacitance of the cable must not exceed
2500pF; therefore, since average cables have a capacitance between 130pF and
170pF per meter, the maximum length of the cable should not be greater than 15m
(49ft).
1.
CNC structure
Pin
CNC CONFIGURATION
Connector X1
Shielded cables with twisted-pair wires should be used to avoid communication
interference when using long cables.
Use shielded 7 conductor cable of 0.14 mm2 section.
Transmission speed
The CNC can operate at up to 115,200 Baud.
It is recommended to ground the unused pins in order to avoid erroneous control and
data signal interpretations.
Ground connection
It is suggested to reference all control and data signals to the same ground cable (pin
7 GND) thus, avoiding reference points at different voltages especially in long cables.
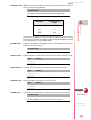
Recommended RS232C interface connection
Simplified connection
Full connection.
CNC 8035
(SOFT M: V11.1X)
(SOFT T: V12.1X)
9
Installation manual
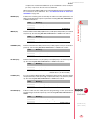
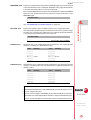
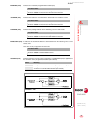
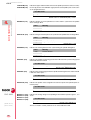
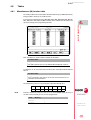
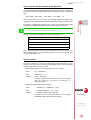
Connector X2
Digital inputs (I1 to I16) and digital outputs (O1 to O8)
It is a 37-pin normal density SUB-D type female connector.
Connect both 24V and 0V of the power supply used for these inputs and outputs must
be connected to pins 18 and 19 (for 0V) and pins 1 and 20 (for the 24V) of the
connector.
All shields must only be connected to ground at the CNC end through pin 37 of the
connector leaving the other end free. The wires of the shielded cables cannot be
unshielded for more than 75mm (about 3 inches).
CNC structure
CNC CONFIGURATION
1.
CNC 8035
(SOFT M: V11.1X)
(SOFT T: V12.1X)
10
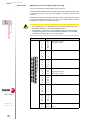
Since the response time of the emergency signal must be very short, the CNC
has assigned input I1 for this purpose; thus, the CNC will treat this input
immediately regardless of how the PLC program uses it.
The emergency output, which coincides with O1 of the PLC, will be activated
(change from logic level 1 to 0) when an ALARM or ERROR occurs at the CNC
or when the PLC output O1 is set to 0 (logic level 0).
Pin
Signal and function
1
24 V
2
O1
3
O3
4
O5
5
O7
6
---
7
---
8
---
9
---
10
I1
11
I3
12
I5
13
I7
14
I9
15
I11
16
I13
External power supply.
/ Emergency output.
17
I15
18
0V
External power supply.
19
0V
External power supply.
20
24 V
External power supply.
21
O2
22
O4
23
O6
24
O8
25
---
26
---
27
---
28
---
29
I2
30
I4
31
I6
32
I8
33
I10
34
I12
35
I14
36
I16
37
Chassis
Shield.
Installation manual
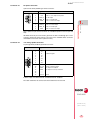
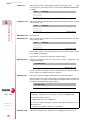
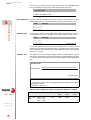
Connector X3
For probe connection
9-pin normal density SUB-D type female connector.
Signal and function
1
Chassis
2
+5 V
3
PRB1_5
5 V TTL input.
4
PRB1_24
Probe 1. 24 Vdc input.
5
GND
Probe 1. Probe's 0 V input.
6
+5 V
Probe 2. +5 V output for the probe.
7
PRB2_5
Probe 2. 5 V TTL input.
8
PRB2_24
Probe 2. 24 Vdc input.
9
GND
Shield.
Probe 1. +5 V output for the probe.
Up to 2 probes may be connected. There are 2 feedback inputs for each one (5V and
24V).
All shields must only be connected to ground at the CNC end through pin 1 of the
connector leaving the other end free. The wires of the shielded cables cannot be
unshielded for more than 75mm (about 3 inches).
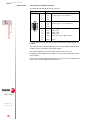
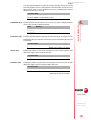
Connector X4
CNC structure
Probe 2. Probe's 0 V input.
1.
CNC CONFIGURATION
Pin
For analog spindle connection
15-pin high density SUB-D type female connector.
Pin
Signal and function
1
A
2
/A
3
B
4
/B
5
I0
6
/ I0
7
AL
8
/AL
Feedback signals.
9
+5 V
+5 V output for feedback.
10
ana_out
Velocity command output.
11
GND
0 V output for feedback.
12
GND
0 V output for velocity command.
13
---
14
---
15
Chassis
Shield.
It admits 1Vpp, non-differential TTL and differential TTL feedback.
The cable shield must be connected to the metallic hood at each end.
CNC 8035
(SOFT M: V11.1X)
(SOFT T: V12.1X)
11
Installation manual
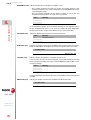
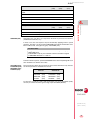
Connector X5
For electronic handwheel connection
15-pin high density SUB-D type female connector.
Pin
CNC structure
CNC CONFIGURATION
1.
Signal and function
1
A1
2
/A1
3
B1
4
/B1
5
A2
6
/A2
7
B2
8
/B2
Feedback signals of first handwheel.
Feedback signals of second handwheel.
9
+5 V
Supply output.
10
+5 V
Supply output.
11
GND
Supply output.
12
GND
Supply output.
13
100P
Push button of Fagor 100P handwheel.
14
---
15
Chassis
Shield
It admits differential (double-ended) and non-differential (single-ended) TTL
feedback.
The cable must have overall shielding. The rest of the specifications depend on the
feedback system used and the cable length required.
The cable shield must be connected to the metallic hood at each end.
It is highly recommended to run these cables as far as possible from the power cables
of the machine.
When using a FAGOR 100P model handwheel, connect it as first handwheel and
connect the axis selecting signal (button) to pin 13.
CNC 8035
(SOFT M: V11.1X)
(SOFT T: V12.1X)
12
Installation manual
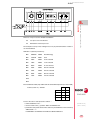
Digital outputs (O33 to O48)
It is a 37-pin normal density SUB-D type female connector.
Connect both 24V and 0V of the power supply used for these inputs and outputs must
be connected to pins 18 and 19 (for 0V) and pins 1 and 20 (for the 24V) of the
connector.
All shields must only be connected to ground at the CNC end through pin 37 of the
connector leaving the other end free. The wires of the shielded cables cannot be
unshielded for more than 75mm (about 3 inches).
Signal and function
1
24 V
2
O33
3
O35
4
O37
5
O39
6
O41
7
O43
8
O45
9
O47
10
---
11
---
12
---
13
---
14
---
15
---
16
---
17
---
18
0V
External power supply.
19
0V
External power supply.
20
24 V
External power supply.
21
O34
22
O36
23
O38
24
O40
25
O42
26
O44
27
O46
28
O48
29
---
30
---
31
---
32
---
33
---
34
---
35
---
36
---
37
Chassis
External power supply.
1.
CNC structure
Pin
CNC CONFIGURATION
Connector X7
Shield.
CNC 8035
(SOFT M: V11.1X)
(SOFT T: V12.1X)
13
Installation manual
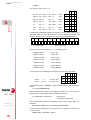
Connector X8
For connecting the outputs for the velocity command of the axes
9-pin normal density SUB-D type female connector.
Pin
CNC structure
CNC CONFIGURATION
1.
CNC 8035
(SOFT M: V11.1X)
(SOFT T: V12.1X)
14
Signal and function
1
Chassis
Shield.
2
Cons 1
Velocity command output for the first axis.
3
Cons 2
Velocity command output for the second axis.
4
Cons 3
Velocity command output for the third axis.
5
Cons 4
Not being used
6
GND
7
GND
8
GND
9
GND
Analog voltage reference signals.
The cable shield must be connected to the metallic hood at each end.
The axis nomenclature is set when setting machine parameters AXIS1 (P0) to AXIS4
(P3).
Installation manual
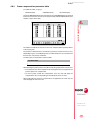
Digital inputs (I65 to I88)
It is a 37-pin normal density SUB-D type male connector.
Connect the 0V of the power supply used for these inputs to pins 18 and 19 (for 0V)
of the connector.
All shields must only be connected to ground at the CNC end through pin 37 of the
connector leaving the other end free. The wires of the shielded cables cannot be
unshielded for more than 75mm (about 3 inches).
1.
Signal and function
1
---
2
I65
3
I67
4
I69
5
I71
6
I73
7
I75
8
I77
9
I79
10
I81
11
I83
12
I85
13
I87
14
---
15
---
16
---
17
---
18
0V
External power supply.
19
0V
External power supply.
20
---
21
I66
22
I68
23
I70
24
I72
25
I74
26
I76
27
I78
28
I80
29
I82
30
I84
31
I86
32
I88
33
---
34
---
35
---
36
---
37
Chassis
CNC structure
Pin
CNC CONFIGURATION
Connector X9
Shield.
CNC 8035
(SOFT M: V11.1X)
(SOFT T: V12.1X)
15
Installation manual
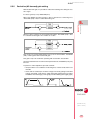
Connectors X10, X11, X12.
Feedback inputs for the axes
X10
For feedback connection of the first axis.
X11
For feedback connection of the second axis.
X12
For feedback connection of the third axis.
15-pin high density SUB-D type female connectors.
Pin
CNC structure
CNC CONFIGURATION
1.
Signal and function
1
A
2
/A
3
B
4
/B
5
I0
6
/ I0
7
AL
8
/AL
9
+5 V
10
+5 V
11
GND
12
GND
13
100P
14
---
15
Chassis
Feedback signals.
Voltage supply for the feedback system.
Shield
Admits differential TTL and 1Vpp sinusoidal feedback.
The cable shield must be connected to the metallic hood at each end.
Protection at the connectors
It detects over-currents or short-circuits at the feedback of the handwheels, spindle
and probe and it issues the relevant error message.
CNC 8035
(SOFT M: V11.1X)
(SOFT T: V12.1X)
16
Installation manual
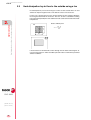
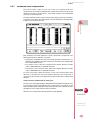
Slot "CMPCT FLASH
Compartment of the Key Compact Flash (KeyCF card for CNC configuration)
The CMPCT FLASH slot is located on the left side of the CNC.
Slot "CMPCT FLASH"
KeyCF card for CNC configuration
CNC structure
CNC CONFIGURATION
1.
This slot is used for the KeyCF that may be used to update the software versions
among other operations.
The KeyCF supplied by Fagor with each CNC has an identification code
corresponding to:
• The card id (all the cards are different).
• The software features that have been purchased for that unit
The id code only needs very little memory space. The rest of memory space of the
KeyCF may be used to store data on machine customizing (user screens, PLC
program backup and/or machine parameters, etc.) as well as user part-programs.
The KeyCF cannot be accessed manually from the outside, but it can via DNC. The
CNC will recognize it as <Hard Disk>. This may be observed by accessing the left
panel of the <explorer>.
CNC 8035
(SOFT M: V11.1X)
(SOFT T: V12.1X)
17
Installation manual
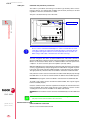
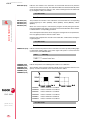
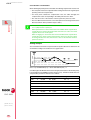
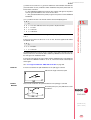
"USB" port
USB hard disk (Pen Drive) connection.
The USB 1.1 port admits connecting a "Pen Drive" type memory device. These
memory devices are commercially available (off-the-shelf) and they're all valid
regardless of their size, brand name or model.
This port is located in the top rear of the CNC.
1.
E
X8
X7
CNC structure
CNC CONFIGURATION
"USB 1.1" port
X1
C
+24V
0V
A
B
X9
X10
X11
X12
X2
X3
X4
X5
X6
D
Do not connect a multi-hub USB adapter to connect several devices at the
same time. It will only recognize the first Pen Drive that is connected. Nor will
it recognize other types of devices such as keyboards, mice, recorders, etc.
When using a USB cable, it should not be more than 3 m long.
The CNC recognizes this device as USB Hard Disk. Even if the CNC is turned on,
when the USB device is either inserted or extracted, it will be recognized immediately.
When it is connected, it will be shown as <USB hard disk> on the left panel of the
<explorer>. To see its contents, press the <update> (refresh) softkey.
Within the USB device, the CNC will only recognize files with extensions *fgr (software
version), *fpg (FPGA files) and part-programs. The CNC will not recognize any other
type of file. Check it by selecting <USB hard disk> on the left panel of the explorer.
The right panel only shows the files stored with the extensions mentioned earlier.
Only software versions can be transferred to the CNC's hard disk (KeyCF) through
this USB device. It can also be transferred from the USB to the hard disk (KeyCF).
WARNING:Part-programs cannot be edited or executed from the USB hard disk.
To install a new software version stored in the USB hard disk, first copy the *fgr file
into the hard disk (KeyCF).
Once the software version has been copied into the KeyCF, the transferred version
may be installed. This is done using the tools of the <explorer>. See the section
"Loading the version from the hard disk" in the 8035 CNC manual.
WARNING:A new software version cannot be installed directly from the USB hard
disk.
CNC 8035
i
(SOFT M: V11.1X)
(SOFT T: V12.1X)
From versions V11.1x and V12.1x on, the CNC will manage the hard disk
(KeyCF) and the USB hard disk at the same time.
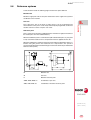
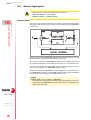
Communications board
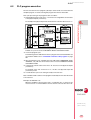
CAN and Ethernet connection
There is a new communications board:
18
Installation manual
CAN - Ethernet:
CAN
ser vo
Ethernet
• CAN servo system bus.
• Ethernet bus
Ethernet
CNC configuration in a local network
The Ethernet option permits configuring the CNC as another node within the local
area network. This makes it possible to communicate with other PC's to transfer files
or carrying out telediagnostic tasks.
CNC structure
This board has the following connections:
CNC CONFIGURATION
1.
Use a standard shielded 10BASE-T cable for this connection. It must not be longer
than 100 meters.
Once the connection to Ethernet has been configured, the following types of
connections are possible:
• PC connection through WinDNC (it requires WinDNC version 4.0 or higher).
• Connection from a PC through an FTP client.
• Connection to a remote hard disk.
Remote hard disk
The Ethernet connection may be used to use a PC directory (server) as a hard disk.
This memory space may be shared by several CNC's or each may have its own
memory space.
The interface and the softkeys of the CNC will the same as if it were a local hard disk.
When accessing the CNC through WinDNC or FTP, the remote hard disk behaves
like a local hard disk.
The remote hard disk is configured by machine parameters. The PC that makes its
hard disk (server) public must be connected to the local network.
i
The NFS protocol is used to communicate with the remote hard disk. This
protocol must be available at the PC that is used as server.
CNC 8035
(SOFT M: V11.1X)
(SOFT T: V12.1X)
19
Installation manual
DIGITAL DRIVES
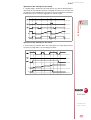
Digital CAN servo
Digital servo is being used to communicate with Fagor drives.
• CAN field bus and standard CanOpen communication protocol.
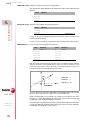
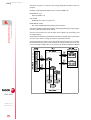
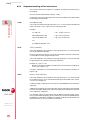
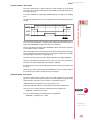
Module identification at the bus
Each one of the elements integrated into the CAN bus is identified by the 16-position
rotary switch (0-15) "Address" (also referred to as "Node_Select"). This rotary switch
selects the address (node) occupied by each element integrated in the bus.
CNC structure
CNC CONFIGURATION
1.
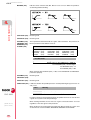
Although the switch has 16 positions, only positions 1 through 8 are valid. The CNC
does not have a switch, The drives occupy consecutive positions (recommended)
starting from ·1·.
The corresponding drive must be turned off and back on (or press the Reset button)
for the address change to be assumed.
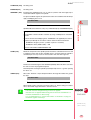
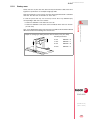
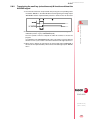
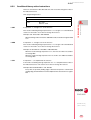
The "Line_Term" switch
The "Line_Term" switch identifies which are the elements that occupy the ends of the
CAN bus; i.e. the first and last physical element in the connection.
The central unit must always be at one end of the line. The other end will be the last
one of the remote module groups.
The switch position of the terminating elements must be "1" and that of the rest of
the elements "0". The CNC does not have a switch and always has the terminating
resistor activated.
Characteristics of the CAN cable
Use a specific CAN cable. The ends of all the wires and the shield must be protected
by the corresponding pin. Also use the pins to secure the cable to the connector.
Type:
Shield. Twisted pairs (1 x 2 x 0,22 mm2).
Flexibility:
Superflexible. Minimum static bending radius of 50 mm and
a dynamic radius of 95 mm.
Cover:
PUR
Impedance:
Cat.5 (100 Ω - 120 Ω)
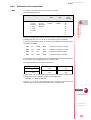
CAN connector pinout
5-pin male Phoenix minicombicon connector (3.5 mm pitch).
Pin
CNC 8035
(SOFT M: V11.1X)
(SOFT T: V12.1X)
Pin
ISO GND
1
1
CAN L
2
2
SHIELD
3
3
CAN H
4
4
SHIELD
5
5
Signal
Description
ISO GND
Ground / 0 V.
CAN L
Bus signal (LOW).
SHIELD
CAN shield.
CAN H
Bus signal (HIGH).
SHIELD
CAN shield.
The connector has two shield pins. Both pins are equivalent; the CAN shield may be
connected to either one.
20
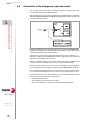
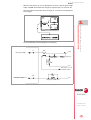
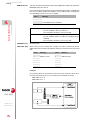
Installation manual
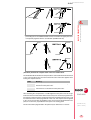
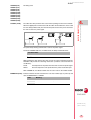
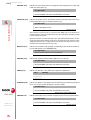
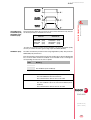
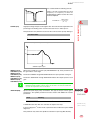
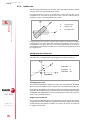
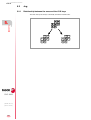
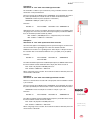
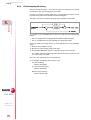
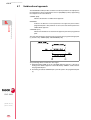
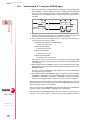
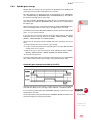
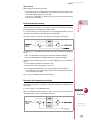
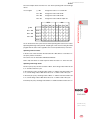
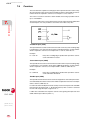
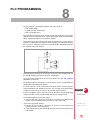
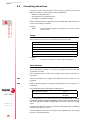
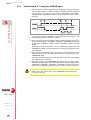
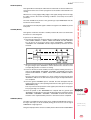
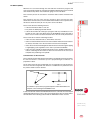
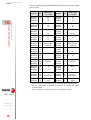
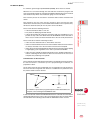
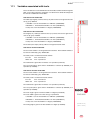
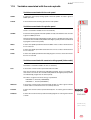
Interconnection of modules
It is connected in series. The figure shows the CAN connection between the central
unit and 2 drives.
DRIVE MODULE 1
DRIVE MODULE 2
BCD
SHIELD
SHIELD
SHIELD
CAN H
CAN H
SHIELD
CAN H
SHIELD
CAN L
SHIELD
CNC structure
78 9
34 5
ISO GND
CNC CONFIGURATION
0 1
ISO GND
CAN L
CAN L
1.
Line Term = 1
0 1
ISO GND
F0 1
F0 1
Line Term = 0
ADDRESS = 2
78 9
B CD
ADDRESS = 1
34 5
CNC
CNC 8035
(SOFT M: V11.1X)
(SOFT T: V12.1X)
21
Installation manual
CNC structure
CNC CONFIGURATION
1.
CNC 8035
(SOFT M: V11.1X)
(SOFT T: V12.1X)
22
HEAT DISSIPATION
2
The temperature of the enclosure for the central unit must not exceed 45 ºC (113 ºF)
while the unit is running. To ensure that this temperature is not exceeded, the
enclosure must have enough surface to evacuate the heat generated inside and
maintain the ambient conditions within the working temperature range.
Calculating the surface needed to dissipate the heat
The expressions have been obtained for an enclosure whose walls are 2 mm thick
and is made out of aluminum. When using internal cooling, the fan is located at 30
mm from the bottom.
To calculate the required total surface of the enclosure in order to dissipate the heat
generated in it, the following data must be taken into account.
A
Ti
Ta
Q
P
30mm
A
(m2)
Total surface required.
P
(W)
Total power dissipated by all the elements that generate heat
inside the enclosure, including the power supply and the fan if
there is one.
Ta
(ºC)
Ambient temperature outside the enclosure.
Ti
(ºC)
Temperature inside the enclosure.
∆t
(ºC)
Temperature difference (Ti-Ta).
Q
(m3/h)
Air flow provided by the fan, if there is one.
Dissipating surface
Only the top and rear of the enclosure are considered as convection heat dissipating
surfaces. The rest of the surfaces will not be considered in the total surface.
Power dissipated by the CNC
CNC 8035
The maximum power dissipated by the CNC is 55 W, power supply not included.
(SOFT M: V11.1X)
(SOFT T: V12.1X)
23
Installation manual
2.1
Heat dissipation by natural convection
Surface without paint.
Ta
A
Ti
P
HEAT DISSIPATION
Heat dissipation by natural convection
2.
CNC 8035
(SOFT M: V11.1X)
(SOFT T: V12.1X)
24
P
A = -------------5 ⋅ ∆T
Surface with smooth metallic enamel.
P
A = -----------------5,7 ⋅ ∆T
Installation manual
Heat dissipation by forced convection with inside fan
Fan whose air flow is Q = 13.6 m3/h facing down.
Surface without paint.
Ta
A
Ti
P
P
A = -----------------5,6 ⋅ ∆T
2.
P
A = -----------------7,6 ⋅ ∆T
Fan whose air flow is Q = 13.6 m3/h facing up.
Surface without paint.
Ta
A
Ti
P
A = -----------------5,8 ⋅ ∆T
P
HEAT DISSIPATION
Surface with smooth metallic enamel.
Heat dissipation by forced convection with inside fan
2.2
Fan whose air flow is Q = 30 m3/h facing down.
Surface without paint.
Ta
A
Ti
P
P
A = -------------------6,75 ⋅ ∆T
Surface with smooth metallic enamel.
P
A = -----------------9,1 ⋅ ∆T
Fan whose air flow is Q = 102 m3/h facing down.
Surface without paint.
Ta
A
Ti
P
P
A = -----------------7,5 ⋅ ∆T
Surface with smooth metallic enamel.
P
A = -----------------9,8 ⋅ ∆T
CNC 8035
(SOFT M: V11.1X)
(SOFT T: V12.1X)
25
Installation manual
2.3
Heat dissipation by air flow to the outside using a fan
Heat dissipation by convection forcing hot air flow to flow outside with a fan and
ambient air input through the holes of the bottom surface of the enclosure.
For this case, calculate the necessary air flow that the fan must supply to dissipate
the heat generated inside the enclosure. The fan's air flow is calculated according
to the power dissipated by the CNC and the fan itself as well as the inside and outside
temperatures.
2.
CNC 8035
(SOFT M: V11.1X)
(SOFT T: V12.1X)
26
V
40
HEAT DISSIPATION
Heat dissipation by air flow to the outside using a fan
Surface without paint.
Ø6
3,8 ⋅ P= -------------∆T
40
It must be borne in mind that this air flow through the unit allows extracting hot air
out, but it may let dust in. A filter should be placed in order to maintain the permitted
ambient conditions.
MACHINE AND POWER
CONNECTION
3
Power switch.
• This power switch must be mounted in such a way that it is easily accessed
and at a distance between 0.7 meters (27.5 inches) and 1.7 meters (5.5ft)
off the floor.
Install this unit in the proper place.
• It is recommended to install the CNC away from coolants, chemical
products, possible blows etc. which could damage it.
Mains connection of the central unit
The "Central Unit + Monitor" set has a three-prong male Phoenix connector with a
7.62 mm pitch.
Pin
Signal and function
1
+24 V
Power supply.
2
0V
Power supply.
3
Chassis
Shield.
Use an independent external power supply with the following specifications:
Nominal voltage:
20 V minimum
Ripple:
4V
Nominal current:
2A
Current peak on power-up:
8A
30 V maximum
The central unit has a protection against overvoltage that activates at 36 V.
CNC 8035
(SOFT M: V11.1X)
(SOFT T: V12.1X)
27
Installation manual
The supply current has the following shape on power-up:
MACHINE AND POWER CONNECTION
3.
Machine connection
The machine tool must have decoupled all those elements capable of generating
interference (relay coils, contactors, motors, etc.)
• DC relay coils.
Diode type 1N4000.
• AC relay coils.
RC connected as close as possible to the coils. Their approximate values should
be:
R 220 Ω / 1 W
C 0.2 µF / 600 V
• AC motors.
RC connected between phases with values:
R 300 Ω / 6 W
C 0.47 µF / 600 V
Ground connection
It is imperative to carry out a proper ground connection in order to achieve:
• Protection of anybody against electrical shocks caused by a malfunction.
• Protection of the electronic equipment against interference generated by the
proper machine or by other electronic equipment near by which could cause
erratic equipment behavior.
Thus, it is essential to connect all metallic parts to a point and it to ground in order
to achieve this. Therefore, it is crucial to install one or two ground points where the
above mentioned elements must be connected.
Use large section cables for this purpose in order to obtain low impedance and
efficiently avoid any interference. This way all parts of the installation will have the
same voltage reference.
CNC 8035
Proper ground installation reduces the effects of electrical interference. But, signal
cables also require additional protections. This is generally achieved by using twistedpair cables that are also covered with antistatic shielding mesh-wire. This shield must
be connected to a specific point avoiding ground loops that could cause undesired
effects. This connection is usually done at one of CNC’s ground point.
Each element of the machine-tool/CNC interface must be connected to ground via
the established main points. These points will be conveniently set close to the
machine-tool and properly connected to the general ground (of the building).
(SOFT M: V11.1X)
(SOFT T: V12.1X)
When a second point is necessary, it is recommended to join both points with a cable
whose section is no smaller than 8 mm2.
Verify that the impedance between the central point of each connector housing and
the main ground point is less than 1 Ω.
28
Installation manual
Ground connection diagram
MACHINE AND POWER CONNECTION
3.
Chassis
Ground
Protection ground (for safety)
CNC 8035
(SOFT M: V11.1X)
(SOFT T: V12.1X)
29
Installation manual
3.1
Digital inputs and outputs
Digital outputs
The CNC system offers a number of optocoupled digital PLC outputs which can be
used to activate relays, deacons, etc.
The electrical characteristics of these outputs are:
Digital inputs and outputs
MACHINE AND POWER CONNECTION
3.
Nominal voltage value
+24 Vdc.
Maximum voltage value
+30 V.
Minimum voltage value
+18 V.
Output voltage
2 V less than the supply voltage.
Maximum output current
100 mA
All outputs are protected by means of:
• Galvanic isolation by optocouplers.
• The CNC has protection against short-circuits, overvoltage of the external power
supply (over 33 Vdc) and against reverse connection of the power supply (up to
–30 Vdc).
Digital inputs
The digital PLC inputs offered by the CNC system are used to read external devices,
etc.
The electrical characteristics of these inputs are:
Nominal voltage value
+24 Vdc
Maximum voltage value
+30 Vdc
Minimum voltage value
+18 Vdc
High threshold voltage (logic level 1)
from +18 V up.
Low threshold voltage (logic level 0)
Under +5 V
Typical consumption for each input
5 mA.
Maximum consumption for each input
7 mA.
All inputs are protected by means of:
• Galvanic isolation by optocouplers.
• Protection against reversal of power supply connection up to -30 V.
The external 24Vdc power supply used for the PLC’s inputs and outputs
MUST be regulated.
CNC 8035
(SOFT M: V11.1X)
(SOFT T: V12.1X)
30
The 0V point of this power supply must be connected to the main ground point
of the electrical cabinet.
Installation manual
Analog inputs and outputs.
Analog outputs
They may be used with axis and spindle drives. The electrical characteristics of these
outputs are:
±10 V.
Minimum impedance of the connected drive:
10 Kw.
Maximum cable length without shield:
75 mm.
Shielded cables should be used connecting the shield at each connector as shown
here. See chapter "1 CNC configuration".
It is recommended to adjust the servo drives so the maximum feedrate (G00)
is obtained at a velocity command of +9.5V .
3.
Analog inputs and outputs.
Analog voltage range:
MACHINE AND POWER CONNECTION
3.2
CNC 8035
(SOFT M: V11.1X)
(SOFT T: V12.1X)
31
Installation manual
3.3
Setup
General considerations
Inspect the whole electrical cabinet verifying the ground connections BEFORE
powering it.
This ground connection must be done at a single machine point (Main Ground Point)
and all other ground points must be connected to this point.
Setup
MACHINE AND POWER CONNECTION
3.
The power supply used for the digital inputs and outputs must be regulated and its
zero volts must be connected to the main ground point.
Check the connection of the cables and connectors. DO NOT connect or disconnect
these cables to/from the CNC when the CNC is on.
Without powering the electrical cabinet on, check all the pins of the connectors for
short-circuits.
Precautions
It is recommended to reduce the axis travel installing the limit switches closer to each
other or detaching the motor from the axis until they are under control.
Verify that there is no power going from the servo drives to the motors.
Verify that the connectors for the digital inputs and outputs are disconnected.
Verify that the E-STOP button is pressed.
Connection
Verify that the A.C. power is correct.
With the CNC completely disconnected from the electrical cabinet, power the
electrical cabinet and verify that it responds properly:
Verify that there is proper voltage between the pins corresponding to external 0V and
24V of the connectors for the digital inputs and outputs.
Apply 24V to each one of the terminals of the electrical cabinet being used that
correspond to the digital outputs of the CNC and verify their correct performance.
Check that the electrical cabinet responds properly.
With the motors being decoupled from the axes, verify that the system consisting of
drive, motor and tacho is operating properly.
Connect the A.C. power to the CNC. If there is any problem, the CNC will display the
corresponding error.
Select the PLC monitoring mode at the CNC and activate the digital outputs (O1=1)
one by one to verify their proper operation.
CNC 8035
With power turned off, connect the I/O and feedback connectors to the CNC.
Connect the CNC and the electrical cabinet to A.C. power and confirm the counting
direction of each axis.
(SOFT M: V11.1X)
(SOFT T: V12.1X)
32
Installation manual
Introduction to machine parameters
The machine parameters relate the CNC to the particular machine. The values that
the CNC assigns to each one of them by default are described in the relevant chapter.
See chapter "4 Machine parameters".
These values, shown in the parameter tables, may be modified manually from the
CNC’s keyboard or from a peripheral (cassette reader, floppy disk reader, computer,
etc.) via the RS 232C serial line.
It is necessary to press the keystroke sequence: "Shift - Reset" or turn
the CNC off and back on.
/
Just press Reset.
The rest of the parameters (those unmarked) will be updated
automatically, only by changing them.
Setting of the machine parameters for the axes
Once the active axes have been assigned by means of g.m.p. “AXIS1” (P0) thru
“AXIS8” (P7), the CNC will enable the relevant axes parameter tables.
The values to be assigned to the parameters of each of these tables will depend on
the results obtained when adjusting each machine axis.
MACHINE AND POWER CONNECTION
//
Setup
3.
Some characters appear next to certain parameters indicating when the CNC
assumes the new value assigned to that parameter.
Before making this adjustment, position the axes near the middle of their travel and
place the hard stops (monitored by the electrical cabinet) near these mid-travel points
in order to prevent any possible damage to the machine.
Verify that the PLC Mark “LATCHM” is OFF. Then, after selecting the parameters of
the desired axes, go on to adjusting them following these advises:
• Adjust the axes one by one.
• Connect the power output of the drive corresponding to the axis being adjusted.
• Selecting the Jog mode at the CNC, jog the axis to be adjusted.
In case of runaway, the CNC will display the relevant following error and the
machine parameter labelled LOOPCHG (corresponding to the sign of the analog
output of the CNC) will have to be changed.
• If the axis does not run away; but the direction of the move is not the desired one,
parameters labelled AXISCHG (P13) (axis feedback counting direction) and
LOOPCHG (P26) (sign of the analog output) will have to be changed.
Machine reference point (home) adjustment for each axis
Once the movement of the axes has been properly adjusted, place the travel-limit
switches back where they should be.
CNC 8035
(SOFT M: V11.1X)
(SOFT T: V12.1X)
33
Installation manual
The following adjusting sequence is one of the many that could be used:
• This adjustment should be done one axis at a time.
• Indicate in the a.m.p. REFPULSE (P32) the type of marker pulse Io being used
for Home Search.
• Set a.m.p. REFDIREC (P33) to indicate the direction of the axis when searching
Home.
• Set g.m.p. REFEED1 (P34) and REFEED2 (P35) to indicate the feedrates for
Home search.
3.
Setup
MACHINE AND POWER CONNECTION
• a.m.p. REFVALUE (P36) will be set to “0”.
• Once in the JOG mode and after positioning the axis in the right area, start homing
the axis. When done, the CNC will assign a "0" value to this point.
• If the machine reference zero is in a different physical location from the machine
reference point (location of the marker pulse), proceed as follows:
After moving the axis to a known position (with respect to Machine Reference
Zero), observe the position reading of the CNC for that point.
This will be the distance away from the machine reference point; thus, the value
to be assigned to a.m.p. REFVALUE (P36) will be:
Machine coordinate of the measured point - CNC reading at that point.
Example:
If the point whose known position is located 230 mm from Machine Reference
Zero and the CNC reads -123.5 mm as the coordinate value for this point, the
coordinate of the Machine Reference Point with respect to Machine Reference
Zero will be:
REFVALUE = 230 - (-123.5) = 353.5 mm.
Assign this new value and press [RESET] so it is assumed by the CNC.
It is also necessary to search Home once again in order for this axis to assume
the correct reference values.
Axis travel limits (software limits)
Once all the axes have been referenced, their software limits must be measured and
set.
This is achieved a single axis at a time as follows:
• Move the axis in the positive direction towards the end of the axis travel stopping
at a safe distance from the mechanical end-of-travel stop.
• Assign the coordinate shown by the CNC for that point to a.m.p. LIMIT+ (P5).
• Repeat these steps in the negative direction assigning the resulting coordinate
to a.m.p. LIMIT- (P6).
• Once this process is completed, hit SHIFT RESET or turn the CNC off and back
on in order for it to assume the new values.
CNC 8035
(SOFT M: V11.1X)
(SOFT T: V12.1X)
34
Installation manual
Adjustment of the drift (offset) and maximum feedrate (G00)
These adjustments are performed on servo drives of the axes and on spindle drives.
Offset (drift) adjustment
Disconnect the analog input and short-circuit it with a wire jumper.
Turn the offset potentiometer of the drive until the voltage on the tach terminals is
0mVdc. Check this with a volt meter set at a range of 200 mV.
It is recommended to adjust the drives so the maximum feedrate is obtained with an
analog signal of 9.5V. If they are adjusted to a different voltage, it must be indicated
in the a.m.p. or s.m.p. MAXVOLT (P37).
Also, the maximum feedrate must be indicated in the a.m.p. G00FEED (P38).
The maximum feedrate can be calculated from the motor rpm, the gear ratios and
the type of leadscrew being used.
Example:
A motor can turn at 3000 rpm and it is attached to a 5 pitch screw (5 mm/turn).
The maximum feedrate will be:
MACHINE AND POWER CONNECTION
Maximum feedrate adjustment
Setup
3.
Remove take the wire jumper that short-circuited the analog input.
3000 rpm x 5 mm/turn = 15000 mm/minute
This will be the value to be assigned to a.m.p. G00FEED (P38).
Once these values are assigned to the relevant parameters, the drives must be
adjusted.
To do so, a CNC program can be executed which will move the axis back and forth
continuously at G00 feedrate. One such program could be:
N10 G00 G90 X200
X-200
(GOTO N10)
If the Tach in use provides 20V per 1000 rpm, its voltage should be:
(20 V / 1000 rpm) x 3000 rpm. = 60 V
CNC 8035
(SOFT M: V11.1X)
(SOFT T: V12.1X)
35
Installation manual
3.4
Connection of the emergency input and output
The emergency input of the CNC corresponds with the PLC input I1 (pin 10 of
connector X2) and must be supplied with 24V.
Since the CNC also processes this signal directly, if the 24V disappear, the CNC will
display EXTERNAL EMERGENCY ERROR and will deactivate all axes enables and
will cancel all analog outputs.
MACHINE AND POWER CONNECTION
Connection of the emergency input and output
3.
During the initializing process carried out by the CNC on power-up, the EMERGENCY
OUTPUT of the CNC (pin 2 of connector X10) remains at low (at “0”) in order to avoid
a premature activation of the electrical cabinet.
If this process is successful, the CNC will set the real value of PLC output O1 to “1”.
Otherwise, it will keep the /EMERGENCY OUTPUT signal active (low) and it will
display the corresponding error message.
Once the initialization process is over, the PLC will execute the PLC program stored
in memory. If none is available, it wait for one to be entered and executed.
When the execution of the first cycle (CY1) (or the first program scan) is finished the
PLC will assign the value of output O1 to physical output “/EMERGENCY OUTPUT”.
It is recommended to program the CY1 cycle of the PLC program assigning a value
of 1 to O1 when everything checks out fine and a value of 0 when there is an error.
The interface of the electrical cabinet will take into account all the elements that could
cause this type of error. Among such elements are:
• E-stop has been pressed.
• The travel limit of any axis has be exceeded.
• There is a malfunction on a drive or it is locked without analog signal.
CNC 8035
(SOFT M: V11.1X)
(SOFT T: V12.1X)
36
Installation manual
When the CNC detects an error, it will indicate it to the PLC with the general logic
output “/ALARM" and it will set the emergency output low (pin 2 of connector X2).
Since this signal corresponds to the PLC output O1, it can also be activated by the
PLC program.
MACHINE AND POWER CONNECTION
The recommended connection diagram is the following:
I1
RE
Connection of the emergency input and output
3.
24 V
Emergency STOP
RSE
Emergency
STOP button
Other emergency
buttons
RE
0V
Emergency from
electrical cabinet
O1
RSE
0V
Emergency output
Emergency STOP relay
CNC 8035
(SOFT M: V11.1X)
(SOFT T: V12.1X)
37
38
MACHINE AND POWER CONNECTION
Connection of the emergency input and output
Installation manual
3.
CNC 8035
(SOFT M: V11.1X)
(SOFT T: V12.1X)
MACHINE PARAMETERS
i
4
It is recommended to save the CNC machine parameters into the memkey
card (CARD A) or in a peripheral or PC to avoid losing them.
On power-up, the CNC performs a system autotest and when this is over, it displays
the following screen:
Report window.
The CNC allows the display of a previously defined screen instead of the Fagor logo.
Refer to the operation manual.
During the autotest, if any error occurs, its relevant message will be displayed in the
report window.
The main menu for the various operating modes will appear at the bottom of the CRT.
These options will be selected using the softkeys F1 through F7.
Since it is possible to have more than 7 options to choose from at one time, use the
“+” softkey to display the rest of them.
Once the “Machine Parameters” operating mode has been selected, the CNC shows
the machine parameter tables that are saved in the memkey card (CARD A).
CNC 8035
(SOFT M: V11.1X)
(SOFT T: V12.1X)
39
Installation manual
The available machine parameter tables are:
• General machine parameters.
• Machine parameters for the axes (one table per axis)
• Spindle parameters.
• Serial line parameters.
• PLC Parameters.
• Auxiliary (miscellaneous) M functions.
• Leadscrew backlash Compensation (one table per axis).
4.
MACHINE PARAMETERS
• Cross compensation.
To access each one of them, use the softkeys shown at the bottom of the screen.
Some characters appear next to certain parameters indicating when the CNC
assumes the new value assigned to that parameter.
Character
Type of update
//
It is necessary to press the keystroke sequence: [SHIFT] +
[RESET] or turn the CNC off and back on.
/
Just do a reset.
The rest of the parameters (those unmarked) will be updated
automatically, only by changing them.
On each table, it is possible to move the cursor line by line using the [©] [ª] keys or
page by page using the Page-up and Page-down keys.
Abbreviations used in this manual
The manual uses the following abbreviations to identify the type of machine
parameter.
Abbreviation
Machine parameter
Example
g.m.p.
General machine parameter.
g.m. p. CUSTOMTY (P92)
a.m.p.
Axis machine parameter.
a.m.p. AXISTYPE (P0)
s.m.p.
Spindle machine parameter.
s.m.p. MAXGEAR1 (P2)
plc.m.p.
PLC machine parameter.
plc.m.p. WDGPRG (P0)
Operation with parameter tables
Once one of the table lines has been selected, the user can move the cursor over
this line by means of the [§] [¨] keys .
It is also possible to perform other functions by using the following keys:
Key
Function
[CL]
Deletes characters.
[INS]
Switches between insert and overwrite (replace) writing modes.
[CAP]
Switches between upper case and lower case letters; when the CRT shows CAP,
it will indicate that the upper case mode has been selected.
CNC 8035
(SOFT M: V11.1X)
(SOFT T: V12.1X)
40
Make sure this mode is selected since all characters entered in these tables must
be upper case.
[ESC]
Quits line editing.
[ENTER]
Assumes the edited line and ends the editing of the line.
Installation manual
The CNC offers the following options when working with each parameter of these
tables:
EDIT
Edit a parameter. The CNC will indicate the proper format by
means of the softkeys.
MODIFY
Modify a parameter. Position the cursor on the desired
parameter and press the Modify softkey.
Once the modification is done, press [ENTER] for the CNC to
assume the new value.
Look for a parameter. The cursor will be positioned over the
indicated parameter. With this function it is also possible to
“find” the beginning or the end of the table.
INITIALIZE
Initialize the table assuming the default values.
LOAD
Load into memory the tables saved in the memkey card (CARD
A), a peripheral device or a PC.
SAVE
Save the tables into the memkey card" (CARD A), a peripheral
device or a PC.
MM/INCHES
See the parameter values in the desired units. Only those
parameters affected by this conversion will be altered. It will not
change the g.m.p. INCHES (P8) that indicates machine units.
4.
MACHINE PARAMETERS
FIND
Machine parameter setting
In order for the machine-tool to be able to properly execute the programmed
instructions as well as interpret the different elements connected to it, the CNC must
“know” the specific data of the machine, such as: feedrates, accelerations, feedback,
automatic tool change, etc..
This data is determined by the machine builder and can be introduced either from
the CNC’s keyboard or via the CNC’s two serial ports.
First, the general machine parameters must be set since they determine the machine
axes.
There are some parameters to indicate whether the machine has cross
compensation or not. This compensation table will be generated by the CNC from
the values assigned to those parameters.
The general machine parameters also determine the number of elements at the
tables for tools, tool magazine, tool offsets and M functions (miscellaneous).
The axes parameters will define the leadscrew compensation tables and they will only
be generated for those axes which require them.
i
When selecting the drive parameters at the CNC, it is possible to display and
modify the parameters stored at each drive.
The CNC does not have parameters of the drive although their copies may
be stored in the memkey card (Card A).
CNC 8035
(SOFT M: V11.1X)
(SOFT T: V12.1X)
41
Installation manual
4.1
Parameters that may be modified from the OEM program or
OEM subroutine
Here is a list of the machine parameters that may be modified either from the
oscilloscope or from an OEM program/subroutine. The variables associated with the
machine parameters must be used to modify these parameters from an OEM
program/subroutine. See "11.3 Variables associated with machine parameters"
on page 302.
4.
MACHINE PARAMETERS
Parameters that may be modified from the OEM program or OEM
subroutine
General machine parameters:
CNC 8035
(SOFT M: V11.1X)
(SOFT T: V12.1X)
42
Parameter
Number
Update
TLOOK
P161
Beginning of program execution
CODISET
P147
Immediate
Machine parameters of an axis:
Parameter
Number
Update
BACKLASH
P14
Immediate
ACCTIME
P18
Beginning of the next block
INPOSW
P19
Immediate
MAXFLWE1
P21
Immediate
MAXFLWE2
P22
Immediate
PROGAIN
P23
Immediate
DERGAIN
P24
Immediate
FFGAIN
P25
Immediate
BAKANOUT
P29
Immediate
BAKTIME
P30
Immediate
REFDIREC
P33
Immediate
REFVALUE
P36
Immediate
MAXVOLT
P37
Immediate
G00FEED
P38
Beginning of the next block
MAXFEED
P42
Beginning of the next block
JOGFEED
P43
Beginning of the next block
ACCTIME2
P59
Beginning of the next block
PROGAIN2
P60
Immediate
DERGAIN2
P61
Immediate
FFGAIN2
P62
Immediate
JERKLIM
P67
Beginning of the next block
FLIMIT
P75
Beginning of the next block
TORQDIST
P78
Immediate
PRELOAD
P79
Immediate
TPROGAIN
P81
Immediate
TINTTIME
P82
Immediate
TCOMPLIM
P83
Immediate
Installation manual
Spindle machine parameters:
Update
MAXGEAR1
P2
Beginning of the next block
MAXGEAR2
P3
Beginning of the next block
MAXGEAR3
P4
Beginning of the next block
MAXGEAR4
P5
Beginning of the next block
ACCTIME
P18
Beginning of the next block
INPOSW
P19
Immediate
PROGAIN
P23
Immediate
DERGAIN
P24
Immediate
FFGAIN
P25
Immediate
REFDIREC
P33
Immediate
REFVALUE
P36
Immediate
MAXVOLT1
P37
Immediate
MAXVOLT2
P38
Immediate
MAXVOLT3
P39
Immediate
MAXVOLT4
P40
Immediate
OPLACETI
P45
Immediate
ACCTIME2
P47
Beginning of the next block
PROGAIN2
P48
Immediate
DERGAIN2
P49
Immediate
FFGAIN2
P50
Immediate
SLIMIT
P66
Immediate
JERKLIM
P80
Beginning of the next block
A modification in the MAXGEAR(1··4) parameters sets the square corner mode even
if a round corner has been programmed.
4.
MACHINE PARAMETERS
Number
Parameters that may be modified from the OEM program or OEM
subroutine
Parameter
CNC 8035
(SOFT M: V11.1X)
(SOFT T: V12.1X)
43
Installation manual
4.2
General machine parameters
AXIS1 (P0)
AXIS2 (P1)
AXIS3 (P2)
AXIS4 (P3)
AXIS5 (P4)
AXIS6 (P5)
AXIS7 (P6)
AXIS8 (P7)
MACHINE PARAMETERS
General machine parameters
4.
They permit associating axes, handwheels, spindles or live tools with each feedback
input and analog output according to the following code:
Value
Meaning
Value
Meaning
0
Free; not associated.
12
Handwheel with axis
selector button
1
X axis.
13
2
Y axis.
14
3
Z axis.
21
Handwheel associated
with X.
4
U axis.
22
Handwheel associated
with Y.
5
V axis.
23
Handwheel associated
with Z.
6
W axis.
24
Handwheel associated
with U.
7
A axis.
25
Handwheel associated
with V.
8
B axis.
26
Handwheel associated
with W.
9
"C" axis.
27
Handwheel associated
with A.
10
Main spindle.
28
Handwheel associated
with B.
11
Handwheel.
29
Handwheel associated
with C.
The following table shows the feedback input, the analog voltage output and the
default values associated with each parameter.
Parameter
Feedback
Analog voltage
(connector)
CNC 8035
Default value
-M-
-T-
AXIS1 (P0)
1st axis
X10
X8 - Pin 2
1 (X axis)
1 (X axis)
AXIS2 (P1)
2nd axis
X11
X8 - Pin 3
2 (Y axis)
3 (Z axis)
AXIS3 (P2)
3rd axis
X12
X8 - Pin 4
3 (Z axis)
0 (free)
AXIS4 (P3)
Not being
used
----
----
0 (free)
0 (free)
AXIS5 (P4)
Spindle
X4
X4
10 (spindle)
10 (spindle)
AXIS6 (P5)
1st
handwheel
X5
----
11
(handwheel)
11
(handwheel)
AXIS7 (P6)
2nd
handwheel
X5
----
0 (free)
0 (free)
AXIS8 (P7)
Not being
used
----
----
0 (free)
0 (free)
About the handwheels
(SOFT M: V11.1X)
(SOFT T: V12.1X)
Depending on their configuration, the available handwheels are:
• General handwheel.
It can be used to jog any axis one by one. Select the axis and turn the handwheel
to move it.
• Individual handwheel.
44
Installation manual
It replaces the mechanical handwheels. Up to 2 handwheels can be used (one
per axis). It only moves the axis it is associated with.
When using a Fagor 100P handwheel, no other handwheels may be used and it must
be connected as first handwheel. See "5.3 Movement with an electronic
handwheel" on page 135.
It defines the measuring units assumed by the CNC for machine parameters, tool
tables and programming on power-up and after executing M02,M30, EMERGENCY
or RESET. The code is:
Meaning
0
Millimeters (G71)
1
Inches (G70)
By default: 0
IMOVE (P9)
Indicates which function G00 (rapid traverse) or G01 (linear interpolation) is assumed
on power-up, after executing M02,M30, EMERGENCY or RESET. The code is:
Value
Meaning
0
G00 (rapid traverse).
1
G01 (linear interpolation).
4.
MACHINE PARAMETERS
Value
General machine parameters
INCHES (P8)
Default value: 0
ICORNER (P10)
Indicates which function, G05 (round corner) or G07 (square corner) is assumed on
power-up, after executing M02,M30, EMERGENCY or RESET. The code is:
Value
Meaning
0
G07 (square corner).
1
G05 (round corner).
Default value: 0
IPLANE (P11)
Indicates which function: G17 (XY plane) or G18 (ZX plane) is assumed on powerup, after executing M02,M30, EMERGENCY or RESET. The code is:
Value
Meaning
0
G17 (XY plane).
1
G18 (ZX plane).
Default value: 0 (for the M model)
Default value: 1 (for the T model)
ILCOMP (P12)
It is only used in the Mill model CNC and indicates which function: G43 (tool length
compensation ON) or G44 (tool length compensation OFF) is assumed on powerup, after executing M02,M30, EMERGENCY or RESET; the code is:
Value
Meaning
0
G44 (tool length compensation ON).
1
G43 (tool length compensation ON).
Default value: 0
ISYSTEM (P13)
Indicates which function: G90 (absolute programming) or G91 (incremental
programming) is assumed on power-up, after executing M02,M30, EMERGENCY or
RESET.
Value
Meaning
0
G90 (absolute programming).
1
G91 (incremental programming).
Default value: 0
CNC 8035
(SOFT M: V11.1X)
(SOFT T: V12.1X)
45
Installation manual
IFEED (P14)
Indicates which function: G94 (feedrate in mm/min or inch/min) or G95
(mm/
rev or inch/rev) is assumed on power-up, after executing M02,M30, EMERGENCY
or RESET.
Value
Meaning
0
G94 (mm/min or inches/min).
1
G95 (mm/rev or inches/rev).
Default value: 0
4.
MACHINE PARAMETERS
General machine parameters
THEODPLY (P15)
Indicates whether the CNC will display real or theoretical position values according
to the following code:
Value
Meaning
0
Real position values.
1
Theoretical position values.
Default value: 1
GRAPHICS (P16)
Not being used.
RAPIDOVR (P17)
Indicates whether it is possible to vary the feedrate override between 0% and 100%
when working in G00.
Value
Meaning
YES
It may be modified.
NO
It cannot be modified; it is set to 100 %.
Default value: NO
The feedrate override % may be changed from the operator panel switch, from the
PLC, via DNC or by program.
The feedrate % can always be changed in JOG movements.
MAXFOVR (P18)
Indicates the maximum value of the feedrate override % applicable to the
programmed feedrate.
Possible values
Integer numbers between 0 and 255.
Default value: 120
From the operator panel switch, it may be varied between 0% and 120% and from
the PLC, DNC or by program between 0% and 255%.
CIRINLIM (P19)
Indicates the maximum angular feedrate value for circular interpolations.
This limitation prevents circular interpolations resulting in polygons instead of arcs
when the radius is very small. The CNC adjusts the angular feedrate in order not to
exceed the selected maximum angular feedrate.
Possible values
Integer numbers between 0 and 65535.
Default value: 0 (it is not limited)
Example
CNC 8035
If “CIRINLIN” = 1500 and an arc of a radius = 0.5mm at F=10000mm/min.
The theoretical angular speed is:
10000 mm/min / 0.5 mm = 20000 min-1
But, since the speed was limited to 1500, the CNC adjusts the feedrate in the
following manner:
(SOFT M: V11.1X)
(SOFT T: V12.1X)
Feedrate to be applied = 1500 x 0.5 = 750 mm/min.
CIRINERR (P20)
46
Indicates the maximum error allowed when calculating the end point of an arc.
Installation manual
From the programmed path, the CNC will calculate the radius for both the starting
point and end point of the arc. Although both of them should be “exactly” the same,
This parameter allows a certain calculation tolerance by establishing the maximum
difference between these two radii.
Possible values
Between 0.0001 and 99999.9999 millimeters.
Between 0.00001 and 3937.00787 inches.
Default value: 0.01 mm.
Meaning
YES
It assumes the arc center.
NO
It is not affected by G02 and G03.
Default value: NO
BLOCKDLY (P22)
It indicates the delay between motion blocks when operating in G7 (square corner).
This dwell can be very useful when some devices have to activated after the execution
of each block.
MACHINE PARAMETERS
Value
General machine parameters
4.
PORGMOVE (P21) Indicates whether the CNC assumes or not as the new polar coordinate origin the
center of the last G02 or G03 programmed.
Possible values
Integers between 0 and 65535 ms.
Default value: 0 (there is no delay)
NTOOL (P23)
Indicates the number of tools in the tool magazine. On the other hand, the CNC
adjusts the length of the tool table to that value.
Possible values
Integer numbers between 0 and 255.
Default value: 100
NPOCKET (P24)
Indicates the number of pockets in the tool magazine. On the other hand, the CNC
adjusts the length of the tool magazine table to that value.
Possible values
Integer numbers between 0 and 255.
Default value: 100 (for the M model)
Default value: 0 (for the T model)
CNC 8035
(SOFT M: V11.1X)
(SOFT T: V12.1X)
47
Installation manual
RANDOMTC (P25) Indicates whether the tool magazine is random or not.
• On a random magazine, the tools may occupy any position (pocket). If this
machine parameter is set for random magazine, g.m.p. TOFFM06 (P28) must be
set for machining center.
• On a non-random magazine, the tool always occupies its own pocket. The
magazine position number is the same as the tool number.
4.
Value
Meaning
YES
It is a random tool magazine.
NO
It is not a random tool magazine.
MACHINE PARAMETERS
General machine parameters
Default value: NO
In a non-random magazine, the tools must be placed in the tool magazine table in
the pre-established order (P1 T1, P2 T2, P3 T3, etc.). Optionally, g.m.p. TOOLMATY
(P164) may be used to assign several different tools to each tool position.
TOOLMONI (P26)
Selects the display units of the tool’s nominal and real lives.
Value
Meaning
0
Tool life in minutes
1
Tool life in number of operations.
Default value: 0
NTOFFSET (P27)
Indicates the number of tool offsets available in the tool offset table. On the other
hand, the CNC adjusts the length of the tool offset magazine table to that value.
Possible values
Integer numbers between 0 and 255.
Default value: 100
TOFFM06 (P28)
Indicates whether the machine is a machining center or not.
If it is, the CNC will select, at the tool magazine, the tool indicated when executing
the "T" function and it will be necessary to execute M06 afterwards in order to carry
out the tool change.
Value
Meaning
YES
Yes, it is a machining center.
NO
It is not a machining center.
Default value: NO
It is recommended to associate he subroutine corresponding to the tool changer with
the M06.
NMISCFUN (P29)
Indicates the number of M functions available in the M function table.
Possible values
Integer numbers between 0 and 255.
Default value: 32
CNC 8035
(SOFT M: V11.1X)
(SOFT T: V12.1X)
48
Installation manual
MINAENDW (P30)
Indicates the minimum time period that the AUXEND signal must remain activated
so the CNC will interpret it as a valid signal. AUXEND is a PLC signal which indicates
to the CNC that functions M,S or T have been executed.
If the corresponding M function has been set in the M table not to wait for the AUXEND
signal, the time period indicated in this parameter will be the duration of the
MSTROBE signal.
Possible values
Integers between 0 and 65535 ms.
NPCROSS (P31)
Indicates the number of points available in the first cross compensation table.
This compensation is used when the movement of one axis causes a position change
on another axis. The CNC offers a table where one could enter the position variations
of one axis for the particular positions of the other axis.
Possible values
Integer numbers between 0 and 255.
Default value: 0 (not available)
MOVAXIS (P32)
MACHINE PARAMETERS
See "5.8 Auxiliary M, S, T function transfer" on page 165.
General machine parameters
4.
Default value: 100
Used in the first cross compensation table, it indicates the axis causing position
variations on another axis. The definition code is:
Value
Meaning
Value
Meaning
0
None.
5
V axis.
1
X axis.
6
W axis.
2
Y axis.
7
A axis.
3
Z axis.
8
B axis.
4
U axis.
9
"C" axis.
Default value: 0 (none)
COMPAXIS (P33)
Used in the first cross compensation table, it indicates the axis suffering the position
variations caused by another axis. The compensation is applied onto this axis. The
definition code is:
Value
Meaning
Value
Meaning
0
None.
5
V axis.
1
X axis.
6
W axis.
2
Y axis.
7
A axis.
3
Z axis.
8
B axis.
4
U axis.
9
"C" axis.
Default value: 0 (none)
Example
If NPCROSS=20, MOVAXIS=X and COMPAXIS=W, the CNC will allow access to
the cross compensation table.
Each one of these 20 points (NPCROSS) of this table will indicate the X position
value and the error suffered by the W axis when the X axis is positioned at this point.
CNC 8035
This way, the CNC will apply the compensation of the X axis table onto the W axis.
(SOFT M: V11.1X)
(SOFT T: V12.1X)
49
Installation manual
REFPSUB (P34)
Indicates the number of the subroutine associated with function G74 (machine
reference zero or home search). This subroutine will be executed automatically when
G74 is programmed alone in a block or, also, when searching home in the JOG mode
by pressing the softkey “ALL AXES”.
Possible values
Integer numbers between 0 and 9999.
Default value: 0 (no associated subroutine)
MACHINE PARAMETERS
General machine parameters
4.
INT1SUB (P35)
INT2SUB (P36)
INT3SUB (P37)
INT4SUB (P38)
They indicate the number of the subroutine associated with the corresponding
general logic input: "INT1" (M5024), "INT2" (M5025), "INT3" (M5026)", "INT4"
(M5027).
When one of these inputs is activated, the program currently being executed is
interrupted and the CNC jumps to execute the associated subroutine whose number
is indicated in the corresponding parameter.
These interruption subroutines do not change the nesting level of local parameters,
thus only global parameters must be used in them.
Once the CNC completes the execution of the subroutine, it will continue running the
original program.
Possible values
Integer numbers between 0 and 9999.
Default value: 0 (no associated subroutine)
PRBPULSE (P39)
Indicates whether the probe functions of the CNC react to the up-flank (leading edge)
or down-flank (trailing edge) of the probe signal. This probe is connected to the
connector X7 of the AXES module.
Value
Meaning
+ sign
Positive pulse (24 V or 5 V).
- sign
Negative pulse (0 V).
Default value: + sign
PRBXMIN (P40)
PRBXMAX (P41)
PRBYMIN (P42)
PRBYMAX (P43)
PRBZMIN (P44)
PRBZMAX (P45)
CNC 8035
Indicate the position of the tabletop probe used for tool calibration.
These position values must be absolute and with respect to machine reference zero
(home). If a lathe model CNC, these values must be in radius.
PRBXMIN
Probe’s minimum X coordinate.
PRBXMAX
Probe’s maximum X coordinate.
PRBYMIN
Probe’s minimum Y coordinate.
PRBYMAX
Probe’s maximum Y coordinate.
PRBZMIN
Probe’s minimum Z coordinate.
PRBZMAX
Probe’s maximum Z coordinate.
Possible values
(SOFT M: V11.1X)
(SOFT T: V12.1X)
±99999.9999 mm or ±3937.00787 inches.
Default value: 0
50
Installation manual
PRBMOVE (P46)
Indicates the maximum distance the tool can travel when calibrating it with a probe
in JOG mode.
Possible values
Between 0.0001 and 99999.9999 millimeters.
Between 0.00001 and 3937.00787 inches.
Default value: 50 mm.
Indicates the number of the user program associated with the execution mode. This
program will be executed via the user channel when pressing the softkey USER in
the EXECUTE mode.
Integer numbers between 0 and 65535.
Default value: 0 (none)
USEREDIT (P48)
Indicates the number of user program associated with the Edit mode. This program
will be executed via the user channel when pressing the softkey USER in the EDIT
mode.
Possible values
Integer numbers between 0 and 65535.
4.
MACHINE PARAMETERS
Possible values
General machine parameters
USERDPLY (P47)
Default value: 0 (none)
USERMAN (P49)
Indicates the number of the user program associated with the JOG mode. This
program will be executed via the user channel when pressing the softkey USER in
the JOG mode.
Possible values
Integer numbers between 0 and 65535.
Default value: 0 (none)
USERDIAG (P50)
Indicates the number of the user program associated with the Diagnosis mode. This
program will be executed via the user channel when pressing the softkey USER in
the DIAGNOSIS mode.
Possible values
Integer numbers between 0 and 65535.
Default value: 0 (none)
ROPARMIN (P51)
ROPARMAX (P52)
They indicate the upper limit "ROPARMAX " and lower limit "ROPARMIN" of the global
arithmetic parameter group (P100-P299), user arithmetic parameters (P1000P1255) or OEM arithmetic parameters (P2000-P2255) to be write-protected. There
are no restrictions to read these parameters.
Possible values
Integer numbers between 0 and 9999.
(Internally between 100 and 299).
Default value: 0 (it is not protected)
The parameters write-protected from the CNC may be modified from the PLC.
PAGESMEM (P53)
Not being used.
NPCROSS2 (P54)
Not being used.
MOVAXIS2 (P55)
Not being used.
COMAXIS2 (P56)
Not being used.
CNC 8035
(SOFT M: V11.1X)
(SOFT T: V12.1X)
51
Installation manual
NPCROSS3 (P57)
Not being used.
MOVAXIS3 (P58)
Not being used.
COMAXIS3 (P59)
Not being used.
TOOLSUB (P60)
Indicates the number of the subroutine associated with the tools. This subroutine will
be executed automatically every time a T function is executed.
Possible values
4.
Integer numbers between 0 and 9999.
MACHINE PARAMETERS
General machine parameters
Default value: 0 (none)
CYCATC (P61)
This parameter must be used when having a machining center, g.m.p. TOFFM06
(P28) = YES.
Indicates whether a cyclic tool changer is being used or not.
A "cyclic tool changer" is an automatic tool changer which requires an M06 command
(tool change) after searching for a tool and before searching for the next one.
With a non-cyclic tool changer, it is possible to search for several tools in a row without
necessarily having to make the actual tool change (M06 function).
Value
Meaning
YES
It is a cyclic changer.
NO
It is not a cyclic changer.
Default value: YES
TRMULT (P62)
Not being used.
TRPROG (P63)
Not being used.
TRDERG (P64)
Not being used.
MAXDEFLE (P65)
Not being used.
MINDEFLE (P66)
Not being used.
TRFBAKAL (P67)
Not being used.
TIPDPLY (P68)
Indicates whether the CNC displays the position of the tool tip or that of the tool base
when working with tool length compensation.
Value
Meaning
0
It displays the coordinate of the tool base.
1
It displays the coordinate of the tool tip.
Default value: 0 (for the M model)
Default value: 1 (for the T model)
On the Mill model, it is necessary to execute G43 in order to work with tool length
compensation. When not working with tool length compensation (G44), the CNC
displays the tool base position.
CNC 8035
(SOFT M: V11.1X)
(SOFT T: V12.1X)
52
On the Lathe model, it always works with tool length compensation. Therefore, by
default, the CNC always displays the tool tip position.
Installation manual
ANTIME (P69)
It is used on punch presses that have an eccentric cam as a punching system.
It indicates how far in advance the general logic output ADVINPOS (M5537) is
activated before the axes reach position.
This reduces idle time, thus increasing the number of punches per minute.
Possible values
Integers between 0 and 65535 ms.
Default value: 0
PERCAX (P70)
Not being used.
TAFTERS (P71)
g.m.p. TOOLSUB (P60) indicates the number of the subroutine associated with the
tool.
The TAFTERS parameter determines whether the tool selection is carried out before
or after executing that subroutine.
Value
Meaning
YES
After executing the subroutine.
NO
Before executing the subroutine.
MACHINE PARAMETERS
If ANTIME = 0, the anticipation signal ADVINPOS will never be activated.
General machine parameters
4.
If the total duration of the movement is lower than the value in parameter ANTIME,
the anticipation signal (ADVINPOS) will be activated immediately.
Default value: NO
LOOPTIME (P72)
It sets the sample period used by the CNC and, consequently, affects the block
processing time.
Value
Meaning
0
4 ms period (standard).
4
Period of 4 milliseconds.
5
Period of 5 milliseconds.
6
Period of 6 milliseconds.
Sampling periods shorter than 2 msec. are not allowed when not using the
CPU-TURBO option.
Likewise, the CNC configuration limits the sample period. The shorter the
sample period, the less time will the CPU have to process data. Therefore,
bear in mind that:
• Sinewave feedback requires more calculation time.
• More axes means more calculation time.
• if the user channel is active, more calculation time is required.
IPOTIME (P73)
It sets the interpolation period used by the CNC and, consequently it affects its block
processing time.
Value
Meaning
0
IPOTIME = LOOPTIME.
1
IPOTIME = 2 * LOOPTIME.
CNC 8035
(SOFT M: V11.1X)
(SOFT T: V12.1X)
53
Installation manual
COMPTYPE (P74)
It determines how tool radius compensation is applied. This parameter has three
digits.
(units) Type of tool radius compensation beginning and end.
The units set the type of beginning/end of tool radius compensation applied by the
CNC.
MACHINE PARAMETERS
Meaning
xx0
It approaches the starting point going around the corner.
xx1
It goes directly perpendicular to the point; without going
around the corner.
Default value: 0
General machine parameters
4.
Value
COMPTYPE= x0
COMPTYPE= x1
(tens) Additional compensation block.
The tens indicate whether the additional compensation block is executed at the end
of the current block or at the beginning of the next block with compensation.
Value
Meaning
x00
It is executed at the end of the current block.
x10
It is executed at the beginning of the next block with
compensation.
Default value: 00
COMPTYPE = 00
COMPTYPE = 10
Executing block by block (single block
mode), the first movement ends at
point "B".
Executing block by block (single block
mode), the first movement ends at
point "A".
When the beginning or the end of the compensation takes place in a different plane
(there is an intermediate vertical movement) and with angle greater than 270º, one
should be analyze the CNC's behavior as shown next:
• At the beginning of the compensation, the tool should be positioned before
penetrating into the part. The additional block must be executed in the upper plane
and, consequently, together with the first block (COMPTYPE=00).
CNC 8035
(SOFT M: V11.1X)
(SOFT T: V12.1X)
54
Installation manual
MACHINE PARAMETERS
• At the end of the compensation, the tool should withdraw from the part without
penetrating into it. The additional block must be executed in the upper plane and,
consequently, together with the second block (COMPTYPE=10).
General machine parameters
4.
(hundreds) Activate the compensation in the first motion block.
The hundreds indicate whether the compensation is activated in the first motion block
or not, even if the plane axes are not involved. The same criteria also applies when
turning the compensation off.
Value
Meaning
0xx
The compensation is activated in the first block having a
movement of the plane axes.
1xx
The compensation is activated in the first motion block
even if there is no movement of the plane axes.
Default value: 000
After activating the compensation, it could happen that the plane axes do not get
involved in the first motion block either because they have not been programmed or
because the same point as the tool position has been programmed or because a null
incremental move has been programmed. In this case, the compensation is applied
in the current tool position; depending on the first movement programmed in the
plane, the tool moves perpendicular to the path on its starting point.
The first movement programmed in the plane may be either linear or circular.
CNC 8035
(SOFT M: V11.1X)
(SOFT T: V12.1X)
55
Installation manual
Example of beginning of compensation (COMPTYPE=1x1)
Y
X
Y
4.
MACHINE PARAMETERS
General machine parameters
X
···
G90
G01 Y40
G91 G40 Y0 Z10
G02 X20 Y20 I20 J0
···
(X0 Y0)
···
G90
G01 X-30 Y30
G01 G41 X-30 Y30 Z10
G01 X25
···
(X0 Y0)
FPRMAN (P75)
It is only used on lathe model CNC's and it indicates whether feedrate per revolution
is permitted or not.
Value
Meaning
YES
Admitted.
NO
Not admitted.
Default value: NO
MPGAXIS (P76)
It is only used on the Lathe model CNCs and it indicates which axis the handwheel
is assigned to. It is set according to the following codes:
Value
Meaning
Value
Meaning
0
None.
5
V axis.
1
X axis.
6
W axis.
2
Y axis.
7
A axis.
3
Z axis.
8
B axis.
4
U axis.
9
"C" axis.
Default value: 0 (shared)
DIRESET (P77)
It is used on the lathe model CNC. It indicates whether the RESET is effective with
or without a previous CYCLE STOP.
Value
Meaning
YES
The CNC accepts the RESET any time.
NO
Only if the STOP condition occurs.
Default value: NO
If DIRESET=YES, the CNC first carries out an internal CYCLE STOP to interrupt
program execution and, then, executes the RESET.
Obviously, if it is performing a threadcutting or similar operation, not admitting a
CYCLE STOP, it will wait for the operation to be concluded before interrupting the
program.
CNC 8035
PLACOMP (P78)
Not being used.
MACELOOK (P79) When using "Look-Ahead" the operator sets the percentage of acceleration being
applied in Look-Ahead by means of function G51.
(SOFT M: V11.1X)
(SOFT T: V12.1X)
With g.m.p. MACELOOK (P79) the OEM can limit the maximum percentage of
acceleration that the user may set with G51.
Possible values
Integer numbers between 0 and 255.
Default value: 0 (there is no limit)
56
Installation manual
These parameters must be used when having an electronic handwheel to jog the
axes.
MPGCHG (P80)
Parameter MPGCHG (P80) indicates the turning direction of the electronic
handwheel. If correct, leave it as is. Otherwise, select YES is there was a NO before
or vice versa.
Possible values
4.
NO / YES.
MPGRES (P81)
Parameter MPGRES (P81) indicates the counting resolution of the electronic
handwheel and depends on the display format selected for the corresponding a.m.p.
DFORMAT (P1).
Possible values
0, 1 and 2.
Default value: 0
Format
MACHINE PARAMETERS
Default value: NO
General machine parameters
MPGCHG (P80)
MPGRES (P81)
MPGNPUL (P82)
Resolution
DFORMAT (P1)
5.3 mm
MPGRES=0
0.001 mm
4.4"
4.4 mm
3.5"
6.2 mm
MPGRES=1
0.010 mm
0.0001"
MPGRES=2
0.100 mm
0.0010"
0.0100"
0.0001 mm
0.0010 mm
0.0100 mm
0.00001"
0.00010"
0.00100"
0.01 mm
5.3"
0.10 mm
0.001"
1.00 mm
0.010"
0.100"
MPGNPUL (P82)
Parameter MPGNPUL (P82) indicates the number of pulses per turn of the electronic
handwheel.
Possible values
Integer numbers between 0 and 65535.
Default value: 0 (means 25)
Example
Having a Fagor electronic handwheel (25 pulses per turn) we would like to move 1
mm per handwheel turn.
1. Set the a.m.p. for the feedback input of the electronic handwheel AXIS1 (P0)
through AXIS7 (P6), to a value of 12 (Fagor 100P handwheel). Also set g.m.p.
MPGAXIS (P76) to indicate which axis has been assigned this handwheel.
2. Set parameter MPGNPUL=25 or 0 meaning 25 pulses per turn of the Fagor
handwheel.
3. Since the handwheel outputs square signals and the CNC applies a x4 multiplying
factor to them, we get 100 pulses per turn.
CNC 8035
4. The value to be assigned to parameter MPGRES depends on the axis resolution
format.
With 5.3mm type display format, set MPGRES=1
With 4.4mm type display format, set MPGRES=2
(SOFT M: V11.1X)
(SOFT T: V12.1X)
With 6.2mm type display format, set MPGRES=0
57
Installation manual
Format
Resolution
MPGRES=0
MACHINE PARAMETERS
General machine parameters
4.
MPG1CHG (P83)
MPG1RES (P84)
MPG1NPUL (P85)
MPG2CHG (P86)
MPG2RES (P87)
MPG2NPUL (P88)
MPG3CHG (P89)
MPG3RES (P90)
MPG3NPUL (P91)
MPGRES=1
MPGRES=2
5.3 mm
Resolution
0.001 mm
0.010 mm
0.100 mm
Pulses / turn
0.100 mm
1.000 mm
10.000 mm.
4.4 mm
Resolution
0.0001 mm
0.0010 mm
0.0100 mm
Pulses / turn
0.0100 mm
0.1000 mm
1.0000 mm
6.2 mm
Resolution
0.01 mm
0.10 mm
1.00 mm
Pulses / turn
1.00 mm
10.000 mm 100.000 mm
These parameters must be used when the machine has several electronic
handwheels, one per axis.
Set the a.m.p. for the feedback input of the electronic handwheel AXIS1 (P0) through
AXIS7 (P6), to one of the following values:
Value
Meaning
Value
Meaning
21
Handwheel associated
with X.
26
Handwheel associated
with W.
22
Handwheel associated
with Y.
27
Handwheel associated
with A.
23
Handwheel associated
with Z.
28
Handwheel associated
with B.
24
Handwheel associated
with U.
29
Handwheel associated
with C.
25
Handwheel associated
with V.
Parameters "MPG1***" correspond to the first handwheel, "MPG2***" to the second
one and "MPG3***" to the third one.
The CNC uses the following order to know which one is the first, second and third
handwheel: X, Y, Z, U, V, W, A, B, C.
The meaning of parameters MPG*CHG, MPG*RES and MPG*NPUL is similar to the
meaning of parameters MPGCHG (P80), MPGRES (P81) and MPGNPUL (P82).
CUSTOMTY (P92)
It indicates the configuration being used.
Possible values
250.
Default value: 0
Keyboard auto-identification
The keyboard has an auto-identification system that updates this parameter
automatically.
i
CNC 8035
The auto-identification system of the keyboards is recognized from versions
V9.11 and V10.11 on.
If an auto-identifying keyboard is connected to a CNC that has an older
software version, the keyboard will beep. In this case, disable the autoidentification hardware of the keyboard by setting the identification switch to
zero.
(SOFT M: V11.1X)
(SOFT T: V12.1X)
58
XFORM (P93)
Not being used.
XFORM1 (P94)
Not being used.
XFORM2 (P95)
Not being used.
Installation manual
PRODEL (P106)
The CNC takes this parameter into account when probing, functions G75 and G76.
When the digital probe communicates with the CNC via infrared beams, there could
be some delay (milliseconds) from the time the probe touches the part to the instant
the CNC receives the probe signal.
4.
MACHINE PARAMETERS
Not being used.
General machine parameters
XDATA0 (P96)
XDATA1 (P97)
XDATA2 (P98)
XDATA3 (P99)
XDATA4 (P100)
XDATA5 (P101)
XDATA6 (P102)
XDATA7 (P103)
XDATA8 (P104)
XDATA9 (P105)
The probe keeps moving until the CNC receives the probe signal.
Parameter PRODEL indicates, in milliseconds, the delay mentioned earlier.
Possible values
Integer numbers between 0 and 255.
Default value: 0
While probing, the CNC always takes into account the value assigned to parameter
PRODEL and provides the following information (variables associated with the
coordinates).
TPOS
Actual position of the probe when the CNC receives the probe signal.
DPOS
Theoretical position of the probe when the probe touched the part.
With "PRODEL=0", the DPOS variable has the same value as the TPOS variable.
MAINOFFS (P107) Indicates whether the CNC maintains the tool offset number (D) on power-up and
after an EMERGENCY or RESET.
Value
Meaning
0
It does not maintain it. It always assumes offset D0.
1
It maintains it.
Default value: 0
CNC 8035
(SOFT M: V11.1X)
(SOFT T: V12.1X)
59
Installation manual
ACTGAIN2 (P108)
The axes and the spindle can have 2 sets of gains and accelerations. By default, the
CNC always assumes the first set indicated by the parameters of the axis or of the
spindle ACCTIME, PROGAIN, DERGAIN and FFGAIN.
Parameter ACTGAIN2 indicates when the CNC assumes the second set of gains and
accelerations, indicated by the parameters of the axis or of the spindle ACCTIME2,
PROGAIN2, DERGAIN2 and FFGAIN2.
This parameter has 16 bits counted from right to left.
4.
MACHINE PARAMETERS
General machine parameters
bit 15 14 13 12 11 10 9 8 7 6 5 4 3 2 1 0
Each bit has a function or work mode associated with it. By default, all the bits will
be assigned the value of ·0·. Assigning the value of ·1· activates the corresponding
function.
Bit
Meaning
Bit
Meaning
0
8
G51
1
9
G50
2
10
3
11
4
JOG
12
5
Rigid tapping
13
G33
6
G95
14
G01
7
G75 / G76
15
G00
Default value in all the bits: 0
Every time each of these functions or work modes is activated, the CNC checks the
value assigned to the corresponding bit and acts as follows:
bit = 0
It applies the first of the sets “ACCTIME, PROGAIN, etc.”
bit = 1
It applies the second of the sets “ACCTIME2, PROGAIN2, etc”
When that function or work mode is deactivated, the CNC applies the first of the sets
“ACCTIME, PROGAIN”.
Example
When setting ACTGAIN2 = 1000 0000 0001 0000, the CNC applies the second set
to all the axes and the spindle whenever function G0 or the JOG mode is selected.
Considerations to bear in mind
The change of gains and accelerations is always made at the beginning of the block.
When working in round corner (G5), the change does not take place until G07 is
programmed.
Example ·1·
CNC 8035
G2 X10 Y10 I10 J0
(Set 1)
G05 G2 X10 Y10 I10 J0 (Set 1)
G1 X20
(Set 2)
G1 X20
(Set 1)
G3 X30 Y20 I0 J10
(Set 1)
G3 X30 Y20 I0 J10
(Set 1)
G1 Y30
(Set 2)
G7 G1 Y30
(Set 2)
The gains and accelerations may also be changed from the PLC. To do that, there
is a general logic CNC input ACTGAIN2 (M5013). Every time this input is activated,
the CNC selects the second set of gains and accelerations regardless of the active
operating mode or function.
(SOFT M: V11.1X)
(SOFT T: V12.1X)
TRASTA (P109)
60
Example ·2·
Not being used.
Installation manual
This parameter indicates whether the CNC takes into consideration or not the additive
zero offset when displaying the coordinates of the axes on the screen and when
accessing the POS(X-C) and TPOS(X-C) variables.
Meaning
0
When displaying the position of the axes referred to home, it only
takes into account the additive offset when displaying the
coordinates referred to machine reference zero.
The coordinate returned by the POS(X-C) and TPOS(X-C)
variables takes into account the additive zero offset.
1
When displaying the position of the axes, it ignores the additive
offset.
The coordinate returned by the POS(X-C) and TPOS(X-C)
variables ignores the additive zero offset.
2
When displaying the position of the axes, the CNC takes into
account the additive offset except when showing the Command
- Actual -To Go coordinates.
The coordinate returned by the POS(X-C) and TPOS(X-C)
variables takes into account the additive zero offset.
Default value: 0
The additive zero offset can be originated as follows:
4.
MACHINE PARAMETERS
Value
General machine parameters
DIPLCOF (P110)
• With variable PLCOF(X-C), it is possible to set an additive zero offset for each
CNC axis from the PLC.
• With the additive handwheel.
HANDWIN
(P111)
HANDWHE1
(P112)
HANDWHE2
(P113)
HANDWHE3
(P114)
HANDWHE4
(P115)
Not being used.
STOPTAP (P116)
Indicates whether the general inputs /STOP (M5001), /FEEDHOL (M5002) and /
XFERINH (M5003) are enabled (P116=YES) or not (P116=NO) while executing
function G84, regular tapping or rigid tapping.
INSFEED (P117)
Sets the tool inspection feedrate.
When accessing tool inspection, the CNC assumes this feedrate as the new one, and
it resumes the execution of the program at the previous feedrate (the one used in the
program or set via MDI while in tool inspection) when tool inspection is over.
Possible values
Between 0.0001 and 199999.9999 degrees/min or mm/min.
Between 0.00001 inches/min and 7874.01574 inches/min.
Default value: NO
If set to "0" (by default), tool inspection will be carried out at the feedrate currently
used for machining.
CNC 8035
DISTYPE (P118)
Only to be used by Fagor Automation technical personnel.
PROBERR (P119)
Indicates whether the CNC issues an error message when the axes reach the
programmed position without having received the probe signal while executing
function G75 or G76.
Value
Meaning
YES
It issues the error message.
NO
It does NOT issue the error message.
(SOFT M: V11.1X)
(SOFT T: V12.1X)
Default value: NO
61
Installation manual
SERSPEED (P120) Not being used.
SERPOWSE
(P121)
Not being used.
LANGUAGE (P122) Defines the work language.
MACHINE PARAMETERS
General machine parameters
4.
Value
Meaning
Value
Meaning
0
English
6
Portuguese
1
Spanish
7
Czech
2
French
8
Polish
3
Italian
9
Mainland Chinese
4
German
10
Basque
5
Dutch
11
Russian
Default value: 0
GEOMTYPE (P123) It indicates whether the cutter geometry is associated with the tool (T) or with the tool
offset (D).
The "T" function, tool number, indicates the magazine position it occupies.
The "D" function, offset, indicates the tool dimensions.
Value
Meaning
0
It is associated with the tool.
1
It is associated with the tool offset.
Default value: 0
When using a tool holding turret, the same turret position is usually used by several
tools. In those cases, the "T" function refers to the turret position and the "D" function
to the dimensions and geometry of the tool occupying that position. Thus,
"GEOMTYPE=1".
SPOSTYPE (P124) Not being used.
AUXSTYPE (P125) Not being used.
FOVRG75 (P126)
It indicates whether function G75 ignores the feedrate override switch of the front
panel or not.
Value
Meaning
NO
It ignores the setting of the switch. Always at 100%.
YES
It is affected by the % of the switch.
Default value: NO
CFGFILE (P127)
Not being used.
STEODISP (P128)
It indicates whethe the CNC displays the real or theoretical RPM (affected by the %)
of the main spindle.
CNC 8035
Value
Meaning
0
It displays the real RPM.
1
It displays the theoretical RPM.
Default value: 0
When not having spindle encoder (NPULSES=0), it is recommended to set P128=1
so it displays theoretical value.
(SOFT M: V11.1X)
(SOFT T: V12.1X)
HDIFFBAC (P129)
This parameter has 16 bits counted from right to left.
bit 15 14 13 12 11 10 9 8 7 6 5 4 3 2 1 0
62
Installation manual
Each bit has a function or work mode associated with it. By default, all the bits will
be assigned the value of ·0·. Assigning the value of ·1· activates the corresponding
function.
Bit
0
Handwheel ·1·.
8
1
Handwheel ·2·.
9
2
10
3
11
4
12
5
13
6
14
7
15
Meaning
4.
It limits the movement.
Default value in all the bits: 0
Bit 15 indicates how the CNC acts when requesting a feedrate greater than the
maximum allowed depending on the handwheel turning speed and the position of the
switch.
(0)
It limits the feedrate to the maximum allowed but it moves the indicated
distance.
(1)
It limits the feedrate and the distance to the maximum allowed. The movement
stops when the handwheel stops. It does not move the indicated distance.
MACHINE PARAMETERS
Meaning
General machine parameters
Bit
The individual handwheels, those associated with each axis, always limit the feedrate
and the distance.
bits 0 and 1 indicate whether the handwheels output differential signals (1) or not (0).
RAPIDEN (P130)
It indicates how the rapid movements are carried out. The behavior of this key is
managed using the EXRAPID mark.
Value
Meaning
0
It has no effect.
1
When the mark is activated, the movements are
executed in rapid. There is no need to press the key.
2
The "rapid" key is enabled when the mark is activated or
when the key is pressed. The key must be pressed to
make the movements.
Default value: 0
The rapid key is treated in execution and simulation as follows:
• The movements are carried out in rapid traverse (G00) while the rapid key is
pressed.
• The rapid key is ignored while threading, while look-ahead is active.
• If G95 is active, it switches to G94 mode. When releasing the rapid key, it goes
back to G95 mode.
• It only affects the main channel. It is ignored in the PLC channel.
CNC 8035
(SOFT M: V11.1X)
(SOFT T: V12.1X)
63
Installation manual
MSGFILE (P131)
Number of the program that contains the OEM texts in several languages.
By default, the CNC sets this parameter to “0” (there is no program).
If programmed with a value of “0”, the texts defined by the OEM are in a single
language and stored in several programs:
PLCMSG
Texts for PLC messages
PLCERR
Texts for PLC errors
The MSGFILE program may be in user memory or in the memkey card. If it is in both
places, it takes the one in user memory.
MACHINE PARAMETERS
General machine parameters
4.
FLWEDIFA (P132)
Not being used.
RETRACAC (P133) It indicates whether retracing is allowed or not
Value
Meaning
0
It is not permitted.
1
It is permitted. The withdrawal stops at the M functions.
2
It is permitted. The withdrawal does not stop at the M
functions.
Default value: 0
If RETRACAC = 2, only the M0 is executed; the rest of the M functions are not sent
out to the PLC, it neither executes them nor interrupts the withdrawal. The [CYCLE
START] key must be pressed after executing M0.
Retracing is activated and deactivated with the RETRACE (M5051) signal.
If while executing a part program, the PLC sets this signal high, the CNC interrupts
the execution of the program and starts executing backwards what has executed so
far.
When the PLC sets the RETRACE signal back low and retracing is canceled. The
CNC starts executing forward what was done backwards and it will go on to execute
the part of the program that was not machined.
G15SUB (P134)
Not being used.
TYPCROSS (P135) It indicates how cross compensation is applied. This parameter has two digits.
(units) Cross compensation with theoretical or real coordinates.
The units indicate whether cross compensation is applied with theoretical
coordinates or with real ones.
Value
Meaning
x0
With real coordinates.
x1
With theoretical coordinates.
Default value: 0
(tens) The cross compensation on Gantry axis affects the slave axis
The tens indicate whether cross compensation on Gantry axes affects only the
master axis or both.
CNC 8035
Value
Meaning
0x
It affects the master axis.
1x
It affects both axes.
Default value: 0
(SOFT M: V11.1X)
(SOFT T: V12.1X)
64
Installation manual
If a CNC is configured so that any of the feedback inputs of its axes or spindles is
free (because they are digital axes or spindle without feedback connection to the
CNC), these free connectors could be configured as electronic or mechanical
handwheels.
AXIS9 ... AXIS12:
Define the handwheel type. The values to be assigned to these parameters are:
Meaning
Value
Meaning
11
Handwheel.
12
Handwheel with axis
selector button
21
Handwheel associated
with X.
22
Handwheel associated
with Y.
23
Handwheel associated
with Z.
24
Handwheel associated
with U.
25
Handwheel associated
with V.
26
Handwheel associated
with W.
27
Handwheel associated
with A.
28
Handwheel associated
with B.
29
Handwheel associated
with C.
4.
MACHINE PARAMETERS
Value
General machine parameters
AXIS9 (P136)
PAXIS9 (P137)
AXIS10 (P138)
PAXIS10 (P139)
AXIS11 (P140)
PAXIS11 (P141)
AXIS12 (P142)
PAXIS12 (P143)
PAXIS9 ... PAXIS12:
Define which connector is each handwheel associated with. Values 1 through 8 must
be assigned to these parameters depending on the connector that the handwheel is
associated with.
When detecting any incompatibility, on power-up, it will issue the messages
"Feedback busy" or "Feedback not available".
ACTBACKL (P144) It is related to a.m.p. BACKLASH (P14), leadscrew backlash compensation due to
change of direction.
This parameter has 16 bits counted from right to left.
bit 15 14 13 12 11 10 9 8 7 6 5 4 3 2 1 0
Each bit has a function or work mode associated with it. By default, all the bits will
be assigned the value of ·0·. Assigning the value of ·1· activates the corresponding
function.
Bit
Meaning
Bit
0
8
1
9
2
10
3
11
4
12
5
13
6
14
7
15
Meaning
G2 / G3
CNC 8035
Default value in all the bits: 0
Bit 13. Backlash compensation on arcs G2/G3.
(SOFT M: V11.1X)
(SOFT T: V12.1X)
This bit indicates whether the compensation is applied only on circular paths G2/G3
(bit=1) or in any other type of movement (bit=0).
65
Installation manual
ACTBAKAN (P145) It is related to a.m.p. BAKANOUT (P29) and BAKTIME (P30), additional analog pulse
to recover the possible leadscrew backlash when reversing the movement.
This parameter has 16 bits counted from right to left.
bit 15 14 13 12 11 10 9 8 7 6 5 4 3 2 1 0
4.
MACHINE PARAMETERS
General machine parameters
Each bit has a function or work mode associated with it. By default, all the bits will
be assigned the value of ·0·. Assigning the value of ·1· activates the corresponding
function.
Bit
Meaning
Bit
0
Exponential backlash peak.
8
1
9
2
10
3
11
4
12
5
13
6
14
7
15
Meaning
Apply the additional pulse with
G2 / G3
Default value in all the bits: 0
Bit 0. Exponential backlash peak.
The additional command pulse used to make up for the possible leadscrew backlash
in movement reversals may be rectangular or exponential. This bit indicates whether
it applies a rectangular backlash peak (bit=0) or an exponential backlash peak (bit=1).
If the duration of the rectangular pulse is adjusted for low speed, it may be too high
for high speed or not enough for low speed when adjusted for high speed. In this
cases, it is recommended to use the exponential type that applies a strong pulse at
the beginning and decreases in time.
Bit 13. Additional pulse only in circular paths G2/G3.
This bit indicates whether the additional pulse of velocity command is applied only
on circular paths G2/G3 (bit=1) or in any other type of movement (bit=0).
CODISET (P147)
CNC 8035
(SOFT M: V11.1X)
(SOFT T: V12.1X)
66
Not being used.
COCYF1 (P148)
Not being used.
COCYF2 (P149)
COCYF3 (P150)
COCYF4 (P151)
COCYF5 (P152)
COCYF6 (P153)
COCYF7 (P154)
COCYZ (P155)
COCYPOS (P156)
COCYPROF (P157)
COCYGROO (P158)
COCYZPOS (P159)
Installation manual
JERKACT (P160)
Jerk ON.
This parameter has 16 bits counted from right to left.
bit 15 14 13 12 11 10 9 8 7 6 5 4 3 2 1 0
Each bit has a function or work mode associated with it. By default, all the bits will
be assigned the value of ·0·. Assigning the value of ·1· activates the corresponding
function.
0
Apply jerk control in look-ahead.
1 - 15
Not being used.
Default value in all the bits: 0
Bit 0. Apply jerk control in look-ahead.
That bit indicates whether jerk control is to be applied (bit=1) or not (bit=0) in lookahead.
Using jerk in look-ahead, a trapezoidal acceleration profile is applied with a ramp
slope equivalent to the maximum jerk of the axis. The maximum jerk depends on the
value assigned to a.m.p. “JERKLIM (P67)” of that axis and of the number of axes
involved in the programmed path. For the axes whose JERKLIM parameter has been
set to zero, the CNC assumes the jerk value recommended for that parameter.
TLOOK (P161)
4.
MACHINE PARAMETERS
Meaning
General machine parameters
Bit
Real block processing time for look-ahead.
Possible values
Integers between 0 and 65535 ms.
Default value: 0
If assigned a value smaller than the real one, the machine will vibrate and if assigned
a value greater than the real one the machining slows down. The value of this
parameter may be calculated as follows:
1. Execute in G91 and G51 E0.1 a program made up of lots of blocks (at least 1000)
with very short moves; for example X0.1 Y0.1 Z0.1.
2. Measure the program execution time, making sure that the machine does not
vibrate. Divide the execution time by the number of blocks executed and assigned
the resulting value (in microseconds) to this parameter.
3. To optimize the parameter, decrease the calculated value and execute the same
program until the machine starts vibrating. To avoid damaging the machine, it is
recommended to start the execution with the feedrate override switch low and
increase its value gradually.
4. We recommend the use of the oscilloscope function and verify that the internal
variable VLOOKR remains constant which means that there is no vibration. From
the oscilloscope, it is possible to change the value of parameter TLOOK, but the
new value is only assumed when executing function G51 from the program.
MAINTASF (P162)
Not being used.
CAXGAIN (P163)
Not being used.
CNC 8035
(SOFT M: V11.1X)
(SOFT T: V12.1X)
67
Installation manual
TOOLMATY (P164) When using a non-random tool magazine (e.g. a turret), it indicates how many tools
may be assigned to each turret position.
When defined with a ·0· value in a non-random magazine, the tools must be placed
in the tool magazine table in the pre-established order (P1 T1, P2 T2, P3 T3, etc.).
4.
Value
Meaning
0
One tool per position.
1
Several tools per position.
Default value: 0
MACHINE PARAMETERS
General machine parameters
MAXOFFI (P165)
Tool wear offsets may be modified from tool inspection mode. This parameter
indicates the maximum amount of wear that may be entered for "I" (it is programmed
in mm or in inches).. It is defined in diameter at the lathe model.
Default value: 0.5
MAXOFFK (P166)
Tool wear offsets may be modified from tool inspection mode. This parameter
indicates the maximum amount of wear that may be entered for "K" (it is programmed
in mm or in inches)..
Default value: 0.5
TOOLTYPE (P167) It defines the behavior of the tool or of the tool offset.
This parameter has 16 bits counted from right to left.
bit 15 14 13 12 11 10 9 8 7 6 5 4 3 2 1 0
Each bit has a function or work mode associated with it. By default, all the bits will
be assigned the value of ·0·. Assigning the value of ·1· activates the corresponding
function.
Bit
Meaning
0 - 12
Not being used.
13
The STOP signal is always executed after the "T" function.
14
Machining in round corner mode when changing the tool offset.
15
Stop block preparation when executing a new "T".
Default value in all the bits: 0
Bit 13. The stop signal is taken into account after the "T" function is completed.
This function is applied when the tool change subroutine has been defined so it is
executed as a single block and the stop signal has been disabled.
If the stop signal ([CYCLE STOP] key or PLC signal) is received while executing a
subroutine, the CNC memorizes it until enabling the stop signal. In this situation, it
does not finish the subroutine and it does not consider the T as done, which could
cause irregularities at the tool magazine. To avoid this situation, it is possible to
consider the stop signal after executing the "T" function.
CNC 8035
This bit determines whether the stop signal is considered after completing the "T"
function (bit=1) or not (bit=0). If the bit is set to ·0·, the stop signal is considered in
the following cases.
• If the stop signal has been disabled, when it is re-enabled.
• If the stop signal has not been disabled, when pressing the [CYCLE STOP] key.
(SOFT M: V11.1X)
(SOFT T: V12.1X)
68
It should be borne in mind that the DSTOP instruction disables both the [CYCLE
STOP] key and the signal coming from the PLC. Both may be re-enabled with the
ESTOP instruction.
Installation manual
Type of corner when changing tool offsets.
When changing a tool offset, the change takes place at the end of the path. The corner
where the tool offset is changed may be machined either with rounding or without it.
This bit indicates whether that point is machined as a round corner (bit=1) or as a
square corner (bit=0).
This bit is only taken into account when round corner machining is active; when
working in square corner, the corner where the change takes place is always
machined as a square corner.
This bit determines whether block preparation is interrupted (bit=1) or not (bit=0)
while executing a "T" function.
Remember that when having a subroutine associated with the "T" function, the tool
change is carried out as follows:
MACHINE PARAMETERS
If while executing the "T" function, the block preparation detects a programming error,
this function might not be executed completely This means that the tool change may
have concluded correctly but the requested tool has not been assumed by the CNC.
To avoid this situation, it is possible to stop block preparation during the execution of
the "T" function.
General machine parameters
4.
Bit 15. Stop block preparation when executing the "T" function.
1. It executes the associated subroutine.
2. The "T" function is executed without using the M06 function.
3. The CNC assumes the change.
PROBEDEF (P168) Defines the behavior of the probe.
This parameter has 16 bits counted from right to left.
bit 15 14 13 12 11 10 9 8 7 6 5 4 3 2 1 0
Each bit has a function or work mode associated with it. By default, all the bits will
be assigned the value of ·0·. Assigning the value of ·1· activates the corresponding
function.
Bit
Meaning
0
Smooth stop of the probe.
1 - 15
Not being used.
Default value in all the bits: 0
Bit 0. Smooth stop of the probe (G75/G76).
This bit permits defining a smooth stop for probing moves (bit=1). When the probe
pulse is detected, the following error is not reset, thus making the probe stop more
smoothly.
When setting the smooth stop, a.m.p "DERGAIN (P25)" and s.m.p. "FFGAIN (P25)"
should be set to zero. This may be done by setting the set of gains through g.m.p.
"ACTGAIN2 (P108)" with the bit corresponding to G75/G76.
CNC 8035
(SOFT M: V11.1X)
(SOFT T: V12.1X)
69
Installation manual
CANSPEED (P169) CAN bus transmission speed for the digital drives.
The transmission speed depends on the length of the cable or total CAN connection
distance.
4.
Value
Meaning
0
1 Mbit/s. Maximum distance: 20 meters.
1
800 kbit/s. Maximum distance: 45 meters.
2
500 kbit/s. Maximum distance: 95 meters.
MACHINE PARAMETERS
General machine parameters
Default value: 0 (1 Mbit/s)
FEEDTYPE (P170) Behavior of the feedrate when programming F0.
Value
Meaning
0
Movement at maximum feedrate possible.
1
F0 cannot be programmed.
Default value: 0
If set to 0, F0 may be programmed and the motion blocks will be executed at the
maximum feedrate allowed.
If set to 0, it is not possible to program F0 or execute motion blocks with F0 active.
ANGAXNA (P171)
Cartesian axis associated with the incline axis.
Value
Meaning
Value
Meaning
0
None.
5
V axis.
1
X axis.
6
W axis.
2
Y axis.
7
A axis.
3
Z axis.
8
B axis.
4
U axis.
9
"C" axis.
Default value: 0 (none)
With the angular transformation of an incline axis, it is possible to make movements
along an axis that is not perpendicular to anoher. In order to program it in the
Cartesian system (Z-X), activate the incline axis transformation to convert the
movements to the non-perpendicular real axes (Z-X’).
X
X'
60º
Z
ANGAXNA
X
ORTAXNA
Z
ANGANTR
60º
OFFANGAX
CNC 8035
The axes defined in parameters "ANGAXNA" and "ORTAXNA"must exist and must
be linear. Those axes may have Gantry axes associated with them.
While searching home, the movements are carried out on the incline axes of the
machine. PLC mark "MACHMOVE" determines how the manual movements with
handwheels or with the keyboard will be carried out.
(SOFT M: V11.1X)
(SOFT T: V12.1X)
70
The incline plane is activated from the part-program (function G46). If the incline plane
is active, the displayed coordinates will be those of the Cartesian system. Otherwise,
it will display the coordinates of the real axes.
Installation manual
Axis perpendicular to the Cartesian axis associated with the incline plane.
Value
Meaning
Value
Meaning
0
None.
5
V axis.
1
X axis.
6
W axis.
2
Y axis.
7
A axis.
3
Z axis.
8
B axis.
4
U axis.
9
"C" axis.
4.
ANGANTR (P173)
Angle between the Cartesian angle and the angular axis it is associated with. If its
value is 0º, there is no need to do an angular transformation.
Positive angle when the angular axis has been rotated clockwise and negative if
counterclockwise.
Possible values
Within ±90 degrees.
Default value: 0
OFFANGAX (P174) Distance between machine zero and the origin of the coordinate system of the incline
axis.
MACHINE PARAMETERS
Default value: 0 (none)
General machine parameters
ORTAXNA (P172)
Possible values
Within ± 99999.9999 millimeters.
Within ±3937.00787 inches.
Default value: 0
COMPMODE
(P175)
It defines how to apply tool radios compensation.
Value
Meaning
0
With an angle between paths of up to 300º, both paths are joined
with straight sections. In the rest of the cases, both paths are
joined with arcs.
1
Both paths are joined with arcs.
2
With an angle between paths of up 300º, it calculates the
intersection. In the rest of the cases such as COMPMODE = 0.
Default value: 0
COMPMODE = 0.
The compensation method depends on the angle between paths.
• For angles up to 300º, it compensates joining both paths with straight sections.
• For angles over 300º, it compensates joining both paths with arcs.
COMPMODE = 2.
The compensation method depends on the angle between paths.
• For angles up to 300º, it calculates the intersection between the compensated
paths.
• For angles over 300º, it resolves it like when COMPMODE = 0.
CNC 8035
α
α < 300º
ADIMPG (P176)
α
(SOFT M: V11.1X)
(SOFT T: V12.1X)
α > 300º
This parameter enables manual intervention with an additive handwheel.
71
Installation manual
This function allows jogging the axes while a program is being executed. This
movement will be applied as if it were another zero offset.
This parameter has 16 bits counted from right to left.
bit 15 14 13 12 11 10 9 8 7 6 5 4 3 2 1 0
4.
MACHINE PARAMETERS
General machine parameters
Each bit has a function or work mode associated with it. By default, all the bits will
be assigned the value of ·0·. Assigning the value of ·1· activates the corresponding
function.
Bit
Meaning
0 - 10
Not being used.
11
Selecting the additive handwheel as handwheel associated with
the axis.
12
The resolution of the handwheel is set by g.m.p. ADIMPRES.
13
Manual intervention enabled with look-ahead.
14
Cancel the additive offset after M02, M30, emergency or Reset.
15
Manual intervention with additive handwheel is available.
Default value in all the bits: 0
When enabling the additive handwheel, the following must be borne in mind.
• If the DWELL parameter of an axis has been set and it is not previously in motion,
it activates the ENABLE mark of the axis and waits a time period indicated in
DWELL to check whether its SERVOON has been activated or not.
• The acceleration applied to the additive handwheel movement is that of
parameter. ACCTIME of the axis.
• On Gantry axes, the movement of the master axis using an additive handwheel
is also applied to the slave axis.
• The mirror image by PLC is not applied to the additive handwheel movement.
• When testing the software limits during block preparation, it checks the theoretical
coordinate ignoring the additional movement of the additive handwheel.
Bit 11. Selecting the additive handwheel as handwheel associated with the
axis.
If this bit is set to 1, even if there is a general handwheel, the additive handwheel will
always be the one associated with the axis.
Bit 12. The resolution of the handwheel is set by g.m.p. ADIMPRES.
This bit indicates whether the handwheel resolution is set by parameter ADIMPRES
(bit01) or not. Otherwise (bit=0), the resolution of the handwheel is set with the switch
of the operator panel. If the switch is not in the handwheel position, it assumes a x1
factor.
Bit 13. Manual intervention enabled with look-ahead.
This bit indicates whether manual intervention is available (bit=1) or not (bit=0) when
look-ahead is active.
CNC 8035
Bit 14. Cancel the additive offset after M02, M30, emergency or Reset.
This bit determines (bit=1) that the additive offset is canceled after executing M02/
M30 or after an emergency or reset.
Bit 15. Manual intervention with additive handwheel is available.
(SOFT M: V11.1X)
(SOFT T: V12.1X)
This bit indicates whether manual intervention with an additive handwheel is available
(bit=1) or not (bit=0). If set to ·0·, the rest of the bits are ignored.
The additive handwheel is activated and deactivated with PLC signal MANINT.
72
Installation manual
ADIMPRES (P177) Resolution of the additive handwheel.
Value
Meaning
0
0.001 mm or 0.0001 inch.
1
0.01 mm or 0.001 inch.
2
0.1 mm or 0.01 inch.
Default value: 0
These values are only applied when bit 12 of parameter ADIMPG has been set to ·1·.
EXPLORER (P180) It sets how to access the explorer.
Value
Meaning
0
It is accessed using the < explorer> softkey of the utilities,
execute, simulate or edit modes.
1
It is accessed directly from the utilities, execute, simulate or edit
modes.
Default value: 0
REPOSTY (P181)
MACHINE PARAMETERS
SERCDEL2 (P179) Not being used.
General machine parameters
4.
SERCDEL1 (P178) Not being used.
It may be used to select the repositioning mode:
Value
Meaning
0
It activates the basic repositioning mode
1
It activates the extended repositioning mode
Default value: 1
DISSIMUL (P184)
It may be used to disable the simulation modes and the block search modes when
selecting blocks in execution. Setting the relevant bit to 1 disables it and removes from
the menu the softkey assigned to this bit. This parameter has 16 bits counted from
right to left.
For the block search: Disabling in execution:
DISSIMUL =
xxxx
xxxx
bit 7 = 1
EXEC G SEARCH
bit 6 = 1
EXEC GMST SEARCH
0/1 x x x
xxxx
xxxx
xxxx
For simulation: Disabling in simulation:
DISSIMUL =
0/1 x x x
xxxx
bit 10 = 1 RAPID [S0]
bit 11 = 1 RAPID
bit 12 = 1 MAIN PLANE
bit 13 = 1 G, M, S, T FUNCTIONS
bit 14 = 1 G FUNCTIONS
bit 15 = 1 THEORETICAL PATH
CNC 8035
(SOFT M: V11.1X)
(SOFT T: V12.1X)
73
Installation manual
4.3
Axis parameters
AXISTYPE (P0)
Axis parameters
MACHINE PARAMETERS
4.
It sets the type of axis and whether it is governed by the CNC or by the PLC.
Value
Meaning
0
Normal linear axis.
1
Rapid positioning linear axis (G00).
2
Normal rotary axis.
3
Rapid positioning rotary axis (G00).
4
Rotary axis with Hirth toothing (positioning in whole degrees).
5
Normal linear axis commanded from the PLC.
6
Rapid positioning linear axis (G00) commanded from the PLC.
7
Normal rotary axis commanded from the PLC.
8
Rapid positioning rotary axis (G00) commanded from the PLC.
9
Rotary axis with Hirth toothing (positioning in whole degrees)
commanded from the PLC.
Default value: 0
By default, rotary axes are Rollover and are displayed between 0º and
359.9999º. If rollover is not desired, set a.m.p. ROLLOVER (P55)=NO. The
axis position will be displayed in degrees.
Positioning-only and/or Hirth axes follow the shortest path when programmed
in absolute (G90). In other words, if its current position is 10º, and its target
position is 350º, the axis will go through, 10º, 9º, ... 352, 351, 350.
See "5.1 Axes and coordinate systems" on page 123.
DFORMAT (P1)
Indicates the work units (radius or diameter) and the display format used for the axis.
Value
GANTRY (P2)
CNC 8035
Work units
Data format
degrees
mm.
inch.
0
radius
5.3
5.3
4.4
1
radius
4.4
4.4
3.5
2
radius
5.2
5.2
5.3
3
radius
4
diameters
5.3
5.3
4.4
5
diameters
4.4
4.4
3.5
6
diameters
5.2
5.2
5.3
It is not displayed
Indicates, if it is a Gantry axis, which axis is this one associated with. This parameter
is to be set only on the slaved axis according to the following code.
Value
Meaning
Value
Meaning
0
Not Gantry.
5
With the V axis.
1
With the X axis.
6
With the W axis.
2
With the X axis.
7
With the A axis.
3
With the Z axis.
8
With the B axis.
4
With the U axis.
9
With the C axis.
Default value: 0 (it is not Gantry)
(SOFT M: V11.1X)
(SOFT T: V12.1X)
74
The position of the Gantry axis is displayed next to its associated axis unless machine
parameter "DFORMAT(P1)=3".
Installation manual
Example:
If the X and U axes form a Gantry pair, the U axis being the slave axis, program
as follows:
Parameter GANTRY (P2) for the X axis = 0
Parameter GANTRY (P2) for U axis = 1 (associated with X axis)
This way, When programming an X axis move, the U axis will also move the same
distance.
DROAXIS (P4)
Indicates whether it is a normal axis or it only works as a Digital Read Out
Value
Meaning
NO
It is a normal axis.
YES
It only works as a Digital Read Out.
Default value: NO
LIMIT+ (P5)
LIMIT - (P6)
They set the travel limits for the axis (positive and negative). Each one of them
indicates the distance from machine reference zero to the relevant travel limit.
4.
Axis parameters
Not being used.
MACHINE PARAMETERS
SYNCHRO (P3)
Possible values
Within ±99999.9999 degrees or millimeters.
Within ±3937.00787 inches.
Default value: For LIMIT+ (P5) = 8000 mm.
For LIMIT- (P6) = -8000 mm.
On linear axes, if both parameters are set to 0, the travel limits will be ignored.
On the rotary axes, act as follows:
• When both parameters are set to "0", the axis may be moved indefinitely in any
direction (rotary tables, indexers, etc.)
• When working with positioning axes and Hirth axes, try to program in incremental
coordinates to avoid mistakes. For example, C axis with P5=0, P6=720 and the
positioning axis in 700 (340 on the screen), when programming G90 C10, the
CNC tries to move the axis via the shortest path (701, 702, etc.) but it will issue
an error message for overrunning the travel limits.
• If the travel of positioning axes and hirth axes is limited to less than a turn, they
cannot move via the shortest path.
• When the travel is limited to less than a revolution and a positive and negative
display is desired, for example P5=-120, P6=120, it is possible to program G90
with positive and negative values.
PITCH (P7)
Defines the pitch of the ballscrew or the resolution of the linear feedback device being
used.
It must be set when the feedback is handled through the CNC connector; analog servo
or digital with DRIBUSLE = 0.
Possible values
Between 0.0001 and 99999.9999 degrees or millimeters.
Between 0.00001 and 3937.00787 inches.
CNC 8035
Default value: 5 mm.
Analog servo system.
The meaning of parameter PITCH depends on the type of axis and encoder used.
• On linear axis with rotary encoder, it sets the leadscrew pitch per encoder turn.
(SOFT M: V11.1X)
(SOFT T: V12.1X)
• On linear axis with linear encoder, it sets the resolution of the encoder.
• On rotary axis, it sets the number of degrees the shaft rotates per encoder turn.
75
Installation manual
With this type of servo system, parameter PITCHB (P86) has no meaning.
Axis type
Encoder type
PITCH (P7)
NPULSES (P8)
Linear axis.
Linear encoder.
Encoder resolution.
0
Rotary encoder.
Leadscrew pitch per Number of pulses (lines)
encoder turn.
per encoder turn.
Rotary encoder.
Degrees that the shaft Number of pulses (lines)
rota tes p er en code r per encoder turn.
turn.
Rotary axis.
4.
Axis parameters
MACHINE PARAMETERS
When using gear reduction on the shaft, only the whole assembly must be taken into
account when setting one of parameters PITCH or NPULSES.
Linear axis with a 5 mm pitch leadscrew.
PITCH = 5 mm.
Axis with a 20µm-pitch Fagor linear encoder
PITCH = 0.020 mm.
Rotary axis with 1/10 gear ratio
PITCH = 36º.
CAN servo system.
The meaning of parameter PITCH depends on the type of axis regardless of the type
of encoder used.
• On linear axis, it sets the resolution of the encoder.
• On rotary axis, it sets the number of degrees the shaft rotates per encoder turn.
In this type of servo system, the leadscrew pitch is set through parameter PITCHB
(P86).
Axis type
Encoder type
PITCH (P7)
PITCHB (P86)
NPULSES (P8)
Linear axis.
Linear encoder.
Encoder resolution.
0
0
Rotary encoder.
Encoder resolution.
Leadscrew pitch per Number of pulses (lines)
encoder turn.
per encoder turn.
Rotary encoder.
Degrees that the shaft
r ot at es pe r e nc od er
turn.
0
Rotary axis.
Number of pulses (lines)
per encoder turn.
When using gear reduction on the shaft, only the whole assembly must be taken into
account when setting one of parameters PITCH or NPULSES.
NPULSES (P8)
Indicates the number or pulses/rev provided by the rotary encoder. When using a
linear encoder, it must be set to ·0·.
It must be set when the drive's velocity command is analog or it is sent via CAN
(DRIBUSLE = 0 or 1).
When using gear reduction on the shaft, only the whole assembly must be taken into
account when setting one of parameters PITCH or NPULSES.
Possible values
Integer numbers between 0 and 65535.
Default value: 1250
CNC 8035
i
DIFFBACK (P9)
(SOFT M: V11.1X)
(SOFT T: V12.1X)
When using CAN servo, if both parameters NPULSES and PITCHB are set
to ·0·, the CNC will assume the equivalent values of the drive.
Indicates whether the spindle encoder uses differential signals (double ended) or not.
Value
Meaning
NO
It does NOT use differential signals.
YES
It uses differential signals.
Default value: YES
76
Installation manual
SINMAGNI (P10)
Indicates the multiplying factor (x1, x4, x20, etc.) that the CNC must apply only to
sinusoidal feedback signal.
For square feedback signals, this parameter must be set to 0 and the CNC will always
apply a multiplying factor of x4.
Possible values
Integer numbers between 0 and 255.
Default value: 0
NPULSES
(P8)
SINMAGNI
(P10)
Square signal encoder
Leadscrew
pitch
Nr of pulses
0
Sinusoidal signal encoder
Leadscrew
pitch
Nr of pulses
multiplying
factor
linear encoder
pitch
0
0
Sinusoidal signal linear encoder linear encoder
pitch
0
multiplying
factor
Square signal linear encoder
FBACKAL (P11)
MACHINE PARAMETERS
PITCH
(P7)
Axis parameters
4.
The axis feedback resolution must be set using a.m.p. PITCH (P7), NPULSES (P8)
and SINMAGNI (P10) as shown in the following table:
This parameter is to be used only when the feedback signals are sinusoidal or
differential (double ended).
Indicates whether the feedback alarm for this axis will be ON or OFF.
Value
Meaning
OFF
No feedback alarm desired, it is canceled.
ON
Feedback alarm is being used.
Default value: ON
FBALTIME (P12)
It indicates the maximum time that the axis may stay without properly responding to
the CNC’s command.
Depending on the command for an axis, the CNC calculates the number of feedback
pulses that it must receive for each sample period.
The axis will be considered that it is working fine when the number of pulses received
is between 50% and 200% of the calculated number.
If at any time, the number of feedback pulses received is out of this range, the CNC
will keep checking that axis until it detects that the number of pulses received has
come back to normal. But if more time elapses than the one indicated in this
parameter without the axis coming back to normal, the CNC will issue the relevant
error message.
Possible values
Integers between 0 and 65535 ms.
Default value: 0 (it is not checked)
AXISCHG (P13)
Indicates the counting direction. If correct, leave it as is, but to change it, select YES
if it was set to NO and viceversa. When changing this parameter, also change a.m.p.
LOOPCHG (P26).
CNC 8035
Possible values
NO / YES.
Default value: NO
(SOFT M: V11.1X)
(SOFT T: V12.1X)
77
Installation manual
BACKLASH (P14)
Indicates the amount of backlash. Enter 0 when using linear encoders.
Possible values
Within ±99999.9999 degrees or millimeters.
Within ±3937.00787 inches.
Default value: 0
LSCRWCOM (P15) Indicates whether the CNC should apply leadscrew error compensation or not.
Axis parameters
MACHINE PARAMETERS
4.
Value
Meaning
OFF
Leadscrew compensation not being used.
ON
Leadscrew compensation being used.
Default value: OFF
NPOINTS (P16)
Indicates the number of leadscrew error compensation points available in the table.
The values in this table will be applied if a.m.p. “LSCRWCOM” (P15) is ON.
Possible values
Integer numbers between 0 and 255.
Default value: 30
DWELL (P17)
Indicates the dwell from the moment the “ENABLE” signal is activated until the analog
voltage is sent out.
Possible values
Integers between 0 and 65535 ms.
Default value: 0 (none)
ACCTIME (P18)
Defines the acceleration stage or the time it takes the axis to reach the feedrate
selected with a.m.p. GOFFED (P38). This time is also valid for the deceleration stage.
Possible values
Integers between 0 and 65535 ms.
Default value: 0 (none)
INPOSW (P19)
Indicates the width of the IN POSITION zone (dead band) where the CNC considers
the axis to be in position.
Possible values
Between 0 and 99999.9999 degrees or millimeters.
Between 0 and 3937.00787 inches.
Default value: 0.01 mm.
INPOTIME (P20)
Indicates the time period that the axis must remain in the “IN POSITION” zone in order
to consider it to be in position.
On axes that are only controlled during the interpolation or the positioning (dead
axes), this prevents the CNC from considering the block completed before the axis
has stopped and could get out of the in-position zone.
Possible values
Integers between 0 and 65535 ms.
Default value: 0
CNC 8035
MAXFLWE1 (P21)
Indicates the maximum following error allowed when this axis moves.
Possible values
(SOFT M: V11.1X)
(SOFT T: V12.1X)
78
Between 0 and 99999.9999 degrees or millimeters.
Between 0 and 3937.00787 inches.
Default value: 30 mm.
Installation manual
MAXFLWE2 (P22)
Indicates the maximum following error allowed when this axis is stopped.
Possible values
Between 0 and 99999.9999 degrees or millimeters.
Between 0 and 3937.00787 inches.
Default value: 0.1 mm.
Indicates the value of the proportional gain. It sets the command in millivolts desired
for a following error of 1 mm.
4.
= Following error (mm) x PROGAIN
Possible values
Integers between 0 and 65535 mV/mm.
Default value: 1000 mV/mm.
Example:
A feedrate of 20000 mm/min is selected by a.m.p. G00FEED (P38) to obtain 1 mm
of following error (axis lag) for a feedrate of F = 1000 mm/min.
MACHINE PARAMETERS
Velocity command (mV)
Axis parameters
PROGAIN (P23)
Command from the drive: 9.5V for a feedrate of 20000 mm/min.
Command for a feedrate of F = 1000 mm/min:
Command = (9.5/20000) x 1000 = 475 mV
Therefore “PROGAIN” = 475
DERGAIN (P24)
Indicates the value of the derivative gain. Its value represents the analog voltage (in
millivolts) corresponding to a change in following error of 1mm (0.03937 inches) in
10 milliseconds.
This analog voltage will be added to the one calculated for the proportional gain.
Analog voltage
ξ ⋅ DERGAIN
= ⎛⎝ ξ ⋅ PROGAIN + ------------------------------------⎞⎠
10 ⋅ t
To apply this gain to an axis, that axis should be working with acc/dec [a.m.p.
ACCTIME (P18) other than 0].
Possible values
Integer numbers between 0 and 65535.
Default value: 0 (derivative gain not applied)
FFGAIN (P25)
Indicates the % of the analog voltage due to the programmed feedrate. The rest will
depend upon the following error. Both the proportional and derivative gains will be
applied onto this following error.
CNC 8035
Analog voltage
(SOFT M: V11.1X)
(SOFT T: V12.1X)
·
⋅ DERGAIN- + FFGAIN
× Fprog × MAXVOLT⎞
= ⎛⎝ ξ ⋅ PROGAIN + ξ--------------------------------------------------------------------------------------------------------------------⎠
10 ⋅ t
100 ⋅ G00FEED
79
Installation manual
The feed-forward gain improves the position loop minimizing the following error, but
it should only be used when working with acceleration/deceleration.
Possible values
Between 0 and 100.99 rpm (numbers with 2 decimals).
Default value: 0 (feed-forward gain not applied)
Usually, a value between 40% and 80% is assigned depending mainly on the type
of machine and its characteristics.
Axis parameters
MACHINE PARAMETERS
4.
When having a CNC with a version V11.01 or later where FFGAIN or FFGAIN2
have two decimals, when passing them to an older version, those parameters
lose their decimals.
LOOPCHG (P26)
Indicates the sign of the analog output. If correct, leave it as is, but to change it, select
YES if it was set to NO and viceversa.
Possible values
NO / YES.
Default value: NO
MINANOUT (P27)
Indicates the minimum analog output for this axis.
Possible values
It is given in D/A converter units and it admits integer values between
0 and 32767 which corresponds to an analog voltage of 10V.
Default value: 0
SERVOFF (P28)
MINANOUT
Minimum analog output
1
--3277
--32767
0.3 mV.
--1 V.
--10 V.
Indicates the analog offset value for the spindle drive.
Possible values
It is given in D/A converter units and it admits integer values between
0 and ±32767 which corresponds to an analog voltage of 10V.
Default value: 0 (not applied)
CNC 8035
(SOFT M: V11.1X)
(SOFT T: V12.1X)
80
SERVOFF
Analog voltage
-32767
---3277
--1
--3277
--32767
-10 V.
---1 V.
--0.3 mV.
--1 V.
--10 V.
Installation manual
BAKANOUT (P29)
Additional velocity command pulse to make up for the possible leadscrew backlash
when reversing the moving direction.
Possible values
It is given in D/A converter units and it admits integer values between
0 and 32767 which corresponds to an analog voltage of 10V.
Default value: 0 (not applied)
1
--3277
--32767
0.3 mV.
--1 V.
--10 V.
Every time the movement is inverted, the CNC will apply to that axis the velocity
command corresponding to the movement plus the additional velocity command
pulse set in this parameter. This additional analog voltage will be applied for a period
of time indicated in the a.m.p. BAKTIME (P30).
BAKTIME (P30)
4.
Axis parameters
Additional analog
voltage
MACHINE PARAMETERS
BAKANOUT
It indicates the duration of the additional velocity command pulse to make up for
backlash in movement reversals.
Possible values
Integers between 0 and 65535 ms.
Default value: 0
DECINPUT (P31)
Indicates whether or not this axis has a home switch for machine reference search.
Value
Meaning
NO
It has no home switch.
YES
It has a home switch.
Default value: YES
REFPULSE (P32)
It indicates the type of flank of the I0 signal that is used for home search.
Value
Meaning
+ sign
Positive flank (leading edge); change from 0V to 5V.
- sign
Negative flank (trailing edge); change from 5V to 0V.
Default value: + sign
REFDIREC (P33)
Indicates the direction of the home search in this axis.
Value
Meaning
+ sign
Positive direction.
- sign
Negative direction.
Default value: + sign
REFEED1 (P34)
Indicates the axis feedrate when searching home until it hits the home switch.
CNC 8035
Possible values
Between 0.0001 and 199999.9999 degrees/min or mm/min.
Between 0.00001 inches/min and 7874.01574 inches/min.
Default value: 1000 mm/min.
(SOFT M: V11.1X)
(SOFT T: V12.1X)
81
Installation manual
REFEED2 (P35)
Indicates the axis feedrate when searching home after hitting the home switch until
it finds the marker pulse (Io).
Possible values
Between 0.0001 and 99999.9999 degrees/min or mm/min.
Between 0.00001 inches/min and 3937.00787 inches/min.
Default value: 100 mm/min.
REFVALUE (P36)
4.
Indicates the position value of the machine reference point (physical location of the
marker pulse) with respect to machine reference zero.
Axis parameters
MACHINE PARAMETERS
Possible values
Within ±99999.9999 degrees or millimeters.
Within ±3937.00787 inches.
Default value: 0
The machine reference point is a point that the OEM sets on the machine to
synchronize the system. The CNC positions the axis at this point, instead of moving
it to the machine zero point.
When the machine uses semi-absolute scales (with coded marker pulses), the axis
may be homed anywhere within its travel. Thus, this parameter must only be set when
applying leadscrew error compensation. The amount of leadscrew error of the
machine reference point may have any value.
MAXVOLT (P37)
Indicates the maximum analog voltage corresponding to the maximum feedrate of
the axis indicated by a.m.p. G00FEED (P38).
Possible values
Integer numbers between 0 mV and 9999 mV.
Default value: 9500 (9.5 V)
G00FEED (P38)
Indicates the maximum feedrate G00 (rapid traverse) of this axis.
Possible values
Between 0.0001 and 199999.9999 degrees/min or mm/min.
Between 0.00001 inches/min and 7874.01574 inches/min.
Default value: 10000 mm/min.
UNIDIR (P39)
Indicates the direction of the unidirectional approach in G00 moves.
Value
Meaning
+ sign
Positive direction.
- sign
Negative direction.
Default value: + sign
OVERRUN (P40)
Indicates the distance to be kept between the approach point and the programmed
point. If it is a Lathe model, this distance must be in radius.
Possible values
Between 0.0001 and 99999.9999 degrees/min or mm/min.
Between 0.00001 inches/min and 3937.00787 inches/min.
Default value: 0 (not unidirectional)
CNC 8035
UNIFEED (P41)
Indicates the feedrate to be used from the approach point to the programmed point.
Possible values
Between 0.0001 and 99999.9999 degrees/min or mm/min.
Between 0.00001 inches/min and 3937.00787 inches/min.
(SOFT M: V11.1X)
(SOFT T: V12.1X)
82
Default value: 0
Installation manual
MAXFEED (P42)
Indicates the maximum programmable feedrate (F0).
Possible values
Between 0.0001 and 199999.9999 degrees/min or mm/min.
Between 0.00001 inches/min and 7874.01574 inches/min.
Default value: 5000 mm/min.
Indicates the feedrate F assumed in the JOG mode if no feedrate is active.
Possible values
4.
Default value: 1000 mm/min.
PRBFEED (P44)
Indicates the probing feedrate when calibrating a tool in "JOG" mode.
Possible values
Between 0.0001 and 99999.9999 degrees/min or mm/min.
Between 0.00001 inches/min and 3937.00787 inches/min.
Default value: 100 mm/min.
MACHINE PARAMETERS
Between 0.0001 and 199999.9999 degrees/min or mm/min.
Between 0.00001 inches/min and 7874.01574 inches/min.
Axis parameters
JOGFEED (P43)
MAXCOUPE (P45) It indicates the maximum difference allowed between the following errors of the
Gantry axes.
This value is only assigned to the slave axis.
Possible values
Between 0.0001 and 99999.9999 degrees or millimeters.
Between 0.00001 and 3937.00787 inches.
Default value: 1 mm.
ACFGAIN (P46)
Indicates whether or not the value assigned to a.m.p. DERGAIN (P24) is applied onto
the variations of the programmed feedrate (AC-forward).
Value
Meaning
NO
It is applied on variations of following error (derivative gain).
YES
It is applied on the variations of the programmed feedrate that
are due to acceleration/deceleration (AC-forward).
Default value: YES
ACFGAIN = NO
ACFGAIN = YES
CNC 8035
(SOFT M: V11.1X)
(SOFT T: V12.1X)
83
Installation manual
REFSHIFT (P47)
This parameter is used when once the machine has been all set up, it is necessary
to reinstall the feedback system and the new machine reference point (home) no
longer coincides physically with the previous one.
It indicates the difference existing between the two reference points, the previous one
and the current one.
Possible values
Within ±99999.9999 degrees or millimeters.
Within ±3937.00787 inches.
4.
If this parameter has a value other than 0, once the home search has been carried
out (the reference mark of the feedback device has been detected) , the CNC moves
the distance indicated by a.m.p. REFSHIFT (P47). This way, the machine reference
point will always be the same.
Axis parameters
MACHINE PARAMETERS
Default value: 0
This movement is carried out at the feedrate indicated by a.m.p. REFEED2 (P35).
STOPTIME (P48)
STOPMOVE (P49)
These parameters are used in conjunction with a.m.p. "STOPAOUT (P50)" with
function G52 (move to hardstop).
STOPTIME (P48)
The CNC considers that the hardstop has been run into when a certain time period
elapses without the axis moving. This time period is indicated, in thousands of a
second, by parameter STOPTIME (P48).
Possible values
Integers between 0 and 65535 ms.
Default value: 0
STOPMOVE (P49)
The CNC considers the axis to be stopped when its movements do not exceed the
value set by STOPMOVE (P49) during the time period set by STOPTIME (P48).
Possible values
Between 0.0001 and 99999.9999 millimeters.
Between 0.00001 and 3937.00787 inches.
Default value: 0
STOPAOUT (P50)
This parameter is used with function G52 (move to hardstop) and it indicates the
residual analog voltage supplied by the CNC to exert pressure once contact has been
detected.
Possible values
It is given in D/A converter units and it admits integer values between
0 and 32767 which corresponds to an analog voltage of 10V.
Default value: 0
CNC 8035
(SOFT M: V11.1X)
(SOFT T: V12.1X)
i
INPOSW2 (P51)
84
STOPAOUT
Minimum analog output
1
--3277
--32767
0.3 mV.
--1 V.
--10 V.
This parameter is especially designed for hydraulic devices.
When using servo motors, first reduce the maximum torque of the drive by
means of an "M" function in order to prevent the motor from overheating.
This parameter is used when function G50 (controlled round corner) is active.
Installation manual
It defines the area before the programmed coordinate where the CNC considers the
axis to be in position and goes on to execute the next block.
Possible values
Between 0 and 99999.9999 degrees or millimeters.
Between 0 and 3937.00787 inches.
Default value: 0.01 mm.
It should be assigned a value 10 times the value of “INPOSW”
Units:
It indicates the type of Io signal (marker pulse) provided by the feedback device.
Value
Meaning
x0
normal I0.
x1
"A" type distance-coded I0.
x2
Type B distance-coded reference mark (only linear
encoder COVS).
x3
Normal I0 (search with retraction)
Axis parameters
4.
Axis machine parameter I0TYPE has two digits:
MACHINE PARAMETERS
I0TYPE (P52)
When using linear encoders with distance-coded reference marks (I0), set a.m.p.
I0CODI1 (P68) and I0CODI2 (P69).
Tenths:
It defines whether it stops smoothly or not when detecting the reference mark of the
axes or not.
Value
Meaning
0x
Normal stop on I0.
1x
Smooth stop on I0.
When setting the smooth stop, parameters "DERGAIN" and "FFGAIN" should be set
to zero.
ABSOFF (P53)
The CNC takes this parameter into account when a.m.p. I0TYPE (P52) has been set
with a value other than 0.
Linear encoders having a distance-coded reference mark indicate the machine
position with respect to the "zero" of the linear encoder.
Possible values
Within ± 99999.9999 millimeters.
Within ±3937.00787 inches.
Default value: 0
In order for the CNC to show the position of the axes with respect to the machine
reference zero (home), this parameter must be assigned the position value
(coordinate) of the machine reference zero (point "M") with respect to the "zero" of
the linear encoder (C).
CNC 8035
MINMOVE (P54)
This parameter has to do with the axis logic outputs "ANT1" through "ANT3".
(SOFT M: V11.1X)
(SOFT T: V12.1X)
85
Installation manual
If the axis move is smaller than the value indicated by this a.m.p. MINMOVE (P54),
the corresponding axis logic output "ANT1 through "ANT3" goes high.
Possible values
Within ±99999.9999 degrees or millimeters.
Within ±3937.00787 inches.
Default value: 0
ROLLOVER (P55)
Axis parameters
MACHINE PARAMETERS
4.
The CNC takes this parameter into account when the axis has been set as rotary
“AXISTYPE (P0)=2 or 3". It indicates whether the rotary axis is Rollover or not.
Value
Meaning
NO
It is NOT Rollover.
YES
It is Rollover.
Default value: YES
DRIBUSID (P56)
It indicates the address of the digital drive (CAN) associated with the axis. It
corresponds with the value of the drive's rotary switch (address, device select).
Value
Meaning
0
Analog axis.
1-8
Address of the digital drive.
Default value: 0
It is recommended (not necessary) that the Can addresses of the various axes and
spindles be consecutive and start from number ·1· (the address of the CNC is always
·0·). For example, with 3 CAN axes and 1 CAN spindle, the values of this parameter
must be 1, 2, 3 and 4.
EXTMULT (P57)
This parameter is to be used when utilizing a distance-coded feedback system. It
indicates the ratio between the mechanical period or the graduation pitch on the glass
or steel tape and the electrical period or period of the feedback signal supplied to the
CNC.
Possible values
Period of the graduation on the glass (mechanical period or
EXTMULT (P57) =
Period of the feedback signal (electrical period)
Default value: 0
Example:
E.g. Fagor linear encoder “FOT” has a graduation pitch of 100 µm and a feedback
signal period of 20 µm.
EXTMULT = 100 / 20 = 5
Values to be assigned for Fagor encoders with distance-coded I0.
Linear encoders
CNC 8035
S O P GOP
SVOP
(SOFT M: V11.1X)
(SOFT T: V12.1X)
86
M OT C OT
MOC COC
MOP COP
FOP
I0CODI1
(P68)
I0CODI2
(P69)
EXTMULT
(P57)
1000
1001
1
Installation manual
MOX
COX
MOY
COY
I0CODI2
(P69)
EXTMULT
(P57)
1000
1001
5
1000
1001
10
LOP
2000
2001
1
LOX
2000
2001
10
1000
1001
25
I0CODI1
(P68)
I0CODI2
(P69)
EXTMULT
(P57)
FOT
FOX
Rotary encoder
SMOTIME (P58)
HO
SO
90000 pulses
1000
1001
5
HO
SO
180000 pulses
1000
1001
10
HOP
SOP
18000 pulses
1000
1001
1
Sometimes the axis does not respond as desired on particular movements
(handwheel movements, etc.).
4.
Axis parameters
S OX GOX
SVOX
I0CODI1
(P68)
MACHINE PARAMETERS
Linear encoders
In these cases, the axis response may be smoothed by applying a filter to speed
variations. This filter is set by parameter SMOTIME that indicates the duration of the
filter in milliseconds, value given by g.m.p. LOOPTIME (P72).
Possible values
Integers between 0 and 64 times the value assigned to g.m.p.
LOOPTIME (P72).
If LOOPTIME = 0 (4 ms), the maximum value that could be assigned
to SMOTIME will be 64 x 4 = 256 ms.
Default value: 0
To obtain a better response, parameter SMOTIME of the axes interpolating with each
other should be set with the same value.
ACCTIME2 (P59)
PROGAIN2 (P60)
DERGAIN2 (P61)
FFGAIN2 (P62)
These parameters define the second set of gains and accelerations. They must be
set like the parameters that define the first set.
First set
ACCTIME
PROGAIN
DERGAIN
FFGAIN
(P18)
(P23)
(P24)
(P25)
Second set
ACCTIME2
PROGAIN2
DERGAIN2
FFGAIN2
(P59)
(P60)
(P61)
(P62)
To select the second set of gains and accelerations, set g.m.p. ACTGAIN2 (P108)
correctly or activate the CNC’s general logic input ACTGAIN2 (M5013).
CNC 8035
(SOFT M: V11.1X)
(SOFT T: V12.1X)
87
Installation manual
DRIBUSLE (P63)
The CNC considers this parameter when using a digital drive (CAN). Axis parameter
DRIBUSID (P56) other than 0.
Even when the data exchange between the CNC and the drive is done via digital CAN
bus, one must define whether the feedback is also handled via bus or through the
corresponding connector for the axis or spindle.
Axis parameters
MACHINE PARAMETERS
4.
Value
Meaning
0
The feedback is done via connector.
1
The feedback is done via CAN.
First feedback (motor feedback).
DRIBUSLE = 0
The CNC controls the position loop.
The axis feedback is done via connector.
The command to the drive is sent out via CAN.
DRIBUSLE = 1
The CNC controls the position loop.
The axis feedback is done via CAN. First feedback (motor
feedback).
The command to the drive is sent out via CAN.
POSINREF (P64)
Not being used.
SWITCHAX (P65)
When having 2 axes controlled by a single servo drive, machine parameter
SWITCHAX of the secondary axis indicates which one is the main axis it is associated
with.
Value
Meaning
Value
Meaning
0
None.
6
With the W axis.
1
With the X axis.
7
With the A axis.
2
With the X axis.
8
With the B axis.
3
With the Z axis.
9
With the C axis.
4
With the U axis.
10
Spindle.
5
With the V axis.
Default value: 0
Example:
On a machine where the X and Z axes cannot move at the same time, the X axis is
the main axis and the Z axis is the secondary (associated with the X axis).
SWITCHAX for X = 0.
SWITCHAX for Z = 1.
CNC 8035
(SOFT M: V11.1X)
(SOFT T: V12.1X)
88
Installation manual
SWINBACK (P66)
When having 2 axes controlled by a single servo drive, machine parameter
SWINBACK of the secondary axis indicates whether it has its own feedback device
or it uses that of the main axis it is associated with.
Value
Meaning
0
It assumes the feedback of the main axis.
1
It has its own feedback device.
Default value: 0
X axis (main)
SWINBACK of the X axis = 0.
Z axis (secondary)
SWINBACK of the Z axis = 1.
MACHINE PARAMETERS
A. Each axis has its own feedback device.
Axis parameters
4.
The following examples show several possibilities. In all of them, the toggling of the
analog voltage must be done from the PLC using the SWTCH2 mark.
B. The two axes share the same feedback device. It must be connected to the
feedback connector of the main axis.
JERKLIM (P67)
X axis (main)
SWINBACK of the X axis = 0.
Z axis (secondary)
SWINBACK of the Z axis = 0.
It defines the derivative of the acceleration. It may be used to limit the acceleration
changes to smooth the machine movements on small speed increments or
decrements and with FFGAIN values close to 100%.
The CNC ignores this parameter when moving with electronic handwheels,
mechanical handwheels, look ahead, threading (G33) and rigid tapping.
CNC 8035
The smaller the value assigned to JERKLIM, the smoother the machine’s response,
but the acc/dec time will be longer. When increasing the value of JERKLIM, it
decreases the acc/dec time but the machine response worsens.
Possible values
Between 0 and 99999.9999
(SOFT M: V11.1X)
(SOFT T: V12.1X)
m/s3.
Default value: 0
Recommended values:
89
Installation manual
In millimeters
JERKLIM = 82*G00FEED / ACCTIME**2
In inches
JERKLIM = 2082*G00FEED / ACCTIME**2
Use parameter ACCTIME2 when adjusting the second set of parameters.
If the stability of the machine is affected by the values mentioned earlier, the JERKLIM
value should be lowered to half as much.
I0CODI1 (P68)
I0CODI2 (P69)
Axis parameters
MACHINE PARAMETERS
4.
The CNC takes this parameter into account when a.m.p. I0TYPE (P52) has been set
with a value other than 0. Parameter I0CODD1 (P68) indicates the gap between 2
fixed distance-coded I0's and parameter I0CODD2 (P69) indicates the gap between
2 variable distance-coded I0's.
It is set in number of waves.
Possible values
Between 0 and 65535 waves.
Default value: For I0CODD1 (P68) = 1000.
Default value: For I0CODD2 (P69) = 1001.
Example with Fagor linear encoder
Gap between two fixed distance-coded 20 000 µm
I0's
Gap between two variable distance-coded 20 020µm
I0's
Signal period
20 µm
Number of waves between fixed I0's
20000/(20 x EXTMULT) = 1000
Number of waves between variable I0's
20020/(20 x EXTMULT) = 1001
Values to be assigned for Fagor encoders with distance-coded I0.
Linear encoders
I0CODI1
(P68)
I0CODI2
(P69)
EXTMULT
(P57)
S O P GOP
SVOP
M OT C OT
MOC COC
MOP COP
FOP
1000
1001
1
S OX GOX
SVOX
MOX
COX
FOT
1000
1001
5
MOY
COY
1000
1001
10
LOP
2000
2001
1
LOX
2000
2001
10
1000
1001
25
I0CODI1
(P68)
I0CODI2
(P69)
EXTMULT
(P57)
FOX
Rotary encoder
HO
SO
90000 pulses
1000
1001
5
HO
SO
180000 pulses
1000
1001
10
HOP
SOP
18000 pulses
1000
1001
1
CNC 8035
ORDER (P70)
Filter order. The down ramp is dampened down; the larger the number the greater
the drop.
Possible values
(SOFT M: V11.1X)
(SOFT T: V12.1X)
From 0 to 4.
Default value: 0 (the filter is not applied).
When applying a filter, it must be set with an order of ·3·. Before setting it to another
value, consult with Fagor Automation's technical service.
90
Installation manual
If the filter has been designed wrong, it will not be applied.
i
The filters are not applied while moving with an electronic handwheel or a
mechanical handwheel or while tracing.
It is recommended not to activate these filters on machines carrying out
movements against a hard stop.
Filter type. Two types of filters may be used, namely "low passing" or "antiresonance". To obtain a good machining quality, all the axes and the spindle
interpolating with each other should be defined with the same type of filter and with
the same frequency.
Meaning
0
"Low passing" filter.
1
"Anti-resonance" (notch) filter.
Default value: 0
When defining anti-resonance filters, parameters NORBWIDTH and SHARE must
also be set.
"Low passing" filter.
The "low passing" filter is used to limit the
jerk by making the movements smoother
although it has the drawback that it rounds
the corners slightly.
Ao
A
0,707·Ao
Axis parameters
Value
4.
MACHINE PARAMETERS
TYPE (P71)
(-3dB)
f
FREQUEN
Anti-resonance filter (notch filter).
The "anti-resonance" (notch) filter must be
used when the machine has a resonance
frequency to be eliminated.
Ao
A
0,707·Ao (-3dB)
f1
f2
FREQUEN
FREQUEN (P72)
The meaning of this parameter depends on the type of filter being applied.
For the "low passing" filter, it indicates the cutoff frequency or frequency at which its
amplitude drops 3 dB or reaches 70% of the nominal amplitude.
-3dB = 20 log (A/Ao) ==> A = 0.707 Ao
For the "anti-resonance" (notch) filter, it indicates the mid frequency or frequency at
which the resonance reaches its maximum value.
CNC 8035
Possible values
Between 0 and 500.0 Hz.
Default value: 30
(SOFT M: V11.1X)
(SOFT T: V12.1X)
91
Installation manual
NORBWID (P73)
Standardized bandwidth.
This parameter is only taken into account for the "anti-resonance (notch)" filter type.
Possible values
between 0 and 100.0
Default value: 1
It is calculated with the following formula.
4.
Points f1 and f2 correspond to the cutoff
frequency or frequency at which its
amplitude drops 3 dB or reaches 70% of the
nominal amplitude.
A
Axis parameters
MACHINE PARAMETERS
Ao
0,707·Ao (-3dB)
f1
f2
FREQUEN
SHARE (P74)
NORBWID = FREQUEN
----------------------------( f2 – f1 )
Signal percentage that passes through the filter. This value must be equivalent to the
percentage overshooting of the resonance because it has to make up for it.
This parameter is only taken into account for the "anti-resonance (notch)" filter type.
Possible values
between 0 and 100
Default value: 100
Calculation example for a particular response of the machine.
Ar
Ao
f
SHARE=100(Ar-Ao)/Ao
FLIMIT (P75)
Maximum safety limit for the axis feedrate. This limit is activated from the PLC and
is applied to all the work modes, including the PLC channel.
Possible values
Between 0 and 99999.9999 degrees/min or mm/min.
Between 0 inches/min and 3937.00787 inches/min.
Default value: 0
CNC 8035
This limit is activated for all the axes using the mark FLIMITAC (M5058). When the
limit is canceled, the CNC recovers the programmed feedrate.
This limit permits clearing the axis feedrate temporarily via PLC, e.g. when opening
the doors, etc.
(SOFT M: V11.1X)
(SOFT T: V12.1X)
92
TANSLAID (P76)
Not being used.
TANSLANA (P77)
Not being used.
TORQDIST (P78)
Not being used.
Installation manual
Not being used.
PRELFITI (P80)
Not being used.
TPROGAIN (P81)
Not being used.
TINTTIME (P82)
Not being used.
TCOMPLIM (P83)
Not being used.
ADIFEED (P84)
Maximum feedrate allowed, due to the additive handwheel.
4.
Between 0 and 99999.9999 degrees/min or mm/min.
Between 0 inches/min and 3937.00787 inches/min.
Default value: 1000
FRAPIDEN (P85)
Maximum axis feedrate when activating the EXRAPID mark and when pressing the
rapid key in execution or in simulation with motion.
If set to 0, it assumes the feedrate set by parameter G00FEED. If it is set with a value
higher than G00FEED, the feedrate will be limited to G00FEED.
MACHINE PARAMETERS
Possible values
Axis parameters
PRELOAD (P79)
Possible values
Between 0 and 199999.9999 degrees/min or mm/min.
Between 0 and 7874.01574 inches/min.
Default value: 0
This limit does not affect the rapid jog which will still have the value of parameter
G00FEED.
PITCHB (P86)
Leadscrew pitch.
This parameter must only be set when using CAN servo system. When not using CAN
servo system, the leadscrew pitch is defined with parameter PITCH (P7).
When using gear reduction on the shaft, only the whole assembly must be taken into
account when setting one of parameters PITCHB or NPULSES.
i
HPITCH (P89)
When using CAN servo, if both parameters NPULSES and PITCHB are set
to ·0·, the CNC will assume the equivalent values of the drive.
On Hirth axes, it indicates its pitch in degrees. When set to ·0·, it assumes a pitch value
of 1º.
Possible values
Between 0 and 99999.9999 degrees.
(the remainder of 360/HPITCH must necessarily be zero)
Default value: 1
It admits values other than 1º and decimal values. When HPITCH is set with a decimal
value, the screen will show the coordinates with decimals.
Any stop or continuous jog movement will stop the axis in coordinates multiple of
HPITCH. The incremental jog movements will be similar to the ones carried out with
a 1 degree pitch.
CNC 8035
• For incremental switch positions of 1, 10, 100 or 1000, it will move 1 step.
• For an incremental switch position 10000, the movement will be multiple of the
closest pitch to 10º (and under 10º). If the pitch value is greater than 10º, it will
move a single step.
Even if the position of a Hirth axis does not coincide with its Hirth pitch, any other axis
may be moved to a valid position in both automatic and jog modes. An error message
will be issued if the position to move the axis does not coincide with the pitch. In any
case, it is possible to move any other axis in both automatic and jog modes.
(SOFT M: V11.1X)
(SOFT T: V12.1X)
93
Installation manual
AXISDEF (P90)
It allows customizing the movement of the axis.
This parameter has 16 bits counted from right to left.
bit 15 14 13 12 11 10 9 8 7 6 5 4 3 2 1 0
Each bit has a function or work mode associated with it. By default, all the bits will
be assigned the value of ·0·. Assigning the value of ·1· activates the corresponding
function.
Axis parameters
MACHINE PARAMETERS
4.
Bit
Meaning
0 - 14
Not being used.
15
Rollover axis. Movement in G53 via the shortest way.
Default value in all the bits: 0
Bit 15. Rollover axis. Movement in G53 via the shortest way.
This bit indicates how the movements in G53 are carried out for a positioning-only
rotary axis without travel limits.
AXISTYPE = 3 or 4
ROLLOVER = YES
LIMIT+ = 0
LIMIT- =0
When set to ·1·, G53 movements are carried out along the shortest path. When
several presets have been made, the axis may rotate several complete turns.
CNC 8035
(SOFT M: V11.1X)
(SOFT T: V12.1X)
94
Installation manual
Spindle parameters
SPDLTYPE (P0)
Indicates the type of spindle output being used.
Value
Meaning
0
±10 V analog output.
1
2-digit BCD coded “S” output.
2
8-digit BCD coded “S” output.
4.
DFORMAT (P1)
Indicates the display format for the spindle.
Value
Meaning
0
In 4 digits.
1
In 5 digits.
2
In 4.3 format
3
In 5.3 format
4
It is not displayed.
Default value: 0
MAXGEAR1 (P2)
MAXGEAR2 (P3)
MAXGEAR3 (P4)
MAXGEAR4 (P5)
MACHINE PARAMETERS
Default value: 0
Spindle parameters
4.4
They indicate the maximum spindle speed assigned to each gear. When using an
automatic gear change, these values will be used to make the change.
MAXGEAR1
for gear 1 (M41).
MAXGEAR2
for gear 2 (M42).
MAXGEAR3
for gear 3 (M43).
MAXGEAR4
for gear 4 (M44).
Possible values
Integers between 0 and 65535 rpm.
Default value: For MAXGEAR1 (P2) = 1000 rpm.
For MAXGEAR2 (P3) = 2000 rpm.
For MAXGEAR3 (P4) = 3000 rpm.
For MAXGEARa4 (P5) = 4000 rpm.
When not using all 4 gears, use the lower ones and set the unused ones to the same
value as the highest one used.
AUTOGEAR (P6)
Indicates whether the gear change is generated automatically or not by the CNC
activating the M functions M41, M42, M43 and M44.
Value
Meaning
NO
There is no automatic gear change.
YES
There is automatic gear change.
Default value: NO
POLARM3 (P7)
POLARM4 (P8)
Indicates the sign of the spindle analog for M03 and M04.
Value
Meaning
+ sign
Positive analog.
- sign
Negative analog.
CNC 8035
Default value: For POLARM3 (P7) = + sign.
For POLARM4 (P8) = - sign.
If the same value is assigned to both parameters, the CNC will output a single polarity
(0V to 10V) signal with the indicated sign.
(SOFT M: V11.1X)
(SOFT T: V12.1X)
95
Installation manual
SREVM05 (P9)
This parameter is used with a Mill model CNC.
Indicates whether it is necessary or not to stop the spindle (M05) when reversing
rotation direction during a tapping canned cycle (G84).
Value
Meaning
NO
It is not necessary.
YES
It is necessary.
Default value: YES
4.
Spindle parameters
MACHINE PARAMETERS
MINSOVR (P10)
MAXSOVR (P11)
Indicate the minimum and maximum % applicable to the programmed spindle speed.
Possible values
Integer numbers between 0 and 255.
Default value: For MINSOVR (P10) = 50.
For MAXSOVR (P11) = 150.
The resulting speed will be limited to the value indicated by s.m.p. MAXVOLT1 (P37),
MAXVOLT2 (P38), MAXVOLT3 (P39) or MAXVOLT4 (P40) corresponding to the
selected gear.
SOVRSTEP (P12)
Indicates the incremental step of the programmed spindle speed every time the
override keys at the operator panel are pressed.
Possible values
Integer numbers between 0 and 255.
Default value: 5
NPULSES (P13)
Indicates the number of pulses per revolution provided by the spindle encoder. 0
means that there is no spindle encoder.
It must be set when the drive's velocity command is analog or it is sent via CAN
(DRIBUSLE = 0 or 1).
When the main spindle does not have an encoder (NPULSES=0), the CNC shows
its theoretical rpm (affected by the %).
Possible values
Integer numbers between 0 and 65535.
Default value: 1000
i
DIFFBACK (P14)
When using a CAN servo system, if parameter NPULSES and parameters
INPREV and OUTPREV of all the gears are set with a ·0· value, the CNC will
assume the equivalent ones of the drive.
Indicates whether the spindle encoder uses differential signals (double ended) or not.
Value
Meaning
NO
It does NOT use differential signals.
YES
It uses differential signals.
Default value: YES
FBACKAL (P15)
CNC 8035
Indicates whether the feedback alarm for this axis will be ON or OFF.
Value
Meaning
OFF
No feedback alarm desired, it is canceled.
ON
Feedback alarm is being used.
Default value: ON
(SOFT M: V11.1X)
(SOFT T: V12.1X)
96
Installation manual
AXISCHG (P16)
Indicates the counting direction. If correct, leave it as is, but to change it, select YES
if it was set to NO and viceversa. If this parameter is changed, s.m.p. LOOPCHG (P26)
must also be changed so the spindle does not “run away”.
Possible values
NO / YES.
Default value: NO
Indicates the dwell from the moment the “ENABLE” signal is activated until the analog
voltage is sent out.
4.
Integers between 0 and 65535 ms.
Default value: 0 (there is no dwell).
ACCTIME (P18)
This parameter is used when working with the spindle in closed loop and it indicates
the acceleration time given to reach the maximum speed set by s.m.p. MAXVOLT1
(P37) thru MAXVOLT4 (P40) in each gear. This time is also valid for the deceleration
stage.
Possible values
Integers between 0 and 65535 ms.
MACHINE PARAMETERS
Possible values
Spindle parameters
DWELL (P17)
Default value: 0 (there is no control).
INPOSW (P19)
Indicates the width of the IN POSITION zone where the CNC considers the spindle
to be in position when working in closed loop (M19).
Possible values
Between 0 and 99999.9999 degrees.
Default value: 0.01 degrees.
INPOTIME (P20)
Indicates the time period that the spindle must remain in the “IN POSITION” zone in
order to consider it to be in position.
This prevents the CNC from considering the spindle to be in position and executing
the next block on those machines where the spindle could just overshoot the “IN
POSITION” zone.
Possible values
Integers between 0 and 65535 ms.
Default value: 0
MAXFLWE1 (P21)
Indicates the maximum following error allowed for the spindle when moving in closed
loop (M19).
Possible values
Between 0 and 99999.9999 degrees.
Default value: 30 degrees.
MAXFLWE2 (P22)
Indicates the maximum following error allowed for the spindle when stopped in closed
loop (M19).
Possible values
Between 0 and 99999.9999 degrees.
Default value: 0.1 degrees.
CNC 8035
(SOFT M: V11.1X)
(SOFT T: V12.1X)
97
Installation manual
PROGAIN (P23)
The CNC takes this parameter into account when operating in closed loop (M19).
Indicates the value of the proportional gain. Its value represents the analog voltage
corresponding to a following error of 1 degree.
Velocity command (mV)
= Following error (degrees) x PROGAIN
Possible values
4.
Integers between 0 and 65535 mV/degree.
Spindle parameters
MACHINE PARAMETERS
Default value: 1000 mV/degree.
This value is taken for the first spindle gear and the CNC calculates the values for
the rest of the gears.
Example:
s.m.p. MAXGEAR1 (P2) = 500 rev/min. The desired speed for a 1 degree of
following error is S = 1000°/min (2.778 rev/rpm).
Command from the drive: 9.5V for 500 rpm
Analog output corresponding to S = 1000 º/min. (2.778 rpm)
Command = (9.5/500) x 2,778 = 52.778 mV
Therefore “PROGAIN” = 53
DERGAIN (P24)
The CNC takes this parameter into account when operating in closed loop (M19).
Indicates the value of the derivative gain. Its value represents the analog voltage (in
millivolts) corresponding to a change in following error of 1mm (0.03937 inches) in
10 milliseconds.
This analog voltage will be added to the one calculated for the proportional gain.
Analog voltage
⋅ DERGAIN-⎞
= ⎛ ξ ⋅ PROGAIN + ξ----------------------------------⎝
⎠
10 ⋅ t
It is a good idea to also use the acc./dec. a.m.p. ACCTIME2 (P18) for this axis (with
a value other than “0”) if this gain is to be applied.
Possible values
Integer numbers between 0 and 65535.
Default value: 0 (derivative gain not applied)
FFGAIN (P25)
The CNC takes this parameter into account when operating in closed loop (M19).
Indicates the % of the analog voltage due to the programmed speed. The rest will
depend upon the following error; both the proportional and derivative gains will be
applied onto this following error.
CNC 8035
(SOFT M: V11.1X)
(SOFT T: V12.1X)
Analog voltage
·
⋅ DERGAIN- + ----------------------------------------------------------------------------------FFGAIN × Fprog × MAXVOLT⎞
= ⎛⎝ ξ ⋅ PROGAIN + ξ----------------------------------⎠
10 ⋅ t
100 ⋅ G00FEED
98
Installation manual
The feed-forward gain improves the position loop minimizing the following error, but
it should only be used when working with acceleration/deceleration.
Possible values
Integer numbers between 0 and 100.
Default value: 0 (feed-forward gain not applied)
Usually, a value between 40% and 80% is assigned depending mainly on the type
of machine and its characteristics.
NO / YES.
Default value: NO
Indicates the minimum value for the spindle analog output.
Possible values
It is given in D/A converter units and it admits integer values between
0 and 32767 which corresponds to an analog voltage of 10V.
Spindle parameters
Possible values
MINANOUT (P27)
4.
Indicates the sign of the analog output. If correct, leave it as is, but to change it, select
YES if it was set to NO and viceversa.
MACHINE PARAMETERS
LOOPCHG (P26)
Default value: 0
SERVOFF (P28)
MINANOUT
Minimum analog output
1
--3277
--32767
0.3 mV.
--1 V.
--10 V.
Indicates the analog offset value for the spindle drive.
Possible values
It is given in D/A converter units and it admits integer values between
0 and ±32767 which corresponds to an analog voltage of 10V.
Default value: 0 (not applied)
SERVOFF
Analog voltage
-32767
---3277
--1
--3277
--32767
-10 V.
---1 V.
--0.3 mV.
--1 V.
--10 V.
CNC 8035
(SOFT M: V11.1X)
(SOFT T: V12.1X)
99
Installation manual
LOSPDLIM (P29)
UPSPDLIM (P30)
Indicate the upper and lower limits of the actual spindle speed so the CNC can “notify”
the PLC (by means of the “REVOK” signal) that the actual spindle rpms are the same
as the programmed ones.
Possible values
Integer numbers between 0 and 255.
Default value: For LOSPDLIM (P29) = 50%.
Default value: For UPSPDLIM (P30) = 150%.
4.
Spindle parameters
MACHINE PARAMETERS
DECINPUT (P31)
Indicates whether or not the spindle has a home switch to synchronize the spindle
when working in M19.
Value
Meaning
NO
It has no home switch.
YES
It has a home switch.
Default value: YES
REFPULSE (P32)
Indicates the type of marker pulse Io to synchronize the spindle when working in M19.
Value
Meaning
+ sign
Positive pulse (5 V).
- sign
Negative pulse (0 V).
Default value: + sign
REFDIREC (P33)
Indicates the rotating direction when synchronizing the spindle during M19.
Value
Meaning
+ sign
Positive direction.
- sign
Negative direction.
Default value: + sign
REFEED1 (P34)
Indicates the spindle’s positioning speed when in M19 and the synchronizing speed
until it finds the home switch.
Possible values
Between 0.0001 degrees/min and 99999.9999 degrees/min.
Default value: 9000 degrees/min.
REFEED2 (P35)
Indicates the synchronizing speed of the spindle after hitting the home switch and until
it finds the marker pulse.
Possible values
Between 0.0001 degrees/min and 99999.9999 degrees/min.
Default value: 360 degrees/min.
REFVALUE (P36)
Indicates the position value assigned to the reference point of the spindle (home or
marker pulse).
Possible values
Within ±99999.9999 degrees.
Default value: 0
CNC 8035
MAXVOLT 1 (P37)
MAXVOLT 2 (P38)
MAXVOLT 3 (P39)
MAXVOLT 4 (P40)
Indicates the analog voltage corresponding to the maximum speed of gears 1, 2, 3
and 4.
Possible values
Integer numbers between 0 mV and 9999 mV.
(SOFT M: V11.1X)
(SOFT T: V12.1X)
100
Default value: 9500 (9.5 V)
There is no need to set this parameter for an axis handled via CAN.
Installation manual
GAINUNIT (P41)
The CNC takes this parameter into account when operating in closed loop (M19).
Defines the units for s.m.p. PROGAIN (P23) and DERGAIN (P24).
Value
Meaning
0
millivolts/degree.
1
millivolts/0.01 degree
Default value: 0 (mV/degree)
This parameter is used when working with the spindle in closed loop.
The CNC takes this parameter into account when operating in closed loop (M19).
Indicates whether or not the value assigned to a.m.p. DERGAIN (P24) is applied onto
the variations of the programmed speed (AC-forward).
Value
Meaning
NO
It is applied on variations of following error (derivative gain).
YES
It is applied on the variations of the programmed speed that are
due to acceleration/deceleration (AC-forward).
Spindle parameters
ACFGAIN (P42)
4.
MACHINE PARAMETERS
A value of “1” will be assigned when the analog voltage corresponding to a following
error of 1 degree is very small. This offers greater sensitivity for adjusting s.m.p.
PROGAIN (P23) and DERGAIN (P24)
Default value: YES
ACFGAIN = NO
ACFGAIN = YES
M19TYPE (P43)
This parameter sets the type of spindle orient (M19) available.
It indicates whether the spindle must be homed when switching from open to closed
loop or it is enough to home it once on power-up.
Value
Meaning
0
When switching from open loop to closed loop.
1
Once after power-up.
CNC 8035
Default value: 0
(SOFT M: V11.1X)
(SOFT T: V12.1X)
101
Installation manual
DRIBUSID (P44)
It indicates the address of the digital drive (Sercos or CAN) associated with the
spindle. It corresponds with the value of the drive's rotary switch (address, device
select).
Value
Meaning
0
Analog spindle.
1-8
Address of the digital drive.
Default value: 0
Spindle parameters
MACHINE PARAMETERS
4.
It is recommended (not necessary) that the Can addresses of the various axes and
spindles be consecutive and start from number ·1· (the address of the CNC is always
·0·). For example, with 3 Sercos axes and 1 Sercos spindle, the values of this
parameter must be 1, 2, 3 and 4.
OPLACETI (P45)
When working in open loop (M3, M4) spindle speed variations may be in a step or
in a ramp.
This parameter indicates the duration of the ramp in milliseconds for the maximum
"S". If OPLACETI=0, it will be in a step.
Possible values
Integers between 0 and 65535 ms.
Default value: 0 (in steps).
SMOTIME (P46)
Sometimes the axis does not respond as desired on particular movements
(handwheel movements, etc.).
In these cases, the response of the spindle may be smoothed by applying a filter to
the speed changes.
This filter is set by parameter SMOTIME that indicates the duration of the filter in
milliseconds, value given by g.m.p. LOOPTIME (P72).
Possible values
Integers between 0 and 64 times the value assigned to g.m.p.
LOOPTIME (P72).
If LOOPTIME = 0 (4 ms), the maximum value that could be assigned
to SMOTIME will be 64 x 4 = 256 ms.
Default value: 0 (not applied)
To obtain a better response, parameter SMOTIME of the axes interpolating with each
other should be set with the same value.
CNC 8035
(SOFT M: V11.1X)
(SOFT T: V12.1X)
102
The spindle's response can also be smoothened when working in open loop (M3,
M4). In this case, s.m.p. OPLACETI (P45) and SOMTIME (P46) must be used.
Installation manual
These parameters define the second set of gains and accelerations. They must be
set like the parameters that define the first set.
First set
ACCTIME
PROGAIN
DERGAIN
FFGAIN
(P18)
(P23)
(P24)
(P25)
Second set
ACCTIME2
PROGAIN2
DERGAIN2
FFGAIN2
(P47)
(P48)
(P49)
(P50)
Spindle parameters
ACCTIME2 (P47)
PROGAIN2 (P48)
DERGAIN2 (P49)
FFGAIN2 (P50)
MACHINE PARAMETERS
4.
To select the second set of gains and accelerations, set g.m.p. ACTGAIN2 (P108)
correctly or activate the CNC’s general logic input ACTGAIN2 (M5013).
DRIBUSLE (P63)
The CNC considers this parameter when using a digital drive (CAN). Axis parameter
DRIBUSID (P56) other than 0.
Even when the data exchange between the CNC and the drive is done via digital CAN
bus, one must define whether the feedback is also handled via bus or through the
corresponding connector for the axis or spindle.
Value
Meaning
0
The feedback is done via connector.
1
The feedback is done via CAN.
First feedback (motor feedback).
DRIBUSLE = 0
The CNC controls the position loop.
The axis feedback is done via connector.
The command to the drive is sent out via CAN.
DRIBUSLE = 1
The CNC controls the position loop.
The axis feedback is done via CAN. First feedback (motor
feedback).
The command to the drive is sent out via CAN.
CNC 8035
(SOFT M: V11.1X)
(SOFT T: V12.1X)
103
Installation manual
MSPIND0 (P52)
Indicates when functions M3, M4, M5 are to be sent out. While the spindle is
accelerating and decelerating.
SYNPOSOF (P53)
Not being used.
SYNSPEOF (P54)
Not being used.
ACCTIME3 (P55)
PROGAIN3 (P56)
DERGAIN3 (P57)
FFGAIN3 (P58)
These parameters define the third set of gains and accelerations. They must be set
like the parameters that define the first set.
Spindle parameters
MACHINE PARAMETERS
4.
First set
ACCTIME
PROGAIN
DERGAIN
FFGAIN
(P18)
(P23)
(P24)
(P25)
Second set
ACCTIME2
PROGAIN2
DERGAIN2
FFGAIN2
(P47)
(P48)
(P49)
(P50)
Third set
ACCTIME3
PROGAIN3
DERGAIN3
FFGAIN3
(P55)
(P56)
(P57)
(P58)
Possible values
The same as for the first gear.
Default value: For ACCTIME3 (P55) = 4000 ms .
For PROGAIN3 (P56) = 50 mV/degree.
For DERGAIN3 (P57) = 0.
For FFGAIN3 (P58) = 100.
When working with FFGAIN3 (P58) = 100, set the MAXGEAR and MAXVOLT
parameters properly.
ACCTIME4 (P59)
SECACESP (P60)
Not being used.
SYNCPOLA (P61)
Not being used.
CONCLOOP (P62) It indicates whether the spindle operates in closed positioning loop (as if it were an
axis) or not.
CNC 8035
Value
Meaning
NO
It operates in open loop.
YES
It operates in closed position loop (as if it were an axis).
Default value: NO
In order to operate in closed positioning loop, the spindle must have an encoder and
a good servo system for the full speed range.
(SOFT M: V11.1X)
(SOFT T: V12.1X)
104
When working with M19, the first two sets of gains and accelerations are used
regardless of the value given to this parameter.
When working in closed positioning loop (M3, M4, M5) the third set of gains and
accelerations is used: ACCTIME3, PROGAIN3, DERGAIN3 and FFGAIN3.
Installation manual
SYNMAXSP (P63)
Not being used.
M3M4SIM (P64)
Not being used.
SINMAGNI (P65)
It indicates the multiplying factor (x1, x4, x20, etc.) that the CNC must apply only to
sinusoidal feedback signals of the spindle.
For square feedback signals, this parameter must be set to 0 and the CNC will always
apply a multiplying factor of x4.
Possible values
Spindle feedback resolution is set by s.m.p. NPULSES (P13) and SINMAGNI (P65).
Example
We would like to obtain a 0.001º resolution by using a 3600 pulse/rev sinusoidal
encoder.
We must calculate the multiplying factor "SINMAGNI" to be applied by the CNC to
the pulses provided by the encoder in order to obtain the desired resolution.
MACHINE PARAMETERS
Default value: 0
Spindle parameters
4.
Integer numbers between 0 and 255.
SINMAGNI = degrees per turn / (number of pulses x resolution)
SINMAGNI = 360 / (3600 x 0,001) = 100
Therefore: NPULSES =3600 SINMAGNI=100
SLIMIT (P66)
Maximum safety limit for the spindle speed. This limit is activated from the PLC and
is applied in all the work modes, including the PLC channel. When the spindle is
controlled by the PLC by means of the PLCCNTL mark, this limit is ignored.
Possible values
Between 0 and 65535 rpm.
Default value: 0
This limit is activated using the mark SLIMITAC (M5059). When this limit is canceled,
the CNC recovers the programmed speed.
This limit permits clearing the spindle speed temporarily via PLC, e.g. when opening
the doors, etc.
ORDER (P67)
Filter order. The down ramp is dampened down; the larger the number the greater
the drop.
Possible values
From 0 to 4.
Default value: 0 (the filter is not applied).
When applying a filter, it must be set with an order of ·3·. Before setting it to another
value, consult with Fagor Automation's technical service.
i
If the filter has been designed wrong, it will not be applied.
The filters are not applied while moving with an electronic handwheel or a
mechanical handwheel or while tracing.
CNC 8035
It is recommended not to activate these filters on machines carrying out
movements against a hard stop.
(SOFT M: V11.1X)
(SOFT T: V12.1X)
105
Installation manual
TYPE (P68)
4.
Filter type. Two types of filters may be used, namely "low passing" or "antiresonance". To obtain a good machining quality, all the axes and the spindle
interpolating with each other should be defined with the same type of filter and with
the same frequency. For the spindle, the filters are only applied in M19 and in rigid
tapping where the spindle is interpolated with the Z axis.
Value
Meaning
0
"Low passing" filter.
1
"Anti-resonance" (notch) filter.
When defining anti-resonance filters, parameters NORBWIDTH and SHARE must
also be set.
Spindle parameters
MACHINE PARAMETERS
Default value: 0
"Low passing" filter.
The "low passing" filter is used to limit the
jerk by making the movements smoother
although it has the drawback that it rounds
the corners slightly.
Ao
A
0,707·Ao
(-3dB)
f
FREQUEN
Anti-resonance filter (notch filter).
The "anti-resonance" (notch) filter must be
used when the machine has a resonance
frequency to be eliminated.
Ao
A
0,707·Ao (-3dB)
f1
f2
FREQUEN
FREQUEN (P69)
The meaning of this parameter depends on the type of filter being applied.
For the "low passing" filter, it indicates the cutoff frequency or frequency at which its
amplitude drops 3 dB or reaches 70% of the nominal amplitude.
-3dB = 20 log (A/Ao) ==> A = 0.707 Ao
For the "anti-resonance" (notch) filter, it indicates the mid frequency or frequency at
which the resonance reaches its maximum value.
Possible values
Between 0 and 500.0 Hz.
Default value: 30
NORBWID (P70)
CNC 8035
Standardized bandwidth.
This parameter is only taken into account for the "anti-resonance (notch)" filter type.
Possible values
between 0 and 100.0
(SOFT M: V11.1X)
(SOFT T: V12.1X)
106
Default value: 1
Installation manual
It is calculated with the following formula.
Points f1 and f2 correspond to the cutoff
frequency or frequency at which its
amplitude drops 3 dB or reaches 70% of the
nominal amplitude.
0,707·Ao (-3dB)
----------------------------NORBWID = FREQUEN
( f2 – f1 )
f1
f2
FREQUEN
SHARE (P71)
Signal percentage that passes through the filter. This value must be equivalent to the
percentage overshooting of the resonance because it has to make up for it.
This parameter is only taken into account for the "anti-resonance (notch)" filter type.
Possible values
between 0 and 100
Default value: 100
4.
MACHINE PARAMETERS
A
Spindle parameters
Ao
Calculation example for a particular response of the machine.
Ar
Ao
f
SHARE=100(Ar-Ao)/Ao
INPREV1 (P72)
OUTPREV1 (P73)
INPREV2 (P74)
OUTPREV2 (P75)
INPREV3 (P76)
OUTPREV3 (P77)
INPREV4 (P78)
OUTPREV4 (P79)
i
JERKLIM (P80)
When using a CAN servo system (only with DRIBUSLE = 0), these parameters set
the gear ratios in each range.
Parameters INPREV1 trough INPUTRE4 indicate the input speed for each gear.
Parameters OUTPREV1 through OUTPREV4 indicate the output speed for each
gear.
When using a CAN servo system, if parameter NPULSES and parameters
INPREV and OUTPREV of all the gears are set with a ·0· value, the CNC will
assume the equivalent ones of the drive.
Square-sine (bell shape) ramp acceleration. This type of ramp is used to gain in
smoothness. This spindle parameter becomes effective with RESET in machine
parameters.
Value
Meaning
JERKLIM = 0
Linear acceleration ramp
CNC 8035
Default value: 0
A JERKLIM value other than zero activates the square-sine ramp.
(SOFT M: V11.1X)
(SOFT T: V12.1X)
It comes in degrees/s3, in other words, a parameter value of 20 means a jerk of 20000
degrees/s3.
This parameter only affects the spindle acceleration in open loop (M3, M4, M5).
107
Installation manual
The parameter value so maximum acceleration (resulting from OPLACETI) is
reached in half the acceleration time up to MAXGEAR1 is calculated as follows:
JERKLIM = 6000 · MAXGEAR1 / OPLACETI 2
In this case, the spindle will take twice as long to reach the MAXGEAR1 speed than
it would without jerk.
The JERKLIM value depends on the dynamics of the machine.
Spindle parameters
MACHINE PARAMETERS
4.
CNC 8035
(SOFT M: V11.1X)
(SOFT T: V12.1X)
108
Installation manual
Drive parameters
This option is available when the CNC uses digital servo drive system; i.e. the drives
are connected to the CNC via CAN.
CAN interface
This option works fine for spindles with drive version SPD V7.01 or newer. It
also works fine for axes with drive version ACSD V1.01 or newer.
When selecting the drive parameters at the CNC, it will display the ones stored in each
drive and if any is modified, it is modified at the drive. The CNC does not have
parameters of the drive although their copies may be stored in the memkey card (Card
A).
When accessing the parameters of a drive, the CNC shows a screen that looks like
this. Refer to the drive manual for further details on commands, variables, etc.
displayed on the screen
AXIS X DRIVE PARAM
GROUP
P...... N....
11:50:14
G) General Parameters
NAME
SP43
SP10.0
SP2.0
SP3.0
CP1
CP2
VALUE
ACCESS BASIC
PASSWORD
VERSION
MODIFY
SET 0
COMMENT
0 ...
200 r.p.m
50 milisec
0 milisec
183 ...
125 ...
NODE 1
SERCOS ID
VelocityPolarityParameters
VelocityLimit
VelocityIntegralTime
KD_Velo
CurrentProportionalGain
CurrentIntegralTime
V01.00 AXIS A100H1
EXECUTE
COMMAND
CHANGE
GROUP
4.
Drive parameters
This option displays the tables of the drive parameters that are stored in the memkey
card" (Card A) and the sofkeys of the digital axes. Press one of those softkeys for
editing the drive parameters for that particular axis.
MACHINE PARAMETERS
4.5
43
91
101
102
106
107
FXM31.20F.I0.000
CHANGE
SET
TO FLASH
DRIVE
+
• In the GROUP window, one must select the group of parameters or variables to
be displayed. To change the group, press the [Change Group] softkey, select the
new group with the [©] [ª] keys and press [ENTER].
• In the SET window, one must select the set of parameters or variables to be
displayed. To select another set, press the [Change set] softkey, select the new
set with the [©] [ª] keys and press [ENTER].
• The NODE window shows the node number identifying that drive in the CAN
connection; i.e. the position of its rotary switch.
In other words, the position of the Sercos switch. The main window shows the
variables or parameters of the selected group and set indicating their Fagor name
in each variable, its value, its meaning and its identifier. If the variable does not
have a write permission, a key will appear before the Fagor name.
This information is updated when selecting a new information (group or set), when
modifying a variable or parameter or when pressing page/up page-down. It is not
refreshed continuously.
CNC 8035
(SOFT M: V11.1X)
(SOFT T: V12.1X)
109
Installation manual
• The ACCESS window shows the permitted access level. There are 3 access
levels at the drive: basic level, OEM level and Fagor level. To change the level,
press the [Password] softkey, key in the relevant code and press [ENTER].
• The VERSION window shows the software version installed at the drive, the name
of the motor associated with the drive and the drive model.
Softkeys available in this mode
4.
Drive parameters
MACHINE PARAMETERS
Password
Modifies the access level selected in the "Access" window.
In the case of CAN servo system, to access the drive parameters with an OEM access
level, the password is defined in Utilities mode as OEMPSW; not a pre-established
one as when using Sercos .
Modify
To modify the variables that are not protected (those without a key icon).
After selecting the variable with the [©] [ª] keys, pressing the "modify" softkey
displays two windows. The first one shows the range of possible values and the
second one the current value. Enter the new value and press [ENTER].
The drive assumes that value and refreshes the screen.
Execute command
Shows the list of commands that can be executed by the drive. Select one using the
[©] [ª] keys and press [ENTER].
Change group
Selects the group of parameters or variables to be displayed.
Change set
Selects the set number of the parameters or variables to be displayed.
To drive flash
The drive stores all its parameters in its flash memory and it then executes a softreset command. This command interrupts the communication, press [ENTER] to
restore it.
Save
It makes a copy of the parameters of the drive's RAM memory into the CNC's CARD
A or to a peripheral device or PC through the serial line.
The parameters are storedwith the name of the axis they are associated with (for
example, the X axis parameters). A file saved from the CNC via WinDNC may be
loaded into the drive via DDSSETUP and vice versa.
CNC 8035
Load
It copies into the drive's RAM memory the parameters saved in the CNC's CARD A
or in a peripheral device or in PC through the serial line.
The CNC copies the axis parameters that are being edited.
(SOFT M: V11.1X)
(SOFT T: V12.1X)
Drive Errors
It displays a window with the warnings and errors of the drive. If all of them do not
fit on the screen, use [©] [ª] keys.
110
Installation manual
Options
It shows a screen where one can select to display either all the parameters and
variables or just the ones than can be modified.
Press the [Modify Option] softkey to change it and [ENTER] to validate it. This option
is common to all the axes.
Drive parameters
MACHINE PARAMETERS
4.
CNC 8035
(SOFT M: V11.1X)
(SOFT T: V12.1X)
111
Installation manual
4.6
Serial line parameters
BAUDRATE (P0)
Indicates the communication speed, in baud, between the CNC and the peripherals.
It is given in baud and it is selected with the following code:
Serial line parameters
MACHINE PARAMETERS
4.
Value
Meaning
Value
Meaning
0
110 baud.
7
9.600 baud.
1
150 baud.
8
19.200 baud.
2
300 baud.
9
38.400 baud.
3
600 baud.
10
57.600 baud.
4
1.200 baud.
11
115.200 baud.
5
2.400 baud.
12
Reserved.
6
4.800 baud.
Default value: 11 (115200 baud)
NBITSCHR (P1)
Indicates the number of data bits per transmitted character.
Value
Meaning
0
Uses the 7 least significant bits of an 8-bit character. It
is used when transmitting ASCII characters (standard)
1
Uses all 8 bits of the transmitting character. Used when
transmitting special characters whose codes are greater
than 127.
Default value: 1
PARITY (P2)
Indicates the type of parity check used.
Value
Meaning
0
No parity.
1
Odd parity.
2
Even parity.
Default value: 0
STOPBITS (P3)
Indicates the number of stop bits at the end of each transmitted word.
Value
Meaning
0
1 STOP bit.
1
2 STOP bits.
Default value: 0
PROTOCOL (P4)
Indicates the type of communications protocol to be used.
Value
Meaning
0
Communications protocol for general device.
1
DNC communications protocol.
2
Communications protocol for Fagor floppy disk unit.
Default value: 1 (DNC)
CNC 8035
(SOFT M: V11.1X)
(SOFT T: V12.1X)
112
PWONDNC (P5)
Indicates whether the DNC feature will be active on power-up or not.
Value
Meaning
NO
Not active on power-up.
YES
Active on power-up
Default value: NO
Installation manual
DNCDEBUG (P6)
Indicates whether the debugging feature for DNC communications is active or not.
It is advisable to use this safety feature in all DNC communications. It could be
deactivated in the debugging process.
Value
Meaning
NO
Debug NOT active. Communication aborted.
YES
Debug active. Communication not aborted.
Default value: NO
Meaning
0
CAN
1
EOT
Indicates the character used to indicate “end of line” when communicating with
general peripheral device.
Value
Meaning
0
LF
1
CR
2
LF-CR
3
CR-LF
Serial line parameters
Value
Default value: 0
EOLCHR (P8)
4.
Indicates the character used to abort communications with general peripheral device.
MACHINE PARAMETERS
ABORTCHR (P7)
Default value: 0
EOFCHR (P9)
Indicates the character used to indicate “end of text” (end of file) when communicating
with a general peripheral device.
Value
Meaning
0
EOT.
1
ESC.
2
SUB
3
ETX
Default value: 0
XONXOFF (P10)
Indicates whether the XON-XOFF communications protocol is active or not when
operating with a generic peripheral.
Value
Meaning
ON
It is active.
OFF
It is NOT active.
Default value: ON
CNC 8035
(SOFT M: V11.1X)
(SOFT T: V12.1X)
113
Installation manual
4.7
PLC Parameters
WDGPRG (P0)
Indicates the Watchdog time-out period for the main PLC program.
Possible values
Integers between 0 and 65535 ms.
Default value: 0
WDGPER (P1)
4.
Indicates the Watch-Dog time-out period for the periodic module of the PLC.
PLC Parameters
MACHINE PARAMETERS
Possible values
Integers between 0 and 65535 ms.
Default value: 0
USER0 (P2)
...
USER23 (P25)
Parameters “USER0” through “USER23” do not mean anything to the CNC.
They could contain the type of information that the OEM may find necessary to
customize this machine, such as: Information about the type of machine, PLC
program version, etc.
This information can be accessed from the PLC program by means of the “CNCRD”
high-level instruction.
Possible values
USER0(P2) - USER7(P9)
Integer numbers between 0 and 255.
USER0(P10) - USER7(P17)
Integer numbers between 0 and 65535.
USER0(P18) - USER7(P25)
Within ±99999.9999 mm or ±3937.00787 inches.
Default value: 0
CPUTIME (P26)
This parameter indicates the time the system CPU dedicates to the PLC.
Value
Meaning
0
1 ms every 8 samplings.
1
1 ms every 4 samplings.
2
1 ms every 2 samplings.
3
1 ms every sampling. With LOOPTIME = 4, 5 or 6
4
2 ms every sampling. With LOOPTIME = 4, 5 or 6
5
3 ms every sampling. With LOOPTIME 5 or 6.
6
4 ms every sampling. With LOOPTIME = 6
7
4 ms every sampling. With LOOPTIME = 6
Default value: 0
The sampling period is determined by the g.m.p. LOOPTIME (P72). Hence, for a
sampling period of 4 msec. and a CPUTIME=0, the system CPU dedicates 1
millisecond every 8 samplings (thus, 32 milliseconds) to the PLC.
CNC 8035
The Status window of the PLC statistics screen indicates the time the system CPU
dedicates to the PLC. Refer to the operation manual.
Same as with sinewave feedback, number of axes and the user channel
active, the PLC demands calculation time from the system CPU.
(SOFT M: V11.1X)
(SOFT T: V12.1X)
114
The more time the CPU dedicates to the PLC, the greater the sampling time
will be, g.m.p. LOOPTIME (P72).
Installation manual
PLCMEM (P27)
Not being used.
SRR700 (P28)
...
SRR739 (P67)
Not being used.
SWR800 (P68)
...
SWR819 (P87)
Not being used.
OCANSPE (P88)
Not being used.
IOCAGEN (P89)
Not being used.
IOCANID1 (P90)
IOCANID2 (P91)
IOCANID3 (P92)
IOCANID4 (P93)
Not being used.
ICAN1 (P94)
OCAN1 (P95)
ICAN2 (P96)
OCAN2 (P97)
ICAN3 (P98)
OCAN3 (P99)
ICAN4 (P100)
OCAN4 (P101)
Not being used.
NUICAN1 (P102)
NUOCAN1 (P103)
NUICAN2 (P104)
NUOCAN2 (P105)
NUICAN3 (P106)
UOCAN3 (P107)
NUICAN4 (P108)
NUOCAN4 (P109)
Not being used.
IANA5V (P130)
Not being used.
NUILO1 (P131)
NUOLO1 (P132)
These PLC machine parameters may be used to redefine the numbering of the inputs/
outputs of the local expansion module without having to modify the PLC program.
Value
Meaning
NUILO1
Numbering of the first input of the expansion module with
inputs/outputs (I/O).
NUOLO1
Numbering of the first output of the expansion module with
inputs/outputs (I/O).
PLC Parameters
MACHINE PARAMETERS
4.
The CPU of the 8035 CNC may have digital 16I/8O and optionally a single local digital
expansion of 24I/16O.
The inputs/outputs that do not belong to the expansion module are numbered starting
from I1 and O1 and cannot be set by parameters.
IMPORTANT:The numbering of both the first local input and the first local output of
the expansion module must be a multiple of 8 plus 1 (1+ 8n).
CNC 8035
If incoherent parameter settings are detected on power-up, an error message
will be issued indicating it.
Inside the expansion module, the numbering of the rest of inputs/outputs will be
sequential from the first one on.
(SOFT M: V11.1X)
(SOFT T: V12.1X)
The numbering for the inputs/outputs of the expansion module will be different
depending on the values entered in parameters NUILO1 and NUOLO1.
115
Installation manual
To properly number the inputs/outputs of the expansion module follow the indications
of the example.
Example:
Let's assume an 8035 CNC with 16i/8O and a local expansion module with 24I/16O.
How should all the inputs/outputs of the expansion module be numbered?
X The inputs/outputs that do not belong to the expansion module (16I/8O) cannot
be set by parameters; therefore, the first input is always numbered as I1 and the first
output as O1.
4.
PLC Parameters
MACHINE PARAMETERS
X The inputs/outputs of the expansion module with the PLC parameters set to zero:
Parameters of the expansion module
NUILO1 = 0
NUOLO1 = 0
will be:
I/O of the expansion module
I17 - I40
O9 - O24
The inputs of the expansion module are numbered sequentially after the last input
that does not belong to the expansion module (I16+1 = I17). Follow the same
procedure for the outputs.
X The inputs/outputs of the expansion module with the PLC parameters set to a value
other than zero and multiple of (1+ 8n) where "n" is a natural number:
Parameters of the expansion module
NUILO1 = 65
NUOLO1 = 33
will be:
I/O of the expansion module
I65 - I86
O33 - O48
The inputs of the expansion module are numbered sequentially after the value
assigned to parameter NUILO1 (I65) chosen at will with the restriction (8n+1).
Follow the same procedure for the outputs.
i
NUILO2 (P133)
NUOLO2 (P134)
NUILO3 (P135)
NUOLO3 (P136)
NUILO4 (P137)
NUOLO4 (P138)
CNC 8035
(SOFT M: V11.1X)
(SOFT T: V12.1X)
116
The values of the PLC machine parameters mentioned earlier should be
multiple of 16 for best managing the inputs and outputs in time.
Not being used.
Installation manual
Miscellaneous (M) function table
The number of M functions in this table is determined by the g.m.p. NMISCFUN (P29),
being possible to define up to 255 M functions.
It must borne in mind that functions: M00, M01, M02, M03, M04, M05, M06, M8, M9,
M19, M30, M41, M42, M43 and M44, besides what is indicated in this table, have
specific meanings when programming the CNC.
4.
Tables
4.8.1
Tables
MACHINE PARAMETERS
4.8
Each miscellaneous function will be called by its M number.
Possible values
Integer numbers between 0 and 9999.
The table elements that are not defined will be displayed as M????.
A subroutine can be associated with each M function and it will be indicated by the
letter S.
Possible values
Integer numbers between 0 and 9999.
If 0 is assigned to this field, it means that the M function has no
subroutine associated with it.
The third field consists of 8 customizing bits called bit 0 through bit 7:
bit 0
*
*
*
*
*
*
*
*
7
6
5
4
3
2
1
0
Indicates whether the CNC must wait or not for the AUXEND signal (M done) to
consider it executed and go on to the next program block
Value
Meaning
0
The AUXEND signal is expected.
1
The AUXEND signal is NOT expected.
CNC 8035
(SOFT M: V11.1X)
(SOFT T: V12.1X)
117
Installation manual
bit 1
bit 2
Tables
MACHINE PARAMETERS
4.
bit 3
bit 4
Indicates whether the M function is executed before or after the movement block
where it is programmed.
Value
Meaning
0
It is executed before the move.
1
It is executed after the move.
Indicates whether the M function interrupts the block preparation or not.
Value
Meaning
0
It does NOT interrupt the block preparation.
1
It interrupts the block preparation.
Indicates whether the M function is executed or not after the associated subroutine
is executed.
Value
Meaning
0
It is executed after the associated subroutine.
1
ONLY the associated subroutine is executed.
When bit "2" has been set to "1", it indicates whether block preparation is to be
interrupted until the execution of the M function begins or until it ends (until the Mdone signal is received).
Value
Meaning
0
It interrupts block preparation until the execution of the
"M" function begins.
1
It interrupts block preparation until the "M-done" signal
(AUXEND) is received.
bit 5
Not being used at this time.
bit 6
Not being used at this time.
bit 7
Not being used at this time.
When executing an M function which has not been defined in the M table, the
programmed function will be executed at the beginning of the block and the CNC will
“wait” for the “AUXEND” signal to continue the execution of the program.
CNC 8035
(SOFT M: V11.1X)
(SOFT T: V12.1X)
118
Installation manual
Leadscrew error compensation table
The CNC provides a table for each one of the axes requiring leadscrew
compensation. The CNC will provide a table for each one of the axes having
leadscrew compensation. This type of compensation is selected by setting a.m.p.
LSCRWCOM (P15).
The number of elements of the table must be set by a.m.p. NPOINTS (P16), being
possible to define up to 255 points per axis. Different compensation values may be
defined at each point for each moving direction.
Tables
4.
MACHINE PARAMETERS
4.8.2
Each parameter of the table represents a point of the profile to compensate. The
following information is defined at each point:
• The position occupied by the point in the profile (position to compensate). This
position is defined by its coordinate referred to machine reference zero.
Possible values
Within ±99999.9999 mm or ±3937.00787 inches.
• The error of the leadscrew at that point, when moving in the positive direction.
Possible values
Within ±99999.9999 mm or ±3937.00787 inches.
• The error of the leadscrew at that point, when moving in the negative direction.
Possible values
Within ±99999.9999 mm or ±3937.00787 inches.
For each axis position, define the amount of error to be compensated in both
directions. If the amount of error in the negative direction is zero in all points, it
assumes that the amount of error defined for the positive direction is valid for both
directions.
CNC 8035
Leadscrew error compensation on rotary axes
On rotary axes, although the display is limited between 0 and 360º, the internal count
is accumulative. When using leadscrew error compensation, set positions 0° and
360°, first and last point of the table, with the same amount of error. This way, the CNC
will apply the same compensation in all the revolutions.
(SOFT M: V11.1X)
(SOFT T: V12.1X)
Otherwise, the compensation will be limited to the indicated field.
119
Installation manual
Considerations and limitations
When defining the profile points in the table, the following requirements must be met:
• The axis points must be in sequential order starting from the most negative (least
positive) point to be compensated.
• For those points outside the compensation zone, the CNC will apply the
compensation value corresponding to the table point closest to them.
• The amount of error of the machine reference point may have any value.
• The error difference between two consecutive points must not be greater than the
distance between them (maximum slope= 100%).
Tables
MACHINE PARAMETERS
4.
CNC 8035
(SOFT M: V11.1X)
(SOFT T: V12.1X)
120
i
Bidirectional compensation of the leadscrew error is available from versions
V7.11 (mill) and V8.11 (lathe) on.
When updated from a version that does not have bidirectional compensation,
it keeps the error values in the positive direction and it sets a zero error in the
negative direction for all the points.
When changing to a version that does not have bidirectional compensation,
it keeps the error values in the positive direction, but it loses the error values
in the negative direction. Also, the amount of error for the machine reference
point must be zero.
Installation manual
Cross compensation parameter table
To enable this table, set g.m.p.:
MOVAXIS (P32)
COMPAXIS (P33)
NPCROSS (P31)
Parameter MOVAXIS indicates the axis that moves and COMPAXIS the axis affected
by the movement of the “movaxis” (to be compensated) and NPCROSS indicates the
number of points in the table.
Tables
4.
MACHINE PARAMETERS
4.8.3
The table must indicate the amount of error to be compensated in specific positions
of the moving axis.
The position is defined in home coordinates (referred to machine reference zero).
Depending on g.m.p. TYPCROSS (P135), the CNC will take into account either the
theoretical or real (actual) coordinates.
Possible values for the position and error fields:
Possible values
Within ±99999.9999 mm or ±3937.00787 inches.
When defining the profile points in the table, the following requirements must be met:
• The axis points must be in sequential order starting from the most negative (least
positive) point to be compensated.
• For those points outside the compensation zone, the CNC will apply the
compensation value corresponding to the table point closest to them.
When both leadscrew and cross compensations are applied on the same axis, the
CNC will apply the sum of the two.
CNC 8035
(SOFT M: V11.1X)
(SOFT T: V12.1X)
121
Installation manual
Tables
MACHINE PARAMETERS
4.
CNC 8035
(SOFT M: V11.1X)
(SOFT T: V12.1X)
122
CONCEPTS
5
It is recommended to save the machine parameters as well as the PLC
program and files into the memkey card” (CARDA) or in a peripheral or PC
to avoid losing them.
5.1
Axes and coordinate systems
Given that the objective of the CNC is to control the movement and positioning of axes,
it is necessary to determine the position of the point to be reached through the
coordinates.
The CNC allows you to use absolute, relative or incremental coordinates throughout
the same program.
Axis nomenclature
The axes are named according to DIN 66217.
Characteristics of the system of axes:
X and Y
main movements on the main work plane of the machine.
Z
parallel to the main axis of the machine, perpendicular to the main XY
plane.
U, V, W
auxiliary axes parallel to X, Y, Z respectively.
A, B, C
Rotary axes on each axis X, Y, Z.
CNC 8035
(SOFT M: V11.1X)
(SOFT T: V12.1X)
123
Installation manual
In the figure (below) an example of the nomenclature of the axes on a milling-profiling
machine with a tilted table.
CONCEPTS
Axes and coordinate systems
5.
Axis selection
From the possible 9 axes that there could be, the CNC lets the OEM select up to 3
of them at the mill model and 2 of them at the lathe model.
Moreover, all the axes should be suitably defined as linear/rotary, etc. through the
machine parameters of axes which appear in the Installation and Start-up Manual.
There is no limitation to the programming of the axes, and interpolations can be made
simultaneously with up to 3 axes.
Example of milling.
The machine has two regular linear axes: X, Y and Z, an analog spindle (S) and a
handwheel.
Setting of g.m.p. AXIS1 (P0) through AXIS8 (P7)
AXIS1 (P0) = 1
X axis
associated with feedback X1 and output O1.
AXIS2 (P1) = 2
Y axis
associated with feedback X2 and output O2.
AXIS3 (P2) = 3
Z axis
associated with feedback X3 and output O3.
AXIS4 (P3) = 10
Spindle (S)
associated with feedback X5 (1-6) and output O5.
Handwheel
associated with feedback input X6 (1-6).
AXIS5 (P4) = 0
AXIS6 (P5) = 0
AXIS7 (P6) = 11
AXIS8 (P7) = 0
The CNC activates a machine parameter table for each axis (X, Y, Z, U) and another
one for the spindle (S).
a.m.p. AXISTYPE (P0) must be set as follows.
CNC 8035
X axis
AXISTYPE (P0) = 0
Regular linear axis
Y axis
AXISTYPE (P0) = 0
Regular linear axis
Z axis
AXISTYPE (P0) = 0
Regular linear axis
s.m.p. SPDLTYPE (P0) must be set as follows:
Spindle
(SOFT M: V11.1X)
(SOFT T: V12.1X)
124
SPDLTYPE (P0) = 0
±10V spindle analog output.
Likewise, a.m.p DFORMAT (P1) and s.m.p. DOFORMAT (P1) must be properly set
to indicate their display formats.
Installation manual
Example of lathe.
The machine has two regular linear axes: X and Z and an analog spindle (S).
Setting of g.m.p. AXIS1 (P0) through AXIS8 (P7).
AXIS1 (P0) = 1
X axis
associated with feedback X1 and output O1.
AXIS3 (P1) = 3
Z axis
associated with feedback X2 and output O2.
AXIS5 (P2) = 10
Spindle (S)
associated with feedback X3 and output O3.
CONCEPTS
AXIS5 (P4) = 0
AXIS6 (P5) = 0
AXIS7 (P6) = 0
AXIS8 (P7) = 0
The CNC activates a machine parameter table for each axis (X, Z) and another one
for the spindle (S).
a.m.p. AXISTYPE (P0) must be set as follows.
X axis
AXISTYPE (P0) = 0
Regular linear axis
Z axis
AXISTYPE (P0) = 0
Regular linear axis
Axes and coordinate systems
5.
AXIS4 (P3) = 0
s.m.p. SPDLTYPE (P0) must be set as follows:
Spindle
SPDLTYPE (P0) = 0
±10V spindle analog output.
Likewise, a.m.p DFORMAT (P1) and s.m.p. DOFORMAT (P1) must be properly set
to indicate their display formats.
CNC 8035
(SOFT M: V11.1X)
(SOFT T: V12.1X)
125
Installation manual
5.1.1
Rotary axes
With this CNC, it is possible to select the type of rotary axis by means of a.m.p.
AXISTYPE(P0).
CONCEPTS
Axes and coordinate systems
5.
Normal rotary axis
AXISTYPE (P0) = 2
Positioning-only axis
AXISTYPE (P0) = 3
Rotary Hirth axis
AXISTYPE (P0) = 4
By default, their position is always displayed between 0 and 360º (Rollover axis). If
these limits are not to be set, modify a.m.p. ROLLOVER (P55).
ROLLOVER = YES
Rotary axis display between 0 and 360º
ROLLOVER = NO
No display limits.
Although the display is limited between 0 and 360º, the internal count is accumulative.
Therefore, a.m.p. "LIMIT+(P5)" and "LIMIT-(P6)" should be set to limit the maximum
number of turns in each direction.
When both parameters are set to "0", the axis can move indefinitely in either direction
(rotary tables, indexers, etc.). See "4.3 Axis parameters" on page 74.
When using leadscrew error compensation, set positions 0° and 360°, first and last
point of the table, with the same amount of error. This way, the CNC will apply the
same compensation in all the revolutions. See "5.5.7 Leadscrew error
compensation" on page 155.
Normal rotary axes
They can interpolate with linear axes. G00 and G01 movement.
• Absolute coordinate programming (G90).
The sign indicates the turning direction and the end coordinate the position
(between 0 and 359.9999).
• Incremental coordinate programming (G91).
The sign indicates the turning direction. If the programmed movement exceeds
360º, the axis will turn more than once before positioning at the desired point.
Normal rotary axis
AXISTYPE=2
ROLLOVER=YES
It counts between 0º and 360º.
G90 The sign indicates the turning direction.
LIMIT+ = 8000
LIMIT- =-8000
G91 The sign indicates the turning direction.
ROLLOVER=NO
It counts between 7999.9999º and 7999.9999º.
G90 and G91 as linear axis.
ROLLOVER=YES
It counts between 0º and 360º.
G90 The sign indicates the turning direction.
CNC 8035
LIMIT+ = 0
LIMIT- =0
G91 The sign indicates the turning direction.
ROLLOVER=NO
There are 2 loops, one between 0º and 360º and
the other between 0º and -360º It is possible to
switch from one to the other.
G90 and G91 as linear axis.
LIMIT+ = 350
(SOFT M: V11.1X)
(SOFT T: V12.1X)
126
LIMIT- =10
ROLLOVER=YES/NO
It can only move between 10º and 350º.
With G90 and G91 like when LIMIT+=8000. An
error message is issued if the target position is
beyond the limits.
Installation manual
Positioning-only axis
It cannot interpolate with linear axes. Movement always in G00, and they do not admit
tool radius compensation (G41, G42).
• Absolute coordinate programming (G90).
Always positive and in the shortest direction. End coordinate between 0 and
359.9999.
• Incremental coordinate programming (G91).
AXISTYPE=3
ROLLOVER=YES
It counts between 0º and 360º.
LIMIT+ = 8000
G90 does not admit negative values. Always via
the shortest path.
LIMIT- =-8000
G91 The sign indicates the turning direction.
ROLLOVER=NO
It counts between 7999.9999º and 7999.9999º.
G90 and G91 as linear axis.
ROLLOVER=YES
It counts between 0º and 360º.
LIMIT+ = 0
G90 does not admit negative values. Always via
the shortest path.
LIMIT- =0
G91 The sign indicates the turning direction.
ROLLOVER=NO
CONCEPTS
Positioning-only axis
Axes and coordinate systems
5.
The sign indicates the turning direction. If the programmed movement exceeds
360º, the axis will turn more than once before positioning at the desired point.
There are 2 loops, one between 0º and 360º and
the other between 0º and -360º It is possible to
switch from one to the other.
G90 and G91 as linear axis.
LIMIT+ = 350
ROLLOVER=YES/NO
LIMIT- =10
It can only move between 10º and 350º.
With G90 and G91 like when LIMIT+=8000. An
error message is issued if the target position is
beyond the limits.
Rotary Hirth axis
It is a positioning-only axis which cannot take decimal coordinates. All positioning
movements must be in whole degrees.
CNC 8035
(SOFT M: V11.1X)
(SOFT T: V12.1X)
127
Installation manual
More than one Hirth axis may be used, but they can only move one at a time.
Rotary Hirth axis (whole degrees)
AXISTYPE=3
ROLLOVER=YES
It counts between 0º and 360º.
G90 does not admit negative values.
LIMIT+ = 8000
LIMIT- =-8000
5.
G91 The sign indicates the turning direction.
ROLLOVER=NO
It counts between 7999.9999º and 7999.9999º.
CONCEPTS
Axes and coordinate systems
G90 and G91 as linear axis.
CNC 8035
(SOFT M: V11.1X)
(SOFT T: V12.1X)
128
ROLLOVER=YES
It counts between 0º and 360º.
LIMIT+ = 0
G90 does not admit negative values. Always via
the shortest path.
LIMIT- =0
G91 The sign indicates the turning direction.
ROLLOVER=NO
There are 2 loops, one between 0º and 360º and
the other between 0º and -360º It is possible to
switch from one to the other.
G90 and G91 as linear axis.
LIMIT+ = 350
LIMIT- =10
ROLLOVER=YES/NO
It can only move between 10º and 350º.
With G90 and G91 like when LIMIT+=8000. An
error message is issued if the target position is
beyond the limits.
Installation manual
Gantry axes
Gantry axes are any two axes that, due to the way the machine is built, must move
together in synchronism. For example: bridge type mills.
Only the movements of one of those axes must be programmed and it is called the
main axis. The other axis is referred to as "slave axis".
In order to operate this way, it is necessary to have the a.m.p. GANTRY (P2)
corresponding to both axes set as follows:
5.
• Parameter "GANTRY" of the slave axis must indicate which axis is its "master"
(or main axis).
Also, a.m.p. MAXCOUPE (P45) of the slave axis must indicate the maximum allowed
difference between the following errors of both axes.
Example of a bridge type milling machine with two Gantry axes (X-U, Z-W).
Machine parameters.
X axis
GANTRY = 0
U axis
GANTRY = 1
Z axis
GANTRY = 0
W axis
GANTRY = 3
CONCEPTS
• Parameter "GANTRY" of the main axis set to "0".
Axes and coordinate systems
5.1.2
CNC 8035
(SOFT M: V11.1X)
(SOFT T: V12.1X)
129
Installation manual
5.1.3
Incline axis
With the angular transformation of an incline axis, it is possible to make movements
along an axis that is not perpendicular to anoher.
On certain machines, the axes are configured in a Cartesian way, they are not
perpendicular to each other. A typical case is the X axis of a lathe that due to
sturdiness reasons is not perpendicular to the Z axis.
5.
X
CONCEPTS
Axes and coordinate systems
X'
X
Cartesian axis.
X'
Angular axis.
Z
Orthogonal axis.
Z
Programming in the Cartesian system (Z-X) requires activating an angular
transformation of an incline plane that converts the movements of the real (nonperpendicular) axes (Z-X'). This way, a movement programmed on the X axis is
transformed into movements on the Z-X' axes; i.e. it then moves along the Z axis and
the angular X' axis.
Configuring the incline axis
The incline axis is configured by the following general machine parameters.
X
X'
60º
Z
ANGAXNA
X
ORTAXNA
Z
ANGANTR
60º
OFFANGAX
Configuring the axes
The parameter ANGAXNA configures the incline axis. The parameter ORTAXNA
defines the axis perpendicular to the Cartesian axis associated with the incline axis.
CNC 8035
The parameter OFFANGAX sets the distance between machine zero and the origin
that defines the coordinate system of the incline axis. The axes defined in parameters
"ANGAXNA" and "ORTAXNA"must exist and must be linear. Those axes may have
Gantry axes associated with them.
Angle of the incline axis
(SOFT M: V11.1X)
(SOFT T: V12.1X)
130
The parameter ANGANTR defines the angle between the Cartesian axis and the
angular axis it is associated with. The angle is positive when the angular axis has been
rotated clockwise and negative if otherwise. If its value is 0º, there is no need to do
an angular transformation.
Installation manual
Programming and movements
Coordinates display
If the incline axis is active, the coordinates displayed will be those of the Cartesian
system; otherwise, it will display the coordinates of the real axes.
Movement programming
• Movement along the incline axis, but programming the coordinate in the Cartesian
system. While this mode is active, in the motion block only the coordinate of the
incline axis must be programmed.
Jog movements
PLC mark "MACHMOVE" determines how the manual movements with handwheels
or with the keyboard will be carried out.
MACHMOVE = 0
Movements on the Cartesian axes.
MACHMOVE = 1
Movements on the incline axes of the machines.
CONCEPTS
• The movements are programmed in the Cartesian system and are transformed
into movements on the real axes.
Axes and coordinate systems
5.
The incline plane is activated from the part-program (function G46). Two kinds of
movements may be executed.
Home search
While searching home, the movements are carried out on the incline axes of the
machine. The incline axis is deactivated when searching home on any axis making
up the configuration of the incline axis.
CNC 8035
(SOFT M: V11.1X)
(SOFT T: V12.1X)
131
Installation manual
5.2
Jog
5.2.1
Relationship between the axes and the JOG keys
The CNC has 3 pairs of keys to manually control the machine axes.
Jog
CONCEPTS
5.
Z+
X+
Y+
XZ-
Mill model
CNC 8035
(SOFT M: V11.1X)
(SOFT T: V12.1X)
132
Y-
X+
ZC-
C+
Z+
X-
Lathe model
Installation manual
Path-jog mode
This mode may be used to act upon the jog keys of an axis to move both axes of the
plane at the same time for chamfering (straight sections) and rounding (curved
sections). The "path jog" mode acts when the switch is the continuous or incremental
jog positions.
The CNC assumes as "Path jog" the keys associated with the X axis.
Feature setting
To activate or cancle the "Path jog" work mode, act upon the logic CNC input
"MASTRHND" M5054.
M5054 = 0
"Path JOG" function off.
M5054 = 1
"Path JOG" function on.
Jog
5.
This feature must be managed from the PLC.
CONCEPTS
5.2.2
To indicate the type of movement, use CNC logic input “HNLINARC” M5053.
M5053 = 0
Linear path.
M5053 = 1
Arc path.
For a linear path, indicate the path angle in the MASLAN variable (value in degrees
between the linear path and the first axis of the plane). For an arc, indicate the arc
center coordinates in the MASCFI, MASCSE variables (for the first and second axes
of the main plane).
Variables MASLAN, MASCFI and MASCSE may be read and written from the CNC,
DNC and PLC.
Operation of the "path jog" feature
The "path jog" mode is only available with the X axis keys. When pressing one of the
keys associated with the X axis, the CNC behaves as follows:
Switch position
Path jog
Type of movement
Continuous jog
OFF
Only the axis and in the indicated direction
ON
Both axes in the indicated direction and
along the indicated path
OFF
Only the axis, the selected distance and in
the indicated direction
ON
Both axes, the selected distance and in
the indicated direction, but along the
indicated path
Incremental jog
Handwheel
CNC 8035
It ignores the keys.
The rest of the jog keys always work in the same way, whether "path jog" is on or off.
The rest of the keys move only the axis and in the indicated direction.
(SOFT M: V11.1X)
(SOFT T: V12.1X)
133
Installation manual
Considerations about the jog movements
This mode assumes as axis feedrate the one selected in jog mode and it will also be
affected by the feedrate override switch. If F0 is selected, it assumes the one indicated
by machine parameter “JOGFEED (P43)”. This mode ignores the rapid jog key.
"PATH JOG" movements respect the travel limits and the work zones.
"Path jog" movements may be aborted in the following ways:
• By pressing the [STOP] key.
5.
• By turning the JOG switch to one of the handwheel positions.
Jog
CONCEPTS
• By setting general logic input “MASTRHND (M5054)” = 0.
CNC 8035
(SOFT M: V11.1X)
(SOFT T: V12.1X)
134
• By setting general logic input "\STOP (M5001)" = 0.
Installation manual
Movement with an electronic handwheel
Depending on their configuration, the available handwheels are:
• General handwheel.
It can be used to jog any axis one by one.
Select the axis and turn the handwheel to move it.
• Individual handwheel.
5.
It replaces the mechanical handwheels.
It only moves the axis it is associated with.
To move any of them, turn the switch to any of the handwheel positions. Positions
1, 10 and 100 indicate the multiplying factor being applied besides the internal x4 to
the feedback pulses supplied by the electronic handwheel.
For example, if the manufacturer has set a distance of 0.100 mm or 0.0100 inches
per handwheel turn for switch position 1:
Switch position
Distance per turn
1
0.100 mm or 0.0100 inches
10
1.000 mm or 0.1000 inches
100
10.000 mm or 1.0000 inches
CONCEPTS
Up to 2 handwheels can be used (one per axis).
Movement with an electronic handwheel
5.3
There are 3 operating modes with handwheels:
Standard handwheel:
• With the general handwheel, select the axis to be moved and turn the handwheel.
• With individual handwheels, turn the handwheel associated with the axis to be
moved.
Path handwheel
• For chamfering and rounding corners.
• 2 axes are moved along a selected path (chamfer or rounding) by moving a single
handwheel.
• This feature must be managed from the PLC.
• The general handwheel is assumed as the "path handwheel" or the individual
handwheel associated with the X axis (Mill) or Z (lathe).
Feed handwheel mode
• To control the feedrate of the machine.
• This feature must be managed from the PLC.
Depending on the turning speed of the handwheel and the position of the
selector switch, when requesting a movement at a faster feedrate than the
maximum allowed.
• With individual handwheels, the movement stops when stopping the
handwheel. It does not move the indicated distance.
• With general handwheels, g.m.p. HDIFFBAC (P129) indicates whether
the movement is stopped or it moves the indicated distance.
CNC 8035
(SOFT M: V11.1X)
(SOFT T: V12.1X)
135
Installation manual
5.3.1
Standard handwheel
General handwheel.
1. Select the axis to be jogged.
Press one of the JOG keys of the axis to be jogged. The selected axis will be
highlighted.
When using a Fagor handwheel with an axis selector button, the axis may be
selected as follows:
5.
CONCEPTS
Movement with an electronic handwheel
• Push the button on the back of the handwheel. The CNC select the first axis
and it highlights it.
CNC 8035
(SOFT M: V11.1X)
(SOFT T: V12.1X)
136
• When pressing the button again, the CNC selects the next axis and so on in
a rotary fashion.
• To deselect the axis, hold the button pressed for more than 2 seconds.
2. Jog the axis.
Once the axis has been selected, it will move as the handwheel is being turned
and in the direction indicated by it.
Individual handwheels.
Each axis will move as the corresponding handwheel is being turned according to
the switch position and in the direction indicated by it.
Simultaneous handwheels.
The machine may have a general handwheel and up to 3 individual handwheels
associated with each axis. The individual handwheels have priority over the general
handwheel. So, if an individual handwheel is moving, the general handwheel will be
ignored.
Installation manual
Path handwheel
With this feature, it is possible to jog two axes at the same time along a linear path
(chamfer) or circular path (rounding) with a single handwheel.
The CNC assumes as the path handwheel the general handwheel or, when this one
is missing, the one associated with the X axis (Mill) or Z axis (lathe).
Feature setting
5.
To activate or cancle the "Path jog" work mode, act upon the logic CNC input
"MASTRHND" M5054.
M5054 = 0
"Path JOG" function off.
M5054 = 1
"Path JOG" function on.
To indicate the type of movement, use CNC logic input “HNLINARC” M5053.
M5053 = 0
Linear path.
M5053 = 1
Arc path.
For a linear path, indicate the path angle in the MASLAN variable (value in degrees
between the linear path and the first axis of the plane). For an arc, indicate the arc
center coordinates in the MASCFI, MASCSE variables (for the first and second axes
of the main plane).
CONCEPTS
This feature must be managed from the PLC.
Movement with an electronic handwheel
5.3.2
Variables MASLAN, MASCFI and MASCSE may be read and written from the CNC,
DNC and PLC.
The next example uses the [O2] key to activate and deactivate the "path handwheel"
mode and the [O3] key to indicate the type of movement.
DFU B29 R561 = CPL M5054
Activate or cancel the "path handwheel" mode.
DFU B31 R561 = CPL M5053
Select the type of movement; straight section or arc section.
Simultaneous handwheels
When selecting the path handwheel mode, the CNC behaves as follows:
• If there is a general handwheel, it will be the one working in path handwheel mode.
The individual handwheels, if any, will remain associated with the corresponding
axes.
• If there is no general handwheel, one of the individual handwheel starts working
in path handwheel mode. The one associated with the X axis if Mill model or the
one associated with the Z if lathe model.
CNC 8035
(SOFT M: V11.1X)
(SOFT T: V12.1X)
137
Installation manual
5.3.3
Feed handwheel mode
Usually, when making a part for the first time, the machine feedrate is controlled by
means of the feedrate override switch.
From this version on, it is also possible to use the machine handwheels to control that
feedrate. This way, the machining feedrate will depend on how fast the handwheel
is turned. To do this, proceed as follows:
• Inhibit all the feedrate override switch positions from the PLC.
5.
CONCEPTS
Movement with an electronic handwheel
• Detect how far the handwheel is turned (reading of pulses received).
• Set the corresponding feedrate override from the PLC depending on the pulses
received from the handwheel.
The following CNC variables return the number of pulses the handwheel has turned.
HANPF
shows the number of pulses of the 1st handwheel.
HANPS
shows the number of pulses of the 2nd handwheel.
HANPT
shows the number of pulses of the 3rd handwheel.
HANPFO
shows the number of pulses of the 4th handwheel.
PLC programming example.
The machine has a button to activate and deactivate this feature (feed handwheel)
and the feedrate control is carried out with the second handwheel.
CY1
R101=0
Resets the register containing the previous handwheel reading.
END
PRG
DFU I71 = CPL M1000
Every time the button is pressed, mark M1000 is inverted.
M1000 = MSG1
If the feature is active, a message is displayed.
NOT M1000
= AND KEYDIS4 $FF800000 KEYDIS4
= JMP L101
If this feature is not active, it enables all the positions of the feedrate override
switch and resumes program execution
DFU M2009
= CNCRD(HANPS,R100,M1)
= SBS R101 R100 R102
= MOV R100 R101
= MLS R102 3 R103
= OR KEYDIS4 $7FFFFF KEYDIS4
CNC 8035
If this feature is activated and an upflank occurs at the clock mark M2009, it reads
in R100 the handwheel pulses (HANPS), calculates in R102 the number of pulses
received from the last reading, updates R101 for the next reading, calculates in
R103 the value of the right feedrate % and inhibits all the positions of the feedrate
override switch (KEYDIS4).
CPS R103 LT 0 = SBS 0 R103 R103
(SOFT M: V11.1X)
(SOFT T: V12.1X)
CPS R103 GT 120 = MOV 120 R103
It adjusts the value of R103 (feedrate %). It ignores the handwheel turning
direction (sign) and limits the value to 120%
DFU M2009
138
Installation manual
= CNCWR(R103,PLCFRO,M1)
With the up flank at the clock mark M2009, set the calculated feedrate override
(PLCFRO=R103)
L101
END
CONCEPTS
Movement with an electronic handwheel
5.
CNC 8035
(SOFT M: V11.1X)
(SOFT T: V12.1X)
139
Installation manual
5.3.4
"Additive handwheel" mode
With manual intervention or additive handwheel, it is possible to move the axes
manually while a program is being executed. To do this, once this option is activated,
use the handwheel to make a movement to be added to the one resulting from the
automatic execution. This movement will be applied as if it were another zero offset.
The general handwheel will be used as the additive handwheel. If there is no general
handwheel, use the handwheel associated with the axis.
CONCEPTS
Movement with an electronic handwheel
5.
G01 X_ Z_
A
G01 X_ Z_
X
(Z,X)
ADIOFX
A
(X,Z)
B
ADIOFZ
Z
B
(A) Position of the tool while in execution.
(B) Position of the tool after a manual intervention.
The intervention with an additive handwheel is only possible in execution mode, even
while the program is interrupted. However, it is not allowed in the tool inspection mode.
The additive handwheel may be enabled for a coordinate transformation G46
(inclined axis) where the handwheel movements are applied to the machining
operation even if they are not shown on the graphics screen.
The offset caused by the additive handwheel stays active after disabling the
handwheel and it is reset to zero after a home search. The offset stays active or is
reset after an M02 or M30 and after an emergency or a reset depending on the setting
of g.m.p. ADIMPG (P176).
Considerations
• The movement with the additive handwheel on the master axis is also applied to
the slave axis when using axes that are gantry, slaved or synchronized by PLC.
• When testing the software limits during block preparation, it checks the theoretical
coordinate ignoring the additional movement of the additive handwheel.
• The mirror image by PLC is not applied to the additive handwheel movement.
Configuring the additive handwheel
When enabling the additive handwheel, the following must be borne in mind.
• If the DWELL parameter of an axis has been set and it is not previously in motion,
it activates the ENABLE mark of the axis and waits a time period indicated in
DWELL to check whether its SERVOON has been activated or not.
CNC 8035
• The acceleration applied to the additive handwheel movement is that of
parameter. ACCTIME of the axis.
• On Gantry axes, the movement of the master axis using an additive handwheel
is also applied to the slave axis.
• The mirror image by PLC is not applied to the additive handwheel movement.
(SOFT M: V11.1X)
(SOFT T: V12.1X)
• When testing the software limits during block preparation, it checks the theoretical
coordinate ignoring the additional movement of the additive handwheel.
The additive handwheel is configured by machine parameters and is activated and
deactivated by PLC.
140
Installation manual
Activating and deactivating the additive handwheel
The additive handwheel is activated and deactivated with the mark MANINT(X-C).
The PLC sets one of these signals high to activate the additive handwheel on each
axis. Only one additive handwheel may be enabled at a time. If there are more than
one mark active, only the first one will be attended to.
Configuring the additive handwheel
The parameter ADIMPG enables the additive handwheel and makes it possible to
configure its operation.
• The resolution of the handwheel is set by parameter ADIMPRES (P177) of the
axis.
• The handwheel resolution is set with the switch of the operator panel. If the switch
is not in the handwheel position, it assumes a x1 factor.
Maximum feedrate allowed, due to the additive handwheel, is limited by parameter
ADIFEED (P84).
Coordinates display
Parameter DIPLCOF determines whether the CNC takes into consideration or not
the additive zero offset when displaying the coordinates of the axes on the screen
and when accessing the POS(X-C) and TPOS(X-C) variables.
CONCEPTS
The resolution of the additive handwheel depends on the setting of parameter
ADIMPG (P176). There are two options to set the resolution:
5.
Movement with an electronic handwheel
Handwheel resolution and maximum feedrate.
CNC 8035
(SOFT M: V11.1X)
(SOFT T: V12.1X)
141
Installation manual
5.4
feedback system
The various feedback inputs available at the CNC admit sinewave and squarewave
differential signals from feedback systems. The following axis machine parameters
indicate the type of feedback system and the resolution utilized for each axis.
• When using linear feedback devices.
CONCEPTS
feedback system
5.
PITCH (P7)
Leadscrew pitch or that of the linear encoder being
used.
NPULSES (P8)
=0
DIFFBACK (P9)
Indicates whether the feedback device uses
differential signals (double ended) or not.
SINMAGNI (P10)
Feedback multiplying factor applied by the CNC.
FBACKAL (P11)
Feedback alarm (only with differential signals).
• When using rotary encoders.
PITCH (P7)
Number of degrees per encoder turn.
NPULSES (P8)
Number of pulses (lines) per encoder turn.
DIFFBACK (P9)
Indicates whether the feedback device uses
differential signals (double ended) or not.
SINMAGNI (P10)
Feedback multiplying factor applied by the CNC.
FBACKAL (P11)
Feedback alarm (only with differential signals).
Next, the feedback counting speed (frequency) limitation is described as well as how
to set these machine parameters for the axes.
CNC 8035
(SOFT M: V11.1X)
(SOFT T: V12.1X)
142
Installation manual
Counting speed limitation
Sinewave signals
The maximum counting speed (frequency) for sinewave feedback is 250 KHz.
The maximum feedrate for each axis will depend upon the selected resolution and
the signal pitch (distance per pulse) in use while with rotary encoders it will depend
on the number of pulses per revolution.
When using a Fagor linear encoder, the signal pitch is 20 µm. Therefore, with a
counting resolution of 1 µm, the maximum feedrate will be:
20 µm/pulse x 250.000 pulses/sec = 300 m/min.
When using Fagor linear encoder, the maximum feedrate is limited by their own
characteristics to 60 m/min.
CONCEPTS
Example 1:
5.
feedback system
5.4.1
Example 2:
Using an indexer with a sinewave Fagor encoder of 3600 lines per turn. Therefore,
for a feedback resolution of 1 µm, the maximum axis feedrate will be:
(360 degrees/turn / 3600 pulses/turn) x 250.000 pulses/s. = 25.000 degrees/s.=
1.500.000 degrees /min
Since Fagor sine-wave encoders admit a frequency of up to 200 KHz, the maximum
feedrate will be:
(360 degrees/turn / 3600 pulses/turn) x 200.000 pulses/s. =
= 20,000 degrees/sec.= 1,200,000 degrees/min.
Squarewave signals
The maximum frequency (speed) for squarewave differential feedback is 425 KHz.
with a separation of 450 ns between A and B flanks. Which is equivalent to 90º ±20º.
The maximum feedrate for each axis will depend upon the selected resolution and
the signal pitch (distance per pulse) in use.
When using Fagor linear encoder, the maximum feedrate is limited by their own
characteristics to 60 m/min.
When using FAGOR rotary encoders, their intrinsic output frequency limit is (200Kz).
CNC 8035
(SOFT M: V11.1X)
(SOFT T: V12.1X)
143
Installation manual
5.4.2
Resolution
The CNC provides a number of machine parameters for the axes and for the spindle
in order to establish the counting resolution of each one of the axes and the spindle.
PITCH (P7)
Defines the pitch of the ballscrew or the linear encoder being used. When using a
Fagor linear encoder, this parameter must be set with the pitch value of the feedback
signals (20 µm or 100 µm).
When using a rotary axis, indicate the number of degrees per encoder revolution. E.g.
if the encoder is mounted on the motor and the axis has gear ratio of 1/10, parameter
PITCH must be set with the value of 360/10 = 36.
CONCEPTS
feedback system
5.
NPULSES (P8)
Indicates the number or pulses/rev provided by the rotary encoder. When using a
linear encoder, just enter “0”. If a gear box is used on the axis, the whole assembly
must be taken into account when setting the number of pulses per turn.
SINMAGNI (P10)
Indicates the multiplying factor (x1, x4, x20, etc.) that the CNC must apply only to
sinusoidal feedback signal.
For square feedback signals, this parameter must be set to 0 and the CNC will always
apply a multiplying factor of x4.
The counting resolution for each axis will be defined by means of the combination
of these parameters as shown in the following table:
PITCH
NPULSES
SINMAGNI
Square signal encoder
Leadscrew pitch
Nr of pulses
0
Sinusoidal signal encoder
Leadscrew pitch
Nr of pulses
multiplying factor
Square signal linear encoder
linear encoder pitch
0
0
Sinusoidal signal linear encoder
linear encoder pitch
0
multiplying factor
Example 1:
Resolution in "mm" with squarewave encoder.
We would like to obtain a 2µm resolution by using a squarewave encoder mounted
on 5 mm pitch leadscrew.
Since the CNC applies a x4 multiplying factor to squarewave signals, we would
require an encoder which provides the following number of pulses (lines) per turn.
Nr of pulses = ballscrew pitch / (multiplying factor x Resolution)
Nr pulses = 5000 µm / (4 x 2 µm) = 625 pulses/turn
Therefore:
INCHES = 0
PITCH=5.0000
NPULSES = 625 SINMAGNI=0
Although the CNC accepts a maximum squarewave frequency of 400 KHz, when
using Fagor squarewave rotary encoders their output frequency is limited to 200KHz;
thus, the maximum possible feedrate (F) will be:
Max. feedrate = (200.000 pulses/sec. / 625 pulses/turn) x 0.2 inch/turn
Max. feedrate = 1600 mm/s = 96 m/min.
CNC 8035
(SOFT M: V11.1X)
(SOFT T: V12.1X)
144
Installation manual
Example 2:
Resolution in "mm" with sinusoidal signal encoder
We would like to obtain a 2µm resolution by using a 250-line sinewave encoder
mounted on 5 mm-pitch ballscrew.
We must calculate the multiplying factor "SINMAGNI" to be applied by the CNC to
the pulses provided by the encoder in order to obtain the desired resolution.
SINMAGNI = ballscrew pitch / (Nr pulses x Resolution)
SINMAGNI = 5000 µm / (250 x 2 µm) = 10
PITCH=5.0000
NPULSES = 250 SINMAGNI=10
Although the CNC accepts a maximum squarewave frequency of 250 KHz, when
using Fagor sine-wave rotary encoders their output frequency is limited to 200KHz;
thus, the maximum possible feedrate (F) will be:
CONCEPTS
INCHES = 0
feedback system
5.
Therefore:
Max. feedrate = (200.000 pulses/sec. / 250 pulses/turn) x 0.2 inch/turn
Max. feedrate = 4.000 mm/s = 240 m/min.
Example 3:
Resolution in "mm" with squarewave linear encoder
Since the CNC applies a x4 multiplying factor to squarewave signals, we must select
a linear encoder whose grading pitch is 4 times the desired resolution.
FAGOR linear encoders use a grading pitch of either 20 µm or 100 µm. Therefore,
the resolution that can be obtained with them are: 5 µm (20/4) or 25 µm (100/4).
Therefore:
INCHES = 0
PITCH=0.0200
PITCH=0.1000
NPULSES = 0
SINMAGNI=0
The CNC's maximum squarewave feedback input frequency is 400 KHz which means
that the maximum feedrate obtainable with a 20 µm pitch linear encoder is:
Max. Feed = 20 µm/pulse x 400.000 pulses/sec.
Max. feedrate = 8000 mm/s = 480 m/min.
When using Fagor linear encoder, the maximum feedrate is limited by their own
characteristics to 60 m/min.
Example 4:
Resolution in "mm" with sinusoidal signal linear encoder
We have a sinewave linear encoder with a 20 µm pitch and we would like to obtain
1 µm resolution.
We must calculate the multiplying factor "SINMAGNI" to be applied by the CNC to
the pulses provided by the linear encoder in order to obtain the desired resolution.
SINMAGNI = linear encoder pitch / resolution = 20 µm / 1 µm = 20
Therefore:
INCHES = 0
PITCH=0.0200
NPULSES = 0
SINMAGNI=20
CNC 8035
The CNC's maximum sinewave feedback input frequency is 250 KHz which means
that the maximum feedrate for this axis will be:
Max. Feed = 20 µm/pulse x 250,000 pulses/sec.
Max. feedrate = 5.000 mm/s = 300 m/min.
(SOFT M: V11.1X)
(SOFT T: V12.1X)
When using Fagor linear encoder, the maximum feedrate is limited by their own
characteristics to 60 m/min.
145
Installation manual
Example 5:
Resolution in "inches" with squarewave encoder
Calculate the necessary squarewave encoder line count and parameter settings to
obtain a 0.0001 inch counting resolution on a 4 pitch ballscrew (4 turns/inch = 0.25
inch/rev.).
Since the CNC applies a x4 multiplying factor to squarewave signals, we would
require an encoder which provides the following number of pulses (lines) per turn.
Nr of pulses = ballscrew pitch / (multiplying factor x Resolution)
5.
CONCEPTS
feedback system
Nr pulses = 0.25 / (4 x 0.0001) = 625 pulses/turn
Therefore:
INCHES = 1
PITCH=0.25000 NPULSES = 625 SINMAGNI=0
Although the CNC accepts a maximum squarewave frequency of 400 KHz, when
using Fagor squarewave rotary encoders their output frequency is limited to 200KHz;
thus, the maximum possible feedrate (F) will be:
Max. feedrate = (200.000 pulses/sec. / 625 pulses/turn) x 0.255 inch/turn
Max. feedrate = 80 inch/sec. = 4800 inch/min.
Example 6:
Resolution in "inches" with sinewave encoder
We would like to obtain a0.0001 inch resolution by using a 250-line sinewave encoder
mounted on a leadscrew with a 5 turns/inch pitch.
We must calculate the multiplying factor "SINMAGNI" to be applied by the CNC to
the pulses provided by the encoder in order to obtain the desired resolution.
SINMAGNI = ballscrew pitch / (Nr pulses x Resolution)
SINMAGNI = 0.2 inch/turn / (250 x 0.0001) = 8
Therefore:
INCHES = 1
PITCH=0.20000
NPULSES = 250 SINMAGNI=8
Although the CNC accepts a maximum squarewave frequency of 250 KHz, when
using Fagor sine-wave rotary encoders their output frequency is limited to 200KHz;
thus, the maximum possible feedrate (F) will be:
Max. feedrate = (200.000 pulses/sec. / 250 pulses/turn) x 0.2 inch/turn
Max. feedrate = 160 inch/sec. = 9.600 inch/min.
Example 7:
Resolution in "degrees" with squarewave encoder
We would like to obtain a 0.0005º resolution by using a squarewave encoder mounted
on a x10 reduction gear.
Since the CNC applies a x4 multiplying factor to squarewave signals, we would
require an encoder which provides the following number of pulses (lines) per turn.
Nr of pulses = º/turn / (multiplying factor x gear ratio x Resolution)
Nr of pulses = 360 / (4 x 10 x 0.0005) = 18,000 pulses/turn
CNC 8035
Therefore:
INCHES = 0
(SOFT M: V11.1X)
(SOFT T: V12.1X)
146
PITCH=36.0000
NPULSES = 18000 SINMAGNI=0
Installation manual
Although the CNC accepts a maximum squarewave frequency of 400 KHz, when
using Fagor squarewave rotary encoders their output frequency is limited to 200KHz;
thus, the maximum possible feedrate (F) will be:
Max. feedrate = (200,000 pulses/sec) / (18,000 pulses/turn)
Max. feedrate =11.111 turns/sec = 666.666 rpm
Example 8:
Resolution in "degrees" with sinewave encoder
SINMAGNI = degrees per turn / (Nr. of pulses x Resolution)
SINMAGNI = 360 / (3600 x 0.001) = 100
Therefore:
INCHES = 0
CONCEPTS
We must calculate the multiplying factor "SINMAGNI" to be applied by the CNC to
the pulses provided by the encoder in order to obtain the desired resolution.
feedback system
5.
We would like to obtain a 0.001º resolution by using a 3600 pulse/rev sinusoidal
encoder.
PITCH=360.0000 NPULSES = 3600 SINMAGNI=100
Although the CNC accepts a maximum squarewave frequency of 250 KHz, when
using Fagor sine-wave rotary encoders their output frequency is limited to 200KHz;
thus, the maximum possible feedrate (F) will be:
Max. feedrate = (200,000 pulses/sec) / (3.600 pulses/turn)
Max. feedrate =55,5556 turns/sec = 3333,33 rpm
CNC 8035
(SOFT M: V11.1X)
(SOFT T: V12.1X)
147
Installation manual
5.5
Axis adjustment
In order to be able to set the axes, their corresponding feedback devices must be
previously connected to the CNC.
Before making this adjustment, position the axes near the middle of their travel and
place the hard stops (monitored by the electrical cabinet) near these mid-travel points
in order to prevent any possible damage to the machine.
5.
CONCEPTS
Axis adjustment
The axis adjustment is carried out in two steps. First, the servo drive loop is adjusted
and, then, the CNC loop.
Drive loop setting
1. Verify that the power output of the drives is OFF. Set all a.m.p. FBALTIME (P12)
to a value other than "0"; for example, FBALTIME=1000.
2. Turn the CNC OFF.
3. Turn the drive power output ON.
4. Turn the CNC ON.
5. If the axis runs away, the CNC will issue the following error message for this axis.
Turn the CNC off and swap the tacho wires at the drive.
6. Repeat steps 4 and 5 until the CNC stops issuing errors.
Loop setting of the CNC.
The axes are set one at a time.
1. Select the JOG operating mode at the CNC
2. Jog the axis to be adjusted.
If the axis runs away, the CNC issues the corresponding following error message.
In this case, the a.m.p. LOOPCHG (P26) must be changed.
If the axis does not run away, but it does not move in the desired direction, Change
both a.m.p. AXISCHG (P13) and LOOPCHG (P26).
CNC 8035
(SOFT M: V11.1X)
(SOFT T: V12.1X)
148
Installation manual
Drive setting
Offset (drift) adjustment
This adjustment is made on one axis at a time:
• Select the JOG mode at the CNC and press the softkey sequence: [Display]
[Following error]. The CNC shows the current following Error (axis lag) of the axes.
5.
Maximum feedrate adjustment
The drives should be adjusted so they provide maximum axis feedrate when receiving
an analog voltage (velocity command) of 9.5 V.
CONCEPTS
• Adjust the offset by turning the offset potentiometer at the drive (NOT AT THE
CNC) until a "0" following error is obtained.
Axis adjustment
5.5.1
Set each a.m.p. MAXVOLT (P37) = 9500 so the CNC outputs a maximum analog
voltage of 9.5 V.
The maximum axis feedrate, a.m.p. MAXFEED (P42), depends on the motor rpm as
well as on the gear reduction and type of ballscrew being used.
Example for the X axis:
The maximum motor rpm is 3,000 and the ballscrew pitch is 5mm/rev. Thus:
Maximum rapid traverse feedrate (G00) = ballscrew rpm. x ballscrew pitch
"MAXFEED" (P42) = 3,000 rpm. x 5 mm/rev. = 15000 mm/min.
In order to adjust the drive, a.m.p. G00FEED (P38) should be set to the same value
as a.m.p. MAXFEED (P42).
Also, a small CNC program must be executed which will move the axis back and forth
a short distance in order to verify that the amount of following error in both directions
is the same. One such program could be:
N10
G00 G90 X200
N20
X -200
(RPT N10, N20)
While the axis is moving back and forth, measure the analog voltage provided by the
CNC to the drive and adjust the feed potentiometer at the drive (NOT AT THE CNC)
until reaching 9.5 V.
CNC 8035
(SOFT M: V11.1X)
(SOFT T: V12.1X)
149
Installation manual
5.5.2
Gain setting
The various types of gains must be adjusted for each axis in order to optimize the
system's performance for the programmed movements.
An oscilloscope is highly recommended to make this critical adjustment by monitoring
the tacho signals. The illustration below shows the optimum shape for this signal (on
the left) and the instabilities to be avoided during start-up and brake down:
CONCEPTS
Axis adjustment
5.
There are three gain types for each axis. They are adjusted by means of axis machine
parameters and following the sequence indicated next.
Proportional gain
It defines the analog output corresponding to a feedrate resulting in 1º of following
error.
It is defined with a.m.p. PROGAIN (P23).
Feed-forward gain
It sets the percentage of analog output dependent of the programmed feedrate.
To use it, acc/dec must be active ACCTIME (P18).
It is defined with a.m.p. FFGAIN (P25).
Derivative gain or AC-forward gain.
The "derivative gain" sets the percentage of analog output applied depending on the
fluctuations of following error.
The "AC-forward gain" sets the percentage of analog output proportional to the
feedrate increments (acceleration and deceleration stages).
To use it, acc/dec must be active ACCTIME (P18).
It is defined with a.m.p. DERGAIN (P24) and ACFGAIN (P46).
CNC 8035
(SOFT M: V11.1X)
(SOFT T: V12.1X)
150
If ACFGAIN = No
it applies derivative gain
If ACFGAIN = Yes
it applies AC-forward gain.
Installation manual
Proportional gain setting
In a "pure" proportional positional loop, the analog output of the CNC to control an
axis is, at all times, proportional to the following error (axis lag) which is the difference
between its theoretical and actual (real) position.
Analog output = Proportional Gain x Following Error
a.m.p. PROGRAIN (P23) sets the value of the proportional gain. Expressed in
millivolts/mm, it takes any integer between 0 and 65535.
5.
Example:
The maximum feedrate for a particular axis (rapid traverse G00) is 15m/min, but we
would like to limit its maximum programmable machining feedrate (F) to 3 m/min with
a gain of 1 mm lag at a feedrate of 1m/min. (Gain of 1 in metric)
CONCEPTS
Its value indicates the analog output corresponding to a feedrate resulting in 1
millimeter (0.03937 inch) of following error.
Axis adjustment
5.5.3
a.m.p. G00FEED (P38) must be set to 15,000 (15 m/min).
a.m.p. MAXVOLT (P37) must be set to 9500 and the servo drive adjusted so as to
provide 15m/min with an analog voltage of 9,5 V.
a.m.p. MAXFEED (P42) must be set to 3,000 (3 m/min).
Analog output corresponding to F 1000 mm/min:
Velocity command = (F x 9.5V) / "G00FEED"
Velocity command = (1000 mm/min x 9.5V) / 15000 mm/min = 0.633V
Velocity command = 633 mV
Therefore, "PROGAIN" (P23) = 633
Considerations to bear in mind
When setting the proportional gain:
• The maximum amount of following error allowed by the CNC for the axis is the
value indicated by a.m.p. MAXFLWE1 (P21). When exceeded, the CNC issues
the corresponding following error message.
• The amount of following error decreases as the gain increases, but it tends to
make the system unstable.
• In practice, the great majority of machines show an excellent behavior with a
unitary gain (gain of 1, as shown in the previous examples).
Once the axes have been adjusted separately, the ones being interpolated
together should be further adjusted so their following errors are as identical
as possible.
The more identical their following errors are, the more "round" the
programmed circles will turn out.
CNC 8035
(SOFT M: V11.1X)
(SOFT T: V12.1X)
151
Installation manual
5.5.4
Feed-forward gain setting
With the feed-forward gain, it is possible to reduce the following error without
increasing the gain, thus keeping the system stable.
It set the percentage of analog output due to the programmed feedrate; the rest
depends on the proportional and derivative/AC-forward gains.
This gain is only to be used when operating with acceleration / deceleration.
CONCEPTS
Axis adjustment
5.
For example, if a.m.p. FFGAIN (P25) has been set to "80", the axis analog voltage
will be:
• 80% of it will depend on the programmed feedrate (feed-forward gain).
• 20% of it will depend on the axis following error (proportional gain).
Setting the Feed-Forward gain involves a critical adjustment of a.m.p. MAXVOLT
(P37).
1. Move the axis in G00 and at 10%.
2. Measure the actual analog voltage at the drive.
3. Set parameter MAXVOLT (P37) to a value 10 times the measured value.
For example, If the measured voltage was 0,945 V, then set this parameter to 9.45
V, in other words: P37=9450.
Next, set a.m.p. FFGAIN (P25) to the desired value.
As an example, the following values may be used:
For slow machining.
between 40 and 60%
For regular feed machining.
between 60 and 80%
Machines (laser, plasma).
between 80 and 100%
CNC 8035
(SOFT M: V11.1X)
(SOFT T: V12.1X)
152
Installation manual
Derivative (AC-forward) gain setting
With the derivative gain, it is possible to reduce the following error during the acc./
dec. stages.
Its value is given by a.m.p. DERGAIN (P24).
When this additional analog voltage is due to fluctuations of following error,
"ACFGAIN" (P46) = NO, it is called "derivative gain".
CONCEPTS
5.
When it is due to variations of the programmed feedrate, "ACFGAIN" (P46) = YES,
it is called AC-forward gain" since it is due to acc./dec.
Axis adjustment
5.5.5
Best results are usually obtained when using it as AC-forward Gain, "ACFGAIN"
(P46) = YES together with feed-forward gain.
This gain is only to be used when operating with acceleration / deceleration.
A practical value between 2 to 3 times the Proportional Gain, "PROGAIN" (P23), may
be used.
To perform a critical adjustment, proceed as follows:
• Verify that there is no oscillations on following error, In other words, that it is not
unstable.
• Check, with an oscilloscope, the tacho voltage or the analog voltage at the drive
(velocity command), verify that it is stable (left graph) and that there are neither
instabilities when starting up (center graph) nor when braking down (right graph).
CNC 8035
(SOFT M: V11.1X)
(SOFT T: V12.1X)
153
Installation manual
5.5.6
Leadscrew backlash compensation.
On this CNC, the leadscrew backlash may be compensated for when reversing the
direction of movement. Leadscrew backlash is defined with a.m.p. BACKLASH (P14).
Sometimes, an additional analog pulse may also be needed to recover the possible
backlash when reversing the axis movement. The additional velocity command
(analog voltage) pulse may be either rectangular or exponential.
CONCEPTS
Axis adjustment
5.
CNC 8035
(SOFT M: V11.1X)
(SOFT T: V12.1X)
154
If the duration of the rectangular pulse is adjusted
for low speed, it may be too high for high speed or
not enough for low speed when adjusted for high
speed. In these cases, it is recommended to use the
exponential type that applies a strong pulse initially
and decreases in time.
a.m.p. BACKNOUT (P29) sets the value of the additional analog voltage and a.m.p.
BACKTIME (P30) indicates the duration of this additional analog pulse and general
machine parameter ACTBAKAN (P145) indicates the type of backlash peak applied.
Installation manual
Leadscrew error compensation
The CNC provides a table for each one of the axes requiring leadscrew
compensation. It is possible to define different compensation values for each moving
direction. This type of compensation is activated by setting a.m.p. LSCRWCOM
(P15)=ON for the desired axis.
The CNC enables one leadscrew error compensation table for each axis. The number
of elements of the table is determined by the a.m.p. NPOINTS (P16), being possible
to define up to 255 points per axis.
CONCEPTS
5.
Axis adjustment
5.5.7
Each parameter of the table represents a point of the profile to compensate. The
following information is defined at each point:
• The position occupied by the point in the profile (position to compensate). It is
defined by its coordinate referred to machine zero. Possible values ±99999.9999
mm or ±3937.00787 inches.
• The amount of error of the axis in this point in the positive direction. Possible
values ±99999.9999 mm or ±3937.00787 inches.
• The amount of error of the axis in this point in the negative direction. Possible
values ±99999.9999 mm or ±3937.00787 inches.
For each axis position, define the amount of error to be compensated in both
directions. If the amount of error in the negative direction is zero in all points, it
assumes that the amount of error defined for the positive direction is valid for both
directions.
Leadscrew error compensation on rotary axes
On rotary axes, although the display is limited between 0 and 360º, the internal count
is accumulative. When using leadscrew error compensation, set positions 0° and
360°, first and last point of the table, with the same amount of error. This way, the CNC
will apply the same compensation in all the revolutions.
Otherwise, the compensation will be limited to the indicated field.
CNC 8035
(SOFT M: V11.1X)
(SOFT T: V12.1X)
155
Installation manual
Considerations and limitations
When defining the profile points in the table, the following requirements must be met:
• The axis points must be in sequential order starting from the most negative (least
positive) point to be compensated.
• For those points outside the compensation zone, the CNC will apply the
compensation value corresponding to the table point closest to them.
• The amount of error of the machine reference point may have any value.
• The error difference between two consecutive points must not be greater than the
distance between them (maximum slope= 100%).
CONCEPTS
Axis adjustment
5.
i
Bidirectional compensation of the leadscrew error is available from versions
V7.11 (mill) and V8.11 (lathe) on.
When updated from a version that does not have bidirectional compensation,
it keeps the error values in the positive direction and it sets a zero error in the
negative direction for all the points.
When changing to a version that does not have bidirectional compensation,
it keeps the error values in the positive direction, but it loses the error values
in the negative direction. Also, the amount of error for the machine reference
point must be zero.
Setting example:
The X axis ballscrew must be compensated in the positive direction for between X-20
and X160 according to the leadscrew error graph below:
Set a.m.p. LSCRWCOM (P15) = ON and NPOINTS (P16) = 7
Considering that the Machine Reference Point (physical location of the marker pulse)
is located 30 mm from HOME (machine reference zero), at X30. The leadscrew error
compensation parameters must be set as follows:
CNC 8035
(SOFT M: V11.1X)
(SOFT T: V12.1X)
156
Point
Position
Positive error
Negative error
P001
X
-20,000
EX
0,001
EX
0
P002
X
0,000
EX
-0,001
EX
0
P003
X
30,000
EX
0,000
EX
0
P004
X
60,000
EX
0,002
EX
0
P005
X
90,000
EX
0,001
EX
0
P006
X
130,000
EX
-0,002
EX
0
P007
X
160,000
EX
-0,003
EX
0
Installation manual
Reference systems
A CNC machine needs the following origin and reference points defined :
Machine zero
Machine’s origin point. This is set by the manufacturer as the origin of the system of
coordinates of the machine.
5.
Part origin point. This is the point of origin which is set for programming the
measurements of the part. It can be freely selected by the programmer, and its zero
machine reference can be set by the zero offset.
Reference point
This is a point on the machine established by the manufacturer (physical location of
the marker pulse from the feedback device).
CONCEPTS
Part zero
Reference systems
5.6
When the feedback system is semi-absolute (with coded marker pulse, Io), this point
is only used when leadscrew error compensation must be applied onto the axis.
When the feedback is a regular incremental system (without coded marker pulse, Io),
besides using this point in the leadscrew error compensation, the system is
synchronized at this point instead of having to move the axis all the way to the Machine
Reference Zero (home).
M
Machine zero
W
Part zero
R
Machine reference point
XMW, YMW, ZMW, etc
Coordinates of part zero
XMR, YMR, ZMR, etc
Coordinates of machine reference point
CNC 8035
(SOFT M: V11.1X)
(SOFT T: V12.1X)
157
Installation manual
5.6.1
Home search
With this CNC, home search may be performed in jog mode or by program. Home
search may be carried out on one axis at a time or on several axes at the same time.
When this search (with or without distance-coded Io) is carried out in JOG mode, the
active zero offset will be cancelled and the CNC will display the position values
indicated by a.m.p. REFVALUE (P36). In all other cases, the active zero offset will
be maintained and the CNC will display the position value with respect to the zero
offset (or part zero) active before the home search.
5.
CONCEPTS
Reference systems
• On axes with no distance-coded feedback system.
The CNC will move all selected axes which have a home switch and in the
direction indicated by a.m.p. REFDIREC (P33) for each axis.
This movement will be carried out at the feedrate established by a.m.p.
REFEED1 (P34) for each axis until the home switch is hit.
Once all the axes have reached their respective home switches, the machine
reference search (marker pulse) will be performed moving the selected axes
one by one and in the selected sequence.
This second movement will be carried out at the feedrate established by a.m.p.
REFEED2 (P35) for each axis until the marker pulse is found.
If machine parameter I0TYPE (P52) =3, the home search procedure is the
following:
The CNC will move all selected axes which have a home switch and in the
direction indicated by a.m.p. REFDIREC (P33) for each axis.
This movement will be carried out at the feedrate established by a.m.p.
REFEED1 (P34) for each axis until the home switch is hit.
Once all the axes have reached their respective home switches, the axes
move back one at a time in the selected order and at REFEED2 until the switch
is released.
Once it has released it, it will recognize the first reference mark found without
changing either its moving direction or its feedrate.
• On axes with distance-coded feedback system:
Home switches are no longer necessary since the axes may be homed anywhere
along its travel. However, a.m.p. REFVALUE (P36) must be set when operating
with leadscrew error compensation.
The home search will be performed on one axis at a time and in the selected
sequence.
The axes will move a maximum of 20 mm or 100 mm in the direction set by a.m.p.
REFDIREC (P33) at the feedrate set by a.m.p. REFEED2 (P35) for each axis until
the marker pulse is found.
If, during the home search, the home switch is pressed (if any), the CNC will
reverse the homing direction.
If after the machine is all set up it is necessary to remove the feedback system,
it may happen that when it is reinstalled, its marker pulse is no longer at the
same physical location as it was before.
CNC 8035
In that case, the distance (shift) between the previous marker pulse location
and the current one must be assigned to a.m.p. REFSHIFT (P47) of the
affected axis in order for the machine reference point (home) to remain the
same.
This way, when searching home, the axis will move this additional distance,
indicated by a.m.p. REFSHIFT (P47) value, after finding the new marker
pulse. This movement is carried out at the feedrate indicated by a.m.p.
REFEED2 (P35).
(SOFT M: V11.1X)
(SOFT T: V12.1X)
158
Installation manual
Gantry axes
Home search on Gantry axes may be carried out in JOG mode or by program. It will
be carried out as follows:
• On axes with no distance-coded feedback system.
The CNC starts the movements of both axes in the direction indicated by
a.m.p. REFDIREC (P33) of the main axis.
These movements will be performed at the feedrate indicated by a.m.p.
REFEED1 (P34) for the main axis until the home switch for this axis is hit.
If machine parameter I0TYPE=3, the home search procedure is the following:
The CNC starts the movements of both axes in the direction indicated by
a.m.p. REFDIREC (P33) of the main axis.
CONCEPTS
The CNC will wait until the marker pulse (home) of the slaved axis is found
and then, it will look for the marker pulse from the main axis.
5.
Reference systems
Then, the home search will start on both axis at the feedrate indicated by
a.m.p. REFEED2 (P35) of the main axis.
These movements will be performed at the feedrate indicated by a.m.p.
REFEED1 (P34) for the main axis until the home switch for this axis is hit.
It then moves back at REFEED2 until the home switch is released.
Once the contact has been released, the CNC will wait until the marker pulse
(home) of the slaved axis is found and then, it will look for the marker pulse
from the main axis. This is done without changing the direction or the speed
of the movement.
• On axes with distance-coded feedback system:
The CNC starts moving both axes in the direction indicated by a.m.p. REFDIREC
(P33) for the main axis at the feedrate indicated by a.m.p. REFEED2 (P35) of the
main axis.
The CNC will wait until the marker pulse (home) of the slaved axis is found and
then, it will look for the marker pulse from the main axis.
If the difference obtained between both reference positions is not the same as the
one indicated by a.m.p. REFVALUE (P36) for both axes, the CNC will correct the
position of the slaved axis. This will end the home search operation.
When this search is carried out in the JOG mode, the active zero offset will be
cancelled and the CNC will display the position value indicated by a.m.p. REFVALUE
(P36) for the main axis. In all other cases, the displayed position value will be referred
to the zero offset (or part zero) active before the home search.
If the a.m.p. REFDIREC (P33) of the main axis has been set for a positive
direction, the a.m.p. REFVALUE (P36) of the slaved axis must be set to a value
lower than that assigned to the main axis.
Likewise, if the a.m.p. REFDIREC (P33) of the main axis has been set for a
negative direction, the a.m.p. REFVALUE (P36) of the slaved axis must be set
to a value greater than that assigned to the main axis. They must never have
the same value.
When encoders are used for feedback, the difference between the values
assigned to a.m.p. REFVALUE (P36) of both axes must be smaller than the
pitch of the ballscrew.
It is recommended that the distance between the marker pulses of both
encoders be half the leadscrew pitch.
CNC 8035
(SOFT M: V11.1X)
(SOFT T: V12.1X)
159
Installation manual
5.6.2
Setting on systems without distance-coded feedback
Machine reference point
The reference point must be adjusted on one axis at a time. The following procedure
is recommended:
• Indicate in the a.m.p. REFPULSE (P32) the type of marker pulse Io being used
for Home Search.
CONCEPTS
Reference systems
5.
• Likewise, set a.m.p. REFDIREC (P33) to indicate the direction of the axis when
searching Home.
• On the other hand, set a.m.p. REFEED1 (P34) that defines the approach feedrate
of the axis until the home switch is pressed and a.m.p. REFEED2 (P35) that
indicates the homing feedrate until the reference mark (marker pulse) is detected.
• The machine reference point will be set to "0". a.m.p. REFVALUE (P36).
• Once in the JOG mode and after positioning the axis in the right area, start homing
the axis. When done, the CNC will assign a "0" value to this point.
• After moving the axis to the Machine Reference Zero or up to a known position
(with respect to Machine Reference Zero), observe the position reading of the
CNC for that point.
This will be distance from the Machine Reference Zero to that point. Therefore,
the value to be assigned to a.m.p. REFVALUE (P36), which defines the
coordinate corresponding to the Machine Reference Point (physical location of
the marker pulse).
REFVALUE = Machine coordinate – CNC reading.
Example:
If the point whose known position is located 230 mm from Machine Reference
Zero and the CNC reads -123.5 mm as the coordinate value for this point, the
coordinate of the Machine Reference Point with respect to Machine
Reference Zero will be:
"REFVALUE" = 230 - (-123.5) = 353.5 mm.
• After allocating this new value, press SHIFT + RESET or turn the CNC off and
back on in order for the CNC to assume this new value.
• The axis must be homed again in order for it to assume its right reference values.
Considerations
If at the time when the home search is requested, the axis is sitting on the home
switch, the axis will back up (in the direction opposite to the one indicated by
“REFDIREC (P33) ”) until it is off the switch and then, it will go on to searching home.
If the axis is positioned beyond the software limits "LIMIT+" (P5) and "LIMIT-" (P6),
it must be brought back into the work area (within those limits) and on the proper side
for referencing (home searching).
Care must be taken when placing the home switch and when setting feedrates
“REFEED1 (P34)” and “REFEED2 (P35)”. The home switch (1) will be installed so
the marker pulse (2) will be found in the zone corresponding to feedrate “REFEED2”
(P35). If there is no room for it, reduce the value of “REFEED1 (P34)”. For example,
for rotary encoders whose consecutive marker pulses are very close to each other.
CNC 8035
(SOFT M: V11.1X)
(SOFT T: V12.1X)
160
Installation manual
When the selected axis does not have a machine reference (home) switch (a.m.p.
DECINPUT (P31) = NO), the CNC will move the spindle at the feedrate set by a.m.p.
REFEED2 (P35) until the first marker pulse from the current position is found, thus
ending the home search.
FAGOR linear encoders (scales) provide a negative marker (reference) pulse Io every
50mm (about 2 inches) and the FAGOR rotary encoders provide one positive
reference pulse per revolution.
Do not mistake the type of pulse provided by the feedback system with the value to
be assigned to a.m.p. REFPULSE (P32). This parameter must indicate the type of
active flank (leading or trailing edge), positive or negative of the reference mark (Io)
used by the CNC.
CONCEPTS
Reference systems
5.
CNC 8035
(SOFT M: V11.1X)
(SOFT T: V12.1X)
161
Installation manual
5.6.3
Setting on systems with distance-coded feedback
Offset adjustment
The offset of the linear encoder must be adjusted on one axis at a time, preferably,
following this procedure:
1. Set the following a.m.p:
5.
REFDIREC (P33) Homing direction.
CONCEPTS
Reference systems
"REFEED2" (P35) Homing feedrate.
2. Verify that the value allocated to a.m.p. REFPULSE (P32) (type of marker pulse
of the feedback system) is correct.
To do this, set a.m.p. DECINPUT (P31) = NO and a.m.p. I0TYPE (P52) = 0 Then
perform a home search.
If assumed immediately, change a.m.p. REFPULSE (P32) and check again.
3. Set a.m.p. I0TYPE (P52) = 1 and ABSOFF (P53) = 0.
4. Once in JOG mode and after positioning the axis in the proper area, home the
axis. The new position value displayed by the CNC is the distance from the current
point to the origin of the linear encoder.
5. Perform several consecutive home searches and observe the CNC display during
the whole process.
The counting must be continuous. If it is not, if jerky, set a.m.p. I0TYPE (P52) =
2 and repeat steps 4 and 5.
6. Move the axis up to the Machine Reference Zero or up to a point whose position
with respect to Machine Reference Zero is already known and observe the
position value displayed by the CNC. This value is the distance from the current
point to the origin of the linear encoder.
7. The value to be assigned to a.m.p. ABSOFF (P53) must be calculated with the
following formula:
ABSOFF (P53) = CNC reading - Machine coordinate.
Example:
If the point whose position is already known is located 230 mm from Machine
Reference Zero and the CNC shows -423.5 mm as the position for this point,
the linear encoder offset will be:
ABSOFF (P53) = -423,5 - 230 = -653.5 mm.
8. After allocating this new value, press SHIFT + RESET or turn the CNC off and
back on in order for the CNC to assume this new value.
9. Home the axis again in order for it to assume the new correct reference values.
Considerations
If the axis is positioned beyond the software limits "LIMIT+" (P5) and "LIMIT-" (P6),
it must be brought back into the work area (within those limits) and on the proper side
for referencing (home searching).
When using distance-coded linear encoders, home switches are no longer
necessary.
However, home switches may be used as travel limits during home search.
CNC 8035
If while homing, the home switch is pressed, the axis will reverse its movement
and it will keep searching home in the opposite direction.
Distance-coded Fagor linear encoders have negative coded marker pulses (Io).
(SOFT M: V11.1X)
(SOFT T: V12.1X)
Do not mistake the type of pulse provided by the feedback system with the value to
be assigned to a.m.p. REFPULSE (P32).
This parameter must indicate the type of active flank (leading or trailing edge),
positive or negative of the reference mark (Io) used by the CNC.
If while homing an axis, its corresponding DECEL* signal is set high, the axis will
reverse movement and the home search will be carried out in the opposite direction.
162
Installation manual
Axis travel limits (software limits)
Once all the axes have been referenced, their software limits must be measured and
set.
This operation must be carried out one axis at a time and it could be done as follows:
• Move the axis in the positive direction towards the end of the axis travel stopping
at a safe distance from the mechanical end-of-travel stop.
• Assign the coordinate shown by the CNC for that point to a.m.p. LIMIT+ (P5).
5.
• Once both travel limits have been set for all the axes, press SHIFT + RESET or
turn the CNC OFF and back ON in order for these new values to be assumed by
the CNC.
CONCEPTS
• Repeat these steps in the negative direction assigning the resulting coordinate
to a.m.p. LIMIT- (P6).
Reference systems
5.6.4
CNC 8035
(SOFT M: V11.1X)
(SOFT T: V12.1X)
163
Installation manual
5.7
Unidirectional approach
The FAGOR 8055 CNC provides a number of machine parameters to help improve
the repetitiveness when positioning the axes in rapid (G00) by always approaching
the end point in the same direction.
"UNIDIR" (P39)
Indicates the direction of unidirectional approach.
5.
CONCEPTS
Unidirectional approach
OVERRUN
Indicates the distance to be kept between the approach point and the
programmed point. If this parameter is set to 0, the CNC will not perform the
unidirectional approach.
"UNIFEED" (P41)
Indicates the feedrate to be used from the approach point to the programmed
point.
The CNC will calculate the approach point (2) based on the programmed target point
(1) and the a.m.p. UNIDIR (P39) and OVERRUN (P40).
The positioning will be carried out in two stages:
1. Rapid positioning (G00) up to the calculated approach point (2). If the axis is
moving in the direction opposite to that indicated by “UNIDIR”, it will overshoot
the programmed point.
2. Positioning at feedrate UNIFEED (P41) from this point to the programmed point
(1).
CNC 8035
(SOFT M: V11.1X)
(SOFT T: V12.1X)
164
Installation manual
Auxiliary M, S, T function transfer
Every time a block is executed in the CNC, information is passed to the PLC about
the M, S, and T functions which are active.
Auxiliary M function
5.
It also activates the general logic output "MSTROBE" to "tell" the PLC to start
executing them.
Every time the CNC detects an M function, it analyzes the M function table to find
out when to pass it along to the PLC (either before or after the movement) and whether
it must wait for the "AUXEND" signal or not before resuming program execution.
If the programmed function is not defined in that table, it will be executed at the
beginning of the block and the CNC will wait for the "AUXEND" signal to resume
program execution.
See "9.1 Auxiliary M, S, T functions" on page 244. See "10.6 General logic
outputs" on page 280. See "4.8 Tables" on page 117.
CONCEPTS
The CNC uses logic outputs "MBCD1" thru "MBCD7" (R550 thru R556) to "tell" the
PLC which M functions it must execute. One function per logic output.
Auxiliary M, S, T function transfer
5.8
Example 1:
Execution of a motion block containing 7 M functions 4 of which are executed before
the axes move (M51, M52, M53, M54) and 3 afterwards (M61, M62, M63).
1. It sends out to the PLC the 4 M functions programmed to be executed before the
move
It sets logic outputs “MBCD1=51”, “MBCD2=52” “MBCD3=53” “MBCD4=54” and
it activates the general logic output "MSTROBE to “tell” the PLC to go ahead with
their execution.
Should any of them need the AUXEND activated, the CNC will “wait” for this signal
to be activated before going on to executing the rest of the block.
If none of them need the AUXEND signal activated, the CNC will maintain the
“MSTROBE” signal activated for a period of time set by the general machine
parameter “MINAENDW (P30)”. This output stays active for the time indicated by
g.m.p. MINAENDW (P30).
2. The programmed axis move will be executed.
3. It sends out to the PLC the 3 M functions programmed to be executed after the
move.
It sets logic outputs “MBCD1=61”, “MBCD2=62”, “MBCD3=63” and it activates
the general logic output "MSTROBE to “tell” the PLC to go ahead with their
execution.
Should any of them need the AUXEND activated, the CNC will “wait” for this signal
to be activated before going on to executing the rest of the block.
If none of them need the AUXEND signal activated, the CNC will maintain the
“MSTROBE” signal activated for a period of time set by the general machine
parameter “MINAENDW (P30)”. This output stays active for the time indicated by
g.m.p. MINAENDW (P30).
CNC 8035
Example 2:
Execution of a motionless block containing 7 M functions 4 of which are executed
before the axes move (M51, M52, M53, M54) and 3 afterwards (M61, M62, M63).
1. It sends out to the PLC the 4 M functions programmed to be executed before the
move
(SOFT M: V11.1X)
(SOFT T: V12.1X)
It sets logic outputs “MBCD1=51”, “MBCD2=52” “MBCD3=53” “MBCD4=54” and
it activates the general logic output "MSTROBE to “tell” the PLC to go ahead with
their execution.
165
Installation manual
Should any of them need the AUXEND activated, the CNC will “wait” for this signal
to be activated before going on to executing the rest of the block.
If none of them need the AUXEND signal activated, the CNC will maintain the
“MSTROBE” signal activated for a period of time set by the general machine
parameter “MINAENDW (P30)”. This output stays active for the time indicated by
g.m.p. MINAENDW (P30).
2. It sends out to the PLC the 3 M functions programmed to be executed after the
move.
It sets logic outputs “MBCD1=61”, “MBCD2=62”, “MBCD3=63” and it activates
the general logic output "MSTROBE to “tell” the PLC to go ahead with their
execution.
CONCEPTS
Auxiliary M, S, T function transfer
5.
Should any of them need the AUXEND activated, the CNC will “wait” for this signal
to be activated before going on to executing the rest of the block.
If none of them need the AUXEND signal activated, the CNC will maintain the
“MSTROBE” signal activated for a period of time set by the general machine
parameter “MINAENDW (P30)”. This output stays active for the time indicated by
g.m.p. MINAENDW (P30).
S function
The CNC transfers the "S function" out to the PLC only when using the BCD-coded
"S" output. s.m.p. SPDLTYPE (P0) set to other than "0".
The CNC sends the programmed "S" value via logic output “SBCD” (R557) and
activates the general logic output “SSTROBE” to indicate to the PLC to go ahead with
its execution.
This transmission is carried out at the beginning of the block execution and the CNC
will wait for the “AUXEND” general input to be activated and then consider its
execution completed.
T function
The CNC will indicate via the variable “TBCD” (R558) the T function which has been
programmed in the block and activates the general logic output “TSTROBE” to tell
the PLC to go ahead with its execution.
This transmission is made at the beginning of the block execution and the CNC will
wait for the general input “AUXEND” to be activated to consider the execution
completed.
Second T function
The CNC transfers the second T function to the PLC in the following cases:
• When having a machining center with non-random tool magazine. g.m.p.
TOFFM06 (P28) = YES and RANDOMTC (P25) = NO
CNC 8035
• When using a random tool magazine, g.m.p. RANDOMTC (P25) = YES and a
special tool change takes place. See the chapter "Tool table" of the operating
manual.
On executing the M06 function, a the CNC indicates the position of the magazine
(empty pocket) where the tool being in the spindle must be placed.
(SOFT M: V11.1X)
(SOFT T: V12.1X)
166
This indication will be made by means of the variable “T2BCD” (R559) and by
activating the general logic output “T2STROBE” to tell the PLC that it must execute
this. The CNC will wait for the general input AUXEND to be activated to consider the
execution completed.
Installation manual
It must be borne in mind that at the beginning of the execution of the block,
the CNC can tell the PLC the execution of the M, S, T and T2 functions by
activating their STROBE signals together and waiting for a single signal
“AUXEND” for all of them.
CONCEPTS
Auxiliary M, S, T function transfer
5.
CNC 8035
(SOFT M: V11.1X)
(SOFT T: V12.1X)
167
Installation manual
5.8.1
Transferring M, S, T using the AUXEND signal
1. Once the block has been analyzed and after sending the corresponding values
in the “MBCD1-7”, “SBCD”, “TBCD” and “T2BCD” variables, the CNC will tell the
PLC by means of the general logic outputs “MSTROBE”, “SSTROBE”,
“TSTROBE” and “T2STROBE” that the required auxiliary functions must be
executed.
CONCEPTS
Auxiliary M, S, T function transfer
5.
2. When the PLC detects the activation of one of the STROBE signals, it must
deactivate the general CNC logic input “AUXEND” to tell the CNC that the
execution of the corresponding function or functions has begun.
3. The PLC will execute all the auxiliary functions required, it being necessary to
analyze the general CNC logic outputs:
"MBCD1" through "MBCD7" and "MSTROBE"
to execute the M functions.
“SBCD” and “SSTROBE”
to execute the S function
“TBCD” and “TSTROBE”
to execute the T function
“T2BCD and “T2STROBE"
to execute the second T function
Once this has been executed the PLC must activate the general logic input
“AUXEND” to indicate to the CNC that the processing of the required functions
was completed.
4. Once the general input “AUXEND” is active, the CNC will require that this signal
be kept active for a period of time greater than that defined by means of the g.m.p.
MINAENDW (P30).
This way, erroneous interpretations of this signal by the CNC due to an improper
PLC program logic are avoided .
5. Once the period of time “MINAENDW (P30)” has elapsed with the general input
“AUXEND” at a high logic level, the CNC will deactivate the general logic outputs
“MSTROBE”, “SSTROBE”, “TSTROBE”, “T2STROBE” to tell the PLC that the
execution of the required auxiliary function or functions has been completed.
When executing 2 consective blocks which send information to the PLC and after
finishing the execution of the first block, the CNC waits a MINAENDW period of time
before starting to execute the second block.
This way, it assures that a MINAENDW delay takes place between the STROBE off
(end of first block) and STROBE on (beginning of the second block).
CNC 8035
(SOFT M: V11.1X)
(SOFT T: V12.1X)
168
It is advisable for the “MINAENDW (P30)” value to be equal to or greater than the
duration of a PLC cycle, in order to ensure the detection of this signal by the PLC.
Installation manual
Transferring the auxiliary (miscellaneous) M functions without the
AUXEND signal
1. Once the block has been analyzed and after passing the corresponding values
in variables “MBCD1-7”, the CNC will tell the PLC through the general logic output
“MSTROBE” that the required auxiliary function or functions must be executed.
2. The CNC will keep the general logic output “MSTROBE” active during the time
indicated by means of g.m.p. MINAENDW (P30).
Once this period of time has elapsed the CNC will continue to execute the
program.
It is advisable for the “MINAENDW (P30)” value to be equal to or greater than the
duration of a PLC cycle, in order to ensure the detection of this signal by the PLC.
3. When the PLC detects the activation of the general logic signal “MSTROBE” it
will execute the required auxiliary “M” functions at the CNC logic outputs “MBCD1
thru 7”.
CONCEPTS
5.
Auxiliary M, S, T function transfer
5.8.2
CNC 8035
(SOFT M: V11.1X)
(SOFT T: V12.1X)
169
Installation manual
5.9
Spindle
5.9.1
Spindle types
The setting of s.m.p. SPDLTYPE (P0) allows the following possibilities:
SPDLTYPE = 0 Analog spindle output..
SPDLTYPE = 1 2-digit BCD coded spindle output (S).
5.
Spindle
CONCEPTS
SPDLTYPE = 2 8-digit BCD coded spindle output (S).
When using BCD coded output, the spindle will operate in open loop and it will be
controlled by means of functions M3, M4 and M5.
When using analog output, the spindle can operate:
• In open loop, controlled by means of functions M3, M4 and M5.
• In closed loop, by means of function M19. This requires an encoder mounted on
the spindle and s.m.p. NPULSES (P13) must be set to a value other than "0".
• Controlled via PLC. With this feature, the PLC may take control of the spindle for
a certain period of time.
A typical application of this feature is the control of the spindle oscillation during
the spindle gear change.
Regardless of the type of spindle output being used, the CNC admits up to 4 spindle
gears.
The spindle gear change may be made either manually or automatically by the CNC.
To change spindle gears, functions M41, M42, M43 and M44 are used to let the PLC
know which one is to be selected.
CNC 8035
(SOFT M: V11.1X)
(SOFT T: V12.1X)
170
Installation manual
Spindle speed (S) control
BCD output
When using BCD coded output, the spindle will operate in open loop and it will be
controlled by means of functions M3, M4 and M5.
To do that, set s.m.p. SPDLTYPE (P0) with the right value.
SPDLTYPE = 2 8-digit BCD coded spindle output (S).
Whenever a new spindle speed is selected, the CNC will transfer the programmed
S value into register “SBCD” (R557) and it will activate general logic output
“SSTROBE” (M5533) to “tell” the PLC to go ahead with its execution.
Spindle
5.
SPDLTYPE = 1 2-digit BCD coded spindle output (S).
CONCEPTS
5.9.2
This transmission is carried out at the beginning of the block execution and the CNC
will wait for the “AUXEND” general input to be activated and then consider its
execution completed.
If it uses 2-bit BCD code, the CNC will indicate the S value to the PLC by means of
this register and according to the following conversion table:
Programmed
S
S
BCD
Programmed
S
S
BCD
Programmed
S
S
BCD
0
00
50-55
54
800-899
78
1
20
56-62
55
900-999
79
2
26
63-70
56
1000-1119
80
3
29
71-79
57
1120-1249
81
4
32
80-89
58
1250-1399
82
5
34
90-99
59
1400-1599
83
6
35
100-111
60
1600-1799
84
7
36
112-124
61
1800-1999
85
8
38
125-139
62
2000-2239
86
9
39
140-159
63
2240-2499
87
10-11
40
160-179
64
2500-2799
88
12
41
180-199
65
2800-3149
89
13
42
200-223
66
3150-3549
90
14-15
43
224-249
67
3550-3999
91
16-17
44
250-279
68
4000-4499
92
18-19
45
280-314
69
4500-4999
93
20-22
46
315-354
70
5000-5599
94
23-24
47
355-399
71
5600-6299
95
25-27
48
400-449
72
6300-7099
96
28-31
49
450-499
73
7100-7999
97
32-35
50
500-559
74
8000-8999
98
36-39
51
560-629
75
9000-9999
99
40-44
52
630-709
76
45-49
53
710-799
77
CNC 8035
(SOFT M: V11.1X)
(SOFT T: V12.1X)
171
Installation manual
If a value over 9999 is programmed the CNC will tell the PLC the spindle speed
corresponding to value 9999.
If S output in 8-digit BCD is used the CNC will indicate the programmed spindle speed
to the PLC by means of this register. This value will be coded in BCD format (8 digits)
in thousandths of a revolution per minute.
S 12345.678
5.
0001 0010 0011 0100 0101 0110 0111 1000
Spindle
CONCEPTS
Analog output
In order for the CNC to provide an analog output to control the spindle speed, it is
necessary to set s.m.p. SPDLTYPE (P0) = 0.
The CNC will generate the analog output (within +10V.) corresponding to the
programmed rotation speed or a unipolar analog output voltage if the s.m.p.
POLARM3 (P7) and POLARM4 (P8) have been assigned the same value.
The Closed Loop mode of operation (with M19) is described later on in this manual.
PLC controlled spindle
With this feature, the PLC may take control of the spindle for a certain period of time.
To do that, follow these steps:
1. Have the PLC place the "S" value at CNC logic input "SANALOG" (R504). This
"S" value corresponds to the analog voltage to be applied to the spindle drive.
Also, set CNC logic input "PLCCNTL" (M5465) high to let the CNC know that from
this moment on, the PLC is the one setting the analog voltage for the spindle.
2. From this instant on, the CNC outputs the spindle analog voltage indicated by the
PLC at CNC logic input "SANALOG" (R504).
If the PLC changes the value of the "SANALOG" input, the CNC will update the
analog voltage accordingly.
3. Once the operation has concluded, the CNC must recover the control of the
spindle back from the PLC. To do this, CNC logic input "PLCCNTL" (M5465) must
be set low again.
A typical application of this feature is the control of the spindle oscillation during the
spindle gear change.
CNC 8035
(SOFT M: V11.1X)
(SOFT T: V12.1X)
172
Installation manual
Spindle gear change
With this CNC, the machine can use a gear box for adjusting the best spindle speed
and torque for the particular machining needs at any time.
The CNC admits up to 4 spindle gears that are determined by s.m.p. “MAXGEAR1
(P2)”, “MAXGEAR2 (P3)”, MAXGEAR3 (P4)" and “MAXGEAR4 (P5)”. They indicate
the maximum speed (in rpm) for each range.
The value assigned to “MAXGEAR1 (P2)” will be the one corresponding to the lowest
gear and the one assigned to “MAXGEAR4 (P5)” will be the one corresponding to
the highest gear.
The auxiliary functions M41, M42, M43 and M44 are used to “tell” the PLC that spindle
gear 1, 2, 3 or 4 must be selected.
Spindle
When not using all 4 gears, use the lower parameters starting with MAXGEAR1 (P2).
Set the unused gears with the same value as the highest of the ones used.
5.
CONCEPTS
5.9.3
In turn, the PLC must “tell” the CNC the speed gear being selected. This will be
indicated by means of the logic inputs for the spindle: “GEAR1 (M5458)”, “GEAR2
(M5459)”, “GEAR3 (M5460)” and “GEAR4 (M5461)”.
Since to each "S" speed corresponds a spindle gear, before selecting a new "S" one
must:
1. Analyze whether the new "S" involves a gear change.
2. If it does, execute the M function corresponding to the new gear (M41 thru M44)
in order for the PLC to select it.
3. Wait for the PLC to select the new gear. Check spindle logic inputs "GEAR1"
(M5458), "GEAR2" (M5459), "GEAR3" (M5460) and "GEAR4" (M5461).
4. Select the new speed "S".
To have the CNC perform all these operations automatically, set s.m.p. AUTOGEAR
(P6) =YES to indicate that the gear change is to be generated by the CNC.
Automatic gear change controlled by the PLC
When the CNC detects a gear change, it sends out to the PLC the corresponding M
code (M41 thru M44) via one of the logic outputs "MBCD1-7" (R550 thru R556).
It also activates general logic output "MSTROBE" (M5532) to "tell" the PLC to go
ahead with the execution.
The PLC deactivates CNC general logic input "AUXEND" (M5016) to indicate to the
CNC that it began processing the "M" function.
CNC 8035
(SOFT M: V11.1X)
(SOFT T: V12.1X)
173
Installation manual
When requiring spindle oscillation control during a gear change, follow these steps:
1. Indicate, from the PLC, at CNC logic input "SANALOG" (R504) the value of the
residual S voltage to be applied to the spindle drive.
Also, set CNC logic input "PLCCNTL" (M5465) high to let the CNC know that from
this moment on, the PLC is the one setting the analog voltage for the spindle.
2. From this instant on, the CNC outputs the spindle analog voltage indicated by the
PLC at CNC logic input "SANALOG" (R504).
If the PLC changes the value of the "SANALOG" input, the CNC will update the
analog voltage accordingly.
Spindle
CONCEPTS
5.
3. Once the operation has concluded, the CNC must recover the control of the
spindle back from the PLC. To do this, CNC logic input "PLCCNTL" (M5465) must
be set low again.
Once the requested gear change is completed, the PLC must set the corresponding
CNC logic input "GEAR1" (M5458), "GEAR2" (M5459), "GEAR3" (M5460) or
"GEAR4" (M5461) high.
Finally, the PLC will reactivate CNC general logic input "AUXEND" (M5016) indicating
to the CNC that it has finished executing the auxiliary function.
Automatic gear change when working with M19
Every time M19 is programmed, it is recommended that the corresponding spindle
gear be selected.
If no gear is already selected, the CNC proceeds as follows:
It converts the speed indicated in degrees per minute ats.m.p. REFEED1 (P34)
into rpm.
It selects the spingle gear corresponding to those rpm.
The spindle gear cannot be changed when operating in M19. The gear must be
selected beforehand.
CNC 8035
(SOFT M: V11.1X)
(SOFT T: V12.1X)
174
Installation manual
Spindle in closed loop
In order for the spindle to operate in closed loop by means of "spindle orientation
(M19)", the following conditions must be met:
• The velocity command for the spindle must be analog (±10V). s.m.p. SPDLTYPE
(P0) = 0.
• An encoder must be mounted onto the spindle. s.m.p. NPULSES (P13) must
indicate the number of square pulses supplied by the spindle encoder.
The S±5.5 code indicates the spindle position, in degrees, from the spindle reference
point (marker pulse).
When switching form open to closed loop, the CNC behaves as follows:
• If the spindle has a home switch, it performs a home-switch search at the turning
speed set by s.m.p. REFEED1 (P34).
Spindle
5.
Also, when switching from open to closed loop, either an "M19" or an "M19 S±5.5"
must be executed.
CONCEPTS
5.9.4
It then searches for actual marker pulse (Io) of the spindle encoder at the turning
speed set by s.m.p. REFEED2 (P35).
And, finally, it positions the spindle at the programmed S±5.5 point.
• If the spindle does not have a home switch, it searches the encoder marker pulse
at the turning speed set by s.m.p. REFEED2 (P35).
And, then, it positions the spindle at the programmed S±5.5 point.
Calculating spindle resolution
The CNC assumes that one encoder revolution represents 360º. Therefore, the
feedback (counting) resolution depends on the number of lines of the spindle
encoder.
Resolution = 360° / (4 x number of pulses per revolution)
Hence, to obtain a resolution of 0.001º, a 90,000 line encoder is required and a
180,000 line encoder to obtain a resolution of 0.0005º.
s.m.p. NPULSES (P13) must indicate the number of square pulses supplied by the
spindle encoder.
In order to be able to use feedback alarm on the spindle encoder, "FBACKAL" (P15),
the pulses provided by the encoder must be differential (double ended) squarewave
"DIFFBACK (P14) = YES".
Gain setting
The various types of gains must be adjusted in order to optimize the system's
performance for the programmed movements.
An oscilloscope is highly recommended to make this critical adjustment by monitoring
the tacho signals. The illustration below shows the optimum shape for this signal (on
the left) and the instabilities to be avoided during start-up and brake down:
CNC 8035
(SOFT M: V11.1X)
(SOFT T: V12.1X)
175
Installation manual
There are three types of gain. They are adjusted by means of machine parameters
and following the sequence indicated next.
Proportional gain
It defines the analog output corresponding to a feedrate resulting in 1º of following
error.
It is defined with s.m.p. PROGAIN (P23).
5.
Feed-forward gain
Spindle
CONCEPTS
It sets the percentage of analog output dependent of the programmed feedrate.
To use it, acc/dec must be active s.m.p. ACCTIME (P18).
It is defined with s.m.p. FFGAIN (P25).
Derivative gain or AC-forward gain.
The "derivative gain" sets the percentage of analog output applied depending on the
fluctuations of following error.
The "AC-forward gain" sets the percentage of analog output proportional to the
feedrate increments (acceleration and deceleration stages).
To use it, acc/dec must be active s.m.p. ACCTIME (P18).
It is defined with s.m.p. DERGAIN (P24) and ACFGAIN (P46).
If "ACFGAIN = No"
it applies derivative gain
If "ACFGAIN = Yes"
it applies AC-forward gain.
Proportional gain setting
In a "pure" proportional positional loop, the analog output of the CNC to control the
spindle is, at all times, proportional to the following error (axis lag) which is the
difference between its theoretical and actual (real) position.
Analog output = Proportional Gain x Following Error
a.m.p. PROGRAIN (P23) sets the value of the proportional gain. Expressed in
millivolts/degree, it takes any integer between 0 and 65535.
Its value indicates the analog output corresponding to a feedrate resulting in 1º of
following error.
This value is taken for the first spindle gear and the CNC calculates the values for
the rest of the gears.
Example
The maximum speed for the 1st gear (rapid traverse G00) is 500 rpm and we would
like to obtain 1º at a speed of 1000 º/min. (2.778 rpm)
Command from the drive: 9.5V for 500 rpm
CNC 8035
Analog output corresponding to S = 1000 º/min. (2.778 rpm)
Analog velocity command = (S x 9,5 V) / "MAXGEAR1"
Analog voltage = (9.5 V / 500 rev/min) *2.778 rev/min =52.778 mV.
(SOFT M: V11.1X)
(SOFT T: V12.1X)
176
Therefore “PROGAIN” = 53
Installation manual
Bear in mind
When setting the proportional gain that:
• The maximum amount of following error allowed by the CNC for the spindle is the
value indicated by s.m.p. MAXFLWE1 (P21). When exceeded, the CNC issues
the corresponding following error message.
• The amount of following error decreases as the gain increases, but it tends to
make the system unstable.
It set the percentage of analog output due to the programmed feedrate; the rest
depends on the proportional and derivative/AC-forward gains.
CONCEPTS
With the feed-forward gain, it is possible to reduce the following error without
increasing the gain, thus keeping the system stable.
Spindle
5.
Feed-forward gain setting.
This gain is only to be used when operating with acceleration / deceleration.
For example, if s.m.p. FFGAIN (P25) has been set to "80", the spindle analog voltage
will be:
• 80% of it will depend on the programmed feedrate (feed-forward gain)
• 20% of it will depend on the spindle following error (proportional gain)
Setting the Feed-Forward gain involves a critical adjustment of s.m.p. MAXVOLT
(P37).
1. Set the spindle at maximum speed and at 10%.
2. Measure the actual analog voltage at the drive.
3. Set parameter MAXVOLT (P37) to a value 10 times the measured value.
For example, If the measured voltage was 0,945 V, then set this parameter to 9.45
V, in other words: P37=9450.
Next, set s.m.p. FFGAIN (P25) to the desired value.
Derivative (AC-forward) gain setting
With the derivative gain, it is possible to reduce the following error during the acc./
dec. stages.
Its value is given by s.m.p. DERGAIN (P24).
When this additional analog voltage is due to fluctuations of following error,
"ACFGAIN" (P46) = NO, it is called "derivative gain".
CNC 8035
(SOFT M: V11.1X)
(SOFT T: V12.1X)
177
Installation manual
When it is due to variations of the programmed feedrate, "ACFGAIN" (P42) = YES,
it is called AC-forward gain" since it is due to acc./dec.
Spindle
CONCEPTS
5.
Best results are usually obtained when using it as AC-forward Gain, "ACFGAIN"
(P42) = YES together with feed-forward gain.
This gain is only to be used when operating with acceleration / deceleration.
A practical value between 2 to 3 times the Proportional Gain, "PROGAIN" (P23), may
be used.
To perform a critical adjustment, proceed as follows:
• Verify that there is no oscillations on following error, In other words, that it is not
unstable.
• Check, with an oscilloscope, the tacho voltage or the analog voltage at the drive
(velocity command), verify that it is stable (left graph) and that there are neither
instabilities when starting up (center graph) nor when braking down (right graph).
Machine reference point setting
To set the machine reference point proceed as follows:
• Indicate in the s.m.p. REFPULSE (P32) the type of marker pulse Io being used
for Home Search.
• Likewise, set s.m.p. REFDIREC (P33) to indicate the direction of the axis when
searching Home.
• On the other hand, set s.m.p. REFEED1 (P34) that defines the approach feedrate
of the spindle until the home switch is pressed and s.m.p. REFEED2 (P35) that
indicates the homing feedrate until the reference mark (marker pulse) is detected.
• The machine reference point will be set to "0". s.m.p. REFVALUE (P36).
• Once in the JOG mode and after positioning the spindle in the right area, start
homing the spindle. When done, the CNC will assign a "0" value to this point.
CNC 8035
(SOFT M: V11.1X)
(SOFT T: V12.1X)
178
Installation manual
• After moving the spindle to the Machine Reference Zero or up to a known position
(with respect to Machine Reference Zero), observe the position reading of the
CNC for that point.
This will be distance from the Machine Reference Zero to that point. Therefore,
the value to be assigned to s.m.p. REFVALUE (P36), which defines the coordinate
corresponding to the Machine Reference Point (physical location of the marker
pulse).
REFVALUE (P36) = Machine coordinate – CNC reading.
Example:
• After allocating this new value, press SHIFT + RESET or turn the CNC off and
back on in order for the CNC to assume this new value.
Spindle
"REFVALUE" P36 = 12 - (-123.5) = 135.5º
5.
CONCEPTS
If the point whose known position is located at 12º mm from Machine
Reference Zero and the CNC reads -123.5º as the coordinate value for this
point, the coordinate of the Machine Reference Point with respect to Machine
Reference Zero will be:
• The spindle must be homed again in order for it to assume its right reference
values.
Considerations
If at the time when the home search is requested, the spindle is sitting on the home
switch, the spindle will back up (in the direction opposite to the one indicated by
“REFDIREC (P33) ”) until it is off the switch and then, it will go on to searching home.
Care must be taken when placing the home switch and when setting feedrates
“REFEED1 (P34)” and “REFEED2 (P35)”. The home switch (1) will be installed so
the marker pulse (2) will be found in the zone corresponding to feedrate “REFEED2”
(P35). If there is no room for it, reduce the value of “REFEED1 (P34)”. For example,
for encoders whose consecutive marker pulses are very close to each other.
When the spindle does not have a machine reference (home) switch (s.m.p.
DECINPUT (P31) = NO), the CNC will move the spindle at the feedrate set by s.m.p.
REFEED2 (P35) until the first marker pulse from the current position is found, thus
ending the home search.
Fagor rotary encoders provide one positive reference pulse per revolution.
Do not mistake the type of pulse provided by the feedback system with the value to
be assigned to s.m.p. REFPULSE (P32).
This parameter must indicate the type of active flank (leading or trailing edge), positive
or negative of the reference mark (Io) used by the CNC.
CNC 8035
(SOFT M: V11.1X)
(SOFT T: V12.1X)
179
Installation manual
5.10
Treatment of emergency signals
The CNC provides the following emergency signals:
/EMERGENCY STOP
Physical emergency input.
It is generated from the outside and corresponds to the physical emergency input.
5.
CONCEPTS
Treatment of emergency signals
This signal is active low (0 V).
/EMERGENCY OUTPUT
Physical emergency output.
It is generated internally when an error is detEcted at the CNC or at the PLC.
This signal is active low (0 V).
/EMERGEN (M5000)
Logic input of the CNC, generated by the PLC.
When the PLC activates this signal, the CNC stops the axes feed and the rotation
of the spindle and it displays the corresponding error message.
This signal is active low (0 V).
/ALARM (M5507)
Logic input of the PLC, generated by the CNC.
The CNC activates this signal to let the PLC “know” that an alarm or emergency
condition has occurred.
This signal is active low (0 V).
CNC 8035
(SOFT M: V11.1X)
(SOFT T: V12.1X)
180
Installation manual
CNC Treatment of emergency signals
The emergency inputs of the CNC are:
/EMERGEN (M5000)
Physical input coming from the PLC.
/EMERGENCY STOP
Physical input coming from the outside. Pin 10 of connector X2
Physical output to the PLC.
/EMERGENCY OUTPUT
Physical output to the outside. Pin 2 of connector X2
CONCEPTS
/ALARM (M5507)
Treatment of emergency signals
5.
The emergency outputs of the CNC are:
There are to ways to cause an emergency at the CNC, by activating the physical input
/EMERGENCY STOP or the general logic input “/EMERGEN” from the PLC.
Whenever any of these signals is activated, the CNC stops the axes feed and the
spindle rotation and it displays the corresponding error message.
By the same token, when the CNC detects an internal malfunction or at an external
device, it stops the axes feed and the spindle rotation displaying at the same time the
corresponding error message.
In both cases, the CNC will activate the /EMERGENCY OUTPUT and /ALARM
signals to indicate to the PLC and to the outside world that an emergency has
occurred at the CNC.
Once the cause of the emergency has disappeared, the CNC will deactivate these
signals to indicate to the PLC and to the outside world that everything is back to
normal.
CNC 8035
(SOFT M: V11.1X)
(SOFT T: V12.1X)
181
Installation manual
PLC Treatment of emergency signals
The emergency inputs of the PLC are:
/EMERGENCY STOP
Physical input coming from the outside.
/ALARM (M5507)
Physical input coming from the CNC.
5.
The emergency outputs of the PLC are:
CONCEPTS
Treatment of emergency signals
/EMERGENCY OUTPUT
Physical output to the outside.
/EMERGEN (M5000)
Physical output to the CNC.
There are two ways to “tell” the PLC that an emergency condition must be treated,
by activating the physical input EMERGENCY STOP of the PLC (which is I1) or the
general logic input “/ALARM” of the PLC which is mark M5507.
In both cases, the treatment of these signals will be up to the PLC programmer. The
PLC program must have the necessary instructions to properly attend to these
emergency inputs and act accordingly.
By the same token, the PLC program must have the necessary instructions to
properly activate the emergency outputs when required.
These emergency signals are the physical output /EMERGENCY OUTPUT (output
O1 of the PLC) and the general logic output /EMERGEN” which is mark M5000 of
the PLC.
It must be born in mind that every time a new PLC program cycle is initiated, the real
inputs are updated with the physical inputs. Therefore, input I1 will have the value of
the physical input /EMERGENCY STOP.
Also, before executing the PLC program cycle, the values of the M and R resources
corresponding to the CNC logic outputs (internal variables) are updated as well as
mark M5507 corresponding to the /ALARM signal.
After the execution of each cycle, the PLC updates the physical outputs with the
values of the real outputs except the physical output /EMERGENCY OUTPUT which
will be activated whenever the real output O1 or mark M5507 (/ALARM signal coming
from the CNC) is active.
CNC 8035
(SOFT M: V11.1X)
(SOFT T: V12.1X)
182
Installation manual
5.11
Digital CAN servo
i
CAN communication requires a drive version V7.02 or later.
G.m.p. CANSPEED (P169) may be used to set the CAN communication speed.
The more data to be transmitted, the more overloaded the transmission will be. These
registers should be limited leaving only the ones absolutely necessary after the setup.
On the other hand, there is data that MUST be transmitted at each position loop
(velocity commands, feedback, etc.) and other information that could be transmitted
in various loops (monitoring, etc.). Since the CNC must know the priority for those
transmissions, from now on, we will use the terms "cyclic channel" and "service
channel" to refer to each of them.
CONCEPTS
The data exchange between the CNC and the drives takes place in each position loop.
Digital CAN servo
5.
5.11.1 Communications channel
Cyclic channel (fast channel)
Data transmitted at each position loop (velocity commands, feedback, etc.).
At every loop time, the CNC transmits to the drive through this channel the World
Control (Speed Enable, Drive Enable, Homing Enable, bit handshake) and the
velocity command. The drive transmits to the CNC the Word Status and the position
value. The transmitted data depends on a.m.p. DRIBUSLE (P63).
The type of data to be transmitted (basically variables) must be indicated. The data
to be sent to the drives must be placed in certain particular registers of the PLC and
the data to be read from the drives is received in other registers of the PLC.
The registers to be used and the data to be transmitted (basically variable) are defined
by machine parameters of the PLC. Use SRR700 (P28) through SRR739 (P67)
parameters to transmit read-only variables. Use SWR800 (P68) through SWR819
(P87) parameters to transmit write variables.
The number of variables defined in this channel is limited depending on the number
of axes, the sampling period and the transmission speed. A data overflow causes an
error at the CNC.
Service channel (slow channel)
Data to be transmitted in several position loops (monitoring, etc.).
The service channel can only be accessed through a high-level block of a partprogram, a PLC channel or a user channel.
CNC 8035
(SOFT M: V11.1X)
(SOFT T: V12.1X)
183
Installation manual
Cyclic channel. Read-only variables for the CNC-PLC
The plc.m.p. SRR700 (P28) through SRR739 (P67) indicate which drive and what
type of information will be placed in CNC registers R700 through R739.
P28=>R700
P29=>R701
P30=>R702
P31=>R703
etc.
These parameters are set in 1.5 format. The units digit identifies the drive (node)
supplying the data and the decimals indicate the identifier number (see table below).
5.
CONCEPTS
Digital CAN servo
For example, "P32=1.00040" indicates that PLC register R704 contains the
"VelocityFeedback" supplied by the drive located in bus node 1.
i
To identify the units of the variables, see the drive manual.
Read-only registers R700 through R739 are updated at the beginning of the
PLC scan, unless the MRD instruction is used.
The type of information available and its associated identifiers are:
Type of information
Identifier
Class2Diagnostics (Warnings)
00012
Class3Diagnostics (OperationStatus)
00013
VelocityFeedback
00040
PositionFeedbackValue1
00051
TorqueFeedback
00084
CurrentFeedback
33079
FagorDiagnostics
33172
AnalogInputValue
33673
AuxiliaryAnalogInputValue
33674
DigitalInputsValues
33675
PowerFeedback
34468
PowerFeedbackPercentage
34469
The bits of identifier 33172 "FagorDiagnostics" contain the following information:
bits
CNC 8035
(SOFT M: V11.1X)
(SOFT T: V12.1X)
184
Meaning
Id at the drive
0,1,2,3
GV25 ActualGearRatio
000255
4,5,6,7
GV21 ActualParameterSet
000254
8
SV4
000330
9
SV5
000331
10
SV3
000332
11
TV10 TGreaterEqualTx
000333
12
TV60 PGreaterEqualPx
000337
Installation manual
Cyclic channel. Write variables for the CNC-PLC
plc.m.p. SWR800 (P68) through SWR819 (P87) indicate which type of information
has been put in registers R800 through R819 and which drive will be assigned that
value.
P69=>R801
P70=>R802
P71=>R803
etc.
These parameters are set in 1.5 format. The units digit identifies the drive (node)
supplying the data and the decimals indicate the identifier number (see table below).
i
To identify the units of the variables, see the drive manual.
The type of information available and its associated identifiers are:
Type of information
5.
CONCEPTS
For example, "P70=2.34178" indicates that the value of PLC register R802 will be
assigned to the "DigitalOutputsValues" of the drive located in bus node 2.
Digital CAN servo
P68=>R800
Identifier
DA1Value
34176
DA2Value
34177
DigitalOutputsValues
34178
VelocityCommand
00036
The "VelocityCommand" variable can be modified for the axes that have been
selected as DRO axes, by a.m.p. DROAXIS (P4) or via PLC by activating the logic
CNC axis input "DRO1,2,3,..."
Service channel
The service channel can only be accessed through a high-level block of a partprogram, a PLC channel or a user channel. All variables can be accessed except the
string type appearing in the drive manual.
• Reading and writing from a part-program or from a user channel.
Read:
(P*** = SVARaxis **)
Write:
(SVARaxis** = P**)
Example:
(P110 = SVARX 40)
It assigns to parameter P110 the value of the X axis variable
with the identifier 40 which corresponds to
"VelocityFeedback"
• Reading and writing from the PLC channel.
Read:
... = CNCEX ((P*** = SVARaxis ***), M1)
Write:
... = CNCEX ((SVARaxis** = P***), M1)
Example:
... = CNCEX (( SVARX 100= P120 ),M1
It assigns the value of parameter P120 to the X axis variable
with identifier 100 (VelocityProportionalGain).
CNC 8035
(SOFT M: V11.1X)
(SOFT T: V12.1X)
185
Installation manual
5.12
Fagor handwheels: HBA, HBE and LGB
Fagor handwheels HBA, HBE and LGB have:
• a pulse generator (encoder).
• an emergency output.
• One or two enable buttons.
• An axis selector switch.
5.
• A resolution selector switch.
CONCEPTS
Fagor handwheels: HBA, HBE and LGB
The encoder signals must be taken to the specific connectors of the CNC.
In the example, the handwheel signals are taken to the feedback input (connector).
Set the corresponding g.m.p. AXIS , for example: AXIS4(P3)=11.
The emergency button must be used in the safety chain of the electrical cabinet.
The HBE handwheel has one contact and the HBA and LGB models have a dual
safety contact.
The enable push button (or buttons), the axis selector and resolution selector
switches are always handled by the PLC.
CNC 8035
(SOFT M: V11.1X)
(SOFT T: V12.1X)
186
Connection example and PLC program for the HBA-072914 handwheel.
Installation manual
CONCEPTS
There are 2 ways to use the “Enable Push Button”.
I78
Just press one of the buttons
I79
Both buttons must be pressed
The examples uses input I79, making it necessary to push both buttons in order to
use the handwheel.
Fagor handwheels: HBA, HBE and LGB
5.
Definition of symbols (mnemonics)
DEF
HDWON
M600
Handwheel jog
DEF
JOGON
M601
JOG
DEF
XSEL
M602
X axis selected
DEF
YSEL
M603
Y axis selected
DEF
ZSEL
M604
Z axis selected
DEF
4SEL
M605
4th axis selected
DEF
5SEL
M606
5th axis selected
DEF
6SEL
M607
6th axis selected
DEF
7SEL
M608
7th axis selected
PRG
REA
If the handwheel enable (I79) and the switch is at handwheel position (x1, x10 or x100)
I79 AND (I73 OR I74) = HDWON
I73
I74
JOG
0
0
x1
0
1
x10
1
1
x100
1
0
CNC 8035
To move the axes in JOG proceed as follows ....
• enable handwheel “I79” ...
• turn the switch to the (·) position: "NOT I73 AND NOT I74"
(SOFT M: V11.1X)
(SOFT T: V12.1X)
• position the CNC panel selector in the JOG area (not handwheel, not incremental)
“SELECTOR > 7"
I79 AND NOT I73 AND NOT I74 AND CPS SELECTOR GE 8
187
Installation manual
= JOGON
Axis selection. Inputs I70, I71, I72
I70 I71 I72
CONCEPTS
Fagor handwheels: HBA, HBE and LGB
5.
NOT I70
AND NOT I71
AND NOT I72
= XSEL
XSEL
0
0
0
NOT I70
AND NOT I71
AND I72
= YSEL
YSEL
0
0
1
NOT I70
AND I71
AND I72
= ZSEL
ZSEL
0
1
1
NOT I70
AND I71
AND NOT I72
= 4SEL
4SEL
0
1
0
I70
AND I71
AND NOT I72
= 5SEL
5SEL
1
1
0
I70
AND I71
AND I72
= 6SEL
6SEL
1
1
1
I70
AND NOT I71
AND I72
= 7SEL
7SEL
1
0
1
If handwheel jog (HDWON), R60 must be ready to store what will be written into the
HBEVAR variable. The "a, b, c" bits indicate the x1, x10, x100 factor for each axis and
bit 30 (*) must be set to "1" in order for the CNC to read the handwheel pulses.
C
* ^
B
A
W
V
U
Z
Y
X
c b t c b t c b t c b t c b t c b t c b t c b t c b t
o
o
o
o
o
o
o
o
o
() = MOV 0 R60
Delete its contents
Sets the bit (a) of the selected axis to "1". x1 multiplying factor.
HDWON AND XSEL
= MOV 1 R60
HDWON AND YSEL
= MOV 8 R60
HDWON AND ZSEL
= MOV $40 R60
HDWON AND 4SEL
= MOV $200 R60
HDWON AND 5SEL
= MOV $1000 R60
HDWON AND 6SEL
= MOV $8000 R60
HDWON AND 7SEL
= MOV $40000 R60
It then analyzes the multiplying factor indicated at the switch (x1, x10, x100)
I73 I74
c
b to
x1
0
1
0
0
1
I73 AND
I74
= RL1 R60 1 R60
x10
1
1
0
1
0
I73 AND
NOT I74
= RL1 R60 2 R60
x100
1
0
1
0
0
And finally, the bit 30 (*) of HBEVAR=1 is enabled, for the CNC to read the handwheel
pulses.
( )= OR R60 $40000000 R60
When enabling the handwheel or changing the position of one of the switches,
HBEVAR and its image register (R61) are updated (refreshed).
CNC 8035
DFU HDWON OR CPS R60 NE R61
= MOV R60 R61
= CNCWR(R61,HBEVAR,M201)
(SOFT M: V11.1X)
(SOFT T: V12.1X)
When disabling the handwheel, HBEVAR=0 and its image register (R61) are
initialized.
DFD HDWON = MOV 0 R61 = CNCWR(R61,HBEVAR,M201)
If JOG movement (JOGON) and [+] key pressed: "I75", then axis movement in the
positive direction.
JOGON AND I75 AND XSEL = AXIS+1
188
Installation manual
JOGON AND I75 AND YSEL = AXIS+2
JOGON AND I75 AND ZSEL = AXIS+3
JOGON AND I75 AND 4SEL = AXIS+4
JOGON AND I75 AND 5SEL = AXIS+5
JOGON AND I75 AND 6SEL = AXIS+6
JOGON AND I75 AND 7SEL = AXIS+7
If JOG movement (JOGON) and [-] key pressed: "I77", then axis movement in the
negative direction.
JOGON AND I77 AND ZSEL = AXIS-3
JOGON AND I77 AND 4SEL = AXIS-4
JOGON AND I77 AND 5SEL = AXIS-5
JOGON AND I77 AND 6SEL = AXIS-6
JOGON AND I77 AND 7SEL = AXIS-7
If JOG movement (JOGON) and [Rapid] key pressed: "I76", axis movement in rapid.
JOGON AND I76 = MANRAPID
Safety. When releasing the "Enable Push Button", the STOP command is sent out
to the CNC (100 ms pulse) to stop the possible movement active at the time (for
example: 10 mm in incremental). Only if the JOG mode is selected and NOT MDI
CONCEPTS
JOGON AND I77 AND YSEL = AXIS-2
Fagor handwheels: HBA, HBE and LGB
5.
JOGON AND I77 AND XSEL = AXIS-1
DFD I79 = TG1 17 100
MANUAL AND NOT MDI AND T17 = NOT /STOP
END
In order to comply with the EN 61000-4-4 (IEC 1000-4-4) regulation on
“immunity against rapid transients and blasts” use a 7x1x0.14 PVC shielded
cable for the 5 V feedback cable.
CNC 8035
(SOFT M: V11.1X)
(SOFT T: V12.1X)
189
Installation manual
5.13
Machine safety related functions
5.13.1 Maximum machining spindle speed
The following safety regulation forces to limit the spindle speed on lathes:
"A program will not be executed in machining mode unless the maximum spindle
speed value for the part is entered as well as the proper maximum speed for the
part holding fixture for the machine.
5.
CONCEPTS
Machine safety related functions
Should the operator forget to enter or validate these speeds in each program
change, the execution in machining mode will not be possible.
It will not exceed the lower speed among the maximum by parameter, the
maximum by program and the maximum entered manually.
There is a variable, MDISL, associated with the spindle speed limits to make this
maneuver easier. This variable is read-write from the PLC and read-only from DNC
and CNC.
Besides updated by the PLC, this variable can also be updated in the following cases:
• When programming G92 in MDI mode.
• When programming G92 in ISO code in MC or TC mode.
• In MC or TC mode, when a new speed limit is defined in the "SMAX" field.
The speed limits entered via CNC, PLC (PLCSL) and DNC (DNCSL) keep the same
functionality and priority and are not affected by the MDISL variable; in other words,
the CNC also limits the spindle speed with these variables.
Management via PLC
To comply the safety regulation, we recommend to manage from the PLC the
variables associated with speed limit as shown in the following example. It applies
the following restrictions:
• A new part-program cannot be executed without previously entering the spindle
speed limit. Otherwise, an error message will be issued.
When repeating the execution of the program, the speed limit needs not be
entered, it must only be entered when executing the program for the first time.
• While executing a program, if a new limit is entered in MDI, it replaces the previous
one.
• In independent MC or TC cycles it is not required to enter the SMAX because it
is already defined in each cycle.
• If the program being executed has a G92 function, the program will only be valid
if the value defined in G92 is smaller than the one programmed by MDI.
• When having two main spindles, the speed limit entered will be valid for both.
CNC 8035
(SOFT M: V11.1X)
(SOFT T: V12.1X)
190
Installation manual
PLC programming example.
PRG
REA
()=CNCRD(OPMODA,R100,M1000)
Reading of the OPMODA variable.
B0R100 AND INCYCLE = M100
Indicator of program in execution.
At the beginning of the execution, it reads the program being executed (CNCRD)
and the speed limit set by MDISL.
;
M100 = CNCRD(PRGSL,R103,M1000)
While executing, it reads the speed limit set by the CNC.
M100 AND CPS R101 NE R201 = M101
If there is a new program in execution, it activates mark M101.
;
M100 AND CPS R101 EQ R201 = M102
CONCEPTS
DFU M100 = CNCRD(PRGN,R101,M1000) = CNCRD(MDISL,R102,M1000)
Machine safety related functions
5.
;
If it is the same program, it activates mark M102.
;
M101 AND CPS R102 EQ 0 = ERR10
If there is a new program in execution (M101) and the speed has not been limited
with MDISL (R102), it issues error 10. This error must be defined in the PLC
messages.
;
M101 AND CPS R102 NE 0 = MOV R101 R201 = MOV R102 R202
If there is a new program in execution (M101) and the speed has been limited with
MDISL (R102), it copies the program number and the speed limit.
;
M102 AND CPS R102 NE 0 = MOV R102 R202
If the same program is in execution (M102) and the speed is limited again with
MDIS (R102), it copies the speed limit.
;
M100 AND CPS R202 LT R103 = CNCWR(R202,PLCSL,M1000)
If there is a program in execution (M100) and the speed limit with MDISL (R202)
is smaller than the limit by CNC (R103), it applies the limit by PLC (value set by
MDISL).
;
M100 AND CPS R202 GT R103 = CNCWR(R210,PLCSL,M1000)
If there is a program in execution (M100) and the speed limit with MDISL (R202)
is greater than the limit by CNC (R103), it does not limit the speed by PLC
(R210=0).
;
DFD M100 = CNCWR(R210,PLCSL,M1000) = CNCWR(R210,MDISL,M1000)
CNC 8035
After the execution, it cancels the speed limit by PLC and initializes the MDISL
variable.
;
END
(SOFT M: V11.1X)
(SOFT T: V12.1X)
191
Installation manual
5.13.2 Cycle start disabled when hardware errors occur.
If when pressing the [CYCLE-START] key, a hardware error is detected (Axes board
error, CAN board error, etc.), the CNC does not allow executing or simulating the
program. When a hardware error occurs, the corresponding message is displayed.
CONCEPTS
Machine safety related functions
5.
CNC 8035
(SOFT M: V11.1X)
(SOFT T: V12.1X)
192
Installation manual
Tool change via PLC
If the tool change process is interrupted, the values of the tool magazine table and
active tool may not reflect the machine's reality.
In order to be able to update the tool table, the tool change may be resumed from
the PLC using variables TOOL, NXTOOL, TOD, NXTOD and TMZT. This way, it is
possible to resume the tool change from the PLC and redefine the tool table according
to their positions using the TMZT variable.
Number of the active tool.
TOD
Number of active tool offset.
NXTOOL
Number of next tool. Tool that is selected but is awaiting the execution
of M06 to be active.
NXTOD
Number of the next tool’s offset.
Variables TOOL, NXTOOL, TOD and NXTOD can only be written from the PLC while
no block or part-program is being executed or simulated.
5.
CONCEPTS
TOOL
Tool change via PLC
5.14
Redefine the tool and tool magazine tables.
To allocate a magazine position to the tool that is considered active by the CNC, but
is actually, physically, in the tool magazine, proceed as follows:
1. Deactivate the tool that the CNC considers active; TOOL=0 and TOD=0.
2. Assign to the tool the relevant position using the TMZT variable.
Before trying to write in variables TOOL, NXTOOL, TOD and NXTOD check the
OPMODA variable to make sure that no block or part-program is being executed or
simulated. The next bits of the OPMODEA variable must be set to ·0·.
Bit 0
Program in execution.
Bit 1
Program in simulation.
Bit 2
Block in execution via MDI, JOG.
Bit 8
Block in execution via CNCEX1.
CNC 8035
(SOFT M: V11.1X)
(SOFT T: V12.1X)
193
Installation manual
CONCEPTS
Tool change via PLC
5.
CNC 8035
(SOFT M: V11.1X)
(SOFT T: V12.1X)
194
INTRODUCTION TO THE PLC
6
It is recommended to save the PLC program and files into the memkey card”
(CARDA) or in a peripheral or PC to avoid losing them.
The PLC program (PLC_PRG) may be edited at the front panel or copied from the
memkey card (CARD A) or from a peripheral device or PC.
The PLC program (PLC_PRG) is stored in the internal CNC memory with the partprograms and it is displayed in the program directory (utilities) together with the partprograms.
Before executing the PLC_PRG program, it must be compiled. Once it is done
compiling, the CNC requests whether the PLC should be started or not.
To make the operator life easier and avoid new compilations, the source code
generated at each compilation is stored in memory.
After power-up, the CNC acts as follows:
1. If there is an executable program stored in memory,
it executes it (RUN).
2. If there is no executable program, but there is a
PLC_PRG in memory, it compiles it (COMPILE) and
executes it (RUN).
3. If there is no PLC_PRG in memory, it looks for it in
the memkey card (CARD A).
If it is there, it compiles it (COMPILE) and executes
it (RUN). If it is not there, it does nothing. Later on,
when accessing the Jog mode, Execution mode,
etc. the CNC will issue the corresponding error
message.
Once the program has been compiled, it is not necessary to keep the source program
(PLC_PRG) in memory because the PLC always executes the executable program.
The PLC has 512 inputs and 512 outputs. Some of them, depending on the CNC
configuration, communicate with external devices.
There is an exchange of information between the CNC and the PLC which is done
automatically and the system has a series of commands which allow the following
to be done quickly and simply:
The control of Logic CNC inputs and outputs by means of an exchange of information
between both systems.
CNC 8035
• The transfer from the CNC to the PLC of M, S and T auxiliary functions.
• To display a screen previously defined by the user, as well as generating
messages and errors in the CNC.
• Reading and writing internal CNC variables from the PLC.
• Access to all PLC variables from any part program.
(SOFT M: V11.1X)
(SOFT T: V12.1X)
• Monitoring on the CNC screen of PLC variables.
• Access to all PLC variables from a computer, via DNC and through the RS 232
C serial line.
195
Installation manual
6.1
PLC Resources
Inputs (I)
These are elements which supply information to the PLC from signals received from
the outside world. They are represented by the letter I and there are 512 inputs
available.
Outputs (O)
PLC Resources
INTRODUCTION TO THE PLC
6.
These are elements which allow the PLC to activate or deactivate the different devices
in the electrical cabinet. These are represented by the letter O and there are 512
outputs available.
Marks (M)
These are elements capable of memorizing in one bit (as if it were an internal relay)
the status of the different internal variables of the CNC (information of the logic
outputs received in the communication between the CNC and the PLC of the CNC)
and the status of the different variables of the PLC, whether these are internal or
established by the user. They are represented by the letter M, and there are 2000
user marks and other special marks.
Registers (R)
These are elements which allow a numerical value to be stored in 32 bits or facilitate
CNC-PLC communication with the Logic CNC inputs and outputs. They are
represented by the letter R and there are 256 user registers and other special
registers.
Timers (T)
These are elements which, once activated, alter the status of their output for a specific
time (time constant). They are represented by the letter T, and there are 256 timers.
Counters (C)
These are elements capable of counting up or down a specific amount of events. They
are represented by the letter C and there are 256 counters.
CNC 8035
(SOFT M: V11.1X)
(SOFT T: V12.1X)
196
Installation manual
PLC program execution
The PLC executes the user program cyclically. In other words, once it executes the
complete program, it restarts running this program from the first instruction.
This cyclic processing of the program is done as follows:
1. At the beginning of the cycle, PLC’s “I” resources are assigned the current values
of the physical inputs (connectors).
PLC program execution
6.
For example, if the physical input I10 is at 24V, the PLC sets the I10 resource to “1”.
INTRODUCTION TO THE PLC
6.2
2. It allocates the current values of the logic CNC outputs (CNCREADY, START,
FHOUT, etc.) to PLC resources M5500 thru M5957 and R550 thru R562 .
3. It runs the program cycle.
The following sections indicate how the PLC program is structured and which are
its execution modules. See "6.4 Modular structure of the program" on page
201.
4. After executing the cycle, it updates the Logic CNC inputs (/EMERGEN, /STOP,
/FEEDHOL, etc.) with the current values of PLC resources M5000 thru M5465
and R500 thru R505.
5. It assigns the current values of the PLC’s “O” resources to the physical outputs
(connectors).
For example, if the “O5” resource is at “1”, the PLC sets physical output O5
(connector) to 24V.
6. It concludes this cycle scan and it gets ready for the next one.
Bear in mind that all the actions of the program executed by the PLC alter the status
of its resources.
Example: I10 AND I20 = O5
When this condition is met [resource I10 is "1" and I20 is also "1"], the PLC sets
resource "O5" to "1". If this condition is not met, the PLC sets resource "O5" to "0".
CNC 8035
(SOFT M: V11.1X)
(SOFT T: V12.1X)
197
Installation manual
Therefore, the status of a resource may change during the execution of the PLC
program.
Example, assuming that the initial status of resource M100 is "0":
M100 AND I7 = O3
Resource M100 = "0"
I10 = M100
M100 takes the value of resource I10
6.
PLC program execution
INTRODUCTION TO THE PLC
M100 AND I8 = M101
CNC 8035
(SOFT M: V11.1X)
(SOFT T: V12.1X)
198
The value of M100 depends on the previous instruction.
This type of problems may be prevented by careful programming or by using "Image"
resource values (instead of "Real" values).
The PLC has 2 memories to store the status of the registers, the real memory and
the image memory.
All the steps described so far work with the real memory. Saying "value of a particular
resource" is the same as saying "real value of a particular resource"
The image memory contains a copy of the values (status) that the resources had at
the end of the previous cycle. The PLC makes this copy at the end of the cycle. The
resources having an image value are: I1 thru I512, O1 thru O512 and M1 thru M2047
Installation manual
The next example shows how the PLC acts when operating with real and image
values.
() = M1
Assigns the value of “1” to mark M1.
M1 = M2
Assigns the value of M1 to M2.
M2 = M3
Assigns the value of M2 to M3.
M3 = O5
Assigns the value of M3 to output O5.
6.
IMA
M1 M2 M3 O5 M1 M2 M3 O5
()=M1
0
0
0
0
0
0
0
0
M1 = M2
Scan 1
1
1
1
1
1
0
0
0
M2 = M3
Scan 2
1
1
1
1
1
1
0
0
M3 = O5
Scan 3
1
1
1
1
1
1
1
0
Scan 4
1
1
1
1
1
1
1
1
As can be observed, the system is faster when operating with real resource values.
PLC program execution
REA
INTRODUCTION TO THE PLC
PLC Program
Operating with image values permits analyzing the same resource along the whole
program with the same value regardless of its current (instantaneous) real value.
Operating with real values
In the first scan, when execution the instruction M1 = M2, M1 has a real value of “1”
set by the previous instruction.
The same is true for instructions M2=M3 and M3=O5
That is why real values are used, output O1 takes the value of “1” in the first scan.
Operating with image values
The first cycle (scan) sets the real value of M1=1; but its image value will not be set
to "1" until the end of the cycle.
In the 2nd cycle (scan), the image value of M1 is "1" and the real value of M2 is set
to "1"; but the image value of M2 will not be set to "1" until the end of the cycle.
In the 3rd cycle (scan), the image value of M2 is "1" and the real value of M3 is set
to "1"; but the image value of M3 will not be set to "1" until the end of the cycle.
In the 4th cycle (scan), the image value of M3 is "1" and the real value of O5 is set to "1".
CNC 8035
(SOFT M: V11.1X)
(SOFT T: V12.1X)
199
Installation manual
6.3
Cycle time
The time the PLC requires to execute the program is called cycle time and can vary
in the successive cycles of a same program, as the conditions under which they are
executed are not the same.
Cycle time
INTRODUCTION TO THE PLC
6.
plc.m.p WDGPRG (P0) sets the maximum cycle execution time This is called
WATCH-DOG time and if a cycle is executed which lasts longer than 1.5 times this
time, or two cycles are executed, one after the other, taking longer than this time
period, the CNC will display the WATCH-DOG error of the main module.
This way, the execution of cycles that, due to their duration, disturb the operation of
the machine can be prevented and the PLC can be prevented from executing a cycle
which has no end due to a programming error.
CNC 8035
(SOFT M: V11.1X)
(SOFT T: V12.1X)
200
Installation manual
6.4
Modular structure of the program
The program to be executed by the PLC consists of a series of modules which are
appropriately defined by means of directing instructions.
The modules which can make up the program are:
• Main module (PRG)
• Periodic execution module (PE)
Should the main program contain the main module only it is not necessary to place
the instructions PRG and END.
6.4.1
First cycle module (CY1)
This module is optional and will only be executed when the PLC is turned on. It is used
to initialize the different resources and variables with their initial values, before
proceeding to execute the rest of the program.
This module operates by default with the real values of resources I, O, M.
INTRODUCTION TO THE PLC
Each module must begin with the directing instruction which defines it (PRG, PE,
CY1) and end with the directing instruction END.
Modular structure of the program
6.
• First cycle module (CY1)
It is not necessary for this to be at the beginning of the program, but must always be
preceded by the instruction CY1.
6.4.2
Main module (PRG)
This module contains the user program. It will be executed cyclically and will be given
the task of analyzing and modifying CNC inputs and outputs. Its execution time will
be limited by the value of plc.m.p. WDGPRG (P0)
This module operates by default with the image values of resources I, O, M.
There can only be one main program and this must be preceded by the instruction
PRG, it is not necessary to define it if it starts on the first line.
CNC 8035
(SOFT M: V11.1X)
(SOFT T: V12.1X)
201
Installation manual
6.4.3
Periodic execution module (PE t)
This module is optional and will be executed every period of time t indicated in the
directing instruction defining the module.
This module may be used to process certain critical inputs and outputs which cannot
be checked or updated properly in the body of the main program due to its extended
execution time.
INTRODUCTION TO THE PLC
Modular structure of the program
6.
Another application for this module is for those cases where specific tasks need not
be evaluated at every PLC program cycle. Those tasks would be programmed in the
periodic module and they would be executed with the frequency established by the
execution time assigned to this module (for example: if t= 30,000; every 30 seconds).
A “t” value between 1 and 65535 milliseconds may be programmed.
The execution time of this module will be limited by the value of plc.m.p. WDGPER
(P1)
This module operates by default with the real values of resources I, O, M.
Example:
PE 10
Defines the beginning of the periodic module PE which will be executed
every 10 milliseconds.
If this module is being executed with real values and acts on a physical output, this
is updated at the end of the execution of the periodic module.
CNC 8035
(SOFT M: V11.1X)
(SOFT T: V12.1X)
202
Installation manual
Priority of execution of the PLC modules
Every time the PLC program is started (command RUN) the first module to be
executed is the first cycle module (CY1). Once execution has been completed, it will
continue with the main module (PRG).
The main module will be executed cyclically until the execution of the PLC has
stopped (command STOP).
INTRODUCTION TO THE PLC
6.
Modular structure of the program
6.4.4
The periodic module will be executed every time the time indicated in the directing
instruction “PE t” elapses. This count starts when the execution of the main module
(the first time) begins.
Every time this module is executed, the execution of the main module is interrupted,
and its execution resumes when the execution of the periodic module finishes.
CNC 8035
(SOFT M: V11.1X)
(SOFT T: V12.1X)
203
Installation manual
INTRODUCTION TO THE PLC
Modular structure of the program
6.
CNC 8035
(SOFT M: V11.1X)
(SOFT T: V12.1X)
204
PLC RESOURCES
7.1
7
Inputs
These are elements which supply information to the PLC from signals received from
the outside world. They are represented by the letter I followed by the input number
which is desired to reference, for example I1, I25, I102, etc.
The PLC may control 512 inputs although when communicating with the outside
world it can only access the physical ones.
Local physical inputs are the ones corresponding to the central unit.
7.2
Outputs
These are elements which allow the PLC to activate or deactivate the different devices
in the electrical cabinet. They are represented by the letter O followed by the output
number which is desired to reference, for example O1, O25, O102, etc.
The PLC may control 512 outputs although when communicating with the outside
world it can only access the physical ones.
Local physical outputs are the ones corresponding to the central unit.
Output O1 coincides with the emergency output of the CNC (connector); thus, it must
be kept high (logic level 1).
CNC 8035
(SOFT M: V11.1X)
(SOFT T: V12.1X)
205
Installation manual
7.3
Marks
These are elements capable of memorizing in one bit (as if they were an internal relay)
information defined by the user, their value being inalterable even when the power
supply to the system is turned off.
This will be programmed by the letter M followed by the number of the mark which
it is wished to reference, for example, M1, M25, M102, etc.
7.
Marks
PLC RESOURCES
The PLC controls the following marks:
User marks
M1
- M2000
Arithmetic flag marks
M2003
Clock marks
M2009 - M2024
Fixed status marks
M2046 and M2047
Marks associated with messages
M4000 - M4127
Marks associated with errors
M4500 - M4563
Screen marks
M4700 - M4955
CNC communication marks
M5000 - M5957
Marks M1 thru M2047 have image values unlike the remainder of the marks, and so
the PLC will always work with their real values.
The arithmetic flag mark available at the PLC is:
M2003
Is the Zero flag and is set to 1 (high logic level) when the result of an
AND, OR, XOR operation is 0.
The clock marks M2009 to M2024, make up internal clocks of different periods which
can be used by the user.
The following table shows the available marks and the average period of each one.
M2009
100 ms.
M2015
6.4 s.
M2021
16 s.
M2010
200 ms.
M2016
12.8 s.
M2022
32 s.
M2011
400 ms.
M2017
1 s.
M2023
64 s.
M2012
800 ms.
M2018
2 s.
M2024
128 s.
M2013
1.6 s.
M2019
4 s.
M2014
3.2 s.
M2020
8 s.
The fixed status marks available at the PLC are:
CNC 8035
(SOFT M: V11.1X)
(SOFT T: V12.1X)
206
M2046
Always has a value of 0.
M2047
Always has a value of 1.
The PLC allows, by means of the activation of a series of message marks, the PLC
message corresponding to the PLC message table to be displayed on the CNC
screen. They can be named by means of the mark M4000 - M4127 or by means of
their associated mnemonic MSG1 - MSG128:
M4000
M4001
M4002
--------
M4126
M4127
MSG1
MSG2
MSG3
--------
MSG127
MSG128
Likewise, 64 error marks are available which allow the error corresponding to the PLC
error table to be displayed on the CNC screen as well as to interrupt the execution
of the CNC program, stopping axis feed and spindle rotation. Activating any of these
marks does not activate the external CNC emergency output.
Installation manual
They can be named by means of mark M4500-M4563 or by means of their associated
mnemonic ERR1 - ERR64:
M4501
M4502
--------
M4562
M4563
ERR1
ERR2
ERR3
--------
ERR63
ERR64
Because the PLC program is not interrupted by these marks, it is advised to make
it possible to change their status via accessible external inputs; otherwise, the CNC
will keep receiving the same error at every PLC scan (cycle) thus preventing access
to any PLC mode.
M4700
M4701
M4702
--------
M4954
M4955
PIC0
PIC1
PIC2
--------
PIC254
PIC255
The PLC has marks M5000 through M5957 to exchange information with the CNC,
all of which have associated mnemonics. See chapter "10 Logic CNC inputs and
outputs".
7.
PLC RESOURCES
By activating one of the marks M4700-M4955 user pages 0-255 can be activated in
the CNC. They can be named by means of mark M4700-M4955 or by means of their
associated mnemonic PIC0 - PIC255:
Marks
M4500
CNC 8035
(SOFT M: V11.1X)
(SOFT T: V12.1X)
207
Installation manual
7.4
Registers
These are elements which store a numerical value in 32 bits, their value remaining
unalterable even when the power supply to the system is cut off.
They do not have image values and are represented by the letter R, followed by the
register number it is desired to reference, for example R1, R25, R102, etc.
The PLC has the following registers:
Registers
PLC RESOURCES
7.
User registers
R1 - R499
Registers for communication with the CNC
R500 - R559
The PLC will consider each value stored in each register as an integer with a sign,
and can be within ±2147483647.
It is also possible to make reference to a BIT of the REGISTER by putting the letter
B and the bit number (0/31) in front of the selected register. For example:
B7R155
Refers to bit 7 of register 155.
The PLC considers bit 0 as being the one with least significance and bit 31 as being
the one with most significance.
The value stored in a register can be treated as being decimal, hexadecimal
(preceded by “$”), binary (preceded by “B”) or in BCD. Example:
CNC 8035
(SOFT M: V11.1X)
(SOFT T: V12.1X)
208
decimal
156
Hexadecimal
$9C
Binary
B0000 0000 0000 0000 0000 0000 1001 1100
Installation manual
Timers
These are elements capable of maintaining their output at a determined logic level
during a preset time (time constant), after which the output changes status.
They do not have image values and are represented by the letter T, followed by the
number of the timer it is required to reference, for example, T1, T25, T102, etc.
The time constant is stored in a 32-bit variable, and so its value can be between 0
and 4294967295 milliseconds, which is equivalent to 1193 hours (almost 50 days).
7.
Timers
The PLC has 256 timers, each of which has T status output and TEN, TRS, TG1, TG2,
TG3 and TG4 inputs. It is also possible to consult at any moment the time which has
elapsed from the moment it was activated.
PLC RESOURCES
7.5
Enable input (TEN)
This input allows the timing of the timer to be stopped. It is referred to by the letter
TEN followed by the number of the timer which is wished to reference, for example
TEN 1, TEN 25, TEN 102, etc.
So that the time elapses within the timer this input must be at level “1”. By default and
every time a timer is activated the PLC will assign this input a logic level of “1”.
If, once the timer is activated, TEN = 0 is selected, the PLC stops timing, and it is
necessary to assign TEN = 1 for this timing to continue.
Example:
I2 = TEN 10 Input I2 controls the Enable input of timer T10.
CNC 8035
(SOFT M: V11.1X)
(SOFT T: V12.1X)
209
Installation manual
Reset input (TRS)
This input allows the timer to be initialized, by assigning the value 0 to its T status
and by canceling its count (it initializes this to 0). It is referred to by the letters TRS
followed by the timer number it is wished to reference, for example TRS 1, TRS 25,
TRS 102, etc.
This initialization of the timer will be made when a transition of logic level from “0” to
“1” (leading edge) is produced. By default and every time a timer is activated the PLC
will assign this input a logic level of “0”.
Timers
PLC RESOURCES
7.
If, once the timer is activated, a leading edge is produced at the TRS input, the PLC
initializes the timer, assigning value 0 to its T status and cancelling the count (it
initializes this to 0). Additionally, the timer is deactivated it being necessary to activate
its trigger input to activate it again.
Example:
I3 = TRS 10 Input I3 controls the Reset input of timer T10.
Trigger input (TG1, TG2, TG3, TG4)
These inputs allow the timer to be activated, and it begins to time. They are referred
to by the letters TG1, TG2, TG3, TG4 followed by the number of the timer it is required
to reference and the value which is required to start the count with (time constant).
For example TG1 1 100, TG2 25 224, TG3 102 0, TG4 200 500, etc.
The time constant value is defined in thousandths of a second, and it is possible to
indicate this by means of a numerical value or by assigning it the internal value of an
R register.
TG1 20 100
Activates timer T20 by means of trigger input TG1 and with a
time constant of 100 milliseconds.
TG2 22 R200
Activates timer T22 by means of trigger input TG2 and with a
time constant which will be defined (in thousandths of a
second) by the value of Register R200 when the instruction is
executed.
Inputs TG1, TG2, TG3 and TG4 are used to activate the timer in four different
operating modes:
• TG1 input in MONOSTABLE mode
• TG2 input in DELAYED CONNECTION mode
• TG3 input in DELAYED DISCONNECTION mode
• TG4 input in SIGNAL LIMITING mode
CNC 8035
(SOFT M: V11.1X)
(SOFT T: V12.1X)
210
This activation of the timer is made when a logic level transition of any of these inputs
is produced, either from “0” to “1” or from “1” to “0” (leading or trailing edge) depending
on the chosen input. By default and every time the timer is initialized by means of the
reset input (TRS), the PLC will assign logic level “0” to these inputs.
The operating mode of each of these trigger inputs is explained individually.
Installation manual
Status output (T)
This output indicates the logic status of the timer. It is referred to by the letter T followed
by the number of the timer which it is required to reference, for example T1, T25, T102,
etc.
The logic status of the timer depends on the operating mode selected by means of
the trigger inputs TG1, TG2, TG3 and TG4, and so the activation or deactivation of
this signal is explained in each of the PLC operating modes.
Although when written as T123 it coincides with the status output, both are different
and they are also used in different types of instruction.
In binary type instructions, function T123 makes reference to the logic status of the
timer.
T123 = M100
PLC RESOURCES
This output indicates the time elapsed in the timer since the moment it was activated.
It is referred to by the letter T followed by the number of the timer which it is required
to reference, for example T1, T25, T102, etc.
Timers
7.
Elapsed time (T)
Assigns mark to M100 the status (0/1) of Timer 123.
In arithmetic and comparison functions T123 makes reference to the time elapsed
in the timer from the moment it was activated.
I2 = MOV T123 R200
Transfers the time of T123 to register R200.
CPS T123 GT 1000 = M100
Compares whether the time of T123 is greater than 1000, in which case it
activates mark M100.
The PLC has a 32-bit variable to store the time of each timer.
CNC 8035
(SOFT M: V11.1X)
(SOFT T: V12.1X)
211
Installation manual
7.5.1
Monostable mode. TG1 input
In this operational mode the timer status is kept at the high logic level (T=1) from the
moment the TG1 input is activated until the time indicated by the time constant
elapses.
Timers
PLC RESOURCES
7.
If the timer is initialized with values TEN=1 and TRS=0, the timer will be activated
when a leading edge is produced at input TG1. At that moment, the timer status
output (T) changes status (T=1) and timing t starts from a value of 0.
Once the time specified by the time constant has elapsed, timing will be considered
as having finished. The timer status output (T) changes status (T=0) and the elapsed
time will be maintained with the time value of the timer (T).
Any alteration which may be produced in input TG1 (leading or trailing edge) during
the timing operation will have no effect whatsoever.
If, once the timing is complete it is required to activate the timer again, another leading
edge must be produced at the TG1 input.
CNC 8035
(SOFT M: V11.1X)
(SOFT T: V12.1X)
212
Installation manual
Operation of the TRS input in this mode
If a leading edge is produced at the TRS input at any moment during timing or
afterwards, the PLC initializes the timer, assigning the value 0 to its T status and
cancelling its count (it initializes this to 0). Due to the fact that the timer is initialized,
it will be necessary to activate its trigger input to activate it again.
Timers
PLC RESOURCES
7.
Operation of the TEN input in this mode
If, once the timer is activated, TEN = 0 is selected, the PLC stops timing, and it is
necessary to assign TEN = 1 for this timing to continue.
CNC 8035
(SOFT M: V11.1X)
(SOFT T: V12.1X)
213
Installation manual
7.5.2
Delayed connection mode. TG2 input
This operating mode allows a delay to be made between the activation of the trigger
input TG2 and the activation of the T status of the timer.
The duration of the delay is determined by the time constant.
Timers
PLC RESOURCES
7.
If the timer is initialized with values TEN=1 and TRS=0, the timer will be activated
when a leading edge is produced at TG2 input. At that moment, timing t will start from
a value of 0.
Once the time specified by the time constant has elapsed the timing operation will
be considered as having completed and the timer status output (T=1) will be activated
and will remain in this status until the trailing edge is produced in the trigger input TG2.
The elapsed time will remain as a timer time value (T) once timing has been
completed.
If, once the timing has finished, it is required to activate the timer again, another
leading edge must be produced in the TG2 input.
If the trailing edge of the trigger input TG2 is produced before the time specified by
the time constant has elapsed, the PLC will consider that the timing operation has
concluded, maintaining the time count it had at that moment as the timer time (T).
CNC 8035
(SOFT M: V11.1X)
(SOFT T: V12.1X)
214
Installation manual
Operation of the TRS input in this mode
If a leading edge is produced at the TRS input at any moment during timing or
afterwards, the PLC initializes the timer, assigning the value 0 to its T status and
cancelling its count (it initializes this to 0). Due to the fact that the timer is initialized,
it will be necessary to activate its trigger input to activate it again.
Timers
PLC RESOURCES
7.
Operation of the TEN input in this mode
If, once the timer is activated, TEN = 0 is selected, the PLC stops timing, and it is
necessary to assign TEN = 1 for this timing to continue.
CNC 8035
(SOFT M: V11.1X)
(SOFT T: V12.1X)
215
Installation manual
7.5.3
Delayed disconnection mode. TG3 input
This operating mode allows a delay to be made between the deactivation of the trigger
input TG3 and the activation of the T status of the timer.
The duration of the delay is determined by the time constant.
Timers
PLC RESOURCES
7.
If the timer is initialized with values TEN=1 and TRS=0, the timer will be activated
when a leading edge is produced at the TG3 input. At that moment, the timer status
output will have a value of T=1.
The timer will wait a trailing edge of the TG3 input to start timing t from a value of 0.
Once the time specified by the time constant has elapsed the timing operation will
be considered as having completed and the timer status output will be deactivated
(T=0).
The elapsed time will remain as a timer time value (T) once timing has been
completed.
If, once the timing has finished, it is required to activate the timer again, another
leading edge must be produced at the TG3 input.
CNC 8035
(SOFT M: V11.1X)
(SOFT T: V12.1X)
216
If another leading edge of the trigger input TG3 is produced before the time specified
by the time constant has elapsed, the PLC will consider that the timer has been
activated again, maintaining its status (T=1) and initializing timing at 0.
Installation manual
Operation of the TRS input in this mode
If a leading edge is produced at the TRS input at any moment during timing or
afterwards, the PLC initializes the timer, assigning the value 0 to its T status and
cancelling its count (it initializes this to 0). Due to the fact that the timer is initialized,
it will be necessary to activate its trigger input to activate it again.
Timers
PLC RESOURCES
7.
Operation of the TEN input in this mode
If, once the timer is activated, TEN = 0 is selected, the PLC stops timing, and it is
necessary to assign TEN = 1 for this timing to continue.
CNC 8035
(SOFT M: V11.1X)
(SOFT T: V12.1X)
217
Installation manual
7.5.4
Signal limiting mode. TG4 input
In this operating mode the timer status is kept at a high logic level (T=1) from the
moment when the TG4 input is activated until the time indicated by the time constant
has elapsed, or until a down flank is produced at the TG4 input.
Timers
PLC RESOURCES
7.
If the timer is initialized with values TEN=1 and TRS=0, the timer will be activated
when a leading edge is produced at the TG4 input. At that moment, the timer status
output (T) changes status (T=1) and timing t starts from a value of 0.
Once the time specified by the time constant has elapsed, timing will be considered
as having finished. The time status output (T) changes status (T=0) and the elapsed
time will be kept as a timer time value (T).
If, before the time specified by the time constant has elapsed, a trailing edge is
produced in the trigger input TG4, the PLC will consider that the timing operation has
concluded it will deactivate the status output (T=0) and maintain the value it has at
that moment as the timer time value (T).
If, once the timing has concluded, it is required to activate the timer again, another
leading edge must be produced at the TG4 input.
CNC 8035
(SOFT M: V11.1X)
(SOFT T: V12.1X)
218
Installation manual
Operation of the TRS input in this mode
If a leading edge is produced at the TRS input at any moment during timing or
afterwards, the PLC initializes the timer, assigning the value 0 to its T status and
cancelling its count (it initializes this to 0). Due to the fact that the timer is initialized,
it will be necessary to activate its trigger input to activate it again.
Timers
PLC RESOURCES
7.
Operation of the TEN input in this mode
If, once the timer is activated, TEN = 0 is selected, the PLC stops timing, and it is
necessary to assign TEN = 1 for this timing to continue.
CNC 8035
(SOFT M: V11.1X)
(SOFT T: V12.1X)
219
Installation manual
7.6
Counters
These are elements capable of counting up or down a specific amount of events. They
do not have image values and are represented by the letter C, followed by the counter
number which it is required to reference, for example C1, C25, C102, etc.
The count of a counter is stored in a 32-bit variable, thus having a possible value of
up to +2147483647.
7.
Counters
PLC RESOURCES
The PLC has 256 counter, each of which has the C status output and CUP, CDW, CEN
and CPR inputs. It is also possible to consult the count value at any time.
Feedback input (CUP)
This input allows the counter count to be increased in a unit every time a leading edge
is produced in it. It is referred to by the letters CUP followed by the counter number
which is required to reference, for example CUP 1, CUP 25, CUP 102, etc.
Example:
I2 = CUP 10
Every time a leading edge is produced at input I2 the counter
count C10 will be increased.
Count-down input (CDW)
This input allows the counter count to be decreased in a unit every time a leading edge
is produced in it. It is referred to by the letters CDW followed by the counter number
which is required to reference, for example CDW 1, CDW 25, CDW 102, etc.
Example:
I3 = CDW 20
Every time a leading edge is produced at input I3 the counter
count C20 will be decreased.
Enable input (CEN)
This input allows the internal counter count to be stopped. It is referred to by the letters
CPR followed by the number of the counter which is required to reference for example
CEN 1, CEN 25, CEN 102, etc.
In order to be able to modify the internal count by means of the inputs CUP and CDW
this input must be at logic level “1”. By default and every time a counter is activated
the PLC will assign this input a logic level of “1”.
CNC 8035
(SOFT M: V11.1X)
(SOFT T: V12.1X)
220
If CEN = 0 is selected the PLC stops the counter count, ignoring the inputs CUP and
CDW until this input allows it (CEN = 1).
Installation manual
Example:
I10 = CEN 12
Input I10 controls the enable input of counter C12.
Counters
PLC RESOURCES
7.
Preset input (CPR)
This input allows the counter to be preset with the desired value. It is referred to by
the letters CPR followed by the number of the counter which is required to reference
and the value to be assigned to the counter count.
For example CPR 1 100, CPR 25 224, CPR 102 0, CPR 200 500, etc.
The value of the count can be indicated by means of a numerical value or by assigning
to it the internal value of an R register.
CPR 20 100
Presets the C20 counter to a value of 100.
CPR 22 R200
Presets the C22 counter with the value of the Register R200
when the instruction is executed.
The counter is preset with the value when a leading edge is produced at the CPR
input.
Status output (C)
This output indicates the logic status of the counter. It is referred to by the letter C,
followed by the counter number which is required to reference, for example C1, C25,
C102, etc.
The logic status of the counter will be C=1 when the value of the count is zero and
C=0 in the remainder of cases.
Count value (C)
This output indicates the value of the internal counter count. It is referred to by the
letter C, followed by the counter number which is required to reference, for example
C1, C25, C102, etc.
Although when written C123 it coincides with the status output, both are different and,
are used in different types of instructions.
In binary type instructions function C123 makes reference to the counter’s logic
status.
C123 = M100
CNC 8035
Assigns mark to M100 the status (0/1) of counter 123.
(SOFT M: V11.1X)
(SOFT T: V12.1X)
221
Installation manual
In arithmetic and function comparison instructions C123 makes reference to the
internal counter count.
I2 = MOV C123 R200
Transfers the count of C123 to register R200.
CPS C123 GT 1000 = M100
Compares whether the count of C123 is greater than 1000, in which case it
activates mark M100.
7.
Counters
PLC RESOURCES
The PLC has a 32-bit variable to store the count of each counter.
CNC 8035
(SOFT M: V11.1X)
(SOFT T: V12.1X)
222
Installation manual
Operating mode of a counter
If the CEN counter input is initialized (CEN=1), the counter allows its count to be
increased and decreased by means of the CUP and CDW inputs.
Operation of CUP and CDW inputs
Every time a leading edge is produced at the CUP input the counter increases its
count by one count.
Operation of the CPR input
If a leading edge is produced at the CPR input the internal count value will take the
new value assigned.
Operation of the CEN input
Counters
7.
Every time a leading edge is produced at the CDW input the counter decreases its
count by one count.
PLC RESOURCES
7.6.1
If CEN = 0 is selected the counter ignores both up-count (CUP) and down-count
(CDW) inputs, it being necessary to assign CEN = 1 for the counter to take notice
of these inputs.
CNC 8035
(SOFT M: V11.1X)
(SOFT T: V12.1X)
223
Installation manual
Counters
PLC RESOURCES
7.
CNC 8035
(SOFT M: V11.1X)
(SOFT T: V12.1X)
224
PLC PROGRAMMING
8
The PLC program is structured by modules and it may consist of:
• Main module (PRG).
• Periodic execution module (PE).
• First cycle module (CY1).
Every time the PLC program starts running, the CNC will execute first, if it has been
defined, the First Cycle module (CY1). Then it will execute the Main Program module
(PRG) continuously until the PLC program is stopped.
The periodic execution modules (PE) will be executed every so often with the
frequency established for each of them. This time period starts counting from the time
the CY1 cycle is ended. The execution of a periodic module temporarily interrupts
the execution of the main module.
When defining the PLC program, both the processing of the main module (PRG) and
the periodic modules (PE) must be taken into consideration.
The main module (PRG) will be processed cyclically. See "6.2 PLC program
execution" on page 197.
The periodic module is optional and it is executed every so often as indicated by the
directing instruction defining the module.
It is used to process certain critical inputs and outputs which cannot be properly
evaluated within the main module because the cycle scan time for the main module
would be too long for these resources to be checked and reacted upon.
It does not modify the status of the PLC resources. Therefore, the main module will
resume execution as if the periodic module had not been executed at all.
CNC 8035
The periodic module is processed as follows:
1. The PLC takes into account the current values, as just before executing the PE
module, of the local physical inputs (connectors of the central unit).
2. Executes the periodic module.
3. It assigns the current values of the PLC’s ”O” resources to the local physical
outputs (connectors of the central unit).
(SOFT M: V11.1X)
(SOFT T: V12.1X)
4. It ends the execution of the Periodic Module and resumes the execution of the
main module.
225
Installation manual
8.1
Module structure
The modules which make up the PLC program (main module "PRG", periodic
modules "PE" and first cycle module "CY1") consist of a series of instructions which,
depending on their functionality, can be divided into:
• Directing instructions.
• Executable instructions.
8.
Module structure
PLC PROGRAMMING
The directing instructions provide the PLC with information on the type of module
(PRG, CY1, ...) and on how it must be executed (REA, IMA, ...).
Executable instructions allow inquiries to be made on and/or alterations to the status
of PLC resources and consist of:
Logic expressions (Boolean 0/1)
I28 AND I30
Action instructions.
= O25
Logic expressions consist of:
Consulting instructions
I28, O25
Operators.
AND
All comments must begin with ";". ";". Lines beginning with a ";" are considered
comments and are not executed.
Programming example:
PRG
; Directing instruction
; Example
Comment.
I100 = M102
; Executable proposition.
I28 AND I30
; Logic expression.
= O25
; Action instruction.
I32 \
; Consulting instruction (1st part of the expression)
AND I36
; Consulting instruction (1st part of the expression).
= M300
; Action instruction.
END
; Directing instruction.
See "Summary of PLC commands" on page 361.
Empty lines are not allowed, they must contain at least one comment.
CNC 8035
(SOFT M: V11.1X)
(SOFT T: V12.1X)
226
Installation manual
8.2
Directing instructions
These provide the PLC with information on the type of module and the way it must
be executed.
The directing instructions available at the PLC are:
Define the module type.
Main module.
CY1
First cycle module.
PE
Periodic module. It is executed every "t" milliseconds.
For example: PE 100 is executed every 100 ms.
END
Indicates the end of the module. If this is not defined, the PLC understands that this
module ends in the last block of the program.
Example of programming using the directing instruction END:
CY1
Beginning of module CY1.
8.
Directing instructions
PRG
PLC PROGRAMMING
PRG, PEt, CY1
——END
End of module CY1.
PRG
Beginning of module PRG.
——END
End of module PRG.
PE 100
Beginning of module PE.
——END
End of module PE.
Example of programming without using the directing instruction END:
CY1
Beginning of module CY1.
——PRG
Beginning of module PRG.
——PE 100
Beginning of module PE.
————
L
End of modules CY1, PRG and PE.
Label. Used to identify a program line, and is only used when references or program
jumps are made.
It will be represented with the letter L followed by three figures (1-256), it not being
necessary to follow any order and numbers out of sequence are permitted.
If there are 2 or more labels with the same number in a single program, the PLC will
show the corresponding error when compiling it.
DEF
Symbol definition. Allows a symbol to be associated with any PLC variable, it being
possible to reference this variable throughout the program by means of the variable
name or by means of the associated symbol.
CNC 8035
Example:
DEF EMERG I1
Assigns the EMERG symbol to input 11, so any reference throughout the program
to EMERG will be interpreted by the PLC as a reference to I1.
(SOFT M: V11.1X)
(SOFT T: V12.1X)
It is also possible to associate a symbol to any number which can be given in decimal,
with or without a sign, or hexadecimal format preceded with the “$” sign.
227
Installation manual
This option, among other applications, makes programming and later understanding
of the PLC program much easier when trying to control the CNC by simulating its
keyboard from the PLC program.
Example:
DEF HELP $FFF2
Assigns the “HELP” symbol to the code for the HELP key.
() = MOV HELP R101
Assigns the code corresponding to the “HELP” key to register R101.
8.
Indicates to the CNC that the key whose code is stored in register R101 and
corresponds to the HELP key.
Directing instructions
PLC PROGRAMMING
CNCWR (R101, KEY, M101)
The PLC allows up to 400 symbol definitions which must always be programmed at
the beginning of the program, before any other instruction, be this directing or
executing.
A symbol will be made up with up to 8 characters, and must not coincide with any
of the words reserved for instructions, nor be formed by the characters space” “, equal
“=”, open and close parentheses “( )”, comma "," and semicolon “;”.
Duplicate symbols cannot be defined; but several symbols may be assigned to the
same resource.
Example:
DEF EMRGOUT O1
DEF SALEMRG O1
The symbols associated to specialized marks and register (M> 2047 y R > =500) are
pre-defined in the PLC and, therefore, it is not necessary to define them, nevertheless
and if required, the PLC allows a different symbol to be assigned to them.
REA, IMA
Indicate to the PLC that the consultations defined below will be made on the real
(REA) or image (IMA) values of I, O, M resources.
Counters, timers and registers do not have image values, so their real values will
always be evaluated.
Action instructions (=O32) will always update the real values of PLC resources.
Example:
IMA
Consultations will evaluate image values.
I1 AND I2 = 01
--------REA
Consultations will evaluate real values.
IMA I3 AND REA M4 = 02
Evaluates the image of I3 and the real of M4.
IMA I5 REA = O3
CNC 8035
(SOFT M: V11.1X)
(SOFT T: V12.1X)
228
Evaluates the image of I5 and the next ones in real.
Installation manual
IRD
Updates the real values of the local inputs after reading the relevant physical inputs.
Care must be taken when using this instruction since the current real values of the
inputs will be lost.
MRD
Updates the values of resources M5000/5957 and R500/559 with the values of the
logic outputs of the CNC.
Care must be taken when using this instruction since the current values of those
resources will be lost. After executing this instruction, the new values will match those
of the logic outputs of the CNC (internal variables).
MWR
Updates the logic inputs of the CNC (internal variables) with the current real values
of resources M5000/5957 and R500/559.
TRACE
This instruction is used when working with the Logic Analyzer in order to capture data
during the execution of the PLC cycle.
8.
Directing instructions
They update the local physical outputs with the current real values of the
corresponding O resources.
PLC PROGRAMMING
OWR
It must be born in mind that the logic analyzer performs a data capture at the beginning
of each cycle (PRG and PE) after reading the physical inputs and updating the marks
corresponding to the CNC logic outputs and just before starting the program
execution.
Use this instruction to carry out another data capture while executing the PLC cycle.
Example of how to use the "TRACE" instruction:
PRG
----------TRACE
Data capture.
----------TRACE
Data capture.
----------TRACE
Data capture.
----------END
PE 5
----------TRACE
Data capture.
----------END
The data capture in the execution of the trace in this program takes place:
• At the beginning of each PRG cycle.
• Every time the periodic cycle is executed (every 5 milliseconds).
• 3 times while executing the PRG module.
• Once while executing the PE module.
This way, by means of the "TRACE" instruction the data capture can be done any time,
especially at those program points considered more critical.
CNC 8035
This instruction must only be used when debugging the PLC program and it should
be avoided once the PLC program is fully debugged.
(SOFT M: V11.1X)
(SOFT T: V12.1X)
229
Installation manual
8.3
Consulting instructions
They may be used to check the status of PLC resources as well as the marks and
registers for CNC-PLC communication. They are divided into:
• Simple consulting Instructions.
• Flank detection consulting Instructions.
• Comparison consulting Instructions.
8.
Consulting instructions
PLC PROGRAMMING
All the consulting instructions allow the previous operand NOT, which reverses the
result of the preceding consultation.
Example:
NOT I1
This Consultation will return a "0" if input I1 is at 1; and a "1" when
input I1 is at 0.
Simple
They test the status of the resources and they return their logic state.
I
1/512
Inputs
O
1/512
Outputs
M
1/5957
Marks
T
1/256
Timers
C
1/256
Counters
B
0/31 R 1/499
Register Bits
Example:
I12
It will return a 1 if input 12 is active and a 0 if otherwise.
Flank detection
They check whether the state of a resource has changed since the last time this
consultation was made.
This consultation may be made on real or image values. There are two types of
instructions:
DFU
It detects an up-flank (0-to-1 change) at the indicated resource. It returns a "1" if it
happened.
DFD
It detects an down-flank (0-to-1 change) at the indicated resource. It returns a "1" if
it happened.
The programming format of the different combinations is:
CNC 8035
(SOFT M: V11.1X)
(SOFT T: V12.1X)
DFU (Up flank detection.)
I 1/512
DFD (Down flank detection)
O 1/512
M 1/5957
The consulting instructions to detect the flanks of marks M4000 thru M4127, M4500
thru M4563, M4700 thru M4955 and M5000 thru M5957 will be executed with their
real values even when working with image values since these marks have no image
values.
Considering that these instructions can evaluate real and image values, the following
points must be taken into account:
The PLC updates the real values of the inputs at the beginning of the cycle, taking
the values of the physical inputs.
230
Installation manual
The image values of the inputs, outputs and marks are updated after executing the
program cycle.
Examples:
DFU I23
DFU B3R120
DFU AUXEND
Comparison
CPS
8.
I3 ima = I3 image
Consulting instructions
I3 rea = I3 real
PLC PROGRAMMING
I3 phy = I3 physical
Used to compare two operands, checking whether the first one is greater than (GT),
greater than or equal to (GE), equal to (EQ), not equal to (NE), smaller than or equal
to (LE) or less than (LT) the second one.
The following may be used as operands: Timers (internal count), Counters (internal
count), Registers, CNC-PLC communication registers and numbers (#) within
±2147483647 or between 0 and $FFFFFFFF.
The programming format of the different combinations is:
CPS
T 1/256
GT
T 1/256
C 1/256
GE
C 1/256
R 1/559
EQ
R 1/559
#
NE
#
LE
LT
If the required condition is met, the consulting instruction returns a logic value "1" and
a "0" if otherwise.
Programming examples:
CPS C12 GT R14 = M100
If the internal count of counter "C12" is GREATER than the value of register
R14, the PLC will assign the value of "1" to mark M100 and a "0" if otherwise.
CPS T2 EQ 100 = TG1 5 2000
When the time elapsed on the counter T2 is EQUAL to the value of 100, timer
T5 will be activated working as a monostable and with a time constant of 2
seconds.
CNC 8035
(SOFT M: V11.1X)
(SOFT T: V12.1X)
231
Installation manual
8.4
Operators and symbols
Used to group and operate with different consulting instructions.
The available operators are:
NOT
AND
The available symbols are:
(
)
OR
XOR
The operators are associated from left to right and the priorities ordered from the
highest to the lowest are:
8.
PLC PROGRAMMING
Operators and symbols
NOT
AND
XOR
OR
With the "(" and ")" symbols, it is possible to clarify and select the order in which the
logic expression is evaluated.
Example: (I2 OR I3) AND (I4 OR (NOT I5 AND I6)) = O7
NOT
Reverses the result of the consultation.
NOT I2 = O3
Output "O3" will be active when input I2 is not.
AND
Logic function "AND".
I4 AND I5 = O6
Output "O6" will be active when both inputs (I4, I5) are active.
OR
Logic function "OR”.
I7 OR I8 = O9
Output "O9" will be active when either one (or both) inputs are active.
XOR
Logic "Exclusive OR" function.
I10 XOR I11 = O12
Output "O12" will be active when both inputs I10 and I11 have different logic
states.
(
)
Open and close parenthesis.
They help clarify and select the order the logic expression is evaluated.
Example: (I2 OR I3) AND (I4 OR (NOT I5 AND I6)) = O7
A consulting instruction consisting of only these two operators always has a value
of "1". In other words:
( ) = O2
Output O2 will always be high (=1).
CNC 8035
(SOFT M: V11.1X)
(SOFT T: V12.1X)
232
Installation manual
Action instruction.
The action instructions, depending on the result obtained in the logic expression may
be used to alter the status of the PLC resources and CNC-PLC communication
marks.
Logic expression = Action instruction
There may be several action instructions associated with a single logic expression.
All the action instructions must be preceded by the “=” sign.
Example:
I2 = O3 = NOT M100 = NOT TG1 2 100 = CPR 1 100
• Output O3 will show the status of input I2.
• Mark M100 will show the negated state of input I2.
• A down-flank at input I2 will activate the trigger input TG1 of timer T2.
• An up-flank at I2 will preset counter C1 with a value of 100.
8.
Action instruction.
All Action Instructions allow a previous NOT, which reverses the result of the
expression for that action.
PLC PROGRAMMING
8.5
Action instructions are divided into:
• Assignment Binary Action Instructions.
• Conditioned binary actions instructions.
• Sequence breaking action instructions.
• Arithmetic action instructions.
• Logic action instructions.
• Specific action instructions.
Action instructions can alter the status of all the PLC resources except that of the
physical inputs being used.
When seeing the field "I 1/1024", one must understand that only the status of the
unused inputs may be changed.
For example, if physical inputs I1 through I32 are used, only inputs I33 through I1024
may be changed.
CNC 8035
(SOFT M: V11.1X)
(SOFT T: V12.1X)
233
Installation manual
8.5.1
Binary assignment instructions
They assign the value obtained from evaluating the logic expression (0/1) to the
indicated resource.
Action instruction.
PLC PROGRAMMING
8.
=I
1/512
Inputs
=O
1/512
Outputs
=M
1/5957
Marks
= TEN
1/256
Timer enable
= TRS
1/256
Timer reset
= TGn
1/256 n/R
Timer trigger input
= CUP
1/256
Counter count up
= CDW
1/256
Counter count down
= CEN
1/256
Counter enable
= CPR
1/256 n/R
Counter preset
=B
0/31 R 1/499
Register Bits
I3 = TG1 4 100
Assigns the status of input I3 to the trigger input TG1 of timer T4. Thus, an upflank at I3 will trigger the TG1 input of timer T4.
(I2 OR I3) AND (I4 OR (NOT I5 AND I6)) = M111
It assigns to Mark M111 the value obtained in the evaluation of the Logic
Expression (I2 OR I3) AND (I4 OR (NOT I5 AND I6)) .
CNC 8035
(SOFT M: V11.1X)
(SOFT T: V12.1X)
234
Installation manual
8.5.2
Conditional binary action instructions
There are 3 instructions: SET, RES and CPL, that are used to change the status of
the indicated resource.
Their programming format is:
= RES
O 1/512
= CPL
M 1/5957
B 0/31 R 1/559
If expression “1”, it assigns a “1” to the resource.
If the result of evaluating the logic expression is a “1”, it assigns a “1” to the indicated
resource. If the result is "0", it does not change the resource.
Example: CPS T2 EQ 100 = SET B0R100
When the timing of timer T2 reaches 100 milliseconds, it sets bit 0 of register R100
to "1".
= RES
8.
Action instruction.
I 1/512
PLC PROGRAMMING
= SET
= SET
If expression “1”, it assigns a “0” to the resource.
If the result of evaluating the logic expression is a “1”, it assigns a “0” to the indicated
resource. If the result is "0", it does not change the resource.
Example: I12 OR NOT I22 = RES M55 = NOT RES M65
When the result of the logic expression is a "1", the PLC sets "M55 = 0”; but does
not change M65.
When the result of the logic expression is a “0”, the PLC sets “M65=0” and does
not change M55.
= CPL
If expression = 1, it complements the resource.
If the result of evaluating the logic expression is a “1”, it complements the status of
the indicated resource. If the result is "0", it does not change the resource.
Example: DFU I8 OR DFD M22 = CPL B12R35
Every time an Up Flank (leading edge) is detected at input I8 or a down flank
(trailing edge) in mark M22 the PLC will complement the status of bit 12 of register
R35.
CNC 8035
(SOFT M: V11.1X)
(SOFT T: V12.1X)
235
Installation manual
8.5.3
Sequence breaking action instructions
These actions interrupt the sequence of a program, resuming it somewhere else in
the program.
That area must be identified with a label (L 1/256).
A subroutine is any part of the program that starts with a label (L1/256) and end with
the directing instruction END.
8.
Unconditional Jump.
If the result of evaluating the logic expression is a “1”, it causes jump to the indicated
label. If the result is a "0", it goes on to the next program line.
Action instruction.
PLC PROGRAMMING
= JMP
Example:
I8 = JMP L12
If I8 = 1 it goes on to L12
M14 AND B7R120 = O8
If I8=1 it is not executed
CPS T2 EQ 2000 = O12
If I8=1 it is not executed
L12
(I12 AND I23) OR M54 = O6
= CAL
Call to a subroutine.
If the result obtained in the evaluation of the logic expression is a “1” this action will
execute the indicated subroutine.
Once the subroutine execution is over, the PLC will continue at the action instruction
or executable instruction programmed after CAL.
If the result obtained in the evaluation of the logic expression is a “0” this action will
be ignored by the PLC without executing the subroutine.
Example: I2 = CAL L5 = O2
With I2=1, subroutine L5 will be executed and once executed, the PLC will set O2
to the value of input I2 (=1).
If I2=0, the subroutine is not executed and the PLC sets output O2 to the status of
input I2 (=0).
= RET
Return or end of subroutine.
If the result obtained in the evaluation of the logic expression is a “1” this action will
be treated by the PLC as if it involved the directing instruction END. If the result is
a "0", the PLC will ignore it.
If while executing a subroutine, the PLC detects a validated RET, it will conclude the
subroutine.
If END is not programmed as end of subroutine, the PLC will continue executing until
the end of the module (END) or the end of the program and it will finish the execution
of the subroutine at that point.
CNC 8035
(SOFT M: V11.1X)
(SOFT T: V12.1X)
236
It is advisable to place the subroutines after the END of the main program since if
these are placed at the beginning, the PLC will start to execute them and will interpret
the END of the subroutine as the END of the module, and it will consider that this has
finished because no call was made to the subroutine.
Installation manual
It is used to move data from one PLC resource to another.
The programming format is:
Origin
MOV
Destination
I 1/512
O 1/512
M 1/5957
T 1/256
C 1/256
R 1/559
#
I 1/512
O 1/512
M 1/5957
R 1/559
Source
code
(Bin)
1(BCD)
Destination
code
0(Bin)
1(BCD)
Number of
bits to
transmit
8.
32
28
24
20
16
12
8
4
The source and destination codes indicate the original and destination format (binary
or BCD) of the data. 4, 8, 12, 16, 20, 24, 28 or 32 bits may be transmitted.
Action instruction.
= MOV
Arithmetic action instructions
PLC PROGRAMMING
8.5.4
If the codes and number of bits to be moved are not indicated, 32 binary bits will be
moved bit to bit (0032).
MOV
I12
M100
0032
from Binary to Binary in 32 bits
MOV
O21
R100
0012
from Binary to Binary in 12 bits
MOV
C22
O23
0108
from Binary to BCD in 8 bits
MOV
T10
M112
1020
from BCD to Binary in 20 bits
If the number to be converted from binary to BCD is larger than the maximum BCD,
its value will be truncated ignoring the most significant bits.
The maximum BCD value that can be converted is:
9
with 4 bits
99
with 8 bits
999
with
bits
12
9999
with
bits
16
9999999
with
bits
28
99999
with
bits
20
99999999
with
bits
32
In these cases, it is recommended to make the move increasing the number of bits
by using, if necessary, registers or marks in intermediate steps.
Example: I11 = MOV I14 O16 108
If input I11 is "=1", the PLC moves the logic states of the 8 inputs (I14 plus the next
7) in BCD code to the 8 outputs (O16 and the next 7) in binary code.
CNC 8035
(SOFT M: V11.1X)
(SOFT T: V12.1X)
237
Installation manual
= NGU
Complements the bits of a register.
It changes the state of each one of the 32 bits of a register.
Example: I15 = NGU R152
If input "I15 is =1", the PLC changes the state of the 32 bits of register R152.
8.
Action instruction.
PLC PROGRAMMING
= NGS
R152 before
0001 0001 0001 0001 0001 0001 0001 0001
R152 after
1110 1110 1110 1110 1110 1110 1110 1110
Register sign change.
Example: I16 = NGS R89
If input "I16 = 1”, the PLC changes the sign of the contents of register R89.
= ADS
= SBS
= MLS
= DVS
= MDS
R89 before
0001 0001 0001 0001 0001 0001 0001 0001
R89 after
1110 1110 1110 1110 1110 1110 1110 1111
They may be used to carry out arithmetic operations such as addition (ADS),
subtraction (SBS), multiplication (MLS), division (DVS) and module or remainder of
a division (MDS).
Its programming format is:
ADS
SBS
MLS
DVS
MDS
R1/559
#
R1/559
#
R1/559
The operands may be: Registers, CNC-PLC communication registers and numbers
(#) within ±2147483647 or between 0 and $FFFFFFFF
The result of the operation may be stored in a register or in CNC-PLC communication
register
Examples with R100=1234 and R101=100
CNC 8035
() = ADS
R100
R101
R102
R102 = 1234 + 100 = 1334
() = SBS
R100
R101
R103
R103 = 1234 -100 = 1134
() = MLS
R100
R101
R104
R104 = 1234 x 100 = 123400
() = DVS
R100
R101
R105
R105 = 1234 : 100 = 12
() = MDS
R100
R101
R106
R106 = 1234 MOD 100 = 34
() = ADS
1563
R101
R112
R112 = 1563 + 100 = 1663
() = SBS
R100
1010
R113
R113 = 1234 -1010 = 224
() = MLS
1563
100
R114
R114 = 1563 x 100 = 156300
() = DVS
R100
1000
R115
R115 = 1234 : 1000 = 1
() = MDS
8765
1000
R116
R116 = 8765 MOD 1000= 765
If a division by “0” is performed in the DVS operation, the CNC stops the
execution of the PLC program and it displays the corresponding error
message.
(SOFT M: V11.1X)
(SOFT T: V12.1X)
238
Installation manual
To perform logic operations: AND, OR and XOR between register contents or
between a register content and a number. The result is always stored in a register.
Its programming format is:
AND
OR
XOR
R1/559
#
R1/559
#
R1/559
Registers (R1/559) or numbers expressed in decimal, hexadecimal or binary format
can be defined as first or second operand.
The destination register indicates where the result of the operation will be deposited
and will be defined by means of a register (R1/559).
The mark M2003 is called zero flag and indicates whether the result of an AND, OR,
XOR, operation equals zero, in which case it follows that M2003=1.
Examples with
R200 = B1001 0010
8.
Action instruction.
= AND
= OR
= XOR
Logic action instructions
PLC PROGRAMMING
8.5.5
R201 = B0100 0101
= RR
= RL
()=AND
R200
R201
R202
R202=B0
M2003=1
()=OR
R200
R201
R203
R203=B11010111
M2003=0
()=XOR
R200
R201
R204
R204=B11010111
M2003=0
()=AND
B1111 R201
R205
R205=B00000101
M2003=0
()=OR
R200
B1111 R206
R206=B10011111
M2003=0
()=XOR
B1010 B1110 R207
R207=B00000100
M2003=0
Used to rotate registers clockwise (RR) or counterclockwise (RL). There are two
types of rotations: type 1 (RR1 or RL1) and type 2 (RR2 or RL2).
Rotation type 1 (RL1 or RR1):
It inserts a "0" at the least significant bit (RL1) or at the most significant bit (RR1),
pushing the other bits of the register. The value of the last bit disappears.
Rotation type 2 (RL2 or RR2):
Circular rotation of the register in the indicated direction.
CNC 8035
Its programming format is:
RR1
RR2
RL1
RL2
Origin
Nr of repetitions
Destination
R1/559
R1/559
0/31
R1/559
(SOFT M: V11.1X)
(SOFT T: V12.1X)
239
Installation manual
The origin and destination registers must always be defined, even when they are both
the same. The number of repetitions indicates the consecutive number of times the
register will be rotated.
Examples:
RR1 R100 1 R200
1 type 1 rotation to the right of the contents of R100 leaving the result in R200.
RL2 R102 4 R101
4 type-2 rotations to the left of the contents of R102 leaving the result in R101.
8.
Action instruction.
PLC PROGRAMMING
() = RL2 R17 4 R20
CNC 8035
(SOFT M: V11.1X)
(SOFT T: V12.1X)
240
R17 =
0011 0000 1100 1100 0100 0110 1101 0100
R20 =
0000 1100 1100 0100 0110 1101 0100 0011
Installation manual
8.5.6
Specific action instructions
= ERA
Used to delete a group of resources. Indicate the first and last resource to be erased.
Its programming format is:
1/512
1/512
O
1/512
1/512
M
1/5957
1/5957
T
1/256
1/256
C
1/256
1/256
R
1/559
1/559
The marks can be M1/2047, M4000/4127, M4500/4563, M4700/4955 or M5000/
5957 and registers R1/559
When deleting a group of I, O, M or R, the PLC sets them to “0”.
If a group of timers is erased this is the equivalent of Resetting them and if a group
of counters is erased this is similar to making a preset with a value 0 for them.
8.
Action instruction.
I
PLC PROGRAMMING
ERA
This action is especially handy when executed in the first cycle module (CY1) in order
to set the desired resources to their initial work conditions (states).
Examples:
I12 = ERA O5 12
If input I12 has a value of “1” the PLC will set to 0 outputs O5 thru O12.
I23 = ERA C15 18
If input "I23 =1”, the PLC presets counters C15 through C18 (both included)
to "0".
= CNCRD
= CNCWR
Access to the internal CNC variables.
Used to read (CNCRD) and write (CNCWR) the internal CNC variables. Their
programming format is:
CNCRD (Variable, Register, Mark)
CNCWR (Register, Variable, Mark)
The CNCRD action loads the contents of the variable into the register and the
CNCWR action reads the contents of the register into the variable.
The internal CNC variables are described in the chapter on "CNC-PLC
communication".
The mark is set to "1" at the beginning of the operation and it keeps its value until
the end of the operation.
When requesting information on a nonexistent variable (for example the position of
an nonexistent axis), it will show the relevant error message.
Examples:
CNCRD (FEED, R150, M200)
Loads into register R150 the feedrate value selected at the CNC by means
of function G94.
CNC 8035
CNCWR (R92, TIMER, M200)
It resets the clock enabled by the PLC with the value contained in register R92.
(SOFT M: V11.1X)
(SOFT T: V12.1X)
241
Installation manual
= PAR
It analyzes the type of parity of a register.
Its programming format is:
PAR
R1/559
M1/5957
If the register being checked has an EVEN parity, this instruction will set the indicated
mark to “1” and if its parity is ODD, it will set it to “0”.
Example:
8.
Action instruction.
PLC PROGRAMMING
I15 = PAR R123 M222
CNC 8035
(SOFT M: V11.1X)
(SOFT T: V12.1X)
242
If I15 = 1 the PLC checks the parity of register R123 and sets M222 = 1 if it
is EVEN or M222 = 0 if it is ODD.
CNC-PLC COMMUNICATION
9
The exchange of information between the CNC and the PLC allows:
• The control of logic inputs and outputs from the CNC by means of an exchange
of information between both systems, which is done periodically and by means
of specific PLC Marks and Registers.
• The transfer from the CNC to the PLC of M, S and T auxiliary functions.
• Display screens which have been defined previously by the user, as well as
generating messages and errors in the CNC, by means of specific PLC Marks.
• Reading and writing internal CNC variables from the PLC.
• Access to all PLC variables from any part program.
• Monitoring on the CNC screen of PLC variables.
• Access to all PLC variables from a computer, via DNC through the RS 232 C serial
line.
CNC 8035
(SOFT M: V11.1X)
(SOFT T: V12.1X)
243
Installation manual
9.1
Auxiliary M, S, T functions
CNC-PLC COMMUNICATION
9.
Auxiliary M, S, T functions
MBCD1 (R550)
MBCD2 (R551)
MBCD3 (R552)
MBCD4 (R553)
MBCD5 (R554)
MBCD6 (R555)
MBCD7 (R556)
MBCDP1 (R565)
MBCD2 (R566)
MBCD3 (R567)
MBCD4 (R568)
MBCDP5 (R569)
MBCD6 (R570)
MBCD7 (R571)
MBCD* resgisters correspond to the main channel whereas MBCDP registers are
for the PLC channel.
The CNC tells the PLC by means of these 32 bit registers, the miscellaneous M
functions programmed in the block being executed.
If there are less than 7 miscellaneous M functions in each block, the CNC will send
the information in the lower-numbered registers, assigning the value $FFFFFFFF to
those which are left free.
This way, if a block contains functions M100, M120 and M135, the CNC will transfer
the following information:
MBCD1 (R550)
= $100
MBCD2 (R551)
= $120
MBCD3 (R552)
= $135
MBCD4 (R553)
= $FFFFFFFF.
MBCD5 (R554)
= $FFFFFFFF.
MBCD6 (R555)
= $FFFFFFFF.
MBCD7 (R556)
= $FFFFFFFF.
Use one of the following methods to determine whether or not a specific “M” function
has been programmed in a block which is being executed:
1. Check all MBCD registers one by one until the specific “M” function is found or
until one of them contains the $FFFFFFFF value.
2. Use the “MBCD*” format which permits checking all MBCD registers at the same
time.
Example:
CPS MBCD* EQ $30 = ...
It returns a “1” if it detects an M30, and a “0” if otherwise.
The miscellaneous M functions can be executed at the beginning or end of the block,
according to how these are set in the miscellaneous M function table.
Besides, this table will indicate whether the CNC must wait, or not, for the general
logic input AUXEND to consider the execution of the corresponding M as having been
completed
SBCD (R557)
This register will be used when using a spindle operating with BCD coded S signal.
s.m.p. SPDLTYPE (P0).
The auxiliary S function will always be executed at the beginning of the block and the
CNC will wait for the general logic input AUXEND to be activated to consider the
execution completed.
CNC 8035
(SOFT M: V11.1X)
(SOFT T: V12.1X)
244
Installation manual
If S output in 2-digit BCD is used the CNC will tell the PLC, by means of this register
the selected spindle speed according to the following conversion table:
Programmed
S
S
BCD
Programmed
S
S
BCD
0
00
50-55
54
800-899
78
1
20
56-62
55
900-999
79
2
26
63-70
56
1000-1119
80
3
29
71-79
57
1120-1249
81
4
32
80-89
58
1250-1399
82
5
34
90-99
59
1400-1599
83
6
35
100-111
60
1600-1799
84
7
36
112-124
61
1800-1999
85
8
38
125-139
62
2000-2239
86
9
39
140-159
63
2240-2499
87
10-11
40
160-179
64
2500-2799
88
12
41
180-199
65
2800-3149
89
13
42
200-223
66
3150-3549
90
14-15
43
224-249
67
3550-3999
91
16-17
44
250-279
68
4000-4499
92
18-19
45
280-314
69
4500-4999
93
20-22
46
315-354
70
5000-5599
94
23-24
47
355-399
71
5600-6299
95
25-27
48
400-449
72
6300-7099
96
28-31
49
450-499
73
7100-7999
97
32-35
50
500-559
74
8000-8999
98
36-39
51
560-629
75
9000-9999
99
40-44
52
630-709
76
45-49
53
710-799
77
9.
Auxiliary M, S, T functions
S
BCD
CNC-PLC COMMUNICATION
Programmed
S
If a value over 9999 is programmed the CNC will tell the PLC the spindle speed
corresponding to value 9999.
If S output in 8-digit BCD is used the CNC will indicate the programmed spindle speed
to the PLC by means of this register.
This value will be coded in BCD format (8 digits) in thousandths of a revolution
per minute.
S 12345.678 =
0001 0010 0011 0100 0101 0110 0111 1000
If no S has been programmed in the block, the CNC will assign a value of
$FFFFFFFF to this register.
CNC 8035
(SOFT M: V11.1X)
(SOFT T: V12.1X)
245
Installation manual
TBCD (R558)
The CNC tells the PLC by means of this 32-bit register, the pocket number in the
magazine where the selected tool is.
If the g.m.p. RANDOMTC (P25) has been set so it is not a random magazine, the
magazine pocket position coincides with the tool number.
This will be coded in BCD format (8 digits).
T 123 =
9.
0000 0000 0000 0000 0000 0001 0010 0011
Auxiliary M, S, T functions
CNC-PLC COMMUNICATION
If no T has been programmed in the block, the CNC will assign a value of $FFFFFFFF
to this register.
The T function will always be executed at the beginning of the block and the CNC will
wait for the general logic input AUXEND to be activated to consider the execution
completed.
T2BCD (R559)
This register is used when a special tool change has been made (family code >=200)
or with machining centers with a non-random tool magazine (general machine
parameter RANDOMTC (P25).
The CNC tells the PLC by means of the 32 bit register, the position of the magazine
(empty pocket) in which the tool which was on the spindle must be deposited.
This will be coded in BCD code (8 digits). If a second T function is not required the
CNC will assign a value $FFFFFFFF to the register.
The second T function will be sent together with M06 and the CNC will wait for the
general logic input AUXEND to the activated to consider the execution completed.
CNC 8035
(SOFT M: V11.1X)
(SOFT T: V12.1X)
246
Installation manual
Auxiliary M, S, T function transfer
Every time a block is executed in the CNC, information is passed to the PLC about
the M, S, and T functions which are active.
M function:
9.
To do this, it uses variables “MBCD1” to “MBCD7” (R550 to R556) and activates the
general logic output “MSTROBE” to indicate to the PLC that it must execute them.
Depending on how these functions are defined on the table, the CNC must wait, or
not, for the general input “AUXEND” to be activated to consider the execution
completed.
S function:
If an S function has been programmed and the spindle has BCD input, the CNC will
send this value to the variable “SBCD” (R557) and will activate the general logic output
“SSTROBE” to indicate to the PLC that it must be executed.
CNC-PLC COMMUNICATION
The CNC analyzes the M functions programmed in the block and in accordance with
how these are defined, will send these to the PLC before and/or after the movement.
Auxiliary M, S, T function transfer
9.2
This transmission is made at the beginning of the block execution and the CNC will
wait for the general input “AUXEND” to be activated to consider the execution
completed.
T function:
The CNC will indicate via the variable “TBCD” (R558) the T function which has been
programmed in the block and activates the general logic output “TSTROBE” to tell
the PLC that it must execute it.
This transmission is made at the beginning of the block execution and the CNC will
wait for the general input “AUXEND” to be activated to consider the execution
completed.
Second T function:
If this involves changing a special tool or a machining center with non-random tool
magazine, the CNC will indicate, on executing the M06 function, the position of the
magazine (empty pocket) in which the tool which was on the spindle must be
deposited.
This indication will be made by means of the variable “T2BCD” (R559) and by
activating the general logic output “T2STROBE” to tell the PLC that it must execute
it. The CNC will wait for the general input AUXEND to be activated to consider the
execution completed.
CNC 8035
It must be borne in mind that at the beginning of the execution of the block,
the CNC can tell the PLC the execution of the M, S, T and T2 functions by
activating their STROBE signals together and waiting for a single “AUXEND”
signal for all of them.
(SOFT M: V11.1X)
(SOFT T: V12.1X)
247
Installation manual
9.2.1
Transferring M, S, T using the AUXEND signal
1. Once the block has been analyzed and after sending the corresponding values
in the variables “MBCD1-7”, “SBCD”, “TBCD” and “T2BCD”, the CNC will tell the
PLC by means of the general logic outputs “MSTROBE”, “SSTROBE”,
“TSTROBE” and “T2STROBE” that the required auxiliary functions must be
executed.
CNC-PLC COMMUNICATION
Auxiliary M, S, T function transfer
9.
2. When the PLC detects that one of the STROBE signals is active, it must deactivate
the general logic input “AUXEND” to tell the CNC that the execution of the
corresponding function or functions is starting.
3. The PLC will execute all the auxiliary functions required, it being necessary to
analyze the “MSTROBE”, “SSTROBE”, “TSTROBE”, “T2STROBE” general logic
outputs and the “MBCD1-7”, “SBCD”, “TBCD” and “T2BCD” variables in order to
do this.
Once this has been executed the PLC must activate the general logic input
“AUXEND” to indicate to the CNC that the processing of the required functions
was completed.
4. Once the general “AUXEND” input is activated, the CNC will require that this
signal be kept active for a time period greater than the value given to the g.m.p.
“MINAENDW” (P30).
This way, erroneous interpretations of this signal by the CNC due to an improper
PLC program logic are avoided .
5. Once the period of time MINAENDW has elapsed with the general input
“AUXEND” at a high logic level, the CNC will deactivate the general logic outputs
“MSTROBE”, “SSTROBE”, “TSTROBE”, “T2STROBE” to tell the PLC that the
execution of the required auxiliary function or functions has been completed.
When the block being executed has several auxiliary functions (M, S, T), the
CNC waits a time period set by g.m.p. MINAENDW (P30) between two
consecutive transfers.
CNC 8035
(SOFT M: V11.1X)
(SOFT T: V12.1X)
248
Installation manual
Transferring the auxiliary (miscellaneous) M functions without the
AUXEND signal
1. Once the block has been analyzed and after passing the corresponding values
in variables “MBCD1-7”, the CNC will tell the PLC through the general logic output
“MSTROBE” that the required auxiliary function or functions must be executed.
2. The CNC will keep the general logic output “MSTROBE” active during the time
indicated by means of g.m.p. MINAENDW (P30).
Once this period of time has elapsed the CNC will continue to execute the
program.
It is advisable for the “MINAENDW” value to be equal to or greater than the
duration of a PLC cycle, in order to ensure the detection of this signal by the PLC.
CNC-PLC COMMUNICATION
9.
Auxiliary M, S, T function transfer
9.2.2
3. When the PLC detects the activation of the general logic signal “MSTROBE” it
will execute the required miscellaneous “M” functions in the “MBCD1-7” variables.
CNC 8035
(SOFT M: V11.1X)
(SOFT T: V12.1X)
249
Installation manual
9.3
Displaying messages, errors and screens
The PLC has a series of marks that allow messages and errors to be displayed in
the CNC, as well as displaying screens which have been defined previously by the
user.
Displaying messages
CNC-PLC COMMUNICATION
Displaying messages, errors and screens
9.
The PLC has 128 marks, with their corresponding mnemonic for displaying messages
in the CNC.
M4000
MSG001
M4100
MSG101
M4125
MSG126
M4001
MSG002
M4101
MSG102
M4126
MSG127
M4002
MSG003
M4102
MSG103
M4127
MSG128
...
...
...
...
...
...
...
...
If one of these marks is activated (high logic level), the CNC will display the selected
message number and its associated text on the PLC message display window (upper
right-hand part).
The CNC allows a text to be associated to each PLC message (PLC message editing
mode).
If the PLC activates 2 or more messages, the CNC will always display the message
with the highest priority, this being understood as being the message with the lowest
number. In this way, MSG1 will have the highest priority and MSG128 the lowest
priority.
In this same message display window, the CNC can show the character + (plus sign),
which indicates that there are more messages activated by the PLC, and these can
be displayed if the active message page option is accessed in the PLC operating
mode.
A message can be erased by deactivating it from the PLC program (low logic level)
or from the CNC keyboard, after selecting it on the active messages page.
Nevertheless and depending on the program, the PLC may reactivate this message
in the following cycle.
Example:
DFU I10 = MSG1
I10 = MSG2
1. Input I10 changes from 0 to 1.
Messages MSG1 and MSG2 are activated.
2. The user deletes the messages using the keyboard.
3. In the next PLC cycle, since I10 is kept at “1”, MSG2 is activated again.
CNC 8035
(SOFT M: V11.1X)
(SOFT T: V12.1X)
250
Installation manual
Displaying errors
The PLC has 64 marks, with their corresponding mnemonic, for displaying errors at
the CNC.
M4530
ERR031
M4561
ERR062
M4501
ERR002
M4531
ERR032
M4562
ERR063
M4502
ERR003
M4532
ERR033
M4563
ERR064
...
...
...
...
...
...
...
...
When one of these marks is activated (they are set high), they interrupt CNC partprogram execution. It also displays the selected error message and its associated text
in the middle of the screen.
The CNC allows a text to be associated to each PLC error (PLC error editing mode).
It is recommended to change the state of these marks by means of accessible
external inputs since the PLC will not stop and the CNC will receive the error message
in each new PLC cycle scan; thus preventing access to any of the PLC modes.
Displaying screens (pages)
9.
CNC-PLC COMMUNICATION
ERR001
Displaying messages, errors and screens
M4500
The PLC has 256 marks with their corresponding mnemonic, for displaying screens
(pages) at the CNC.
M4700
PIC000
M4900
PIC200
M4953
PIC253
M4701
PIC001
M4901
PIC201
M4954
PIC254
M4702
PIC002
M4902
PIC202
M4955
PIC255
...
...
...
...
...
...
...
...
If one of these marks is activated (high logic level), the CNC will display the character
* (asterisk) on the PLC message display window (upper right-hand part) indicating
that at least one of the 256 screens (pages) defined by the user in the graphic editor
mode is activated.
The selected screens (pages) will be displayed, one by one, if the active page (screen)
option is accessed in the PLC operating mode.
A page can be deactivated from the PLC program (by placing the corresponding mark
at the low logic level) or, from the CNC keyboard, after selecting it in the active page
mode.
CNC 8035
(SOFT M: V11.1X)
(SOFT T: V12.1X)
251
Installation manual
9.4
Access to the PLC from the CNC
The CNC is provided with an operating mode in which it can:
• Monitor the user PLC program.
• Monitor PLC resources.
• Modify PLC resources.
• Execute PLC commands (compile, execute, etc.).
9.
CNC-PLC COMMUNICATION
Access to the PLC from the CNC
• Etc.
CNC 8035
(SOFT M: V11.1X)
(SOFT T: V12.1X)
252
Likewise, the CNC allows access to all PLC variables of any part program and is
provided with several high level language instructions for this purpose, which allow
Inputs, Outputs, Marks, Registers, Timers and Counters to be read or modified.
Installation manual
Access to the PLC from a PC, via DNC.
The CNC allows the PLC to communicate with a computer via DNC through the
RS232C serial line.
In this way a computer can access the PLC carrying out:
• Transfer and reception of the user PLC program.
• Monitoring of the user PLC program.
9.
• Monitoring of PLC resources.
• Execution of PLC commands (compile, execute, etc.).
• Etc.
The DNC manual can be applied for from the Commercial Department of Fagor
Automation.
CNC-PLC COMMUNICATION
• Consultation or modification of PLC resources.
Access to the PLC from a PC, via DNC.
9.5
CNC 8035
(SOFT M: V11.1X)
(SOFT T: V12.1X)
253
Installation manual
CNC-PLC COMMUNICATION
Access to the PLC from a PC, via DNC.
9.
CNC 8035
(SOFT M: V11.1X)
(SOFT T: V12.1X)
254
LOGIC CNC INPUTS AND
OUTPUTS
10
Physical inputs and outputs are the names given to the set of inputs and outputs of
the CNC system which, being controlled by the PLC, communicate with the outside
through CNC connectors.
The CNC also has a series of logic inputs and outputs for the internal exchange of
information with PLC marks and registers. This type of marks do not have images
on the PLC.
Each of these CNC logic inputs and outputs may be referred to with the corresponding
PLC resource or with their associated mnemonic. Mnemonics which begin with “/”
indicate that the signal is active low (0 V). For example:
M5000
/EMERGEN
M5104
MIRROR1
M5016
AUXEND
M5507
/ALARM
All the mnemonics refer to their associated variable, it being necessary to use the
NOT operator to refer to its negation, for example:
NOT M5000
NOT /EMERGEN
NOT M5016
NOT AUXEND
CNC logic inputs and outputs can be grouped in:
• General logic inputs.
• Axis logic inputs.
• Spindle logic inputs.
• Key inhibiting logic inputs.
• Logic inputs of the PLC channel
• General logic outputs.
• Axis logic outputs.
• Spindle logic outputs.
• Logic outputs of key status
• Logic inputs of the PLC channel
CNC 8035
(SOFT M: V11.1X)
(SOFT T: V12.1X)
255
Installation manual
10.1
General logic inputs
These inputs must always be defined in the PLC program.
/EMERGEN (M5000) /STOP (M5001)
/FEEDHOL (M5002) /XFERINH (M5003)
General logic inputs
LOGIC CNC INPUTS AND OUTPUTS
10.
/EMERGEN (M5000)
There are to ways to cause an emergency at the CNC, by activating the physical input
/Emergency stop (pin 10 of connector X2) or the general logic input “/EMERGEN”
from the PLC.
When the PLC sets the "/EMERGEN" input low (0V), the CNC stops the axes and
the spindle and it displays the corresponding error message.
Also, the CNC activates the "/EMERGENCY OUTPUT" and "/ALARM" signals to let
the outside world and the PLC know that an emergency has occurred at the CNC.
The CNC does not allow executing programs and it aborts any attempt to move the
axes or the spindle while the "/EMERGEN" input is low (0V).
When the PLC brings the "/EMERGEN" input back high (24V), the CNC deactivates
the "/EMERGENCY OUTPUT" and "/ALARM" signals to let the outside world and the
PLC know that there is no longer an emergency at the CNC.
Example
I-EMERG AND (rest of conditions) = /EMERGEN
If the external emergency input is activated or any other emergency occurs, the
general logic input /EMERGEN of the CNC. When there is no emergency, this
signal must remain high.
CNC 8035
(SOFT M: V11.1X)
(SOFT T: V12.1X)
256
Installation manual
/STOP (M5001)
When the PLC sets this signal low, the CNC stops the part program, and maintains
spindle rotation.
In order to continue executing the program, as well as setting this signal at a high logic
level, the general logic input CYSTART must be activated.
The treatment which this /STOP signal receives is similar to that given to the STOP
key on the CNC front panel keeping all the keys enabled even when the /STOP signal
is at low logic level (0) .
/FEEDHOL (M5002)
When the PLC sets this signal low, the CNC stops the axes (maintaining spindle
rotation). When the signal returns to the high logic level, the movement of the axes
continues.
If the /FEEDHOL signal is activated (0V) in a block without motion, the CNC will
continue the execution of the program until detecting a block with motion.
Example
LOGIC CNC INPUTS AND OUTPUTS
( ) = /STOP
There is always permission to execute the part program.
General logic inputs
10.
Example
() = /FEEDHOL
There is always permission to move the axes.
/XFERINH (M5003)
If the PLC sets this signal low, the CNC prevents the following block from starting,
but finishes the one it is executing. When the signal returns to high logic level, the
CNC continues to execute the program.
Example
( ) = /XFERINH
There is always permission to execute the next block.
CYSTART (M5007)
If the START key is pressed on the front panel of the CNC, this is indicated to the PLC
by means of the general logic output START.
If the PLC program considers that there is nothing to prevent the part program form
being executed, the CYSTART signal must be set at a high logic level, thus beginning
the execution of the program.
The CNC will indicate by means of the general logic output INCYCLE that the program
is being executed. As of that moment the CYSTART can return to low logic level.
Example
START AND (rest of conditions) = CYSTART
When the cycle START key is pressed, the CNC activates the general logic
output START. The PLC must check that the rest of the conditions (hydraulic,
safety devices, etc.) are met before setting the general input CYSTART high in
order to start executing the program
CNC 8035
(SOFT M: V11.1X)
(SOFT T: V12.1X)
257
Installation manual
SBLOCK (M5008)
When the PLC sets this signal high, the CNC changes to the single block execution
mode.
The treatment this signal receives is similar to that given to the "single block" softkey.
MANRAPID (M5009)
If the PLC sets this signal at a high logic level, the CNC selects rapid feed for all the
movements executed in JOG mode.
General logic inputs
LOGIC CNC INPUTS AND OUTPUTS
10.
When the signal returns to a low logic level, the movements executed in JOG mode
are made at the previously-selected feedrate.
The treatment which this signal receives is similar to that given to the rapid feedrate
key on the control panel.
The EXRAPID (M5057) signal is similar, but for movements in jog mode.
OVRCAN (M5010)
If the PLC sets this signal at a high logic level, the CNC selects 100% feedrate
override, irrespective of whether this is selected by the PLC, DNC, program or by the
front panel switch.
While the OVERCAN signal is activated (logic 1), the CNC will apply in each mode
100 % of the feedrate corresponding to that mode.
LATCHM (M5011)
This allows the type of JOG key operation to be selected in JOG mode.
If the PLC sets this signal low, the axes will only move while the corresponding JOG
key is pressed.
If the PLC sets this signal at a high logic level, the axes will move from the moment
the corresponding JOG key is pressed until the STOP key or other JOG key is
pressed. In this case, the movement will be transferred to that indicated by the new
key.
ACTGAIN2 (M5013)
The axes and the spindle can have 2 sets of gains and accelerations.
By default, the first set is always assumed. The one indicated by the a.m.p. and s.m.p.:
ACCTIME (P18), PROGAIN (P23), DERGAIN (P24) and FFGAIN (P25).
g.m.p. ACTGAIN2 (P108) indicates with which functions or in which mode the second
set is applied, the one set by a.m.p. ACCTIME2 (P59), PROGAIN2 (P60), DERGAIN2
(P61) and FFGAIN2 (P62) or s.m.p. ACCTIME2 (P47), PROGAIN2 (P48),
DERGAIN2 (P49) and FFGAIN2 (P50).
The gains and accelerations can also be changed from the PLC regardless of the
active operating mode or function. To do this, use general input ACTGAIN2 (M5013).
CNC 8035
ACTGAIN2 (M5013) = 0
The CNC assumes the first set.
ACTGAIN2 (M5013) = 1
The CNC assumes the second set.
The change of gains and accelerations is always made at the beginning of the
block.
When working in round corner (G5), the change does not take place until G07
is programmed.
(SOFT M: V11.1X)
(SOFT T: V12.1X)
258
Installation manual
RESETIN (M5015)
This signal will be treated by the CNC when the JOG mode is selected and there is
no movement of the axes or when a program to be executed is selected and it is not
running.
When there is a rising edge (leading edge) of this signal (change from low to high)
the CNC assumes the initial machining conditions selected by the machine
parameter.
The CNC will indicate by means of the general logic output RESETOUT that this
function has been selected.
This signal is used in the execution of auxiliary functions M, S and T, to tell the CNC
that the PLC is executing them.
It operates in the following way:
1. Once the block has been analyzed and after sending the corresponding values
in the variables “MBCD1-7”, “SBCD”, “TBCD” and “T2BCD”, the CNC will tell the
PLC by means of the general logic outputs “MSTROBE”, “SSTROBE”,
“TSTROBE” and “T2STROBE” that the required auxiliary functions must be
executed.
General logic inputs
AUXEND (M5016)
10.
LOGIC CNC INPUTS AND OUTPUTS
The treatment received by this signal is similar to that given to the RESET key on the
front panel.
2. When the PLC detects that one of the STROBE signals is active, it must deactivate
the general logic input “AUXEND” to tell the CNC that the execution of the
corresponding function or functions is starting.
3. The PLC will execute all the auxiliary functions required, it being necessary to
analyze the “MSTROBE”, “SSTROBE”, “TSTROBE”, “T2STROBE” general logic
outputs and the “MBCD1-7”, “SBCD”, “TBCD” and “T2BCD” variables in order to
do this.
Once this has been executed the PLC must activate the general logic input
“AUXEND” to indicate to the CNC that the processing of the required functions
was completed.
4. Once the general “AUXEND” input is activated, the CNC will require that this
signal be kept active for a time period greater than the value given to the g.m.p.
“MINAENDW” (P30).
This way, erroneous interpretations of this signal by the CNC due to an improper
PLC program logic are avoided .
5. Once the period of time MINAENDW has elapsed with the general input
“AUXEND” at a high logic level, the CNC will deactivate the general logic outputs
“MSTROBE”, “SSTROBE”, “TSTROBE”, “T2STROBE” to tell the PLC that the
execution of the required auxiliary function or functions has been completed.
CNC 8035
TIMERON (M5017)
The CNC is provided with a timer which can be enabled and disabled. By means of
this logic CNC input, it will be enabled (timing) when the PLC sets the signal
TIMERON at a high logic level.
(SOFT M: V11.1X)
(SOFT T: V12.1X)
This general purpose timer can be accessed by means of the internal variable TIMER.
259
Installation manual
TREJECT (M5018)
The PLC sets this signal at a high logic level in order to tell the CNC to reject the tool
in use, even though it may not have come to the end of its service life. An important
application is to replace the tool when the PLC detects that it is broken.
PANELOFF (M5019)
The PLC sets this signal high to tell the CNC that the keyboard is deactivated.
It is recommended to change the state of this mark by means of an accessible external
input since the PLC will not stop and the CNC will receive the error message in each
new PLC cycle scan; thus preventing access to any of the PLC modes.
General logic inputs
LOGIC CNC INPUTS AND OUTPUTS
10.
PLCABORT (M5022)
The PLC sets this signal high to indicate to the CNC that it must stop the PLC axes.
It also cancels the rest of the movement and the possible blocks that might have been
sent from the PLC.
Once this process is ended, the CNC automatically deactivates this signals.
On power-up, the CNC sets this mark to "0".
PLCREADY (M5023)
This mark indicates the PLC status.
PLCREADY = 0
PLC stopped.
PLCREADY = 1
PLC running.
If this mark is set to 0. The PLC program will stop.
This mark MUST be set to 1 so the CNC allows the spindle and/or the axes to be
moved. Otherwise, it will issue the corresponding error message.
INT1 (M5024)
INT2 (M5025)
INT3 (M5026)
INT4 (M5027)
The PLC sets one of these signals to logic state "1" to "tell" the CNC to interrupt the
execution of the currently running program and jump to execute the interruption
subroutine whose number is indicated in the general machine parameter "INT1SUB"
(P35), "INT2SUB" (P36), "INT3SUB" (P37) or "INT4SUB" (P38) respectively.
All these inputs have the same priority and are active by level (not by flank or edge).
Only the first one being detected high ("1") will be attended to.
The status of these signals "INT1", "INT2", "INT3", "INT4" are not stored; therefore,
it is recommended to activate these marks at the PLC by means of an instruction of
the “=SET” type. These marks will be deactivated automatically when starting the
execution of the corresponding subroutine.
An interruption subroutine cannot, in turn, be interrupted.
BLKSKIP1 (M5028)
CNC 8035
(SOFT M: V11.1X)
(SOFT T: V12.1X)
260
The PLC sets this signal at a high logic level to tell the CNC that the block skip
condition “/ or /1” is met, therefore, the blocks which have this block skip condition
will not be executed.
Installation manual
BLKSKIP2 (M5029)
The PLC sets this signal at a high logic level to tell the CNC that the block skip
condition “/ or /2” is met, therefore, the blocks which have this block skip condition
will not be executed.
BLKSKIP3 (M5030)
The PLC sets this signal at a high logic level to tell the CNC that the block skip
condition “/ or /3” is met, therefore, the blocks which have this block skip condition
will not be executed.
RETRACE (M5051)
The CNC takes into account this input when retracing is available, g.m.p. RETRACAC
other than zero.
If while executing a part-program the PLC sets this signal high, retracing is activated.
The CNC interrupts program execution and starts executing backwards what has
been done so far.
When the PLC sets this signal back low, retracing is canceled. The CNC starts
executing forward what was done backwards and it will go on to execute the part of
the program that was not machined.
LOGIC CNC INPUTS AND OUTPUTS
The PLC sets this signal at a high logic level to tell the CNC to stop the execution of
the part program when the auxiliary (miscellaneous) M01 function is executed.
General logic inputs
10.
M01STOP (M5031)
Retracing executes backwards the current block plus up to 75 blocks that were
already executed.
The retracing function ends in the following cases:
• When the previous 75 blocks are retraced.
• When retraced all the way to the beginning of the program.
• When finding a block that contains an M function (only if RETRACAC = 1).
• When finding a block that contains an S or a T function.
• When finding a high-level language block.
In all cases, the CNC activates the RETRAEND (M5522) signal to let the PLC know
that all possible blocks have been executed.
While the retracing function is active, neither tool inspection nor MDI operations are
possible.
Retracing cannot be activated while a canned cycle is active or when working in
“look-ahead”.
ACTLIM2 (M5052)
The PLC sets this signal high to "tell" to the CNC to activate the second travel limits
set by means of variables LIMPL(X-C) and LIMMI(X-C).
The second travel limit of each axis will be taken into account if the first one has been
set using a.m.p. LIMIT+ (P5) and LIMIT- (P6).
CNC 8035
(SOFT M: V11.1X)
(SOFT T: V12.1X)
261
Installation manual
HNLINARC (M5053)
This signal is used when either the “path handwheel” or "path jog" work mode has
been selected using general input "MASTRHND (M5054)". It allows selecting the
type of movement.
General logic inputs
Linear path.
M5053 = 1
Arc path.
For a linear path, the path angle must be indicated by the MASLAN variable and for
an arc, the center coordinates must be indicated by the MASCFI and MASCSE
variables
10.
LOGIC CNC INPUTS AND OUTPUTS
M5053 = 0
Variables MASLAN, MASCFI and MASCSE may be read and written from the CNC,
DNC and PLC.
MASTRHND (M5054)
The PLC sets this signal high to "tell" the CNC to activate the "path handwheel" or
the "path jog" mode.
M5054 = 0
Normal work mode with handwheels or jog keys.
M5054 = 1
"Path handwheel" or "path jog" function on.
EXRAPID (M5057)
The CNC only takes this signal into account if parameter RAPIDEN has been set to
·1· or ·2·.
If the PLC sets this signal high, the programmed movements are executed as follows.
"RAPIDEN" = 1
When the mark is activated, the programmed movements
are executed in rapid. There is no need to press the "rapid"
key.
RAPIDEN = 2
When the mark is activated, the "rapid" key is enabled. The
key must be pressed to make movements in rapid; in other
words, both the key and the mark must be active.
When the signal is set back low, the movements are executed at the programmed
feedrate.
The treatment which this signal receives is similar to that given to the rapid feedrate
key on the control panel.
The MANRAPID (M5009) signal is similar, but for movements in jog mode.
FLIMITAC (M5058)
When the PLC sets this signal high, it limits the feedrate of each axis to the value set
by its a.m.p. "FLIMIT (P75)". When this limit is canceled, the CNC recovers the
programmed feedrate.
SLIMITAC (M5059)
When the PLC sets this signal high, it limits the spindle speed to the value set by its
s.m.p. "SLIMIT (P66)". When this limit is canceled, the CNC recovers the
programmed turning speed.
CNC 8035
(SOFT M: V11.1X)
(SOFT T: V12.1X)
262
When the spindle is controlled by the PLC by means of the PLCCNTL mark, this limit
is ignored.
Installation manual
BLOABOR (M5060)
When the PLC sets this mark high, the CNC ends the movement in progress and
starts executing the next block. If the interrupted block had M functions to be executed
after the block, they will be executed before going on to the next block.
This mark only affects the execution in automatic mode and the simulation with
motion.
This mark does not stay active after the execution. Once executed, the CNC
deactivates it. Likewise, if they are activated in a block that does not accept them, they
will also be deactivated; they do not stay active for the next block.
• They affect the dwell programmed with G4.
• It affects the look-ahead. In this type of programs with very small blocks, it is not
possible to stop at the same block where the "BLOABOR" mark is detected. In
these cases, it will be canceled at the block where the axis is fully decelerated.
These marks do not affect the following functions.
• It does not affect motionless blocs, which will be executed.
• It does not affect the M functions that are executed after the block. These functions
are always executed, even if the movement of the block is interrupted.
• It does affect not affect threading blocks G33. Nor does it affect the regular tapping
or rigid tapping cycles regardless of the value of parameter STOPTAP.
General logic inputs
• It affect motion blocks G0, G1, G2, G3.
10.
LOGIC CNC INPUTS AND OUTPUTS
These marks affect the following functions.
• It does not affect spindle positioning blocks M19. If the spindle positioning is in
a block containing axis movement, it aborts the movement of the axes, but it
completes the positioning of the spindle.
Considerations for the execution
These marks do not affect block preparation. When canceling the execution of a block,
the next movement is carried out up to the prepared target coordinates; no
preparation is done.
On the other hand, only the programmed axes are involved in the next movement.
The rest of the axes are ignored, even if there is a real difference in position because
the previous block has been aborted.
Path 1
Path 2
The solid lines represent the programmed paths and the dashed lines the
real paths, after activating the BLOABOR mark.
If a block is aborted and then the RETRACE function is activated, the retraced path
(backwards) will not be the same as the one traveled forward. The two paths will not
coincide either when aborting a block while the RETRACE function is active.
CNC 8035
(SOFT M: V11.1X)
(SOFT T: V12.1X)
263
Installation manual
10.2
Axis logic inputs.
There are several groups of logic inputs (LIMIT, DECEL, etc.) which refer to the
possible axes of the machine by means of digits 1 through 3 (LIMIT+2, DECEL1,etc.)
or using the axis name (LIMIT+X, DECELZ, etc.).
The marks of the axes that do not exist in the machine parameters assume the value
of the M2045 mark, that's always set to 0.
Axis logic inputs.
LOGIC CNC INPUTS AND OUTPUTS
10.
When monitoring the PLC program, it shows the edited marks, either with a letter or
with a number. However, the resource windows created from monitoring will replace
the marks with axis names by the marks with axis numbers. For example:
SERVOXON by SERVO1ON
SERVOZON by SERVO2ON if there is no Y axis, but there are X and Z
axes.
i
The use of mnemonics with the axis name is available from versions V9.0x
and V10.0x on. If PLC programs older than this version have defined these
marks as symbols, when compiling the program will issue an error on this line.
Example: DEF ENABLEX M333
Mnemonics using numbers 1 through 3.
These signals are numbered as the logic order of the axes; it is not related to the
values assigned to g.m.p. AXIS1 (P0) through AXIS8 (P7).
For example, if the CNC controls the X, Y and Z axis, the order will be: X, Y, Z and,
therefore:
LIMIT+1, LIMIT-1, DECEL1, etc.
for the X axis:
LIMIT+2, LIMIT-2, DECEL2, etc.
for the Y axis:
LIMIT+3, LIMIT-3, DECEL3, etc.
for the Z axis:
Mnemonics using the axis name.
The mnemonics of the signals refer to the axis name.
Mnemonics with axis names offer the advantage that if an axis is eliminated, the PLC
program will still be consistent with the rest of the axes.
LIMIT+1 (M5100) | LIMIT-1 (M5101)
LIMIT+2 (M5150) | LIMIT-2 (M5151)
LIMIT+3 (M5200) | LIMIT-3 (M5201)
The PLC sets these signals at a high logic level in order to tell the CNC that the
corresponding axis has overrun the end of its range of movement in the positive (+)
or negative (-) direction indicated by the limit switch.
In this case, the CNC stops axis feed and spindle rotation and displays the
corresponding error on screen.
In manual (JOG) operating mode the axis which has overrun its range of travel can
be moved in the correct direction in order to place it within the correct range of travel.
CNC 8035
DECEL1 (M5102)
DECEL2 (M5152)
DECEL3 (M5202)
These signals are used by the CNC when machine reference search is made.
If the PLC sets one of these signals high, this indicates to the CNC that the machine
reference search switch of the corresponding axis has been pressed.
(SOFT M: V11.1X)
(SOFT T: V12.1X)
264
When this signal is activated in the machine reference search mode, the CNC
decelerates the axis, changing the rapid approach feedrate indicated by the a.m.p.
“REFEED1”, with the slow feedrate indicated by the a.m.p. “REFEED2”. After
decelerating it accepts the following reference signal from the corresponding axis
feedback system as being valid.
Installation manual
INHIBIT1 (M5103) INHIBIT2 (M5153)
INHIBIT3 (M5203)
The PLC sets one of these signals at a high logic level in order to tell the CNC to
prevent any movement of the corresponding axis. This movement will continue when
the PLC sets this signal at the low logic level once more.
If the inhibited axis is moving together with other axes, all these stop moving until the
signal returns to the low logic level.
MIRROR2 (M5154)
MIRROR3 (M5204)
10.
It must be borne in mind that if this signal is activated during a programmed
movement, the CNC will only apply mirror image to the movement, not to the final
coordinate.
LOGIC CNC INPUTS AND OUTPUTS
If the PLC sets one of these signals at a high logic level, the CNC applies mirror image
to the movement of the corresponding axis.
Axis logic inputs.
MIRROR1 (M5104)
N00 G01 X0 Y0 F1000
N10 G01 X70 Y42
N20 G01 X100 Y60
N30 M30
If, when executing the programmed movement in block N20 the signal corresponding
to the X axis “MIRROR1” is active, the CNC will apply mirror image to the remaining
movement in X.
This way, the new end of travel point will be X40 Y60.
By means of the activation of these signals, symmetrical parts can be executed by
using a single program, for example, soles of shoes.
In order to obtain the same effect as functions G11, G12, G13 and G14, it is necessary
for the corresponding axis or axes to be positioned at part zero when these signals
are activated.
SWITCH1 (M5105)
SWITCH2 (M5155) SWITCH3 (M5205)
When having 2 axes controlled by the same servo drive, this mark may be used to
toggle the velocity commands between the two axes.
CNC 8035
(SOFT M: V11.1X)
(SOFT T: V12.1X)
265
Installation manual
DRO1 (M5106)
DRO2 (M5156)
DRO3 (M5206)
These inputs, together with the corresponding "SERVOON" inputs make it possible
to operate with the axes as DRO.
In order for the axis to work in DRO mode, its "DRO" input must be high and its
corresponding "SERVOON" input must be low.
When an axis works as a DRO, the positioning loop is open and its following error
is ignored while in motion
Axis logic inputs.
LOGIC CNC INPUTS AND OUTPUTS
10.
If the DRO signal is brought back low, the axis will no longer behave as a DRO and
the CNC will take as position value its current position assigning a 0 value to the
following error.
SERVO1ON (M5107)
SERVO2ON (M5157)
SERVO3ON (M5207)
When one of these signals is set high, the CNC closes the positioning loop of the
corresponding axis.
If set low, the CNC does not close the position loop of the axis. Any position deviation
is stored as following error, thus when the signal gets back high, the axis moves to
return to position
These signals are controlled by the PLC and when the positioning loop is to be closed,
they will be processed by the CNC according to the value given to machine parameter
“DWELL” (P17) for the axes.
DWELL = 0
When a.m.p. DWELL (P17) for the axis to be moved is set to 0, the CNC will check
the status of the SERVOON signal at the time when the ENABLE must be output.
If the SERVOON signal is high, the CNC allows the movement of this axis by activating
the ENABLE signal and outputting the required analog voltage.
On the other hand, if the SERVOON signal is low or if it changes during the movement
of the axes, the CNC stops the axes feed and the spindle rotation displaying the
corresponding error message.
DWELL<>0
When a.m.p. DWELL (P17) for the axis to be moved is set to other than “0”, the CNC
will check the status of the SERVOON signal at the time when the ENABLE must be
output.
When this signal (SERVOON) is high, the CNC allows the movement of the axis by
activating the ENABLE signal and providing the required analog output voltage.
CNC 8035
(SOFT M: V11.1X)
(SOFT T: V12.1X)
266
On the other hand, if the SERVOON signal is low, the CNC activates the ENABLE
signal and after “waiting” for a time period indicated in DWELL, it checks again the
status of the SERVOON signal. If it is high, the required spindle analog voltage will
be output. If low, the CNC will stop the axes feed and the spindle rotation displaying
the corresponding error message.
Installation manual
The CNC uses these signals when working in the manual (JOG) operating mode.
If the PLC sets one of these signals high, the CNC will move the corresponding axis
in the direction indicated, positive (+) or negative (-). This movement will be performed
at the feedrate override % currently selected.
The treatment which these signals receive is similar to that given to the JOG keys
of the operator panel.
Axis logic inputs.
AXIS+1 (M5108) | AXIS-1 (M5109)
AXIS+2 (M5158) | AXIS-2 (M5159)
AXIS+3 (M5208) | AXIS-3 (M5209)
10.
LOGIC CNC INPUTS AND OUTPUTS
Also, if the SERVOON signal changes states during the movement of the axis, the
CNC stops the axes feed and the spindle rotation displaying the corresponding error
message.
SPENA1 (M5110) | DRENA1 (M5111)
SPENA2 (M5160) | DRENA2 (M5161)
SPENA3 (M5210) | DRENA3 (M5211)
The CNC uses these signals when communicating with the drive via CAN. Every time
the PLC sets one of these signals high, the CNC lets the corresponding drive know
about it.
These signals correspond to the "speed enable" and "drive enable" signals of the
drive. The drive manual describes how the two signals work, however, remember the
following:
• Both signals must be initialized low when powering up the PLC.
• For normal drive operation, both signals must be set high.
• A down flank (trailing edge) of the DRENA signal (drive enable) turns off the power
circuit of the drive and the motor loses its torque. In this situation, the motor is no
longer governed and it will stop when its kinetic energy runs out. (Stop by friction).
• A trailing edge of the SPENA signal (speed enable) switches the "internal velocity
reference" to "0" rpm and brakes the motor while maintaining its torque. Once the
motor has stopped, the drive's power circuit is turned off and the motor has no
torque.
ELIMINA1 (M5113)
ELIMINA2 (M5163) ELIMINA3 (M5213)
If the PLC sets one these signals high, the CNC does not display the corresponding
axis but keeps controlling it. Same as when setting a.m.p. DFORMAT (P1) =3.
The ELIMINA mark can be activated and deactivated at any time and it also cancels
the feedback alarms which the machine parameter does not do.
CNC 8035
(SOFT M: V11.1X)
(SOFT T: V12.1X)
267
Installation manual
SMOTOF1 (M5114)
SMOTOF2 (M5154)
SMOTOF3 (M5214)
The SMOTIME (P58) filter set for each axis with parameter P58 can be canceled from
the PLC.
This SMOTIME filter will be activated or deactivated at the beginning of the block. If
one of these logic inputs is activated or deactivated while the CNC is overlapping
blocks being executed in round corner, it will be ignored until that operation is finished.
LIM1OFF (M5115)
Axis logic inputs.
LOGIC CNC INPUTS AND OUTPUTS
10.
CNC 8035
(SOFT M: V11.1X)
(SOFT T: V12.1X)
268
LIM2OFF (M5165)
LIM3OFF (M5215)
The PLC sets one of these signals high so that the CNC ignores the software limits
of the corresponding axis.
MANINT1 (M5116) MANINT2 (M5166) MANINT3 (M5216)
The PLC sets one of these signals high to activate the additive handwheel on each
axis. Only one additive handwheel may be enabled at a time. If there are more than
one mark active, only the first one will be attended to.
When a program is in execution and the mark associated with an axis is activated,
it calculates the movement to be applied to that axis according to the resolution of
the handwheel.
Installation manual
10.3
Spindle logic inputs.
LIMIT+S (M5450) | LIMIT-S (M5451)
main spindle
The CNC uses this signal while searching home when the spindle changes to working
in closed loop (M19). The CNC only considers the signals for the currently selected
spindle.
The PLC sets one of the signals high to tell the CNC that the spindle has overrun its
range of travel in the positive (+) or negative (-) direction.
Main spindle
The CNC uses this signal while searching home when the spindle changes to working
in closed loop (M19). The CNC only considers the signals for the currently selected
spindle.
The PLC sets this signal high to indicate to the CNC that the reference search switch
is pressed.
When this signal is activated in the reference search mode the CNC decelerates the
spindle, changing the rapid approach speed indicated by the s.m.p. REFEED1 (P34),
with the slow feedrate indicated by the s.m.p. REFEED2 (P35). After decelerating,
it accepts the following reference signal from the spindle feedback systems as being
valid.
Spindle logic inputs.
DECELS (M5452)
10.
LOGIC CNC INPUTS AND OUTPUTS
In this case, the CNC stops axis feed and spindle rotation and displays the
corresponding error on screen.
SPDLEINH (M5453) Main spindle
The CNC considers these 2 signals at all times so both spindles can be controlled
by the PLC.
When the PLC sets this signal high, the CNC outputs a zero analog for the spindle.
SPDLEREV (M5454) Main spindle
The CNC considers these 2 signals at all times so both spindles can be controlled
by the PLC.
When the PLC sets this signal high, the CNC reverses the programmed spindle
turning direction.
If while being this signal high, a block containing an M3 or M4 is executed, the spindle
will start turning in the opposite direction.
SMOTOFS (M5455)
Main spindle
The SMOTIME (P46) filter set for the spindle with parameter P46 can be canceled
from the PLC.
This SMOTIME filter will be activated or deactivated at the beginning of the block. If
one of these logic inputs is activated or deactivated while the CNC is overlapping
blocks being executed in round corner, it will be ignored until that operation is finished.
CNC 8035
(SOFT M: V11.1X)
(SOFT T: V12.1X)
269
Installation manual
SERVOSON (M5457)
Main spindle
These signals are controlled by the PLC and the CNC will process them only when
the spindle is working in closed loop (M19). Its treatment depends on the value
assigned to s.m.p. DWELL (P17).
DWELL = 0
If s.m.p. DWELL (P17) has been set to “0”, the CNC will check the status of the
SERVOSON signal at the time when the ENABLE signal is to be output.
If the SERVOSON signal is high, the CNC will allow the spindle to rotate by activating
the ENABLE signal and providing the required analog output voltage.
Spindle logic inputs.
LOGIC CNC INPUTS AND OUTPUTS
10.
On the other hand, if the SERVOSON signal is low or if it changes to low during the
rotation of the spindle, the CNC will stop the axes feed and the spindle rotation
displaying the corresponding error message.
DWELL<>0
If s.m.p. DWELL (P17) has been set to other than “0”, the CNC will check the status
of the SERVOSON signal at the time when the ENABLE signal is to be output.
If the SERVOSON signal is high, the CNC will allow the spindle to rotate by activating
the ENABLE signal and providing the required analog output voltage.
On the other hand, if the SERVOSON signal is low, the CNC will activate the ENABLE
signal and, after waiting for a time period indicated by the value given to “DWELL”,
the CNC checks the SERVOSON signal again. If it is high, the required spindle analog
voltage will be output. If low, the CNC will stop the axes feed and the spindle rotation
displaying the corresponding error message.
Also, if it changes to low during the rotation of the spindle, the CNC will stop the axes
feed and the spindle rotation displaying the corresponding error message.
CNC 8035
(SOFT M: V11.1X)
(SOFT T: V12.1X)
270
Installation manual
GEAR2 (M5459) GEAR3 (M5460) GEAR4 (M5461)
Main spindle
The PLC uses these signals to indicate to the CNC which spindle gear is currently
selected (high logic level). The CNC only considers the signals for the currently
selected spindle.
When any of the miscellaneous functions M41, M42, M43 or M44 is programmed,
the CNC will “tell” the PLC so it selects the desired gear even if it is already selected.
When working with automatic gear changer, the CNC will check the currently selected
gear (GEAR1... GEAR4) and if it does not match the selected speed, the CNC will
let the PLC know using the relevant auxiliary function (M41, M42, M43 or M44) to
select it.
The spindle gear change depends on the setting of functions M41 through M44 in
the M function table:
The M41, M42, M43 or M44 function uses the “AUXEND” signal:
The CNC indicates to the PLC the selected gear M41, M42, M43 or M44 in one of
the registers “MBCD1” through “MBCD7” and it activates the “MSTROBE” signal to
let the PLC “know” that it must execute it.
When the PLC detects the activation of the “MSTROBE” signal it must deactivate the
general logic input “AUXEND” to “tell” the CNC that the execution of the gear change
has started.
Spindle logic inputs.
Once the PLC selects the proper gear, it indicates it to the CNC by means of the logic
input corresponding to the spindle (GEAR1 ...). GEAR4).
10.
LOGIC CNC INPUTS AND OUTPUTS
GEAR1 (M5458)
Once executed this function, the PLC will inform the CNC that the new gear has been
selected by means of the logic input corresponding to the spindle (“GEAR1”....
“GEAR4”).
The PLC, then, activates the logic input “AUXEND” to “tell” the CNC that the execution
of the gear change has been completed.
Once the “AUXEND” input is activated, the CNC will require that this signal be kept
active for a time period greater than the value given to the g.m.p. “MINAENDW” (P30).
This way, erroneous interpretations of this signal by the CNC due to an improper PLC
program logic are avoided .
Once the “MINAENDW” time has elapsed with the “AUXEND” general input kept high,
the CNC will check whether the new spindle gear has been selected by verifying that
the corresponding input (GEAR1... GEAR4) is set high.
If it is, it will cancel the general logic output “MSTROBE” to “tell” the PLC that the gear
change has finished and if the corresponding input (GEAR1... GEAR4) is not
selected, the CNC will stop the axes feed and the spindle rotation displaying the
corresponding error message.
CNC 8035
(SOFT M: V11.1X)
(SOFT T: V12.1X)
271
Installation manual
If the M41, M42, M43 or M44 function does not use the “AUXEND” signal:
• The CNC indicates to the PLC the selected gear M41, M42, M43 or M44 in one
of the registers “MBCD1” through “MBCD7” and it activates the “MSTROBE”
signal to let the PLC “know” that it must execute it.
• The CNC will keep the output “MSTROBE” active during the time indicated by
means of g.m.p. MINAENDW (P30).
Spindle logic inputs.
LOGIC CNC INPUTS AND OUTPUTS
10.
• After this time, the CNC will check whether the new spindle gear has been
physically selected by verifying that the corresponding GEAR input (GEAR1...
GEAR4) is set high.
• If it is not selected, the CNC will stop the axes feed and the spindle rotation
displaying the corresponding error message.
SPENAS (M5462) | DRENAS (M5463)
Main spindle
The CNC uses these signals when communicating with the drive via CAN. Every time
the PLC sets one of these signals high, the CNC lets the corresponding drive know
about it.
These signals correspond to the "speed enable" and "drive enable" signals of the
drive. The drive manual describes how the two signals work, however, remember the
following:
• Both signals must be initialized low when powering up the PLC.
• For normal drive operation, both signals must be set high.
• A down flank (trailing edge) of the DRENA signal (drive enable) turns off the power
circuit of the drive and the motor loses its torque. In this situation, the motor is no
longer governed and it will stop when its kinetic energy runs out. (Stop by friction).
• A trailing edge of the SPENA signal (speed enable) switches the "internal velocity
reference" to "0" rpm and brakes the motor while maintaining its torque. Once the
motor has stopped, the drive's power circuit is turned off and the motor has no
torque.
PLCFM19 (M5464) | M19FEED (R505)
Main spindle
The CNC only considers the signals for the currently selected spindle.
The PLC uses the "PLCM19" signal to indicate to the CNC the positioning and rapid
synchronized speed value to assume when operating in closed loop (M19).
When this input is low, the CNC assumes the value set by s.m.p. "REFEED1" (P34)
When this input is high, the CNC assumes the value set by the spindle input register
"M19FEED" (R505).
The "M19FEED" value is given in 0.0001º/min.
CNC 8035
(SOFT M: V11.1X)
(SOFT T: V12.1X)
272
Installation manual
PLCCNTL (M5465)
Main spindle
The CNC considers these 2 signals at all times so both spindles can be controlled
by the PLC. This is used to tell the CNC that the spindle is controlled directly by the
PLC (high logic level).
It is used, for example, for oscillating the spindle during a gear change or for changing
tools.
The following example shows how a new spindle speed is selected involving a gear
change.
The PLC will deactivate the logic input AUXEND to tell the CNC that the treatment
of the auxiliary function is starting.
Spindle logic inputs.
LOGIC CNC INPUTS AND OUTPUTS
After analyzing the block and detecting the gear change the CNC indicates this to
the PLC in one of the “MBCD1-7” registers (M41 to M44) and will activate the general
logic output “MSTROBE” to tell the PLC that it must execute it.
10.
After calculating the value corresponding to the residual output S for the gear change,
the PLC will indicate this to the CNC by means of the register “SANALOG”, afterwards
setting the signal “PLCCNTL” at a high logic level.
At this time the CNC will send out the output indicated in the register SANALOG.
Once the requested gear change has been made, the new active speed will be
indicated to the CNC (spindle logic inputs GEAR1 to GEAR4).
In order to give the control of the spindle back to the CNC, the signal “PLCCNTL” must
be set low.
Finally, the PLC will activate the logic input AUXEND once more to tell the CNC that
the execution of the auxiliary function has been completed.
SANALOG (R504)
Main spindle
The CNC considers these 2 signals at all times so both spindles can be controlled
by the PLC. The PLC will indicate by means of this 32 bit register the spindle analog
output which the CNC must send out when it is controlled by the PLC.
SANALOG=32767 corresponds to an analog output of 10 V.
(10/32767) 0.305185 millivolts of analog output correspond to SANALOG=1.
This way, for 4V of analog voltage, the following must be programmed:
SANALOG = (4x32767)/10 = 13107
For -4V of analog voltage, the following must be programmed:
SANALOG = (-4x32767)/10 = -13107
CNC 8035
(SOFT M: V11.1X)
(SOFT T: V12.1X)
273
Installation manual
ELIMIS (M5456) Main spindle
If the PLC sets this signal high, the CNC does not display the corresponding spindle
but keeps controlling it. Same as when setting a.m.p. DFORMAT (P1) =4.
This mark can be activated and deactivated at any time and it also cancels the
feedback alarms which the machine parameter does not do.
Spindle logic inputs.
LOGIC CNC INPUTS AND OUTPUTS
10.
CNC 8035
(SOFT M: V11.1X)
(SOFT T: V12.1X)
274
Installation manual
Key inhibiting logic inputs.
KEYDIS2 (R501) KEYDIS3 (R502) KEYDIS4 (R503)
The PLC can individually inhibit the operation of the panel keys, setting the
corresponding bit of one of these 32-bit registers high.
Register
Bit
Inhibited key
Register
Bit
Inhibited key
KEYDIS1
KEYDIS1
KEYDIS1
0
1
2
F
L
Q
KEYDIS2
KEYDIS2
KEYDIS2
0
1
2
B
H
N
KEYDIS1
KEYDIS1
KEYDIS1
3
4
5
W
[SHIFT]
9
KEYDIS2
KEYDIS2
KEYDIS2
3
4
5
S
Y
[RESET]
KEYDIS1
KEYDIS1
KEYDIS1
6
7
8
6
3
E
KEYDIS2
KEYDIS2
KEYDIS2
6
7
8
[ESC]
[MAIN MENU]
A
KEYDIS1
KEYDIS1
KEYDIS1
9
10
11
K
P
V
KEYDIS2
KEYDIS2
KEYDIS2
9
10
11
G
M
R
KEYDIS1
KEYDIS1
KEYDIS1
12
13
14
[CAPS]
8
5
KEYDIS2
KEYDIS2
KEYDIS2
12
13
14
X
[ENTER]
[HELP]
KEYDIS1
KEYDIS1
KEYDIS1
15
16
17
2
D
J
KEYDIS2
KEYDIS2
KEYDIS2
15
16
17
.
0
KEYDIS1
KEYDIS1
KEYDIS1
18
19
20
O
U
[SP]
KEYDIS2
KEYDIS2
KEYDIS2
18
19
20
KEYDIS1
KEYDIS1
KEYDIS1
21
22
23
7
4
1
KEYDIS2
KEYDIS2
KEYDIS2
21
22
23
KEYDIS1
KEYDIS1
KEYDIS1
24
25
26
C
I
Ñ
KEYDIS2
KEYDIS2
KEYDIS2
24
25
26
[PG DW]
[PG UP]
[©]
KEYDIS1
KEYDIS1
KEYDIS1
27
28
29
T
Z
=
KEYDIS2
KEYDIS2
KEYDIS2
27
28
29
[ª]
[¨]
[§]
KEYDIS1
KEYDIS1
30
31
/
*
KEYDIS2
KEYDIS2
30
31
[CL]
[INS]
10.
Key inhibiting logic inputs.
KEYDIS1 (R500)
LOGIC CNC INPUTS AND OUTPUTS
10.4
+
CNC 8035
(SOFT M: V11.1X)
(SOFT T: V12.1X)
275
Installation manual
The keys inhibited by register KEYDIS3 (R502) depends on the CNC model available
(M or T model).
Key inhibiting logic inputs.
LOGIC CNC INPUTS AND OUTPUTS
10.
Register
Bit
KEYDIS3
KEYDIS3
KEYDIS3
0
1
2
KEYDIS3
KEYDIS3
KEYDIS3
Inhibited key
Inhibited key
Register
Bit
F1
F2
F3
KEYDIS3
KEYDIS3
KEYDIS3
0
1
2
F1
F2
F3
3
4
5
F4
F5
F6
KEYDIS3
KEYDIS3
KEYDIS3
3
4
5
F4
F5
F6
KEYDIS3
KEYDIS3
KEYDIS3
6
7
8
F7
6
7
8
F7
X+
KEYDIS3
KEYDIS3
KEYDIS3
KEYDIS3
KEYDIS3
KEYDIS3
9
10
11
Y+
Z+
4+
KEYDIS3
KEYDIS3
KEYDIS3
9
10
11
X+
KEYDIS3
KEYDIS3
KEYDIS3
12
13
14
5+
Spdl override +
Spdl CW
KEYDIS3
KEYDIS3
KEYDIS3
12
13
14
4th axis +
Spdl override +
Spdl CW
KEYDIS3
KEYDIS3
KEYDIS3
15
16
17
START
KEYDIS3
KEYDIS3
KEYDIS3
15
16
17
START
KEYDIS3
KEYDIS3
KEYDIS3
18
19
20
Rapid feedrate
KEYDIS3
KEYDIS3
KEYDIS3
18
19
20
Rapid feedrate
Z+
KEYDIS3
KEYDIS3
KEYDIS3
21
22
23
Spdl stop
KEYDIS3
KEYDIS3
KEYDIS3
21
22
23
KEYDIS3
KEYDIS3
KEYDIS3
24
25
26
XYZ-
KEYDIS3
KEYDIS3
KEYDIS3
24
25
26
KEYDIS3
KEYDIS3
KEYDIS3
27
28
29
45Spdl override -
KEYDIS3
KEYDIS3
KEYDIS3
27
28
29
4th axis Spdl override -
KEYDIS3
KEYDIS3
30
31
Spdl CCW
STOP
KEYDIS3
KEYDIS3
30
31
Spdl CCW
STOP
(·M· model)
(·T· model)
3rd axis +
Z-
Spdl stop
3rd axis X-
• Bit ·14· (spdl CW) corresponds to the key for starting the spindle clockwise.
• Bit ·30· (spdl CCW) corresponds to the key for starting the spindle
counterclockwise.
• Bit ·22· (spdl stop) corresponds to the key for stopping the spindle.
CNC 8035
(SOFT M: V11.1X)
(SOFT T: V12.1X)
276
Installation manual
Register KEYDIS4 disables the positions of the feedrate override switch (feedrate %
selector).
Register
Bit
Inhibited key
Register
Bit
Inhibited key
KEYDIS4
KEYDIS4
KEYDIS4
0
1
2
Handwheel x100
Handwheel x10
Handwheel x1
KEYDIS4
KEYDIS4
KEYDIS4
16
17
18
Feedrate override
60%
KEYDIS4
KEYDIS4
KEYDIS4
3
4
5
Jog 10000
Jog 1000
Jog 100
KEYDIS4
KEYDIS4
KEYDIS4
6
7
8
Jog 10
Jog 1
KEYDIS4
KEYDIS4
KEYDIS4
9
10
11
Feedrate override
10%
KEYDIS4
KEYDIS4
12
13
19
20
21
Feedrate override
20%
Feedrate override
30%
Feedrate override
90%
Feedrate override
100%
Feedrate override
110%
KEYDIS4
KEYDIS4
KEYDIS4
22
23
24
KEYDIS4
KEYDIS4
KEYDIS4
25
26
27
KEYDIS4
KEYDIS4
28
29
Feedrate override
120%
Key inhibiting logic inputs.
KEYDIS4
KEYDIS4
KEYDIS4
LOGIC CNC INPUTS AND OUTPUTS
Feedrate override
4%
10.
Feedrate override
80%
Feedrate override
0%
Feedrate override
2%
Feedrate override
70%
Should one of the inhibited positions of the feedrate override switch be selected, the
CNC will take the value corresponding to the nearest uninhibited position below it.
If all of them are inhibited, the lowest will be taken (0%).
For example, if only positions 110% and 120% of the switch are allowed and position
50% is selected, the CNC will take a value of 0%.
CNC 8035
(SOFT M: V11.1X)
(SOFT T: V12.1X)
277
Installation manual
10.5
Logic inputs of the PLC channel
To govern the axes managed by PLC.
/FEEDHOP (M5004)
It is similar to general logic input /FEEDHOL (M5002), but for the PLC channel.
When the PLC sets this signal low, the CNC stops the axes (maintaining spindle
rotation). When the signal returns to the high logic level, the movement of the PLC
axes continues.
Logic inputs of the PLC channel
LOGIC CNC INPUTS AND OUTPUTS
10.
This input must always be defined in the PLC program.
/XFERINP (M5005)
It is similar to general logic input /XFERINH (M5003), but for the PLC channel.
If the PLC sets this signal low, the CNC prevents the following block from starting,
but finishes the one it is executing. When the signal returns to high logic level, the
CNC continues to execute the program.
This input must always be defined in the PLC program.
AUXENDP (M5006)
It is similar to general logic input AUXEND (M5016), but for the PLC channel.
This signal is used in the execution of auxiliary M functions to tell the CNC that the
PLC is executing them.
It operates in the following way:
1. Once the block has been analyzed and after passing the corresponding values
in variables “MBCD1-7”, the CNC will tell the PLC through the general logic output
“MSTROBEP” that the required auxiliary function or functions must be executed.
2. When the PLC detects the activation of the “MSTROBEP” signal it must
deactivate the general logic input “AUXENDP” to “tell” the CNC that the execution
of the function has started.
3. The PLC will execute all the required auxiliary functions analyzing general logic
output “MSTROBEP” and variables “MBCDP1” through “MBCDP7” (R565
through R571).
Once this has been executed the PLC must activate the general logic input
“AUXENDP” to indicate to the CNC that the processing of the required functions
was completed.
CNC 8035
4. Once the general “AUXENDP” input is activated, the CNC will require that this
signal be kept active for a time period greater than the value given to the g.m.p.
“MINAENDW” (P30).
This way, erroneous interpretations of this signal by the CNC due to an improper
PLC program logic are avoided .
(SOFT M: V11.1X)
(SOFT T: V12.1X)
278
5. Once the period of time MINAENDW has elapsed with the general input
“AUXENDP” at a high logic level, the CNC will deactivate the general logic output
“MSTROBEP” to tell the PLC that the execution of the required auxiliary function
or functions has been completed.
Installation manual
BLOABORP (M5061)
It is similar to general logic input BLOABOR (M5060), but for the PLC channel.
When the PLC sets this mark high, the CNC ends the movement in progress and
starts executing the next block. If the interrupted block had M functions to be executed
after the block, they will be executed before going on to the next block.
This mark only affects the execution in automatic mode and the simulation with
motion.
• It affect motion blocks G0, G1, G2, G3.
• They affect the dwell programmed with G4.
• It affects the look-ahead. In this type of programs with very small blocks, it is not
possible to stop at the same block where the "BLOABOR" mark is detected. In
these cases, it will be canceled at the block where the axis is fully decelerated.
These marks do not affect the following functions.
• It does not affect motionless blocs, which will be executed.
• It does not affect the M functions that are executed after the block. These functions
are always executed, even if the movement of the block is interrupted.
Logic inputs of the PLC channel
These marks affect the following functions.
10.
LOGIC CNC INPUTS AND OUTPUTS
This mark does not stay active after the execution. Once executed, the CNC
deactivates it. Likewise, if they are activated in a block that does not accept them, they
will also be deactivated; they do not stay active for the next block.
• It does affect not affect threading blocks G33. Nor does it affect the regular tapping
or rigid tapping cycles regardless of the value of parameter STOPTAP.
• It does not affect spindle positioning blocks M19. If the spindle positioning is in
a block containing axis movement, it aborts the movement of the axes, but it
completes the positioning of the spindle.
Considerations for the execution
These marks do not affect block preparation. When canceling the execution of a block,
the next movement is carried out up to the prepared target coordinates; no
preparation is done.
On the other hand, only the programmed axes are involved in the next movement.
The rest of the axes are ignored, even if there is a real difference in position because
the previous block has been aborted.
Path 1
Path 2
The solid lines represent the programmed paths and the dashed lines the
real paths, after activating the BLOABORP mark.
If a block is aborted and then the RETRACE function is activated, the retraced path
(backwards) will not be the same as the one traveled forward. The two paths will not
coincide either when aborting a block while the RETRACE function is active.
CNC 8035
(SOFT M: V11.1X)
(SOFT T: V12.1X)
279
Installation manual
10.6
General logic outputs
CNCREADY (M5500)
The CNC activates and maintains this signal high if the autotest which the CNC makes
when it is powered up has not detected any problem. Should any hardware error be
detected (RAM, over-temperature, etc.) this signal is set low.
Example
General logic outputs
LOGIC CNC INPUTS AND OUTPUTS
10.
CNCREADY AND (rest of conditions) = O1
The emergency output O1 of the PLC must be normally high. Should any
problem come up on CNC power-up (CNCREADY), emergency output O1 must
be set low (0V).
START (M5501)
The CNC sets this signal high in order to tell the PLC that the START key on the front
panel has been pressed.
If the PLC program considers that there is nothing to prevent the part program from
starting, it must set the general logic input CYSTART at a high logic level, thereby
starting the execution of the program.
When the CNC detects an up flank (logic level change from low to high) at the
CYSTART signal, it reset the START signal to low.
Example
START AND (rest of conditions) = CYSTART
When the cycle START key is pressed, the CNC activates the general logic
output START. The PLC must check that the rest of the conditions (hydraulic,
safety devices, etc.) are met before setting the general input CYSTART high in
order to start executing the program
FHOUT (M5502)
The CNC sets this signal high in order to tell the PLC that the execution of the program
is stopped due to one of the following causes:
• Because the CONTROL PANEL STOP key has been pressed.
• Because the general logic input /STOP has been set low, even though later it has
returned high.
• Because the general logic input /FEEDHOL is low.
RESETOUT (M5503)
The CNC sets this signal high for 100 milliseconds, in order to tell the PLC that it is
under initial conditions because the Reset key on the front panel has been pressed
or because the general logic input RESETIN has been activated.
LOPEN (M5506)
The CNC sets this signal high in order to tell the PLC that the positioning loop of the
axes is open since an error has occurred.
CNC 8035
(SOFT M: V11.1X)
(SOFT T: V12.1X)
280
Installation manual
/ALARM (M5507)
The CNC sets this signal low in order to tell the PLC that an alarm or emergency
condition has been detected. This signal will be set high once again, once the
message from the CNC has been eliminated and the cause of the alarm has
disappeared.
Likewise, while this signal is low, the CNC keeps the emergency output (pin 2 of
connector X2) active (low).
General logic outputs
LOGIC CNC INPUTS AND OUTPUTS
10.
Example
/ALARM AND (other conditions) = O1
The emergency output O1 of the PLC must be normally high. If an alarm or an
emergency is detected at the CNC, the emergency output O1 must be set low
(0V).
MANUAL (M5508)
The CNC sets this signal high to tell the PLC that the JOG (Manual) operating mode
is selected.
AUTOMAT (M5509)
The CNC sets this signal high to tell the PLC that the automatic operating mode is
selected.
MDI (M5510)
The CNC sets this signal high to tell the PLC that the MDI mode (manual data input)
is selected in one of the operating modes (JOG, automatic, etc).
SBOUT (M5511)
The CNC sets this signal high to tell the PLC that the single block execution mode
is selected.
CNC 8035
(SOFT M: V11.1X)
(SOFT T: V12.1X)
281
Installation manual
INCYCLE (M5515)
The CNC sets this signal high while executing a block or moving an axis.
Once the execution of the program has been requested by the PLC to the CNC by
means of the logic input CYSTART, the latter will indicate that it is being executed by
setting the INCYCLE signal high.
This signal is maintained high until the CNC finishes the part program or when this
is stopped by means of the STOP key on the CONTROL PANEL or the general logic
input /STOP.
General logic outputs
LOGIC CNC INPUTS AND OUTPUTS
10.
If the CNC is in the single block execution mode, the INCYCLE signal is set low as
soon as the block execution is concluded.
If the CNC is in JOG mode, the INCYCLE signal is set low as soon as the position
indicated has been reached.
If the CNC is in JOG mode and the axes are being jogged, the "INCYCLE" signal goes
high while any of the jog keys are pressed.
RAPID (M5516)
The CNC sets this signal high to tell the PLC that a rapid positioning (G00) is being
executed.
TAPPING (M5517)
The CNC sets this signal high to tell the PLC that a tapping canned cycle is being
executed (G84).
THREAD (M5518)
The CNC sets this signal high to tell the PLC that a threading block is being executed
(G33).
PROBE (M5519)
The CNC sets this signal high to tell the PLC that a probing movement is being
executed (G75/G76).
ZERO (M5520)
The CNC sets this signal high to tell the PLC that a machine reference search is being
executed (G74).
RIGID (M5521)
This output is only available on the mill model. The CNC set this signal high to indicate
to the PLC that a RIGID TAPPING operation (G84) is being performed.
RETRAEND (M5522)
The CNC sets this signal high to indicate to the “PLC” that while retracing is active
all the possible blocks have been retraced.
For further information, see general input “RETRACE (M5051)”.
CSS (M5523)
CNC 8035
(SOFT M: V11.1X)
(SOFT T: V12.1X)
282
This output is only available on the lathe model. The CNC sets this signal high to tell
the PLC that the constant cutting speed function is selected (G96).
Installation manual
SELECT0 (M5524) SELECT1 (M5525)
SELECT4 (M5528) SELECT5 (M5529)
SELECTOR (R564)
SELECT2 (M5526)
SELECT6 (M5530)
SELECT3 (M5527)
SELECT7 (M5531)
The CNC uses these signals to indicate to the PLC the position selected at each
keyboard switch.
SELECTOR indicates the position currently selected.
indicates the value applied by the CNC.
SELECTOR
bit (7)
bit (6) bit (5)
bit (4) bit (3)
bit (2)
bit (1)
SELECT7 ...
bit (0)
Hex.
... SELECT0
Handwheel x100
1
1
1
1
0
0
0
0
F0
Handwheel x10
1
1
1
1
0
0
0
1
F1
Handwheel x1
1
1
1
1
0
0
1
0
F2
JOG 10000
1
1
1
1
0
0
1
1
F3
JOG 1000
1
1
1
1
0
1
0
0
F4
JOG 100
1
1
1
1
0
1
0
1
F5
JOG 10
1
1
1
1
0
1
1
0
F6
JOG 1
1
1
1
1
0
1
1
1
F7
Feedrate override 0%
0
0
0
0
1
0
0
0
08
Feedrate override 2%
0
0
0
1
1
0
0
0
18
Feedrate override 4%
0
0
1
0
1
0
0
0
28
Fe e d r a t e
override10%
0
0
1
1
1
0
0
0
38
Fe e d ra t e ove r r i d e
20%
0
1
0
0
1
0
0
0
48
Fe e d ra t e ove r r i d e
30%
0
1
0
1
1
0
0
0
58
Fe e d ra t e ove r r i d e
40%
0
1
1
0
1
0
0
0
68
Fe e d ra t e ove r r i d e
50%
0
1
1
1
1
0
0
0
78
Fe e d ra t e ove r r i d e
60%
1
0
0
0
1
0
0
0
88
Fe e d ra t e ove r r i d e
70%
1
0
0
1
1
0
0
0
98
Fe e d ra t e ove r r i d e
80%
1
0
1
0
1
0
0
0
A8
Fe e d ra t e ove r r i d e
90%
1
0
1
1
1
0
0
0
B8
Fe e d ra t e ove r r i d e
100%
1
1
0
0
1
0
0
0
C8
Fe e d ra t e ove r r i d e
110%
1
1
0
1
1
0
0
0
D8
Fe e d ra t e ove r r i d e
120%
1
1
1
0
1
0
0
0
E8
10.
General logic outputs
Usually, the two values coincide, except when a position has been selected which
has been disabled with the KEYDIS4 input (R503). If while being the 60% and 120%
inhibited, the 100% position is selected, SELECTOR will show the selected position
(100%) and SELECT will show the value being applied (50%).
LOGIC CNC INPUTS AND OUTPUTS
SELECT
CNC 8035
(SOFT M: V11.1X)
(SOFT T: V12.1X)
283
Installation manual
MSTROBE (M5532)
The CNC sets this signal high to tell the PLC that it must execute the auxiliary M
function or functions which are indicated in registers “MBCD1” to “MBCD7” (R550 to
R556).
SSTROBE (M5533)
This signal will be used when operating a spindle with BCD coded S signal. s.m.p.
SPDLTYPE (P0).
General logic outputs
LOGIC CNC INPUTS AND OUTPUTS
10.
The CNC sets this signal high to tell the PLC that it must execute the auxiliary S
function which is indicated in the register “SBCD” (R557).
TSTROBE (M5534)
The CNC sets this signal high to tell the PLC that it must execute the auxiliary S
function which is indicated in the register “TBCD” (R558).
In this register the CNC will tell the PLC the position of the magazine where the
selected tool is.
If the g.m.p. RANDOMTC (P25) has been set so it is not a random magazine, the
magazine pocket position coincides with the tool number.
T2STROBE (M5535)
This register is used when a special tool change has been made, family code or 200
or with machining centers with a non-random tool magazine (g.m.p. RANDOMTC
(P25).
The CNC sets this signal high to tell the PLC that it must execute a second auxiliary
T function indicated in the register “T2BCD” (R559).
In this register the CNC indicates to the PLC the position of the magazine in which
the tool which was on the spindle must be placed.
ADVINPOS (M5537)
It is used on punch presses that have an eccentric cam as a punching system.
The CNC sets this signal high a specific time period before the axes reach position.
This time is set by g.m.p. ANTIME (P69).
This reduces idle time, thus increasing the number of punches per minute.
INTEREND (M5538) | INPOS (M5539)
The CNC uses these two signals to let the PLC “know” that the theoretical
interpolation between axes has been completed (INTEREND) and that all the axes
involved in the interpolation are in position (INPOS).
The CNC sets the “INTEREND” signal high when the interpolation is ended being low
while in execution.
When the CNC verifies that all the axes have been within the dead band (in position
zone INPOSW P19) for a time period indicated in the a.m.p INPOTIME (P20), it will
consider that all of them are in position and it will inform the PLC by setting the logic
output “INPOS” high.
CNC 8035
(SOFT M: V11.1X)
(SOFT T: V12.1X)
284
The logic output “INTEREND” can be used when it is required to activate mechanisms
before the axes reach their position.
Installation manual
DM00 (M5547)
The CNC sets this signal high to tell the PLC that the auxiliary function M00 (program
stop) is programmed in the block being executed.
DM01 (M5546)
The CNC sets this signal high to tell the PLC that the auxiliary function M01
(conditional stop) is programmed in the block being executed.
DM03 (M5544)
The CNC sets this signal high to tell the PLC that the spindle is turning clockwise or
that the auxiliary function M03 is programmed in the block being executed.
DM04 (M5543)
The CNC sets this signal high to tell the PLC that the spindle is turning counterclockwise or that the auxiliary function M04 is programmed in the block being
executed.
DM05 (M5542)
LOGIC CNC INPUTS AND OUTPUTS
The CNC sets this signal high to tell the PLC that the auxiliary function M02 (program
end) is programmed in the block being executed.
General logic outputs
10.
DM02 (M5545)
The CNC sets this signal high to tell the PLC that the spindle is stopped or that the
auxiliary function M05 is programmed in the block being executed.
DM06 (M5541)
The CNC sets this signal high to tell the PLC that the spindle is stopped or that the
auxiliary function M06 is programmed in the block being executed (tool change).
DM08 (M5540)
The CNC sets this signal high to tell the PLC that the coolant output is activated or
that the auxiliary function M08 is programmed in the block being executed.
DM09 (M5555)
The CNC sets this signal high to tell the PLC that the coolant output is deactivated
or that the auxiliary function M09 is programmed in the block being executed.
DM19 (M5554)
The CNC sets this signal high to tell the PLC that it is working with spindle orientation
or that the auxiliary function M19 is programmed in the block being executed.
DM30 (M5553)
The CNC sets this signal high to tell the PLC that the auxiliary function M30 (program
end) is programmed in the block being executed.
DM41 (M5552)
The CNC sets this signal high to tell the PLC that the first spindle gear is selected
or that the auxiliary function M41 is programmed in the block being executed.
CNC 8035
(SOFT M: V11.1X)
(SOFT T: V12.1X)
285
Installation manual
DM42 (M5551)
The CNC sets this signal high to tell the PLC that the second spindle gear is selected
or that the auxiliary function M42 is programmed in the block being executed.
DM43 (M5550)
The CNC sets this signal high to tell the PLC that the third spindle gear is selected
or that the auxiliary function M43 is programmed in the block being executed.
General logic outputs
LOGIC CNC INPUTS AND OUTPUTS
10.
CNC 8035
(SOFT M: V11.1X)
(SOFT T: V12.1X)
286
DM44 (M5549)
The CNC sets this signal high to tell the PLC that the fourth spindle gear is selected
or that the auxiliary function M44 is programmed in the block being executed.
Installation manual
Logic outputs of the axes
There are several groups of logic inputs (ENABLE, DIR, etc.) which refer to the
possible axes of the machine by means of digits 1 through 3 (ENABLE2, DIR1,etc.)
or using the axis name (ENABLEX, DIRZ, etc.).
The marks of the axes that do not exist in the machine parameters assume the value
of the M2045 mark, that's always set to 0.
ENABLEX with ENABLE1
ENABLEZ by ENABLE2 if there is no Y axis, but there are X and Z axes.
i
The use of mnemonics with the axis name is available from versions V9.0x
and V10.0x on. If PLC programs older than this version have defined these
marks as symbols, when compiling the program will issue an error on this line.
Example: DEF ENABLEX M333
Mnemonics using numbers 1 through 3.
These signals are numbered as the logic order of the axes; it is not related to the
values assigned to g.m.p. AXIS1 (P0) through AXIS8 (P7).
Logic outputs of the axes
10.
When monitoring the PLC program, it shows the edited marks, either with a letter or
with a number. However, the resource windows created from monitoring will replace
the marks with axis names by the marks with axis numbers. For example:
LOGIC CNC INPUTS AND OUTPUTS
10.7
For example, if the CNC controls the X, Z and Y axes, the order will be: X, Y, Z and,
therefore:
ENABLE1, DIR1, REFPOIN1, INPOS1
for the X axis:
ENABLE2, DIR2, REFPOIN2, INPOS2
for the Y axis:
ENABLE3, DIR3, REFPOIN3, INPOS3
for the Z axis:
Mnemonics using the axis name.
The mnemonics of the signals refer to the axis name.
Mnemonics with axis names offer the advantage that if an axis is eliminated, the PLC
program will still be consistent with the rest of the axes.
CNC 8035
(SOFT M: V11.1X)
(SOFT T: V12.1X)
287
Installation manual
ENABLE1 (M5600)
ENABLE2 (M5650)
ENABLE3 (M5700)
The CNC sets these signals at a high logic level to tell the PLC to allow the
corresponding axis to move.
DIR1 (M5601)
DIR2 (M5651) DIR3 (M5701)
The CNC uses these signals to tell the PLC in which direction the axes move.
If the signal is high this indicates that the corresponding axis moves in a negative
direction.
Logic outputs of the axes
LOGIC CNC INPUTS AND OUTPUTS
10.
If the signal is low this indicates that the corresponding axis moves in a positive
direction.
REFPOIN1 (M5602)
REFPOIN2 (M5652)
REFPOIN3 (M5702)
The CNC sets these signals high to tell the PLC that the machine reference search
has been made already. The CNC forces a home search on an axis by setting its mark
low.
The marks are set low in the following instances:
• On CNC power-up.
• After executing the sequence [SHIFT] [RESET].
• When the feedback is direct through the axes board and a feedback alarm occurs.
• When modifying certain machine parameters; for example, number of axes.
In all these cases, a home search must be carried out so the signal is set back high.
DRSTAF1 (M5603) | DRSTAS1 (M5604)
DRSTAF2 (M5653) | DRSTAS2 (M5654)
DRSTAF3 (M5703) | DRSTAS3 (M5704)
The CNC uses these signals when communicating with the drive via Sercos or via
Can and indicate the status of the drive.
DRSTAF*
DRSTAS*
Actuating the main switch of the electrical cabinet
supplies 24 Vdc to the drive.
The drive runs an internal test.
If correct, it activates the output "System OK".
0
0
From that moment on, the power supply must be
turned on.
When there is power at the drive bus, it is ready to
output torque.
0
1
To do that, activate the “drive enable” and “speed
enable” inputs.
1
0
Once the “drive enable” and “speed enable” are
activated, the drive is running properly.
1
1
When an internal error occurs at the drive, the DRSTAF* and DRSTAS* signals are
set low (logic level low).
ANT1 (M5606)
ANT2 (M5656)
ANT3 (M5706)
CNC 8035
These signals are related to a.m.p. MINMOVE (P54).
If the axis move is smaller than the value indicated by this a.m.p. MINMOVE (P54),
the corresponding axis logic output "ANT1 thru "ANT7" goes high.
(SOFT M: V11.1X)
(SOFT T: V12.1X)
288
Installation manual
INPOS1 (M5607) INPOS2 (M5657)
INPOS3 (M5707)
The CNC sets these signals high to tell the PLC that the corresponding axis is in
position.
There is also the general logic output INPOS in which the CNC indicates to the PLC
that all the axes have reached their position.
Logic outputs of the axes
LOGIC CNC INPUTS AND OUTPUTS
10.
CNC 8035
(SOFT M: V11.1X)
(SOFT T: V12.1X)
289
Installation manual
10.8
Spindle logic outputs.
ENABLES (M5950) Main spindle
This signal is used when working with the spindle in closed loop (M19). The CNC only
considers the signals for the currently selected spindle.
The CNC sets this signal high to tell the PLC to allow the spindle to move.
Spindle logic outputs.
LOGIC CNC INPUTS AND OUTPUTS
10.
DIRS (M5951)
Main spindle
This signal is used when working with the spindle in closed loop (M19). The CNC only
considers the signals for the currently selected spindle.
The CNC uses this signal to tell the PLC in which direction the spindle is moving.
If the signal is at a high logic level, this indicates that the spindle moves in a negative
direction.
If the signal is low, this indicates that the spindle moves in a positive direction.
REFPOINS (M5952) Main spindle
This signal is used when working with the spindle in closed loop (M19). The CNC only
considers the signals for the currently selected spindle.
The CNC sets this signal high to tell the PLC that the spindle reference point search
has already been made.
This is set low when the CNC is powered up, after executing the [SHIFT] [RESET]
sequence or a feedback alarm occurs due to loss of count, and every time a change
is made from closed loop (M19) to open loop.
DRSTAFS (M5953) | DRSTASS (M5954) Main spindle
The CNC uses these signals when communicating with the drive via Sercos or via
Can and indicate the status of the drive.
DRSTAF*
DRSTAS*
Actuating the main switch of the electrical cabinet
supplies 24 Vdc to the drive.
The drive runs an internal test.
If correct, it activates the output "System OK".
0
0
From that moment on, the power supply must be
turned on.
When there is power at the drive bus, it is ready to
output torque.
0
1
To do that, activate the “drive enable” and “speed
enable” inputs.
1
0
Once the “drive enable” and “speed enable” are
activated, the drive is running properly.
1
1
When an internal error occurs at the drive, the DRSTAF* and DRSTAS* signals are
set low (logic level low).
CNC 8035
(SOFT M: V11.1X)
(SOFT T: V12.1X)
290
Installation manual
REVOK (M5956) Main spindle
The CNC only considers the signals for the currently selected spindle.
When working with M03 and M04 the CNC sets this signal high to tell the PLC that
the real spindle revolutions correspond to those programmed.
The CNC will activate this signal every time the real revolutions are within the range
defined by s.m.p. “LOSPDLIM” and “UPSPDLIM”.
When working with the spindle in closed loop (M19), the CNC sets this signal high
if the spindle is stopped.
This signal is used when working with the spindle in closed loop (M19). The CNC only
considers the signals for the currently selected spindle.
The CNC sets this signal high to tell the PLC that the spindle is in position.
10.
Spindle logic outputs.
Main spindle
LOGIC CNC INPUTS AND OUTPUTS
INPOSS (M5957)
CNC 8035
(SOFT M: V11.1X)
(SOFT T: V12.1X)
291
Installation manual
10.9
Logic outputs of key status
KEYBD1 (R560) KEYBD2 (R561)
KEYBD3 (R562)
KEYBD4 (R563)
These registers indicate whether or not one of the keys on the keyboard or on the
operator panel is pressed.
When one of these keys is pressed, the corresponding bit will be set high and it will
return low when the key is released.
Logic outputs of key status
LOGIC CNC INPUTS AND OUTPUTS
10.
CNC 8035
(SOFT M: V11.1X)
(SOFT T: V12.1X)
292
Register
Bit
keystroke code
KEYBD1
KEYBD1
KEYBD1
0
1
2
F
L
Q
KEYBD1
KEYBD1
KEYBD1
3
4
5
KEYBD1
KEYBD1
KEYBD1
Register
Bit
keystroke code
KEYBD2
KEYBD2
KEYBD2
0
1
2
B
H
N
W
[SHIFT]
9
KEYBD2
KEYBD2
KEYBD2
3
4
5
S
Y
[RESET]
6
7
8
6
3
E
KEYBD2
KEYBD2
KEYBD2
6
7
8
[ESC]
[MAIN MENU]
A
KEYBD1
KEYBD1
KEYBD1
9
10
11
K
P
V
KEYBD2
KEYBD2
KEYBD2
9
10
11
G
M
R
KEYBD1
KEYBD1
KEYBD1
12
13
14
[CAPS]
8
5
KEYBD2
KEYBD2
KEYBD2
12
13
14
X
[ENTER]
[HELP]
KEYBD1
KEYBD1
KEYBD1
15
16
17
2
D
J
KEYBD2
KEYBD2
KEYBD2
15
16
17
.
0
KEYBD1
KEYBD1
KEYBD1
18
19
20
O
U
[SP]
KEYBD2
KEYBD2
KEYBD2
18
19
20
KEYBD1
KEYBD1
KEYBD1
21
22
23
7
4
1
KEYBD2
KEYBD2
KEYBD2
21
22
23
KEYBD1
KEYBD1
KEYBD1
24
25
26
C
I
Ñ
KEYBD2
KEYBD2
KEYBD2
24
25
26
[PG DW]
[PG UP]
[©]
KEYBD1
KEYBD1
KEYBD1
27
28
29
T
Z
=
KEYBD2
KEYBD2
KEYBD2
27
28
29
[ª]
[¨]
[§]
KEYBD1
KEYBD1
30
31
/
*
KEYBD2
KEYBD2
30
31
[CL]
[INS]
+
Installation manual
The values returned by register KEYBD (R562) depend on the CNC model available
(M or T model).
keystroke code
(·M· model)
Register
Bit
keystroke code
(·T· model)
KEYBD3
KEYBD3
KEYBD3
0
1
2
F1
F2
F3
KEYBD3
KEYBD3
KEYBD3
0
1
2
F1
F2
F3
KEYBD3
KEYBD3
KEYBD3
3
4
5
F4
F5
F6
KEYBD3
KEYBD3
KEYBD3
3
4
5
F4
F5
F6
KEYBD3
KEYBD3
KEYBD3
6
7
8
F7
6
7
8
F7
X+
KEYBD3
KEYBD3
KEYBD3
KEYBD3
KEYBD3
KEYBD3
9
10
11
Y+
Z+
4+
KEYBD3
KEYBD3
KEYBD3
9
10
11
X+
KEYBD3
KEYBD3
KEYBD3
12
13
14
5+
Spdl override +
Spdl CW
KEYBD3
KEYBD3
KEYBD3
12
13
14
4th axis +
Spdl override +
Spdl CW
KEYBD3
KEYBD3
KEYBD3
15
16
17
START
KEYBD3
KEYBD3
KEYBD3
15
16
17
START
KEYBD3
KEYBD3
KEYBD3
18
19
20
Rapid feedrate
KEYBD3
KEYBD3
KEYBD3
18
19
20
Rapid feedrate
Z+
KEYBD3
KEYBD3
KEYBD3
21
22
23
Spdl stop
KEYBD3
KEYBD3
KEYBD3
21
22
23
KEYBD3
KEYBD3
KEYBD3
24
25
26
XYZ-
KEYBD3
KEYBD3
KEYBD3
24
25
26
KEYBD3
KEYBD3
KEYBD3
27
28
29
45Spdl override -
KEYBD3
KEYBD3
KEYBD3
27
28
29
4th axis Spdl override -
KEYBD3
KEYBD3
30
31
Spdl CCW
STOP
KEYBD3
KEYBD3
30
31
Spdl CCW
STOP
3rd axis +
10.
Logic outputs of key status
Bit
LOGIC CNC INPUTS AND OUTPUTS
Register
Z-
Spdl stop
3rd axis X-
CNC 8035
(SOFT M: V11.1X)
(SOFT T: V12.1X)
293
Installation manual
Register KEYDIS4 refers to the positions of the feedrate override switch (feedrate %
selector).
Register
Logic outputs of key status
LOGIC CNC INPUTS AND OUTPUTS
10.
Bit
Key pressed
KEYBD4
KEYBD4
KEYBD4
0
1
2
Handwheel x100
Handwheel x10
Handwheel x1
KEYBD4
KEYBD4
KEYBD4
3
4
5
Jog 10000
Jog 1000
Jog 100
KEYBD4
KEYBD4
KEYBD4
6
7
8
Jog 10
Jog 1
KEYBD4
KEYBD4
KEYBD4
9
10
11
12
13
Feedrate override
2%
Feedrate override
4%
Feedrate override
20%
Feedrate override
30%
CNC 8035
(SOFT M: V11.1X)
(SOFT T: V12.1X)
294
KEYBD4
KEYBD4
KEYBD4
Bit
Key pressed
16
17
18
Feedrate override
60%
Feedrate override
70%
Feedrate override
80%
KEYBD4
KEYBD4
KEYBD4
19
20
21
Feedrate override
0%
Feedrate override
10%
KEYBD4
KEYBD4
Register
Feedrate override
90%
Feedrate override
100%
Feedrate override
110%
KEYBD4
KEYBD4
KEYBD4
22
23
24
KEYBD4
KEYBD4
KEYBD4
25
26
27
KEYBD4
KEYBD4
28
29
Feedrate override
120%
ACCESS TO THE INTERNAL CNC
VARIABLES
11
The CNC has a number of internal variables that may be accessed from the user
program, from the PLC program or via DNC. Depending on how they are used, these
variables may be read-only or read-write.
Reading and writing variables from the PLC
The PLC provides two instructions (actions) which permit to read or modify the
various internal variables of the CNC from the PLC.
Reading variables. –CNCRD– command
The CNCRD command allows reading the CNC's internal variables. Its programming
format is:
CNCRD (Variable, Register, Mark)
This PLC action loads the contents of the indicated variable into the selected register.
If this instruction has been executed properly, the PLC will assign a value of “0” to
the indicated “error detection” mark and “1” if otherwise.
CNCRD (FEED, R150, M200)
It loads the value of the feedrate selected at the CNC when working in G94 into
the PLC register R150.
When requesting information about a nonexisting variable (i.e. the position value of
a nonexisting axis), this instruction will not alter the contents of the register and it will
set the selected error mark indicating that the variable does not exist.
Writing variables. –CNCWR– command
The CNCWR command allows writing the CNC's internal variables. Its programming
format is:
CNCWR (Register, Variable, Mark)
This PLC action loads the contents of the indicated register into the selected variable.
If this instruction has been executed properly, the PLC will assign a value of “0” to
the indicated “error detection” mark and “1” if otherwise.
CNCWR (R92, TIMER, M200)
It resets the clock enabled by the PLC with the value contained in register R92.
When trying to modify the contents of a nonexisting variable or assign an improper
value to it, the selected “error mark” will be set to “1” which will indicate that this
instruction is incorrect.
When performing an improper reading or writing request, the PLC will continue the
execution of the program unless interrupted by the programmer after having analyzed
the “error” mark defined in the instruction.
CNC 8035
(SOFT M: V11.1X)
(SOFT T: V12.1X)
295
Installation manual
Identifying the variables in the PLC commands
These variables are accessed from the PLC using high level commands. Each one
of these variables is referred to by its mnemonic that must be written in upper-case
(capital) letters.
• Mnemonics ending in (X-C) indicate a set of 9 elements formed by the
corresponding root followed by X, Y, Z, U, V, W, A, B and C.
ACCESS TO THE INTERNAL CNC VARIABLES
11.
CNC 8035
(SOFT M: V11.1X)
(SOFT T: V12.1X)
296
ORG(X-C) -> ORGX
ORGY
ORGZ
ORGU
ORGV
ORGW
ORGA
ORGB
ORGC
• Mnemonics ending in n indicate that the variables are grouped in tables. To access
an element of any of these tables, indicate the field of the desired table using the
relevant mnemonic followed by the desired element.
TORn ->
TOR1
TOR3
TOR11
These variables can also be referred to by its corresponding mnemonic and a
register that indicates the element number of that table.
TORn ->
TOR R1
TOR R23
CNCRD (TOR R222, R100, M102)
It assigns the radius value of the offset indicated by Register R222 to register
R100
Installation manual
Variables associated with tools.
These variables are associated with the tool offset table, tool table and tool magazine
table, so the values which are assigned to or read from these fields will comply with
the formats established for these tables.
Tool table for mill model CNC
The radius (R), length (L) and wear offset (I, K) values of the tool are given in the units
set by g.m.p. INCHES.
If INCHES = 1, in hundred-thousandths of an inch (±393700787).
If rotary axis, in ten-thousandths of a degree (±999999999).
Tool table for lathe model CNC
The length (X, Z), radius (R) and wear offset (I, K) values of the tool are given in the
units set by g.m.p. INCHES.
If, INCHES = 0, in ten-thousandths of a millimeter (±999999999).
If INCHES = 1, in hundred-thousandths of an inch (±393700787).
If rotary axis, in ten-thousandths of a degree (±999999999).
The location (tool shape) code (F) will be an integer between 0 and 9.
Tool table at the mill model CNC
The tool offset number is an integer between 0 and 255. The maximum number of
tool offsets is limited by g.m.p. NTOFFSET.
Variables associated with tools.
11.
If, INCHES = 0, in ten-thousandths of a millimeter (±999999999).
ACCESS TO THE INTERNAL CNC VARIABLES
11.1
The family code is a number between 0 and 255.
0 to 199
if it is a normal tool.
200 to 255
if it is a special tool.
The nominal life is given either in minutes or in operations (0··65535).
The real (actual) life is given either in hundredths of a minute (0··9999999) or in
operations (0··999999).
Tool table at the lathe model CNC
The tool offset number is an integer between 0 and 255. The maximum number of
tool offsets is limited by g.m.p. NTOFFSET.
The family code is a number between 0 and 255.
0 to 199
if it is a normal tool.
200 to 255
if it is a special tool.
The nominal life is given either in minutes or in operations (0··65535).
The real (actual) life is given either in hundredths of a minute (0··9999999) or in
operations (0··999999).
The cutter angle is given in ten-thousandths of a degree (0··359999).
The cutter width is given in the units set by g.m.p. INCHES.
CNC 8035
If, INCHES = 0, in ten-thousandths of a millimeter (±999999999).
If INCHES = 1, in hundred-thousandths of an inch (±393700787).
If rotary axis, in ten-thousandths of a degree (±999999999).
The cutting angle is given in ten-thousandths of a degree (0··359999).
(SOFT M: V11.1X)
(SOFT T: V12.1X)
297
Installation manual
Tool magazine table
Each magazine position is represented as follows:
1··255
Tool number.
0
The magazine position is empty.
-1
The magazine position has been canceled.
The tool position in the magazine is represented as follows:
Variables associated with tools.
ACCESS TO THE INTERNAL CNC VARIABLES
11.
1··255
Position number.
0
The tool is in the spindle.
-1
Tool not found.
-2
The tool is in the change position.
Read-only variables
Variables TOOL, NXTOOL, TOD and NXTOD can only be written from the PLC while
no block or part-program is being executed or simulated.
TOOL
Returns the number of the active tool.
CNCRD(TOOL,R100,M100)
Assigns the number of the active tool to register R100.
TOD
Returns the number of the active tool offset.
NXTOOL
Returns the next tool number, which is selected but is awaiting the execution of M06
to be active.
NXTOD
Returns the number of the tool offset corresponding to the next tool, which is selected
but is awaiting the execution of M06 to be active.
TMZPn
Returns the position occupied in the tool magazine by the indicated tool (n).
Read-and-write variables
TLFDn
This variable allows the tool offset number of the indicated tool (n) to be read or
modified in the tool table.
TLFFn
This variable allows the family code of the indicated tool (n) to be read or modified
in the tool table.
TLFNn
This variable allows the value assigned as the nominal life of the indicated tool (n)
to be read or modified in the tool table.
TLFRn
This variable allows the value corresponding to the real life of the indicated tool (n)
to be read or modified in the tool table.
TMZTn
This variable allows the contents of the indicated position (n) to be read or modified
in the tool magazine table.
HTOR
The HTOR variable indicates the tool radius being used by the CNC to do the
calculations.
CNC 8035
Being a variable that can be read and written by the CNC and read-only from the PLC
and DNC, its value may be different from the one assigned in the table (TOR).
(SOFT M: V11.1X)
(SOFT T: V12.1X)
298
On power-up, after a T function, after a RESET or after an M30 function, it assumes
the value of the table (TOR).
Installation manual
Application example
To machine a profile with a residual stock of 0.5 mm running 0.1mm-passes with a
tool whose radius is 10 mm.
Assign to the tool radius the value of:
10.5 mm in the table and execute the profile.
10,4 mm in the table and execute the profile.
10,3 mm in the table and execute the profile.
10,0 mm in the table and execute the profile.
However, if while machining, the program is interrupted or a reset occurs, the table
assumes the radius value assigned in that instant (e.g.: 10.2 mm). Its value has
changed.
To avoid this, instead of modifying the tool radius in the (TOR) table, use the variable
(HTOR) to change the tool radius value used by the CNC to calculate.
Now, if the program is interrupted, the tool radius value initially assigned in the (TOR)
table will be correct because it has not changed.
Read-and-write variables of the mill model CNC
TORn
This variable allows the value assigned to the radius of the indicated tool offset (n)
in the tool offset table to be read or modified.
ACCESS TO THE INTERNAL CNC VARIABLES
10,1 mm in the table and execute the profile.
Variables associated with tools.
11.
10,2 mm in the table and execute the profile.
CNCRD(TOR3,R100,M102);
Assigns the R value of tool offset 3 to register R100.
CNCWR(R101,TOR3,M101)
Assigns the value indicated in R101 to the radius of tool offset 3.
TOLn
This variable allows the value assigned to the length of the indicated tool offset (n)
to be read or modified in the tool offset table.
TOIn
This variable allows the value assigned to the wear in radius (I) of the indicated tool
offset (n) to be read or modified in the tool offset table.
TOKn
This variable allows the value assigned to the wear in length (K) of the indicated tool
offset (n) to be read or modified in the tool offset table.
Read-and-write variables of the lathe model
TOXn
This variable allows reading or modifying the length value along the X axis assigned
to the indicated tool offset (n).
CNCRD (TOX3, R100, M102)
Loads R100 with the length value along X of the tool offset 3.
CNCWR (R101, TOX3, M101)
Assigns the value indicated in R101 to the length along X of tool offset 3.
TOZn
This variable allows reading or modifying the length value along the Z axis assigned
to the indicated tool offset (n).
TOFn
This variable allows reading or modifying the location code (F) of the indicated tool
offset (n).
TORn
This variable allows reading or modifying the radius R value of the indicated tool offset
(n).
CNC 8035
(SOFT M: V11.1X)
(SOFT T: V12.1X)
299
Installation manual
Variables associated with tools.
ACCESS TO THE INTERNAL CNC VARIABLES
11.
CNC 8035
(SOFT M: V11.1X)
(SOFT T: V12.1X)
300
TOIn
This variable allows reading or modifying the length wear value (I) along the X axis
of the indicated tool offset (n).
TOKn
This variable allows reading or modifying the length wear value (K) along the Z axis
of the indicated tool offset (n).
NOSEAn:
This variable allows reading or modifying the cutter angle assigned to the indicated
tool (n) in the tool table.
NOSEWn
This variable allows reading or modifying the cutter width assigned to the indicated
tool (n) in the tool table.
CUTAn
This variable allows reading or modifying the cutting angle assigned to the indicated
tool (n) in the tool table.
Installation manual
11.2
Variables associated with zero offsets.
These variables are associated with the zero offset table, due to which the values that
will be assigned to or read from these fields will comply with the formats established
for this table.
The possible zero offsets in addition to the additive offset indicated by the PLC, are
G54, G55, G56, G57, G58 and G59.
If INCHES = 1, in hundred-thousandths of an inch (±393700787).
If rotary axis, in ten-thousandths of a degree (±999999999).
Although there are variables which refer to each axis, the CNC only allows those
referring to the axes selected at the CNC. Thus, if the CNC controls the X and Z axes,
it only allows the variables ORGX and ORGZ in the case of ORG(X-C).
Read-only variables
ORG(X-C)
Returns the value of the active zero offset in the selected axis. The value of the
additive offset indicated by the PLC or by the additive handwheel is not included in
this value.
ADIOF(X-C)
It returns the value of the zero offset generated by the additive handwheel in the
selected axis.
ACCESS TO THE INTERNAL CNC VARIABLES
If, INCHES = 0, in ten-thousandths of a millimeter (±999999999).
Variables associated with zero offsets.
11.
The values are given in the units set by g.m.p. INCHES.
Read-and-write variables
ORG(X-C)n
This variable allows the value of the selected axis to be read or modified in the table
corresponding to the indicated zero offset (n).
CNCRD(ORGX 55,R100,M102)
Loads register R100 with the X value of G55 in the zero offset table.
CNCWR (R101, TOX3, M101)
Assigns the value indicated in R101 to the Y value of G54 in the zero offset table.
PLCOF(X-C)
This variable allows the value of the selected axis to be read or modified in the table
of additive offsets indicated by the PLC.
Accessing any of the PLCOF(X-C) variables interrupts block preparation and the
CNC waits for that command to be executed before resuming block preparation.
CNC 8035
(SOFT M: V11.1X)
(SOFT T: V12.1X)
301
Installation manual
11.3
Variables associated with machine parameters
These variables associated with machine parameters are read-only variables.
Refer to the installation and start-up manual to know the format of the values returned.
The values of 1/0 correspond to the parameters that are set as YES/NO, +/- or ON/
OFF.
Values regarding position and feedrate values will be given in the units set by g.m.p.
INCHES.
If, INCHES = 0, in ten-thousandths of a millimeter (±999999999).
If INCHES = 1, in hundred-thousandths of an inch (±393700787).
Variables associated with machine parameters
ACCESS TO THE INTERNAL CNC VARIABLES
11.
If rotary axis, in ten-thousandths of a degree (±999999999).
OEM programs or subroutines
These variables may be read and written when executed inside an OEM program or
subroutine.
In order to be able to modify these parameters via PLC, an OEM subroutine
containing the relevant variables must be executed using the CNCEX command.
For the CNC to assume the new values, operate according to the indicators
associated with the machine parameters.
Character
Type of update
//
It is necessary to press the keystroke sequence: [SHIFT] +
[RESET] or turn the CNC off and back on.
/
[RESET] must be pressed.
The rest of the parameters (those unmarked) will be updated
automatically, only by changing them.
Read-only variables
MPGn
Returns the value assigned to general machine parameter (n).
CNCRD (MPG 8,R100,M102)
Loads register R100 with the value of general machine parameter INCHES
(P8), If mm, R100 = 0; and if inch, R100 =1.
MP(X-C)n
Returns the value assigned to the machine parameter (n) of the indicated axis (X-C).
CNCRD (MPY 1,R100,M102)
Assigns the value of Y axis machine parameter DFORMAT (P1) to register
R100.
CNC 8035
(SOFT M: V11.1X)
(SOFT T: V12.1X)
302
MPSn
Returns the value assigned to the indicated machine parameter (n) of the main
spindle.
MPLCn
Returns the value assigned to the indicated machine parameter (n) of the PLC.
Installation manual
11.4
Variables associated with work zones
The values of the limits are given in the units set by g.m.p. INCHES.
If, INCHES = 0, in ten-thousandths of a millimeter (±999999999).
If INCHES = 1, in hundred-thousandths of an inch (±393700787).
If rotary axis, in ten-thousandths of a degree (±999999999).
The status of the work zones are defined according to the following code:
2 = Enabled as no-exit zone.
Read-and-write variables
FZONE
It returns the status of work zone 1.
FZLO(X-C)
Lower limit of zone 1 along the selected axis (X-C).
FZUP(X-C)
Upper limit of zone 1 along the selected axis (X-C).
The following example shows how it is possible to define as forbidden zone for the
X axis the area between coordinates 0 and 100mm (1000000 tenths of microns).
<condition>
= MOV 0 R1
= CNCWR(R1, FZLOX, M1)
= MOV 1000000 R1
= CNCWR(R1, FZUPX, M1)
= MOV 1 R1
= CNCWR(R1, FZONE, M1)
SZONE
Status of work zone 2.
SZLO(X-C)
Lower limit of zone 2 along the selected axis (X-C).
SZUP(X-C)
Upper limit of zone 2 along the selected axis (X-C).
TZONE
Status of work zone 3.
TZLO(X-C)
Lower limit of zone 3 along the selected axis (X-C)
TZUP(X-C)
Upper limit of zone 3 along the selected axis (X-C).
FOZONE
Status of work zone 4.
FOZLO(X-C)
Lower limit of zone 4 along the selected axis (X-C).
FOZUP(X-C)
Upper limit of zone 4 along the selected axis (X-C).
FIZONE
Status of work zone 5.
FIZLO(X-C):
Lower limit of zone 5 along the selected axis (X-C).
FIZUP(X-C)
Upper limit of zone 5 along the selected axis (X-C).
ACCESS TO THE INTERNAL CNC VARIABLES
1 = Enabled as no-entry zone.
Variables associated with work zones
11.
0 = Disabled.
CNC 8035
(SOFT M: V11.1X)
(SOFT T: V12.1X)
303
Installation manual
11.5
Variables associated with feedrates
Read-only variables associated with the real (actual) feedrate
FREAL
In 0.0001 mm/min. or 0.00001 inch/min units.
Variables associated with feedrates
11.
ACCESS TO THE INTERNAL CNC VARIABLES
It returns the CNC's real feedrate. It takes into account the feedrate override and the
acc/dec of the machine.
On Laser cutting machines, it is recommended to use this variable to make the power
of the Laser proportional to the actual feedrate at all times.
FREAL(X-C)
It returns the actual (real) CNC feedrate of the selected axis.
In 0.0001 mm/min. or 0.00001 inch/min units.
FTEO(X-C)
It returns the theoretical CNC feedrate of the selected axis.
In 0.0001 mm/min. or 0.00001 inch/min units.
Read-only variables associated with function G94
FEED
It returns the feedrate selected at the CNC by function G94. In mm/minute or inches/
minute.
This feedrate may be indicated by program, by PLC or by DNC; the CNC selects one
of them, the one indicated by DNC has the highest priority and the one indicated by
program has the lowest priority.
DNCF
It returns the feedrate, in mm/minute or inches/minute selected by DNC. If it has a
value of 0 it means that it is not selected.
PRGF
It returns the feedrate, in mm/minute or inches/minute selected by program. If it has
a value of 0 it means that it is not selected.
Read-write variables associated with function G94
PLCF
It returns the feedrate, in mm/minute or inches/minute selected by PLC. If it has a
value of 0 it means that it is not selected.
Read-only variables associated with function G95
FPREV
It returns the feedrate selected at the CNC by function G95. In mm/turn or inches/turn.
This feedrate may be indicated by program, by PLC or by DNC; the CNC selects one
of them, the one indicated by DNC has the highest priority and the one indicated by
program has the lowest priority.
CNC 8035
DNCFPR
It returns the feedrate, in mm/turn or inches/turn selected by DNC. If it has a value
of 0 it means that it is not selected.
PRGFPR
It returns the feedrate, in mm/turn or inches/turn selected by program. If it has a value
of 0 it means that it is not selected.
(SOFT M: V11.1X)
(SOFT T: V12.1X)
Read-write variables associated with function G95
PLCFPR
304
It returns the feedrate, in mm/turn or inches/turn selected by PLC. If it has a value
of 0 it means that it is not selected.
Installation manual
Read-only variables associated with function G32
PRGFIN
It returns the feedrate selected by program, in 1/min.
Likewise, the CNC variable FEED, associated with G94, indicates the resulting
feedrate in mm/min or inches/min.
Read-only variables associated with the override
This feedrate percentage may be indicated by program, by PLC, by DNC or by the
front panel; the CNC selects one of them and the priority (from the highest to the
lowest) is: by program, by DNC, by PLC and from the front panel switch.
DNCFRO
It returns the feedrate override % currently selected by the DNC. If it has a value of
0 it means that it is not selected.
CNCFRO
It returns the feedrate override % currently selected by the switch.
PRGFRO
This variable may be used to read or modify the feedrate override percentage
currently selected by program. It is given in integer values between 0 and
“MAXFOVR” (maximum 255). If it has a value of 0 it means that it is not selected.
Read-write variables associated with the override
PLCFRO
It returns the feedrate override % currently selected by the PLC. If it has a value of
0 it means that it is not selected.
PLCCFR
It returns the feedrate percentage currently selected by the PLC's execution channel.
It is only set from the PLC, using an integer between 0 and 255.
11.
Variables associated with feedrates
It returns the feedrate override (%) currently selected at the CNC. It is given in integer
values between 0 and “MAXFOVR” (maximum 255).
ACCESS TO THE INTERNAL CNC VARIABLES
FRO
CNC 8035
(SOFT M: V11.1X)
(SOFT T: V12.1X)
305
Installation manual
11.6
Variables associated with coordinates
The values are given in the units set by g.m.p. INCHES.
If, INCHES = 0, in ten-thousandths of a millimeter (±999999999).
If INCHES = 1, in hundred-thousandths of an inch (±393700787).
If rotary axis, in ten-thousandths of a degree (±999999999).
Variables associated with coordinates
ACCESS TO THE INTERNAL CNC VARIABLES
11.
Read-only variables
Accessing any of the variables POS(X-C), TPOS(X-C), APOS(X-C), ATPOS(X-C),
DPOS(X-C) or FLWE(X-C) interrupts block preparation and the CNC waits for that
command to be executed before resuming block preparation.
POS(X-C)
It returns the real tool base position value referred to machine reference zero (home).
On limit-less rotary axes, this variable takes into account the value of the active zero
offset. The values of the variable are between the active zero offset and ±360º (ORG*
± 360º).
If ORG* = 20º
it displays between 20º and 380º / displays between -340º
and 20º.
If ORG* = -60º
it displays between -60º and 300º / displays between -420
and -60º
At the lathe model CNC, the coordinates of each axis are given as follows:
• When read from the CNC, they are given in radius or diameter, depending on the
active units system. Check the DIAM variable to know the active units system.
• When read from the PLC, they are always given in radius.
TPOS(X-C)
It returns the theoretical position value (real coordinate + following error) of the tool
base referred to machine reference zero (home).
On limit-less rotary axes, this variable takes into account the value of the active zero
offset. The values of the variable are between the active zero offset and ±360º (ORG*
± 360º).
If ORG* = 20º
it displays between 20º and 380º / displays between -340º
and 20º.
If ORG* = -60º
it displays between -60º and 300º / displays between -420
and -60º
At the lathe model CNC, the coordinates of each axis are given as follows:
• When read from the CNC, they are given in radius or diameter, depending on the
active units system. Check the DIAM variable to know the active units system.
• When read from the PLC, they are always given in radius.
APOS(X-C)
It returns the real tool base position value, referred to part zero, of the selected axis.
At the lathe model CNC, the coordinates of each axis are given as follows:
• When read from the CNC, they are given in radius or diameter, depending on the
active units system. Check the DIAM variable to know the active units system.
• When read from the PLC, they are always given in radius.
CNC 8035
ATPOS(X-C)
It returns the theoretical position value (real coordinate + following error) of the tool
base referred to part zero.
At the lathe model CNC, the coordinates of each axis are given as follows:
• When read from the CNC, they are given in radius or diameter, depending on the
active units system. Check the DIAM variable to know the active units system.
(SOFT M: V11.1X)
(SOFT T: V12.1X)
• When read from the PLC, they are always given in radius.
DPOS(X-C)
306
The CNC updates this variable when probing, functions G75 and G76.
Installation manual
When the digital probe communicates with the CNC via infrared beams, there could
be some delay (milliseconds) from the time the probe touches the part to the instant
the CNC receives the probe signal.
TPOS(X-C)
Actual position of the probe when the CNC receives the probe
signal.
DPOS(X-C)
Theoretical position of the probe when the probe touched the part.
FLWE(X-C)
It returns the following error of the selected axis.
DPLY(X-C)
It returns the position value (coordinate) shown on the screen for the selected axis.
Read-and-write variables
DIST(X-C)
Variables associated with coordinates
Although the probe keeps moving until the CNC receives the probing signal, the CNC
takes into account the value assigned to general machine parameter PRODEL and
provides the following information in the variables TPOS(X-C) and DPOS(X-C).
ACCESS TO THE INTERNAL CNC VARIABLES
11.
These variables may be used to read or modify the distance traveled by the selected
axis. This value is accumulative and is very useful when it is required to perform an
operation which depends on the distance traveled by the axes, their lubrication for
example.
Accessing any of the DIST(X-C) variables interrupts block preparation and the CNC
waits for that command to be executed before resuming block preparation.
LIMPL(X-C)
LIMMI(X-C)
With these variables, it is possible to set a second travel limit for each axis: LIMPL
for the upper limit and LIMMI for the lower one.
The PLC activates and deactivates these second limits through general logic input
ACTLIM2 (M5052).
The second travel limit will be taken into account if the first one has been set using
axis machine parameters LIMIT+ (P5) and LIMIT- (P6).
CNC 8035
(SOFT M: V11.1X)
(SOFT T: V12.1X)
307
Installation manual
11.7
Variables associated with electronic handwheels
Read-only variables
Variables associated with electronic handwheels
ACCESS TO THE INTERNAL CNC VARIABLES
11.
HANPF
HANPS
HANPT
HANPFO
They return the pulses of the first (HANPF), second (HANPS), third (HANPT) or
fourth (HANPFO) handwheel received since the CNC was turned on.
HANDSE
For handwheels with axis selector button, it indicates whether that button has been
pressed or not. A value of ·0· means that it has not been pressed.
Read-and-write variables
HANFCT
It returns the multiplying factor set by PLC for each handwheel.
It must be used when using several electronic handwheels or when using a single
handwheel but different multiplying factors (x1, x10, x100) are to be applied to each
axis.
C
B
A
W
V
U
Z
Y
X
c b t c b t c b t c b t c b t c b t c b t c b t c b t lsb
o
o
o
o
o
o
o
o
o
Once the switch has been turned to one of the handwheel positions, the CNC checks
this variable and, depending on the values assigned to each axis bit (c, b, a) it applies
the multiplying factor selected for each one of them.
c
b t
o
0
0
0
The value indicated at the front panel or keyboard switch.
0
0
1
x1 factor
0
1
0
x10 factor
1
0
0
x100 factor
If there are more than one bit set to "1" for an axis, the least significant bit will be
considered. Thus:
c
b t
o
1
1
1
x1 factor
1
1
0
x10 factor
i
HBEVAR
CNC 8035
The screen always shows the value selected at the switch.
It must be used when having a Fagor HBE handwheel.
It indicates whether the HBE handwheel is enabled or not, the axis to be jogged and
the multiplying factor to be applied (x1, x10, x100).
C
*
(SOFT M: V11.1X)
(SOFT T: V12.1X)
^
B
A
W
U
Z
Y
X
c b t c b t c b t c b t c b t c b t c b t c b t c b t lsb
o
o
o
o
o
o
o
o
o
(*) Indicates whether the HBE handwheel pulses will be taken into account or not in
jog mode.
0 = They are ignored.
1 = They are taken into account.
308
V
Installation manual
(^) When the machine has a general handwheel and individual handwheels
(associated with an axis), it indicates which handwheel has priority when both are
turned at the same time.
0 = The individual handwheel has priority. The relevant axis ignores the pulses
from the general handwheel, the rest of the axes don’t.
1 = The general handwheel has priority. It ignores the pulses from the individual
handwheel.
(a, b, c) Indicate the axis to be moved and the selected multiplying factor.
0
0
0
The value indicated at the front panel or keyboard switch.
0
0
1
x1 factor
0
1
0
x10 factor
1
0
0
x100 factor
If several axes are selected, the following order of priority is applied: X, Y, Z, U, V, W,
A, B, C.
If there are more than one bit set to "1" for an axis, the least significant bit will be
considered. Thus:
c
b t
o
1
1
1
x1 factor
1
1
0
x10 factor
The HBE handwheel has priority. That is, regardless of the mode selected at the CNC
switch (continuous or incremental JOG, handwheel), HBEVAR is set to other than "0",
the CNC goes into handwheel mode.
Variables associated with electronic handwheels
b t
o
ACCESS TO THE INTERNAL CNC VARIABLES
11.
c
It shows the selected axis in reverse video and the multiplying factor selected by the
PLC. When the HBEVAR variable is set to "0", it shows the mode selected by the
switch again.
See "5.12 Fagor handwheels: HBA, HBE and LGB" on page 186.
MASLAN
It must be used when the path-handwheel or the path-jog is selected.
Indicates the angle of the linear path.
MASCFI
MASCSE
They must be used when the path-handwheel or the path-jog is selected.
On circular paths (arcs), they indicate the center
coordinates.
CNC 8035
(SOFT M: V11.1X)
(SOFT T: V12.1X)
309
Installation manual
11.8
Variables associated with feedback
ACCESS TO THE INTERNAL CNC VARIABLES
11.
CNC 8035
(SOFT M: V11.1X)
(SOFT T: V12.1X)
310
Variables associated with feedback
ASIN(X-C)
"A" signal of the CNC's sinusoidal feedback for the X-C axis.
BSIN(X-C)
"B" signal of the CNC's sinusoidal feedback for the X-C axis.
ASINS
"A" signal of the CNC's sinusoidal feedback for the spindle.
BSINS
"B" signal of the CNC's sinusoidal feedback for the spindle.
Installation manual
11.9
Variables associated with the main spindle
Variables associated with the real speed
FTEOS
It returns the theoretical turning speed of the main spindle.
Variables associated with spindle speed
PLCS is a read-write variable; the rest are read-only.
SPEED
It returns the turning speed of the main spindle currently selected at the CNC. Its value
is given in 0.0001 rpm units.
This turning speed may be indicated by program, by PLC or by DNC; the CNC selects
one of them, the one indicated by DNC has the highest priority and the one indicated
by program has the lowest priority.
DNCS
It returns the spindle speed limit selected via DNC. If it has a value of 0 it means that
it is not selected.
PLCS
It returns the spindle speed limit selected via PLC. If it has a value of 0 it means that
it is not selected.
PRGS
It returns the spindle speed limit selected by programa. If it has a value of 0 it means
that it is not selected.
11.
Variables associated with the main spindle
It returns the actual (real) turning speed of the main spindle. Its value is given in
0.0001 rpm units.
ACCESS TO THE INTERNAL CNC VARIABLES
SREAL
Variables associated with constant cutting speed (lathe model)
PLCCSS is a read-write variable, the rest are read-only.
CSS
It returns the constant surface speed selected at the CNC.
This constant surface speed may be indicated by program, by PLC or by DNC; the
CNC selects one of them, the one indicated by DNC has the highest priority and the
one indicated by program has the lowest priority.
The values are given in the units set by g.m.p. INCHES.
If INCHES = 0, in m/min (±999999999).
If INCHES = 1, in ft/min (±393700787).
DNCCSS
It returns the constant surface speed selected via DNC. Its value is given in m/min
or ft/min and it is 0 it means that it is not currently selected.
PLCCSS
It returns the constant surface speed selected by PLC. Its value is given in m/min or
ft/min.
PRGCSS
It returns the constant surface speed selected by program. Its value is given in m/min
or ft/min.
CNC 8035
(SOFT M: V11.1X)
(SOFT T: V12.1X)
311
Installation manual
Variables associated with the spindle override
The variable PLCSSO is a read-write variable, the rest are read-only.
SSO
Variables associated with the main spindle
ACCESS TO THE INTERNAL CNC VARIABLES
11.
It returns the turning speed override (%) of the main spindle currently selected at the
CNC. It is given in integer values between 0 and “MAXFOVR” (maximum 255).
This turning speed percentage of the main spindle may be indicated by program, by
PLC, by DNC or by the front panel; the CNC selects one of them and the priority (from
the highest to the lowest) is: by program, by DNC, by PLC and from the front panel.
PRGSSO
This variable may be used to read or modify the speed override percentage of the
main spindle currently selected by program. It is given in integer values between 0
and “MAXFOVR” (maximum 255). If it has a value of 0 it means that it is not selected.
DNCSSO
It returns the turning speed override % of the main spindle currently selected via DNC.
If it has a value of 0 it means that it is not selected.
PLCSSO
It returns the turning speed override % of the main spindle currently selected by PLC.
If it has a value of 0 it means that it is not selected.
CNCSSO
It returns the turning speed override % of the main spindle currently selected from
the front panel.
Speed limit related variables
PLCSL and MDISL are read-write variables, the rest are read-only.
SLIMIT
It returns the value set in rpm at the CNC for the turning speed limit of the main spindle.
This limit may be indicated by program, by PLC or by DNC; the CNC selects one of
them, the one indicated by DNC has the highest priority and the one indicated by
program has the lowest priority.
DNCSL
It returns the speed limit of the main spindle in rpm currently selected via DNC. If it
has a value of 0 it means that it is not selected.
PLCSL
It returns the speed limit of the main spindle in rpm currently selected by PLC. If it
has a value of 0 it means that it is not selected.
PRGSL
It returns the speed limit of the main spindle in rpm currently selected by program.
MDISL
Maximum machining spindle speed. This variable is also updated (refreshed) when
programming function G92 via MDI.
Position related variables
POSS
It returns the real position of the main spindle. Its value is given in 0.0001 degree units
within ±999999999º.
RPOSS
It returns the real position of the main spindle in 360º module. Its value is given in
0.0001 degree units within 0 and 360º.
TPOSS
It returns the theoretical position of the main spindle (real position + lag). Its value
is given in 0.0001 degree units within ±999999999º.
RTPOSS
It returns the theoretical position of the main spindle (real position + lag) in 360º
module. Its value is given in 0.0001 degree units within 0 and 360º.
PRGSP
Position programmed in M19 via program for the main spindle. This variable may be
read from the CNC, from the PLC and from DNC.
CNC 8035
(SOFT M: V11.1X)
(SOFT T: V12.1X)
312
Installation manual
Read-only variables associated with the following error (axis
lag)
Following error (lag) of the main spindle. Its value is given in 0.0001 degree units
within ±999999999º.
Variables associated with the main spindle
11.
ACCESS TO THE INTERNAL CNC VARIABLES
FLWES
CNC 8035
(SOFT M: V11.1X)
(SOFT T: V12.1X)
313
Installation manual
11.10 Variables associated with local and global parameters
The CNC offers two types of general purpose variables, local parameters P0 through
P25 and global parameters P100 through P299.
It is possible to assign local parameters to more than one subroutine. Up to 6 nesting
levels of the local parameters are possible within the 15 nesting levels for the
subroutines. Therefore, each time a local parameter must be referred to, it is
necessary to indicate its current nesting level.
ACCESS TO THE INTERNAL CNC VARIABLES
Variables associated with local and global parameters
11.
Local and global parameters may be assigned a value within +2147483647.
Reading these parameters using functions GUP and LUP gives an integer number
ignoring its decimals. Likewise, if the parameter value is greater than ±2147483647,
the obtained value will be the maximum allowed, i.e. either 2147483647 or 2147483647.
Read-and-write variables
GUP n
It allows reading or modifying the indicated global parameter (n) (P100-P299).
CNCRD (GUP 155, R100, M102)
Loads register R100 with the value of global parameter P155.
CNCWR (R101, GUP 155, M102)
It assigns the value of global parameter P155 to register R100.
LUP a b:
It permits reading or modifying the indicated local parameter (P0-P25) (b) of the
indicated nesting level (a).
CNCRD (LUP 3 15, R100, M102)
It assigns the value of local parameter P15 of nesting level 3 to register R100.
CNCWR (R101, GUP 2 15, M102)
It assigns the value of local parameter P15 of nesting level 2 to register R101.
CNC 8035
(SOFT M: V11.1X)
(SOFT T: V12.1X)
314
Installation manual
11.11
Operating-mode related variables
Read-only variables related to the standard mode
It returns the code corresponding to the selected operating mode.
0 = Main menu.
11 = Single block execution.
12 = MDI in EXECUTION.
13 = Tool inspection.
14 = Repositioning.
15 = Block search executing G.
16 = Block search executing G, M, S, T.
20 = Theoretical path simulation.
21 = G function simulation.
22 = G, M, S and T function simulation.
23 = Simulation with movement in the main plane.
24 = Simulation with rapid movement.
25 = Rapid simulation with S=0.
Operating-mode related variables
11.
10 = Automatic execution.
ACCESS TO THE INTERNAL CNC VARIABLES
OPMODE
30 = Normal editing.
31 = User editing.
32 = TEACH-IN editing.
33 = Interactive editor.
40 = Movement in continuous JOG.
41 = Movement in incremental JOG.
42 = Movement with electronic handwheel.
43 = HOME search in JOG.
44 = Position preset in JOG.
45 = Tool calibration.
46 = MDI in JOG.
47 = User JOG operation.
50 = Zero offset table.
51 = Tool offset table.
52 = Tool table.
53 = Tool magazine table.
54 = Global parameter table.
55 = Local parameter table.
CNC 8035
56 = User parameter table.
57 = OEM parameter table.
60 = Utilities.
(SOFT M: V11.1X)
(SOFT T: V12.1X)
70 = DNC status.
71 = CNC status.
315
Installation manual
80 = PLC file editing.
81 = PLC program compilation.
82 = PLC monitoring.
83 = Active PLC messages.
84 = Active PLC pages.
85 = Save PLC program.
Operating-mode related variables
ACCESS TO THE INTERNAL CNC VARIABLES
11.
86 = Restore PLC program.
87 = PLC usage maps.
88 = PLC statistics.
90 = Customizing.
100 = General machine parameter table.
101 = Axis machine parameter tables.
102 = Spindle machine parameter table.
103 = Serial line related machine parameter tables.
104 = PLC machine parameter table.
105 = M function table.
106 = Leadscrew error compensation tables and cross compensation tables.
110 = Diagnosis: configuration.
111 = Diagnosis: hardware test.
112 = Diagnosis: RAM memory test.
113 = Diagnosis: Flash memory test.
114 = User diagnosis.
CNC 8035
(SOFT M: V11.1X)
(SOFT T: V12.1X)
316
Installation manual
11.12 Other variables
Read-only variables
Indicates the tool number being managed. This variable can only be used within the
tool change subroutine.
Example: There is a manual tool changer. Tool T1 is currently selected and the
operator requests tool T5.
(P103 = NBTOOL)
(MSG “SELECT T?P103 AND PRESS CYCLE START”)
Instruction (P103 = NBTOOL) assigns the number of the tool currently being
managed to parameter P103. Therefore, P103=5.
The message displayed by the CNC will be “”SELECT T5 AND PRESS CYCLE
START”.
PRGN
Returns the program number being executed. Should none be selected, a value of
-1 is returned.
BLKN
It returns the label number of the last executed block.
GGSA
It returns the status of functions G00 through G24. The status of each one of the
functions will be given in the 25 least significant bits and it will be indicated by a 1
when active and a 0 when not active or when not available in the current software
version.
G24
G23
G22
G21
G20
...
G04
G03
G02
G01
11.
ACCESS TO THE INTERNAL CNC VARIABLES
The subroutine associated with the tools may contain the following instructions:
Other variables
NBTOOL
G00
CNCRD (GGSA, R110, M10)
Loads register R110 with the status of functions G00 through G24.
GGSB
It returns the status of functions G25 through G49. The status of each one of the
functions will be given in the 25 least significant bits and it will be indicated by a 1
when active and a 0 when not active or when not available in the current software
version.
G49
GGSC
G46
G45
...
G29
G28
G27
G26
G25
G73
G72
G71
G70
...
G54
G53
G52
G51
G50
It returns the status of functions G75 through G99. The status of each one of the
functions will be given in the 25 least significant bits and it will be indicated by a 1
when active and a 0 when not active or when not available in the current software
version.
G99
GGSE
G47
It returns the status of functions G50 through G74. The status of each one of the
functions will be given in the 25 least significant bits and it will be indicated by a 1
when active and a 0 when not active or when not available in the current software
version.
G74
GGSD
G48
G98
G97
G96
G95
...
G79
G78
G77
G76
It returns the status of functions G100 through G124. The status of each one of the
functions will be given in the 25 least significant bits and it will be indicated by a 1
when active and a 0 when not active or when not available in the current software
version.
G124 G123 G122 G121 G120
...
CNC 8035
G75
(SOFT M: V11.1X)
(SOFT T: V12.1X)
G104 G103 G102 G101 G100
317
Installation manual
GGSF
It returns the status of functions G125 through G149. The status of each one of the
functions will be given in the 25 least significant bits and it will be indicated by a 1
when active and a 0 when not active or when not available in the current software
version.
G149 G148 G147 G146 G145
GGSG
Other variables
ACCESS TO THE INTERNAL CNC VARIABLES
11.
...
It returns the status of functions G150 through G174. The status of each one of the
functions will be given in the 25 least significant bits and it will be indicated by a 1
when active and a 0 when not active or when not available in the current software
version.
G174 G173 G172 G171 G170
GGSH
...
...
...
...
...
...
PLANE
...
G304 G303 G302 G301 G300
Returns data on the abscissa axis (bits 4 to 7) and the ordinate axis (bits 0 to 3) of
the active plane in 32 bits and in binary.
...
(SOFT M: V11.1X)
(SOFT T: V12.1X)
G279 G278 G277 G276 G275
It returns the status of functions G300 through G320. The status of each one of the
functions will be given in the 25 least significant bits and it will be indicated by a 1
when active and a 0 when not active or when not available in the current software
version.
G320 G319 G318 G317 G316
CNC 8035
G254 G253 G252 G251 G250
It returns the status of functions G275 through G299. The status of each one of the
functions will be given in the 25 least significant bits and it will be indicated by a 1
when active and a 0 when not active or when not available in the current software
version.
G299 G298 G297 G296 G295
GGSM
G229 G228 G227 G226 G225
It returns the status of functions G250 through G274. The status of each one of the
functions will be given in the 25 least significant bits and it will be indicated by a 1
when active and a 0 when not active or when not available in the current software
version.
G274 G273 G272 G271 G270
GGSL
G204 G203 G202 G201 G200
It returns the status of functions G225 through G249. The status of each one of the
functions will be given in the 25 least significant bits and it will be indicated by a 1
when active and a 0 when not active or when not available in the current software
version.
G249 G248 G247 G246 G245
GGSK
G179 G178 G177 G176 G175
It returns the status of functions G200 through G224. The status of each one of the
functions will be given in the 25 least significant bits and it will be indicated by a 1
when active and a 0 when not active or when not available in the current software
version.
G224 G223 G222 G221 G220
GGSJ
G154 G153 G152 G151 G150
It returns the status of functions G175 through G199. The status of each one of the
functions will be given in the 25 least significant bits and it will be indicated by a 1
when active and a 0 when not active or when not available in the current software
version.
G199 G198 G197 G196 G195
GGSI
G129 G128 G127 G126 G125
...
...
...
...
...
Abscissa axis
7654 3210
lsb
Ordinate axis
The axes are coded in 4 bits and indicate the axis number according to the
programming order.
318
Installation manual
Example: If the CNC controls the X, Y and Z axes and the ZX plane (G18) is selected.
(CNCRD PLANE, R100, M33) assigns the hexadecimal value $31 to register R100.
0000 0000 0000 0000 0000 0000 0011 0001 LSB
=> Z axis
Ordinate axis
= 1 (0001)
=> X axis
This variable can only be used at the mill model. It returns the number according to
the programming order corresponding to the longitudinal axis. This will be the one
selected with the G15 function and by default the axis perpendicular to the active
plane, if this is XY, ZX or YZ.
Example:
If the CNC controls the X, Y and Z axes and the Z axis is selected.
(CNCRD LONGAX, R22, M34) assigns the value of 3 to register R22.
MIRROR
Returns in the least significant bits of the 32-bit group, the status of the mirror image
of each axis, 1 in the case of being active and 0 if not.
Bit 8
Bit 7
Bit 6
Bit 5
Bit 4
Bit 3
Bit 2
Bit 1
Bit 0
Axis 3
Axis 2
Axis 1
LSB
The axis name corresponds to the number according to the programming order for
them.
Example: If the CNC controls the X, Y and Z axes, axis1=X, axis2 = Y, axis 3=Z.
SCALE
It returns the general scaling factor being applied. It will be multiplied by 10000.
SCALE(X-C)
Returns the specific scaling factor of the indicated axis (X-C). It will be multiplied by
10000.
ORGROT
This variable can only be used at the mill model. It returns the rotation angle of the
coordinate system currently selected with G73. Its value in 0.0001 degree units.
PRBST
Returns probe status.
11.
Other variables
= 3 (0011)
ACCESS TO THE INTERNAL CNC VARIABLES
LONGAX
Abscissa axis
0 = the probe is not touching the part.
1 = the probe is touching the part.
CLOCK
Returns the time in seconds indicated by the system clock. Possible values
0..4294967295.
TIME
Returns the time in hours-minutes-seconds format.
(CNCRD TIME, R100, M102) ; assigns the time to register R100. For example, if the
time is 18h 22m 34s, R100 will show 182234.
DATE
Returns the date in year-month-day format.
(CNCRD DATE, R101, M102) ; assigns the date to register R101. For example: if the
date is April 25th 1992, R101 = 920425.
CYTIME
It returns the amount of time (in hundredths of a second) elapsed executing the part.
It ignores the time the execution has been interrupted. Possible values
0..4294967295.
CNC 8035
The CNC will consider the execution of the program finished after executing its last
block or after executing a block containing an M02 or M30 miscellaneous function.
FIRST
Indicates whether it is the first time that a program has been run or not. It returns a
value of 1 if it is the first time and 0 if not.
(SOFT M: V11.1X)
(SOFT T: V12.1X)
319
Installation manual
A first-time execution is considered as being one which is done:
• After turning on the CNC.
• After pressing [SHIFT]+[RESET].
• Every time a new program is selected.
Other variables
ACCESS TO THE INTERNAL CNC VARIABLES
11.
ANAIn
It returns the status in tenths of a volt (±5 V range) of the indicated analog input (n)
and it is possible to select one of the 8 analog inputs (1 through 8).
CNCERR
Returns the Error code active at the CNC. If none, it returns “0”.
DNCERR
Returns the Error code generated via DNC. If none, it returns “0”.
DNCSTA
DNC transmission status, even when not having this option. There is on bit that will
be set to ·1· when a transmission is in progress.
TIMEG
It shows the timing status of the timer programmed with G4 K in the CNC channel.
This variable, returns the time remaining to end the timing block in hundredths of a
second.
RIP
Linear theoretical feedrate resulting from the next loop (in mm/min).
The calculation of the resulting feedrate ignores the rotary axes, slave axes (gantry,
coupled and synchronized) as well as DRO axes.
Read-and-write variables
TIMER
This variable allows reading or modifying the time, in seconds, indicated by the clock
enabled by the PLC. Possible values 0..4294967295.
The CNC will set this value to 0 when changing the software version or when a
checksum error occurs.
PARTC
The CNC has a part counter whose count increases, in all modes except simulation,
every time M30 or M02 is executed and this variable allows its value to be read or
modified. This value will be between 0 and 4294967295
The CNC will set this value to 0 when changing the software version or when a
checksum error occurs.
KEY
It allows reading the last accepted keystroke or simulating the CNC keyboard
assigning the desired key code to it.
CNCRD (KEY, R110, M10)
Loads register R110 with the value of the last key accepted.
To simulate the CNC keyboard from the PLC, follow these steps:
R111=1
R110=0
CNCWR (R111, KEYSCR, M10)
Indicates to the CNC that only keystrokes coming from the PLC must be
processed (CNC keyboard inhibited).
CNC 8035
CNCWR (R101, KEY, M10)
It indicates to the CNC that a key has been pressed whose code is indicated
in register R101.
CNCWR (R110, KEYSCR, M10)
Process only keystrokes coming from the CNC.
(SOFT M: V11.1X)
(SOFT T: V12.1X)
320
Installation manual
KEYSRC
This variable allows reading or modifying the source of keystrokes, possible values
being:
0 = Keyboard.
1 = PLC.
2 = DNC.
The CNC only allows modification of this variable if it is set to “0” or “1”.
Once the keystroke simulation is finished, it is advisable to re-enable the CNC
keyboard in order to be able to access the various operating modes of the CNC.
This variable allows the required analog output (n) to be read or modified. The value
assigned will be expressed in 0.0001 volt units and within ±10 V.
The analog outputs which are free among the eight (1 through 8) available at the CNC
may be modified, the corresponding error being displayed if an attempt is made to
write in one which is occupied.
SELPRO
When having two probe inputs, it allows selecting the active input.
On power-up, it assumes the value of ·1· thus selecting the first probe input. To select
the second probe input, set it to a value of ·2·.
Accessing this variable from the CNC interrupts block preparation.
DIAM
In the lathe model, it changes the programming mode for X axis coordinates between
radius and diameter. When changing the value of this variable, the CNC assumes
the new way to program the following blocks.
Other variables
ANAOn
11.
ACCESS TO THE INTERNAL CNC VARIABLES
The CNC will assign a value of 0 to this variable on power-up and after pressing
[SHIFT]+[RESET].
When the variable is set to ·1·, the programmed coordinates are assumed in diameter;
when is set to ·0·, the programmed coordinates are assumed in radius.
This variable affects the display of the real value of the X axis in the coordinate system
of the part and the reading of variables PPOSX, TPOSX and POSX.
On power-up, after executing an M02 or M30 and after an emergency or a reset, the
variable is initialized according to the value of the DFORMAT parameter of the X axis.
If this parameter has a value equal to or greater than 4, the variable takes a value
of 1; otherwise, it takes the value of ·0·.
PRBMOD
It indicates whether a probing error is to issued or not in the following cases, even
if general machine parameter PROBERR (P119) =YES.
• When a G75 probing move finishes before the probe has touched part.
• When a G76 probing move finishes but the probe is still touching the part.
The PRBMOD variable takes the following values.
Value
Meaning
0
An error message is issued.
1
No error message is issued.
Default value 0.
The PRBMOD variable can be read and written from the CNC and the PLC an read
from the DNC.
CNC 8035
(SOFT M: V11.1X)
(SOFT T: V12.1X)
321
Installation manual
Other variables
ACCESS TO THE INTERNAL CNC VARIABLES
11.
CNC 8035
(SOFT M: V11.1X)
(SOFT T: V12.1X)
322
AXES CONTROLLED FROM THE
PLC
12
The PLC offers actions CNCEX and CNCEX1 to send commands to the CNC.
CNCEX
sends commands to the CNC so it executes movements on one
or several axes.
CNCEX1
sends commands to the CNC so it executes any kind of block.
The CNCEX action is executed through the execution channel of the PLC.
The CNCEX1 action is executed via main channel of the CNC and as long as the JOG
keyboard is enabled. Its execution can be interrupted by pressing [CYCLE STOP] or
even canceled by pressing [RESET].
If a CNCEX1 action is received when the JOG keyboard is disabled, the CNC ignores
this command.
The programming format for these actions is:
CNCEX
(ASCII block, Mark)
CNCEX1
(ASCII block, Mark)
By means of these actions, the PLC sends to the CNC the command indicated in the
"ASCII Block" to be executed.
If the "ASCII Block" has been accepted by the CNC, the PLC will set the indicated
mark to "0" or to "1" if otherwise. The CNC only indicates that the "ASCII Block" has
been accepted. It is up to the operator to verify whether the command has actually
been executed by the CNC or not.
CNCEX (G1 U125 V300 F500, M200)
Sends to the CNC the command "G1 U125 V300 F500" so it executes a linear
interpolation of the U and V axes at a feedrate of F500 being the end point: U125
V300.
CNCEX1 (T5, M200)
Selects the tool T5 in the tool changer.
Example of how to use action CNCEX1 when using a tool changer controlled by the
PLC.
1. The T executed last at the CNC is T1. Therefore, it is the active T.
2. A new tool is selected, for example T5.
If carried out by means of action CNCEX1, the change is made by the CNC and
it assumes T5 as the new active tool.
If not carried out by means of action CNCEX1, the change is made by the PLC
and T1 remains as the active tool.
3. Then, an operation programmed with T1 is carried out.
CNC 8035
If the change was made with action CNCEX1, the CNC detects the tool change
(from T5 to T1) and carries out the change.
If the change was not made with action CNCEX1, the CNC does not detect the
tool change (T1), it does not make the change and carries out the operation with
the selected tool T5 with the problems this may cause.
(SOFT M: V11.1X)
(SOFT T: V12.1X)
323
Installation manual
12.1
PLC execution channel
The CNC offers a parallel execution channel to execute commands received from the
PLC. This channel will have its own history and it permits the execution of blocks
programmed from the PLC regardless of the operating mode being selected at the
CNC at the time.
PLC execution channel
AXES CONTROLLED FROM THE PLC
12.
When the CNC receives a command from the PLC and it is executing another
command received earlier, it will store the new one in an internal buffer. This new
command will be executed after finishing the one being executed.
The internal buffer can store up to 3 commands received from the PLC besides the
one currently in execution.
12.1.1 Considerations
Screen editor
The a.m.p. "AXISTYPE" of each axis of the machine must be set properly indicating
whether that axis is controlled by the CNC or from the PLC.
The axes of the PLC channel can only be governed from the PLC.
They may be edited and part-programs may be generated with axes of the PLC
channel. This permits generating part-programs or subroutines associated with the
PLC channel.
It issues an error message when trying to execute, from the CNC channel, a program
block that includes a PLC axis.
When all the axes of the machine are set to be governed from the CNC, with the
CNCEX action only blocks programmed in high level language may be executed
through the PLC execution channel.
Axis control
To govern axes managed by PLC, use the following marks associated with “Feedhold” and “Transfer Inhibit”:
/FEEDHOP
(M5004)
Similar to the /FEEDHOL signal
FHOUTP
(M5504)
Similar to the /FHOUT signal
/XFERINP
(M5005)
Similar to the /XFERINH signal
Auxiliary M functions
To control the M functions managed by the PLC, the following marks and registers
are generated:
CNC 8035
MBCDP1 through MBCDP7 (R565 through R571)
similar to signals MBCD1 through MBCD7.
AUXENDP (M5006)
Similar to the AUXEND signal.
MSTROBEP (M5505)
(SOFT M: V11.1X)
(SOFT T: V12.1X)
324
Similar to the MSTROBE signal.
Installation manual
Data transfer
If when executing at the PLC the action "CNCEX (ASCII Block, Mark)", the CNC
detects that the contents of the ASCII block being received is erroneous, it will set
the indicated Mark to "1". The PLC program will keep executing while it is up to the
programmer to check whether the function was executed correctly or not.
The CNC considers the contents of the ASCII block incorrect in the following
instances:
• When programming an auxiliary function M, S, T or tool offset D.
• When programming a high level language block.
• When the axis to be moved cannot be controlled from the PLC.
• When the internal buffer for PLC command storage is full.
Errors during execution
When the CNC detects an execution error in one of the two execution channels (for
example, travel limit overrun), it will show the corresponding error code.
If it must also stop the movement of the axes and the spindle rotation, the CNC will
stop the movement of all the axes regardless of whether they are controlled from the
CNC or the PLC.
AXES CONTROLLED FROM THE PLC
• When programming a not-permitted preparatory function (G code).
PLC execution channel
12.
• When the syntax is incorrect.
Also, if the detected error stops the program execution, the CNC will stop the
execution of both channels and each one of them will act as follows:
CNC channel
Once the cause of the error has been removed, select again the execution or
simulation mode and continue with the program execution.
PLC channel
The PLC program does not stop and continues running.
The commands sent by means of action "CNCEX" will not be executed until removing
the cause of the error.
Once the cause of the error removed, the CNC will execute all the new commands
sent by the PLC.
To know from the PLC program whether any CNC error is active, this information can
be requested by accessing the internal CNC variable "CNCERR". This variable
indicates the error number being active at the CNC and if none is active, it returns
a 0 value.
CNC 8035
(SOFT M: V11.1X)
(SOFT T: V12.1X)
325
Installation manual
12.1.2 Blocks which can be executed from the PLC
It is possible to execute blocks that contain G codes, axis position values, feedrates,
M functions and high level language programming.
Auxiliary functions S, T and D cannot be programmed.
The ASCII block to be sent to the CNC by means of the action CNCEX to be executed
in the PLC execution channel must be written in the CNC's own programming format.
PLC execution channel
AXES CONTROLLED FROM THE PLC
12.
CNC 8035
(SOFT M: V11.1X)
(SOFT T: V12.1X)
326
Preparatory functions
The preparatory functions which can be used in the PLC execution channel are the
following:
G00
Rapid travers
G01
Linear interpolation
G02
Clockwise circular (helical) interpolation
G03
Counterclockwise circular (helical) interpolation
G04
Interrupt block preparation of the PLC channel.
G04 K
Dwell
G05
Round corner
G06
Circle center in absolute coordinates
G07
Square corner
G09
Arc defined by three points
G16
Main plane selection by two addresses and longitudinal axis
G32
Feedrate "F" as an inverted function of time.
G50
Controlled corner rounding
G52
Movement until making contact
G53
Programming with respect to machine zero
G70
Programming in inches
G71
Metric programming
G74
Home search
G75
Probing move until touching
G76
Probing move while touching
G90
Absolute programming:
G91
Incremental programming
G92
Coordinate preset
G93
Polar origin preset
G94
Feedrate in millimeters (inches) per minute
G95
Feedrate in millimeters (inches) per revolution.
All these functions must be programmed as described in the programming manual.
Installation manual
Move the axes
Only those axes set by means of a.m.p. AXISTYPE (P0) for each axis as to be
controlled by the PLC can be mentioned.
The position values of these axes, which can be either linear or rotary, can be
programmed in either Cartesian or polar coordinates.
These coordinates can also be defined via parametric programming using any global
arithmetic parameters (P100 thru P299)
... = CNCWR (R1, GUP200, M100)
Assigns the value of R1 to parameter P200, (P200=150).
... = CNCEX (G90 G1 U P200, M100)
Requests the CNC to execute the command: G90 G1 U150. The U axis will go
to position 150.
To govern axes managed by PLC, use the following marks associated with “Feedhold” and “Transfer Inhibit”:
/FEEDHOP
(M5004)
Similar to the /FEEDHOL signal
FHOUTP
(M5504)
Similar to the /FHOUT signal
/XFERINP
(M5005)
Similar to the /XFERINH signal
PLC execution channel
... = MOV 150 R1
Assigns the value of 150 to register R1.
12.
AXES CONTROLLED FROM THE PLC
When using parametric programming, it is recommended to previously assign a value
to the corresponding global parameter by means of the instruction: CNCWR.
Feedrate of the axes
The programming format for the axis feedrate (F5.5) depends on the function (G94
or G95) and on the work units selected for this execution channel.
• If G94, in mm/min. or inches/min.
• If G95, in mm/rev or inches/rev.
It must be borne in mind that this feedrate depends on the actual spindle rpm which
is in the main execution channel.
If the moving axis is rotary, the CNC interprets that the programmed feedrate is in
degrees/minute.
CNC 8035
(SOFT M: V11.1X)
(SOFT T: V12.1X)
327
Installation manual
Modify the feedrate (override)
The PLCCFR variable sets, from the PLC, the % of feedrate selected by the execution
channel of the PLC.
G.m.p. MAXFOVR (P18) limits the value of the percentage applied to both execution
channels (main and PLC).
PLC execution channel
AXES CONTROLLED FROM THE PLC
12.
The OVRCAN (M5020) mark sets the feedrate override of the main channel to 100%.
It does not affect the feedrate override of the PLC channel
Same as with the main channel, the following movements have a special treatment:
• When searching home, the value of PLCCFR is ignored.
• In G0, it considers the value of g.m.p. "RAPIDOVR (P17)".
If "P17=NO" always 100%, except if PLCCFR=0. In that case, the movement
stops.
If "P17=YES" considers PLCCFR, but it limits its value to 100%.
• In G1, G2, G3 it is always applied except when operating at maximum feedrate
(F0).
• In that case, it is limited to 100%. In G75, G76, it is only applied when g.m.p.
FOVRG75 (P126) = YES.
Blocks programmed in high-level language
The high-level instructions that can be used in the PLC execution channel are:
(IF condition <action1> ELSE <action2>)
(CALL (expression))
CNCEX ((CALL 100), M1000)
Sends the (CALL 100) command to the CNC so it executes (calls) subroutine
100
CNCEX ((P100=P100+2), M1000)
Sends the (P100=P100+2) command to the CNC to increment the value of
parameter P100 in 2 units.
Programming high-level blocks has the following restrictions:
• The programmed blocks can only work with global parameters.
• Up to 5 nesting levels of standard subroutines are allowed (neither parametric nor
global).
Example in mm:
Move the W axis to the coordinate indicated by register R101.
When the PLC works with integers (32 bits), the value of register R2 is given in
tenths of microns (0.0001 mm).
CNCWR (R101, GUP 155, M101)
Assigns the value indicated in R101 to global parameter P155.
CNCEX ((P155=P155/10000), M101)
Converts the value of P155 into mm.
CNC 8035
(SOFT M: V11.1X)
(SOFT T: V12.1X)
328
CNCEX (G1 WP155 F2000, M101)
Movement of the W axis
Installation manual
Interrupt block preparation
Same as in the CNC channel, blocks are also prepared in advance in the PLC
channel.
CNCEX (G1 W100, M101)
Movement of the W axis.
CNCEX (IF P100=0 <action1>)
P100 is analyzed during block preparation.
CNCEX (G4, M102)
Interrupts block preparation.
CNCEX (IF P100=0 <action1>)
P100 is analyzed after moving the axis.
Likewise, every time a PLC resource is accessed (I, O, M, R), block preparation is
interrupted.
CNCEX (G1 W100, M101)
Movement of the W axis.
PLC execution channel
CNCEX (G1 W100, M101)
Movement of the W axis
12.
AXES CONTROLLED FROM THE PLC
The value of P100 may be different before, during and after the movement of the W
axis. If it is to be analyzed after moving the axis, function G4 must be programmed.
CNCEX (IF PLCI8=1 <action2>)
I8 is checked after moving the axis.
Auxiliary M functions
The M functions programmed in the PLC channel may be defined in the M function
table.
In the PLC channel, the following functions cannot be programmed: M0, M1, M2, M3,
M4, M5, M6, M19, M30, M41, M42, M43 and M44.
The following marks and registers are generated for managing the M functions, :
MBCDP1 through MBCDP7 (R565 through R571)
similar to signals MBCD1 through MBCD7.
AUXENDP (M5006)
Similar to the AUXEND signal.
MSTROBEP (M5505)
Similar to the MSTROBE signal.
CNC 8035
(SOFT M: V11.1X)
(SOFT T: V12.1X)
329
Installation manual
12.1.3 Control of the PLC program from the CNC
The section of the PLC program regarding the "axes controlled from the PLC" can
be controlled from the CNC itself.
To do this, the inputs, outputs, marks, registers, timers or counters of the PLC itself
are used.
PLC execution channel
AXES CONTROLLED FROM THE PLC
12.
The CNC has the following PLC related variables to read or change the status of the
selected resource.
PLCI
To read or modify up to 32 PLC inputs.
PLCO
To read or modify up to 32 PLC outputs.
PLCM
To read or modify up to 32 PLC marks (internal relays).
PLCR
To read or modify the status of a register.
PLCT
To read or modify the count of a timer.
PLCC
To read or modify the count of a counter.
With these variables, the desired values will be assigned, in the part-program of the
CNC, to the PLC resources used in the communication. The setting of these values
will be carried out whenever an axis or axes are to be controlled from the PLC.
In turn, the PLC program must check the status of such resources and when detecting
that one of them is activated, it must execute the corresponding section of the PLC
program.
It is also possible to transfer data from the CNC to the PLC via global and local
arithmetic parameters. The PLC has the following variables related to those CNC
parameters:
GUP
To read or modify a global parameter of the CNC.
LUP
To read or modify a local parameter of the CNC.
Example:
The "U" axis is controlled by the PLC and we want to command it from any partprogram of the CNC in such way that we could select the type of move (G00 or G01),
the positioning coordinate and the feedrate for that move.
In order to command it from any part-program, it is convenient to have in a subroutine
the section of the CNC program allowing the data transfer with the PLC.
This example uses subroutine SUB1 and, for data exchange, it uses global CNC
parameters.
P100
Type of move. If P100 = 0, then G00; If P100 = 1, then G01.
P101
"U" axis positioning coordinate.
P102
Feedrate. It only makes sense when moving in G01.
To indicate to the PLC that it must execute this move, it activates the following PLC
resource:
M1000
Command to begin movement.
Any part-program of the CNC may contain a block of the type:
CNC 8035
(SOFT M: V11.1X)
(SOFT T: V12.1X)
330
(PCALL 1, G1, U100, F1000)
Installation manual
This block calls subroutine SUB1 and it transfers the local parameters G, U and F
with the following information:
G
Type of move.
U
"U" axis positioning coordinate.
F
Feedrate for the movement.
Subroutine SUB1 can be programmed as follows:
( SUB 1)
( PLCM1000 = PLCM1000 OR 1 )
Execution command for the PLC.
(RET)
The PLC program, in turn, will have to contain the following instructions:
M1000 = CNCEX (G90 GP100 UP101 FP102, M111)
;When mark M1000 is active, it sends the indicated block to the CNC.
NOT M111 = RES M1000
If the CNC accepts this block, it resets mark M1000.
AXES CONTROLLED FROM THE PLC
Data transfer to global parameters.
PLC execution channel
12.
(P100 = G, P101 = U, P102 = F)
CNC 8035
(SOFT M: V11.1X)
(SOFT T: V12.1X)
331
Installation manual
12.2
Action CNCEX1
The CNCEX1 action is executed via main channel of the CNC and as long as the JOG
keyboard is enabled. Its execution can be interrupted by pressing [CYCLE STOP] or
even canceled by pressing [RESET].
If a CNCEX1 action is received when the JOG keyboard is disabled, the CNC ignores
this command.
Action CNCEX1
AXES CONTROLLED FROM THE PLC
12.
CNC 8035
(SOFT M: V11.1X)
(SOFT T: V12.1X)
332
The block to be executed must be written in the programming format of the CNC itself.
Any type of block can be sent which is edited in ISO or high level language. It admits
preparatory functions, auxiliary functions, calls to subroutines, etc.
PLC PROGRAMMING EXAMPLE
13
It is a three-axes machine (X, Y, Z) having a spindle with two speed ranges.
The PLC, besides controlling the 3 axes and the spindle, is in charge of lubricating
the axes as well as turning the coolant on and off.
CNC configuration
The PLC has 512 inputs and 512 outputs. Some of them, depending on the CNC
configuration, communicate with external devices.
Input I1 is the emergency input of the CNC and must be supplied with 24V.
Regardless of how it is treated by the PLC program, this signal is processed
directly by the CNC at all times.
Output O1 is normally at 24V, high logic level, and it is set low, 0V, whenever
an ALARM or an ERROR occurs at the PLC output O1.
CNC 8035
(SOFT M: V11.1X)
(SOFT T: V12.1X)
333
Installation manual
13.1
Definition of symbols (mnemonics)
It is a possible to associate a symbol (name) to any PLC resource. It may have up
to 8 characters so long as the name does not coincide with any of the reserved
instructions. It may not contain the following characters: blank-space " ", equal sign
"=", parenthesis "(" or ")", comma "," or semi-colon ";".
PLC PROGRAMMING EXAMPLE
Definition of symbols (mnemonics)
13.
These symbols or names must always be defined at the beginning of the program.
Duplicate symbols are not allowed; but, one resource may have more than one
symbol.
For better clarification, the symbols used in this program are grouped by subjects.
Used in: Basic and necessary programming.
DEF
I-EMERG
I1
External emergency input
DEF
I-CONDI
I70
Conditional mode. The CNC interrupts part-program
execution when executing auxiliary function M01
DEF
SERVO-OK
I71
The servo drives are O.K.
DEF
O-EMERG
O1
Emergency output. It must be normally high.
Used in: Treatment of the axis travel limit switches.
DEF
I-LIMTX1
I72
X axis positive overtravel limit switch
DEF
I-LIMTX2
I73
X axis negative overtravel limit switch
DEF
I-LIMTY1
I74
Y axis positive overtravel limit switch
DEF
I-LIMTY2
I75
Y axis negative overtravel limit switch
DEF
I-LIMTZ1
I76
Z axis positive overtravel limit switch
DEF
I-LIMTZ2
I77
Z axis negative overtravel limit switch
Used in: Treatment of the machine reference (home) switches.
DEF
I-REF0X
I78
X axis home switch
DEF
I-REF0Y
I79
Y axis home switch
DEF
I-REF0Z
I80
Z axis home switch
Used in: Treatment of M, S, T functions.
CNC 8035
(SOFT M: V11.1X)
(SOFT T: V12.1X)
334
DEF
M-03 M1003
Auxiliary mark. Indicates that M03 must be executed
DEF
M-04 M1004
Auxiliary mark. Indicates that M04 must be executed
DEF
M-08 M1008
Auxiliary mark. Indicates that M08 must be executed
DEF
M -41 M1041
Auxiliary mark. Indicates that M41 must be executed
DEF
M -42 M1042
Auxiliary mark. Indicates that M42 must be executed
Used in: Machine way lubrication.
DEF
I-LUBING
I81
Operator request to lubricate the ways of the machine
DEF
O-LUBING
O2
Ways lubrication output
Installation manual
Used in: Coolant treatment.
DEF
I-COOLMA
I82
The operator control the coolant. Manual mode.
DEF
I-COOLAU
I83
The CNC controls the coolant. Automatic mode.
DEF
O-COOL
O3
Coolant output
Used in: Spindle turning control.
O4
13.
Spindle enable output
Used in: Treatment of the spindle gear change.
DEF
O-GEAR1
O5
Move gears to select range 1 (gear 1)
DEF
O-GEAR2
O6
Move gears to select range 2 (gear 1)
DEF
I-GEAR1
I84
Indicates that Gear 1 is selected
DEF
I-GEAR2
I85
Indicates that Gear 2 is selected
Used in: Keyboard simulation.
DEF
I-SIMULA
I86
The operator requests the simulation of program
P12
DEF
SENDKEY
M1100
Indicates that the code of a key is to be sent out to
the CNC
DEF
KEYCODE
R55
Indicates the code of the key to be simulated
DEF
LASTKEY
R56
Indicates which is the last key accepted by the
CNC
DEF
SENTOK
M1101
Indicates that the key code has been sent correctly
DEF
KEYBOARD R57
Used to indicate to the CNC the source of the keys
DEF
CNCKEY
0
Used to indicate that the keys come from the CNC
keyboard
DEF
PLCKEY
1
Used to indicate that the keys come from the PLC
DEF
MAINMENU $FFF4
Code of the "MAIN MENU" key
DEF
SIMULATE
$FC01
Code of the "SIMULATE" key (F2)
DEF
KEY1
$31
Code of the "1" key
DEF
KEY2
$32
Code of the "2" key
DEF
ENTER
$0D
Code of the "ENTER" key
DEF
THEOPATH
$FC00
Code of the "THEORETICAL PATH" key (F1)
DEF
START
$FFF1
Code of the "START" key
PLC PROGRAMMING EXAMPLE
O-S-ENAB
Definition of symbols (mnemonics)
DEF
CNC 8035
(SOFT M: V11.1X)
(SOFT T: V12.1X)
335
Installation manual
13.2
First cycle module.
CY1
( ) = ERA O1 512 = ERA C1 256 = ERA T1 256 = ERA R1 256 = ERA M1 2000
( ) = ERA M4000 4127 = ERA M4500 4563 = ERA M4700 4955
First cycle module.
PLC PROGRAMMING EXAMPLE
13.
CNC 8035
(SOFT M: V11.1X)
(SOFT T: V12.1X)
336
Initializes all PLC resources to low logic level "0".
( ) = TG1 2 120000
Initializes the timer which controls the lubrication of the machine ways on power-up.
This operation will be performed for 2 minutes.
( ) = TG2 4 3600000
Initializes the timer which controls the amount of time the axes are moving before they
are lubricated. This lubrication lasts 5 minutes and it takes place after the axes have
been moving for 1 hour.
END
Installation manual
Main module.
PRG
REA
---- Basic and necessary programming ----
Permission to execute the part-program
() = /FEEDHOL
Permission to move the axes
( ) = /XFERINH
Permission to execute the next block
I-EMERG AND (rest of conditions) = /EMERGEN
If the external emergency input is activated or any other emergency occurs, the
general logic input /EMERGEN of the CNC. When there is no emergency, this signal
must remain high.
Main module.
13.
( ) = /STOP
PLC PROGRAMMING EXAMPLE
13.3
/ALARM AND CNCREADY = O-EMERG
The emergency output, O1, of the PLC (O-EMERG) must be normally high
If an alarm or emergency is detected at the CNC (/ALARM) or a problem was detected
when powering the CNC up (CNCREADY), the emergency output O-EMERG must
be brought low.
I-CONDI = M01STOP
When the operator selects the conditional mode (I-CONDI), the CNC general logic
input M01STOP must be activated. It interrupts the program when executing M01.
START AND (rest of conditions) = CYSTART
When the cycle START key is pressed, the CNC activates the general logic output
START.
The PLC must check that the rest of the conditions (hydraulic, safety devices, etc.)
are met before setting the general input CYSTART high in order to start executing
the program
SERVO-OK AND NOT LOPEN = SERVO1ON = SERVO2ON = SERVO3ON
If the servo drives are OK and the CNC does not detect any errors in the positioning
loop of the axes (LOPEN), the positioning loop must be closed on all axes. Axis logic
inputs of the CNC: SERVO1ON, SERVO2ON, SERVO3ON.
CNC 8035
(SOFT M: V11.1X)
(SOFT T: V12.1X)
337
Installation manual
----- Treatment of the axis overtravel limit switches ----I-LIMTX1 = LIMIT+1
I-LIMTX2 = LIMIT-1
I-LIMTY1 = LIMIT+2
I-LIMTY2 = LIMIT-2
Main module.
PLC PROGRAMMING EXAMPLE
13.
I-LIMTZ1 = LIMIT+3
I-LIMTZ2 = LIMIT-3
----- Treatment of the machine reference (home) switches ----I-REF0X = DECEL1
I-REF0Y = DECEL2
I-REF0Z = DECEL3
----- Message treatment ----The PLC allows displaying the corresponding PLC message at the CNC screen by
activating marks MSG1 through MSG128,. This text must be previously edited at the
PLC message table.
The following example shows how to generate a message to remind the operator to
home the axes after powering the machine up.
(MANUAL OR MDI OR AUTOMAT) AND NOT (REFPOIN1 AND REFPOIN2 AND
REFPOIN3) = MSG5
The message (MSG5) appears in the JOG, MDI or Automatic modes and only when
the axes of the machine have not been referenced (homed). The CNC logic outputs
"REFPOIN" indicate that the axes have been homed. ----- Error treatment -----
----- Error message treatment ----The PLC permits displaying the corresponding error message on the CNC screen
by activating marks ERR1 through ERR64 as well as interrupting the CNC program
execution stopping the axes and the spindle. The activation of any of these marks
does not activate the external CNC Emergency output.
Because the PLC program is not interrupted by these marks, it is advised to make
it possible to change their status via accessible external inputs; otherwise, the CNC
will keep receiving the same error at every PLC scan (cycle) thus preventing access
to any PLC mode.
CNC 8035
The text associated to the error message must be previously edited at the PLC error
table.
The next example shows how to generate the X axis overtravel limit overrun error
when one of the overtravel limit switches is pressed.
NOT I-LIMTX1 OR NOT I-LIMTX2 = ERR10
(SOFT M: V11.1X)
(SOFT T: V12.1X)
338
Installation manual
----- Treatment of M, S, T functions ----The CNC activates the general logic output MSTROBE to "tell" the PLC to execute
the M functions indicated at the variables MBCD1 through MBCD7.
It also activates: the SSTROBE output when the S function indicated at variable
SBCD must be executed, the TSTROBE output when the T function indicated at
variable TBCD must be executed and the T2STROBE output when the T function
indicated at variable T2BCD must be executed.
MSTROBE OR SSTROBE OR TSTROBE OR T2STROBE = TG1 1 100
The activation of the STROBE signals activates timer T1 in the mono-stable mode
for 100 milliseconds.
Whenever timer T1 is active, the PLC must set the AUXEND signal low as described
in: "Treatment of the general CNC input AUXEND".
When the CNC activates the MSTROBE signal, the contents of variables MBCD1
through MBCD7 must be analyzed in order to know which auxiliary functions are to
be executed. All MBCD variables may be analyzed at the same time by using
"MBCD*".
Main module.
This example deactivates the AUXEND signal for 100 milliseconds using the timer T1.
13.
PLC PROGRAMMING EXAMPLE
Whenever the CNC activates one of these signals, it is convenient to deactivate the
general CNC input AUXEND in order to interrupt the execution of the CNC. When the
PLC concludes the processing of the required function, this AUXEND signal must be
activated back so that the CNC resumes the execution of the interrupted program.
This example SETs the auxiliary marks so they can be analyzed later. Once analyzed,
they must be RESet so that the PLC does not analyze them again on the next cycle
(scan).
DFU MSTROBE AND CPS MBCD* EQ $0 = RES M-08
DFU MSTROBE AND CPS MBCD* EQ $2 = RES M-08
Functions M00 and M02 cancel the coolant (M08).
DFU MSTROBE AND CPS MBCD* EQ $3 = SET M-03 = RES M-04
DFU MSTROBE AND CPS MBCD* EQ $4 = SET M-04 = RES M-03
DFU MSTROBE AND CPS MBCD* EQ $5 = RES M-03 = RES M-04
Functions M03 and M04 are incompatible with each other and M05 cancels both.
DFU MSTROBE AND CPS MBCD* EQ $8 = SET M-08
DFU MSTROBE AND CPS MBCD* EQ $9 = RES M-08
DFU MSTROBE AND CPS MBCD* EQ $30 = RES M-08
Functions M09 and M30 cancel the coolant (M08)
DFU MSTROBE AND CPS MBCD* EQ $41 = SET M-41 = RES M-42
DFU MSTROBE AND CPS MBCD* EQ $42 = SET M-42 = RES M-41
CNC 8035
Functions M41 and M42 are incompatible with each other.
(SOFT M: V11.1X)
(SOFT T: V12.1X)
339
Installation manual
----- Spindle turning control ----The spindle enable output O-S-ENAB will be activated when selecting function M03
or M04.
M-03 OR M-04 = O-S-ENAB
----- Treatment of spindle gear change -----
Main module.
PLC PROGRAMMING EXAMPLE
13.
The spindle in this example has two gears (high and low). To perform a gear change,
proceed as follows:
• Deactivate the general CNC input AUXEND.
• Remove the control of the spindle back to the CNC Controlled by PLC.
• Output an oscillating analog signal to change gears.
• Move the gears.
• Verify that the gear change has been completed.
• Remove the oscillating analog signal.
• Return the control of the spindle back to the CNC.
• Activate the general CNC input AUXEND.
Deactivate the general CNC input AUXEND
While changing gears (ranges), general CNC input AUXEND should be
canceled in order to interrupt the execution of the CNC. "Treatment of the
general CNC input AUXEND".
Remove the control of the spindle back to the CNC Controlled by PLC.
Output an oscillating analog signal to change gears.
DFU M-41 OR DFU M-42
When a range (gear) change is requested...
= MOV 2000 SANALOG
... A 0.610V analog signal for the spindle is prepared and...
= SET PLCCNTL
... the PLC grabs the control of the spindle loop.
PLCCNTL AND M2011
While the PLC has the spindle control...
= SPDLEREV
... the spindle turning direction is changed every 400 milliseconds.
Move the gears.
The corresponding gear output (O-GEAR) is kept active until the range selection
is completed (I-GEAR).
M-41 AND NOT I-GEAR1 = O-GEAR1
CNC 8035
M-42 AND NOT I-GEAR2 = O-GEAR2
Verify that the gear change has been completed.
Remove the oscillating analog signal.
(SOFT M: V11.1X)
(SOFT T: V12.1X)
340
Return the control of the spindle back to the CNC.
Installation manual
(M-41 AND I-GEAR1) OR (M-42 AND I-GEAR2)
Once the gear change has concluded, the following must be done:
= RES M-41 = RES M-42
... remove the request for a gear change (M-41, M-42), ....
= MOV 0 SANALOG
... remove the spindle analog voltage,...
I-GEAR1 = GEAR1
I-GAMA2 = GEAR2
The corresponding CNC logic input (GEAR1, GEAR2) must be activated to confirm
the gear change.
----- Lubrication of the machine ways -----
PLC PROGRAMMING EXAMPLE
... Return the control of the spindle to the CNC.
Main module.
13.
= RES PLCCNTL
In this example, the machine axes are lubricated in the following instances:
• On machine power-up. For 2 minutes.
• When requesting a manual lubrication. For 5 minutes.
• After the axes have been moving for 1 hour. For 5 minutes.
• After an axis has travelled a specific distance since last lubricated. For 4 minutes.
Lubrication on machine power-up.
This operation will be performed for 2 minutes.
Whenever the machine is powered up, the PLC program starts running.
Therefore, the first cycle module CY1 must activate timer T2 in the mono-stable
mode for 2 minutes (120000 milliseconds).
( ) = TG1 2 120000
Manual lubrication.
This operation will last 5 minutes and it will be performed at operator's request.
DFU I-LUBING = TG1 3 300000
Whenever the operator requests the lubricating (lubing) operation, T3 must be
activated in the mono-stable mode for 5 minutes (300000 milliseconds).
Lubrication every hour of axis motion.
This operation takes place when the axes of the machine have been moving for
an accumulated time period of 1 hour. They will be lubricated for 5 minutes.
Timer T4 is used to keep track of the axis accumulated moving time and T5 to
time the 5 minute lubrication period.
The first cycle module CY1 must activate timer T4 in the delayed activation mode
with a time constant of 1 hour (3600 000 milliseconds).
CNC 8035
( ) = TG2 4 3600000
ENABLE1 OR ENABLE2 OR ENABLE3 = TEN 4
T4 only times when any of the axis is moving.
(SOFT M: V11.1X)
(SOFT T: V12.1X)
341
Installation manual
T4 = TG1 5 300000
After having timed 1 hour, T5 must be activated in the mono-stable mode for 5
minutes. (300000 milliseconds)
T5 = TRS 4 = TG2 4 3600000
Resets the axis-motion timer T4 to zero.
Main module.
PLC PROGRAMMING EXAMPLE
13.
Lubrication when an axis has traveled a specific distance since the last time it was
lubricated
PLC machine parameters USER12 (P14), "USER13 (P15) and USER14 (P16) are
used to indicate the distance each axis must travel before it gets lubricated.
( ) = CNCRD(MPLC12,R31,M302) = CNCRD(MPLC13,R32,M302) =
CNCRD(MPLC14,R33,M302)
Assigns to registers R31, R32 and R33 the values of PLC machine parameters
USER12 (P14), "USER13 (P15) and USER14 (P16)
( ) = C N C R D ( D I S T X , R 4 1 , M 3 0 2 ) = C N C R D ( D I S T Y, R 4 2 , M 3 0 2 ) =
CNCRD(DISTZ,R43,M302)
Assigns to registers R41, R42 and R43 the distance each axis has travelled.
CPS R41 GT R31 OR CPS R42 GT R32 OR CPS R43 GT R33
If the distance traveled by any axis exceeds the one set by machine parameter,......
= TG1 6 240000
... .....timer T6 must be activated in the mono-stable mode for 4 minutes (240000
milliseconds) and ......
= MOV 0 R39
= CNCWR(R39,DISTX,M302)
CNCWR(R39,DISTZ,M302)
=
C N C W R ( R 3 9 , D I S T Y, M 3 0 2 )
... reset to "0" the count of the distance traveled by each axis.
Activate the lubricating (lubing) operation.
T2 OR T3 OR T5 OR T6 = O-LUBING
If any of these conditions is met, the lubing output will be activated.
DFD O-LUBING = TRS2 = TRS3 = TRS4 = TRS5 = TRS6
Once the lubricating operation has concluded, All timers must be reset to "0".
CNC 8035
(SOFT M: V11.1X)
(SOFT T: V12.1X)
342
=
Installation manual
---- Coolant treatment ---The CNC executes function M08 to turn the coolant on and function M09 to turn it off.
Also, in this case, the operator has a switch to select whether the coolant is activated
manually by the operator or automatically by the CNC.
The operator control the coolant. Manual mode.
I-REFAUT
The operator control the coolant. Automatic mode.
O-REFRIG
Coolant on/off output.
13.
Coolant ON.
RESETOUT = NOT O-COOL = RES M-08
The coolant will be turned off when the CNC is reset to initial conditions (RESETOUT)
or when executing functions M00, M02, M09 and M30.
This instruction does not contemplate functions M00, M02, M09 and M30 since the
treatment of M, S, T functions turns mark M-08 off when activating any of them.
----- Treatment of the general CNC input AUXEND -----
PLC PROGRAMMING EXAMPLE
I-COOLMA OR (I-COOLAU AND M-08) = O-COOL
Main module.
I-REFMAN
It is advisable to have one single instruction to control each one of the logic CNC
inputs, thus preventing undesired functioning.
When having several instructions which can activate or deactivate an input, the PLC
will always assign the result of analyzing the last one of those instructions.
This example shows how to group in a single instruction all the conditions that activate
or deactivate one logic CNC input.
NOT T1 AND NOT M-41 AND NOT M-42 = AUXEND
Input AUXEND will remain low while:
• The "Treatment of the MSTROBE, TSTROBE, STROBE signals" is in progress
(timer T1 active)
• A spindle gear change is being performed (M-41, M-42)
----- Keyboard simulation ----With this example it is possible to simulate the theoretical path of part-program P12
whenever the operator requests it.
To do this, follow these steps:
• Indicate to the CNC that from now on the keys will come from the PLC.
• Simulate all the necessary steps sending the code of each one of the keys.
• Indicate to the CNC that from now on the keys will be coming from the CNC
keyboard, not from the PLC.
In order to make sending the keys easier, a subroutine is used which utilizes the
following parameters:
ENVIATEC
(Send Key) Calling parameter that must be activated whenever a key
is to be sent.
CODTECLA (Code of the key) Calling parameter that must contain the code
corresponding to the key being simulated.
ENVIOK
CNC 8035
(Sent OK) Outgoing parameter indicating that the key code has been
sent successfully.
(SOFT M: V11.1X)
(SOFT T: V12.1X)
343
Installation manual
DFU I-SIMULA = SET M120 = ERA M121 126
Whenever the operator requests the simulation (I-SIMULA), marks M120 through
M126 must be activated....
= MOV PLCKEY KEYBOARD = CNCWR (KEYBOARD, KEYSRC, M100)
.. indicate to the CNC that, from now on, the keys will be coming from the PLC
(PLCKEY)
Main module.
PLC PROGRAMMING EXAMPLE
13.
= MOV MAINMENU KEYCODE = SET SENDKEY
... and send the code for the "MAIN MENU" key.
M120 AND SENTOK = RES M120 = RES SENTOK = SET M121
If the previous key was sent out successfully (SENTOK), flags M120 and SENTOK
will be turned off, the flag for the next stage (M121) is activated ....
= MOV SIMULATE KEYCODE = SET SENDKEY
... and the code for the SIMULATE key (F2) is sent out.
M121 AND SENTOK = RES M121 = RES SENTOK = SET M122
If the previous key was sent out successfully (SENTOK), flags M121 and SENTOK
will be turned off, the flag for the next stage (M122) is activated ....
= MOV KEY1 KEYCODE = SET SENDKEY
... ...and the code for the "1" key is sent out.
M122 AND SENTOK = RES M122 = RES SENTOK = SET M123
If the previous key was sent out successfully (SENTOK), flags M122 and SENTOK
will be turned off, the flag for the next stage (M123) is activated ....
= MOV KEY2 KEYCODE = SET SENDKEY
... ...and the code for the "2" key is sent out.
M123 AND SENTOK = RES M123 = RES SENTOK = SET M124
If the previous key was sent out successfully (SENTOK), flags M123 and SENTOK
will be turned off, the flag for the next stage (M124) is activated ....
= MOV ENTER KEYCODE = SET SENDKEY
... ...and the code for the "ENTER" key is sent out.
M124 AND SENTOK = RES M124 = RES SENTOK = SET M125
If the previous key was sent out successfully (SENTOK), flags M124 and SENTOK
will be turned off, the flag for the next stage (M125) is activated ....
= MOV THEOPATH KEYCODE = SET SENDKEY
... and the code for the "THEORETICAL PATH" (F1) is sent out.
CNC 8035
M125 AND SENTOK = RES M125 = RES SENTOK = SET M126
If the previous key was sent out successfully (SENTOK), flags M125 and SENTOK
will be turned off, the flag for the next stage (M126) is activated ....
= MOV START KEYCODE = SET SENDKEY
(SOFT M: V11.1X)
(SOFT T: V12.1X)
344
... and the code for the START key is sent out.
Installation manual
M126 AND SENTOK = RES M126 = RES SENTOK
If the last key was sent out successfully (SENTOK), flags M126 and SENTOK will be
turned off....
Main module.
PLC PROGRAMMING EXAMPLE
13.
CNC 8035
(SOFT M: V11.1X)
(SOFT T: V12.1X)
345
Installation manual
= MOV CNCKEY KEYBOARD = CNCWR (KEYBOARD, KEYSRC, M100)
.. and the CNC is "told" that from now on the keys will be coming from CNC keyboard
(CNCKEY), not from the PLC.
--- Subroutine used to send a key ---
Main module.
PLC PROGRAMMING EXAMPLE
13.
SENDKEY =SET M100 =SET M101 =SET M102 =RES SENDKEY
To send a key (SENDKEY), set to "1" internal marks M100 through M102 and reset
the SENDKEY flag to "0".
M100 = CNCWR (KEYCODE, KEY, M100)
Sends to the CNC the code of the key to be simulated (KEYCODE). If this command
is not executed correctly (M100=1), the PLC will try again on the next cycle scan.
M101 AND NOT M100 = CNCRD (KEY, LASTKEY, M101)
If the previous command was executed correctly, (M100=0), it reads the last key
accepted by the CNC (LASTKEY).
M102 AND NOT M101 AND CPS LASTKEY EQ KEYCODE
If the previous command was executed correctly (M101=0) and the CNC accepted
the key sent to it (LASTKEY = KEYCODE), .....
= RES M102 = SET SENTOK
... the flag is turned off (M102=0) and the key is considered to be sent out successfully
(SENTOK=1)...
= NOT M101
... But if the CNC did not accept the key sent to it, it waits until it does (M101=1).
End of subroutine.
END
End of program.
CNC 8035
(SOFT M: V11.1X)
(SOFT T: V12.1X)
346
Installation manual
APPENDIX
A.
Technical specifications of the CNC ......................................349
B.
Probe connection .....................................................................353
C.
Summary of internal CNC variables. .....................................355
D.
Summary of PLC commands..................................................361
E.
Summary of PLC inputs and outputs .....................................365
F.
2-digit BCD code output conversion table.............................371
G.
Key codes .................................................................................373
H.
Logic outputs of key status.....................................................375
I.
Key inhibiting codes ................................................................377
J.
Machine parameter setting chart ............................................379
K.
M functions setting chart.........................................................385
L.
Leadscrew error compensation table.....................................387
M.
Cross compensation table.......................................................389
N.
Maintenance..............................................................................391
CNC 8035
(SOFT M: V11.1X)
(SOFT T: V12.1X)
347
Installation manual
TECHNICAL SPECIFICATIONS OF THE CNC
The machine manufacturer must comply with the EN 60204-1 (IEC-204-1)
standard in terms of protection against electrical shock due to faulty contacts
with external power supply.
Access to the inside of the unit is absolutely forbidden to non authorized
personnel.
3 feedback inputs for the axes.
3 analog outputs to control the axes (±10 V).
1 feedback input for the spindle encoder.
1 analog output to control the spindle (±10 V).
2 feedback inputs for the electronic handwheels.
2 inputs for digital probes (TTL or 24 Vdc)
0.0001mm or 0.00001 inch resolution.
Multiplying factor up to x 25 with sinewave input.
Feedrate from 0.0001 to 99999.9999 mm/min (0.00001 - 3937 inches/min).
Maximum travel: ±99999.9999 mm (±3937 inches).
APPENDIX
General characteristics
A.
Technical specifications of the CNC
To avoid overheating the internal circuitry, do not block the ventilation grooves
and install a ventilation system that removes the hot air from the enclosure.
1 RS232C communication line.
40 optocoupled digital inputs
24 optocoupled digital outputs
32-bit processor
Math coprocessor
Graphics coprocessor.
256 Kb CNC program memory.
Block processing time of 6.5 ms.
Configurable sample time: 2, 3, 4, 5 or 6 ms.
Approximate weight 7.5 Kg.
Maximum consumption of 48 W in normal operation.
Monochrome monitor
Technology: LCD STN.
Diagonal display area dimension: 7,5”.
Resolution: 640 x 480 pixels.
8 grey ranges.
Backlit with 1 cold-cathode fluorescent lamp.
CNC 8035
Due to the current state of the LCD technology, all manufacturers accept the
fact the LCD screens have a certain number of defective pixels.
(SOFT M: V11.1X)
(SOFT T: V12.1X)
349
Installation manual
Power supply
Nominal voltage: 20 V minimum and 30 V maximum.
Ripple: 4 V.
Nominal current: 2 A.
Current peak on power-up: 8 A.
The figure shows the shape of the supply current on power-up
PLC
APPENDIX
Technical specifications of the CNC
A.
Memory: 100 kbytes.
Programming in mnemonics.
1 millisecond time unit.
512 inputs.
512 outputs.
2047 user marks.
256 32-bit registers.
256 32-bit counters.
256 32-bit timers.
5V probe input.
Typical value 0.25 mA. ≅ Vin = 5V.
High threshold (logic level 1) VIH: from +2.4 Vdc up.
Low threshold (logic level 0) VIL: Below +0.9 Vdc
Maximum nominal voltage Vimax = +15 Vcc.
24V probe input.
Typical value 0.30 mA. ≅ Vin = 24V.
High threshold (logic level 1) VIH: from +12.5 Vdc up.
Low threshold (logic level 0) VIL: Below +4 Vdc
Maximum nominal voltage Vimax = +35 Vcc.
Digital inputs
Nominal voltage + 24 Vdc.
Maximum nominal voltage + 30 Vdc.
Minimum nominal voltage + 18 Vdc.
High threshold (logic level 1) VIH: from +18 Vdc up.
Low threshold (logic level 0) VIL: Under +5 Vdc or not connected.
Typical consumption of each input 5 mA.
Maximum consumption of each input 7 mA.
Protection by means of galvanic isolation by optocouplers.
Protection against reverse connection up to -30 Vdc.
Digital outputs
CNC 8035
Nominal supply voltage + 24 Vdc.
Maximum nominal voltage + 30 Vdc.
Minimum nominal voltage + 18 Vdc.
Output voltage Vout = Supply voltage (Vdc) -3 V
Maximum output current 100 mA
Protection by means of galvanic isolation by optocouplers.
Shortcircuit protection. Place external recovery diodes.
Analog outputs for axes and spindle
(SOFT M: V11.1X)
(SOFT T: V12.1X)
350
Command voltage within ±10 V, 16-bit solution
Minimum impedance of the connected connector 10 KΩ.
Shielded cable should be used.
Installation manual
Ambient conditions
Relative humidity: 30-95 % non condensing
Operating temperature: between +5 ºC (41 ºF) and +40 ºC (104 ºF) with an average
under +35 ºC (95 ºF).
Storage temperature: between -25 ºC (-13 ºF) and +70 ºC (158 ºF).
Maximum operating altitude : Meets the “IEC 1131-2” standard.
Packaging
Meets the “EN 60068-2-32” standard
Electromagnetic compatibility and safety
Refer to the section on safety conditions in the introduction of this manual.
Degree of protection
Central Unit : IP54 for the front panel and IP2X for the rear panel.
Accessible parts inside the enclosure: IP1X.
Operator panel: IP54
APPENDIX
When running 10-50 Hz amplitude 0.2 mm (1g).
While being shipped 10-50 Hz amplitude 1 mm (5g).
Free fall of packaged unit under Fagor ruling 1m.
Technical specifications of the CNC
A.
Vibration
Battery
3.5 V lithium battery
Estimated life: 3 years
As from error indication (low battery) the information contained in the memory will
be kept for 10 days maximum, with the CNC off. It must be replaced.
Neither attempt to recharge the battery nor expose it to temperatures over 100
ºC (212 ºF).
Do not short-circuit the terminals for risk of explosion or combustion.
CNC 8035
(SOFT M: V11.1X)
(SOFT T: V12.1X)
351
Installation manual
APPENDIX
Technical specifications of the CNC
A.
CNC 8035
(SOFT M: V11.1X)
(SOFT T: V12.1X)
352
Installation manual
PROBE CONNECTION
The CNC has two probe inputs (of 5Vdc and 24Vdc) at connector X3.
Depending on the type of connection applied the g.m.p. “PRBPULSE” (P39) must be
set, indicating whether it operates with the leading edge or trailing edge of the signal
which the probe provides.
APPENDIX
Active high (with an up flank).
Probe connection
B.
Probe with “normally open contact” output,
Probe with “normally closed contact” output.
Active high (with an up flank).
Interface with output in open collector Connection to +5 V.
Active low (with a down flank).
Interface with output in open collector Connection to +24 V.
Active low (with a down flank).
Interface with output in PUSH-PULL
The active flank depends on
the interface
CNC 8035
(SOFT M: V11.1X)
(SOFT T: V12.1X)
353
Installation manual
APPENDIX
Probe connection
B.
CNC 8035
(SOFT M: V11.1X)
(SOFT T: V12.1X)
354
Installation manual
SUMMARY OF INTERNAL CNC VARIABLES.
• The R symbol indicates that the variable can be read.
• The W symbol indicates that the variable can be modified.
Variables associated with tools.
TOOL
TOD
NXTOOL
NXTOD
TMZPn
TLFDn
TLFFn
TLFNn
TLFRn
TMZTn
HTOR
R
R
R
R
R
R/W
R/W
R/W
R/W
R/W
R/W
R
R
R
R
R
R/W
R/W
R/W
R/W
R/W
R
R
R
R
R
R
Number of the active tool.
Number of active tool offset.
Number of the next requested tool waiting for M06.
Number of the next tool’s offset.
(n) tool’s position in the tool magazine.
(n) tool’s offset number.
(n) tool’s family code.
Nominal life assigned to tool (n).
Real life value of tool (n).
Contents of tool magazine position (n).
Tool radius being used by the CNC to do the calculations.
Tool related variables (specific of the mill model).
TORn
TOLn
TOIn
TOKn
R/W
R/W
R/W
R/W
R/W
R/W
R/W
R/W
-
C.
( section 11.1 )
APPENDIX
CNC PLC DNC
Tool radius value of offset (n).
Tool length value of offset (n).
Tool radius wear of offset (n).
Tool length wear of offset (n).
Summary of internal CNC variables.
Variable
Tool related variables (specific of the lathe model).
TOXn
TOZn
TOFn
TORn
TOIn
TOKn
NOSEAn:
NOSEWn
CUTAn
R/W
R/W
R/W
R/W
R/W
R/W
R/W
R/W
R/W
R/W
R/W
R/W
R/W
R/W
R/W
R/W
R/W
R/W
-
Tool length offset (n) along X axis.
Tool length offset (n) along Z axis.
Location code of offset (n).
Tool radius value of offset (n).
Tool length wear of offset (n) along X axis.
Tool length wear of offset (n) along Z axis.
Cutter angle of indicated tool.
Width of indicated tool.
Cutting angle of indicated tool.
Variables associated with zero offsets.
Variable
ORG(X-C)
PORGF
PORGS
ORG(X-C)n
PLCOF(X-C)
ADIOF(X-C)
( section 11.2 )
CNC PLC DNC
R
R
-
R
R
R/W
R/W
R
R/W
R/W
R
R
R
R
R
R
Active zero offset on the selected axis. The value of the additive offset
indicated by the PLC is not included.
Abscissa coordinate value of polar origin.
Ordinate coordinate value of polar origin.
Zero offset (n) value of the selected axis.
Value of the additive zero offset activated via PLC.
Value for the selected axis of the zero offset with additive handwheel.
Variables associated with machine parameters.
Variable
MPGn
MP(X-C)n
MPSn
MPLCn
CNC PLC DNC
R
R
R
R
R
R
R
R
-
( section 11.3 )
Value assigned to general machine parameter (n).
Value assigned to (X-C) axis machine parameter (n).
Value assigned to machine parameter (n) of the main spindle.
Value assigned to machine parameter (n) of the PLC.
CNC 8035
(SOFT M: V11.1X)
(SOFT T: V12.1X)
355
Installation manual
Variables associated with work zones.
Variable
APPENDIX
Summary of internal CNC variables.
C.
FZONE
FZLO(X-C)
FZUP(X-C)
SZONE
SZLO(X-C)
SZUP(X-C)
TZONE
TZLO(X-C)
TZUP(X-C)
FOZONE
FOZLO(X-C)
FOZUP(X-C)
FIZONE
FIZLO(X-C):
FIZUP(X-C)
( section 11.4 )
CNC PLC DNC
R
R
R
R
R
R
R
R
R
R
R
R
R
R
R
R/W
R/W
R/W
R/W
R/W
R/W
R/W
R/W
R/W
R/W
R/W
R/W
R/W
R/W
R/W
R
R
R
R
R
R
R
R
R
R
R
R
R
R
R
Status of work zone 1.
Work zone 1. Lower limit along the selected axis (X/C).
Work zone 1. Upper limit along the selected axis (X-C).
Status of work zone 2.
Work zone 2. Lower limit along the selected axis (X/C).
Work zone 2. Upper limit along the selected axis (X-C).
Status of work zone 3.
Work zone 3. Lower limit along the selected axis (X/C).
Work zone 3. Upper limit along the selected axis (X-C).
Status of work zone 4.
Work zone 4. Lower limit along the selected axis (X/C).
Work zone 4. Upper limit along the selected axis (X-C).
Status of work zone 5.
Work zone 5. Lower limit along the selected axis (X/C).
Work zone 5. Upper limit along the selected axis (X-C).
Feedrate related variables.
Variable
FREAL
FREAL(X-C)
FTEO/X-C)
( section 11.5 )
CNC PLC DNC
R
R
R
R
R
R
R
R
R
Real feedrate of the CNC in mm/min or inch/min.
Actual (real) CNC feedrate of the selected axis.
Theoretical CNC feedrate of the selected axis.
Variables associated with function G94.
FEED
DNCF
PLCF
PRGF
R
R
R
R
R
R
R/W
R
R
R/W
R
R
Active feedrate at the CNC in mm/min or inch/min.
Feedrate selected via DNC.
Feedrate selected via PLC.
Feedrate selected by program.
Variables associated with function G95.
FPREV
DNCFPR
PLCFPR
PRGFPR
R
R
R
R
R
R
R/W
R
R
R/W
R
R
Active feedrate at CNC, in m/rev or inch/rev.
Feedrate selected via DNC.
Feedrate selected via PLC.
Feedrate selected by program.
Variables associated with function G32.
PRGFIN
R
R
R
Feedrate selected by program, in 1/min.
Variables associated with feedrate override (%)
FRO
PRGFRO
DNCFRO
PLCFRO
CNCFRO
PLCCFR
R
R/W
R
R
R
R
R
R
R
R/W
R
R/W
R
R
R/W
R
R
R
Feedrate Override (%) active at the CNC.
Override (%) selected by program.
Override (%) selected via DNC.
Override (%) selected via PLC.
Override (%) selected from the front panel knob.
Override (%) of the PLC execution channel.
Coordinate related variables.
CNC 8035
(SOFT M: V11.1X)
(SOFT T: V12.1X)
356
Variable
CNC PLC DNC
PPOS(X-C)
POS(X-C)
TPOS(X-C)
APOS(X-C)
ATPOS(X-C)
DPOS(X-C)
FLWE(X-C)
DIST(X-C)
LIMPL(X-C)
LIMMI(X-C)
DPLY(X-C)
GPOS(X-C)n p
R
R
R
R
R
R
R
R/W
R/W
R/W
R
R
R
R
R
R
R
R
R/W
R/W
R/W
R
-
R
R
R
R
R
R
R
R
R
R
-
( section 11.6 )
Programmed theoretical position value (coordinate).
Machine coordinates. Real coordinates of the tool base.
Machine coordinates. Theoretical coordinates of the tool base.
Part coordinates. Real coordinates of the tool base.
Part coordinates. Theoretical coordinates of the tool base.
Theoretical position of the probe when the probe touched the part.
Following error of the indicated axis.
Distance traveled by the indicated axis.
Second upper travel limit.
Second lower travel limit.
Coordinate of the selected axis displayed on the screen.
Coordinate of the selected axis, programmed in the (n) block of the program
(p).
Installation manual
Variables associated with electronic handwheels.
( section 11.7 )
HANPF
HANPS
HANPT
HANPFO
HANDSE
R
R
R
R
R
R
R
R
R
R
-
HANFCT
HBEVAR
R
R
R/W
R/W
R
R
MASLAN
MASCFI
MASCSE
R/W
R/W
R/W
R/W
R/W
R/W
R/W
R/W
R/W
Pulses received from 1st handwheel since the CNC was turned on.
Pulses received from 2nd handwheel since the CNC was turned on.
Pulses received from 3rd handwheel since the CNC was turned on.
Pulses received from 4th handwheel since the CNC was turned on.
For handwheels with a selector button, it indicates whether that button has
been pressed or not.
Multiplying factor different for each handwheel (when having several).
HBE handwheel. Reading enabled, axis being jogged and multiplying factor
(x1, x10, x100).
Linear path angle for "Path handwheel" or "Path Jog" mode.
Arc center coordinates for "Path handwheel mode" or "Path jog".
Arc center coordinates for "Path handwheel mode" or "Path jog".
Feedback related variables.
Variable
ASIN(X-C)
BSIN(X-C)
ASINS
BSINS
( section 11.8 )
CNC PLC DNC
R
R
R
R
R
R
R
R
R
R
R
R
A signal of the CNC's sinusoidal feedback for the selected axis.
B signal of the CNC's sinusoidal feedback for the selected axis.
"A" signal of the CNC's sinusoidal feedback for the spindle.
"B" signal of the CNC's sinusoidal feedback for the spindle.
Variables associated with the main spindle.
Variable
SREAL
FTEOS
( section 11.9 )
CNC PLC DNC
R
R
R
R
R
R
C.
APPENDIX
CNC PLC DNC
Summary of internal CNC variables.
Variable
Real spindle speed
Theoretical spindle speed.
Variables associated with spindle speed.
SPEED
DNCS
PLCS
PRGS
R
R
R
R
R
R
R/W
R
R
R/W
R
R
Active spindle speed at the CNC.
Spindle speed selected via DNC.
Spindle speed selected via PLC.
Spindle speed selected by program.
Variables associated with constant cutting speed (lathe model).
CSS
DNCCSS
PLCCSS
PRGCSS
R
R
R
R
R
R
R/W
R
R
R/W
R
R
Constant surface speed active at the CNC.
Constant surface speed selected via DNC.
Constant surface speed selected via PLC.
Constant surface speed selected by program.
Variables associated with the spindle override.
SSO
PRGSSO
DNCSSO
PLCSSO
CNCSSO
R
R/W
R
R
R
R
R
R
R/W
R
R
R
R/W
R
R
Spindle Speed Override (%) active at the CNC.
Override (%) selected by program.
Override (%) selected via DNC.
Override (%) selected via PLC.
Spindle Speed Override (%) selected from front panel.
Speed limit related variables.
SLIMIT
DNCSL
PLCSL
PRGSL
MDISL
R
R
R
R
R
R
R
R/W
R
R/W
R
R/W
R
R
R
Spindle speed limit active at the CNC.
Spindle speed limit selected via DNC.
Spindle speed limit selected via PLC.
Spindle speed limit selected by program.
Maximum machining spindle speed.
CNC 8035
(SOFT M: V11.1X)
(SOFT T: V12.1X)
357
Installation manual
Position related variables.
POSS
RPOSS
TPOSS
RTPOSS
Summary of internal CNC variables.
APPENDIX
C.
PRGSP
R
R
R
R
R
R
R
R
R
R
R
Real Spindle position.
R
Reading from the PLC in ten-thousandths of a degree (within ±999999999)
and from the CNC in degrees (within ±99999.9999).
Real Spindle position.
R
Reading from the PLC in ten-thousandths of a degree (between 0 and
3600000) and from the CNC in degrees (between 0 and 360).
Theoretical spindle position.
R
Reading from the PLC in ten-thousandths of a degree (within ±999999999)
and from the CNC in degrees (within ±99999.9999).
Theoretical spindle position.
R
Reading from the PLC in ten-thousandths of a degree (between 0 and
3600000) and from the CNC in degrees (between 0 and 360).
Position programmed in M19 via program for the main spindle.
Variables related to the following error.
FLWES
R
R
R
Spindle following error.
PLC related variables.
Variable
CNC PLC DNC
PLCMSG
PLCIn
PLCOn
PLCMn
PLCRn
PLCTn
PLCCn
PLCMMn
R
R/W
R/W
R/W
R/W
R/W
R/W
R/W
-
R
-
Number of the active PLC message with the highest priority.
32 PLC inputs starting from (n).
32 PLC outputs starting from (n).
32 PLC marks starting from (n).
(n) Register.
Indicated (n) Timer’s count.
Indicated (n) Counter’s count.
Modifies the (n) mark of the PLC.
Variables associated with local and global parameters.
Variable
GUP n
LUP (a,b)
CALLP
( section 11.10 )
CNC PLC DNC
R
R/W
R/W
-
-
Global parameter (P100-P299) (n).
Indicated local (P0-P25) parameter (b) of the nesting level (a).
Indicates which local parameters have been defined by means of a PCALL
or MCALL instruction (calling a subroutine).
Operating-mode related variables.
Variable
OPMODE
( section 11.11 )
CNC PLC DNC
R
R
R
Operating mode.
Other variables.
Variable
CNC 8035
(SOFT M: V11.1X)
(SOFT T: V12.1X)
358
NBTOOL
PRGN
BLKN
GSn
GGSA
GGSB
GGSC
GGSD
GGSE
GGSF
GGSG
GGSH
GGSI
GGSJ
GGSK
GGSL
GGSM
MSn
GMS
PLANE
LONGAX
( section 11.12 )
CNC PLC DNC
R
R
R
R
R
R
R
R
R
R
R
R
R
R
R
R
R
R
R
R
R
R
R
R
R
R
R
R
R
R
R
R
R
R
R
R
R
R
R
R
R
R
R
Number of the tool being managed..
Number of the program in execution.
Label number of the last executed block.
Status of the indicated G function (n).
Status of functions G00 thru G24.
Status of functions G25 thru G49.
Status of functions G50 thru G74.
Status of functions G75 thru G99.
Status of functions G100 thru G124.
Status of functions G125 thru G149.
Status of functions G150 thru G174.
Status of functions G175 thru G199.
Status of functions G200 thru G224.
Status of functions G225 thru G249.
Status of functions G250 thru G274.
Status of functions G275 thru G299.
Status of functions G300 thru G320.
Status of the indicated M function (n)
Status of M functions: M (0..6, 8, 9, 19, 30, 41..44).
Abscissa and ordinate axes of the active plane.
Axis affected by the tool length compensation (G15).
Installation manual
R
R
R
R
R
R
R
R
R
ORGROT
ROTPF
ROTPS
PRBST
CLOCK
TIME
DATE
TIMER
CYTIME
PARTC
FIRST
KEY
KEYSRC
ANAIn
ANAOn
CNCERR
PLCERR
DNCERR
DNCSTA
TIMEG
SELPRO
DIAM
R
R
R
R
R
R
R
R/W
R
R/W
R
R/W
R/W
R
R/W
R
R/W
R/W
R
R
R
R
R
R/W
R
R/W
R
R/W
R/W
R
R/W
R
R
R
R
R/W
R/W
R
R
R
R/W
R/W
R/W
R
R/W
R
R/W
R/W
R
R/W
R
R
R
R
R
PRBMOD
RIP
R/W
R
R/W
R
R
R
( section 11.12 )
Active mirror images.
General scaling factor applied. Reading from the PLC in ten-thousandths.
Scaling Factor applied only to the indicated axis. Reading from the PLC in
ten-thousandths.
Rotation angle (G73) of the coordinate system.
Abscissa of rotation center.
Ordinate of rotation center.
Returns probe status.
System clock in seconds.
Time in Hours, minutes and seconds.
Date in Year-Month-Day format
Clock activated by PLC, in seconds.
Time to execute a part in hundredths of a second.
Parts counter of the CNC.
First time a program is executed.
keystroke code.
Source of the keys.
Voltage (in volts) of the indicated analog input (n).
Voltage (in volts) to apply to the indicated output (n).
Active CNC error number.
Active PLC error number.
Number of the error generated during DNC communications.
DNC transmission status.
Remaining time to finish the dwell block (in hundredths of a second).
When having two probe inputs, it selects the active input.
It changes the programming mode for X axis coordinates between radius
and diameter.
Indicates whether a probing error must be displayed or not.
Linear theoretical feedrate resulting from the next loop (in mm/min).
C.
APPENDIX
MIRROR
SCALE
SCALE(X-C)
CNC PLC DNC
Summary of internal CNC variables.
Variable
The "KEY" variable can be "written" at the CNC only via the user channel.
The "NBTOOL" variable can only be used within the tool change subroutine.
CNC 8035
(SOFT M: V11.1X)
(SOFT T: V12.1X)
359
Installation manual
APPENDIX
Summary of internal CNC variables.
C.
CNC 8035
(SOFT M: V11.1X)
(SOFT T: V12.1X)
360
Installation manual
SUMMARY OF PLC COMMANDS
PLC Resources.
Outputs:
O 1/512
User marks:
M 1/2000
Arithmetic flag marks:
M 2003
Clock marks:
M 2009/2024
Fixed status marks:
M 2046/2047
Marks associated with messages:
M 4000/4127
Marks associated with errors:
M 4500/4563
Screen marks:
M 4700/4955
CNC communication marks:
M 5000/5957
Timers:
T 1/256
Counters:
C 1/256
User registers
R 1/499
Registers for communication with the CNC
R 500/559
D.
APPENDIX
I 1/512
Summary of PLC commands
Inputs:
The value stored in each register will be considered by the PLC as a signed integer
which could be referred to in the following formats:
Decimal
Integer within ±2147483647.
Hexadecimal
Number preceded by the $ sign and between 0 and FFFFFFFF.
Binary
Number preceded by the letter B and made up of up to 32 bits (1
or 0).
Directing instructions.
PRG
Main module.
CY1
First cycle module.
PE t
Periodic module. It will be executed every t time (in milliseconds).
END
End of module.
L 1/256
Label.
DEF
Symbol definition.
REA
All consultations will be performed on real values.
IMA
All consultations will be performed on image values.
IRD
Updates the "I" resources with the values of the physical inputs.
MRD
Updates resources M5000/5957 and R500/559 with the values of the logic CNC
outputs.
OWR
Updates the physical outputs with the real values of the "O" resources.
MWR
Updates the logic CNC inputs (internal variables) with the values of resources
M5000/5957 and R500/599
TRACE
Captures data for the Logic Analyzer while executing the PLC cycle.
CNC 8035
(SOFT M: V11.1X)
(SOFT T: V12.1X)
361
Installation manual
Simple consulting Instructions.
1/512
Inputs
O
1/512
Outputs
M
1/5957
Marks
T
1/256
Timers
C
1/256
Counters
B
0/31 R 1/499
Register Bits
Flank detection consulting Instructions.
Summary of PLC commands
APPENDIX
D.
I
DFU (Up flank detection)
I 1/512
O 1/512
M 1/5957
DFD (Down flank detection)
Comparison consulting Instructions.
CPS
T 1/256
C 1/256
R 1/559
#
GT
GE
EQ
NE
LE
LT
T 1/256
C 1/256
R 1/559
#
Operators.
NOT
Inverts the result of the consulting instruction it precedes.
AND
Performs the logic function “AND” between consulting
instructions.
OR
Perfor ms the logic function “OR” between consulting
instructions.
XOR
Performs the logic function “EXCLUSIVE OR” between
consulting instructions.
Assignment Binary Action Instructions.
CNC 8035
(SOFT M: V11.1X)
(SOFT T: V12.1X)
=I
1/512
Inputs.
=O
1/512
Outputs.
=M
1/5957
Marks.
= TEN
1/256
Timer enable.
= TRS
1/256
Timer reset.
= TGn
1/256
= CUP
1/256
Counter count up.
= CDW
1/256
Counter count down.
= CEN
1/256
Counter enable.
= CPR
1/256
=B
0/31 R 1/499
n/R
n/R
Counter preset.
Register Bits.
Conditioned binary actions instructions.
= SET
If the logic expression is “1”, this action assigns a “1” to the resource.
= RES
If the logic expression is “1”, this action assigns a “0” to the resource.
= CPL
If the logic expression is “1”, this action complements the logic state of the
resource.
= SET
= RES
= CPL
362
Timer trigger input.
I 1/512
O 1/512
M 1/5957
B 0/31 R 1/559
Installation manual
Sequence breaking action instructions.
= JMP L 1/256
Unconditional Jump.
= RET
Return or End of Subroutine.
= CAL L 1/256
Call to a Subroutine.
Arithmetic action instructions.
= NGU
Complements all register bits.
= NGS
Changes the sign of the Register contents.
= ADS
Adds the contents of a two registers or a number and a register content.
= SBS
Subtracts between the contents of two registers or between a number and
a register content.
= MLS
Multiplies the contents of two registers or a number and a register content.
= DVS
Divides the contents of two registers or a number and a register content.
= MDS
Module between registers contents or between a number and a register
content.
MOV
Code
Code
Source
code
Destinati
on code
Number of bits to
transmit
I 1/512
O 1/512
M 1/5957
T 1/256
C 1/256
R 1/559
#
I 1/512
O 1/512
M 1/5957
R 1/559
0 (Bin)
1 (BCD)
0 (Bin)
1 (BCD)
32
28
24
20
16
12
8
4
R1/559
#
R1/559
ADS
SBS
MLS
DVS
MDS
R1/559
#
D.
APPENDIX
Transfers the logic states of the indicated source to the indicated
destination.
Summary of PLC commands
= MOV
Logic action instructions.
= AND
Logic AND operation between register contents or between a number and
a register content.
= OR
Logic OR operation between register contents or between a number and
a register content.
= XOR
Logic XOR operation between register contents or between a number and
a register content.
= RR 1/2 Right-hand register rotation.
= RR 1/2 Left-hand register rotation.
AND
OR
XOR
RR1
RR2
RL1
RL2
R1/559
#
R1/559
#
CNC 8035
R1/559
Code
Number of repetitions
Code
R1/559
R1/559
0/31
R1/559
(SOFT M: V11.1X)
(SOFT T: V12.1X)
363
Installation manual
Specific action instructions.
APPENDIX
Summary of PLC commands
D.
CNC 8035
(SOFT M: V11.1X)
(SOFT T: V12.1X)
364
= ERA
Group erase
= CNCRD
CNCRD (Variable, R1/559, M1/4955)
Read internal CNC variables.
= CNCWR
CNCWR (R1/559, Variable, M1/5957)
Write internal CNC variables.
= PAR
PAR R1/559 M1/5957
Parity of register
ERA
I
O
M
T
C
R
1/512
1/512
1/5957
1/256
1/256
1/559
1/512
1/512
1/5957
1/256
1/256
1/559
Installation manual
SUMMARY OF PLC INPUTS AND OUTPUTS
GENERAL LOGIC INPUTS.
Stops the axes and the spindle. Displays the error.
/STOP
M5001
Stops execution of the part program, maintaining spindle rotation.
/FEEDHOL
M5002
Stops axis feed momentarily, maintaining spindle rotation.
/XFERINH
M5003
Prevents the next block from being executed, but finishes the one being executed.
CYSTART
M5007
Starts program execution..
SBLOCK
M5008
The CNC changes to single block execution mode.
MANRAPID
M5009
Selects rapid travel for all the movements that are executed in JOG mode.
OVRCAN
M5010
Selects feedrate override at 100%.
LATCHM
M5011
The axes will move from the moment the corresponding JOG key is pressed until the
STOP key is pressed.
ACTGAIN2
M5013
Indicates that the CNC assumes the 2nd set of gains.
RESETIN
M5015
Initial machining conditions selected by machine parameter.
AUXEND
M5016
Indicates that the execution of the M, S and T functions has completed.
TIMERON
M5017
Enables the timer:
TREJECT
M5018
Rejection of tool in use.
PANELOFF
M5019
Deactivation of keyboard.
PLCABORT
M5022
Possibility to abort the PLC channel
PLCREADY
M5023
PLC without errors.
INT1
M5024
Executes the interruption subroutine indicated in g.m.p. P35
INT2
M5025
Executes the interruption subroutine indicated in g.m.p. P36
INT3
M5026
Executes the interruption subroutine indicated in g.m.p. P37
INT4
M5027
Executes the interruption subroutine indicated in g.m.p. P38
BLKSKIP1
M5028
The “/ and /1” block skip condition is met.
BLKSKIP2
M5029
The “/2” block skip condition is met.
BLKSKIP3
M5030
The “/3” block skip condition is met.
M01STOP
M5031
Stops execution of the part program when the auxiliary M01 function is executed.
RETRACE
M5051
It activates the Retrace function.
ACTLM2
M5052
Activates the second travel limits.
HNLINARC
M5053
Type of path with "Path Handwheel" or "Path jog".
MASTRHND
M5054
It activates the "Path Handwheel" or "Path jog" mode.
EXRAPID
M5057
Selects rapid travel for all the movements that are executed in execution mode.
FLIMITAC
M5058
Limit the feedrate of each axis to the value set in its machine parameter FLIMIT (P75).
SLIMITAC
M5059
Limit the spindle speed to the value set in its machine parameter SLIMIT (P66).
BLOABOR
M5060
Finish the movement in progress and start executing the next block.
E.
APPENDIX
M5000
Summary of PLC inputs and outputs
/EMERGEN
CNC 8035
(SOFT M: V11.1X)
(SOFT T: V12.1X)
365
Installation manual
AXIS LOGIC INPUTS.
APPENDIX
Summary of PLC inputs and outputs
E.
Axis 1
Axis 2
Axis 3
LIMIT+
M5100
M5150
M5200
Travel limit overrun. Stops the axes and the spindle. Displays
the error.
LIMIT-*
M5101
M5151
M5201
Travel limit overrun. Stops the axes and the spindle. Displays
the error.
DECEL*
M5102
M5152
M5202
Home switch pressed.
INHIBIT*
M5103
M5153
M5203
Inhibits axis movement.
MIRROR*
M5104
M5154
M5204
Applies mirror image.
SWITCH*
M510
M5155
M5205
Swaps commands (axes with 1 drive)
DRO*
M5106
M5156
M5206
DRO axis. (DRO*=1 and SERVOON*=0).
SERVO*ON
M5107
M5157
M5207
Servo signal. (=1) closes the position loop
AXIS+*
M5108
M5158
M5208
Moves the axis in JOG mode. Similar to JOG keys.
AXIS-*
M5109
M5159
M5209
Moves the axis in JOG mode. Similar to JOG keys.
SPENA*
M5110
M5160
M5210
With Sercos. Speed enable signal of the drive.
DRENA*
M5111
M5161
M5211
With Sercos. Drive enable signal of the drive.
ELIMINA*
M5113
M5163
M5213
It does not display the axis and cancels the feedback alarms.
SMOTOF*
M5114
M5164
M5214
Cancels the SMOTIME filter, a.m.p. SMOTIME (P58).
LIM*OFF
M5115
M5165
M5215
It ignores the software limits.
MANINT*
M5116
M5166
M5216
Activate the additive handwheel in each axis.
SPINDLE LOGIC INPUTS.
Main
CNC 8035
(SOFT M: V11.1X)
(SOFT T: V12.1X)
366
LIMIT+S
M5450
Travel limit overrun. Stops the axes and the spindle. Displays the error.
LIMIT -S
M5451
Travel limit overrun. Stops the axes and the spindle. Displays the error.
DECELS
M5452
Home switch pressed.
SPDLEINH
M5453
Outputs a zero command for the spindle.
SPDLEREV
M5454
Reverses the spindle turning direction.
SMOTOFS
M5455
Cancels the SMOTIME filter, s.m.p. SMOTIME (P46).
SERVOSON
M5457
Servo signal. (=1) to move the spindle in closed loop (M19).
GEAR1
M5458
Spindle gear 1 selected.
GEAR2
M5459
Spindle gear 2 selected.
GEAR3
M5460
Spindle gear 3 selected.
GEAR4
M5461
Spindle gear 4 selected.
SPENAS
M5462
With Sercos. Speed enable signal of the drive.
DRENAS
M5463
With Sercos. Drive enable signal of the drive.
PLCFM19
M5464
Rapid synchronization feedrate, in M19.
M19FEED
R505
Rapid synchronization feedrate, in M19.
PLCCNTL
M5465
Spindle controlled directly by the PLC.
SANALOG
R504
Spindle analog voltage. Only for spindle controlled by PLC.
ELIMIS
M5456
The CNC does not display the spindle although it keeps controlling it.
Installation manual
KEY INHIBITING LOGIC INPUTS.
R500
KEYDIS2
R501
KEYDIS3
R502
KEYDIS4
R503
Inhibit the operation of the panel keys.
E.
/FEEDHOP
M5004
Stops the PLC axes momentarily, maintaining spindle rotation.
/XFERINP
M5005
Prevents the next block from being executed in the PLC channel, but finishes the one
being executed.
AUXENDP
M5006
Indicates that the execution of the M, S and T functions has completed.
BLOABORP
M5061
Possibility to abort the PLC channel
GENERAL LOGIC OUTPUTS.
CNCREADY
M5500
CNC without errors.
START
M5501
The CYCLE START key of the front panel has been pressed.
FHOUT
M5502
Indicates that program execution has been interrupted.
RESETOUT
M5503
Indicates that the CNC is set to initial conditions.
LOPEN
M5506
Indicates that the positioning loop for the axes is open.
/ALARM
M5507
An alarm or emergency condition was detected.
MANUAL
M5508
The manual operation (JOG) mode has been selected.
AUTOMAT
M5509
The automatic operation mode has been selected.
MDI
M5510
The MDI mode has been selected.
SBOUT
M5511
The single block execution mode has been selected.
INCYCLE
M5515
The part program is being executed.
RAPID
M5516
A rapid traverse is being executed (G00).
TAPPING
M5517
A tapping cycle is being executed (G84).
THREAD
M5518
A threading block is being executed (G33).
PROBE
M5519
A probing movement is being executed (G75/G76).
ZERO
M5520
A machine reference search is being executed (G74).
RIGID
M5521
A rigid tapping block in execution. Mill model.
RETRAEND
M5522
Retrace function. All possible blocks have been retraced.
CSS
M5523
The G96 function is selected.
SELECT0
M5524
Position selected at the front panel switch.
SELECT1
M5525
Position selected at the front panel switch.
SELECT2
M5526
Position selected at the front panel switch.
SELECT3
M5527
Position selected at the front panel switch.
SELECT4
M5528
Position selected at the front panel switch.
SELECT5
M5529
Position selected at the front panel switch.
SELECT6
M5530
Position selected at the front panel switch.
SELECT7
M5531
Position selected at the front panel switch.
SELECTOR
R564
Position selected at the front panel switch.
APPENDIX
LOGIC INPUTS OF THE PLC CHANNEL
Summary of PLC inputs and outputs
KEYDIS1
CNC 8035
(SOFT M: V11.1X)
(SOFT T: V12.1X)
367
Installation manual
APPENDIX
Summary of PLC inputs and outputs
E.
MSTROBE
M5532
Indicates that the auxiliary M functions which are indicated in registers R550 to R556
must be executed.
SSTROBE
M5533
Indicates that the auxiliary S function of register R557 must be executed.
TSTROBE
M5534
Indicates that the auxiliary T function of register R558 must be executed.
T2STROBE
M5535
Indicates that the auxiliary T function of register R559 must be executed.
ADVINPOS
M5537
For punch presses, it indicates that punching may begin.
INTEREND
M5538
It indicates that the interpolation is finished.
INPOS
M5539
The axes are in position.
DM00
M5547
Program interrupted after executing the auxiliary function M00.
DM01
M5546
Program interrupted after executing the auxiliary function M01.
DM02
M5545
The execution of the program has stopped after executing the auxiliary M02 function.
DM03
M5544
The spindle is turning clockwise (M03).
DM04
M5543
The spindle is turning counterclockwise (M04).
DM05
M5542
The spindle is stopped (M05).
DM06
M5541
The auxiliary M06 function has been executed.
DM08
M5540
The coolant output has been activated (M08).
DM09
M5555
The coolant output has been canceled (M09).
DM19
M5554
A block with spindle stop has been executed (M19).
DM30
M5553
The program concluded after executing the auxiliary M30 function.
DM41
M5552
First spindle speed gear (range) selected (M41).
DM42
M5551
Second spindle speed gear (range) selected (M42).
DM43
M5550
Third spindle speed gear (range) selected (M43).
DM44
M5549
Fourth spindle speed gear (range) selected (M44).
AXIS LOGIC OUTPUTS.
Axis 1
Axis 2
Axis 3
ENABLE*
M5600
M5650
M5700
Enables axis movement.
DIR*
M5601
M5651
M5701
Indicate axis moving direction.
REFPOIN*
M5602
M5652
M5702
Home search done.
DRSTAF*
M5603
M5653
M5703
With Sercos. They indicate servo drive status.
DRSTAS*
M5604
M5654
M5704
With Sercos. They indicate servo drive status.
ANT*
M5606
M5656
M5706
If distance < MINMOVE (P54), ANT*=1
INPOS*
M5607
M5657
M5707
Axis in position.
SPINDLE LOGIC OUTPUTS.
Main
CNC 8035
(SOFT M: V11.1X)
(SOFT T: V12.1X)
368
ENABLES
M5950
Enables spindle movement.
DIRS
M5951
Spindle turning direction
REFPOINS
M5952
The spindle has been already referenced (homed).
DRSTAFS
M5953
With Sercos. They indicate servo drive status.
DRSTASS
M5954
With Sercos. They indicate servo drive status.
REVOK
M5956
Spindle rpm correspond to programmed speed.
INPOSS
M5957
Spindle in position.
Installation manual
AUXILIARY M, S, T FUNCTION TRANSFER.
Auxiliary M function to be executed in the main channel.
MBCD2
R551
Auxiliary M function to be executed in the main channel.
MBCD3
R552
Auxiliary M function to be executed in the main channel.
MBCD4
R553
Auxiliary M function to be executed in the main channel.
MBCD5
R554
Auxiliary M function to be executed in the main channel.
MBCD6
R555
Auxiliary M function to be executed in the main channel.
MBCD7
R556
Auxiliary M function to be executed in the main channel.
MBCDP1
R565
Auxiliary M function to be executed in the PLC channel.
MBCDP2
R566
Auxiliary M function to be executed in the PLC channel.
MBCDP3
R567
Auxiliary M function to be executed in the PLC channel.
MBCDP4
R568
Auxiliary M function to be executed in the PLC channel.
MBCDP5
R569
Auxiliary M function to be executed in the PLC channel.
MBCDP6
R570
Auxiliary M function to be executed in the PLC channel.
MBCDP7
R571
Auxiliary M function to be executed in the PLC channel.
SBCD
R557
Spindle speed in BCD (2 or 8 digits).
TBCD
R558
Indicates the magazine position of the tool to be placed in the spindle.
T2BCD
R559
Magazine position (pocket) for the tool.
E.
APPENDIX
R550
Summary of PLC inputs and outputs
MBCD1
LOGIC OUTPUTS OF KEY STATUS.
KEYBD1
R560
KEYBD2
R561
KEYBD3
R562
KEYBD4
R563
Indicate whether a key of the operator panel is pressed.
CNC 8035
(SOFT M: V11.1X)
(SOFT T: V12.1X)
369
Installation manual
APPENDIX
Summary of PLC inputs and outputs
E.
CNC 8035
(SOFT M: V11.1X)
(SOFT T: V12.1X)
370
Installation manual
2-DIGIT BCD CODE OUTPUT CONVERSION TABLE
Programmed
S
S
BCD
Programmed
S
S
BCD
0
00
50-55
54
800-899
78
1
20
56-62
55
900-999
79
2
26
63-70
56
1000-1119
80
3
29
71-79
57
1120-1249
81
4
32
80-89
58
1250-1399
82
5
34
90-99
59
1400-1599
83
6
35
100-111
60
1600-1799
84
7
36
112-124
61
1800-1999
85
8
38
125-139
62
2000-2239
86
9
39
140-159
63
2240-2499
87
10-11
40
160-179
64
2500-2799
88
12
41
180-199
65
2800-3149
89
13
42
200-223
66
3150-3549
90
14-15
43
224-249
67
3550-3999
91
16-17
44
250-279
68
4000-4499
92
18-19
45
280-314
69
4500-4999
93
20-22
46
315-354
70
5000-5599
94
23-24
47
355-399
71
5600-6299
95
25-27
48
400-449
72
6300-7099
96
28-31
49
450-499
73
7100-7999
97
32-35
50
500-559
74
8000-8999
98
36-39
51
560-629
75
9000-9999
99
40-44
52
630-709
76
45-49
53
710-799
77
F.
APPENDIX
S
BCD
2-digit BCD code output conversion table
Programmed
S
CNC 8035
(SOFT M: V11.1X)
(SOFT T: V12.1X)
371
Installation manual
APPENDIX
2-digit BCD code output conversion table
F.
CNC 8035
(SOFT M: V11.1X)
(SOFT T: V12.1X)
372
Installation manual
KEY CODES
Alphanumeric operator panel (M-T models)
c
e
101
f
j
k
107
l
o
111
p
q
112
113
u
117
v
118
w
119
i
103
h
104
105
106
m
109
n
110
ñ
164
r
114
s
115
t
116
x
120
y
z
122
g
121
99
d
100
98
102
65
66
67
68
69
70
108
71
72
73
74
75
76
77
78
79
80
81
82
83
84
85
86
87
88
89
90
91
32
65454
65453
65456
65445
65460
64512
65522
64513
64514
65524
64515
027
64516
64517
61446
64518
65458
013
61447
65462
65455
61452
35
40
61
37
93
33
60
43
61443
53
54
44
50
59
45
57
38
34
49
42
62
56
52
47
36
41
55
91
63
G.
Key codes
b
97
APPENDIX
a
51
58
48
46
65523
65521
65520
CNC 8035
(SOFT M: V11.1X)
(SOFT T: V12.1X)
373
Installation manual
Key codes
APPENDIX
G.
CNC 8035
(SOFT M: V11.1X)
(SOFT T: V12.1X)
374
Installation manual
LOGIC OUTPUTS OF KEY STATUS
Alphanumeric operator panel (M-T models)
B4
R563
B3
R563
B2
R563
B1
R563
B0
R562
B1
R562
B14
R561
B2
R562
B7
R561
B3
R562
B6
R561
B4
R562
B5
R562
B15
R561
B6
R562
B13
R561
B16
R560
B8
R560
B0
R560
B9
R561
B1
B25
R561 R560
B17
R560
B9
R560
B1
R560
B10
R561
B2
B26
R561 R560
B18
R560
B10
R560
B2
R560
B11
R561
B3
B27
R561 R560
B19
R560
B11
R560
B3
R560
B12
R561
B4
B28
R561 R560
B20
R560
B12
R560
B4
R560
B31
R561
B30
B29
R561 R560
B21
R560
B13
R560
B5
R560
B26
R561
B25
B30
R561 R560
B22
R560
B14
R560
B6
R560
B29
R561
B28
B31
R561 R560
B23
R560
B15
R560
B7
R560
B27
R561
B24
R561
B19
R561
B18
R561
B17
R561
B16
R561
B7
R562
B10
R562
B25
R562
B10
R563
B15
R563
B8
R562
B23
R562
B24
R562
B9
R563
B18
R562
B9
R562
B26
R562
B0
R563
B7
R563
B16
R562
B22
R561
B17
R562
B8
R563
H.
APPENDIX
B5
R563
B0
B24
R561 R560
Logic outputs of key status
B6
R563
B8
R561
B5
R561
B15
R562
B20
R562
B21
R562
B22
R562
B31
R562
CNC 8035
(SOFT M: V11.1X)
(SOFT T: V12.1X)
375
Installation manual
APPENDIX
Logic outputs of key status
H.
CNC 8035
(SOFT M: V11.1X)
(SOFT T: V12.1X)
376
Installation manual
KEY INHIBITING CODES
Alphanumeric operator panel (M-T models)
B4
R504
B3
R504
B2
R504
B1
R504
B0
R502
B1
R502
B14
R501
B2
R502
B7
R501
B3
R502
B6
R501
B4
R502
B5
R502
B15
R501
B6
R502
B13
R501
B16
R500
B8
R500
B0
R500
B9
R501
B1
B25
R501 R500
B17
R500
B9
R500
B1
R500
B10
R501
B2
B26
R501 R500
B18
R500
B10
R500
B2
R500
B11
R501
B3
B27
R501 R500
B19
R500
B11
R500
B3
R500
B12
R501
B4
B28
R501 R500
B20
R500
B12
R500
B4
R500
B31
R501
B30
B29
R501 R500
B21
R500
B13
R500
B5
R500
B26
R501
B25
B30
R501 R500
B22
R500
B14
R500
B6
R500
B29
R501
B28
B31
R501 R500
B23
R500
B15
R500
B7
R500
B27
R501
B24
R501
B19
R501
B18
R501
B17
R501
B16
R501
B7
R502
B10
R502
B25
R502
B10
R504
B15
R504
B8
R502
B23
R502
B24
R502
B9
R504
B18
R502
B9
R502
B26
R502
B0
R504
B7
R504
B16
R502
B22
R501
B17
R502
B8
R504
I.
APPENDIX
B5
R504
B0
B24
R501 R500
Key inhibiting codes
B6
R504
B8
R501
B5
R501
B15
R502
B20
R502
B21
R502
B22
R502
B31
R502
CNC 8035
(SOFT M: V11.1X)
(SOFT T: V12.1X)
377
Installation manual
APPENDIX
Key inhibiting codes
I.
CNC 8035
(SOFT M: V11.1X)
(SOFT T: V12.1X)
378
Installation manual
MACHINE PARAMETER SETTING CHART
General machine parameters
P100
P101
P102
P103
P104
P105
P106
P107
P108
P109
P110
P111
P112
P113
P114
P115
P116
P117
P118
P119
P120
P121
P122
P123
P124
P125
P126
P127
P128
P129
P130
P131
P132
P133
P134
P135
P136
P137
P138
P139
P140
P141
P142
P143
P144
P145
P146
P147
P148
P149
P150
P151
P152
P153
P154
P155
P156
P157
P158
P159
P160
P161
P162
P163
P164
P165
P166
P167
P168
P169
P170
P171
P172
P173
P174
P175
P176
P177
P178
P179
P180
P181
P182
P183
P184
P185
P186
P187
P188
P189
P190
P191
P192
P193
P194
P195
P196
P197
P198
P199
J.
APPENDIX
P50
P51
P52
P53
P54
P55
P56
P57
P58
P59
P60
P61
P62
P63
P64
P65
P66
P67
P68
P69
P70
P71
P72
P73
P74
P75
P76
P77
P78
P79
P80
P81
P82
P83
P84
P85
P86
P87
P88
P89
P90
P91
P92
P93
P94
P95
P96
P97
P98
P99
Machine parameter setting chart
P0
P1
P2
P3
P4
P5
P6
P7
P8
P9
P10
P11
P12
P13
P14
P15
P16
P17
P18
P19
P20
P21
P22
P23
P24
P25
P26
P27
P28
P29
P30
P31
P32
P33
P34
P35
P36
P37
P38
P39
P40
P41
P42
P43
P44
P45
P46
P47
P48
P49
CNC 8035
(SOFT M: V11.1X)
(SOFT T: V12.1X)
379
Installation manual
_______ axis machine parameters
APPENDIX
Machine parameter setting chart
J.
CNC 8035
(SOFT M: V11.1X)
(SOFT T: V12.1X)
380
P0
P1
P2
P3
P4
P5
P6
P7
P8
P9
P10
P11
P12
P13
P14
P15
P16
P17
P18
P19
P20
P21
P22
P23
P24
P25
P26
P27
P28
P29
P30
P31
P32
P33
P34
P35
P36
P37
P38
P39
P40
P41
P42
P43
P44
P45
P46
P47
P48
P49
P50
P51
P52
P53
P54
P55
P56
P57
P58
P59
P60
P61
P62
P63
P64
P65
P66
P67
P68
P69
P70
P71
P72
P73
P74
P75
P76
P77
P78
P79
P80
P81
P82
P83
P84
P85
P86
P87
P88
P89
P90
P91
P92
P93
P94
P95
P96
P97
P98
P99
P100
P101
P102
P103
P104
P105
P106
P107
P108
P109
P110
P111
P112
P113
P114
P115
P116
P117
P118
P119
P120
P121
P122
P123
P124
P125
P126
P127
P128
P129
P130
P131
P132
P133
P134
P135
P136
P137
P138
P139
P140
P141
P142
P143
P144
P145
P146
P147
P148
P149
P150
P151
P152
P153
P154
P155
P156
P157
P158
P159
P160
P161
P162
P163
P164
P165
P166
P167
P168
P169
P170
P171
P172
P173
P174
P175
P176
P177
P178
P179
P180
P181
P182
P183
P184
P185
P186
P187
P188
P189
P190
P191
P192
P193
P194
P195
P196
P197
P198
P199
Installation manual
_______ axis machine parameters
P100
P101
P102
P103
P104
P105
P106
P107
P108
P109
P110
P111
P112
P113
P114
P115
P116
P117
P118
P119
P120
P121
P122
P123
P124
P125
P126
P127
P128
P129
P130
P131
P132
P133
P134
P135
P136
P137
P138
P139
P140
P141
P142
P143
P144
P145
P146
P147
P148
P149
P150
P151
P152
P153
P154
P155
P156
P157
P158
P159
P160
P161
P162
P163
P164
P165
P166
P167
P168
P169
P170
P171
P172
P173
P174
P175
P176
P177
P178
P179
P180
P181
P182
P183
P184
P185
P186
P187
P188
P189
P190
P191
P192
P193
P194
P195
P196
P197
P198
P199
J.
APPENDIX
P50
P51
P52
P53
P54
P55
P56
P57
P58
P59
P60
P61
P62
P63
P64
P65
P66
P67
P68
P69
P70
P71
P72
P73
P74
P75
P76
P77
P78
P79
P80
P81
P82
P83
P84
P85
P86
P87
P88
P89
P90
P91
P92
P93
P94
P95
P96
P97
P98
P99
Machine parameter setting chart
P0
P1
P2
P3
P4
P5
P6
P7
P8
P9
P10
P11
P12
P13
P14
P15
P16
P17
P18
P19
P20
P21
P22
P23
P24
P25
P26
P27
P28
P29
P30
P31
P32
P33
P34
P35
P36
P37
P38
P39
P40
P41
P42
P43
P44
P45
P46
P47
P48
P49
CNC 8035
(SOFT M: V11.1X)
(SOFT T: V12.1X)
381
Installation manual
_______ axis machine parameters
APPENDIX
Machine parameter setting chart
J.
CNC 8035
(SOFT M: V11.1X)
(SOFT T: V12.1X)
382
P0
P1
P2
P3
P4
P5
P6
P7
P8
P9
P10
P11
P12
P13
P14
P15
P16
P17
P18
P19
P20
P21
P22
P23
P24
P25
P26
P27
P28
P29
P30
P31
P32
P33
P34
P35
P36
P37
P38
P39
P40
P41
P42
P43
P44
P45
P46
P47
P48
P49
P50
P51
P52
P53
P54
P55
P56
P57
P58
P59
P60
P61
P62
P63
P64
P65
P66
P67
P68
P69
P70
P71
P72
P73
P74
P75
P76
P77
P78
P79
P80
P81
P82
P83
P84
P85
P86
P87
P88
P89
P90
P91
P92
P93
P94
P95
P96
P97
P98
P99
P100
P101
P102
P103
P104
P105
P106
P107
P108
P109
P110
P111
P112
P113
P114
P115
P116
P117
P118
P119
P120
P121
P122
P123
P124
P125
P126
P127
P128
P129
P130
P131
P132
P133
P134
P135
P136
P137
P138
P139
P140
P141
P142
P143
P144
P145
P146
P147
P148
P149
P150
P151
P152
P153
P154
P155
P156
P157
P158
P159
P160
P161
P162
P163
P164
P165
P166
P167
P168
P169
P170
P171
P172
P173
P174
P175
P176
P177
P178
P179
P180
P181
P182
P183
P184
P185
P186
P187
P188
P189
P190
P191
P192
P193
P194
P195
P196
P197
P198
P199
Installation manual
Machine parameters for main spindle
P100
P101
P102
P103
P104
P105
P106
P107
P108
P109
P110
P111
P112
P113
P114
P115
P116
P117
P118
P119
P120
P121
P122
P123
P124
P125
P126
P127
P128
P129
P130
P131
P132
P133
P134
P135
P136
P137
P138
P139
P140
P141
P142
P143
P144
P145
P146
P147
P148
P149
P150
P151
P152
P153
P154
P155
P156
P157
P158
P159
P160
P161
P162
P163
P164
P165
P166
P167
P168
P169
P170
P171
P172
P173
P174
P175
P176
P177
P178
P179
P180
P181
P182
P183
P184
P185
P186
P187
P188
P189
P190
P191
P192
P193
P194
P195
P196
P197
P198
P199
J.
APPENDIX
P50
P51
P52
P53
P54
P55
P56
P57
P58
P59
P60
P61
P62
P63
P64
P65
P66
P67
P68
P69
P70
P71
P72
P73
P74
P75
P76
P77
P78
P79
P80
P81
P82
P83
P84
P85
P86
P87
P88
P89
P90
P91
P92
P93
P94
P95
P96
P97
P98
P99
Machine parameter setting chart
P0
P1
P2
P3
P4
P5
P6
P7
P8
P9
P10
P11
P12
P13
P14
P15
P16
P17
P18
P19
P20
P21
P22
P23
P24
P25
P26
P27
P28
P29
P30
P31
P32
P33
P34
P35
P36
P37
P38
P39
P40
P41
P42
P43
P44
P45
P46
P47
P48
P49
CNC 8035
(SOFT M: V11.1X)
(SOFT T: V12.1X)
383
Installation manual
Machine parameters for serial line 1
P0
P1
P2
P3
P4
P5
P6
P7
APPENDIX
Machine parameter setting chart
J.
CNC 8035
(SOFT M: V11.1X)
(SOFT T: V12.1X)
384
P8
P9
P10
P11
P12
P13
P14
P15
P16
P17
P18
P19
P20
P21
P22
P23
P24
P25
P26
P27
P28
P29
P30
P31
P44
P45
P46
P47
P48
P49
P50
P51
P52
P53
P54
P55
P56
P57
P58
P59
P60
P61
P62
P63
P64
P65
P66
P67
P68
P69
P70
P71
P72
P73
P74
P75
P76
P77
P78
P79
P80
P81
P82
P83
P84
P85
P86
P87
PLC machine parameters
P0
P1
P2
P3
P4
P5
P6
P7
P8
P9
P10
P11
P12
P13
P14
P15
P16
P17
P18
P19
P20
P21
P22
P23
P24
P25
P26
P27
P28
P29
P30
P31
P32
P33
P34
P35
P36
P37
P38
P39
P40
P41
P42
P43
Installation manual
M FUNCTIONS SETTING CHART
M
M
Setting bits
M
function
Associated
subroutine
S
S
M
M
S
S
M
M
S
S
M
M
S
S
M
M
S
S
M
M
S
S
M
M
S
S
M
M
S
S
M
M
S
S
M
M
S
S
M
M
S
S
M
M
S
S
M
M
S
S
M
M
S
S
M
M
S
S
M
M
S
S
M
M
S
S
M
M
S
S
7 6 5 4 3 2 1 0
Setting bits
7 6 5 4 3 2 1 0
K.
APPENDIX
Associated
subroutine
M functions setting chart
M
function
CNC 8035
(SOFT M: V11.1X)
(SOFT T: V12.1X)
385
Installation manual
APPENDIX
M functions setting chart
K.
CNC 8035
(SOFT M: V11.1X)
(SOFT T: V12.1X)
386
Installation manual
LEADSCREW ERROR COMPENSATION TABLE
Position
Error
Error (-)
Point
Position
Error
Error (-)
P
P
E
E
E
E
P
P
E
E
E
E
P
P
E
E
E
E
P
P
E
E
E
E
P
P
E
E
E
E
P
P
E
E
E
E
P
P
E
E
E
E
P
P
E
E
E
E
P
P
E
E
E
E
P
P
E
E
E
E
P
P
E
E
E
E
P
P
E
E
E
E
P
P
E
E
E
E
P
P
E
E
E
E
P
P
E
E
E
E
P
P
E
E
E
E
P
P
E
E
E
E
P
P
E
E
E
E
L.
APPENDIX
Point
Axis _______
Leadscrew error compensation table
Axis _______
Axis _______
Point
Position
Error
Error (-)
P
P
E
E
E
E
P
P
E
E
E
E
P
P
E
E
E
E
P
P
E
E
E
E
P
P
E
E
E
E
P
P
E
E
E
E
P
P
E
E
E
E
P
P
E
E
E
E
P
P
E
E
E
E
CNC 8035
(SOFT M: V11.1X)
(SOFT T: V12.1X)
387
Installation manual
APPENDIX
Leadscrew error compensation table
L.
CNC 8035
(SOFT M: V11.1X)
(SOFT T: V12.1X)
388
Installation manual
CROSS COMPENSATION TABLE
Position
Error
Point
COMPAXIS
(P33)
Position
Error
P
P
E
E
P
P
E
E
P
P
E
E
P
P
E
E
P
P
E
E
P
P
E
E
P
P
E
E
P
P
E
E
P
P
E
E
P
P
E
E
P
P
E
E
P
P
E
E
P
P
E
E
P
P
E
E
P
P
E
E
P
P
E
E
P
P
E
E
P
P
E
E
M.
APPENDIX
Point
Axis to be compensated
_____
Cross compensation table
MOVAXIS
(P32)
Moving axis _____
CNC 8035
(SOFT M: V11.1X)
(SOFT T: V12.1X)
389
Installation manual
APPENDIX
Cross compensation table
M.
CNC 8035
(SOFT M: V11.1X)
(SOFT T: V12.1X)
390
Installation manual
MAINTENANCE
Cleaning
The dirt accumulated in the unit could act as a layer that hampers the dissipation of
the heat generated by the internal electronic circuitry with the risk of overheating and
damaging the CNC.
Do not use air at high pressure to clean the unit because it could cause grease to
accumulate which in turn may cause electrostatic discharges.
APPENDIX
To clean the operator panel and the monitor’s front panel, a soft cloth should be used
soaked in de-ionized water and home non-abrasive dishwasher soap (liquid, never
powder) or with 75º alcohol.
Maintenance
N.
Also, accumulated dirt
The plastics used on the front panel of the units are resistant to:
• Grease and mineral oil.
• Bases and bleach.
• Dissolved detergents.
• Alcohol.
Fagor Automation shall not be held responsible for any material or physical
damage derived from the violation of these basic safety requirements.
To check the fuses, first unplug the unit from mains. If the CNC does not turn
on when flipping the power switch, check that the fuses are the right ones and
they are in good condition.
Avoid solvents. The action of solvents such as chlorine hydrocarbons,
benzole, esters and ether may damage the plastics used to make the front
panel of the unit.
Do not open this unit. Only personnel authorized by Fagor Automation may
open this unit.
Do not handle the connectors with the unit connected to mains. Before
manipulating the connectors (inputs/outputs, feedback, etc.) make sure that
the unit is not connected to AC power.
CNC 8035
(SOFT M: V11.1X)
(SOFT T: V12.1X)
391
Installation manual
APPENDIX
N.
CNC 8035
(SOFT M: V11.1X)
(SOFT T: V12.1X)
392
Installation manual
N.
CNC 8035
(SOFT M: V11.1X)
(SOFT T: V12.1X)
393
Installation manual
N.
CNC 8035
(SOFT M: V11.1X)
(SOFT T: V12.1X)
394