1
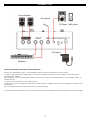
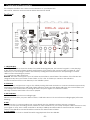
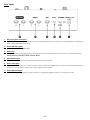
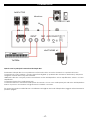
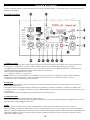
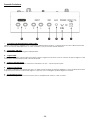
All-In-One MP3 Recorder / Player and Vocal FX Station
USER MANUAL
MANUALE D’USO
-2-
All-IN-One MP3 recorder / player and Vocal FX station
USER MANUAL
-3-
-4-
Contents
Features ……………………………………………………………………………………………………………………… 5
Important Safety Instructions …………………………………………………………………………………………….. 6
Connections ………………………………………………………………………………………………………………… 7
Controls and Connectors
Front Panel ………………………………………………………………………………………………………... 8-9
Rear Panel …………………………………………………………………………………………………………. 10
Specification ………………………………………………………………………………………………………………. 11
Features
GENERAL
¾
All-In-One MP3 Recorder / Player and Vocal FX Station
¾
Plug-and-REC, no computer needed
¾
MP3 File recording in studio quality
¾
Connect your keyboard / microphone or any stereo electronic instrument
¾
Microphone input with pre-amp / FX
¾
AUX input
¾
USB player to jam & record along with your music
USB RECORDER / PLAYER:
¾
Play and Record directly to USB Pen Drive
¾
Stereo CD resolution 44.1kHz 256kbps
¾
Supports up to 32GB USB pen drive.
¾
Recording format: MP3
¾
Record from any stereo instrument / Mixer / Microphone
¾
Record Level Control with LEDs meter
¾
Intelligent vocal cancel on MP3, best for karaoke and jamming purpose
¾
USB Class: USB 2.0 Mass Storage Host
¾
EZ Search system and file management by Folder
¾
Maximum number of Folder = 99
¾
Maximum number of MP3 files per Folder = 999
FOR VOCALIST
¾
Built-in 8 High Quality 24-bit DSP vocal effects
¾
Adjustable FX parameter and mix level
¾
1/4" jack microphone input
¾
Selectable Hi/Low Microphone gain to fit all dynamic microphone
¾
Adjustable Tone Control
¾
Microphone Level clip indicator
-5-
Important Safety Instructions
CAUTION
RISK OF ELECTRIC SHOCK
DO NOT OPEN
Précaution
Risque du choc électrique
Ne jamais ouvrir
The lightning flash with arrowhead symbol inside an
equilateral triangle is intended to alert User that the
presence of uninsulated "hazardous voltage"within
the product’s enclosure, which may be of sufficient
magnitude to induce a risk of electric shock to persons.
CAUTION: TO REDUCE THE RISK OF ELECTRIC SHOCK, DO
NOT REMOVE COVER (OR BACK). NO USER-SERVICEABLE
PARTS INSIDE. REFER SERVICING TO QUALIFIED
PERSONNEL.
AVERTISSEMENT : POUR REDUIRE LE RISQUE DE CHOC
The exclamation mark inside an equilateral triangle is
intended to alert user that the presence of important
operating and maintenance (servicing) instructions in
the literature accompanying the product.
ELECTRIQUE, NE JAMAIS EXPOSER CET APPAREIL SOUS LA
PLUIE OU DANS UN ENVIRONNEMENT HUMIDE. AUCUNE
PIECE CONCERNANT L’UTILISATEUR N’EST A L’INTERIEUR.
POUR LA REPARATION, REFEREZ-VOUS A UN PERSONNEL DE
SERVICE QUALIFIE.
This device complies with Part 15 of the FCC Rules. Operation is subject to the following two conditions: (1) this device may not
cause harmful interference, and (2) this device must accept any interference received, including interference that may cause
undesired operation.
-
-
Read these instructions.
Keep these instructions.
Heed all warnings.
Follow all instructions.
Do not use this apparatus near water.
Clean only with dry cloth.
Do not block any ventilation openings. Install in accordance with the manufacturer’s
instructions.
Do not install near any heat sources such as radiators, heat registers, stoves, or other apparatus
(including amplifiers) that produce heat.
Protect the power adapter cord from being walked on or pinched particularly at plugs,
convenience receptacles, and the point where they exit from the apparatus.
Only use attachments/accessories specified by the manufacturer.
Unplug this apparatus during lightning storms or when unused for long periods of time.
Refer all servicing to qualified service personnel. Servicing is required when the apparatus has
been damaged in any way, such as power-supply cord or plug is damaged, liquid has been
spilled or objects have fallen into the apparatus, the apparatus has been exposed to rain or
moisture, does not operate normally, or has been dropped.
The apparatus shall not be exposed to dripping or splashing and that no objects filled with
liquids, such as vases, shall be placed on the apparatus.
FCC part 15.21
Warning: Changes or modifications to this unit not expressly approved by the party responsible for compliance could void the user's
authority to operate the equipment.
FCC part 15.105
NOTE: This equipment has been tested and found to comply with the limits for a Class B digital device, pursuant to Part 15 of the FCC Rules.
These limits are designed to provide reasonable protection against harmful interference in a residential installation. This equipment
generates, uses, and can radiate radio frequency energy and, if not installed and sued in accordance with the instructions, may cause
harmful interference to radio communications. However, there is no guarantee that interference will not occur in a particular installation.
If this equipment does cause harmful interference to radio or television reception, which can be determined by turning the equipment off
and on, the user is encouraged to try to correct the interference by one or mote of the following measures:
· Reorient or relocate the receiving antenna.
· Increase the separation between the equipment and receiver.
· Connect the equipment into an outlet on a circuit different from that to which the receiver is connected.
· Consult the dealer or an experienced radio TV technician for help.
-6-
CONNECTION
Active Speaker
Microphone
CD Player / MP3 player
AC adaptor
Keyboard
This is the standard connections of the Simple Rec.
Position the Simple Rec unit in a confortable position near your instrument at your reach.
Connect your keyboard or digital piano (or other electronic instruments) to the input sockets using two
standard jack cables.
Also using two more standard jack cables, connect the output of the Simple Rec to an amplifier, mixer, or
speaker boxes.
Connect your microphone to the MIC socket.
Connect now the AC adapter to the main socket and the adapter cable to the DC plug in the back of the
Simple Rec.
You can switch on all your instrument now and start playing.
To have maximum satisfaction and to use in the best way the Simple Rec read carefully the next few pages.
-7-
Controls and Connectors
This chapter describes the various control elements of your Simple REC.
All controls, switches and connectors will be discussed in detail
Font Panel;
1. 3 Digit Display
ThE 3 digit LED display shows the index of the MP3 file being played. 001 means Song Nr.1 is now playing.
It also shows the current Folder index if the EZ Search (2) is pressed. F01 means the files in Folder Nr.1 are
selected, you can change or select the folder by turning the EZ Search button and pressing to confirm.
<REC> means Recording in process.
< --- > means no USB is detected.
Remark: The mixer can support up to 99 folders and 999 files in each folder. The number of the Folders are
assigned every time you create a new folder, so F01 is the 1st folder you create in the USB drive.
The F00 is reserved for the root directory in the USB file system.
2. EZ Search
You can select next/previous song on the USB by turning this knob clockwise or counter-clockwise respectively.
Pressing this EZ Search button will enter folder selection mode and the display will show the current folder, you
can change the folder index by turning this knob and press again to confirm the folder.
All songs stored in that folder can now be played.
3. REC indicator
This red LED will flash when recording begin.
Please note that after you press <REC> button, it will take around 1-2 sec before recording begins (LED starts
flashing).
4. REC
Press this button to start recording your songs directly into the USB drive without using a computer.
Before you start your recording, set the volume of each instument of your setup and press <REC> button to start,
press again to stop, then a MP3 audio file in 44.1kbps, 256kbps resolution will be stored inside the <AUDIO>
folder in the USB drive and the file will be stored at the latest index in folder.
5. PLAY/PAUSE
Press this button to PLAY or PAUSE the MP3 song playback from the USB disk.
-8-
6. NEXT SONG >>
Press this button to select the next song on the USB disk.
7. PREVIOUS SONG <<
Press this button to select the previous song on the USB disk.
8. USB Connector.
Connect your pen drive here. You can use very large USB disk: up to 32GB. If you have MP3 song loaded in
your USB disk, all songs will be played after the PLAY button (5)is pressed.
Remark: This connector doesn’t accept USB device other than USB Mass Storage class (MSC) device. Thus, it
cannot accept USB hard disk or USB pen drive with more than 32GB memory.
9. Record Input Level Control
This knob is used to control the master record level of the USB drive.
This knob controls the level of the mixed signal to USB.
10. Record Level Meters
The 4 LEDs indicated the record signal level to the USB drive. When the red <Clip> LED (17) is clipping, adjust the
record level to avoid unwanted distortion.
11. Level
The MP3/AUX LEVEL controls the MP3 playback or the AUX input volume level.
12. TONE
This knob controls the tone of the MP3 song played.
Turn clockwise for less bass and more treble.
Turn counter-clockwise for less treble and more bass.
When Tone is in the center position, the Tone is Flat.
13. VOCAL CANCEL
Press to enable the Vocal Cancel feature.
This will almost eliminate the original vocal part in the MP3 song and transforms the Simple REC into a Karaoke
machine.
Pressed it again to restored normal vocal functions in MP3 song.
Nota: The efficency of the Vocal Cancel can be different on the different songs.
14. Microphone GAIN selection
Select this switch to adjust the microphone gain (Hi/Low). To use most of normal karaoke microphones, select
“Low”. For low-sensitivity microphones, select “Hi” to get more sensitivity.
15. Tone
You can turn this knob to control the tone of the connected microphone, turn clockwise for more treble and
less bass, turn anti-clockwise for more bass and less treble
When the knob is in center position, this control is Flat.
16. Mic Vol
The Mic Vol knob controls the level of the microphone.
17. Clip
The Clip-LED illuninates when the microphone signal is driven too high, which could cause distortion. If this
happens, use the gain control or volume to reduce the preamp level until the LED does not light anymore
18. FX - Effects
Turn the 8 positions switch to select the 8 built-in high quality digital effects designed for vocal performances.
(Bright Hall / Echo / Doubler / Echo+Reverb / Ping Pong / Harmonizer / Chop / Radio)
19. FX - Paramter
Turn this knob to adjust the parameter of the selected effect.
20. Dry/Wet
The Dry/Wet knob controls the effects level into the microphone. If the control is turned all the way counterclockwise,
no effect signal is present on the microphone
-9-
Rear Panel;
1. DC power input connector:
This connector is used for external DC power adapter. Please use only DC9V 1A DC adapter, otherwise, it
may cause damage to the unit.
2. Power ON/OFF switch:
To turn ON / OFF the Simple REC
3. AUX Input
You can connect your CD player / MP3 player to this 3.5mm AUX input, the volume of this input will be
controlled by the MP3/AUX volume knob
4. Microphone input
You can connect your 1/4” dynamic microphone into this jack
5. Stereo Line-Input
You can connect the 1/4” stereo output of your keyboard, digital piano or other musical instrument into
this jack. You can also connect the output signal of your mixer.
6. Stereo Master Output
You can connect this stereo master output to external amplifier or input of a mixing console.
- 10 -
Specification
Microphone Inputs
Type.............................................................................................................. unbalanced 1/4’’Jack
Gain Range............................................................................................. High: 54dB - Low: 40dB
Max. Input level..............................................................................................….. -10dB@+6dB gain
Impedance.......................................................................................................................... 600Ohm
Stereo Inputs
Impedance.........................................................................……………… 10kOhm (unbalanced)
Max. Input level......................................................................................................................... +6dB
Main Outputs
Type.............................................................................................................. unbalanced 1/4’’ jack
Impedance.......................................................................................................................... 100Ohm
Maximum output level.........................................................................................…………… +6dB
FX section
Converter.................................................................................................................................. 24-bit
Effect number.................................................................................................................................. 8
USB section
USB Class................................................................................. USB 2.0 Mass Storage Device (Host)
Maximum USB capacity........................................................................................................... 32GB
Recording Resolution......................................................................................... 44.1kHz @256kbps
Recording format................................................................................. MPEG Audio Layer 3 (MP3)
Playback Bitrate................................................................................................... Full range of MP3
Maximum number of Folder......................................................................................................... 99
Maximum number of File per folder.......................................................................................... 999
Dimensions (WxHxD)...........................................................................................184.6x70x116.5mm
Weight........................................................................................................................................ 750g
Power Supply.......................................................................................……….…….. DC9V 1000mA
- 11 -
NOTE :
…………………………………………………………………………………………………………………………………………………………………
…………………………………………………………………………………………………………………………………………………………………
…………………………………………………………………………………………………………………………………………………………………
…………………………………………………………………………………………………………………………………………………………………
…………………………………………………………………………………………………………………………………………………………………
…………………………………………………………………………………………………………………………………………………………………
…………………………………………………………………………………………………………………………………………………………………
…………………………………………………………………………………………………………………………………………………………………
…………………………………………………………………………………………………………………………………………………………………
…………………………………………………………………………………………………………………………………………………………………
…………………………….…………………………………………………………………………………………………………………………………
…………………………………………………………………………………………………………………………………………………………………
…………………………………………………………………………………………………………………………………………………………………
…………………………………………………………………………………………………………………………………………………………………
…………………………………………………………………………………………………………………………………………………………………
…………………………………………………………………………………………………………………………………………………………………
…………………………………………………………………………………………………………………………………………………………………
…………………………………………………………………………………………………………………………………………………………………
…………………………………………………………………………………………………………………………………………………………………
…………………………………………………………………………………………………………………………………………………………………
…………………………………………………………….…………………………………………………………………………………………………
…………………………………………………………………………………………………………………………………………………………………
…………………………………………………………………………………………………………………………………………………………………
…………………………………………………………………………………………………………………………………………………………………
…………………………………………………………………………………………………………………………………………………………………
…………………………………………………………………………………………………………………………………………………………………
…………………………………………………………………………………………………………………………………………………………………
…………………………………………………………………………………………………………………………………………………………………
…………………………………………………………………………………………………………………………………………………………………
…………………………………………………………………………………………………………………………………………………………………
…………………………………………………………………………………………………………………………………………………………………
…………………………………………………………………………………………………………………………………………………………………
…………………………………………………………………………………………………………………………………………………………………
…………………………………………………………………………………………………………………………………………………………………
…………………………………………………………………………………………………………………………………………………………………
…………………………………………………………………………………………………………………………………………………………………
…………………………………………………………………………………………………………………………………………………………………
…………………………………………………………………………………………………………………………………………….…………………
………………………………………………………………………………………………………………….……………………………………………
…………………………………………………………………………………………………………………………………………………………………
…………………………………………………………………………………………………………………………………………………………………
…………………………………………………………………………………………………………………………………………………………………
…………………………………………………………………………………………………………………………………………………………………
………………………….……………………………………………………………………………………………………………………………………
…………………………………………………………………………………………………………………………………………………………………
…………………………………………………………………………………………………………………………………………………………………
…………………………………………………………………………………………………………………………………………………………………
…………………………………………………………………………………………………………………………………………………………………
…………………………………………………………………………………………………………………………………………………………………
…………………………………………………………………………………………………………………………………………………………………
………………………………………………………..
- 12 -
All-IN-One MP3 Recorder / Player and Vocal FX Station
All-IN-One MP3 recorder / player and Vocal FX station
MANUALE D’USO
- 13 -
- 14 -
Contenuti
Caratteristiche ……………………………………………………………………………………………………………. 15
Importanti istruzioni di sicurezza ………….……………………………………………………………………………. 16
Connessioni ………………………………………………………………………………………………………………... 17
Pannello di Controllo
Pannello Frontale …………………………………………………………………………………………….. 18-19
Pannello Posteriore ………………………………………………………………………………………………. 20
Specifiche Tecniche ……………………………………………………………………………………………………... 21
Caratteristiche
GENERALI
¾
All-In-One MP3 Recorder / Player and Vocal FX Station
¾
Plug-and-REC, computer non necessario
¾
Registrazione in qualità Studio
¾
Collegabile con Tastiera, Microfono o con qualsiasi altro strumento elettronico
¾
Ingresso microfono con pre-amplificatore FX
¾
USB player per suonare e registrare la tua musica
USB RECORDER / PLAYER:
¾
Play e Record direttamente su dispositivo USB
¾
Risoluzione Stereo CD 44.1kHz 256kbps
¾
Supporta Pen Drive fino a 32GB (più di 5000 brani)
¾
Formato di registrazione: MP3
¾
Registra da qualsiasi strumento elettronico / Mixer / Microfono
¾
Controllo del livello della registrazione a LED
¾
Vocal Cancel su brano MP3, perfetto per il karaoke e per l’improvvisazione
¾
Tipo USB Disk: USB 2.0
¾
Sistema EZ Search e gestione per cartelle
¾
Numero Massimo di Cartelle = 99
¾
Numero Massimo di file audio MP3 per cartella = 999
PER IL CANTANTE
¾
8 effetti di alta qualità (24 bit) per microfono incorporati
¾
Parametri e livello del mix FX regolabili
¾
Presa jack microfono da 1/4”
¾
Gain del microfono selezionabile Hi/Low adattabile a tutti i microfoni
¾
Tone Control regolabile
¾
Livello del clip del Microfono
- 15 -
Importanti Istruzioni di Sicureza
Précaution
Risque du choc électrique
Ne jamais ouvrir
ATTENZIONE
RISCHIO DI SCOSSE ELETTRICHE
NON APRIRE
Il lampo con simbolo della freccia all'interno di
un triangolo equilatero serve ad avvisare l'utente che la
presenza di "tensione pericolosa" all'interno del prodotto,
che può essere di entità tale da indurre un rischio di
scossa elettrica per le persone.
ATTENZIONE: PER RIDURRE IL RISCHIO DI SCOSSE ELETTRICHE
NONTOGLIERE IL COPERCHIO, NON CI SONO PARTI RIPARABILI
DALL’UTENTE RIVOLGERSI A PERSONALE QUALIFICATO.
AVERTISSEMENT : POUR REDUIRE LE RISQUE DE CHOC ELECTRIQUE,
NE JAMAIS EXPOSER CET APPAREIL SOUS LA PLUIE OU DANS UN
Il punto esclamativo all'interno di un triangolo equilatero serve
a segnalare all'utente che la presenza di importanti istruzioni
operative e di manutenzione(assistenza)
nella documentazione che accompagna il prodotto.
ENVIRONNEMENT HUMIDE. AUCUNE PIECE CONCERNANT
L’UTILISATEUR N’EST A L’INTERIEUR. POUR LA REPARATION, REFEREZVOUS A UN PERSONNEL DE SERVICE QUALIFIE.
Questo dispositivo è conforme alla Parte 15 delle norme FCC. Il funzionamento è soggetto alle seguenti due condizioni: (1) questo
dispositivo non può causare interferenze dannose e (2) questo dispositivo deve accettare qualsiasi interferenza ricevuta, incluse le
interferenze che potrebbero comprometterne il funzionamento.
-
-
-
Leggere queste istruzioni.
Mantenere queste istruzioni.
Osservare tutte le avvertenze.
Seguire tutte le istruzioni.
Non usare questo apparecchio in prossimità dell’acqua.
Pulire soltanto con un panno asciutto.
Non ostruire le aperture di ventilazione. Installare conformemente alle istruzioni del costruttore
Non installare vicino a fonti di calore come radiatori, caloriferi, stufe o altri apparecchi
(compresi amplificatori) che producono calore.
Proteggere il cavo di alimentazione prima che venga tirato o calpestato, in particolare le spine
e il punto di uscita
dell’apparecchio.
Usare solo dispositivi opzionali / accessori specificati dal costruttore.
Scollegare l’apparecchio durante temporali o se inutilizzato per lunghi periodi di tempo.
Per l’assistenza rivolgersi a personale qualificato. L’assistenza è necessaria quando
l’apparecchio è stato danneggiato in qualsiasi modo, come il cavo di alimentazione o della
spina, rovesciamento di liquidi od oggetti caduti all’interno,
l’apparecchio è stato esposto
a pioggia o umidità, non funziona normalmente o è caduto.
L’apparecchio non deve essere esposto a sgocciolamenti o spruzzi e che nessun oggetto
contenente liquidi, come
vasi, devono essere posti sopra l’apparecchio.
FCC parte 15.21
ATTENZIONE: Cambiamenti o modifiche a questa unità non espressamente approvate dalla parte responsabile della conformità
potrebbero invalidare il diritto dell’utente di utilizzare l’apparecchiatura.
FCC parte 15.105
NOTA: Questo apparecchio è stato testato ed è risultato conforme ai limiti per i dispositivi digitali di Classe B, ai sensi dell’Articolo 15 delle
norme FCC.
Questi limiti sono progettati per fornire una ragionevole protezione contro interferenze dannose in una istallazione residenziale. Questa
apparecchiatura genera, utilizza e può irradiare energia a radiofrequenza e se non installata in accordo con le istruzioni, può causare
interferenze dannose alle comunicazioni radio. Tuttavia, non vi è alcuna garanzia che non si verifichino interferenze in una particolare
installazione.
Se questo apparecchio causa interferenze dannose alla ricezione radio o televisiva, che possono essere determinate accendendo o
spegnendo l’apparecchio, l’utente è incoraggiato a provare a correggiere l’interferenza in uno o più modi tra le seguenti misure:
-
Riorientare o riposizionare l’antenna ricevente
-
Aumentare la distanza tra l’apparecchio e il ricevitore
-
Collegare l’apparecchiatura a una presa su un circuito diverso da quello in cui è collegato il ricevitore.
-
Consultare il rivenditore o un tecnico radio TV per assistenza.
- 16 -
CONNESSIONI
CASSE ATTIVE
Microfono
LETTORE CD / MP3
ADATTATORE AC
TASTIERA
Queste sono le principali connessioni al Simple Rec.
Posizionare il Simple Rec in una posizione confortevole vicino al vostro strumento e a portata di mano.
Connettere la vostra tastiera o il vostro pianoforte digitale (o qualsiasi altro strumento elettronico) alla presa
d’ingresso usando due cavi jack standard.
Utilizzando altri due cavi jack potete connettere l’uscita del Simple Rec ad un amplificatore, mixer o a casse
amplificate.
Connettere il microfono nella presa MIC.
Connettere adesso l’adattatore nella presa di corrente, e il suo cavo nella presa jack nel retro del Simple Rec.
Adesso si possono accendere tutti gli strumenti e iniziare a suonare.
Per avere la massima soddisfazione e di utilizzare nel migliore dei modi il Simple Rec, leggere attentamente le
prossime pagine.
- 17 -
Pannello di Controllo
Questo capitolo descrive i diversi elementi di controllo del SIMPLE REC. Tutti i regolatori e i connettori saranno
illustrati in dettaglio.
Pannello Frontale;
1. Display a 3 cifre
Questo Display LED a 3 cifre mostra l’indice dei file mp3 in riproduzione. 001 indica che è in riproduzione la
canzone N.1. Inoltre mostra l’indice della cartella corrente se il pulsante EZ Search (2) è premuto.
F01 significa che i file nella cartella N.1 sono in fase di riproduzione, è possibile modificare o selezionare la
cartella ruotando il pulsante EZ Search e premere per confermare.
<REC> Significa: Registrazione in corso
<- - -> Significa: USB non riconosciuto
NOTA: Il mixer può supportare fino a 99 cartelle e 999 file in ciascuna cartella. Il numero della cartella è
assegnato in modo progressivo. Così, la cartella F01 è la prima creata, F02 la seconda e così via.
La F00 è riservata, alla directory della USB Disk.
2. EZ Search
E’ possible selezionare le traccie successive o precedenti sulla USB girando la manopola in senso orario o
antiorario(next/previus).
Premendo questo pulsante EZ Search entrerà in modalità di “selezione cartella” e il display visualizzerà la
cartella corrente, è possibile modificare l’indice della cartella ruotando la manopola e premere di nuovo per
la conferma.
I brani salvati in questa cartella verranno riprodotti automaticamente.
3. Indicazione REC
Il LED rosso lampeggia durante la fase di registrazione.
Dopo aver premuto il pulsante REC si prega di attendere 1-2 secondi prima di iniziare la registrazione, ovvero
quando inizia a lampeggiare il led rosso.
4. REC
Premere questo pulsante per avviare la registrazione direttamente su USB senza l’uso di computer.
Prima di iniziare a registrare, bilanciare il volume di ogni strumento con i vostri setup, poi premere il pulsante
REC per avviare la registrazione, premerlo di nuovo per interromperla, quindi un file audio MP3 di 44.1kbps con
risoluzione 256kbps sarà memorizzato nella cartella <AUDIO> nella USB e il file sarà salvato all’ultimo posto
dell’indice della cartella.
- 18 -
5. PLAY/PAUSE
Premere questo pulsante per far partire o mettere in pausa il brano MP3 della USB.
6. NEXT SONG >>
Premere questo pulsante per selezionare la song successiva della USB.
7. PREVIOUS SONG <<
Premere questo pulsante per selezionare la song precedente della USB.
8. Connessione USB.
Qui è possible collegare dispositivi USB fino a 32 GB di memoria. Se si dispone di contenuti musicali in formato
mp3, la musica verrà riprodotta solamente dopo aver premuto il tasto PLAY.
Nota: Questo connettore non accetta dispositivi di archiviazione diversi da Pen Drive USB classe (MSC).
Pertanto non accetta Pen Drive superiori a 32 Gb e Hard Disk.
9. Registrazione del livello del segnale Input
Questa manopola viene utilizzata per il controllo del volume generale in registrazione verso la penna USB.
Questa manopola controlla il livello del segnale miscelato verso la USB.
10. Indicatore Livello di Registrazione
I 4 LED visualizzano il livello del segnale rilevato durante la registrazione in USB. Quando il <CLIP> (17) rosso
lampeggia, girare la manopola per regolare il livello di registrazione ed evitare distorsioni indesiderate.
11. Livello
Livello MP3 controlla la riproduzione di MP3 o il livello del volume di ingresso AUX.
12. TONE
Questa manopola controlla il tono della musica MP3 in riproduzione. Girare in senso orario per meno bassi e più
alti. Girare in senso antiorario per più bassi e meno alti. Quando è in posizione centrale il Tone è su OFF.
13. VOCAL CANCEL
Premere il pulsante per attivare la funzione Vocal Cancel.
Questo eliminerà la voce originale nel brano mp3 trasforma il REC in un semplice karaoke.
Premere di nuovo per disattivare la funzione Vocal Cancel.
Nota: l’efficacia del Vocal Cancel puo’ variare a seconda del brano MP3 selezionato.
14. Selezione Microfono e Gain
Selezionare questo switch per settare il Gain (Hi/Low).
Per usare la maggior parte dei microfoni da karaoke selezionare “low”. Per microfoni con bassa sensibilità
selezionare “Hi” per ottenere una maggiore sensibilità.
15. Tone
E’ possible usare questa manopola per controllare il tono del microfono, girare in senso orario per meno bassi e
più alti. Girare in senso antiorario per più bassi e meno alti. Quando è in posizione centrale il Tone è su OFF.
16. Mic Vol
Il Mic Vol serve per controllare il livello del microfono.
17. Clip
Il led Clip si illumina quando il segnale del microfono è troppo alto e provocherebbe una distorsione. In questo
caso utilizzare il controllo Gain o ridurre il volume di pre-amplificazione fino a quando il led non spegne.
18. Cambio degli Effetti
Ruotare l’interruttore ad 8 posizioni per selezionare uno degli 8 effetti digitali integrati di alta qualità, progettati
per performance vocali.
(Bright Hall/Echo/Doubler/Echo+Reverb/Ping Pong/Harmonizer/Chop/Radio)
19. Parametri FX
Girare questa manopola per regolare l’effetto selezionato.
20. Dry/Wet
La manopola Dry/Wet controlla il livello degli effetti del microfono. Se il controllo è girato completamente in
senso antiorario, nessun effetto è presente sul microfono.
- 19 -
Pannello Posteriore;
1. Connettore di alimentazione ingresso DC:
Questo connettore è utilizzato per connettere l’alimentatore esterno. Si prega di usare solo l’alimentatore da
9V 1A a corredo del Simple Rec, in caso contrario, può provocare danni all’unità.
2. Interruttore ON/OFF:
Si usa per accendere o spegnere il Simple REC.
3. Ingreso AUX
E’ possibile collegare Lettori CD/Lettori MP3 a questo ingresso AUX da 3,5 mm, il volume di questo ingresso sarà
controllato dalla manopola del volume MP3/AUX.
4. Ingresso del Microfono
E’ possibile connettere il vostro microfono dinamico da 1/4” a questa presa jack.
5. Ingresso Line stereo
E’ possible collegare una presa jack da 1/4" della vostra tastiera, pianoforte digitale o di un qualsiasi strumento
in questa presa come una linea di ingresso. Oppure si può collegare qualsiasi ingresso di mixer.
6. Uscita Master Stereo
E’ possible collegare questa uscita stereo ad un amplificatore esterno o ad un mixer.
- 20 -
SPECIFICHE TECNICHE
Ingresso Microfono
Tipo …………………………………………………………………………… unbalanced 1/4’’Jack
Gain Range ……………………………………………………………….. High:54dB - Low:40dB
Livello Input Max. ………………………………………………………………… -10dB@+6dB gain
Impedenza ……………………………………………………………………………………. 600Ohm
Ingresso Stereo
Impedenza ………………………………………………………………… 10kOhm (unbalanced)
Livello Input Max. ………………………………………………………………………………… +6dB
Uscita Main
Tipo …………………………………………………………………………… unbalanced 1/4’’ jack
Impedenza ……………………………………………………………………………………. 100Ohm
Livello Output Max. ……………………………………………………………………………… +6dB
Sezione FX
Convertitore ……………………………………………………………………………………… 24-bit
Numero Effetti …………………………………………………………………………………………. 8
Sezione USB
USB …………………………………………………………….. USB 2.0 Mass Storage Device (Host)
Capacità Max. USB ……………………………………………………………………………… 32GB
Risoluzione Registrazione ………………………………………………………. 44.1kHz @256kbps
Formato Registrazione ……………………………………………….. MPEG Audio Layer 3 (MP3)
Riproduzione Bitrate ……………………………………………………………… Full range of MP3
Numero Max. di Cartelle …………………………………………………………………………… 99
Numero Max. di file per Cartella ………………………………………………………………... 999
Dimensioni (WxHxD) ……………………………………………………………. 184.6x70x116.5mm
Peso …………………………………………………………………………………………………. 750g
Adattatore …………………………………………………………………………….. DC9V 1000mA
- 21 -
NOTE :
…………………………………………………………………………………………………………………………………………………………………
…………………………………………………………………………………………………………………………………………………………………
…………………………………………………………………………………………………………………………………………………………………
…………………………………………………………………………………………………………………………………………………………………
…………………………………………………………………………………………………………………………………………………………………
…………………………………………………………………………………………………………………………………………………………………
…………………………………………………………………………………………………………………………………………………………………
…………………………………………………………………………………………………………………………………………………………………
…………………………………………………………………………………………………………………………………………………………………
…………………………………………………………………………………………………………………………………………………………………
…………………………….…………………………………………………………………………………………………………………………………
…………………………………………………………………………………………………………………………………………………………………
…………………………………………………………………………………………………………………………………………………………………
…………………………………………………………………………………………………………………………………………………………………
…………………………………………………………………………………………………………………………………………………………………
…………………………………………………………………………………………………………………………………………………………………
…………………………………………………………………………………………………………………………………………………………………
…………………………………………………………………………………………………………………………………………………………………
…………………………………………………………………………………………………………………………………………………………………
…………………………………………………………………………………………………………………………………………………………………
…………………………………………………………….…………………………………………………………………………………………………
…………………………………………………………………………………………………………………………………………………………………
…………………………………………………………………………………………………………………………………………………………………
…………………………………………………………………………………………………………………………………………………………………
…………………………………………………………………………………………………………………………………………………………………
…………………………………………………………………………………………………………………………………………………………………
…………………………………………………………………………………………………………………………………………………………………
…………………………………………………………………………………………………………………………………………………………………
…………………………………………………………………………………………………………………………………………………………………
…………………………………………………………………………………………………………………………………………………………………
…………………………………………………………………………………………………………………………………………………………………
…………………………………………………………………………………………………………………………………………………………………
…………………………………………………………………………………………………………………………………………………………………
…………………………………………………………………………………………………………………………………………………………………
…………………………………………………………………………………………………………………………………………………………………
…………………………………………………………………………………………………………………………………………………………………
…………………………………………………………………………………………………………………………………………………………………
…………………………………………………………………………………………………………………………………………….…………………
………………………………………………………………………………………………………………….……………………………………………
…………………………………………………………………………………………………………………………………………………………………
…………………………………………………………………………………………………………………………………………………………………
…………………………………………………………………………………………………………………………………………………………………
…………………………………………………………………………………………………………………………………………………………………
………………………….……………………………………………………………………………………………………………………………………
…………………………………………………………………………………………………………………………………………………………………
…………………………………………………………………………………………………………………………………………………………………
…………………………………………………………………………………………………………………………………………………………………
…………………………………………………………………………………………………………………………………………………………………
…………………………………………………………………………………………………………..
- 22 -
- 23 -
Musical Instruments
[email protected] - www.orla.it