1
The WombatDialer User Manual
Loway
The WombatDialer User Manual
Loway
Table of Contents
................................................................................................................................................................. v
1. What is WombatDialer? ................................................................................................................................. 1
1.1. Why was WombatDialer created? ........................................................................................................... 1
1.2. Key features .................................................................................................................................... 1
1.3. Typical usage scenarios ...................................................................................................................... 2
2. Getting started with WombatDialer .................................................................................................................... 3
2.1. Install WombatDialer ........................................................................................................................... 3
2.2. Create a recording to be broadcast ......................................................................................................... 4
2.3. Create a PBX application to play back the recording ..................................................................................... 5
2.4. Set up WombatDialer .......................................................................................................................... 6
2.5. Create a list of numbers to be called ....................................................................................................... 7
2.6. Create a new campaign ...................................................................................................................... 7
2.7. Create reschedule rules ....................................................................................................................... 8
2.8. Run your first campaign ...................................................................................................................... 8
2.9. Run a report on your campaign ............................................................................................................ 10
2.10. Where to go from here ..................................................................................................................... 11
3. WombatDialer Concepts ............................................................................................................................... 12
3.1. The architecture of WombatDialer ......................................................................................................... 12
3.2. Asterisk servers ............................................................................................................................... 12
3.3. Trunks .......................................................................................................................................... 13
3.4. End-points ..................................................................................................................................... 14
3.5. Call lists and call records ................................................................................................................... 16
3.6. Campaigns .................................................................................................................................... 17
3.7. AMD & Fax detection ........................................................................................................................ 21
3.8. Campaign runs ................................................................................................................................ 22
3.9. Opening Hours ................................................................................................................................ 25
3.10. Call logs ...................................................................................................................................... 25
3.11. Users and security .......................................................................................................................... 26
4. Running WombatDialer ................................................................................................................................ 29
4.1. Understanding the GUI ...................................................................................................................... 29
4.2. Controlling the dialer ......................................................................................................................... 29
4.3. The Live page ................................................................................................................................ 31
4.4. Running campaign reports .................................................................................................................. 35
4.5. Importing and exporting call lists ........................................................................................................... 38
4.6. The License page ............................................................................................................................ 40
5. QueueMetrics integration .............................................................................................................................. 42
5.1. Installation ..................................................................................................................................... 42
5.2. Understanding QueueMetrics integration .................................................................................................. 42
5.3. Real-time monitoring ......................................................................................................................... 42
5.4. Reporting ...................................................................................................................................... 43
5.5. Using the agent’s page ...................................................................................................................... 43
6. A WombatDialer Cookbook ........................................................................................................................... 45
6.1. A social media dialer ........................................................................................................................ 46
6.2. Helping Wombats one carrot at a time .................................................................................................... 49
6.3. Outbound IVRs and dr. Strangelove ....................................................................................................... 50
6.4. Understanding queue end-points ........................................................................................................... 54
6.5. A custom QueueMetrics integration ........................................................................................................ 56
6.6. Elastix queue call-backs ..................................................................................................................... 59
6.7. Automated recall of lost inbound calls ..................................................................................................... 61
6.8. Preview dialing with QueueMetrics, Elastix and SugarCRM ............................................................................ 63
7. Administering WombatDialer .......................................................................................................................... 66
7.1. Installing ....................................................................................................................................... 66
7.2. Upgrading ...................................................................................................................................... 68
7.3. Starting and stopping ........................................................................................................................ 68
7.4. Backing up .................................................................................................................................... 69
7.5. Logs and logging ............................................................................................................................. 69
7.6. Troubleshooting a running instance ........................................................................................................ 69
8. API reference ............................................................................................................................................ 71
8.1. Controlling Asterisk from WD ............................................................................................................... 71
8.2. Controlling WD from Asterisk ............................................................................................................... 71
8.3. Controlling WD over HTTP .................................................................................................................. 72
8.4. The JSON configuration API ................................................................................................................ 76
8.5. The JSON Live and Reporting API ........................................................................................................ 80
8.6. HTTP life-cycle notifications of calls ....................................................................................................... 84
9. System configuration ................................................................................................................................... 86
9.1. Security keys .................................................................................................................................. 86
9.2. Default users .................................................................................................................................. 86
10. For more information… ............................................................................................................................... 87
iii
List of Tables
4.1.
4.2.
6.1.
8.1.
9.1.
9.2.
Live calls ...............................................................................................................................................
Campaign runs ........................................................................................................................................
Recipes ................................................................................................................................................
JSON API .............................................................................................................................................
System Keys ..........................................................................................................................................
Default users ..........................................................................................................................................
iv
35
35
45
79
86
86
v
Chapter 1. What is WombatDialer?
WombatDialer is a new-generation mass outbound calling platform for the Asterisk PBX.
It can be used to implement many different services. By offering a set of ready-to-use components and a monitoring GUI, you can create
complex solutions in minutes.
WombatDialer can work on pre-defined call lists or can dynamically create them over an API (e.g. dial number X after 10:30 AM). It shares
the load on one or more PBX servers and has a flexible rescheduling logic to handle missed calls. It is built to be used with your existing
Asterisk PBX and does not require separate servers or a separate set of lines. It can call over VoIP or through the public telephone
network.
WombatDialer is built to integrate with your business processes, can receive calls to be made over HTTP and/or notify an external system
in real-time about calls made and results gathered.
WombatDialer works natively with the QueueMetrics Call-Center Monitoring Suite in order to produce state-of-the-art campaign analyses
and insight.
1.1. Why was WombatDialer created?
If you are an Asterisk integrator, it may have happened to you: one of your clients requires simple outbound capabilities, e.g. calling back a
customer who filled in a recall form on their website. Simple enough.
You start by creating an Asterisk callfile to generate each call - it works nicely and it is easy to set up, but if the call does not complete
then it is lost. So you have to create a process that keeps track of the call and retries it in time. And that’s not an easy feat to pull off when
starting from a callfile.
The first thing your client notices is that calls end up using an unpredicatble amount of lines - as they basically have an office PBX, people
cannot dial in because at peak times your script is saturating all outgoing channels. Management is not happy and you have to keep track
of trunk usage - not only your own, but your client’s as well.
Then your client notices that those calls should not be made outside business hours - a customer might require a call at night, but there
must be someone at their offices in order to call back. So you have to implement a calendar in your custom application.
Now that you have the calendar, your client notices that calls are generated at inconvenient times - sometimes all of their service reps are
sitting idle, and other times they are all busy and calls keep piling up. So you have to edit your scripts to keep track of the current end-point
statuses and decide when it is a good time to call.
Just at this point, they start to saturate their existing PBX, so they need to set up a cluster of boxes and they want your application to
handle this. And while you are at it, what about usage statistics? and why not running different outbound services at once? and did they tell
you they need to integrate their existing CRM? and could you add predictive capabilities to the set? and….
It looks like a nightmare. And it actually is - been there, done that. That’s why WombatDialer was created: all common outbound logic
should be encapsulated through a declarative interface. No need to reinvent the wheel. You program the dialplan to be executed - either
manually or through a GUI - and WombatDialer takes care of the rest. You create scripts if you need to send and receive data from
WombatDialer, and you can control it all through a simple HTTP interface.
How much time is this going to save you?
1.2. Key features
• Works with your existing Asterisk PBX
• Easy, automated installation
• High scalability: from one to hundreds of outbound lines on multiple servers
• Run multiple prioritized campaigns in parallel
• Different dialing modes - automated, reverse and preview
• Pervasive security model with extensive auditing capabilities
• Programmable handling of calls that do not complete
• Easy to integrate through its HTTP API
• Strong real-time monitoring capabilities
• Runs locally - you do not have to depend on third-party services
• Provides a set of "building blocks" so you can create custom-tailored solutions
1
What is WombatDialer?
1.3. Typical usage scenarios
1.3.1. Telecasting
Send a pre-recorded message to a set of receivers. The message can be easily customized by having your PBX read custom variables,
e.g. current account balances, planned service outages, end of current subscription periods. Works with your existing PBX.
• Automated warning systems (e.g school alerts)
• Event cancellations
• Number verification services
1.3.2. Telemarketing
Send a pre-recorded message to a list of contacts, and offer them an option to be put in contact with an operator if interested. When
required, a maximum call duration can be enforced.
• Appointment reminders and cancellations for physicians, dentists, etc.
• Track subscription expirations and process renewals
• Product offerings
• Debt tracking and collection
1.3.3. Voice conferencing
Ever tried setting up a conference call with many attendants? WombatDialer can connect them all in parallel at the click of a button - no
more wasted time and manually dialing busy numbers.
• Connect tens or hundreds of parties at once
• Different parties can have different access levels, e.g some may speak and some may only listen
• Virtual town hall
1.3.4. Automated phone interviews
Connect to a group of receivers and offer them a set of IVR options (reverse IVR). WombatDialer keeps track of selected options and
forwards them to your tracking system.
• Automated service satisfaction interviews
• Quality Assessment of your services
• Instant automated polling stations
2
Chapter 2. Getting started with
WombatDialer
Using WombatDialer is easy once you get the hang of how it works. In order to work profitably with it, there are a few prerequisites that you
should be aware of:
• WombatDialer drives one or more Asterisk PBX’s and uses them to place calls. You should have the logins and passwords of the AMI
interface for these PBXs.
• You must know the names of the trunks WombatDialer will use - they depend on the local setup. E.g. SIP/myprovider/123456
or DAHDI/g0/123456 might be valid formats to dial the number 123456.
• When a call is started, WombatDialer directs it to some place in the Asterisk dialplan in order to be processed. So you should have a
general idea of how to program your Asterisk PBX in order to execute the functionality you’re after - e.g. playing a broadcast message,
recording an audio message, setting up an inbound queue. You should know where in the dialplan these actions will happen, in terms of
extension and context as used by Asterisk.
In the following example, we will show you one of the simplest things you can do with WombatDialer - that is, calling a list of numbers and
playing back a pre-defined message. All numbers will be called in sequence; if any of them cannot connect, then it will be retried.
To make life easier, we will run the following example by using the free 2-channel demo key that is embedded in WombatDialer. You may
want to test more complex scenarios by getting a free demo key from our website in order to test-drive WombatDialer thoroughly.
This is our battle plan:
• Install WombatDialer
• Create a recording to be broadcast
• Create a PBX function to play back the recording
• Set up WombatDialer
• Create a list of numbers to be called
• Create a new campaign
• Create reschedule rules for our campaign
• Run your first campaign
• Run a report on the campaign
2.1. Install WombatDialer
We will be installing the dialer on the same box as your PBX is. Installation is very easy; on an Elastix box it is enough to login as root
and enter the following commands:
wget -P /etc/yum.repos.d http://yum.loway.ch/loway.repo
yum install wombat
A number of packages will be selected and installed on your local system. This may take a while.
3
Getting started with WombatDialer
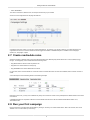
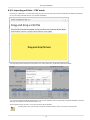
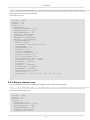
When done, go to http://serveraddress:8080/wombat and follow the on-line instructions to create the database.
the default MySQL password in earlier versions of Elastix used to be passw0rd. On newer versions, you decide it while
you are installing Elastix.
When done, login as demoadmin password demo by clicking on the Users icon on the top-right.
If all goes well, you should be presented a screenshot like the following one:
2.2. Create a recording to be broadcast
First we create an extension on the new PBX.
Then we go to PBX → System Recordings and follow the instructions to record a new message or upload an existing audio file.
4
Getting started with WombatDialer
When done, save the recording under the name "BroadcastMessage".
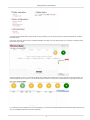
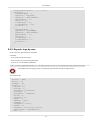
2.3. Create a PBX application to play back the recording
Now we create an announcement by clicking on Announcements and selecting our recording. We set up the announcement so that the
message is played twice and then the channel is hung up.
Then we go to Misc Applications and create a custom application with feature code "999" that plays the announcement we just defined.
5
Getting started with WombatDialer
We save and apply changes to the PBX.
If now we dial 999 on our local extension, the message we just set up is played back. So far, so good. This ends what we had to do on the
PBX.
2.4. Set up WombatDialer
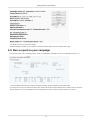
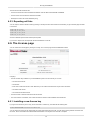
Now go back to WombatDialer; after logging in, click on "Edit basic settings" and add a new Asterisk Server like:
• Server description: MyPBX
• Adress: 127.0.0.1
• Port: 5038
• Login: admin
• Password: password
in this example, we use the default AMI user for Elastix - it would be generally better to create a new user specifically for
WD.
Now we create a new trunk. This will be used to dial numbers out. We might be using a SIP trunk, a local channel or whatever suits you.
For the moment we use the default format used by Elastix, so that numbers will be composed as if they were dialed on a local extension.
• Server: MyPBX
• Name: Trunk
• Capacity: 10
• Dial string: Local/${num}@from-internal/n
Now we create an end-point, that is a destination for calls that are successfully answered. This will match the function just created in Elastix
- again we will fake dialling 999 on a local extension.
• Server: MyPBX
• Type: PHONE
• Queue name / phone : 999
• Max channels: 10
• Extension: 999
• Context: from-internal
By the end of the configuration, your page should look like the following one:
6
Getting started with WombatDialer
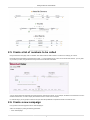
2.5. Create a list of numbers to be called
Now go back to the main page, click on "Edit lists" and create a new list called "TestList". The list has no settings, just a name.
Now select the list just created on the left and then press "+" on the "Numbers for list" control. From here we add numbers - you may enter
any numbers you want, using the same format you would use to dial them from Elastix.
You may want to add local extensions and remote channels - WD will work just fine. In our example, we added a local extension and a nonexistent local extension, in order to display what WD does when a number cannot complete.
For real-life usage, you may prepare a CSV file with your favourite spreadsheet and upload thousands of numbers at once.
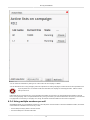
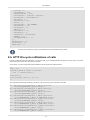
2.6. Create a new campaign
Let’s go back to the home page and click on "Edit Campaigns"
Add a new campaign by setting the following parameters:
• name: TestCampaign
7
Getting started with WombatDialer
• status: RUNNABLE
Then save it and select it; add the trunk, the end-point and the list you just created.
At the end of the configuration the campaign will look like:
Campaigns have many options you can set to control their behavior - for example, you can set a caller-id, or the time period they are
supposed to be active it, or how their resultst should be logged and notified. A detailed description is available on the Campaigns
Section 3.6, “Campaigns” chapter.
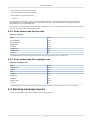
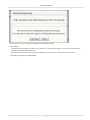
2.7. Create reschedule rules
While the campaign is selected, take a second to add resechedule rules. Basically they tell WD what to do in case a call does not go
through. You will typically want to handle at least the following cases:
• RS_REJECTED: the network could not place the call
• RS_BUSY: the number dialed is currently busy
• RS_NOANSWER: the number dialed does not answer
For each case, add a new reschedule rule. Just enter a time in seconds after which the call is to be redialed, and a maximum number of
retries.
You would expect to have something similar to the following example:
Note that, for each rule, you may have a different retry delay and a maximum number of retry attempts that is different based on the status
encountered.
A detailed explanation of completion codes and how reschedule rules interact can be found at Reschedule Rules Section 3.6.3,
“Reschedule rules”.
2.8. Run your first campaign
Now go back to the home page and start the dialer by clicking on the "Play" icon under "Dialer status". After a few seconds, click on the
"Refresh" icon to confirm WD is up and running:
8
Getting started with WombatDialer
If you want to see what the dialer is doing without manually realoading, you may want to tick the box close to the Reload icon to enable
automatic refresh.
Click on the "View Live" page. From the "Available Campaigns" box, select your new campaign and run it by clicking on the "Start" button
by the bottom of the page:
While the campaign is running, you will see WD dialing calls. Please note that while WD is running, your PBX can be used normally. The
same campaign can be run only once - you cannot start it anymore when it’s running, but you will be able to run it again when it finishes.
If you select the running campaign from "Running Campaigns", you will see its completion statistics and expected termination time (as soon
as it has completed enough calls to provide an estimate).
9
Getting started with WombatDialer
You can also click on a live call to see its details.
When the campaign completes, its run is placed in the "Recently closed" section and you are able to start it again.
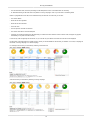
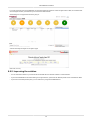
2.9. Run a report on your campaign
From the home page, click on "Campaign reports". Click on "TestCampaign" and make sure your run is selected. Then press ">>>".
You will see statistics about the runs included, trunk usage and status codes; and details for every attempt made.
If you want, from here you can create a new list that only contains calls for which the final status was not successful. Click on "Export to
new list", select the runs you are interested in and the final statuses you want to include, and enter a name for your new list.
10
Getting started with WombatDialer
This way you can save calls to be retried at a later date.
2.10. Where to go from here
This manual provides a detailed description of the concepts involved in WD and how it is run and administered, plus a complete API
reference.
Of particular interest can be the section named "WombatDialer Cookbook" that includes a number of recipes that cover different real-world
scenarios and show common usage patterns.
11
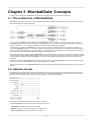
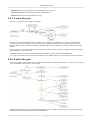
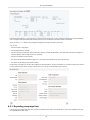
Chapter 3. WombatDialer Concepts
In order to work profitably with WombatDialer, it is necessary to understand the core concepts that come into play.
3.1. The architecture of WombatDialer
WombatDialer is a complex system that is built out of different subsystems. Understanding which ones they are and what they are for will
make understanding the whole product easier.
As a first thing, WombatDialer can be accessed through its GUI Client (in order to configure it, view what it is doing and run reports) or
through APIs (see the HTTP API section Section 8.3, “Controlling WD over HTTP”). APIs are meant for external programs to control the
behavior of the dialer, e.g. by controlling runs, adding new numbers to dial and creating new campaigns.
The dialer itself is controlled by the GUI Server - this way you can start and stop the dialer process from the GUI. When the dialer runs,
an associated watchdog process runs - if the dialer process is to terminate for an unexpected error, the watchdog is supposed to log the
error on the system log and restart it. As the dialer is able to sync to the state of an external PBX, during the restart phase calls might not
be placed for a few seconds but existing calls will be preserved and tracked correctly.
When the dialer is running, it creates separate AMI handlers for each Asterisk PBX. Each of them runs as a separate thread and connects
to a PBX throgh its Asterisk Manager Interface (AMI). If a PBX crashes, the rest of the system keeps on working; and if one PBX is delayed
or loses connection, this does not impact other PBXs. In case of errors, each AMI handler will automatically retry until a connection is
estabilished.
The dialer also spawns a helper thread that is meant to run long operations, e.g. HTTP notifications (see the HTTP Notifications section
Section 8.6, “HTTP life-cycle notifications of calls”), without delaying the main dialer.
Both the dialer and the GUI use a persistence layer that reads and writes to the MySQL database used for long-term persistence and log
tracking.
3.2. Asterisk servers
WombatDialer can control activities on multiple Asterisk servers at once. It does so by keeping a control channel open with each server
through its Asterisk Manager Interface (AMI for short). Each server is managed independently and in case of failure does not stop the rest
of WD from running. Servers can be on the same network as WD is, or can be in remote locations.
When editing an Asterisk server, the following information is required:
• Server description: the name that this server will appear under in WD
• Server address: the PBX server’s name or IP address
• AMI port: the port that Asterisk’s AMI interface uses. Default 5038.
• Login and Password: the login and password for the AMI user
12
WombatDialer Concepts
• Unit length and Max msg per unit: these settings work as congestion control on the AMI port.
• Security key is the key that will protect this resource. Leave blank if not needed.
3.2.1. How congestion control works
In order to avoid flooding the PBX with too many messages at once, WD uses the concept of Time Unit; this is a period of time in which no
more than a fixed number of messages can be sent.
For example, using the default values, if WD has to start 100 calls at once, it will send no more than 5 requests to Asterisk every 50 ms,
and will queue the rest for the next time unit. This still amounts to a respectable rate of about 100 messages per second! (though multiple
messages are needed to track a call’s lifecycle).
The difference is hardly ever noticeable from a human point of view, but sometimes the PBX might crash if it receives too many requests at
once. If your PBX runs on low-end hardware, you may want to reduce the number of messages per unit; on the other side, if your PBX is on
a high-end server, you may want to increase it. In general the defaults work fine in the majority of cases.
3.2.2. Do I have to configure Asterisk to work with WombatDialer?
You need to tell Asterisk that WD is allowed to connect and send commands. Our suggestion is to have a dedicated AMI user on each
machine - so it is easier to keep track of which applications are connected to the PBX at a given time.
You could e.g. have a stanza in your /etc/asterisk/manager.conf file like the following one:
[wombat]
secret = dials
read = system,call,log,verbose,command,agent,user,originate
write = system,call,log,verbose,command,agent,user,originate
3.2.3. What is the Asterisk status?
When WD is running, it will display the current Asterisk status - if a successful connection is possible, then the Asterisk instance will be UP,
otherwise it will be DOWN and WD will simply retry after a few seconds.
The current Asterisk status is propagated to the entities that belong to that instance - that is, its trunks, end-points and queues. If there are
calls being processed while an Asterisk system becomes unreachable, WD will try and reconcile them to the current status as soon as the
system comes back up. This should work even if WD is restarted in the meantime.
3.3. Trunks
A trunk is a set of lines that are addressed as a single logical entity. They can be a set of physical lines (like a DAHDI interface in Asterisk)
or a set of logical lines (like a connection to your SIP provider, or to another PBX). It may be one single line as well if nothing else is
available!
• Asterisk server: is the name of the PBX on which this trunk is located
• Name: is a logical name for the trunk to appear in WD
• Dial string: is the actual Asterisk channel name that WD will invoke (see below)
• Capacity: is the number of parallel calls that WD can dial. Make sure you do not exceed the trunk’s physical capacity!
• Security key is the key that will protect this resource. Leave blank if not needed.
You do not need to define all the trunks that are on your PBX, or to define them to their full capacity. For example, if you have a 15-channel
E1 to your telco, you might define the trunk in WD as being a 10-channel one, so that you can use the rest with your PBX without any
special rule.
It is also perfectly legal to define a physical trunk multiple times, splitting its capacity: again in the example you have a 15-channel trunk,
you might define it as two trunks in WD, one having 10 channels and another having 5. Then you can assign each (or even both) to
campaigns to control the maximum number of parallel outgoing calls.
13
WombatDialer Concepts
A note on the dial string: it must be a valid Asterisk channel name, and the string ${num} is replaced with the actual number being dialed.
So the following ones are valid examples:
• DAHDI/g0/0${num} - dial the number through group 0 of your PSTN interface, prepending the digit zero
• SIP/myprovider/${num} - dial the number through the SIP server myprovider defined in sip.conf
• Local/${num}@from-internal/n - dial the number as if was input on an local extension when using a popular Asterisk GUI
When using channels of type Local, Asterisk will sometimes change them during the call, so that Wombat may lose them. In
order to avoid this, we strongly suggest adding the option /n at the end of the channel name, so that it’s never renamed. The
GUI will display a warning message if you try to enter a Local channel that does not end in /n.
3.4. End-points
An end-point is where a call goes after being answered on the trunk.
• Server: is the Asterisk server the EP is on
• Description: a free name that the EP will appear as
• EP Type: it can be QUEUE (if it is an Asterisk queue - see below) or PHONE in all other cases.
• Max channels: the maximum number of parallel calls to be handled by this EP.
• Located at Extension and Context: the location in the Asterisk dialplan where the EP can be reached.
• Security key is the key that will protect this resource. Leave blank if not needed.
WD will try and connect answered calls from trunks to end-points on the same Asterisk server. If a campaign has multiple end-points, it will
try to connect any EP that has free capacity.
An end point of type PHONE could be:
• a dial-plan script that plays a recorded message
• a physical phone given to an agent (set max channels to 1 to receive one call after the other)
• an IVR script
• a conference call
• anything that can be programmed in Asterisk!
WD assumes that Trunks and EPs are always usable to their declared capacity, so it will try to fill them in as soon as
possible. If they are to be shared, make sure you have enough capacity for WD plus other resources that may be using
them. If you exceed their physical capabilities, you may experience REJECTED calls or a degradation of speech quality for
VoIP. Beware!
3.4.1. Queue end-points
As a special case, it is possible to have EPs of type QUEUE. They are used to distribuite calls on a set of agents that are members of a
queue. WD will try and observe the queue, in order to determine:
• how many agents are logged on to the queue
• how many of them are currently available, that is, neither in conversation nor paused
• how many calls are currently queued without being answered
The difference between the number of available agents and the number of calls queued is taken as the current capacity of the queue. This
value is computed in real-time, so the EP will immediately respond to changes in state to its agent set and to calls queued.
Please note that you can use a single queue both for inbound and outbound activity: if the number of free agents exceeds the number of
queued calls, WD will try and fill-in the rest. This makes it easy to implement small blended (inbound/outbound) call-centers.
If the number of free agents is below the number of calls waiting, WD will not place any call and will wait until there are free slots on the
queue. This way:
• calls are in general distribuited to agents as soon as they are queued
14
WombatDialer Concepts
• if the number of available agents is not enough to serve calls at once (e.g because some logged off, or pause in the meantime) then calls
are queued and picked up by available agents when they become free.
Queue EPs have a few additional parameters that control their behavior:
• Queue Name: The exact name of the Asterisk queue being used
• Boost factor: as most of the calls in a campaign are going to be unanswered, it is often effective to have WD place a number of calls
that is a multiple of available agents. For example, if you have a boost factor of 1.5 and 4 available agents, it will try and place 6 calls at
once. If more calls are completed successfully than the available agents, the remaining calls are held waiting on the queue. The boost
factor is applied only on the number of calls that should be made to saturate agents that do not have a call currently in progress for them.
Please note that the boost factor can then be managed on running campaign from the Live page, so you can tweak it dynamically as
needed - see Boost factor on the Live page Section 4.3.2, “Controlling the boost factor”.
• Max waiting calls: if there are more than this number of calls waiting on the queue, then stop making calls. The number of waiting calls
is computed as the number of available channels on the queue minus the numbers of calls currently waiting, as Asterisk will report a call
to be waiting even when it’s being connected. In theory there should never be calls queued, as they follow the number of availble agents,
but it is possible that either some agent logs off after being counted or some calls reach a queue without passing through WD. This also
acts as a counterbalance to high "boost factor" values.
• Reverse dialing: check to make this EP use Reverse dialing (see below for "Dialing mode")
• Preview: check to use Preview mode (only valid in Reverse mode)
• Find and Replace: sometimes - notably in FreePBX systems - agents that are on a queue cannot be dialed directly, and therefore do not
work in Reverse Dialing mode. You find that your queue has agents in the format Local/4851@from-queue but what you would like to do
is to dial Local/4851@from-internal instead. By setting @from-queue as the Find item and @from-internal as the Replace item, you can
easily obtain this result.
In addition to these parameters, the maximum capacity of the EPs is used - so if you have a queue with 100 agents but you set the EPs
capacity to 10, WD will never use more than 10 lines on this EP at once.
General Asterisk tips for using Queue endpoints
In order to use WD effectively with a queue, the following guidelines are best followed:
• Though WD works with static member channels, if you want your calls to go through to agents who may or may not be available (e.g.
some days they may be sick) it is strongly advisable to use dynamic agents who log on and off from the queue.
• As an agent cannot be physically available at all times during the day, it is important that they have a way to pause themselves, be it to
run "wrap up" activities after calls or to take breaks. The QueueMetrics web interface offers an excellent panel that lets you add pause
codes as well.
• The queue must provide informational "events" about agent activities. This is enabled by setting "eventswhencalled=true" - otherwise the
queue will be unobservable. It is also important that extension presence is correctly observed - e.g. if an end-point is busy because the
agent is making a personal call, its queue status should immediately reflect this. Whether this happens or not on your system is a matter
of Asterisk version and type of channel that is used to reach the agent - with recent versions of Asterisk and SIP channels this should
work automatically. You can make sure this is working correctly by observing the queue status as described in Controlling the Dialer
Section 4.2, “Controlling the dialer”
• The queue should connect calls to agent as efficiently as posssible when there are multiple calls waiting and multiple available agents, so
it should have the "autofill" option set to true.
• Do not use the queue wrap-up feature. As Asterisk does not publish wrap-up events though the AMI interface, WD sees the agent as
"idle" and tries routing calls to paused agents.
3.4.2. Dialing modes
Depending on how you set up your end-point, WombatDialer offers different dialing modes.
• Direct dialing is the default and works with extension and queue end-points. When doing direct dialing, WD will first try to connect the
callee and will then route the call to a local extension, that may or may not be a queue. This is fine for delivering voice messages or for
situations where any agent can process any call. When working with call queues, this dialing mode might introduce a slight delay, as the
call has to be answered by the agent - not usually a big deal, but it might be there.
• Reverse dialing has WombatDialer connecting the agent first and then placing the call. This is less effective in terms of agent efficiency
than direct dialing, as the agent has to wait for the call to connect. The big advantage is that when the callee picks up, he is immediately
on line with your agent. WD picks an agent at random from the available pool in order to share the load with all available agents.
• Reverse preview dialing has the agent reviewing the call before the call is made. This may happen through the API, or by using a special
page that WD offers. A number is "reserved" when an agent is to dial it, and the agent has 10 minutes to accept it (and have it placed)
or skip it. Calls skipped are marked as such and not retried, unless you set up a reschedule rule to have them retried. Calls for which a
decision is not made within 10 minutes are simply returned to the pool of callable numbers.
When using reverse dialing (vanilla or preview) WombatDialer uses a queue to keep track of agent presence. This lets you manage log
ons, log offs, agent pause and unpauses the same way you would for inbound queues. Also, as agent state is shared across multiple
queues, you can have agents working on multiple queues at once. In reverse dialing, through, calls are NOT connected through queues,
15
WombatDialer Concepts
as WD decides which agent is to receive which call; in order to do this, the agent channels are connected directly without going through the
queue.
When using preview dialing, the agent must reserve a call before it can be placed. In order to do this, WD offers a rich API for your
integration software see Preview API Section 8.3.4, “Preview dialing”.
WombatDialer includes a simple preview panel that can be called as a web page and lets you reserve calls and open
external URLs for previewing - typically you will use it to preview a call in your CRM software before it goes live. See the
Preview Page Section 5.5.1, “Using the agent’s page for preview dialing” for more information.
A simple example tutorial on preview dialing can be found in Preview dialing with Elastix, WombatDialer, QueueMetrics and SugarCRM.
3.4.3. Safety measures when running in reverse dialing
Though most calls will correctly be handled in Reverse or Reverse Preview mode, it is always possible that a call gets "stuck" because the
agent that was to serve it was not able to complete it or to answer the phone (this often happens with remote agents becoming suddenly
unavailable because of network problems, or because their sofphones crash. It’s wise to make plans in advance).
In this case, WD has a set of built-in safety measures, including:
• If a call stays reserved for more than 10 minutes, it is unreserved and put back in the pool
• If an agent is not able to anser to a call that they asked for within 60 seconds, the call is closed with state RS_NOAGENT. You should
usually add a reschedule rule in order to "recycle" those numbers.
3.5. Call lists and call records
Call lists are sets of numbers (or more technically, sets of call records) ready to be dialed.
After being created they cannot be deleted, so you will end up having quite a number of them. In order to avoid having too many of them as
visible/selectable items, it is possible to set a "hidden" flag so that they disappear from normal views.
As happens with the campaigns, you can enter a tilde "~" symbol in the search box to see all lists, including hidden ones. All searches
happen on both visible and hidden lists.
If you add calls to running campaigns through the APIs, WD will create a list called "CampaignName/AUTO" to which all of
your new items will be added to. This list is just a placeholder for those numbers and should not be run manually or added
to existing campaigns.
It is possible to import and export data from lists through the GUI, and it is possible to create new lists based on the final state of existing
campaign runs from the Reports page.
A call list will store multiple instances of the same number and will dial them in succession; so if you upload the same set of numbers
multiple times, you get them called multiple times.
As with other WD resources, call lists can be proteced by Security keys.
3.5.1. Call records
A call record represents a single number to be dialed by WD.
• Number is the number to be dialed
• Attributes are an (optional) set of variables that are sent or read from Asterisk during the call processing phase.
Attributes make WD very powerful: input attributes are sent to Asterisk along the number and are availble at the dialplan level as standard
channel variables, and can also be used to compose the interrnal or external caller-id. Output attributes instead are values set by Asterisk
on this call and are meant for data collection.
16
WombatDialer Concepts
You can manually edit the number or the attributes from the web GUI, though you cannot delete an existing call record.
3.6. Campaigns
A campaign is the basic unit of work of WD. It behaves as a template for running an actual campaign, that we call a Campaign Run. A
campaign defines:
• a set of general properties
• a set of trunks
• a set of end-points
• a set of list (zero or more). They are further claassified as normal or black lists.
• a set of reschedule rules
• a set of disposition rules
• a set of opening hours
A campaign can only be run one at a time - before running it again, you must make sure that any actual runs are terminated. Trunks, endpoints and list are instead shared entities - you can have multiple campaigns using them at the same time.
The following properties are defined for a campaign:
Basics
• Name: a name to display in WD
• Priority: the relative importance of this campaign against any other (see below)
• Status: this field lets you decide what to do with the campaign:
• RUNNABLE: this campaign can be run
• CLOSED: this campaign cannot be run, but it is still visibile in the default editor
• HIDDEN: this campaign is not visible anymore unless you set the flag "Display hidden campaigns"
• ERROR: this campaign is marked as an error. Cannot be started but visible.
• Idles on termination: whether this campaign terminates when out of numbers, or will live on waiting for more numbers to be added via
the API
• Batch size: The number of calls to be placed that are cached in memory when reading from the database. They should be roughly 2x
the size of outgoing trunks.
• Security key is the optional key that protects this resource.
Active Period
• Start active period: the time of day after which this campaign can place calls
• End active period: the time of day before which this campaign can place calls
• Allowed Days of Week: the days of the week that the campaign is allowed to run on
Call Placing Details
• Answer timeout: if the number dialed does not answer within this period (expressed in milliseconds), consider the call to be a
NOANSWER
17
WombatDialer Concepts
• Forced closure: the maximum length of this call, in seconds. If reached, the call is forcibly closed and set to status TIMEOUT. Set to
zero to turn off.
• Dial CLID: the caller-id to use for this campaign
• Agent CLID: the caller-id that will be set on the end-point. This might for example be the internal code of the campaign, or the name of
the called person.
• Dial account: the account code that will be used by Asterisk when writing CDR records
• Dial presentation: The number to set as "call presentation", that is the number that callees are expected to see as the caller-id. This
may be overridden by your provider.
• Autopause: if this is set and the campaign has queue end-points, each agent will be automatically paused when the call terminates (so
that they can process their wrap-up activities). The agent will then have to manually unpause when he is ready to take a new call. (Note:
this is not currently implemented).
• Campaign variables: a set of variables defined for this specific campaign. They should be in the format "A:B,C:D" to set a diaplan
variable "A" to "B" and "C" to "D".
Amd & Boosting
• Boosting model: At the moment, the only boosting model used is manual boosting (appears as OFF).
• Initial boost factor: This is the extra boost factor applied when a campaign runs. This value can be modified dynamically through the
Live page.
• AMD FAX tracking mode: Determines which AMD/FAX tracking mode is to be used. If AMD or fax are to be detected, the dialplan
variable AMD_MODE is set to the required mode. See AMD and fax tracking Section 3.7, “AMD & Fax detection”.
• Extra AMD settings: A string of additional parameters to be used when doing AMD detection. This is translated into the dialplan variable
AMD_EXTRA. You may or may not want to use this.
• Audio file to send on AMD: The name of a file to be sent to the client on AMD detection. This is passed to the dialplan under the name
AMD_FILE
• TIFF file to send on fax: The name of a TIFF file to be sent to the client on fax detection. This is passed to the dialplan under the name
FAX_FILE
Logging
• Additional logging: set to QM_COMPATIBLE to have the campaign log to queue_log on the Asterisk server
• Alias for logging: if this field is set, this is the name that this campaign will be logged under on the queue_log. If empty, the name of the
campaign is used. This way you can have multiple WD campaigns log as the same Asterisk queue.
• HTTP notification URL: the URL to be called when a call has a state change in WD
• Send campaign events by e-mail: whether WD should send lifecycle notifications by e-mail. Can be set to:
• NO: No notifications.
• ALL: All campaign life-cycle changes.
• FINISH: Send only on campaign completions.
• E-mail addresses: a set of e-mail addresses to receive notifications for this campaign.
A campaign has a priority so that you can have multiple running campaigns at the same time. Priorities are taken into consideration
from the lowest to the highest, where each priority level has a go to fill in all available channels; if some available channels are left over,
campaigns with a higher priority number are processed. For example, imagine you have a campaign of priority 1 linked to a queue (for
human outbound) and then a quality review automated campaign running at priority 10. If there are available agents, it is just natural that
the campaign at priority 1 has its go first at placing calls. But if for example some of your agents are paused, then not all outbound lines are
used - in this case, they are used by the campaign at priority 10. As soon as your agents go back on line, calls for them are dialed first.
If you have multiple campaigns at the same priority level, they are offered a fair chance of placing calls, so you would expect them to place
roughly the same number of calls if calling an homogeneus set of callees. In practice the numbers may differ based on call length, call
completion ratio and average answer times.
You can define an active period for calling, so that you can e.g. tell WD to place calls between 9 AM and 4 PM of working days. Any
reschedules will be placed only in the active period. If the campaign is in its active period, then any Opening Hours linked to the campaign
wil lbe processed. They will be processed in the order they are defined, and in case of no match, the value from the last rule will be used to
decide whether the campaign can run or not. See Opening Hours Section 3.9, “Opening Hours”.
There is no guarantee as which trunks and end-points will be chosen when a campaign is running. Call lists instead are processed in order
from the first to the last.
If you want WD to send you e-mail when something happens on a campaign, you should make sure that you configured the SMTP
parameters as explained in Configuring e-mail Section 7.1.4, “Configuring e-mail”. You can have WD send you notifications for all
campaign life-cycle event changes, or simply when the campaign completes.
18
WombatDialer Concepts
3.6.1. What happens to hidden campaigns?
Hidden campaigns are removed from the editor so that you don’t have to see them all of the time. They are still present on the database,
and may be found again by:
• entering a search string. It will match all campaigns, including hidden ones (this way it easy to access them and un-hide them if
necessary)
• entering a single tilde "~" in the campaign search box. This will display all campaigns, whether they are hidden or not.
3.6.2. Using attributes in Caller-Ids
WombatDialer lets you enter placeholder values in the Dial CLID, Agent CLID, Dial account, and Caller presentation fields. These values
are expanded when a call is actually being connected using the values of attributes set for the number dialed.
For example, you may be dialing number 5551234 to reach mr. White. You may upload a list of numbers setting the attribute NAME to the
name of the person called, and you may want the caller-id changed when the call reaches your agents so that they see "WHITE" instead of
the campaign’s caller id. Or you may dial a list of numbers by setting an unique call presentation for each of them.
In order to do this, you have to specify attributes to be expanded. For example, if you set the agent CLID of your campaign to "C1
${NAME}", agents will see on their phone "C1 WHITE", "C1 SMITH" and so on. You may use multiple variables in the same ID, so that you
can pass along a practice ID, or the code used to find the person called in your CRM.
Together with the custom attributes you manually define for each number, WombatDialer will also expand:
• ${NUM} to the number being called
• ${LST} to the name of the list that the number belongs to
3.6.3. Reschedule rules
It is a fact of life: most calls placed on an outgoing campaign are destined to fail. Maybe the user is not available, maybe your provider
has a temprary failure, or maybe your PBX (or even WD itself!) crashes while calling. It is advisable to take this into consideration when
programming a campaign. For example, you could say that:
• if a number is busy, you retry two times after 5 minutes each
• if a number does not answer, you retry two times after 30 minutes each
• if a call has a technical glitch and ends in error, or is lost due to a PBX crash, then retry it once in 10 minutes
The number of retries is computed after the call is first attempted - so if you have a retry rule of 2, the call is first tried once and then retried
twice, for a maximum of three times if it goes wrong every time. All retries are attempted in the active period of the campaign - so if a call is
rescheduled in 20 minutes at 5:50 PM and the campaign is not allowed to run after 6 PM, then it is retried the next day.
WD in general tries first to obey any applicable reschedules and then fetches new calls form call lists, so you can expect the retry period to
be quite accurate in most scenarios. Still there is no hard guarantee that a call will be placed at exactly the time it was rescheduled for.
Parametrs are set as follows:
• On status: the call status this rule applies to
• With custom status: the custom status to consider (see below). Custom statuses can be set through the API - see Controlling WD from
Asterisk Section 8.2, “Controlling WD from Asterisk”.
• Max Attempts: the maximum attempts this rules applies to
• Retry after: the number of seconds to retry after
• With mode: the way to compute the retry period
When rescheduling, you can set the mode to FIXED or MULTI. In fixed mode, if you set the retry time to 5 minutes, it tries after 5 minutes
at every attempt. In multiplicative mode, the retry period is computed multiplying the number of the current attempt by the number of
attempt it’s trying - so it would be 5 minutes on the first attempt, 10 minutes on the second, 15 minutes on the third and so on.
If a call has a normal completion or is over the maximum number of retries, then it is not rescheduled. You can look-up the status of the last
attempt in order to know why it was not rescheduled.
Writing advanced reschedule rules
It is valid to have multiple reschedule rules that pertain to the same status code - in this case, WD will find the rule that matches. For
example, imagine we have two rules:
RS_BUSY
RS_BUSY
Attempts
-------2
5
Retry in
-------300s
1800s
19
WombatDialer Concepts
Up to the second BUSY attempt, WD will retry in 5 minutes (300 seconds); from the third to the fifth, it will retry in 1800 seconds (30
minutes).
The status code considered is always the current status code; so for example given this set of rules:
RS_BUSY
RS_NONASWER
Attempts
-------3
1
Retry in
-------300s
600s
If we get a BUSY on first attempt and a NOANSWER on second attempt, as the NOANSWER retries only once, the call is not retried.
You can also have an extended status set through the APIs - if that is present on the call, the rule matches only if the extended status
matches - see Controlling WD from Asterisk Section 8.2, “Controlling WD from Asterisk”.
3.6.4. Disposition rules
Disposition rules are like Reschedule Rules; the main difference is that while a Reschedule Rule is applied on each call tried, a Disposition
Rule is matched only when the call is not rescheduled further.
For example, let’s say that you are dialing out on a campaign where there is a reschedule rule to retry twice in 10 seconds on busy. You
dial a number, and the number is busy; it is rescheduled in 10 seconds, retried and it’s busy again; it’s rescheduled again, and again it’s
busy. At this point the call is "complete", meaning that it is not meant to be rescheduled again. So, the call will be matched against any
disposition rules with the current status of "busy".
With disposition rules, you can have actions that are more complex than reschedule rules and are meant to interact with external systems.
You can:
• Call an HTTP service of type GET or POST, with a variable payload.
• Send an email (for example, if you want someone to be notified when some rare status happens)
• Add the number to an existing list,
• Add the number to an existing blacklist. This is the same thing as adding the number to a list, but with an optional parameter to control
the amount of time the number is to be blacklisted.
• Pipe the number to be recalled on a different run. The run must be active at the time the number is added.
Multiple rules may match the same call, so for example you might be sending two separate HTTP notifications and an email, or you could
reschedule the number to be recalled and add it to a new list at the same time. Matching happens on the basis of the (last) dialing state. If
the rule specifies an extened state, it is to be matched as well.
When a Disposition Rule is matched, sometimes it is useful or necessary to access some information from the call and put it in the request,
for example to specify the number called in the email body. WombatDialer offers a number of variables that you can use for this purpose:
• NUM is the number dialed
• N_RETRY is the number of retries made on this call
• LIST is the list name
• STATE is the current state
• EXTSTATE is the extended status (if set)
• CAMPAIGN is the campaign that this call was dialed upon
• ATTR is a prefix that lets you access call attributes. They can be inbound or outbound attributes.
So if you set an HTTP GET URL of 'http://server/page.php?num=${NUM}&var=${ATTRV}' will be rewritten with the current number and the
current value of attribute V.
When doing a disposition to a list or a different run, you can control which attributes are to be set on the new number. You can decide if you
want ALL, NONE, INBOUND or OUTBOUND attributes; plus you can manually specify a set of attributes which values will be set on the
new call.
3.6.5. Black lists
WombatDialer has the concept of Black Lists; they are lists like any other but are used to collect numbers that are not to be called.
When WombatDialer is loading numbers to be dialed, they are checked against all black lists defined for that campaign. This is done
automatically and behind the scenes; if a number is found, it is logged as dialed in state BLACKLIST without actually trying it.
Blacklists are checked dynamically when a number is first scheduled; so if you add numbers to a blacklist while a campaign is running,
new numbers to be scheduled will be checked against the blacklist. Numbers that are already scheduled (e.g. to be recalled) will not be
affected.
20
WombatDialer Concepts
WombatDialer schedules numbers well in advance before they are called, so it may take a while before it starts checking
the blacklists.
You may have multiple blacklists on a campaign; their order in unimportant.
A number may be added to a blacklist up to a specific point in time; this means that the number will be a valid match for the blacklist only
until the date passed is in the future. In order to do this, you need to set a call attribute called BLACKLISTED_UNTIL with a valid date in the
format "YYYY-MM-DD.hh.mm.ss" or "YYYY-MM-DD". You may also have an expiry date computed for you by using a Disposition Rule to
add the call.
Note that if you use the shorter date format, the number is supposed to be blacklisted until the midnight of the given day. If the date format
is not valid, the number will be blacklisted forever.
It is perfectly acceptable to add a call mutiple times to a blacklist, each time having different expiry dates. The number will
be blacklisted up to the maximum date specified.
3.7. AMD & Fax detection
WombatDialer allows you to track answering machines (AMD) and faxes. Following the general WombatDialer philosophy of leveraging the
capabilities of your PBX, WombatDialer sets a series of additional dialplan variables that are to be used in order to detect them and react
accordingly. This way:
• You configure AMD and/or fax detection on your PBX
• When either detection triggers, you have variables that tell the dialplan how to handle those cases
In general, we suggest using an extended status of "AMD" when an answering machine is detected, and "AMDSENT" when a message is
left on the machine; and "FAX" when a fax is detected and "FAXSENT" when a fax is successfully sent.
It is also wise to offer your agents a quick blind transfer hook that lets them transfer calls to AMD or FAX routines in case the detection
went wrong.
Working with AMD and fax can be tricky. Make sure you can talk to an Asterisk consultant with a proven experience before
running a large-scale campaign.
3.7.1. Detecting answering machines
Asterisk ships with an application called AMD that will analyze audio and try to guess whether the other party is a live person or an
answering machine. Keep in mind that the call does not "go through" while the analysis is in progress, so there is a definite tradeoff
between a long and accurate detection versus a quick but less accurate detection.
AMD receives a set of parameters to discriminate what is an answering machine and what is a live person, so you may want to experiment
a bit to find a setup that works for your country and for your callers.
A good starting point would be to set in amd.conf the following parameters:
initial_silence
greeting
after_greeting_silence
total_analysis_time
min_word_length
between_words_silence
maximum_number_of_words
silence_threshold
=
=
=
=
=
=
=
=
2500
1500
300
5000
120
50
4
384
It is also customary to send a background tone (be it blank or a beep) to the called party to help set-up the line on SIP circuits. This way the
accuracy of AMD is reported to be increased considerably.
So you would:
• Play audio, e.g. via Background(beep)
• Run AMD, optionally passing the contents of AMD_EXTRA if you want to override the default parameters
• Check the status of the dialplan variable AMDSTATUS. If set to "MACHINE", go to the AMD processor; else route to a live agent. You
may want to log the AMDCAUSE as well; it contains an explanation of the reason why Asterisk decided the call was of the specific kind.
• On the AMD processor, set the extstatus to "AMD", so that Wombat logs this call as an Answering Machine
21
WombatDialer Concepts
• Wait for silence (so the greeting message is terminated)
• Play the audio file defined in AMD_FILE
• Set the extstatus to AMD_SENT
• Hang up.
3.7.2. Detecting faxes
Asterisk is natively able to detect faxes on DAHDI and SIP channels; all you have to do is tell it to run the detection engine.
• For DAHDI, you have to turn on the option "faxdetect" in chan_dahdi.conf by setting it to "incoming", "outgoing" or "both".
• For SIP, you need to turn on "faxdetect" in sip.conf. Valid options are "cng", "t38" or "yes" for both.
When a fax is detected, the dialplan will jump to the extension "fax". At this point:
• you set the extstatus of the call to "FAX" in Wombat (so it can be traced)
• you send a fax by issuing the command SendFAX(/path/to/FAX_FILE,d), where FAX_FILE is the file name set through the GUI
• you set the extstatus to "FAXSENT" in Wombat
• you hang up the call
The file must be a valid TIFF file that is compatible with Asterisk. Digiumâ##s "Fax For Asterisk Administration Manual" documents a
process for converting a PDF file into a TIFF using commonly available Linux command-line tools.
3.8. Campaign runs
Campaign runs are real, out-calling instances of campaigns. You start them from the Live page, by selecting one of the available
campaigns. They are named after their parent campaign and the time when they were started.
The system displays a set of information on the Live page:
Campaign name: C1
Started at: Wed Oct 17 15:54:22 CEST 2012
Current state: COMPLETED
Priority: 10
Calls placed: 40 - Items in call cache: 0
Calls terminated: 10
Life-cycle termination rate: 25% - Reschedule rate: 75%
Est. remaining calls: 0
Running for: 00:00:05 - Estimated completion in: 00:00:00
Attempts per hour: 72720 - Completions per hour: 72720
High-water mark: 20 in L2
The run name is actually made of the Campaign name plus the time it was started. This uniquely identifies a run in the system.
The other parameters are as follows:
• Current state: is the state the run is in (see below).
• Priority: is the campaign’s priority
• Calls placed: is the total number of call attempts made
• Items in call cache: is the number of calls currently held in the hopper plus any open reschedules
• Calls terminated: is the numbers of calls that have either been successful or gone through the last possible reschedule, so they will not
be retried
• Life-cycle termination rate: is the percentage of calls that are not to be retried (terminated)
• Reschedule rate: is the percentage of calls that are to be retried
• Est. remaining calls: this is a rough estimate of calls that remain to be placed. Might be rather inaccurate - consider it only a basic
indicator that will converge to zero as the run terminates.
• Running for: is the total time that this run has been going.
• Estimated completion: tries to display the remaining time to completions. This time may actually vary strongly from what is displayed
depending on what happens during the campaign. Estimates will be produced after a few calls have completed.
22
WombatDialer Concepts
• Attempts per hour: its the average number of calls attempted per hour on this run
• Completions per hour: is the average number of calls completed per hour
• High-water mark: the last call record added to the cache
3.8.1. A run’s life-cycle
When a run is first started, it goes through a set of stages.
Initially the run will be made RUNNABLE, WD will prepare to run it and will put it in RUNNING state. A run stays in state RUNNING
as long as it has retries to complete or calls not yet placed. When a RUNNING campaign is out of the allowed time period, it is put to
WRONG_TIME; from here it goes back automatically to RUNNING state when time conditions (hour and day of week) are successfully
matched.
When out of calls, a run can either COMPLETE or become IDLE; when IDLE it waits for new calls to be added through the API and goes
back to RUNNING mode to process them.
A RUNNING campaign run may be manually PAUSED and from PAUSED it can manually be made RUNNING again.
If a run is no longer needed, it can be manually set to REMOVE; when in REMOVE status the run is terminated and cannot be restarted.
3.8.2. A call’s life-cycle
When a call is started, it is first loaded in a cache called hopper that contains calls that are to be dialed soon. This way it is not necessary to
consult the database for each and every call to be made.
When WD is about to place the call, it marks it as SCHEDULED and sends it to Asterisk for processing; if all goes well, it then goes from
REQUESTED to DIALLING to CONNECTED and then TERMINATED.
23
WombatDialer Concepts
Of course it may not be possible to start the call (so you get BUSY, NUMBER and NOANSWER states), or the call might be ended by WD
because it exceeded the maximun allowed duration (TIMEOUT).
When using reverse dialing, a call starts its life being RD_SCHEDULED, so that the agent can be called. When this happens, the call
progresses forward. In preview mode, the call is first RD_RESERVED and when the agent approves it, it is placed.
Initial states
IN_HOPPER
Call will be placed soon - not visible to user
SCHEDULED
WD requested the call to be placed
RD_RESERVED
When preview dialing, an agent has reserved this call but has not processed it yet
RD_AGENTREQ
When doing reverse dialing, WD is connecting the to an agent before the call is actually placed
Call processed
REQUESTED
The request was sent to Asterisk for processing
RD_REQUESTED
Asterisk is processing this call when reverse dialing
DIALLING
Asterisk confirmed the call was started
CONNECTED
The opposite side picked up the call
Error states
RS_ERROR
A technical error happened while dialing
RS_LOST
WD lost track of this call. Usually happens only on system crashes.
RS_NOAGENT
An agent that was being predialed in reverse mode did not answer. You should reschedule those calls.
Calls that could not go through
RS_REJECTED
The call was rejected by the network. This is usually caused by the upstream provider returning 'Congestion' (all circuits busy),
'Off-hook dialing' with analog interfaces, or your upstream provider terminating a call before it’s answered without providing any
status code.
RS_BUSY
Number called was busy.
RS_NUMBER
Number called appears to to be invalid. Asterisk also raises this error if it cannot allocate a new channel for the call.
RS_NOANSWER
Number did not answer within the Answer timeout period set on the Campaign
Completion states
TERMINATED
Call completed successfully
RS_TIMEOUT
Call was forcibly closed because it exceeded the maximum allowed duration set on the Campaign.
RS_AGENTSKIP
Agent decided to skip this call.
RS_BLACKLIST
The call was skipped as the number was blacklisted.
States not already implemented
RS_AGENT
Agent requested special retry.
24
WombatDialer Concepts
3.9. Opening Hours
It is very often needed to have a finer level of control on the opening hours of a campaign.
Typical scenarios include:
• Having different opening and closing times for a campaign during the week. For example,you might want to dial out from 9:30 to 11:30
and 13:30 to 17:00 Monday to Thursday, and only 9:30 to 13:00 on Fridays.
• Marking specific time periods as invalid; for example, public holidays.
It is also often needed to maintain and share these "opening hours" across campaigns; for example, by having one single instance of public
holidays to be shared across all campaigns.
Opening Hours work by defining a set of items that must match for a rule to be considered valid.
• Rules are scanned from top to bottom, in order
• If a rule matches, its output will be passed to the campaign.
• If no rule matches, the campaign can ask a rule for a default value.
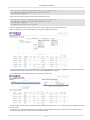
For example, let us say that we want to implement the multiple hours scenario as described above:
Rule
#1
#2
#3
DayOfWeek
DateFrom DateTo
TimeFrom
TimeTo
State
Mo Tu We Th
Mo Tu We Th
Fr
-
9:30:00
13:30:00
9:30:00
11:30:00
17:00:00
13:00:00
OPEN
OPEN
OPEN
-
You could also have a separate rule based on dates to flag some days as always invalid:
Rule
#1
#2
DayOfWeek
DateFrom DateTo
TimeFrom
TimeTo
State
-
25/12
1/01
-
-
CLOSED
CLOSED
26/12
1/01
Rule 1 tells us that Dember 25 and 26 are always invalid; and January 1 is as well.
When running on an existing campaign, you first have to make sure that the campaign is allowed to run in the specific time period.
In most cases, you will want to keep the campaign always active and tweak associated Opening Hours instead. This lets
you use campaign rules for very simple campaigns and Opening Hours for more complex scenarios.
Then you would add:
• First the Opening Hours based on dates. If any of these match, we know that we cannot run.
• Then you would add the rule about time periods by day, with a default of CLOSED.
The order in which you add Opening Hours to a campaign is important, and so is the order of rules within an existing
Opening Hour.
3.10. Call logs
After a call record is processed, it leaves a "trail" in the form of a call log.
25
WombatDialer Concepts
From here we can see:
• Call: this section displays the number that was called and any attributes that are set on that call record. Any output attributes (coming
from Asterisk) are marked with a ">" prefix.
• Campaign: the name of the campaign that this call was placed on
• Run as: the name of the campaign run that had this call placed
• Run started: when the campaign run was started
• List: The list this number belongs to
• Attempted: when the call was actually attempted
• Wait Pre: the difference (in milliseconds) between call stages REQUESTED and DIALLING
• Wait After: the difference (in milliseconds) between call stages DIALLING and CONNECTED
• Talk: the duration (in milliseconds) of the active call, that is, while the callee was connected
• Status code: the call status code when it was closed
• Extended status: the extended status set by Asterisk
• Retry #: The number of retry this call was on (0: initial attempt)
• Next retry: When the next retry is scheduled. If set to zero, this means the call was not set to be rescheduled.
• Trunk: The trunk the call was placed on
• Log Id: The internal log id
• Asterisk channel: The Asterisk channel that was created for the first leg of the call
• Asterisk unique: The Asterisk internal Unique-Id that was used
3.11. Users and security
WombatDialer offers a powerful and pervasive security model that is similar to the one used in QueueMetrics. It is built around the concepts
of users, classes and keys.
The idea is that each user has a keyring and all features are controlled by keys. Every time WombatDialer has a possible feature to show
the user (e.g. editing servers) it checks whether the current user holds the correct key in its keyring. If he does not have it, the feature is
hidden or grayed out.
Each user has a keyring that is composed of their personal keys plus all the keys for their class. This way you can organize multiple groups
of users (e.g. administrators, monitors, etc) with different grants, and then give each specific user additional keys to fine-tune each person’s
profile.
A set of default users Section 9.2, “Default users” and of security keys Section 9.1, “Security keys” is available below.
3.11.1. The security model
You can set security keys on most entities in WombatDialer - you can have them on servers, trunks, end-points, campaigns and lists. They
will be enforced for:
• Selection of items to be added to camapigns
• Live monitoring
• Reporting
The following rules apply:
• Elements are visible both to users holding the required key and to their creator, even if he does not hold the required key (in order to
avoid "locking yourself out")
• Elements having no keys will be visible to everyone
• Key security is not transitive, that is, if you can observe a campaign, you can observe it in its entirety, even if (say) one of the trunks it
uses is protected with a key you do not hold.
3.11.2. Users
A user is some person who can log on to WombatDialer.
26
WombatDialer Concepts
They have the following properties:
• Login and Password are used to log on from the main page
• Real Name is displayed on the WombatDialer page
• Enabled may be toggled to avoid a user logging on without deleting it.
• E-mail The user’s e-mail address
• Master key: if set to "yes", all security checks are bypassed. You should only set it to yes for testing and debugging.
• Class is a pre-defined set of keys that is used for this user. Any user must have a class.
• User keys are additional keys granted to this user. They are space.-separated. If keys are prefixed with a minus sign, they are revoked if
present in their class and ignored otherwise.
• Logged on are the number of successful log-ons for this user and Last logon is the time this user last logged on successfully.
• Comment and Token are free fields you can use to keep track of your users.
3.11.3. Classes
Classes are common profiles to be given to all users of a certain kind. So you do not have to remember which keys to give users for each
specific functionality, but you can group them all together.
Any class has the following properties:
• Class name is the name used in the User Editor to choose the class.
• Description is a long version of the class name
• Keys are a space-separated set of keys that are granted to all users of this class.
You can create new classes than the ones that ship with WD in order to fine-tune access controls for your instance.
3.11.4. The system log
When something important happens in WombatDialer, it is written to the System Log. The system log tracks:
• Campaign lifecycle events
• User logins and log-offs
• System errors
27
WombatDialer Concepts
28
Chapter 4. Running WombatDialer
4.1. Understanding the GUI
The WombatDialer GUI is made up of a set of editors - there can be multiple editors on the same page.
An editor can:
• display a set of records (e.g a list of servers, campaigns or end-points)
• select a record in the set (usually in order to load a dependent editor - e.g. when you select a List then the editor for the numbers of that
list will be enabled)
• edit a record
4.1.1. Using editors
Editors let you search by text in their items and let you sort data by clicking on the relevant columns.
When you are editing an item, the following fuctions might be available:
From left to right, these icons mean:
• Save current record
• Add a new record
• Clone the current record
• Delete the current record
• Know who created the current record, when it was created, who modified it last time and when it was last modified
Sometimes when an editor has an item selected and it’s impossible to unselect it, it is then necessary to close the relevant tab and reopen
it from the Home page.
4.1.2. Hiding and deleting entities
In many cases it will not be possible to delete records when you created them. This is because such records are referenced by other
records that cannot be deleted - for example, a campaign that has run cannot be delete anymore, as it is referenced by the logs created
during the run.
Still, it would sometimes be useful to hide things you do not currently need. So campaigns and lists have the concept of visibility - you can
make them invisible so they won’t appear anymore in selection menus and on the main screens.
They will not be deleted though - you can still search them by name, and you can get a complete view of all records (including deleted
ones) by searching for "~".
4.2. Controlling the dialer
From the main page, you can control the status of the dialer process.
29
Running WombatDialer
You can see how long the dialer has been used, its current status and the entities currently loaded (that is the campaigns, trunks and endpoints being used). The dialer is "lazy" and loads entities only when needed, so entities do not appear until they are actually used.
The check box next to the Reload button is used to set the control in auto-reload mode; this way the current state of the dialer is refreshed
automatically every 5 seconds.
You should see:
• for the dialer, the current state (usually DOWN or READY) and the number of licensed channels.
• For each PBX, whether it is successfully connected or not
• For each running campaign, the current status, the total number of calls placed ("Att") and the size of the current reschedule buffer
("Rtr"), plus the date when the run was started
• For each trunk, the total capacity and the current used channels. A green / red icon shows whether the relevant PBX is online or not
• For each EP, the total and used capacity. A green / red icon shows whether the relevant PBX is online or not.
For Queue EPs, a number of additional entries are displayed:
• You can see the number of free agents in respect to the currect queue capacity, the number of idle entities, the overdialing channels ("O/
D"), the number of queued calls that are ringing or waiting to be connected ("W") and the used channels ( "U").
• If dialing is currently not allowed because the queue has too many waiting calls, the string "BK_W" is displayed.
• A list of statuses that are reported by the queue ("AS") and a set of statuses that are computed by Wombat ("C")
• A list of queued calls (if any)
• A list of agents working on the queue, and their current status (Paused, Talking, Ringing, Idle or Error)
When you restart the dialer, all state is synchronized to disk and all entities are reloaded.
In general, the dialer is supposed to start automatically when the system starts - see Dialer startup for more information on the issue.
4.2.1. Observing Asterisk queues
When an EP of type Queue is used, its status should immediately reflect the state of the underlying queue.
Before using those EPs, it is advisable to run a limited test to make sure the configuration is in working order.
In order to run such a test:
• create a campaign with a Queue endpoint. You may create it IDLE and add no call lists, as we do not need the campaign to do anything
special
• run that campaign
• reload the Dialer status in order to see if the queue is being observed (you have to click on the reload icon manually each time).
• If the queue is present, you should see it something saying "Free 4 of 7 W:2". This means that WD is seeing 7 agents connected of
which 4 are free (where 4 is the result of multiplying the actual number of observd channels by its boost factor), and that there are 2 calls
waiting on the queue.
30
Running WombatDialer
• You should be able to see the current agents and waiting calls - if any - the queue is processing.
• try and log on, log off, pause and unpause an agent. You should see the number of free and available channels change accordingly. Try
also sending calls to the queue and see if the number of free agents and of waiting calls is correct.
• try also placing calls from some agent extensions and see if the number of free channels reflects this correctly.
• if you plan to have agents working on multiple queues at once, run the tests above while the agents are logged on in at least two queues
and make sure statues are updated correctly.
4.3. The Live page
The Live page lets you interactively control and monitor what the dialer is doing. You will be able to see at once all the Runs of Campaigns
that you can access.
The top part of the page displays a set of "doughnut" graphs, showing:
• The active channels per Asterisk servers involved. Each Asterisk server is displayed in a different color and you can see which is which
by hovering over it
• The status of calls on trunks. This shows how many calls are in each state.
• The usage of trunks by campaigns
• The relative number of calls per each trunk
• The usage of end-points by campaign
• An estimated number of remaining calls, divided by campaigns. This number is estimated as it is impossible to know in advance how
many recalls will be necessary to complete each campaign.
• The status of each running campaign
If you fly over each pie slice in the graphs, then a legend will be shown explaining what that slice means. Note that for live calls and
campaign runs, the color codes are fixed to make them easily recognizable at a glance.
Just below the graphs, there is a row displaying (for all campaigns):
• The number of open calls
• The total number of calls placed on running campaigns (since they were started)
31
Running WombatDialer
• The call termination rate, that is the percentage of calls attempted for which a reschedule was not necessary
• An estimated backlog of calls that have to be placed for running campaigns. This only counts calls in the dialing buffer
Below is a pageable list of live calls, that is refreshed every few seconds. For each call you can see:
• The number dialed
• When the call was originated
• When the call was answered
• The trunk used
• The end-point the call was connected to
• The number of times this call was attempted
• If present, the actual agent taking the call (depending on whether the call is dialed in reverse or direct mode, the agent may appear
immediately or only when the call connects).
In this list only calls managed by WD are shown, so you can still use your PBX as usual and such calls will not be displayed.
By the bottom of the page there is a "Details" section, where you see the details for the last item you selected - be it a call, a campaign to
be started, a running campaign or a closed campaign.
For example, here is what you would see by selecting a connected call:
And here is what you would see by selecting a running campaign:
32
Running WombatDialer
Next to the "Details" section there are buttons with possible actions for the item being displayed - you may for example start and stop
campaigns. When you perform an action, a pop-up will be displayed to confirm that the action was received.
The Live page does not work unless the dialer is running (state READY). So if you try starting a campaign but the dialer is
not working, you will see the notification but nothing will happen.
4.3.1. Campaigns and runs
On the right-hand side of the screen there is a pull-up overlay box made up of three sections plus one, labelled "Campaigns". It is usually
hidden and you have to open it manually in order to see it.
On the right-hand side of the screen there is a panel with:
• Available campaigns: the set of campaigns that can actually be run. As a campaign can be run only once, campaigns that are running
and therefore not startable are displayed in italics.
• Running campaigns: these campaigns are running now, or could be running if some condition was met - e.g. having some more calls
appended for IDLE canpaigns, or a different moment in time for WRONG_TIME campaigns
• Recently closed campaigns: here are displayed the detaiils of each recent run
For each campaign run, a color code is used to display the state it is in. You will also see:
• when the run was started (as to distinguish it from other runs)
• the number of calls placed
• an estimate of the current backlog for this run
The section labelled "…" lets you modify the order under which campaigns and runs appear.
The selection you make will be applied to all campaigns and runs while the page is open.
When you select a startable, running or recently closed run you will see a panel showing its details plus available actions. You can start,
pause and remove runs, plus you can control the dialer’s "boost factor".
4.3.2. Controlling the boost factor
You can manually "tune" the boosting currently applied to a campaign by dynamically setting an additional factor that will be used to decide
how many channels to dial.
The way this works is:
• The number of free agents on a queue will be multiplied by the EP’s boost factor
• The result will be again multiplied by the run’s boost factor. Boost factors below 1 will reduce the number of available channels, while
values over 1 will increase it.
So if you have a queue with 2 idle agents, with an EP’s boost factor of 2, and your current boost factor on the Live page is set to 1.5, WD
will try placing 2 * 2 * 1.5 = 6 calls. If you tune the boost factor on the Live page to 0.5, WD will only place 3 calls.
When a run starts, its boost factor is always set to 1. In general, you should change the boost factor from the Live page only in cases where
the pattern of answered calls changes strongly during the day. WD is build for unattended operation, so there should be no need to have a
person constantly changing this value.
You will get best results by changing this value slowly and waiting for a while after each change to let it stabilize. By
constantly moving between very high and very low factors, you will send Wombat into a self-oscillating mode where you will
have a lot of idle agents and a lot of lost calls. In any case, Wombat converges automatically towards a stable state, so if
bad things happen, just wait a couple of minutes.
4.3.3. Using dynamic lists
Right from the Live page, you can control the lists that are run on a campaign.
33
Running WombatDialer
You can access this information by clicking on the "Lists" button next to a campaign run details.
You can add new lists to a running campaign, pause and unpause lists on existing campaigns, and see how far lists were processed so far.
If you stop all lists on a run that does not IDLE on termination, the campaign run will simply terminate - make sure this is
what you want to do.
Please note that if you change lists on a running campaign and reload it, the new lists (or any removed list) are NOT added or removed
from a running campaign. This is an expected behavior as, by forcing a list reload, you could override the finer list control you have from the
Live page itself. The next time your campaign runs, though, its initial set of lists will be taken from the current configuration.
4.3.4. Using multiple numbers per call
WombatDialer allows you to set additional numbers for a call to be placed. The idea is that if a call has two additional numbers, the number
chosen takes into consideration the current retry, so that:
• The first attempt is always placed on the main number
• The second attempt is on the first multinumber
34
Running WombatDialer
• The third attempt is on the second multinumber
• The fourth attempt is on the main number again
• The fifth attempt is on the first multinumber
• …and so on
In order to define a multinumber on a call, you need to provide attributes which names begining with MULTINUM - eg MULTINUM1,
MULTINUM2 and so on. If a MULTINUM is empty or not present, it is skipped - so it is valid to upload a call with MULTINUM1=123,
MULTINUM2 is empty and MULTINUM3=456.
When reporting on a call where a multinumber was used, it will appear as "123 / 456", where this means that the call is the one which main
number is "123" but the actual number dialed was "456".
4.3.5. Color codes used for live calls
Table 4.1. Live calls
State
Color
RD_RESERVED
purple
RD_REQUESTED
pink
REQUESTED
blue
DIALLING
orange
CONNECTED
green
TERMINATED
black
Any other
red
A complete description of a call’s life-cycle can be found in A call’s life cycle Section 3.8.2, “A call’s life-cycle”.
4.3.6. Color codes used for campaign runs
Table 4.2. Campaign runs
State
Color
COMPLETED
black
ERROR
red
IDLE
gold
PAUSED
gray
RUNNABLE
blue
RUNNING
green
WRONG_TIME
maroon
Any other
pink
A complete description of a call’s life-cycle can be found in chapter A campaign run’s life cycle Section 3.8.1, “A run’s life-cycle”.
4.4. Running campaign reports
You can use WombatDialer to get hands-on details on the activities it performed.
35
Running WombatDialer
Reports are performed per run, so the first thing you have to do is to search a set of runs by selecting a suitable time period and selecting
runs of campaigns that were started within that time period. Each run is identified by the date and time it was started.
When you click on ">>>", statistics are computed and displayed in the right-hand side of the screen.
You can see:
• The total number of calls placed
• The total talk duration (in seconds)
• The total "wait pre" and "wait after" times (in seconds). "Wait pre" is linked to PBX latency, while "Wait After" is actual time waiting for a
call to be picked up. See Call logs Section 3.10, “Call logs”.
• The total conversation time (in seconds)
• The number of calls that were placed on each trunk - trunk names are prefixed with the server they belong to
• The number of calls that got each specific outcome
By the bottom of the page you can then see a paged list of calls that belong to the set you selected. You can use the search tool to zoom in
on some specific number, and by clicking on the Pencil icon you can get a complete display of the call logs.
4.4.1. Exporting campaign lists
Looking at the list of dialed calls interactively is useful to undertsnad what went on, but sometimes you want to save the details of all calls
into a spreadsheet for later review.
36
Running WombatDialer
This can easily be obtained by clicking on the "Export to CSV" button - you will get a spreadsheet of all the calls belonging to your selected
runs.
Most spreadsheet packages cannot manipulate more than 50,000 records in a single file. Though WombatDialer will not
enforce this, make sure you avoid exporting data files that are too large to be usable.
4.4.2. Building new call lists out of run results
When you run a campaign, you usually set reschedule rules so that call can be retried in case of errors.
Still, it is often handy to operate on a different time-scale so that you can:
• run a campaign to completion
• get the set of calls that would not complete
• reschedule those calls as a separate campaign at a later time
This can be done using the "Export to new list" button on the Reports page.
When you click on that icon, calls are counted by their final status, that is the status of the last retry. For example, if a call was tried at
10AM and got BUSY, and was retried at 11AM and completed successfully, its final status will be TERMINATED.
As terminal states are not available before this transaction runs, the states you see in the list and the number of calls for each state are
about all possible states of all possible calls within the selected runs. So it is quite common to find that the numbers of calls actually created
is way lower than the numbers shown, or that a specific state has actually no terminal calls.
37
Running WombatDialer
We first select a set of runs from the ones we selected in the Reports page, and select a set of termination codes. Then you enter a name
for the new list to be created and click on "Run job".
A new list will be created under the new name and containing the records for the calls you just selected. In order to see it, you must go to
the Lists page (it might be necessary to close the Lists tab and reopen it).
You can also use this feature to create lists of numbers that were answered correctly in order to "prune" existing lists of old
and invalid entries.
By creating a call list numbers you know to be invalid, you can add it to your campaigns as a black list so that those
numbers will be immediately discarded.
4.5. Importing and exporting call lists
From the Lists page, you can import and export data to and from call lists. WombatDialer lets you select either native or CSV format.
4.5.1. Importing call lists - Native mode
By clicking on "Upload list of numbers" when a list is selected, you can copy and paste a set of numbers to be added to an existing list.
As numbers might have associated call attributes, there is no control over possible duplicate numbers as you may want to dial the same
number multiple times.
Numbers should be uploaded as a set of rows, each starting with the number to be dialed. If you want to add attributes to be passed to the
PBX, you should have them in the format "ATTR:VALUE" separated by a comma.
For example, the line:
5551234,A:1,B:HELLO
Loads the number "5551234" vith attribute A set to "1" and attribute B set to "HELLO".
You can also use a wizard to generate a set of progressive numbers, e.g. generate 1000 numbers from 5550000 onwards. The generator is
smart enough to handle the generation of numbers starting with one or more zeros.
the maximum set uploadable in one batch is about 2Mb, or about 100,000 numbers. It would be advisable to use smaller
sets as to avoid causing CPU spikes.
38
Running WombatDialer
4.5.2. Importing call lists - CSV mode
By clicking on "Upload CSV", you will be able to drag and drop a CSV file containing numbers and attributes to be added to the selected
list. You can easily create CSV files from your favourite spreadsheet.
You simply drag and drop the CSV file to the yellow box on screen. When done, the file will be read and previewed.
As your CSV file might have different field delimiters, once you have uploaded the file you will be able to change the delimiters until the file
looks right. The numbers to be called will be shown in red.
When it appears correctly on screen, you confirm and the file will be uploaded.
In order for this to work, your browser must support the HTML5 File API. This may not work on older browsers.
39
Running WombatDialer
The CSV file must be created so that:
• The first line of the file contains the labels for attributes. THe first label should be NUM or NUMBER
• The first column must contain the numbers to be dialed
• Subsequent columns will contain attributes (if any)
4.5.3. Exporting call lists
You can export a call list in textual format. By pressing on the "Export calls" button while a list is selected, you get a new text page with data
in the format:
5551234,A:1,B:2
5551235,Y:20,X:10
5551236,Y:20,X:20
5551237,Y:30,X:10
All current attributes (inbound and outbound) are reported.
If you click on "Export CSV" the export file will be downloaded as a CSV file.
4.6. The License page
You can access the License page by clicking on the "key" icon on the top-right of the WombatDialer instance.
It displays:
• The set of license keys installed on your WombatDialer system. For each license you can see:
• The name of the license
• The licensee
• From when to when this license is valid. Note that you can install a license that will only be valid in the future
• The status of the license
• The number of licensed channels
• The total number of licensed channels acrross all licenses
• The current version of the dialer, when it was built and the versions of the embedded TPF frameworks.
4.6.1. Installing a new license key
If you get a new license key from Loway, be it a full license or a demo key, it will look like the following item:
YOURCOMPANYNAME.12345678-23456789
You can install it by clicking on the "Add license key" button and entering the new code. You will need a working Internet connection from
the server, as the new license will be downloaded and activated. This may take a few seconds to complete.
40
Running WombatDialer
You may also force a check of all licenses by restarting the WombatDialer webapp.
Please note that:
• commercial licenses are additive, this means you can install two 10-channel licenses together in order to get a 20-channel license
(though they will disable previous demo keys)
• demo license are exclusive, this means that they will disable other demo keys as only one can be active at a given time.
Any disabled keys will appear in state REVOKED.
41
Chapter 5. QueueMetrics integration
QueueMetrics is a powerful call-center reporting suite that can be used together with WD for extensive and accurate reporting of the whole
call-center activity (inbound and outbound).
QueueMetrics offers:
• strong analytic capabilities, with over 150 elements computed
• live monitoring of agent status
• quality review and assessment of calls
• access to call recordings
• a powerful agent panel
• …and many more features.
QueueMetrics can be found at http://queuemetrics.com
WombatDialer and QueueMetrics do different things, but together can be a very powerful call-center solution.
• WombatDialer is able to use a Queue as and end-point in order to connect calls to a set of agents
• QueueMetrics is able to monitor extensively the queue and provides a convenient agent interface that works well with WombatDialer
5.1. Installation
Both QueueMetrics and WD can be installed on the same server, that may or may not be the same server running the PBX. If installed
automatically through yum, they will share the same Tomcat instance.
As QueueMetrics is a CPU- and memory-intensive application (as you could run reports on millions of calls at once) it might be better
to put each application on its own virtual or physical machine in order to avoid slowing down WD - for which timely responses to what is
happening on the PBX are paramount.
5.2. Understanding QueueMetrics integration
In order to turn on QueueMetrics integration, you simply need to enable the "QM_COMPATIBLE" logging option for WD campaigns. This
will tell WD to produce a log on each Asterisk system that closely resembles the one created by inbound calls on queues.
This log will be created with the following peculiarities:
• the name of the queue is the name of the campaign - that is the name that needs to be configured in QueueMetrics
• the "agent" name answering the call corresponds to the end-point being used to place the call
• the extended call status reported to WD will be logged
The most common case of QueueMetrics integration happens when you use an end-point of type QUEUE to have outbound calls routed to
agents through a queue. In this case, you will have two different queue entities producing data for QueueMetrics:
• The queue that matches the campaign: here you will see all calls that WD attempted - the successful as well as the unsuccessful ones.
This is basicall the activity that WD performed and the actual telephone usage durations. In a real-life scenario, the vast majority of calls
will be unanswered.
• If you run a report for the physical queue used, you will see information about calls that were successfully connected and were actually
queued. You would expect to have a very low unanswered rate here - if it is high, it means something is not working as expected. You
will of course have some lost calls, e.g. because the called person hung up before the agent was connected.
The difference between the number of successful calls in the campaign versus the total number of calls in the physical queue is due to calls
that were hung-up before reaching the queue, e.g. during an initial IVR phase.
When you use a queue for inbound, it is often better to avoid playing music-on-hold and to offer ringing instead.
5.3. Real-time monitoring
You will be mostly interested in monitoring only the physical queue - here actual agent activity is displayed, and agent presence information
(log-ins, log-offs and pauses) is immediately available.
42
QueueMetrics integration
5.4. Reporting
You might be interested in running reports on both the campaign and the physical queue in order to gather information on actual PBX
usage times versus agent activity.
5.5. Using the agent’s page
QueueMetrics offers an interesting Agent’s page, from where the agent can get a screen pop to an external application (e.g. a CRM) when
they receive an inbound call.
If you use the telephone number as the main key that is used to connect to an extenral CRM, then this will work natively with the basic WD
integration, as the caller-id us usually preserved.
You may want to have finer control on the CRM pop-up by tracing not only the number dialed, but also the campaign ID or some of the
variables that WD sends along the call. This can be achieved by rewriting the caller-id field in Asterisk and using a decoder script that will in
turn launch the actual CRM application. An example can be found in the Cookbook.
5.5.1. Using the agent’s page for preview dialing
WombatDialer includes an HTML preview panel that lets your agents preview, process or skip calls.
It can be reached at the URL http://myserver:8080/wombat/agents/rd_pop.jsp and accepts the following parameters:
• agent: the channel being used, as present on the queue. It must match exactly the Asterisk id.
• url: an URL that can be opened for this call. Note that special characters must be quoted, e.g. "?" must be written as %3F and "&" will
appear as %26. Any variables will be quoted when written like "<NUMBER>"
• inset: if 0, the page will display a list of known variables for this call and a link to the URL. If 1, the URL will be opened within an IFRAME
right in the page.
For example, to have calls opened from the agents' page in QM, you would use one of the programmable buttons to link to WD, like in:
realtime.agent_button_1.enabled=true
realtime.agent_button_1.caption=Wombat
realtime.agent_button_1.url=http://10.10.5.30:8080/wombat/agents/rd_pop.jsp
?agent=SIP/[a]
&url=http://10.10.5.31/sugarcrm/index.php%3faction=UnifiedSearch
%26module=Home%26query_string=<NUMBER>%26name=<NAME>
&inset=1
The code above will link to WombatDialer on 10.10.5.30, will replace the agent code in the URL and wil link to an embedded instance of
SugarCRM running on server 10.10.5.31 passing along the number to be called.
5.5.2. Using the agent’s page for regular dialing
WombatDialer includes an HTML panel to inquire/display the status of a live call. This integrates nicely with QueueMetrics, as
QueueMetrics allows for recalls to be scheduled right from the Agent’s page.
It can be reached at the URL http://myserver:8080/wombat/agents/rd_pop.jsp and accepts the following parameters:
• agent: the Agent’s identifier.
43
QueueMetrics integration
• wid: the WombatID. It can be written with a prefix (as it apperas in QM logs) or without them.
• unqid: the Asterisk UniqueID for the call.
For example, you could use a Queue URL like the following:
http://myserver:8080/wombat/agents/live_call.jsp?agent=[A]&wid=[U]
To have the page opened in Icon. If you are taking the ID from an entry that is logged by Wombat you should use the "wid" code; if instead
you are reading from a genuine app_queue entry you should use "unqid" instead.
44
Chapter 6. A WombatDialer Cookbook
This section of the manual contains a few examples of WombatDialer deployments that show common usage patterns.
Table 6.1. Recipes
Title
Diff.
Social
*
Media
Dialer
Section 6.1,
“A social
media
dialer”
EPP
X
Helping
**
Wombats
Section 6.2,
“Helping
Wombats
one carrot
at a time”
Outbound * *
IVR
Section 6.3,
“Outbound
IVRs
and dr.
Strangelove”
EPQ
API
NOT
X
ATT
X
QueueMetrics
***
integration
Section 6.5,
“A custom
QueueMetrics
integration”
X
Queue
**
call-backs
Section 6.6,
“Elastix
queue callbacks”
X
Understanding
**
Queue EP
Section 6.4,
“Understanding
queue
endpoints”
X
Automated * *
Recalls
Section 6.7,
“Automated
recall
of lost
inbound
calls”
X
Preview
*
Dialing
Section 6.8,
“Preview
dialing
with
QueueMetrics,
Elastix and
SugarCRM”
X
EVT
X
X
TTS
QM
X
X
X
INP
X
X
X
X
X
X
X
X
X
X
X
X
Diff
The level of difficulty - * Beginner - * * Intermediate - * * * Advanced
45
X
A WombatDialer Cookbook
EPP
Uses PHONE end-points
EPQ
USes QUEUE end-points
API
Shows HTTP APIs
NOT
Shows HTTP notifications
ATT
Shows call attributes
INP
Importing and exporting call lists
EVT
Call events
TTS
Using Text-to-Speech engines
QM
QueueMetrics integration
6.1. A social media dialer
Let’s imagine that we work for ACME Social, a company that specializes in tracking the success of its clients on social networks like
Facebook or Google+. So, every time someone befriends one of their clients, we want WombatDialer to call the client telling them their
current number of friends. The call would say something like "Hello ! Customer 1234 has 127 friends. Goodbye!"
This example shows a couple of features that are not trivial to implement on most dialers, notably:
• The message will be customized with a number of parameters, so that each client receives a personalized version and not just a prerecorded note
• The dialer starts calling on-demand when something happens and handles reschedules internally
In order to implement this, we start by editing the Asterisk dialplan and create a couple of new contexts. The first one is called "telecast"
and is used to generate the message being played:
[telecast]
exten => 100,1,Wait(1)
exten => 100,2,Answer
exten => 100,n,Playback(hello-world)
exten => 100,n,Playback(agent-loginok)
exten => 100,n,SayDigits(${user})
exten => 100,n,Playback(vm-youhave)
exten => 100,n,SayDigits(${friends})
exten => 100,n,Playback(vm-Friends)
exten => 100,n,Playback(vm-goodbye)
exten => 100,n,Hangup
As you can see, the context above introduces two channel variables ${user} and ${friends} that are placeholders for the user-id
of our client and the number of friends they currently have.
As a convenience when testing, we want all numbers dialed during the test phase to actually dial our own SIP phone; to do this we create a
new context called dialout that routes any number to our extension:
[dialout]
exten => _X.,1,Dial(SIP/500)
exten => _X.,n,Hangup
We reload Asterisk to pick up the dial-plan changes. Then we log-in in WombatDialer and configure it, so that:
•
AS is our Asterisk server
• We create a trunk called "Out" on server AS that points to our telephone. We enter Local/${num}@dialout as its dial string
and set its capacity to 1 (so we never receive more than one call)
46
A WombatDialer Cookbook
• We create an end-point called "Msg" on our server AS with extension 100@telecast and a capacity that is enough for the
campaign - let’s say 10 lines.
Your configuration will look like the following screenshot:
At this point, we create a new List called "Test" and add only one number to it; you may enter the number as:
0916300000,user:10,friends:100
This uploads the number and associates the variables "user" with value 10 and "friends" with value 100.
Then we create a new campaign - this is where all the pieces are tied together:
• We set its name as "Runme" - avoid long names or spaces if you plan to control it externally
• We set its priority to 10 - the priority is the order in which campaigns are queued when trying to assign free lines. A campaign with a
lower number will run first, while campaigns with the same priority will have a fair share each.
• We set "Idle on termination?" to Yes - this way this campaign will not just stop when it is out of numbers but will wait for more.
• We set "Additional logging" to "QM compatible" so that you may use QueueMetrics to keep track of it.
After saving the campaign, we select it and then add:
• Trunks: Out
• Endpoints: Msg
• Lists:Test
As you can see, a campaign can have multiple trunks, multiple end-points and multiple call lists, and they may be shared between multiple
campaigns.
It would be fair to add some rescheduling rules as well - for example, if we do not get an answer within 30 seconds, we want the system to
retry placing the call exactly once after two minutes.
In the end, you would get a situation similar to the one here:
47
A WombatDialer Cookbook
At this point we’re ready to go:
• make sure that the WombatDialer engine is turned on (from the Home Page, click on the "Play" icon)
• go to the "View Live" page and select our campaign "Runme" under "Available campaigns"
• click on "Start"
If all goes well, within a few seconds you shoul receive a call to your SIP phone telling you that user 10 has 100 friends. Hooray!
After this, you should see your campaign being shown on the Live page in gold, with status IDLE; now, when our internal tracking system
detects new friends for one of our valued customers, all it needs to do is to send a HTTP request to the WombatDialer, like we would
manually from the command line:
curl "http://server:8080/wombat/api/calls/index.jsp?
op=addcall&campaign=Runme
&number=0916309765&attrs=user:107,friends:123"
If you do, in a few seconds the dialer will send this new call. You can send all the calls it needs to place, one at a time, and it will try
scheduling them as soon as possible given the current system conditions, running campaigns and available outbound lines.
Now, if you want it to actually dial out and not just call our SIP phone, edit your Trunk "Out": set the dial string to something like SIP/
myprovider/${num} and set its capacity as the total number of parallel calls you want to place. Then go to the Live page and
reload the campaign.
When you want to stop the campaign, you have two choices:
• You can temporarily pause it
• You can remove it from running campaigns when it is paused
Of course, you can have this campaign run on multiple trunks and multiple endpoints, using multiple separate Asterisk servers, just by
creating the relevant items and telling the campaign to use them. This way, handling hundreds of channels is just as easy as testing with
your SIP phone!
Further evolution:
• You could create your own audio recordings - the example here was created with sounds present in a standard Asterisk distribution, but
of course you should record your own messages.
• You can do even better and embed a Text-to-Speech engine script, so you are not limited to inserting numbers but can play back nearly
anything
• You can add an IVR option to the "telecast" context, so that if the callee wants to talk to a live person, they are sent to a queue. By
monitoring the number of lines that you are using on your trunk and the number of available agents, the WombatDialer acts as a simple
progressive dialer.
• As all the configuration is GUI-agnostic, you can use your favourite Asterisk configuration GUI to create End-points - play messages,
read IVRs, add time-dependent rules like you would for incoming calls. All you need to know is the point in the dial-plan that they start
from - e.g. internal number 123 in FreePBX is always available as 123@from-internal.
48
A WombatDialer Cookbook
• You can optionally add an Active Period to the running campaign, so that calls on it are placed only - say - between 9 AM and 6 PM no
matter when the messages are queued.
6.2. Helping Wombats one carrot at a time
You know how it goes; so many good ideas in real-life end up being limited by the amount of funds you can raise to implement them. That’s
why Vicky, the energetic new president of "Friends of the Wombat", called you. "Friends of the Wombat" is a non-profit institution that helps
wombats in need, but their activities are limited by the rising cost of carrots; so they decided to start a volunteer fund-raising campaign.
What they would like to do is to call a list of known contacts that expressed an interest in wombats and ask them to make a donation. They
started doing this manually with paper and pencil, but getting to a lead is really tiring and time-consuming - their volunteers spend most of
the time dialling numbers and it is really hard for them to get through to somebody who is interested.
After a good cup of green tea, what you propose to do is to use WombatDialer to automate the process by dividing it into multiple stages:
• Create an electronic list of those leads
• Leads from their list are dialled
• If the call is answered, a message is played that explains what the campaign is for
• If the callee is interested, they press 1 to be put in conversation with a volunteer that will explain how to send a donation.
This setting leads to two huge efficiency boosters:
• As numbers are dialled automatically and error conditions are handled behind the scenes, a lot of drudge work with paper and telephone
keyboards is automated; no more post-it notes to recall a busy number!
• As they noticed that about 50% of the calls made manually result in calls to busy numbers or numbers where nobody picks up, and
that only 50% of the callees are actually interested after an initial interview, they expect that 75 calls out of every 100 they make can be
screened out automatically. So if they have 4 volunteers on shift, WombatDialer could start 16 calls at once on average, and have all of
our volunteers busy most of the time with people who are actually interested in contributing.
In order to implement such a campaign with WombatDialer, we start by creating a call queue that will hold our agents and will send them
calls. You can use any Asterisk GUI to do this - in the example below we use Elastix, but you can choose the one that suits you best.
We go to Queues → Create new, set the extension for the queue as 999, enter any name you want, and look on the settings below so that:
• Strategy is set to "rrmemory"
• Queue events: yes (this is very important - if you don’t do this Wombat won’t be able to observe your queue at all).
• Autofill: yes (all free agents are assigned calls at the same time)
If you create a queue manually without using a GUI, configure it with the parameters below so that WombatDialer can observe it.
[999]
autofill=yes
eventmemberstatus=yes
eventwhencalled=no
maxlen=0
strategy=rrmemory
Now we create a custom piece of dialplan to be called as an end-point for calls that connect successfully.
[friendscampaign]
exten => 100,1,Answer
exten => 100,n,Playback(campaign_message)
exten => 100,n,Read(type,,1)
exten => 100,n,GotoIf($["${type}" = "1"]?ok)
exten => 100,n,Goto(1)
exten => 100,n(ok),UserEvent(CALLSTATUS,Uniqueid:${UNIQUEID},V:1)
exten => 100,n,Queue(999,,120)
(In order to make this example shorter, we assume you have a basic familiarity with WombatDialer concepts such as Campaigns, Servers,
Trunks and End-points.)
Now log-in to WombatDialer and create a new End-Point:
• Type: QUEUE
• Queue: 999
• Max channels: 10
• Boost factor: 2.0
49
A WombatDialer Cookbook
• Max waiting callers: 2
This means that WombatDialer will try and place two calls for each agent available, but never more than 10, and will stop placing calls if
there are two or more people waiting in queue. We expected to use a boost factor of three to four given the previous statistics, but it is
better to start with a small figure and grow it if needed.
It is important to understand the impact of different boost factor settings; in general having more calls made than agents may result in calls
waiting in queue when all of your agents are busy (in call-center parlance this is usually referred as "nuisance calls"). WombatDialer tries to
minimize the impact of this case by continuously monitoring the number of calls waiting on the queue and avoiding placing new calls if there
are too many. If you don’t want to have cases where calls are not immediately connected to an agent, you should leave the boost factor to
1, that is, place no more calls than available agents. The trade-off here is that agents end up being under-used, as they have to wait for a
successful call to come in.
We then create a test trunk, upload a list of test numbers and create a campaign called "friends" as in the previous examples; we now start
the dialer and start the campaign from the Live page. When we start running it we notice that it does not seem to work - the campaign is
running but no calls are placed. How comes?
If we reload the current Dialer status, we see that it is saying that the queue has 0 channels available - this is because there are no agents
on the queue.
If we log an agent on (e.g. by entering 999* on Elastix), we will notice that WombatDialer starts dialing. If you pause an agent or log him off,
WombatDialer will immediately react and adapt to the changed number of available end-point channels.
Another thing that we do is to track (through a status code) which callers ask for being put in contact with a volunteer - this allows easy
inspection of what goes where from the Campaign Report panel.
Now all we have to do is to set our campaign to use an actual telephone trunk and upload the "real" list of numbers and we are ready to go
- it’s time to buy some new carrots for our wombats!
Understanding statistics
If you run a report of our campaign with a queue analyzer like QueueMetrics, you will have two different views of the campaign:
• if you analyze the queue "friends" (the one that matches the name of your WombatDialer campaign) you will see the total "external"
system activity - all calls placed on the campaign are tracked, and the wait time matches the external wait time (that is, the time between
the dial request and a successful connect). All calls appear to be connected on the end-point, as you could have multiple ones assigned
to the same campaign.
• if you analyze the queue "999", you will see the human side of action - how many calls were queues for humans to interact with, how fast
they were answered and by whom.
Further expansion
• You can use the same end-point in multiple parallel campaigns, if needed.
• It is possible that your campaign reaches someone who is interested but is currently doing something else so does not have the time to
speak to your volunteers. They could tell you by hitting 2 - you could add a Reschedule Rule that reschedules the call in a few hours.
• You could easily generate personalized messages instead of one single rescorded message by using a Text-to-Speech synthesizer
Please note that outbound telemarketing, whether it is of the good or evil persuasion, is regulated by your local law, so be sure you comply
to its terms before you start calling millions of people!
6.3. Outbound IVRs and dr. Strangelove
A Dr. Strangelove just called, saying he needs your help for an automated appointment reminder system. Dr. Strangelove is tired of
patients forgetting appointments, so he needs a way to call them the day before and making sure they will be there at the right time. Also,
as he specializes in every possible thing, he needs to know what the appointment will be about so he can either have an operating room
ready to remove your appendix or his psych couch cleaned and stocked with a large supply of paper towels. Do you think you can help?
After calling him, you understand that he wants a system that will not only connect to a list of numbers and handle common issues (busy
calls, non-answers, etc) but also a system that is able to detect whether the callee actually confirms receipt of the message. If they do,
that’s okay; if they don’t, a new call is placed after a while.
He also wants a system that is able to synthesize a custom message for each call, and that is able to gather data from the callee and pass
it along to his office management system as it is collected.
Doing this with WombatDialer is easy; it is basically a matter of implementing an outbound IVR and tracking call parameters and call
completion codes. Doing so will also let us show how WombatDialer handles call retries. As an added bonus, we’ll see how WombatDialer
notifies other systems over HTTP.
To get us started, we create a list of telephone numbers called "Appointments" with custom attributes; in order to do this, we log in to
WombatDialer, go to the Lists page and create a new list. After creation, we select it and upload a list of numbers like the following one:
5551234,HH:10,MM:30
5556785,HH:11,MM:00
5552012,HH:11,MM:30
This means that the person at number 5551234 is to be reminded an appointment for tomorrow at 10:30. We use two separate variables as
this makes life easier for our Text-to-Speech engine.
50
A WombatDialer Cookbook
We now have to program the outbound IVR context in Asterisk; we can do that easily with the help of WD call attributes so that we know
what we have to tell our customer. In this example, we will also use the Google Text-to-Speech engine to synthesize audio on-demand.
[drstrangelove]
exten => s,1,Answer
exten => s,n,Set(TIMEOUT(response)=5)
exten => s,n,UserEvent(CALLSTATUS,Uniqueid:${UNIQUEID},V:0)
exten => s,n(start),agi(googletts.agi,"Your appointment with doctor
strangelove is for tomorrow at ${HH} ${MM}")
exten => s,n,agi(googletts.agi,"Press 1 for to book for major surgery
press 2 for psychiatric counseling.")
exten => s,n,Read(type,,1)
exten => s,n,GotoIf($["${type}" = "1"]?appe)
exten => s,n,GotoIf($["${type}" = "2"]?psyc)
exten => s,n,Goto(start)
exten => s,n(appe),UserEvent(ATTRIBUTE,Uniqueid:${UNIQUEID},APPT:APPE)
exten => s,n,agi(googletts.agi,"You choose the appendectomy.")
exten => s,n,Goto(confirm)
exten => s,n(psyc),UserEvent(ATTRIBUTE,Uniqueid:${UNIQUEID},APPT:PSYC)
exten => s,n,agi(googletts.agi,"You choose psychiatric counseling.")
exten => s,n,Goto(confirm)
exten => s,n(confirm),agi(googletts.agi,"Thank you! Now press 1
to confirm the appointment")
exten => s,n,agi(googletts.agi,"or 2 to cancel it.")
exten => s,n,Read(conf,,1)
exten => s,n,GotoIf($["${conf}" = "1"]?ok)
exten => s,n,GotoIf($["${conf}" = "2"]?ko)
exten => s,n,Goto(confirm)
exten => s,n(ok),UserEvent(CALLSTATUS,Uniqueid:${UNIQUEID},V:1)
exten => s,n,agi(googletts.agi,"The appointment was confirmed.
See you tomorrow.")
exten => s,n,Hangup
exten => s,n(ko),UserEvent(CALLSTATUS,Uniqueid:${UNIQUEID},V:2)
exten => s,n,agi(googletts.agi,"Boo the appointment was cancelled.")
exten => s,n,Hangup
Notable points in the code above are:
• Custom call attributes HH and MM are passed along with the phone number so we can know what to tell each client.
• We set the call status to "0", "1" or "2". "0" means that the call was connected but no choice was made, "1" means that the appointment
is confirmed and "2" is that it is cancelled
• We generate some UserEvents in order to populate the outbound (that is, coming from outbound) attribute APPT with the patient’s
choice
51
A WombatDialer Cookbook
We now have to create an end-point for our campaign that points at extension s@drstrangelove so that WombatDialer knows
where to connect successful calls. We will also need at least one trunk to send calls through - to get us started it is advisable to have a
"dummy" trunk routing everything to a local extension.
If you have not already done so, it would be advisable at this point to have a look at our previous tutorial - Section 6.1, “A social media
dialer” - to see how to create and control a simple campaign.
When done, we create a new Campaign to connect all pieces together.
We set the campaing to be idle on termination, so that we can add more numbers over HTTP when they become available. We also
program it to be running only between 8AM and 6PM, every day of the week, so we don’t call people in the middle of the night if a nightly
job is used to load new appointments every day.
We also set a forced closure after 90 seconds so that if the call exceeds a duration of 90 seconds, it is automatically hung up to prevent
using valuable resources on a call that is likely invalid.
As a last measure, we set the logging format to QM_COMPATIBLE (so that we can observe activity via QueueMetrics) and enter the HTTP
notification URL of Dr. Strangelove’s office management system to be notified of call events (see below for more information).
We then complete the campaign by adding a trunk, our new end-point with the outbound IVR and our Appointments list.
As a last step, we create a set of Reschedule Rules that implement the retry logic.
• If the call is unanswered, busy or in error, we retry every 300 seconds for up to five times.
• If the call times out because of a forced closure, we retry after 120 seconds.
• If the call completes naturally but its extended status is 0 (no choice), we retry it for up to three times after 300 seconds each.
• If a call completes naturally but its extended status is not 0, then it is not retried.
Now it is time for us to start the campaign - make sure the WD is running, go to the Live page, select your campaign and run it. If all goes
well, you should start receiving calls on your test extension.
While the campaign is running, you can add more calls to it via HTTP by issuing:
52
A WombatDialer Cookbook
curl "http://server:8088/wombat/api/calls/index.jsp?
op=addcall&campaign=AppRemiders&number=45678
&attrs=HH:12,MM:15"
and you can even specify a minimum time for calls to be placed at, like e.g.
curl "http://server:8088/wombat/api/calls/index.jsp?
op=addcall&campaign=AppRemiders&number=45678
&attrs=HH:12,MM:15
&schedule=2012-06-01.10:00:00"
When the campaign terminates, it will be in IDLE state. In order to close it, first pause and then remove it.
After a successful run, you can see its statistics, by viewing the Campaign Report screen:
You will see that some calls appear as TERMINATED 0, some as TERMINATED 1 and some as TERMINATED 2, based on the extended
call status entered through a user selection. Only calls in state TERMINATED 0 are retried.
You can also see the state of attributes for each call by going to the List editor:
You see that calls successfully placed will have an APPT attribute that is either APPE or PSYC; also you will see a complete log of activity
for each number.
As a last item, you’ll remember we enabled HTTP notification. This basically POSTs the result of each call to a HTTP server, where you
could have a simple PHP script to parse it, like in the following example:
53
A WombatDialer Cookbook
<?
$out = "";
foreach($_POST as $name => $value) {
$out .= "$name:$value ";
}
print($out);
error_log("RQ: $out",0, "", "");
?>
The script above basically logs all activity on the HTTP error log. What you get is a sequence of calls like:
RQ: num:5551234 reschedule:0 I_MM:30 extstate:
state:RS_REJECTED I_HH:10 retry:0
RQ: num:5556785 reschedule:0 I_MM:00 extstate:
state:RS_REJECTED I_HH:11 retry:0
RQ: num:5552012 reschedule:0 I_MM:30 extstate:
state:RS_REJECTED I_HH:11 retry:0
RQ: num:5551234 reschedule:0 I_MM:30 extstate:1
state:TERMINATED I_HH:10 O_APPT:APPE retry:0
RQ: num:5556785 reschedule:300 I_MM:00 extstate:
state:RS_NOANSWER I_HH:11 retry:0
RQ: num:5552012 reschedule:0 I_MM:30 extstate:2
state:TERMINATED I_HH:11 O_APPT:PSYC retry:0
RQ: num:5556785 reschedule:300 I_MM:00 extstate:0
state:TERMINATED I_HH:11 retry:1
RQ: num:5556785 reschedule:300 I_MM:00 extstate:0
state:TERMINATED I_HH:11 retry:2
RQ: num:5556785 reschedule:300 I_MM:00 extstate:0
state:TERMINATED I_HH:11 retry:3
RQ: num:5556785 reschedule:0 I_MM:00 extstate:0
state:TERMINATED I_HH:11 retry:4
You see that for each call:
• num is set to the number dialed
• state is the call state at its completion
• extstate is the call’s extended state, if present
• retry is the retry counter
• reschedule is set to the time to be waited before a reschedule; if no reschedule is necessary, it will be set to zero
• all inbound attributes (the ones you set with the telephone number) are passed along prepended by I_
• all outbound attributes (the ones you read from the callee), if any, are passed along prepended by O_
This way you can easily create an integration script that stores the results of the call on a database or passes them along for furter
processing.
Further developments
• By connecting multiple trunks and end-points residing on multiple servers you can scale this example up to hundreds of parallel lines
• If you have clients living in different time zones, you could have multiple campaigns active with different time windows to place calls
• It is often a good idea to set call attributes that are not actually used by Asterisk (e.g. a patient ID) but make life easier for third-party
systems to find out what the call was about.
The Google-TTS script used is available at: http://zaf.github.com/asterisk-googletts/
6.4. Understanding queue end-points
An end-point of type queue in Wombat tries to determine the number of available channels based on the number of available agents on the
queue it is observing. An agent is considered available if it is logged on to the queue, is not paused and is not currently in conversation.
After getting the number of available agents, it multiplies it by the "boost factor" (that is used to account for the success rate in connecting
the numbers to be dialed) and tries to schedule as many calls. Therefore, if you have e.g. 7 available agents and a boost factor of 1.3, it will
try to connect to 9 numbers at once (7 x 1.3 = 9.1).
54
A WombatDialer Cookbook
It will also enforce two limits:
• If there are more than "max waiting calls" waiting on a queue, it will not try and place new calls - in theory there should never be calls
queued, as they follow the number of availble agents, but it is possible that either some agent logs off after being counted to place calls
or some calls reach a queue without passing through Wombat. This also acts as a counterbalance to high "boost factor" values.
• it will never place more than "max channels" calls on the queue - this lets you use a shared queue where some calls come from inbound
activity and some come from Wombat itself. Of course you can turn this off by setting "max channel" to a value higher than the total
number of agents on the queue.
It is also important to notice that the queue is used only as a way to know how many calls can be placed on a queue, but calls will still
be transferred to a point in the dial-plan that should lead to the queue. This lets you execute dial-plan logic (e.g. playing pre-recorded
messages or running IVRs) on the calls it just placed.
In order to use WombatDialer effectively with a queue, the following guidelines are best followed:
• though Wombat would work with static member channels, if you want your calls to go through to agents who may or may not be available
(e.g. some days they may be sick) it is strongly advisable to use dynamic agents who log on and off from the queue.
• as an agent cannot be physically available at all times during the day, it is important that they have a way to pause themselves, be it to
run "wrap up" activities after calls or to take breaks. The QueueMetrics web interface offers an excellent panel that lets you add pause
codes as well
• the queue must provide events to Wombat about agent activities. Therefore you must set "eventswhencalled=true" - otherwise the queue
will be unobservable. It is also important that extension presence is correctly observed - e.g. if an end-point is busy because the agent
is doing a personal call, its queue status should immediately reflect this. Whenther this happens or not on your system is a matter of
Asterisk version and type of channel that is used to reach the agent - with recent versions of Asterisk and SIP channels this should work
automatically.
• the queue should connect calls to agent as efficiently as posssible when there are multiple calls waiting and multiple avavilable agents,
so it should have the "autofill" option set to true.
In order to run a campaign with a Queue endpoint, it is best to:
• create a campaign with a Queue endpoint. You may create it IDLE and add no call lists, so the campaign does not actually do anything
until fed some numbers.
• run that campaign
• reload the Dialer status in order to see if the queue is being observed (you have to click on the reload icon manually each time).
• If the queue is present, you should see it something saying "Free 4 of 7 W:2". This means that WD is seeing 7 agents connected of
which 4 are free (where 4 is the result of multiplying the actual number of observd channels by its boost factor), and that there are 2 calls
waiting on the queue.
• try and log on, log off, pause and unpause an agent. You should see the number of free and available channels change accordingly. Try
also sending calls to the queue and see if the number of free agents and of waiting calls is correct.
• try also placing calls from some agent extensions and see if the number of free channels reflects this correctly.
• if you plan to have agents working on multiple queues at once, run the tests above while the agents are logged on in at least two queues
and make sure statues are updated correctly.
55
A WombatDialer Cookbook
The Queue EPs let you use WD as a powerful progressive dialer and can lead to very complex integration scenarios, but as it involves
actual people being called and answering the phone, it is better to understand it well before actually using it in production.
6.5. A custom QueueMetrics integration
The WombatDialer can be used as a stand-alone product for message broadcating, but it was built to integrate easily with QueueMetrics,
the premier call-center monitoring and reporting tool for the Asterisk PBX. WombatDialer and QueueMetrics do different things, but together
can be a very powerful call-center solution.
• WombatDialer is able to use a Queue as and end-point in order to connect calls to a set of agents
• QueueMetrics is able to monitor extensively the queue and provides a convenient agent interface that works well with WombatDialer
In this example, we improve the scenario described in a previous tutorial - Section 6.2, “Helping Wombats one carrot at a time” - imagining
that the want to:
• use a custom CRM interface so that agents can immediately see the name of the person being called and can open up an external CRM
application for each client so they can gather donation data
• monitor each agent’s performance
• use a dynamic list of people to be called so that as soon as you know of an interesting lead, you can add it to the list of persons to be
called.
You can have WombatDialer and QueueMetrics installed on the same server, unless you have a very high load or a very high number of
lines.
As a first step, we’ll have to create a small interface script that will be our CRM application. We will call it wombatPopup.php and will store it
on one of our servers as http://10.10.5.10/lenz/wombatPopup.php
Plain WombatDialer Agent Panel<hr>
<?
$number = $_REQUEST["caller"];
$agent = $_REQUEST["agent"];
$unique = $_REQUEST["unique"];
preg_match('/#(\d+)\s(.+)/', $number, $matches);
$id = $matches[1];
$name = $matches[2];
?>
Person is: <?= $name ?> (ID #<?= $id ?>)<p>
Agent is: <?= $agent ?> <p>
Call unique is: <?= $unique ?>
This page basically displays the person’s name and ID, so we can display it immediately - or this could redirect to an external CRM
application.
At the Asterisk level, if you have not already done so, create a queue "999" with the correct parameters to be monitored by Wombat - see
Section 6.4, “Understanding queue end-points” . Then edit your extensions_custom.conf file so that you have an extension "1235" that
leads to the queue:
[from-internal-custom]
....
exten => 1235,1,Answer
exten => 1235,n,Set(CALLERID(num)=#${ID} ${PERS})
exten => 1235,n,Goto(from-internal,999,1)
This rewrites the incoming caller-id for the queue to e.g. "#1234 John_Doe", so this is what the agent sees - even before the agent pop-up
is opened. This also is recorded in QueueMetrics, so this is what you will see when you run call reports. Note that if you run FreePBX you
cannot call the queue directly using the Queue() command but you’ll have to go through its dialplan in order to have all parameters correctly
set.
In QueueMetrics, set the following properties in configuration.properties:
realtime.agent_autoopenurl=true
default.crmapp=
56
A WombatDialer Cookbook
Then create a queue "999" and set its Queue URL to:
http://10.10.5.10/lenz/wombatPopup.php?caller=[C]&unique=[U]&agent=[A]
This tells QueueMetrics that it has to enable a screen-pop for calls coming in through that queue.
Now log on to WombatDialer; create an EndPoint of type Queue set for queue 999, and its entry point in the dialplan to 1235@frominternal-custom . Do not forget to set the "Boost factor" to 1 and the "Maximum queue length" to 2.
Then create a campaign called "QmSample" that idles on termination.
Set the trunks, the EP we just created, add no lists and define any reschedule rules you need. The end result should look like the following:
57
A WombatDialer Cookbook
Now start the campaign. It will go in status IDLE immediately, as it has no numbers to dial, and you will see it all yellow in the Live page of
WombatDialer.
At this point, it is time for your agents to log in in QueueMetrics. Have them log-in to their Agent’s page, and from there log them on to
queue 999. At this point, make sure that each agent’s browser allows QueueMetrics to open pop-up windows (this is usually disabled in
modern browsers).
Now, for each call you’d like to be started, send an HTTP request to WombatDialer that looks like the following one (we do this through the
Linux shell, but there is nothing preventing you to script this in some other way:
curl "http://10.10.5.18:8080/wombat/api/calls/index.jsp
?op=addcall
&campaign=QmSample
&number=2000136
&attrs=ID:2301,PERS:John_Doe"
Note that you associate two parameters: ID that is a unique id used by your CRM and PERS that is the called person’s name. You could
also add additional parameters you may need, e.g. a person’s class or their thelephone number.
What happens now is that when the call goes through, its caller-id is rewritten as "#2301 John_Doe" as soon as it reaches Asterisk. When
your agent receives the call, they will reload the agent’s page and the pop-up will be immediately opened.
58
A WombatDialer Cookbook
In the pop-up, you parse the caller field and extract your CRM id, so you can use this for your external application to display the correct
data.
From the agent’s page you can also manually open other forms for recent calls. The agent will also see the person’s name in
QueueMetrics, so this makes their life easier. The agent may also set a manual status code for each call through QueueMetrics, e.g. if
the sale was successful or not, and this lets you measure your agent’s performance. You may also use QueueMetrics’s extensive QA
monitoring features to analyze calls and improve the process.
Analyzing outbound campaigns
If you set your campaign to have QM_COMPATIBLE logging, you will find data abpout two different queues on QueueMetrics:
• If you run a report for queue "QmSample", you will see all calls that WD attempted - the successful as well as the unsuccessful ones.
This is basicall the activity that WombatDialer performed and the actual telephone usage durations. In a real-life scenario, the vast
majority of calls will be unanswered.
• If you run a report for queue "999", you will see activity about calls that were successfully connected and were actually queued to be
answred by agents, You would expect to have a very low unanswered rate here - if it is high, it means something is not working as
expected. You will of course have some lost calls, e.g. because the called person hung up before the agent was connected.
• The difference between the number of successful calls in "QmSample" and the total number of calls in "999" are calls that were hung-up
before reaching the queue, e.g. during an initial IVR phase.
6.6. Elastix queue call-backs
You are called in to a client site; they seem to have a problem. They run a small (10 agents) inbound call centre, and when you join
everybody else in the meeting room, there is a large and colourful graph in the middle of the table. The graph shows the call wait times
during the week and boy, it’s not a good sight. Their main inbound activity is to offer client support for a company selling sport bikes, and
everybody seems to be calling on Monday morning. It looks like people go riding on weekends and whatever problem they have, they call
on Monday morning. Wait times peak, abandon rates spike, and nobody is happy. The call center manager is mostly concerned of having
to hire and train some temp people in order to handle the load that only happens one day a week. They ask you if you have any better idea
on what can be done. And yes, you have some.
You can program an Asterisk queue so that when people tire of waiting, they press a digit and get to a menu where they can leave their
number. Then the system queues their call and attempts to call them at a convenient time. This way:
• your customer are happy; they don’t have to wait in queue for so long
• your call center manager is twice happy: the first time because wait times and abandon rates go down, the second one because by
placing calls at a convenient time they can smooth out the workload of their agents during the day
This scenario requires some additional "glue" to what is basically supported by Asterisk - exiting a queue and reading a number are easy,
but then starts the pain. You’ll have to create a database and write a script that reads back from it. You have to handle invalid numbers,
busy numbers and the like (if we promised to call back the client, we cannot just try once and forget about it). You’ll have to have a GUI
of some kind for the manager to start and stop dialing. You’ll have to adapt to the number of available agents. You’ll have to report on this
activities. You’ll have to avoid flooding the trunks of your PBX with too many calls. In short, it’s the kind of thing that gets more complex the
more you think about it. That’s what WombatDialer is for.
What we plan to do is to use WombatDialer as the call-back engine. It can be controlled by an external HTTP API, so you can do that
from the Asterisk dial-plan. It has exact knowledge of the current set-up and call back rules, so you get the number of calls you expect
on one or more Asterisk servers. It can work with an existing PBX and does not interfere with calls that are not its own. It keeps track of
call completions and knows what to do in case of invalid and busy numbers. It has reports of its own and can work with QueueMetrics for
powerful and detailed reports.
59
A WombatDialer Cookbook
The client uses Elastix as PBX system, so we’ll have to integrate it with WombatDialer. No problem!
So what we do is:
• First we create a normal queue, for inbound. We call it "400".
• Then we create a call-back queue. If our main queue is called "400", then let’s call this second queue "401". The idea is that WD will
monitor this queue - when you have members on this queue, then WD will start placing calls. This way an inbound call-center with
multiple queues will find it very natural to have some agents join and leave a call-back queue. When you creet this queue, make sure you
set "Ring Strategy: rrmemory", "Event When Called: Yes", "Member Status: Yes", "Autofill: yes" so that WD can use it effectively.
• we create a piece of dialplan that will handle the exits from queue "400" and will gather the telephone number
• we create a new "custom extension" (399) that will jump in the dialplan at "Local/1@queue-leavenumber"
• In Elastix, we create an IVR menu and set it as a destination for queue "400". This menu has only one option (1) that basically jumps to
the custom extension "399" that we just created, in order to call our script
• we go back to the queue "400" and set its "Fail Over Destination" as our IVR we just created
We start by editing the extensions_custom.conf file in our system, adding a new stanza like:
[queue-leavenumber]
exten => 1,1,NoOp
exten => 1,n(Start),agi(googletts.agi,"Please enter your telephone
number and we will call you back.",en)
exten => 1,n,agi(googletts.agi,"The number must be composed of 7 digits.",en)
exten => 1,n,Read(CBNUM,beep,7,,2,5)
exten => 1,n,NoOp( Num ${CBNUM} )
exten => 1,n,GotoIf($["${LEN(${CBNUM})}"="7"]?lenOk)
exten => 1,n,agi(googletts.agi,"The number you entered has the wrong number
of digits.",en)
exten => 1,n,GoTo(1)
exten
exten
exten
exten
=>
=>
=>
=>
1,n(lenOk),agi(googletts.agi,"You entered the following number",en)
1,n,SayDigits(${CBNUM})
1,n,Wait(1)
1,n,agi(googletts.agi,"Press 1 to confirm or any other digit to start
again.",en)
exten => 1,n,Read(CONF,beep,1,,2,5)
exten => 1,n,GotoIf($["${CONF}"="1"]?Store:Start)
exten
exten
exten
exten
=>
=>
=>
=>
1,n(Store),NoOp
1,n,Set(WHEN=${STRFTIME(${EPOCH},,%y%m%d-%H%M%S )}
1,n,Set(PARM=number=${CBNUM}&attrs=orgQ:400%2Cwhen:${WHEN})
1,n,Set(foo=${CURL(http://10.10.5.18:8080/wombat/api/calls/?
op=addcall&campaign=callback&${PARM})})
exten => 1,n,agi(googletts.agi,"Thank you! we will call you back as soon
as possible.",en)
exten => 1,n,Hangup
We use Google TTS as a voice synthesizer - you could use a different one or you could have the messages custom-recorded for you.
What our diaplan does is first to collect a 7-digit number, then read it back asking for confirmation and when confirmed, it sends it over to
WombatDialer on a campaign called "callback". Together with the number, we also store the code of the queue that the call was on and the
date and time this number was gathered. (Please note that in order to send multiple comma-separated parameters in the HTTP request, we
have to use %2C instead of the plain comma ",").
In order to configure WombatDialer:
• We create a trunk called "Trunk" with a dial-string of Local/9${num}@from-internal and a capacity of 10 lines. This
basically replies all numbers as if they were entered on a local extension prefixed by 9.
• We create an End-Point of type Queue for monitoring queue 401; set extension to "401" and context to "from-internal"; max number of
lines to 10; boost factor as 1 and max waiting calls to 2. This means that the number of calls placed will match the number of available
agents on queue 401.
• We create a campaign called "callback"; set it to Idle on termination and turn on QM_COMPATILE logging. We add the trunk and the
EP we just created. We create a set of reschedule rules in order to handle REJECTED, BUSY, INVALID and NOANSWER calls, e.g. by
retrying up to 5 times each waiting 10 minutes between each attempt. Note that we create no lists for this campaign.
60
A WombatDialer Cookbook
• We start the new campaign; having no numbers, it should immediately turn yellow on the Live page to tell you it’s idling.
If we start sending calls to the queue and we try and leave any numbers, we will see that a new list will be created on WombatDialer under
the name "callback/AUTO" and that will contain the numbers and attributes like:
Number:
5551235
Attributes:
orgQ:400
when:121115-153402
Those numbers are NOT immediately called, but WD will wait for some agent to be present and active on queue "401" so that they can
be called back. This way, the call-center manager can monitor the current call backlog and decide who and when it is to join the callback
queue.
Further improvements
• If there is a caller-id on the call, you could ask the caller whether to use it as the number to be called back
• You could add time limits to the WD campaign so that you are sure that no calls are made otside acceptable periods
6.7. Automated recall of lost inbound calls
If you run a call center, serving clients in a timely way is often very complex, as it requires having enough people available to handle traffic
spikes. The number of callers that disconnect because they have been waiting too long in a queue is then an important driver of the quality
of your work, and these frustrated callers are the focus of much attention and scheduling/planning efforts in all call centers. This is because
in a traditional setting doing inbound calling you basically had no other way of servicing the client but waiting for the person to call in.
With an Asterisk-based PBX and using digital lines, this scenario changes a bit, as:
• Your average caller has an associated caller-id that often matches a physical phone in their proximity
• Telephone traffic is very cheap compared to the cost of agent time for call handling
• You have ample means of programming the PBX to suit your exact needs
So it is now a conceivable scenario to improve the services you are offering by adding an automated call-back option, so that you search
the logs of lost calls and you actively schedule recalls on them in order to get back to people who hung up in frustration.
6.7.1. The plan: automatic queue recalls
In this article, we explain how to implement a basic call-back scenario using QueueMetrics and WombatDialer. What we do is very easy, as
in:
• We periodically run a script to gather the caller-ids of lost calls that were handled on a queue
• We check each caller-id as to be sure is a valid number
• We check that there is no subsequent successful call on the queue from the same caller-id (as to prevent recalling people who already
retried themselves)
• We schedule those calls for dialing no more than once per number per day
As our dialing schedule happens on a WombatDialer campaign, we can control the flow of calls through it by adding and removing agents
supposed to handle outbound traffic, or pausing it completely during periods of high inbound traffic.
6.7.2. Step 1. Configuring QueueMetrics
In order to gather information from QueueMetrics to an external script, we need to enable XML-RPC access credentials. This is usually
very easy to do, as QueueMetrics ships with a (disabled) ROBOT login that allows external access.
Enabling it is very easy: log in as an administrator, click on "Edit users", edit the "robot" user and set "Enabled" to yes. While you are at it,
take a second to change the default password.
6.7.3. Step 2. Configuring WombatDialer
Set up WombatDialer with a queue end-point (as described for example in Elastix Queue call-backs with WombatDialer Section 6.6,
“Elastix queue call-backs”) and make sure everything is working.
Create a new campaign for calling back people - set its "Idles on termination" property to yes and make the logging QueueMetricscompatible. This way the campaign can run until needed, waiting for more numbers to be added when idle. Do not add any call list as we
will load numbers to be called through the WombatDialer APIs.
Before you start scheduling recalls, your campaign should look like the following one:
61
A WombatDialer Cookbook
You might also want to pause it, so you can decide when to run it.
6.7.4. Step 3. The script
Scripting QueueMetrics and WombatDialer is really easy. It can be done in any language - we chose PHP as it is well known, has good
XML-RPC support to query QueueMetrics and is very simple to edit and customize.
We created a sample script that can easily be downloaded from GitHub - as you will likely edit this to suit your needs, feel free to fork a new
project and work on that. Our script is available from https://github.com/Loway/WombatDialerExamples in a folder named "AutoRecall".
The following parameters should be edited in the script:
$qm_server = "10.10.5.11";
$qm_port = 8080;
$qm_webapp = "queuemetrics";
$qm_login ="robot";
$qm_pass = "robot";
These parameters specify the XML-RPC connector of your QueueMetrics instance.
$wbt_url = "http://10.10.5.18:8080/wombat";
$wbt_cmp = "c1";
These parameters specify the URL of WombatDialer and the campaign that calls should be added to. The dialer must be running when the
calls are added and the campaign should be active (usually IDLE). Note that the campaign you use for call-back might be paused so that
call-backs are actually deferred during periods of high activity.
$queue = "300";
$lookback = 3600 * 8 ; // in seconds
$allowedPatterns = array(
"/^555..../",
"/^0041.+/"
);
These parameters decide which set of queue(s) should be scanned and how long is to look back for the current day. Multiple queues can
be used, separated by the pipe character.
The last parameter is a set of regexps that will be used to check the numbers read from QueueMetrics. At least one regexp must match for
the number to be queued. This is used to avoid queueing invalid numbers or - worse - malicious numbers.
6.7.5. Step 4. Putting it all together
In order to run the script periodically, you could crete a cron jub that runs it every 20 minutes. As number are never recalled more than once
and the script keeps an history files of numbers already dialed, you can safely run it over and over again.
Once tested, a crontab entry like the following one will automate the running:
*/20 * * * * /usr/bin/php /root/WombatDialerExamples/AutoRecall/autoRecall.php
This is how a simple run looks like - the scripts logs its activity to STDOUT, so you may want to redirect it to some log file for the keeping.
$>php autoRecall.php
Finding applicable period
Loading call log file for 2013-01-24
Looking for data between 2013-01-24.07:54:33 and 2013-01-24.15:54:33
on server '10.10.5.25' - queues '300'
62
A WombatDialer Cookbook
Query took 0 seconds.
# 201 - Last call lost @ 2013-01-24.15:46:39 - Scheduling.
Adding 201 to campaign c1 on WombatDialer.
Saving call log
After running this, you should see that new numbers are added to an AUTO call list like the one shown in the following screenshot; and if
the campaign is not paused and agents are availble on the recall queue, calls will be dialed as needed.
6.7.6. Improving the solution
In order to run this solution in a real-life scenario, you should edit the campaign in order to:
• set up a time window that matches your agents' presence and when it is customarily allowed to recall. For example, even if a call is
queued at 11 PM on a Saturday night, a recall might be acceptable only on Monday morning. This of course depends on what you are
doing and the local customs.
• set up reschedule rules in order to handle calls unanswered and busy lines correctly. It would be too bad not to be able to recall just
because the caller’s phone was busy at the moment
• it could also be useful to connect the caller to a reverse-IVR first, so that they get a message like "Hello, we are calling you back because
of your call made at 10.30AM. If you’d like to talk to one of our agents, please press 1 now" before being routed to an agent
• a simple addition that could be made to the script would be to set up a minimum wait time to qualify calls; that is, you would recall only
people who waitied in queue for more than 10 seconds.
• using a technique very similar to the one explained here, it would be trivial to set up campaigns for quality assessment or customer
satisfaction, run as reverse IVRs.
6.8. Preview dialing with QueueMetrics, Elastix and SugarCRM
Preview dialing is a type of reverse dialing where the agent has a chance to "preview" the number that is to be called before actually having
a call placed.
The way it works is:
• The agent logs on to a queue. WombatDialer uses the queue (as it usually does in Reverse dialing modes) to know which agents are
available. This makes integration with QueueMetrics very easy.
• The agent asks WombatDialer for a number to call. WombatDialer gets the next number out - considering all its dialing and reschedule
rules - and reserves it for the agent.
• The agent uses a GUI where they can see the number to be dialed and typically embeds, or links to, an external CRM app so that they
can review the call
• When the agent is ready, they ask for the call to be either placed or skipped.
• If the call is to be placed, the agent is connected immediatately and listens to Music on Hold until the callee is on line
• If the call is not to be placed, it is maked with a special code
• Reschedule rules apply - so error states are handled correctly
6.8.1. Step 1: Installing Elastix
In order to run this tutorial, we install a brand-new Elastix 2.4 system. On it we create:
• Three SIP extensions: 300, 301 and 302. We will use 302 as the agent extension while 301 and 300 will be used as sample end-points
• One queue, called "400", to hold our agent. Note that calls will NOT be processed through the queue but we will use the queue to keep
track of which agents are available. When defining it, we make sure that we set: "Ring Strategy: rrmemory" - "Event when called: yes" "Member status: yes" so that WombatDialer can fully observe it.
6.8.2. Step 2: Installing WombatDialer
We install WombatDialer on the Elastix system using yum. When we log in, we create:
63
A WombatDialer Cookbook
• An Asterisk server that can talk to Elastix. We can use the AMI user "admin" with the default password you gave during the system
installation.
• A trunk named named "Trunk", which dial string will be Local/${num}@from-internal
• An end-point of type QUEUE, which name is "400" (so that it observes queue 400), located at extension "400" context "frominternal" (this is not really needed if you run only reverse campaigns), setting both "Reverse dialing: yes" and "Manual preview: yes"
• We create a list called "Numbers" and leave it blank for now
• We create a campaign called "Reverse", which has logging set as "QM_COMPATIBLE" and which logging code is "400". We add to it the
trunk, the EP and the list we just created.
Now we go to the list manager and upload the following list:
300,NAME:John
301,NAME:Mike
This tells WD to dial numbers 300 and 301, and sets a NAME attribute for each call (that will be useful when previewing).
6.8.3. Step 3: Installing and configuring QueueMetrics
Install QueueMetrics on the same machine as the Elastix system by typing:
yum install queuemetrics-espresso
Now log in into QM and configure:
• An agent called agent/302
• A user for agent 302 called "agent/302" password "999" class "AGENTS"
• A general monitoring queue called "400". Set agent/302 in the MAIN level of that queue.
Now edit the "System parameters" and edit the section realtime.agent_button_1 as follows:
realtime.agent_button_1.enabled=true
realtime.agent_button_1.caption=Wombat
realtime.agent_button_1.url=http://10.10.5.30:8080/wombat/agents/rd_pop.jsp?agent=SIP/[a]
Edit the public IP of your Elastix server and replace the "10.10.5.30" address above.
This code links to an instance of SugarCRM on 10.10.5.31. On it, create a contact named "John" which telephone number is "300" and one
contact named "Mike" which telephone number is "301". You can link to any other CRM software that has a web-based interface just the
same way.
6.8.4. Making it all work together
• Log "agent/302" into QueueMetrics and have him join queue 400 on extension "302". Note that we are using Hotdesking - the agent logs
into Asterisk with their SIP extension.
• Start the dialer. From the Live page, start the campaign "Reverse". No calls will be placed.
• Check the dialer status. You should see WombatDialer observing queue 400 and finding "SIP/302" logged on. Try pausing and
unpausing the agent and refreshing the dialer: the status of SIP/302 should change accordingly.
Now click on the button called "Wombat" from the Agent’s page. You should see a preview panel like the one in the picure:
As you can see the SugarCRM panel is displaying the right record.
the first time you call the page, SugarCRM might ask you to log in. Do it and refresh the page.
64
A WombatDialer Cookbook
If you look at the Live page on WombatDialer, the call should appear as "Reserved". When the agent clicks on Dial, the call should start.
Once the agent answers, your dialer will try and connect the other extension.
When dialing, the Live page will show what is going on:
And the same thing will happen on the Agent’s page:
Nice work, isnt’t it? :)
6.8.5. Improving the solution
• You can add PSTN numbers to your lists and the will be dialed as if the had been entered on a local extension.
• If you want WombatDialer to dial without waiting for an agent decision, just remove the "Manual preview" check and restart the dialer.
• If you want a customized preview panel, you can create one by using the WombatDialer API.
65
Chapter 7. Administering WombatDialer
7.1. Installing
WombatDialer is easily installed using yum or it can be installed manually. It can be installed on the same server as Asterisk is (for small
systems or testing) but on larger production systems we recomment that it should be installed on a dedicated system (even a virtual
machine will do).
WombatDialer can share a Tomcat instance with QueueMetrics for smaller systems (up to 50 agents/50 lines) but it should be really
installed on a separate machine for larger systems, as it might use large quantities or RAM and CPU.
WombatDialer can also be easily deployed using Docker, as explained in Docker installation Section 7.1.5, “Installing on
Docker”. This is perfect for installing a test system; and although currently experimental, we have run real-life workloads on
it.
7.1.1. Installing using yum
On a CentOS or derived Linux distribution, just run the following commands:
wget -P /etc/yum.repos.d http://yum.loway.ch/loway.repo
yum install wombat
This will in turn:
• install Java
• install Tomcat
• install MySQL server (if missing)
• download the MySQL driver
• install the dialer
7.1.2. Manual installation
You can install WombatDialer within any working servlet container version 2.5 or newer. You will also need a working MySQL server. Any
recent version of Apache Tomcat will do - we strongly suggest using a Sun JDK.
• Download the latest version of WombatDialer as a .tar.gz package from the website
• Unpack the file in your servlet containers’s webapps directory and rename the folder to "wombat"
• Download the MySQL Connector/J jar file and add it under the WEB-INF/lib/ folder
• Restart your servlet container
Example: manual installation on Debian / Ubuntu
The following example was tested on an Ubuntu 12.10 system.
First make sure you are running your shell as as root.
First install Sun’s JDK - WD should also work with OpenJDK.
add-apt-repository ppa:webupd8team/java
apt-get update
apt-get install oracle-java7-installer
Install general dependencies: Apache Tomcat, the MySQL Connector/J package, MySQL server and client.
apt-get
apt-get
apt-get
apt-get
install tomcat7
libmysql-java
install mysql-server
install mysql-client
Make sure you can connect to MySQL as root by issuing mysql -uroot -p mysql. You need to know the default MySQL
password in order to install the database. If you do not know the root password for MySQL, you can reset it manually by following the
instructions at: http://ubuntu.flowconsult.at/en/mysql-set-change-reset-root-password/
66
Administering WombatDialer
We are now ready to proceed with the installation - you will likely need to edit the download URL for the WombatDialer package:
cd /var/lib/tomcat7/webapps
wget http://www.wombatdialer.com/download/Wombat-trunk-0.6.4-441.tar.gz
tar zxvf Wombat-trunk-0.6.4-441.tar.gz
mv Wombat-trunk-0.6.4 wombat
cd wombat/WEB-INF/lib/
cp /usr/share/java/mysql-connector-java.jar .
service tomcat7 restart
Now connect to http://127.0.0.1:8080/wombat and follow the on-line wizard to create the database.
7.1.3. On installation complete….
When installation is done, connect to http://myserver.address:8080/wombat - you will be asked for the MySQL root
password to create a local database When done, login using as user demoadmin password demo.
WombatDialer ships with a free demo key that lets you use up to two lines - no limit on the number of calls you make. You may want to get
a free demo key so you can run a full evaluation of the software in a real-life scenario.
License keys can be installed from the License page Section 4.6, “The License page” as soon as you log in.
7.1.4. Configuring e-mail
If you plan to use e-mail notifications, you should edit the tpf.properties file to tell WD about your SMTP servers and the e-mail
address it is supposed to use.
SMTP_HOST=smtp.gmail.com
SMTP_PORT=587
SMTP_AUTH=yes
[email protected]
SMTP_PASSWORD=wombat
SMTP_USE_SSL=no
SMTP_FROM="WombatDialer" <[email protected]>
SMTP_DEBUG=yes
As e-mail sending happens on the notification thread, a very slow SMTP server might delay HTTP notifications. In this case, we suggest
setting up a local SMTP relay that will immediately accept e-mail and will forward it to the "true" SMTP host.
We suggest leaving SMTP_DEBUG on during the initial setup as it writes a verbose log of all SMTP activity on the logs and lets you spot
errors and issues quickly.
7.1.5. Installing on Docker
Docker is an open-source project that automates the deployment of applications inside software containers, by providing an additional layer
of abstraction and automation of operating system-level virtualization on Linux.
When you have Docker installed, starting a temporary instance of WombatDialer is as simple as typing:
docker run -p 8080:8080 -d loway/wombatdialer
This will download the current WombatDialer (already pre-configured for you) and will run it by exposing it on the local port 8080.
The problem with this approach is that when the image is terminated, all data is lost.
A better approach would be to create a data-only container to store the data. At this point, every time you start WombatDialer, it looks for its
own data into the data-only container.
You start by creating a named data-only container:
docker run --name=MYWBT loway/data true
At this point, you can run WombatDialer using that container, as in:
docker run --volumes-from MYWBT -p 8080:8080
-d loway/wombatdialer
WombatDialer will recognize whether the data container is blank and will initialize it properly. The container also monitors the health of the
running WombatDialer process and will restart it as needed.
If you prefer, you may use a local folder instead of a data-only container, as in:
67
Administering WombatDialer
docker run -v /root/WBT1DATA:/data -p 9090:8080 -d loway/wombatdialer
This command mounts the local folder /root/WBT1DATA for WombatDialer to store its data in, and - for a change - will expose
WombatDialer on port 9090.
You can also control the local time-zone and the amount of memory used, by passing them as parameters when starting up the image:
docker run -e CFG='{"memory":400,"timezone":"GMT"}' -p 8080:8080 -d loway/wombatdialer
When you need to upgrade WombatDialer - you simply stop the current image and start a new one using the same data container. Your
dialer is updated!
7.2. Upgrading
Upgrading WombatDialer is meant to be very easy - it is in any case worthwhile to make a complete backup (see below) before attempting
an upgrade. If you run WombatDialer on a virtual machine, the easiest way might be taking a snapshot of the whole box before attempting
the upgrade.
Before attempting an upgrade, always make sure that no calls are in progress and that the dialer is turned OFF. If you have
running campaigns, you should pause them and wait for relevant calls to terminate.
7.2.1. Upgrading via yum
If you originally installed via yum, this should be enough:
yum update wombat
System settings should be automatically transferred.
When the update is complete, on the first connection you might be asked to upgrade the database - the dialer will not start until the
database is up to date. Database upgrades will be applied automatically.
7.2.2. Manual upgrade
• Stop the servlet container
• Download the latest version of WombatDialer as a .tar.gz package from the website
• Move the current "wombat" webapp to a storage place (do not delete it!)
• Unpack the file in your servlet containers’s webapps directory and rename the folder to "wombat"
• Download the MySQL Connector/J jar file and add it under the WEB-INF/lib/ folder
• Copy the tpf.properties file from the old wombat webapp to wombat/WEB-INF
• Restart your servlet container
When the update is complete, on the first connection you might be asked to upgrade the database - the dialer will not start until the
database is up to date. Database upgrades will be applied automatically.
7.3. Starting and stopping
If you installed using yum, you should be able to run:
/etc/init.d/qm-tomcat6 stop
/etc/init.d/qm-tomcat6 start
to stop and start the Tomcat servlet container and thence WombatDialer.
If you installed manually, see the user manual for your servlet container.
Before stopping, always make sure that no calls are in progress and that the dialer is turned OFF. If you have running
campaigns, you should pause them and wait for all relevant calls to terminate. If not, those calls will end up in status LOST.
7.3.1. The dialer status at startup
The dialer will usually start automatically when the webapp is loaded. Exceptions to this behavior happen if:
68
Administering WombatDialer
• WombatDialer was updated and the database required updating. In this case the dialer will be turned off until manually activated.
• There is no valid license installed.
If you prefer to avoid the dialer starting automatically, you can do this by creating a flag file called 'donotstart' to be placed under WEB-INF,
like e.g.
touch ./WEB-INF/donotstart
In order to revert to the previous behavior, simply remove the flag file.
7.4. Backing up
All the information WombatDialer requires to run is contained withn the wombat MySQL database. Backing it up should suffice in most
cases.
If you use a different database that the defsult MySQL on localhost, then you need to back-up the file wombat/WEB-INF/
tpf.properties that contains the database connection information.
For ease of recovery, you may also want to back up the whole "wombat" webapp.
7.5. Logs and logging
User-serviceable logs are available on the syslog viewer page. This tracks errors, agent logins, campaign activity and many common userfacing conditions.
A log of severe errors is also held in the Tomcat logs directory, usually with file names of the format wombat.2013-01-05.txt or similar.
This behavior can be customized by editing the file WEB-INF/classes/logging.properties in the WombatDialer webapp.
org.apache.juli.FileHandler.level = SEVERE
org.apache.juli.FileHandler.directory = ${catalina.base}/logs
org.apache.juli.FileHandler.prefix = wombat.
java.util.logging.ConsoleHandler.level = SEVERE
java.util.logging.ConsoleHandler.formatter = java.util.logging.SimpleFormatter
You can turn off logging by setting the logging level to NONE, or create extra-detailed and huge logs by setting the log level to FINE.
An extensive tutorial on Tomcat logging can be found at http://wiki.apache.org/tomcat/Logging_Tutorial
Please note that running very detailed logs on a production system may create huge files and may render the system
unusable by generating too many I/O requests.
7.6. Troubleshooting a running instance
Problems with a WD instance are usually either on the Java side or on the database side. We present a few useful techniques to gather
important data to be sent over for inspection.
7.6.1. Creating a thread dump
In order to diagnose problems with WombatDialer, it may be needed to take thread dumps by running:
/etc/init.d/qm-tomcat6 threaddump > dump_2013-01-18.txt
These dumps prints what the threads are doing at a point in time. It may be worthwhile to take multiple ones, a few minutes apart from each
other.
7.6.2. Creating a heap dump
On request, you may need to create a heap dump. This is a large file containing the full contents of the live JVM.
[root@wombat1 ~]# /usr/local/queuemetrics/java/bin/jps
1900 Jps
30808 Bootstrap
The line containing Bootstrap contains the PID of the Java VM running Tomcat.
69
Administering WombatDialer
[root@wombat1 ~]# /usr/local/queuemetrics/java/bin/jmap -F -dump:live,format=b,file=heap.
Attaching to process ID 30808, please wait...
Debugger attached successfully.
Server compiler detected.
JVM version is 17.1-b03
Dumping heap to heap.bin ...
Finding object size using Printezis bits and skipping over...
Finding object size using Printezis bits and skipping over...
Finding object size using Printezis bits and skipping over...
Finding object size using Printezis bits and skipping over...
Finding object size using Printezis bits and skipping over...
Heap dump file created
The resulting file (called heap.bin as specified on the command line) might be very large and it might take a while to create on busy
systems with large Java heaps.
Before sending the file over it is better to compress it:
[root@wombat1 ~]#
-rw-r--r-- 1 root
[root@wombat1 ~]#
[root@wombat1 ~]#
-rw-r--r-- 1 root
ls -l heap.bin
root 40779016 Jan 10 08:45 heap.bin
bzip2 heap.bin
ls -l heap.bin.bz2
root 8055474 Jan 10 08:45 heap.bin.bz2
7.6.3. Logging all MySQL queries
Edit the my.cnf file (usually in /etc/mysql/my.cnf). Look for the section called "Logging and Replication".
#
# * Logging and Replication
#
# Both location gets rotated by the cronjob.
# Be aware that this log type is a performance killer.
log = /var/log/mysql-all-queries.log
Just uncomment the "log" entry to turn on logging. Restart MySQL with this command:
service mysql restart
7.6.4. Logging of "slow queries" in MySQL
Edit file my.cnf and add the following parameters:
[mysqld]
log-slow-queries=/var/log/mysql-slow-queries.log
long_query_time = 2
log-queries-not-using-indexes
This will log all queries taking more than two seconds or running without a defined index to the slow queries log.
Then restart MySQL.
70
Chapter 8. API reference
8.1. Controlling Asterisk from WD
When a call is originated in Asterisk, a set of channel variables are created:
• WOMBAT_ID is a unique identifier of the call being processed
• all input attributes are passed to the call
This way, all attributes you set for the call are immediately available within the Asterisk dialplan.
For example, if you define input attributes called HH and MM in WD, you can use them in the dialplan to synthesize an audio message as
in the following example:
exten => s,n(start),agi(googletts.agi,"Your appointment with the dentist
is for tomorrow at ${HH} ${MM}")
8.2. Controlling WD from Asterisk
WD lets you pass information about a call that is currently processed in Asterisk in the form of User Events. This lets you set the
completion code for the call and any additional parameters, e.g. IVR responses, right from the Asterisk dialplan.
8.2.1. Format of User Events
User events are triggered through the dialplan through the UserEvent Asterisk application.
They are used to:
• Set the completion code for a given call
• Store additional outbound attributes on the call in WD
8.2.2. Triggering a user event
You can esily trigger User Events by calling the Asterisk dialplan like:
exten => s,n,UserEvent(name,Uniqueid:${UNIQUEID},P0:parm1)
or
exten => s,n,UserEvent(name,Uniqueid:${UNIQUEID},P0:parm1|P1:parm1)
In case you want to pass two parameters.
The event name is not case sensitive.
8.2.3. Setting call status codes
In order to set the extended status (completion code) of a call, you should trigger an UserEvent like:
exten => s,n,UserEvent(CALLSTATUS,Uniqueid:${UNIQUEID},V:XXX)
This sets the completion code for the current call to XXX. If multiple completion codes are received for the same call, the last one wins.
Completion codes are then used by WD’s Reschedule Rules in order to decide what to do with the call.
8.2.4. Output call variables
You can set an output attribute for the current call by running:
exten => s,n,UserEvent(ATTRIBUTE,Uniqueid:${UNIQUEID},name:value)
This will create an attribute called "name" with value "value". If the same attribute altready exists, it is replaced.
As an alternative, you can append values to an existing attribute, like:
exten => s,n,UserEvent(ATTR_APPEND,Uniqueid:${UNIQUEID},name:value)
This will append the value "value" to the current value of attribute "name"; if the attribute is not present, it will be created with value "value".
This makes it easy to to track the traversal of IVR trees.
71
API reference
You may also want to clear all output attributes (but of course not input ones) of a call by issuing:
exten => s,n,UserEvent(ATTR_CLEAR,Uniqueid:${UNIQUEID})
Please note that:
• Attributes are per number; so if you call the same number multiple times, its attributes will be the last ones used.
• All attributes are text strings
• A call may have an unlimited number of attributes
It is possible to set status and attributes from the HTTP interface as well.
8.3. Controlling WD over HTTP
WD is built so that it can be controlled externally by an external script.
In the following examples, we assume that WD is running at address http://127.0.0.1:8080/wombat
It is important to notice that the /' before the question mark in the following examples is mandatory - if not present you will get an HTTP
error 404.
Though the examples below display HTTP GET requests, the APIs work as well with HTTP POST calls.
8.3.1. Calls
Add a call to a campaign
This methods lets you add a call to a campaign that is either running or idling.
http://127.0.0.1:8080/wombat/api/calls/?op=addcall&campaign=ABC&number=45678
You can queue calls for the future by adding a reschedule attribute, either as an offset in seconds (positive integer) or an absolute date
having the format YYYY-MM-DD.HH:MM:SS.
schedule=15
schedule=2012-03-18.00:00:00
You can also set multiple attributes, as in:
attrs=ID:2301,PERS:John_Doe
If you add the same number multiple times, it will be dialed multiple times.
Set extStatus and attributes on a live call
While a call is being dialed, it is possible to set a user event externally in a manner that exactly matches normal UserEvents. The important
difference is that you do not need the UniqueID but the WombatID.
Set a call’s extStatus to XY:
http://127.0.0.1:8080/wombat/api/calls/?op=extstatus&wombatid=123456&status=XY
Create or set attribute AB to value CD:
http://127.0.0.1:8080/wombat/api/calls/?op=attr&wombatid=123456&attr=AB&val=CD
Append string EF to the current value of attribute AB:
http://127.0.0.1:8080/wombat/api/calls/?op=attrAppend&wombatid=123456&attr=AB&val=EF
Remove all outbound attributes for this call:
http://127.0.0.1:8080/wombat/api/calls/?op=attrClear&wombatid=123456
This API works as well for closed calls; so you can set extStatus and variables on calls that are already terminated. The most important
limitation when doing so is that any Reschedule or Disposition Rules that would have been triggered by if the call had had the correct
extStatus on termination are NOT triggered.
72
API reference
8.3.2. Campaigns and runs
Start a new run with an existing campaign
This call starts a new run an existing campaign; if the campaign is not startable (e.g. because it is already running) the call is ignored.
http://127.0.0.1:8080/wombat/api/campaigns/?op=start&campaign=ABC
Pause a running campaign
This call pauses a campaign that is running or idling; if no run is found in a suitable state the call is ignored.
http://127.0.0.1:8080/wombat/api/campaigns/?op=pause&campaign=ABC
Unpause a running campaign
This call unpauses a run that is currently paused, when unpaused it may start dialing or keep on idling or start waiting for a correct time to
place calls.
http://127.0.0.1:8080/wombat/api/campaigns/?op=unpause&campaign=ABC
Clone a campaign
http://127.0.0.1:8080/wombat/api/campaigns/?op=clone&campaign=xx&newcampaign=yy
This will clone existing campaign named ABC to a new one named DEF. It will clone only the campaign definition, so no activity statistics just like if you were to create a new one from the GUI. After cloning, you’ll have to start the campaign run.
Add an existing list to a campaign
This call lets you add a list to an existing campaign (usually on a cloned one). It will not work on running campaigns as they will not pick-up
the new configuration until restarted.
http://127.0.0.1:8084/wombat_script/api/campaigns/?op=addList&campaign=QMS2&list=ZEB_3
Query current calls and recalls for runs
This call lets you query the state of ready and deferred calls for a given run or set of runs. Calls scheduled for the future are split into
"reschedulingSoon", that is calls that are either immediately reschedulable or will become so within a short time limit (by default 5 minutes)
and "reschedulingLater". The limit on which they are to be separated can be set by the user.
http://127.0.0.1:8084/wombat_script/api/recallinfo/
The method accepts the following parameters:
• campaign is a substring to be searched in a campaign’s name. If missing, all runs will be shown.
• late_reschedule is the time limit - in seconds - that separates "soon" to be rescheduled calls from "late" reschedules. Default is 300.
The resuslt shows all calls ready to be run (as they are in the hopper) and all live calls, split by status; plus all recalls scheduled for the run.
The output looks like the following one:
{
"runs" : [ {
"campaignName" : "ABC-3.15-fixed",
"runName" : "15.03.25 16:18:36",
"runId" : 123,
"callsInHopper" : 10,
"callsByState" : {
"IN_HOPPER" : 10
},
"reschedules" : 0,
"reschedulingSoon" : 0,
"reschedulingLater" : 0
}, {
"campaignName" : "ABC Mexico",
"runName" : "15.04.02 14:39:49",
73
API reference
"runId" : 124,
"callsInHopper" : 134,
"callsByState" : {
"IN_HOPPER" : 134
},
"reschedules" : 257,
"reschedulingSoon" : 254,
"reschedulingLater" : 3
} ],
"reschedule_late_limit_sec" : 300
}
8.3.3. Call lists
Add numbers to a list
This call adds the numbers passed in numbers to the call list ZEB_2 - if it does not exist, it will create it. Numbers are a pipe-separated list
of numbers and optional attributes.
http://127.0.0.1:8084/wombat_script/api/lists/?op=addToList
&list=ZEB_2&numbers=1234,AA:bb,CC:dd|5678,XX:yy
If you set the parameter dedupe=1 then numbers will be checked for existance on this this list before being added. This requires a
significant database load, so use with caution on a running system where lists are over 10,000 elements each. Numbers are considered to
be existent if they are present on the list no matter what their attributes might be.
It is very common to use HTTP POST to add numbers, so that you can upload a large set at once. The maximum request size depends on
your servlet container, but is usually in the order of 1-2 megabytes.
8.3.4. Preview dialing
You can control Preview Reverse dialing through the API. A somewhat simpler alternative may be using the Preview page Section 5.5.1,
“Using the agent’s page for preview dialing”.
Reserve a call
In order to reserve a call, you should call WombatDialer by issuing a request like the following:
http://localhost:8084/wombat_script/api/reserve/?op=reserve&agent=SIP/302
It is of paramount importance that the agent parameter matches an agent code as present in Asterisk.
If all goes well, the reply is like:
OK: OK
WOMBATID: 366253628
NUMBER: 301
VAR: A=1
VAR: B=2
You should make a note of the WOMBATID as it will be used in subsequent calls. If you call this API multiple times, the same call will be
returned as long as the agent has one reserved call.
Error codes include:
• AGENT_NOT_AVAILABLE: The agent is not present, or is busy o paused
• AGENT_CANNOT_RESERVE: No available call for the agent
Place a reserved call
In order to place a reserved call, you need to feed Wombat its WOMBATID:
http://127.0.0.1:8084/wombat_script/api/reserve/?op=dial&id=123456
Returns
• DIALING: the call is being placed
• ID_NOT_FOUND: No such ID
74
API reference
• ID_FOUND_WRONG_STATE: The ID exists but the call is in a wrong state
Skip a reserved call
In order to skip a reserved call, you need to feed Wombat its WOMBATID:
http://127.0.0.1:8084/wombat/api/reserve/?op=skip&id=123456&withStatus=XXX
The parameter "withStatus" is optional and that will be the extStatus for the call being skipped. You can use this to get fine control on
whether it is to be rescheduled and how.
Returns:
• SKIPPED: the call was skipped
• ID_NOT_FOUND: No such ID
• ID_FOUND_WRONG_STATE: The ID exists but the call is in a wrong state
8.3.5. Live call details
You can get the details of a currently live or scheduled call.
http://127.0.0.1:8084/wombat/api/callinfo/?wid=WBT.1234
The parameter "wid" contains the WombatId. It can contain a prefix "WBT" as it is logged on QueueMetrics logs or it can be without it. As
an alternative, you can pass the parameter "unqid" that contains an Asterik’s UniqueID for the call.
The method will:
• look for the call on the Live calls table (returns "isLive" as true)
• look for the call in the logs (returns "isLive" as false)
Wombat will return a JSON data structure of the format:
{
"callFound" : true,
"isLive": true,
"callRecord" : {
"callId" : 418760,
"listId" : {
"listId" : 95,
"name" : "Z7_04142015",
"isHidden" : false,
"securityKey" : ""
},
"number" : "9377893386",
"attributes" : [ {
"isInput" : true,
"attrName" : "FIRST NAME",
"attrValue" : "KATRINA"
} ]
},
"call" : {
"hopperCallId" : 212783745,
"number" : "9377893386",
"numberId" : 418760,
"state" : "IN_HOPPER",
"trunk" : "ABC Trunk",
"astServer" : "ABC",
"trunk_size" : 40,
"endpoint" : "QUEUE Zebra Seven",
"campaignRun" : "Z7_1210 15.04.16 12:22:57",
"tst_originate" : 0,
"tst_connect" : 0,
"tst_terminate" : 0,
75
API reference
"astUnique" : "",
"astChannel" : "",
"nRetry" : 0,
"statusExt" : "",
"subEp" : "SIP/21071",
"bridgedChan" : ""
}
}
The most important items are:
• callFound: whether a call with the ID was found or not
• isLive: whether the returned result comes from a live call or from the logs (completed call)
• call: the curret details of the live call
• callRecord: the details of the number being called - its current attributes and the list it belongs to.
8.3.6. System health
It is possible to receive a JSON structure with general information about the system. It is meant to be used by external monitoring systems
that need to make sure WombatDialer is working.
http://127.0.0.1:8084/wombat_script/api/sysup/
The response will be similar to the one below:
{
"state" : "WBTUP",
"ramFreeMb" : 73,
"ramTotalMb" : 139,
"ramMaxMb" : 1818,
"db_access_ms" : 4,
"generatedOn" : "Mon Sep 29 16:04:00 CEST 2014",
"version" : "0.8.0/#1234"
}
When this transaction is run, the database is accessed to make sure it is available. If the response block does not contain the string
"WBTUP" the dialer is supposed to be down and in need of a restart.
8.4. The JSON configuration API
WombatDialer exposes a JSON configuration API that lets you fully configure WombatDialer - as you would through the GUI - using a
JSON API. This makes it easy to deploy multiple instances of Wombat for very large systems handing thousands of channels at once. It
also lets you configure campaigns to be run programmatically.
8.4.1. General concepts
JSON API requests can be of four kinds:
• LIST: returns a paged list of objects. You can tell Wombat the page you want to read by specifying a start offset and an expect result
size. Plus, you can optionally send along a filter parameter that will be used to further refine the results.
• EDIT: you push a JSON object to be added to the Wombat database. If you define a primary key for the object, the object will be
updated; if the key is empty (as set to JSON null) then the object will be added. A basic sanity check will be performed on inserts and
updates. The result of an update is typically the first page of results.
• DELETE: The JSON object will be deleted. The object must include a primary key to tell Wombat which object is to be deleted.
• MOVE UP/DOWN: on some lists (e.g. reschedule rules) it is possible to move an object up or down in the list.
You specify the operation that is to be performed by passing the following parameters:
• mode: shall be L for list, E for editing, D for delete, MU and MD to move the object up and down. If not specified, listing is assumed.
• data: the JSON object itself. This is not needed when listing.
• parent: some objects depend on other objects being selected first (see the description of dependent objects below). This is the primary
key of the main object that holds those sub-objects.
76
API reference
• from: the beginning of the list to be returned. If missing, zero is assumed.
• items: the maximum number of items to be returned. If missing, 100 is used.
• query: a string that is to be searched in text fields. Depends on the object - this behaves like the search boxes you see on the GUI.
• For any JSON query, you need to send Wombat an active user who holds the grants to perform the required operation, passing it as a
Basic HTTP authentication.
For example, the following query lists available trunks through the popular curl command-line HTTP client:
curl
--user demoadmin:demo -i -X POST "http://127.0.0.1:8080/wombat/api/edit/trunk/?mode
The result will be something like:
{
"status" : "OK",
"error" : "",
"results" : [ {
"sys_dt_creazione" : "2015-03-18 17:02:46",
"sys_user_creazione" : "Demo Admin",
"sys_dt_modifica" : "",
"sys_user_modifica" : "-",
"trunkId" : 1,
"astId" : {
"sys_dt_creazione" : "2015-03-18 17:02:29",
"sys_user_creazione" : "Demo Admin",
"sys_dt_modifica" : "2015-03-23 15:49:45",
"sys_user_modifica" : "Demo Admin",
"id" : 1,
"description" : "Asterisk Server",
"ipAddress" : "127.0.0.1",
"login" : "hello",
"password" : "kitty",
"port" : 5038,
"unit_len" : 50,
"msg_per_unit" : 5,
"securityKey" : "",
"state" : "DOWN"
},
"name" : "My Trunk",
"dialstring" : "Local/${num}@from-internal/n",
"capacity" : 10,
"securityKey" : ""
} ],
"allResults" : 1,
"startFrom" : 0,
"nRecords" : 1,
"timeMs" : 12
}
The JSON response always includes:
• a status that should be OK if all went well. If something went wrong, you will have a description in the error field (usually a Java stack
trace).
• a list named results that may include zero or more elements. These are the objects you are querying.
• an estimated size for all possible results to this query passed as allResults.
• the point in the list of results from where results are sent back (startFrom) and the amount of records on the current page (nRecords).
• how long the operation took on the server, expressed in milliseconds, as timeMs.
If you want to insert or upgrade an object, you first need to save it as a JSON entity. All objects specify a primary key that you must use
to make sure that the object stays the same during updates. Any access information - who created and updated the object, and when - is
updated automatically.
77
API reference
So to change the name of the previous trunk, you could create a file called newtrunk.json that contains:
{
"trunkId" : 1,
"astId" : {
"id" : 1
},
"name" : "NewName",
"dialstring" : "Local/${num}@from-internal/n",
"capacity" : 10,
"securityKey" : ""
}
Note that:
• We use the trunkId we were supplied by reading, as it is the primary key for this object.
• All user and timestamp information were removed. There is no harm in leaving it in, but it will not be used when updating.
• Any inner objects (like, in our example, the Asterisk server) will NOT be updated on the same query. It is safe to remove everything but
the primary key (in our case id), as the object will be loaded by primary key in order to be correctly associated. You cannot associate to
objects that are not existing at the moment the request is issued.
We can then push this new object by issuing:
curl
--user demoadmin:demo -i -X POST --data-urlencode [email protected] "http://127.0.
Please note that you can mix-and-match GET and POST parameters as you best see fit.
8.4.2. Working with dependent objects
Dependent object are objects that have a parent and that make no sense without specifying their parent. For example, reschedule rules
depend on a campaign and have no meaning outside of it. To work with a dependent object, you must specify the primary key of its parent,
like in:
curl
--user demoadmin:demo -i -X POST
"http://127.0.0.1:8080/wbt/api/edit/campaign/resc
The response will be like:
{
"status" : "OK",
"error" : "",
"results" : [ {
"rescheduleRuleId" : 1,
"status" : "RS_NOANSWER",
"statusExt" : "",
"maxAttempts" : 1,
"retryAfterS" : 120,
"mode" : "FIXED",
"idx" : "1",
"campaignId" : 1
} ],
"allResults" : 1,
"startFrom" : 0,
"nRecords" : 1,
"timeMs" : 18
}
Dependent objects always appear in the API "below" their main object, as in "/edit/campaign/reschedule/".
In order to insert a new rule for campaign #1, you would create a new entry like:
{
78
API reference
"rescheduleRuleId" : null,
"status" : "RS_NOANSWER",
"statusExt" : "",
"maxAttempts" : 1,
"retryAfterS" : 120,
"mode" : "FIXED",
"campaignId" : 1
}
and push it like:
curl
--user demoadmin:demo -i -X POST --data-urlencode [email protected] "http://127.0.0.1
Note that the primary key of the parent appears in both the object - as campaignId - and as parent in the JSON query.
If we want to move the object up (MU) or down (MD), we can edit the rrnew.json file to set the new rescheduleRuleId and:
curl
--user demoadmin:demo -i -X POST --data-urlencode [email protected] "http://127.0.0.1
And to delete it we would:
curl
--user demoadmin:demo -i -X POST --data-urlencode [email protected] "http://127.0.0.1
8.4.3. Using the JSON API in practice
• Issue a list query using the shell to see available objects and how they are represented.
• To create a new object, create it manually from the GUI and read it through JSON to see how it "looks like".
• The primary key for any object appears in the object definition
• When listing objects, always take advantage of paged queries if you think that there might be more than a hundred objects returned.
Reading and serializing thousands or tens of thousands of elements at once is not a good idea! On the other hand, returning hundreds of
thousands of objects, 500/1000 at a time, is usually safe. Remember that it is important to avoid running extremely expensive operations
that might impact the dialer itself by using too much CPU, contending the database or - worse - crashing the JVM by exhausting all of its
available RAM! So while it is hard to put general rules that depend on the kind of hardware you are running and on the current load, it is
always better to err on the side of caution.
• Objects are usually returned in descending order of insertion, so your shiny new object is typically the first one returned.
8.4.4. Available JSON APIs
The URL expressed in the table below are only the URL fragments that have to be appended to your WombatDialer API main URL - for
example, if the table lists asterisk as the fragment, the URL will be http://127.0.0.1:8080/wbt/api/edit/asterisk/ (note the mandatory trailing
slash).
Table 8.1. JSON API
URL fragment
Description
Primary key name
Depends on?
Moves Up/Down
Security key
asterisk
Asterisk servers
id
-
No
ADMIN
ep
End-points
epId
-
No
ADMIN
trunk
Trunks
trunkId
-
No
ADMIN
oh
Opening Hours
openingHourId
-
No
OPHR
campaign
Campaigns
campaignId
-
No
CAMP
campaign/ep
EPs on campaigns
-
Campaign
No
CAMP
campaign/trunk
Tks on campaigns
-
Campaign
No
CAMP
campaign/list
Lists on campaigns
cclId
Campaign
Yes
CAMP
campaign/reschedule Reschedule Rules
rescheduleRuleId
Campaign
Yes
CAMP
campaign/disposition Cmp. Dispositions
dispositionId
Campaign
Yes
CAMP
campaign/oh
Cmp. Opening Hours cohId
Campaign
Yes
CAMP
list
A call list
listId
-
No
LIST
list/record
Numbers on a list
callId
List
No
LIST
list/logs
Called numbers
id
List
No
LIST
79
API reference
Notes:
• OpeningHours are composite objects, so any inner rule is handled as a private JSON structure.
• Campaign EPs and Trunks are checked for uniqueness, as they do not have an inner order. Wombat will make sure that they cannot be
added more than once.
• A field named idx is used to track the position of items in a sorted list.
8.5. The JSON Live and Reporting API
The JSON live API lets you query the state of the system as seen from the Live and Reports page.
The following table shows a succint description of what is available.
URL fragment
Description
Result key
Depends on?
Security key
live/calls
Live calls
-
-
RT
live/runs
Active campaigns
-
-
RT
reports/runs
Runs for period
hoppercampId
from / to
REPORT
reports/stats
Stats for runs
-
id
REPORT
reports/logs
Logs for runs
-
id/from/items
REPORT
8.5.1. Live Calls
You can get a list of live calls and available campaigns by issuing:
curl
--user demoadmin:demo -i -X POST "http://127.0.0.1:8080/wombat/api/live/calls/"
The results includes:
• A list of possible campaigns, their IDs and whether they are running
• A list of live calls, under "hopperState"
For example:
{
"status" : "OK",
"error" : "",
"timeMs" : 9,
"result" : {
"requestId" : "",
"lockUntilComplete" : false,
"responseStatus" : "OK",
"responseMessage" : "",
"toPanel" : "API_CALL",
"responseLog" : null,
"campaigns" : [ {
"campaignId" : 1,
"name" : "My Campaign",
"isRunning" : true,
"secKey" : ""
} ],
"asterisks" : [ ],
"hopperState" : [ {
"hopperCallId" : 554418377,
"number" : "12345678991",
"state" : "DIALLING",
"trunk" : "MyTrunk",
"astServer" : "A44",
"trunk_size" : 10,
"endpoint" : "ep8",
"campaignRun" : "test 15.03.18 17:04:32",
"tst_originate" : 1427475059650,
80
API reference
"tst_connect" : 0,
"tst_terminate" : 0,
"astUnique" : "1427475059.7189",
"astChannel" : "Local/12345678991@wdtrunk-00000dcf;1",
"nRetry" : 0,
"statusExt" : "",
"subEp" : "",
"bridgedChan" : ""
}]
}
}
8.5.2. Live Campaigns
You can get information on Live campaigns by issuing:
curl
--user demoadmin:demo -i -X POST "http://127.0.0.1:8080/wombat/api/live/runs/"
The result includes an item called "campaigns" where you can see the live status:
{
"status" : "OK",
"error" : "",
"timeMs" : 2404,
"result" : {
"requestId" : "",
"lockUntilComplete" : false,
"responseStatus" : "OK",
"responseMessage" : "",
"toPanel" : "API_CALL",
"responseLog" : null,
"action" : "NONE",
"hopcampId" : 0,
"campaignId" : 0,
"campaigns" : [ {
"name" : "cccd",
"startedAt" : "15.03.18 17:04:32",
"campaignId" : 1,
"hoppercampId" : 2,
"priority" : 10,
"state" : "IDLE",
"n_calls_completed" : 0,
"n_open_retries" : 0,
"n_calls_attempted" : 0,
"n_est_remaining_calls" : 0,
"secondsSinceStarted" : 771835,
"listName" : "#0",
"listPos" : 0,
"timeDow" : "1234567",
"timeStartHr" : "000000",
"timeEndHr" : "235959",
"predictiveModel" : "OFF",
"boostFactor" : 1.0,
"dowAsString" : "Su | Mo | Tu | We | Th | Fr | Sa"
} ]
}
}
8.5.3. Reports: runs in period
This call gets you a list of runs (identified by their "hoppercampId") that were made in a specific period:
81
API reference
curl
--user demoadmin:demo -i -X POST "http://127.0.0.1:8080/wbt/api/reports/runs/?from=
Both the "from" and "to" parameters are mandatory.
The result is a list of runs:
{
"status" : "OK",
"error" : "",
"timeMs" : 69,
"result" : {
"requestId" : "",
"lockUntilComplete" : true,
"responseStatus" : "OK",
"responseMessage" : "",
"toPanel" : "API_CALL",
"responseLog" : null,
"dateFrom" : 946681200000,
"dateTo" : 1577833200000,
"campaignsAndRuns" : [ {
"name" : "test",
"startedAt" : "15.03.18 17:04:32",
"campaignId" : 1,
"hoppercampId" : 2,
"priority" : 10,
"state" : "RUNNING",
"n_calls_completed" : 91,
"n_open_retries" : 109,
"n_calls_attempted" : 91,
"n_est_remaining_calls" : 9911,
"secondsSinceStarted" : 782167,
"listName" : "appero",
"listPos" : 0,
"timeDow" : "1234567",
"timeStartHr" : "000000",
"timeEndHr" : "235959",
"predictiveModel" : "OFF",
"boostFactor" : 1.0,
"dowAsString" : "Su | Mo | Tu | We | Th | Fr | Sa"
} ]
}
}
8.5.4. Report: stats for runs
This call runs statistics for a set of runs, identified by the parameter "id" that cna be present multiple times.
curl
--user demoadmin:demo -i -X POST "http://127.0.0.1:8080/wbt/api/reports/stats/?id=1
The result is a set of stats by call type:
{
"status" : "OK",
"error" : "",
"timeMs" : 8,
"result" : {
"requestId" : "",
"lockUntilComplete" : true,
"responseStatus" : "OK",
"responseMessage" : "",
"toPanel" : "API_CALL",
"responseLog" : null,
82
API reference
"campaignsToConsider" : [ 1, 7, 123 ],
"statsOut" : [ {
"gbCampaignId" : 1,
"gbState" : "RS_BUSY",
"gbTrunk" : "A44 NewName",
"gbStateExt" : "",
"nCalls" : 90,
"totWaitPre" : 10,
"totWaitAfter" : 271,
"totTalk" : 0
}, {
"gbCampaignId" : 1,
"gbState" : "RS_NUMBER",
"gbTrunk" : "A44 NewName",
"gbStateExt" : "",
"nCalls" : 1,
"totWaitPre" : 0,
"totWaitAfter" : 0,
"totTalk" : 0
} ]
}
}
8.5.5. Reports: logs by runs
Given a set of runs, gets the details of calls placed.
Parameters:
• from: the start of results in the log set
• items: how many logs you want back (page length)
• id: the run ids - can be repeated multiple times
curl
--user demoadmin:demo -i -X POST "http://127.0.0.1:8080/wbt/api/reports/logs/?from=
do not forget to set "sane" paging criteria, to avoid getting a result set that’s too large for avilable memory.
The results look like:
{
"status" : "OK",
"error" : "",
"timeMs" : 12,
"results" : [ {
"dim_id" : 1,
"listId" : 1,
"listName" : "GoodList",
"trunkId" : 1,
"trunkName" : "NewName",
"astId" : 1,
"astName" : "",
"epId" : 4,
"epName" : "ep7",
"campId" : 1,
"campName" : "test",
"runId" : 2,
"runName" : "15.03.18 17:04:32",
"runStarted" : 1426694673000,
"id" : 1,
83
API reference
"callId" : 1,
"callNumber" : "1",
"numberDialed" : "1",
"attributes" : "IN:puts ^OUT:put",
"attempted" : 1427474910000,
"waitPre" : 1,
"waitAfter" : 111,
"talk" : 0,
"statusCode" : "RS_NUMBER",
"astChannel" : "",
"astUnique" : "",
"nRetry" : 0,
"statusExt" : "",
"nextRetry" : 0,
"wombatId" : "515144647",
"subEp" : "",
"bridgedChannel" : ""
} ],
"allResults" : 91,
"startFrom" : 0,
"nRecords" : 3
}
The result set is the same you’d get for the edit/list/logs call, but with different search criteria.
8.6. HTTP life-cycle notifications of calls
In order to enable HTTP lifecycle notifications, you must set a URL in your campaign definition that points to an HTTP script. This causes
WD to POSTs the result of each call to your HTTP server.
On the server, you’ll have a script that accepts notification, like the simple PHP script that follows:
<?
$out = "";
foreach($_POST as $name => $value) {
$out .= "$name:$value ";
}
print($out);
error_log("RQ: $out",0, "", "");
?>
The script above basically logs all activity on the HTTP error log. What you get is a sequence of calls like:
RQ: num:5551234 reschedule:0 I_MM:30 extstate:
state:RS_REJECTED I_HH:10 retry:0
RQ: num:5556785 reschedule:0 I_MM:00 extstate:
state:RS_REJECTED I_HH:11 retry:0
RQ: num:5552012 reschedule:0 I_MM:30 extstate:
state:RS_REJECTED I_HH:11 retry:0
RQ: num:5551234 reschedule:0 I_MM:30 extstate:1
state:TERMINATED I_HH:10 O_APPT:APPE retry:0
RQ: num:5556785 reschedule:300 I_MM:00 extstate:
state:RS_NOANSWER I_HH:11 retry:0
RQ: num:5552012 reschedule:0 I_MM:30 extstate:2
state:TERMINATED I_HH:11 O_APPT:PSYC retry:0
RQ: num:5556785 reschedule:300 I_MM:00 extstate:0
state:TERMINATED I_HH:11 retry:1
RQ: num:5556785 reschedule:300 I_MM:00 extstate:0
state:TERMINATED I_HH:11 retry:2
84
API reference
RQ: num:5556785 reschedule:300 I_MM:00 extstate:0
state:TERMINATED I_HH:11 retry:3
RQ: num:5556785 reschedule:0 I_MM:00 extstate:0
state:TERMINATED I_HH:11 retry:4
You can see that for each call:
• num is set to the number dialed
• state is the call state at its completion
• extstate is the call’s extended state, if present
• retry is the retry counter
• reschedule is set to the time in seconds to be waited before a reschedule is attempted; if no reschedule is required, it will be set to zero
• all input attributes (the ones you set with the telephone number) are passed along prepended by I_
• all output attributes (the ones you set in the Asterisk dialplan), if any, are passed along prepended by O_
This way you can easily create an integration script that stores the results of the call on a database or passes them along for furter
processing.
The HTTP notification server works asynchronously on a dedicated thread, so it is possible that there is some latency if your script has long
completion times. The notification server does not retry on errors.
85
Chapter 9. System configuration
9.1. Security keys
The following security keys are reserved for use by WombatDialer and have a pre-defined meaning.
Table 9.1. System Keys
Key
Meaning
USER
All interactive users must hold this key
RT
User can access the Live page
REPORT
User can run reports
ADMIN
User can edit configuration and users
SYSLOG
User can view the system log
LIST
User can view lists
CAMP
User can view campaigns
LICKEY
User can add/edit licenses
V_WBT
User can view the dialer status
CTRL_WBT
User can start/stop the dialer
OPHR
User can edit Opening Hours
DEBUG_AMI
User can see the extended AMI status. Do not turn on in production
unless explicitly told so.
All other strings can be freely used as "feature" security keys.
9.2. Default users
The following users ship in the default database installation.
They are meant as a template - you should create your own or at least change the default passwords. Failure to do so is a
major security risk.
Table 9.2. Default users
Login
Password
Class
demoadmin
demo
ADMIN
demouser
demo
USER
86
Notes
Chapter 10. For more information…
To know more about WombatDialer in your specific setting or inquire about commercial licences, please feel free to contact Loway.
The latest version of WombatDialer can be found on the home page located at the address http://wombatdialer.com
There is a WombatDialer section in the QueueMetrics users forum for mutual support, troubleshooting and ideas at http://
forum.queuemetrics.com
To stay updated on the latest developments of WombatDialer, you may:
• read our blog at http://blog.wombatdialer.com
• join the Facebook group at http://www.facebook.com/WombatDialer
• read our Twitter feed at http://twitter.com/WombatDialer
87